


Blazor 混合开发_MAUI+Vue_WPF+Vue
背景
在 MAUI 微软的官方方案是使用 Blazor 开发,但是当前市场大多数的 Web 项目使用 Vue、React 等技术构建,用Blazor重写整个项目并不现实。
Vue 是当前流行的 Web 框架, 简单来说是一套模板引擎,利用 “模板” 和 “绑定” 两大特性实现Web页面 MVVM 模式开发。利用 .NET MAUI 框架可以将 Vue 应用嵌入到 Web 容器中,可以实现跨平台的混合开发。
混合开发的核心
- 混合开发的核心工作是构建 Web 与 .NET 的互操作,我们将利用 Blazor 引擎的如下功能:
- 资源的统一管理
- js 代码的注入
- js 调用 C# 代码
- C# 调用 js 代码
为什么必须使用 wwwroot 文件夹放置 Web 项目文件
这个文件夹将是混合开发Web部分的根目录,这个名称不能随便定义

Microsoft.AspNetCore.Components.WebView.Maui库会将 wwwroot 文件夹里的内容作为 Maui 资源(MauiAsset)类型设置标签,编译器则会根据MauiAsset标签将这些内容打包进各个平台的资源文件夹。
创建 MAUI 项目
项目名字 MAUI.Vue.hybirddev

创建完成后编辑Hybrid.Maui.csproj,在Sdk最末尾加上.Razor,VS 会自动安装Microsoft.AspNetCore.Components.WebView.Maui 依赖包
不要手动 Nuget 添加这个包,否则程序无法运行


创建 wwwroot 文件夹
创建之后会自动变成网络资源文件夹
服务注册
- 使用扩展方法
builder.Services.AddMauiBlazorWebView()对 BlazorMauiWebView 组件服务进行注册
using Microsoft.Extensions.Logging;

namespace MAUI.Vue.hybirddev
{
    public static class MauiProgram
    {
        public static MauiApp CreateMauiApp()
        {
            var builder = MauiApp.CreateBuilder();
            builder
                .UseMauiApp<App>()
                .ConfigureFonts(fonts =>
                {
                    fonts.AddFont("OpenSans-Regular.ttf", "OpenSansRegular");
                    fonts.AddFont("OpenSans-Semibold.ttf", "OpenSansSemibold");
                });

            builder.Services.AddMauiBlazorWebView(); // 注册

#if DEBUG
            builder.Services.AddBlazorWebViewDeveloperTools();
            builder.Logging.AddDebug();
#endif

            return builder.Build();
        }
    }
}
创建 _import.razor
添加 → 类 → Razor 组件

导入 namespace
@using System.Net.Http
@using System.Net.Http.Json
@using Microsoft.AspNetCore.Components.Forms
@using Microsoft.AspNetCore.Components.Routing
@using Microsoft.AspNetCore.Components.Web
@using Microsoft.AspNetCore.Components.Web.Virtualization
@using Microsoft.JSInterop
@using Hybrid.Maui @*当前项目名称*@
添加 Main.razor 组件
- 被JS调用的方法必须是静态的
- Dispose 销毁页面资源,防止内存溢出
@inject IJSRuntime JSRuntime
@implements IDisposable

@code {

    [JSInvokable]
    public static Task<string> Test()
    {
        return Task.FromResult("Maui Test Function");
    }

    public void Dispose()
    {

    }
}
修改 MainPage.xaml 文件
建立 BlazorWebView 控件铺满屏幕,并设置 HostPage 为Web部分的主页 index.html
<?xml version="1.0" encoding="utf-8" ?>
<ContentPage
    x:Class="Hybrid.Maui.MainPage"
    xmlns="http://schemas.microsoft.com/dotnet/2021/maui"
    xmlns:x="http://schemas.microsoft.com/winfx/2009/xaml"
    xmlns:local="clr-namespace:Hybrid.Maui"
    Shell.NavBarIsVisible="False">

    <BlazorWebView HostPage="wwwroot/index.html">
        <BlazorWebView.RootComponents>
            <RootComponent ComponentType="{x:Type local:Main}" Selector="#blazorApp" />
        </BlazorWebView.RootComponents>
    </BlazorWebView>

</ContentPage>
创建 WPF 项目
项目名字 Hybrid.Wpf

创建完成后编辑Hybrid.Wpf.csproj,在Sdk最末尾加上.Razor
同时在项目文件的现有 <PropertyGroup> 中,添加 <RootNamespace>Hybrid.Wpf</RootNamespace> 标记

安装 Nuget 包 Microsoft.AspNetCore.Components.WebView.Wpf

创建 wwwroot 文件夹
创建之后会自动变成网络资源文件夹

服务注册
- 通过依赖注入容器注入
AddWpfBlazorWebView()服务 - 在资源中添加已注册的服务
Resources.Add("services", Services) - 删除App.xaml 中的
StartupUri="MainWindow.xaml"
using System.Windows;
using Microsoft.Extensions.DependencyInjection;

namespace Hybrid.Wpf
{
    /// <summary>
    /// Interaction logic for App.xaml
    /// </summary>
    public partial class App : Application
    {
        public App()
        {
            Services = ConfigureServices();
            Resources.Add("services", Services);
        }

        public new static App Current => (App)Application.Current;

        public IServiceProvider Services { get; }

        protected override void OnStartup(StartupEventArgs e)
        {
            Services.GetRequiredService<MainWindow>().Show();
        }

        private static IServiceProvider ConfigureServices()
        {
            var serviceCollection = new ServiceCollection();
            serviceCollection.AddSingleton<MainWindow>();

            serviceCollection.AddWpfBlazorWebView();

#if DEBUG
            serviceCollection.AddBlazorWebViewDeveloperTools();
#endif

            return serviceCollection.BuildServiceProvider();

        }
    }
}
创建 _import.razor
添加 → 类 → Razor 组件

导入 namespace
@using System.Net.Http
@using System.Net.Http.Json
@using Microsoft.AspNetCore.Components.Forms
@using Microsoft.AspNetCore.Components.Routing
@using Microsoft.AspNetCore.Components.Web
@using Microsoft.AspNetCore.Components.Web.Virtualization
@using Microsoft.JSInterop
@using Hybrid.Wpf @*Object Namespace*@
添加 Shell.razor 组件
- 被JS调用的方法必须是静态的
- Dispose 销毁页面资源,防止内存溢出
@inject IJSRuntime JSRuntime
@implements IDisposable

@code {

    [JSInvokable]
    public static Task<string> Test()
    {
        return Task.FromResult("Wpf Test Function");
    }

    public void Dispose()
    {

    }
}
修改 MainWindow.xaml 文件
建立 BlazorWebView 控件铺满屏幕,并设置 HostPage 为Web部分的主页 index.html
<Window
    x:Class="Hybrid.Wpf.MainWindow"
    xmlns="http://schemas.microsoft.com/winfx/2006/xaml/presentation"
    xmlns:x="http://schemas.microsoft.com/winfx/2006/xaml"
    xmlns:blazor="clr-namespace:Microsoft.AspNetCore.Components.WebView.Wpf;assembly=Microsoft.AspNetCore.Components.WebView.Wpf"
    xmlns:d="http://schemas.microsoft.com/expression/blend/2008"
    xmlns:local="clr-namespace:Hybrid.Wpf"
    xmlns:mc="http://schemas.openxmlformats.org/markup-compatibility/2006"
    Title="Hybrid.Wpf"
    d:Height="200"
    d:Width="450"
    WindowStartupLocation="CenterScreen"
    mc:Ignorable="d">

    <blazor:BlazorWebView HostPage="wwwroot\index.html" Services="{DynamicResource services}">
        <blazor:BlazorWebView.RootComponents>
            <blazor:RootComponent ComponentType="{x:Type local:Shell}" Selector="#blazorApp" />
        </blazor:BlazorWebView.RootComponents>
    </blazor:BlazorWebView>

</Window>
创建 Vue 项目
通过命令 npm create vue@latest 前提是已安装 Node.js

执行命令尝试运行项目


修改创建好的 Vue 项目
DotNet.invokeMethodAsync("Hybrid.Maui", "Test") 第一个参数是容器项目的 Namespace,第二个参数是要调用的方法。
<script setup>
import { RouterLink, RouterView } from 'vue-router';
import HelloWorld from './components/HelloWorld.vue';

/**
 * 访问 Hybrid.Wpf 项目中的 Test 方法
 */
async function getTest() {
  await DotNet.invokeMethodAsync("Hybrid.Maui", "Test").then(res => {
    console.log(res);
  });
}
</script>

<template>
  <header>
    <img alt="Vue logo" class="logo" src="@/assets/logo.svg" width="125" height="125" />

    <div class="wrapper">
      <HelloWorld msg="You did it!" />

      <nav>
        <RouterLink to="/">Home</RouterLink>
        <RouterLink to="/about">About</RouterLink>
      </nav>

      <button @click="getTest">To Hybrid.Maui Test</button>
    </div>
  </header>

  <RouterView />
</template>

<style scoped>
header {
  line-height: 1.5;
  max-height: 100vh;
}

.logo {
  display: block;
  margin: 0 auto 2rem;
}

nav {
  width: 100%;
  font-size: 12px;
  text-align: center;
  margin-top: 2rem;
}

nav a.router-link-exact-active {
  color: var(--color-text);
}

nav a.router-link-exact-active:hover {
  background-color: transparent;
}

nav a {
  display: inline-block;
  padding: 0 1rem;
  border-left: 1px solid var(--color-border);
}

nav a:first-of-type {
  border: 0;
}

@media (min-width: 1024px) {
  header {
    display: flex;
    place-items: center;
    padding-right: calc(var(--section-gap) / 2);
  }

  .logo {
    margin: 0 2rem 0 0;
  }

  header .wrapper {
    display: flex;
    place-items: flex-start;
    flex-wrap: wrap;
  }

  nav {
    text-align: left;
    margin-left: -1rem;
    font-size: 1rem;

    padding: 1rem 0;
    margin-top: 1rem;
  }
}
</style>
执行 npm run build 命令
执行 npm run build 命令发布 Vue 项目

Copy dist
将 dist 文件夹下的所有文件复制到容器项目下的 wwwroot 文件夹下

修改 index.html 内容
- JS、CSS 文件名一定要与编译后的文件名一致
- head 中的 JS 导入添加
crossorigin="anonymous"跨域支持 - 在 body 中导入
_framework/blazor.webview.js必须的,没有它玩不成
<!DOCTYPE html>
<html lang="en">
<head>
    <meta charset="UTF-8">
    <link rel="icon" href="/favicon.ico">
    <meta name="viewport" content="width=device-width, initial-scale=1.0">
    <title>Vite App</title>
    <script type="module" crossorigin="anonymous" src="/assets/index-lGWBURTF.js"></script>
    <link rel="stylesheet" crossorigin href="/assets/index-bTbjHxa7.css">
</head>
<body>

    <div id="app">Loading...</div>
    <div id="blazorApp"></div>

	<!-- Maui 项目需要添加 autostart="false" -->
	<script src="_framework/blazor.webview.js" autostart="false"></script>
	<!-- Wpf 项目不需要 -->
    <script src="_framework/blazor.webview.js"></script>
</body>
</html>
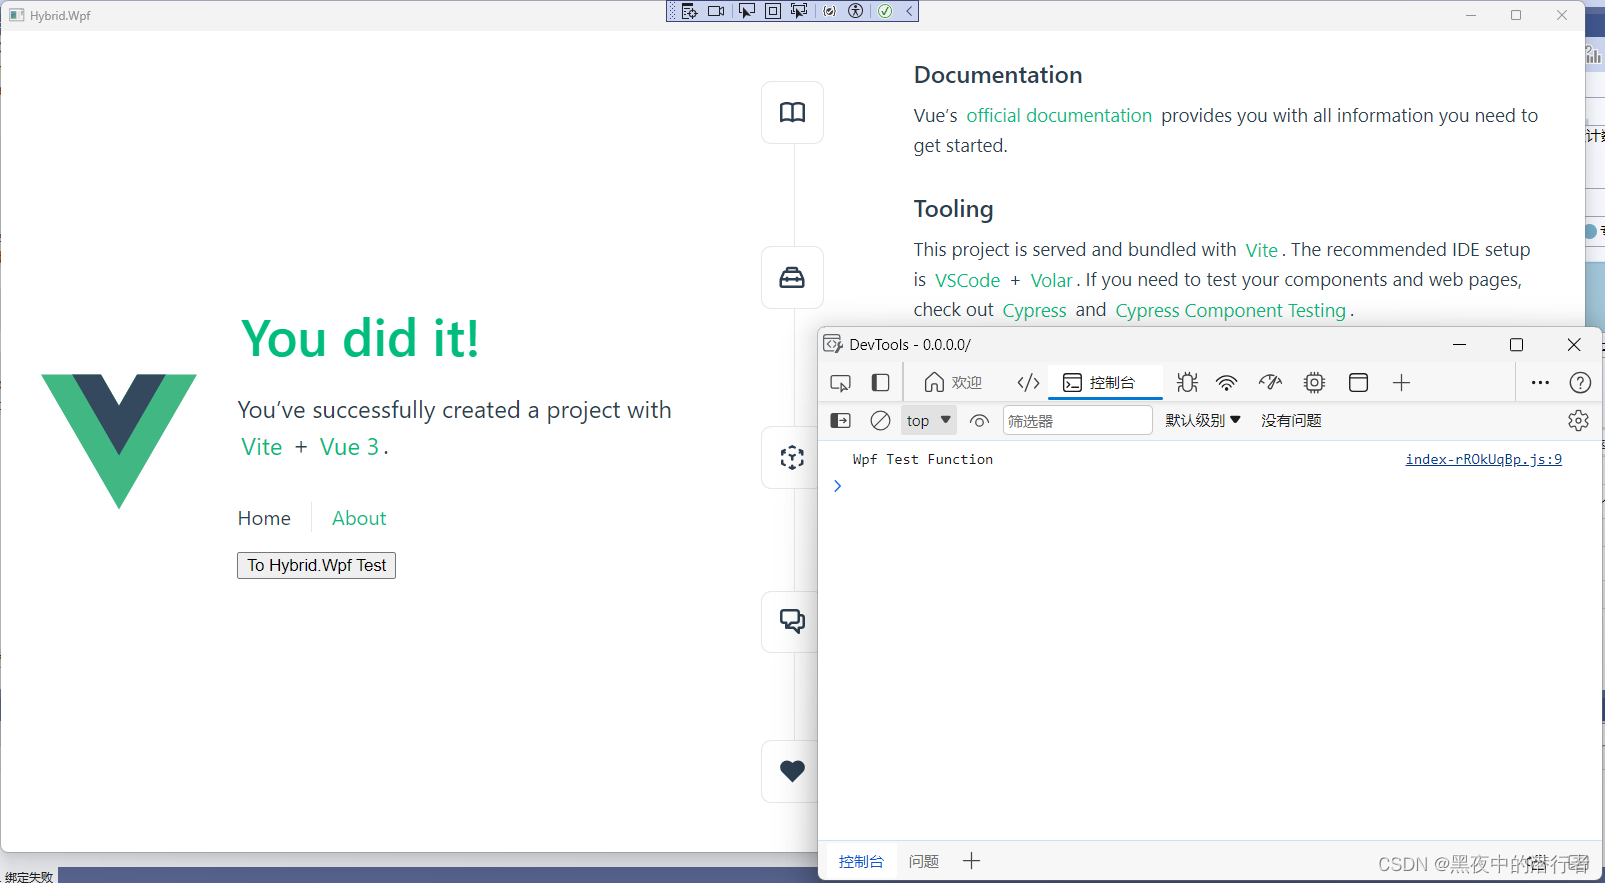
效果预览
点击 To Hydrid.Wpf Test 按钮就可以在控制台打印出 C# 代码中的返回值


 6491
6491


 被折叠的 条评论
为什么被折叠?
被折叠的 条评论
为什么被折叠?
 到【灌水乐园】发言


