


 本文详细介绍LVM(逻辑卷管理)的概念、建立过程及在Linux环境下的具体操作,包括分区管理、逻辑卷的创建与调整、快照的创建与删除,以及文件系统的拉伸与缩减等关键步骤。
1.什么是LVM
LVM是 Logical Volume Manager(逻辑卷管理)的简写。
它是Linux环境下对磁盘分区进行管理的一种机制。Linux用户安装Linux操作系统时遇到的一个常见的难以决定的问题就是如何正确地评估各分区大小,以分配合适的硬盘空间。普通的磁盘分区管理方式在逻辑分区划分好之后就无法改变其大小,当一个逻辑分区存放不下某个文件时,这个文件因为受上层文件系统的限制,也不能跨越多个分区来存放,所以也不能同时放到别的磁盘上。而遇到出现某个分区空间耗尽时,解决的方法通常是使用符号链接,或者使用调整分区大小的工具,但这只是暂时解决办法,没有从根本上解决问题。随着Linux的逻辑卷管理功能的出现,这些问题都迎刃而解,用户在无需停机的情况下可以方便地调整各个分区大小。
2.LVM的建立
lvm中的一些常见符号及意义
| 符号 | 名称 | 意义 |
|---|---|---|
| pv | 物理卷 | 被lv命令处理过的物理分区 |
| vg | 物理卷组 | 被组装到一起的物理卷 |
| pe | 物理扩展 | lvm设备的最小存储单元lvm是pe的整数倍 |
| lvm | 逻辑卷 | 直接使用的设备,可以增大缩减并保持原有数据不变 |
1.xfs文件系统的LVM管理
1)分区并设定分区标签为8e
[root@170 ~]# fdisk /dev/vdb
Welcome to fdisk (util-linux 2.23.2).
Changes will remain in memory only, until you decide to write them.
Be careful before using the write command.
Device does not contain a recognized partition table
Building a new DOS disklabel with disk identifier 0x0e551341.
Command (m for help): n
Partition type:
p primary (0 primary, 0 extended, 4 free)
e extended
Select (default p):
Using default response p
Partition number (1-4, default 1):
First sector (2048-20971519, default 2048):
Using default value 2048
Last sector, +sectors or +size{K,M,G} (2048-20971519, default 20971519): +100M
Partition 1 of type Linux and of size 100 MiB is set
Command (m for help): n
Partition type:
p primary (1 primary, 0 extended, 3 free)
e extended
Select (default p):
Using default response p
Partition number (2-4, default 2):
First sector (206848-20971519, default 206848):
Using default value 206848
Last sector, +sectors or +size{K,M,G} (206848-20971519, default 20971519): +100M
Partition 2 of type Linux and of size 100 MiB is set
Command (m for help): n
Partition type:
p primary (2 primary, 0 extended, 2 free)
e extended
Select (default p):
Using default response p
Partition number (3,4, default 3):
First sector (411648-20971519, default 411648):
Using default value 411648
Last sector, +sectors or +size{K,M,G} (411648-20971519, default 20971519): +100M
Partition 3 of type Linux and of size 100 MiB is set
Command (m for help): n
Partition type:
p primary (3 primary, 0 extended, 1 free)
e extended
Select (default e):
Using default response e
Selected partition 4
First sector (616448-20971519, default 616448):
Using default value 616448
Last sector, +sectors or +size{K,M,G} (616448-20971519, default 20971519):
Using default value 20971519
Partition 4 of type Extended and of size 9.7 GiB is set
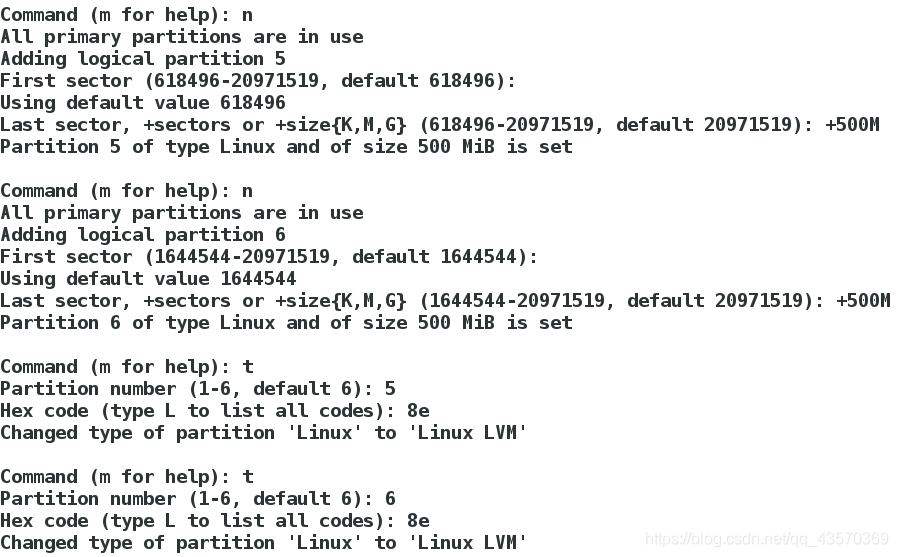
Command (m for help): n
All primary partitions are in use
Adding logical partition 5
First sector (618496-20971519, default 618496):
Using default value 618496
Last sector, +sectors or +size{K,M,G} (618496-20971519, default 20971519): +500M
Partition 5 of type Linux and of size 500 MiB is set
Command (m for help): n
All primary partitions are in use
Adding logical partition 6
First sector (1644544-20971519, default 1644544):
Using default value 1644544
Last sector, +sectors or +size{K,M,G} (1644544-20971519, default 20971519): +500M
Partition 6 of type Linux and of size 500 MiB is set
Command (m for help): t
Partition number (1-6, default 6): 5
Hex code (type L to list all codes): 8e
Changed type of partition 'Linux' to 'Linux LVM'
Command (m for help): t
Partition number (1-6, default 6): 6
Hex code (type L to list all codes): 8e
Changed type of partition 'Linux' to 'Linux LVM'
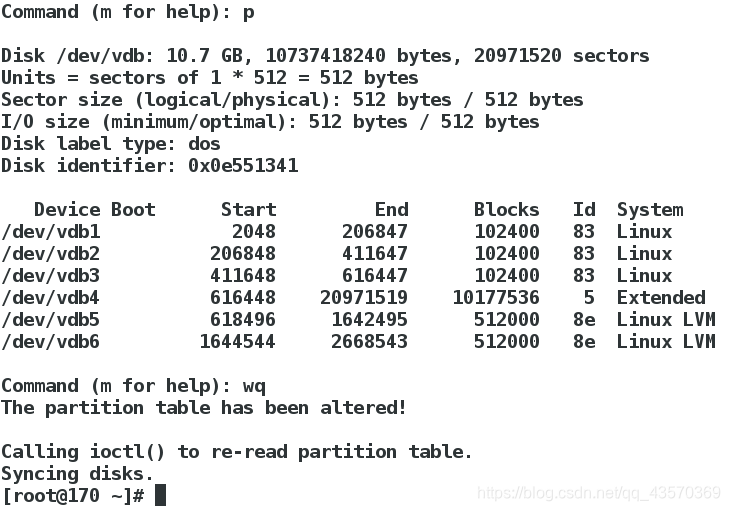
Command (m for help): p
Disk /dev/vdb: 10.7 GB, 10737418240 bytes, 20971520 sectors
Units = sectors of 1 * 512 = 512 bytes
Sector size (logical/physical): 512 bytes / 512 bytes
I/O size (minimum/optimal): 512 bytes / 512 bytes
Disk label type: dos
Disk identifier: 0x0e551341
Device Boot Start End Blocks Id System
/dev/vdb1 2048 206847 102400 83 Linux
/dev/vdb2 206848 411647 102400 83 Linux
/dev/vdb3 411648 616447 102400 83 Linux
/dev/vdb4 616448 20971519 10177536 5 Extended
/dev/vdb5 618496 1642495 512000 8e Linux LVM
/dev/vdb6 1644544 2668543 512000 8e Linux LVM
Command (m for help): wq
The partition table has been altered!
Calling ioctl() to re-read partition table.
Syncing disks.
[root@170 ~]#
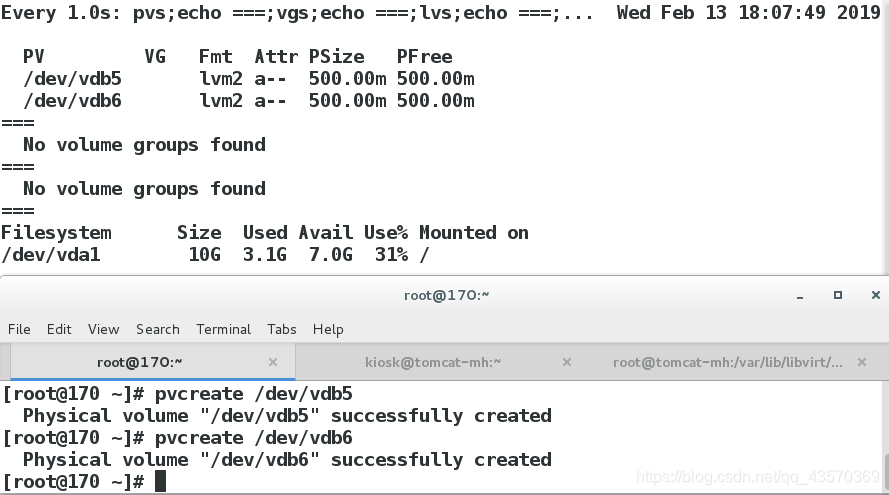
2)创建物理卷
pvcreate /dev/vdb[n]
例子:
采用以下命令监控物理卷、物理卷组、逻辑卷、以及逻辑卷挂载点的有关数据。
watch -n 1 "pvs;echo ===;vgs;echo ===;lvs;echo ===;df -h /mnt"
3)创建物理卷组
vgcreate vg0 /dev/vdb[n]
vgextend vg0 /dev/vdb[n+1]
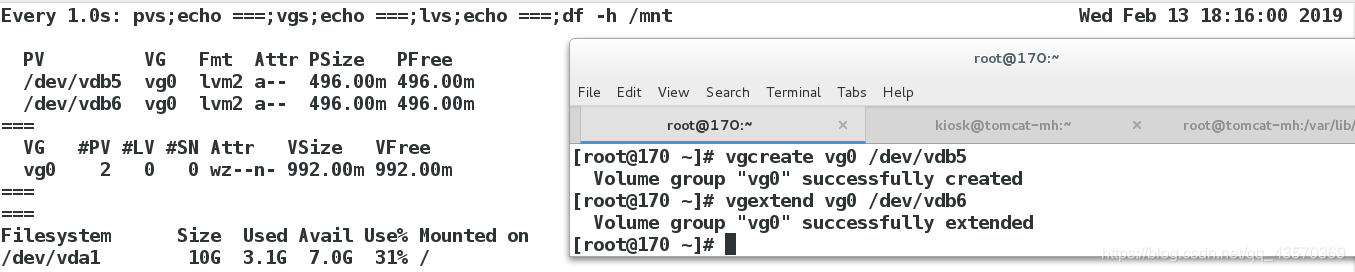
分析:把第一块物理卷加入物理卷组时用 vgcreate ,之后增添物理卷组都用 vgextend。
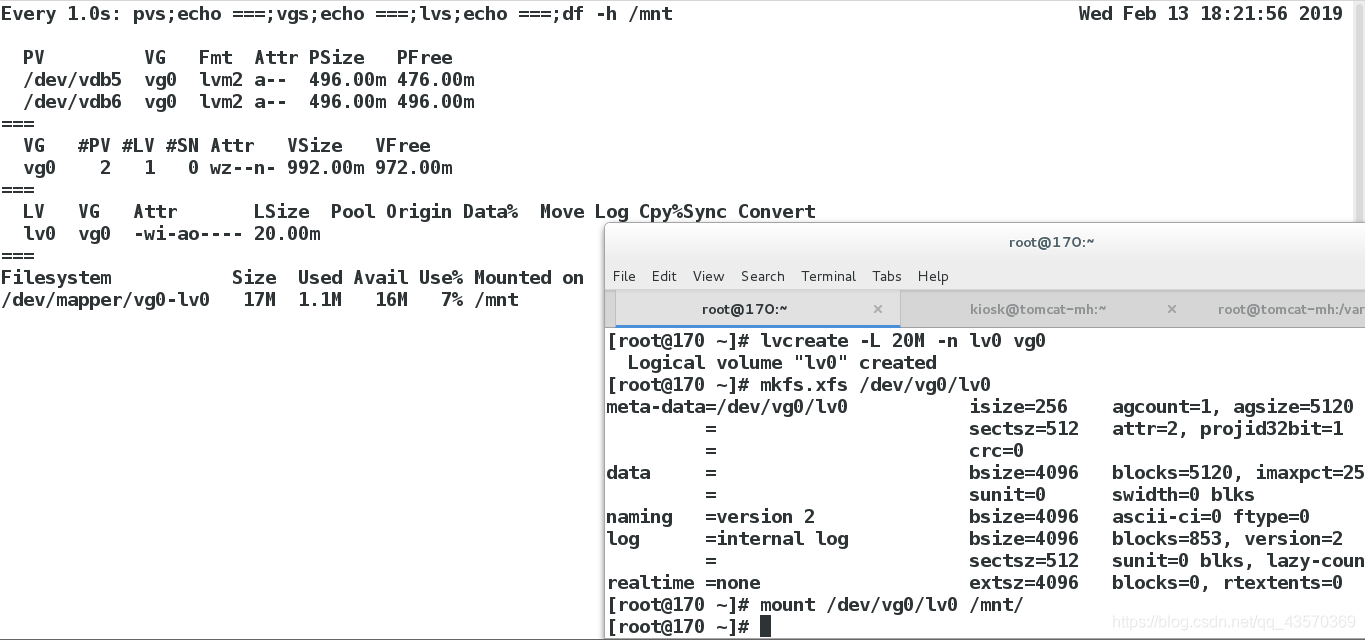
4)创建逻辑卷并挂载逻辑卷
lvcreate -L 20M -n lv0 vg0
mkfs.xfs /dev/vg0/lv0
mount /dev/vg0/lv0 /mnt/
df -H /mnt

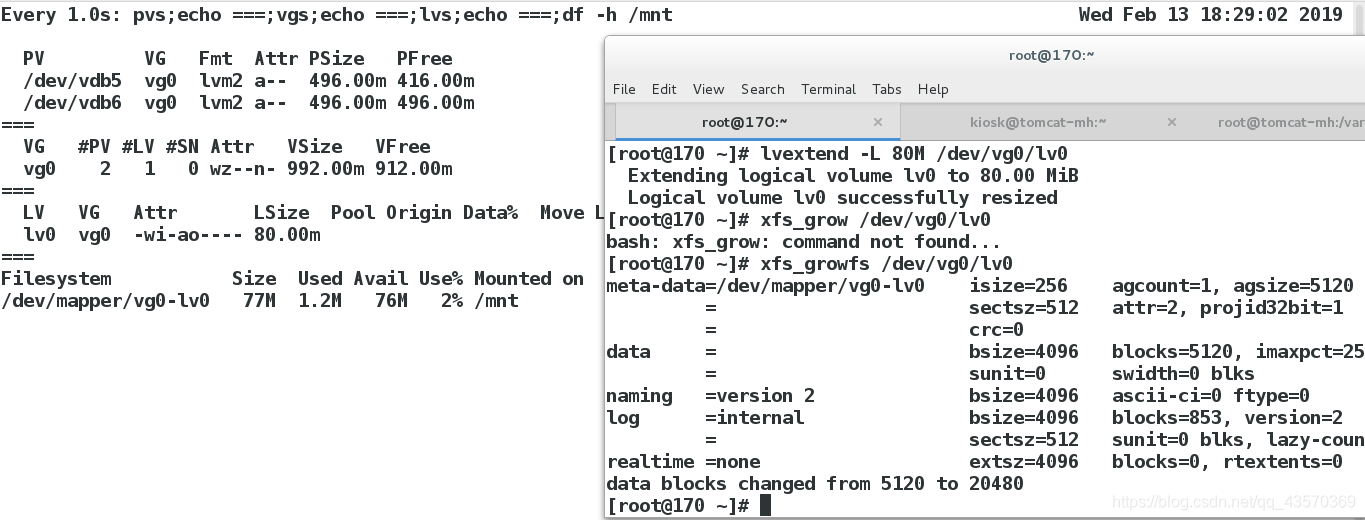
5)lvm的拉伸
1.当vg中的剩余容量充足情况
lvextend -L 80M /dev/vg0/lv0	##拉伸设备
xfs_growfs /dev/vg0/lv			##拉伸文件系统
2.当vg中的容量不足时
再次建立分区并修改标签8e
pvcreate /dev/vdb[n]
vgextend vg0 /dev/vdb[n]
lvextend -L 80M /dev/vg0/lv0
xfs_growfs /dev/vg0/lv
例子:
[root@170 ~]# fdisk /dev/vdb
Welcome to fdisk (util-linux 2.23.2).

Changes will remain in memory only, until you decide to write them.
Be careful before using the write command.


Command (m for help): n
All primary partitions are in use
Adding logical partition 7
First sector (2670592-20971519, default 2670592):
Using default value 2670592
Last sector, +sectors or +size{K,M,G} (2670592-20971519, default 20971519): +1G
Partition 7 of type Linux and of size 1 GiB is set

Command (m for help): t
Partition number (1-7, default 7): 7
Hex code (type L to list all codes): 8e
Changed type of partition 'Linux' to 'Linux LVM'

Command (m for help): wq
The partition table has been altered!

Calling ioctl() to re-read partition table.

WARNING: Re-reading the partition table failed with error 16: Device or resource busy.
The kernel still uses the old table. The new table will be used at
the next reboot or after you run partprobe(8) or kpartx(8)
Syncing disks.
[root@170 ~]# partprobe
[root@170 ~]# pvcreate /dev/vdb7
  Physical volume "/dev/vdb7" successfully created
[root@170 ~]# vgextend vg0 /dev/vdb7
  Volume group "vg0" successfully extended
[root@170 ~]# lvextend -L 1500M /dev/vg0/lv0
  Extending logical volume lv0 to 1.46 GiB
  Logical volume lv0 successfully resized
[root@170 ~]# xfs_growfs /dev/vg0/lv0
meta-data=/dev/mapper/vg0-lv0    isize=256    agcount=4, agsize=5120 blks
         =                       sectsz=512   attr=2, projid32bit=1
         =                       crc=0
data     =                       bsize=4096   blocks=20480, imaxpct=25
         =                       sunit=0      swidth=0 blks
naming   =version 2              bsize=4096   ascii-ci=0 ftype=0
log      =internal               bsize=4096   blocks=853, version=2
         =                       sectsz=512   sunit=0 blks, lazy-count=1
realtime =none                   extsz=4096   blocks=0, rtextents=0
data blocks changed from 20480 to 384000
[root@170 ~]#

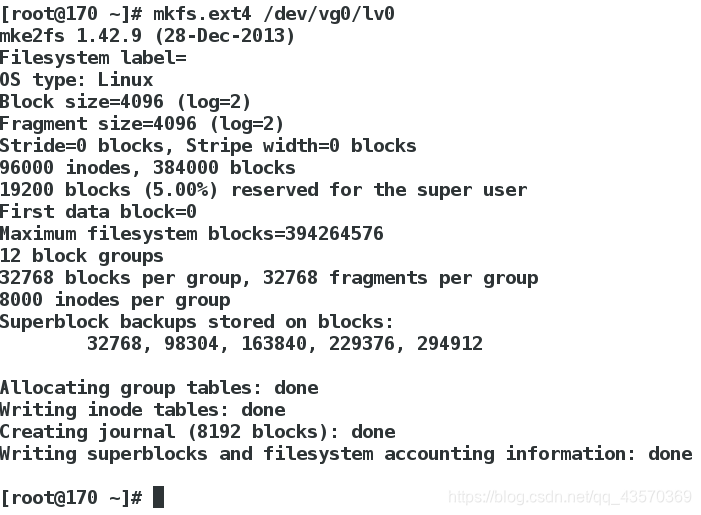
2.针对ext4文件系统的设备的拉伸
1)创建逻辑卷,将逻辑卷格式化为ext4的文件系统。
mkfs.ext4 /dev/vg0/lv0 ##lv0格式化为ext4文件系统
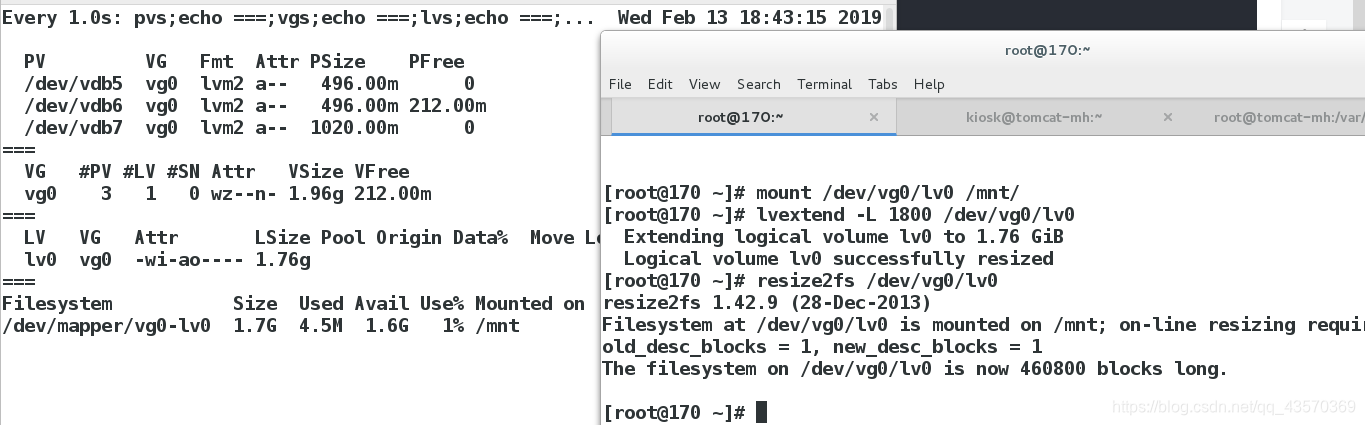
2)挂载ext4文件系统的lv0到 /mnt ,及拉伸逻辑卷、拉伸文件系统。
mount /dev/vg0/lv0 /mnt/		##挂载
lvextend -L 1800 /dev/vg0/lv0	##拉伸逻辑卷
resize2fs /dev/vg0/lv0 			##拉伸ext4文件系统
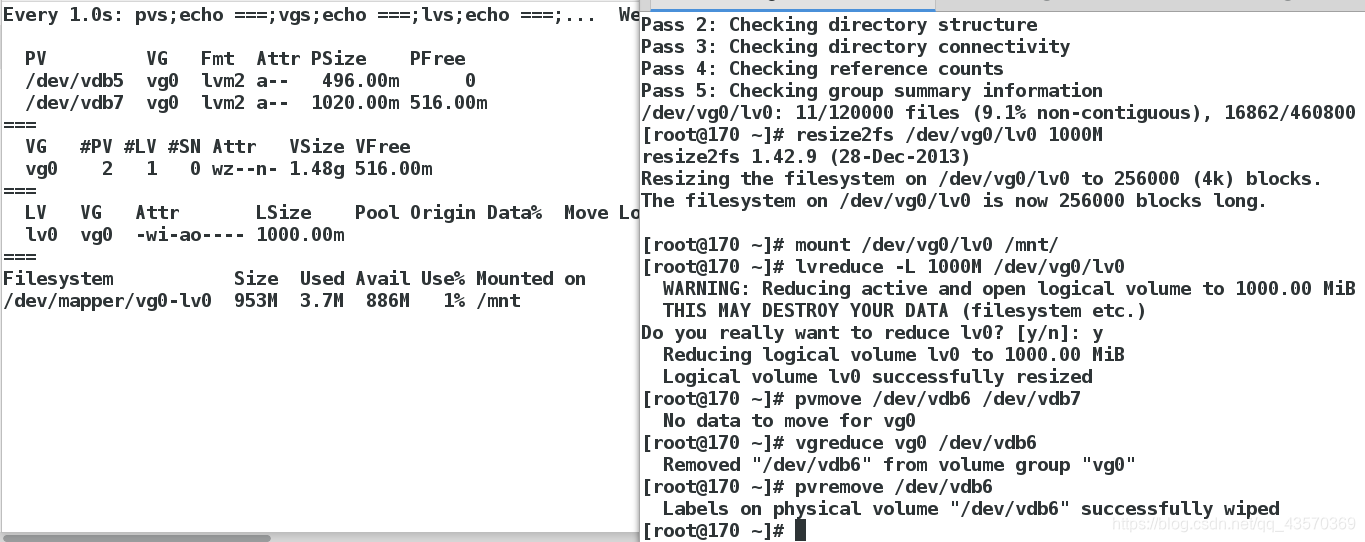
3.缩减逻辑卷及文件系统
umount /mnt
e2fsck -f /dev/vg0/lv0 ##检查lv0数据
resize2fs /dev/vg0/lv0 1000M ##缩减ext4文件系统
mount /dev/vg0/lv0 /mnt/ ##挂载
lvreduce -L 1000M /dev/vg0/lv0 ##缩减逻辑卷
pvmove /dev/vdb6 /dev/vdb7 ##把vdb6的数据移动到vdb7
vgreduce vg0 /dev/vdb6 ##把vdb6移除vg0物理卷组
pvremove /dev/vdb6 ##把vdb6移除物理卷
例子:
[root@170 ~]# umount /mnt/
[root@170 ~]# e2fsck -f /dev/vg0/lv0
e2fsck 1.42.9 (28-Dec-2013)
Pass 1: Checking inodes, blocks, and sizes
Pass 2: Checking directory structure
Pass 3: Checking directory connectivity
Pass 4: Checking reference counts
Pass 5: Checking group summary information
/dev/vg0/lv0: 11/120000 files (9.1% non-contiguous), 16862/460800 blocks
[root@170 ~]# resize2fs /dev/vg0/lv0 1000M
resize2fs 1.42.9 (28-Dec-2013)
Resizing the filesystem on /dev/vg0/lv0 to 256000 (4k) blocks.
The filesystem on /dev/vg0/lv0 is now 256000 blocks long.

[root@170 ~]# mount /dev/vg0/lv0 /mnt/
[root@170 ~]# lvreduce -L 1000M /dev/vg0/lv0
  WARNING: Reducing active and open logical volume to 1000.00 MiB
  THIS MAY DESTROY YOUR DATA (filesystem etc.)
Do you really want to reduce lv0? [y/n]: y
  Reducing logical volume lv0 to 1000.00 MiB
  Logical volume lv0 successfully resized
[root@170 ~]# pvmove /dev/vdb6 /dev/vdb7
  No data to move for vg0
[root@170 ~]# vgreduce vg0 /dev/vdb6
  Removed "/dev/vdb6" from volume group "vg0"
[root@170 ~]# pvremove /dev/vdb6
  Labels on physical volume "/dev/vdb6" successfully wiped
[root@170 ~]#

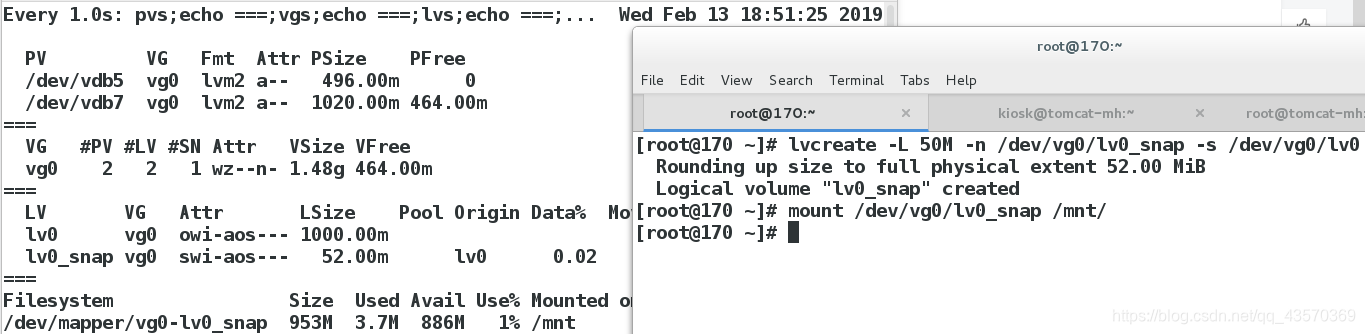
3.创建LVM快照
lvcreate -L 40M -n lv0_snap -s /dev/vg0/lv0
mount /dev/vg0/lv0_snap /mnt
模拟逻辑卷快照的损坏及重新拍摄快照
umount /mnt
mount /dev/vg0/lv0 /mnt/
touch /mnt/file{1..9}
umount /mnt/
lvcreate -L 50M -n lv0_snap -s /dev/vg0/lv0
mount /dev/vg0/lv0_snap /mnt
ls /mnt/*
rm -rf /mnt/
umount /mnt
lvremove /dev/vg0/lv0_snap
lvcreate -L 50M -n /dev/vg0/lv0_snap -s /dev/vg0/lv0
mount /dev/vg0/lv0_snap /mnt/
ls /mnt/*
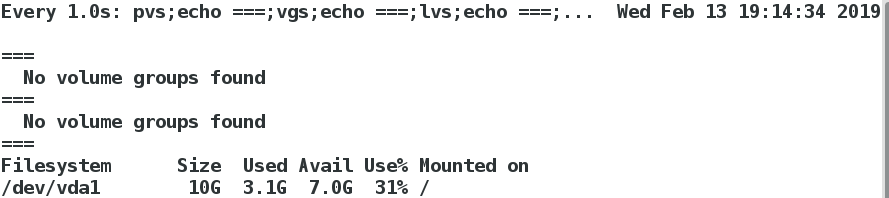
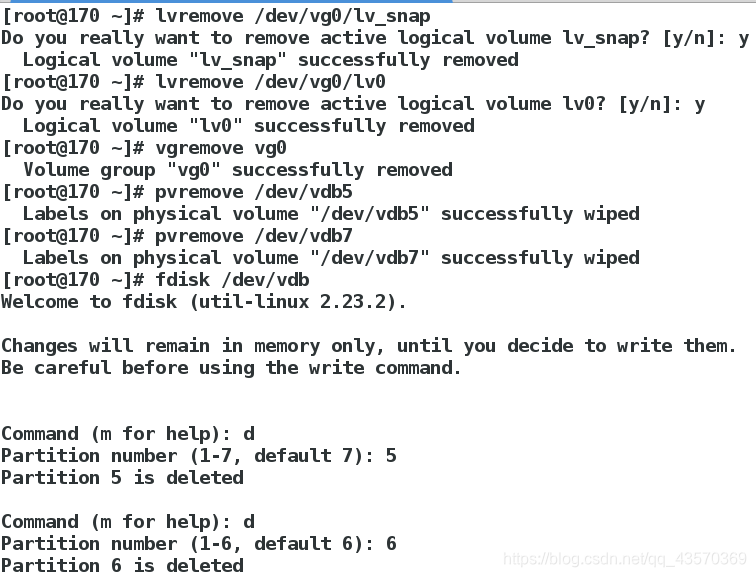
4.LVM快照的删除
lvremove /dev/vg0/lv0_snap ##删除逻辑卷快照
lvremove /dev/vg0/lv0 ##删除逻辑卷
vgremove vg0 ##删除物理卷组
pvremove /dev/vdb5 ##移除物理卷
pvremove /dev/vdb7 ##移除物理卷
fdisk /dev/vdb ##删除LVM分区
partprobe ##重新加载分区表
例子:
[root@170 ~]# lvremove /dev/vg0/lv_snap
Do you really want to remove active logical volume lv_snap? [y/n]: y
Logical volume "lv_snap" successfully removed
[root@170 ~]# lvremove /dev/vg0/lv0
Do you really want to remove active logical volume lv0? [y/n]: y
Logical volume "lv0" successfully removed
[root@170 ~]# vgremove vg0
Volume group "vg0" successfully removed
[root@170 ~]# pvremove /dev/vdb5
Labels on physical volume "/dev/vdb5" successfully wiped
[root@170 ~]# pvremove /dev/vdb7
Labels on physical volume "/dev/vdb7" successfully wiped
[root@170 ~]# fdisk /dev/vdb
Welcome to fdisk (util-linux 2.23.2).
Changes will remain in memory only, until you decide to write them.
Be careful before using the write command.
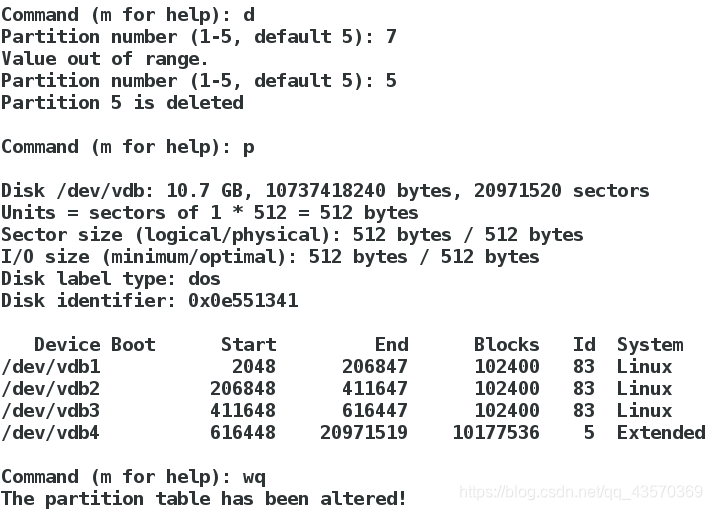
Command (m for help): d
Partition number (1-7, default 7): 5
Partition 5 is deleted
Command (m for help): d
Partition number (1-6, default 6): 6
Partition 6 is deleted
Command (m for help): d
Partition number (1-5, default 5): 7
Value out of range.
Partition number (1-5, default 5): 5
Partition 5 is deleted
Command (m for help): p
Disk /dev/vdb: 10.7 GB, 10737418240 bytes, 20971520 sectors
Units = sectors of 1 * 512 = 512 bytes
Sector size (logical/physical): 512 bytes / 512 bytes
I/O size (minimum/optimal): 512 bytes / 512 bytes
Disk label type: dos
Disk identifier: 0x0e551341
Device Boot Start End Blocks Id System
/dev/vdb1 2048 206847 102400 83 Linux
/dev/vdb2 206848 411647 102400 83 Linux
/dev/vdb3 411648 616447 102400 83 Linux
/dev/vdb4 616448 20971519 10177536 5 Extended
Command (m for help):
关于LVM的学习收获就是这些。


 1262
1262

 被折叠的 条评论
为什么被折叠?
被折叠的 条评论
为什么被折叠?
 到【灌水乐园】发言


