


SpringSecurityOAuth2学习和实战
1.OAuth2概述
1.1 什么是OAuth2
OAuth(Open Authorization)是一个关于授权(authorization)的开放网络标准,允许用户授权第三方 应用访问他们存储在另外的服务提供者上的信息,而不需要将用户名和密码提供给第三方移动应用或分享他 们数据的所有内容。OAuth在全世界得到广泛应用,目前的版本是2.0版。
协议特点:
简单:不管是OAuth服务提供者还是应用开发者,都很易于理解与使用;
安全:没有涉及到用户密钥等信息,更安全更灵活;
开放:任何服务提供商都可以实现OAuth,任何软件开发商都可以使用OAuth;
1.2 应用场景
原生app授权:app登录请求后台接口,为了安全认证,所有请求都带token信息,如果登录验证、 请求后台数据。
前后端分离单页面应用:前后端分离框架,前端请求后台数据,需要进行oauth2安全认证,比如使用vue、react后者h5开发的app
第三方应用授权登录,比如QQ,微博,微信的授权登录。
1.3 不使用OAuth2的隐患
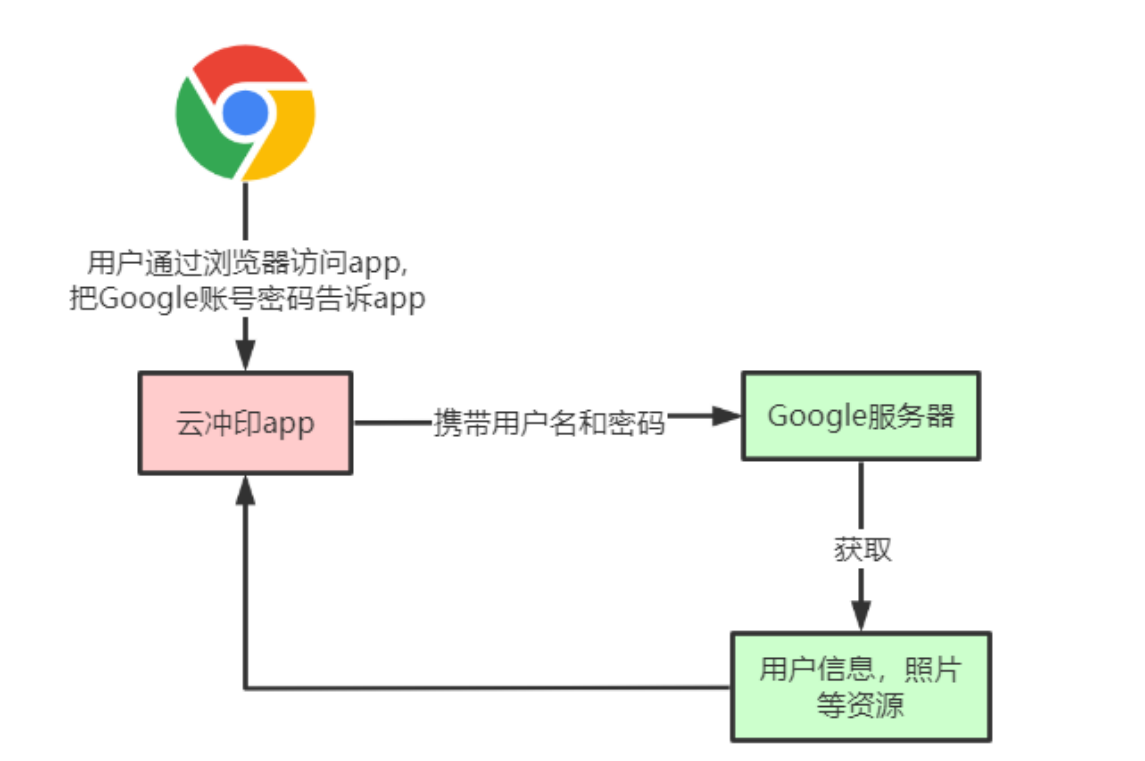
有一个"云冲印"的网站,可以将用户储存在Google的照片,冲印出来。用户为了使用该服务,必须让"云冲印"读取自己储存在Google上的照片。只有得到用户的授权,Google才会同意"云冲印"读取这些照片。那么,“云冲印"怎样获得用户的授权呢? 传统方法是,用户将自己的Google用户名和密码,告诉"云冲印”,后者就可以读取用户的照片了。这样的做
法有以下几个严重的缺点:
1."云冲印"为了后续的服务,会保存用户的密码,这样很不安全。
2.Google不得不部署密码登录,而我们知道,单纯的密码登录并不安全。
3."云冲印"拥有了获取用户储存在Google所有资料的权力,用户没法限制"云冲印"获得授权的范围和有效期。
4.用户只有修改密码,才能收回赋予"云冲印"的权力。但是这样做,会使得其他所有获得用户授权的 第三方应用程序全部失效。
5.只要有一个第三方应用程序被破解,就会导致用户密码泄漏,以及所有被密码保护的数据泄漏。
1.4 OAuth2中的基本概念
(1) Thirdparty application:第三方应用程序,又称"客户端"(client),即例子中的"云冲印"。
(2)HTTP service:HTTP服务提供商,简称"服务提供商",即例子中的Google。
(3)Resource Owner:资源所有者,又称"用户"(user)。
(4)User Agent:用户代理,比如浏览器。
(5)Authorization server:授权服务器,即服务提供商专门用来处理认证授权的服务器。
(6)Resource server:资源服务器,即服务提供商存放用户生成的资源的服务器。它与授权服务器,可以 是同一台服务器,也可以是不同的服务器。
OAuth的作用就是让"客户端"安全可控地获取"用户"的授权,与"服务提供商"进行交互
1.5 OAuth2的优缺点
优点:
-
更安全,客户端不接触用户密码,服务器端更易集中保护
-
广泛传播并被持续采用
-
短寿命和封装的token
-
资源服务器和授权服务器解耦
-
集中式授权,简化客户端
-
HTTP/JSON友好,易于请求和传递token
-
考虑多种客户端架构场景
-
客户可以具有不同的信任级别
缺点:
-
协议框架太宽泛,造成各种实现的兼容性和互操作性差
-
不是一个认证协议,本身并不能告诉你任何用户信息。
2. OAuth2原理
OAuth在"客户端"与"服务提供商"之间,设置了一个授权层(authorization layer)。“客户端"不能直接登 录"服务提供商”,只能登录授权层,以此将用户与客户端区分开来。"客户端"登录授权层所用的令牌 (token),与用户的密码不同。用户可以在登录的时候,指定授权层令牌的权限范围和有效期,"客户端"登 录授权层以后,"服务提供商"根据令牌的权限范围和有效期,向"客户端"开放用户储存的资料。
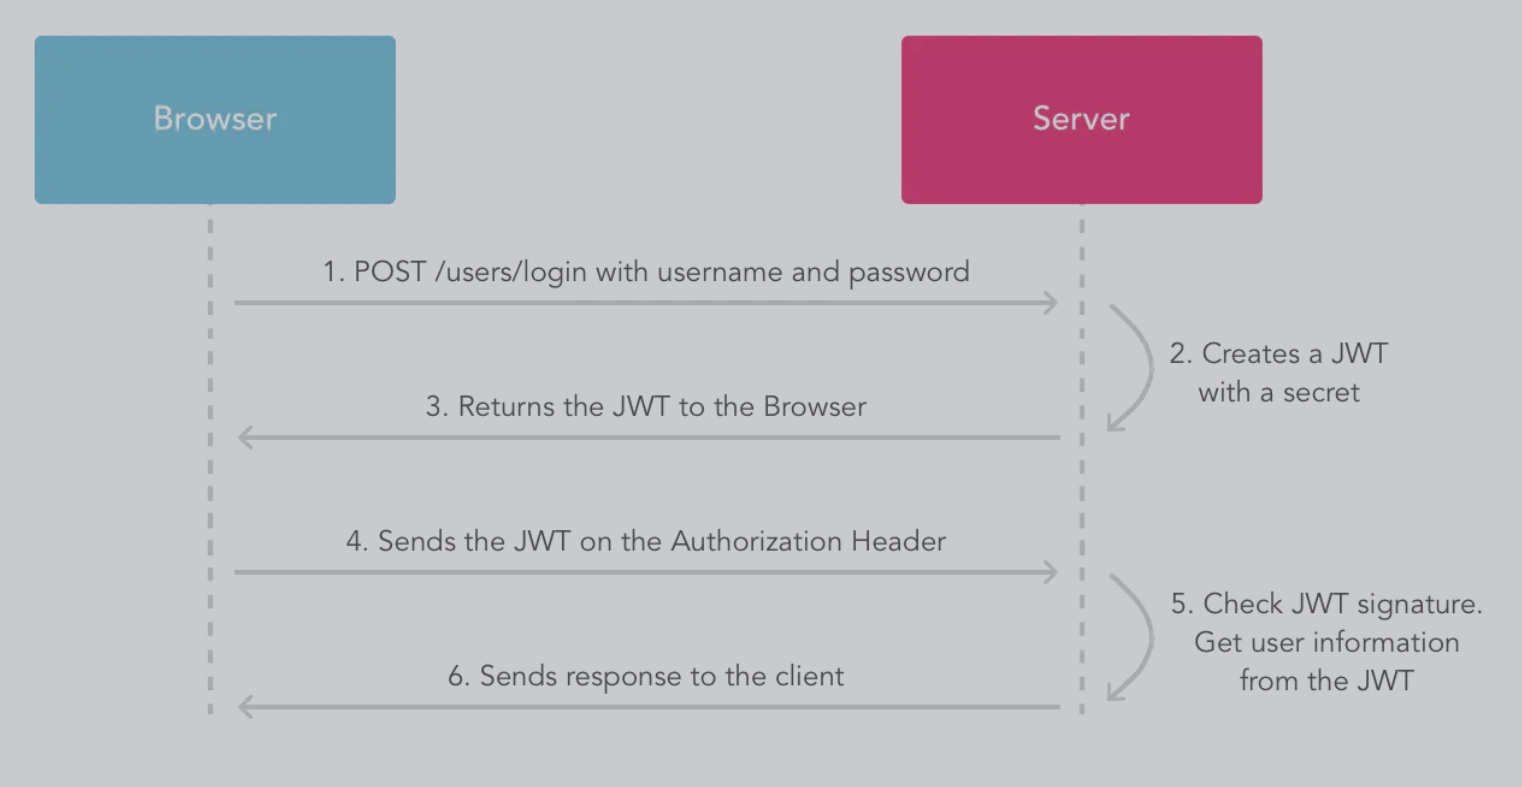
OAuth 2.0的运行流程如下图,摘自RFC 6749:
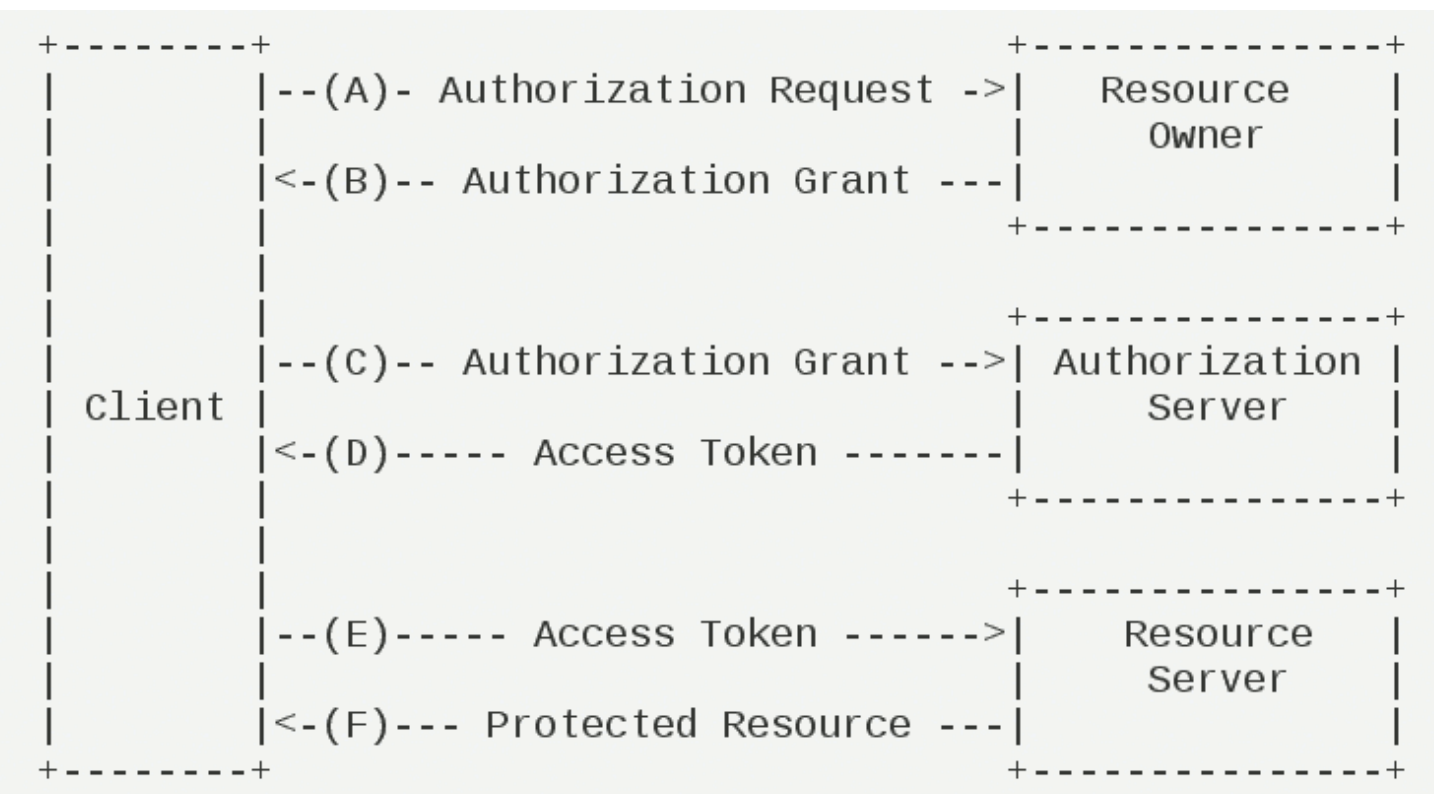
(A)用户打开客户端以后,客户端要求用户给予授权。
(B)用户同意给予客户端授权。
(C)客户端使用上一步获得的授权,向授权服务器申请令牌。
(D)授权服务器对客户端进行认证以后,确认无误,同意发放令牌。
(E)客户端使用令牌,向资源服务器申请获取资源。
(F)资源服务器确认令牌无误,同意向客户端开放资源。
令牌(token)与密码(password)的作用是一样的,都可以进入系统,但是有三点差异。
(1)令牌是短期的,到期会自动失效,用户自己无法修改。密码一般长期有效,用户不修改,就不会发生变化。
(2)令牌可以被数据所有者撤销,会立即失效。密码一般不允许被他人撤销。
(3)令牌有权限范围(scope)。对于网络服务来说,只读令牌就比读写令牌更安全。密码一般是完整权限。
上面这些设计,保证了令牌既可以让第三方应用获得权限,同时又随时可控,不会危及系统安全。这就是 OAuth 2.0 的
优点。
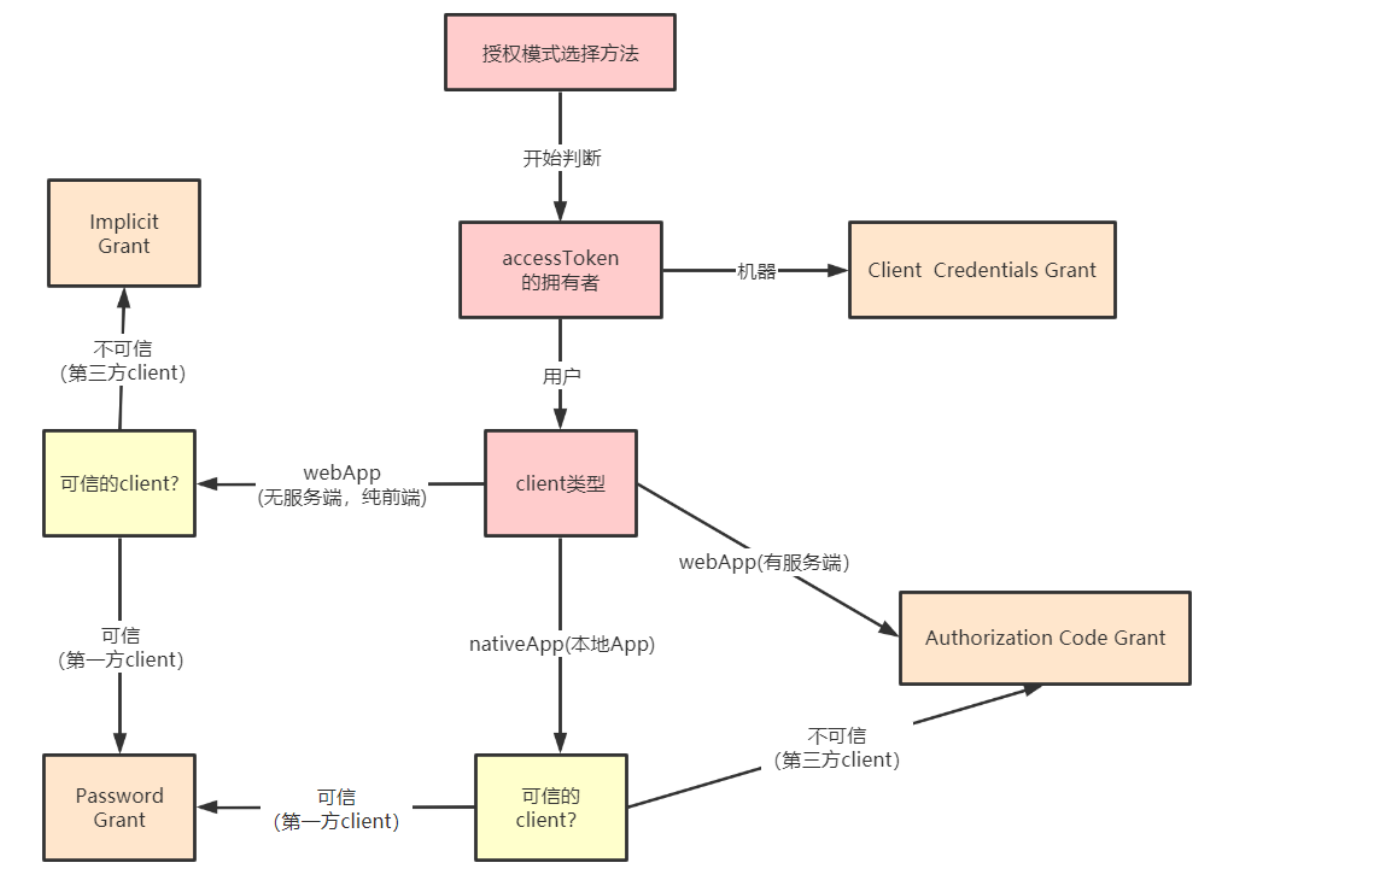
3 OAuth2的四种模式
客户端必须得到用户的授权(authorization grant),才能获得令牌(access token)。OAuth 2.0 对于如何 颁发令牌的细节,规定得非常详细。具体来说,一共分成四种授权类型(authorization grant),即四种颁发 令牌的方式,适用于不同的互联网场景。
授权码模式(authorization code)
密码模式(resource owner password credentials)
简化(隐式)模式(implicit)
客户端模式(client credentials)
不管哪一种授权方式,第三方应用申请令牌之前,都必须先到系统备案,说明自己的身份,然后会拿到两个 身份识别码:客户端 ID(client ID)和客户端密钥(client secret)。这是为了防止令牌被滥用,没有备案过 的第三方应用,是不会拿到令牌的。
3.1 授权码模式
授权码(authorization code)方式,指的是第三方应用先申请一个授权码,然后再用该码获取令牌。 这种方式是最常用的流程,安全性也最高,它适用于那些有后端的 Web 应用。授权码通过前端传送,令牌 则是储存在后端,而且所有与资源服务器的通信都在后端完成。这样的前后端分离,可以避免令牌泄漏。
适用场景:目前市面上主流的第三方验证都是采用这种模式
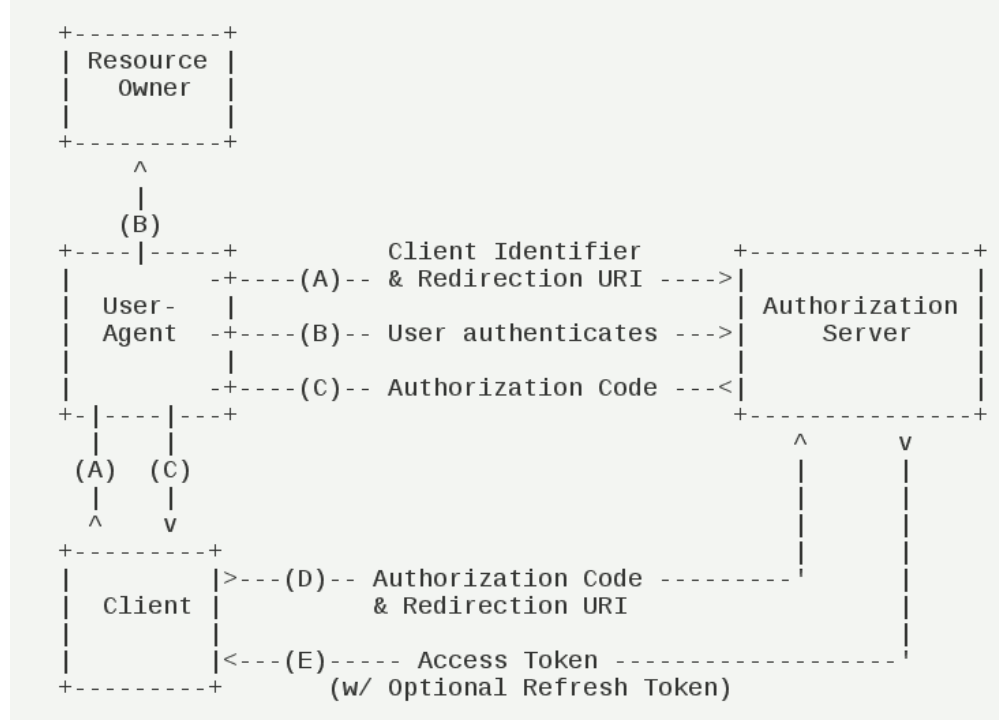
它的步骤如下:
(A)用户访问客户端,后者将前者导向授权服务器。
(B)用户选择是否给予客户端授权。
(C)假设用户给予授权,授权服务器将用户导向客户端事先指定的"重定向URI"(redirection URI),同时附上一个授
权码。
(D)客户端收到授权码,附上早先的"重定向URI",向授权服务器申请令牌。这一步是在客户端的后台的服务器上完
成的,对用户不可见。
(E)授权服务器核对了授权码和重定向URI,确认无误后,向客户端发送访问令牌(access token)和更新令牌
(refresh token)。
举个例子:
1.A网站提供一个链接,用户点击后就会跳转到 B 网站,授权用户数据给 A 网站使用。下面就是 A 网站跳转B 网站的一个示意链接。
https://b.com/oauth/authorize? 2 > response_type=code& #要求返回授权码(code)
> client_id=CLIENT_ID& #让 B 知道是谁在请求
> redirect_uri=CALLBACK_URL& #B 接受或拒绝请求后的跳转网址
> scope=read # 要求的授权范围(这里是只读)
客户端申请授权的URI,包含以下参数:
response_type:表示授权类型,必选项,此处的值固定为"code"
client_id:表示客户端的ID,必选项
redirect_uri:表示重定向URI,可选项
scope:表示申请的权限范围,可选项
state:表示客户端的当前状态,可以指定任意值,授权服务器会原封不动地返回这个值。
2.用户跳转后,B 网站会要求用户登录,然后询问是否同意给予 A 网站授权。用户表示同意,这时 B 网站 就会跳回redirect_uri参数指定的网址。跳转时,会传回一个授权码,就像下面这样。
> https://a.com/callback?code=AUTHORIZATION_CODE #code参数就是授权码
3.A 网站拿到授权码以后,就可以在后端,向B网站请求令牌。 用户不可见,服务端行为
https://b.com/oauth/token?
client_id=CLIENT_ID&
client_secret=CLIENT_SECRET& # client_id和client_secret用来让 B 确认 A 的身份,client_secret参数是保密的,因此只能在后端发请求
grant_type=authorization_code& # 采用的授权方式是授权码
code=AUTHORIZATION_CODE& # 上一步拿到的授权码
redirect_uri=CALLBACK_URL # 令牌颁发后的回调网址
4.B 网站收到请求以后,就会颁发令牌。具体做法是向redirect_uri指定的网址,发送一段 JSON 数据。
{

 "access_token":"ACCESS_TOKEN",
 "token_type":"bearer",
  "expires_in":2592000,
  "refresh_token":"REFRESH_TOKEN",
  "scope":"read",
  "uid":100101,
  "info":{...}
}
3.2 简化模式
有些 Web 应用是纯前端应用,没有后端。这时就不能用上面的方式了,必须将令牌储存在前端。RFC 6749就规定了第二种方式,允许直接向前端颁发令牌,这种方式没有授权码这个中间步骤,所以称为(授权码)隐藏式(implicit)
简化模式不通过第三方应用程序的服务器,直接在浏览器中向授权服务器申请令牌,跳过了"授权码"这个步 骤,所有步骤在浏览器中完成,令牌对访问者是可见的,且客户端不需要认证。这种方式把令牌直接传给前端,是很不安全的。因此,只能用于一些安全要求不高的场景,并且令牌的有效 期必须非常短,通常就是会话期间(session)有效,浏览器关掉,令牌就失效了。
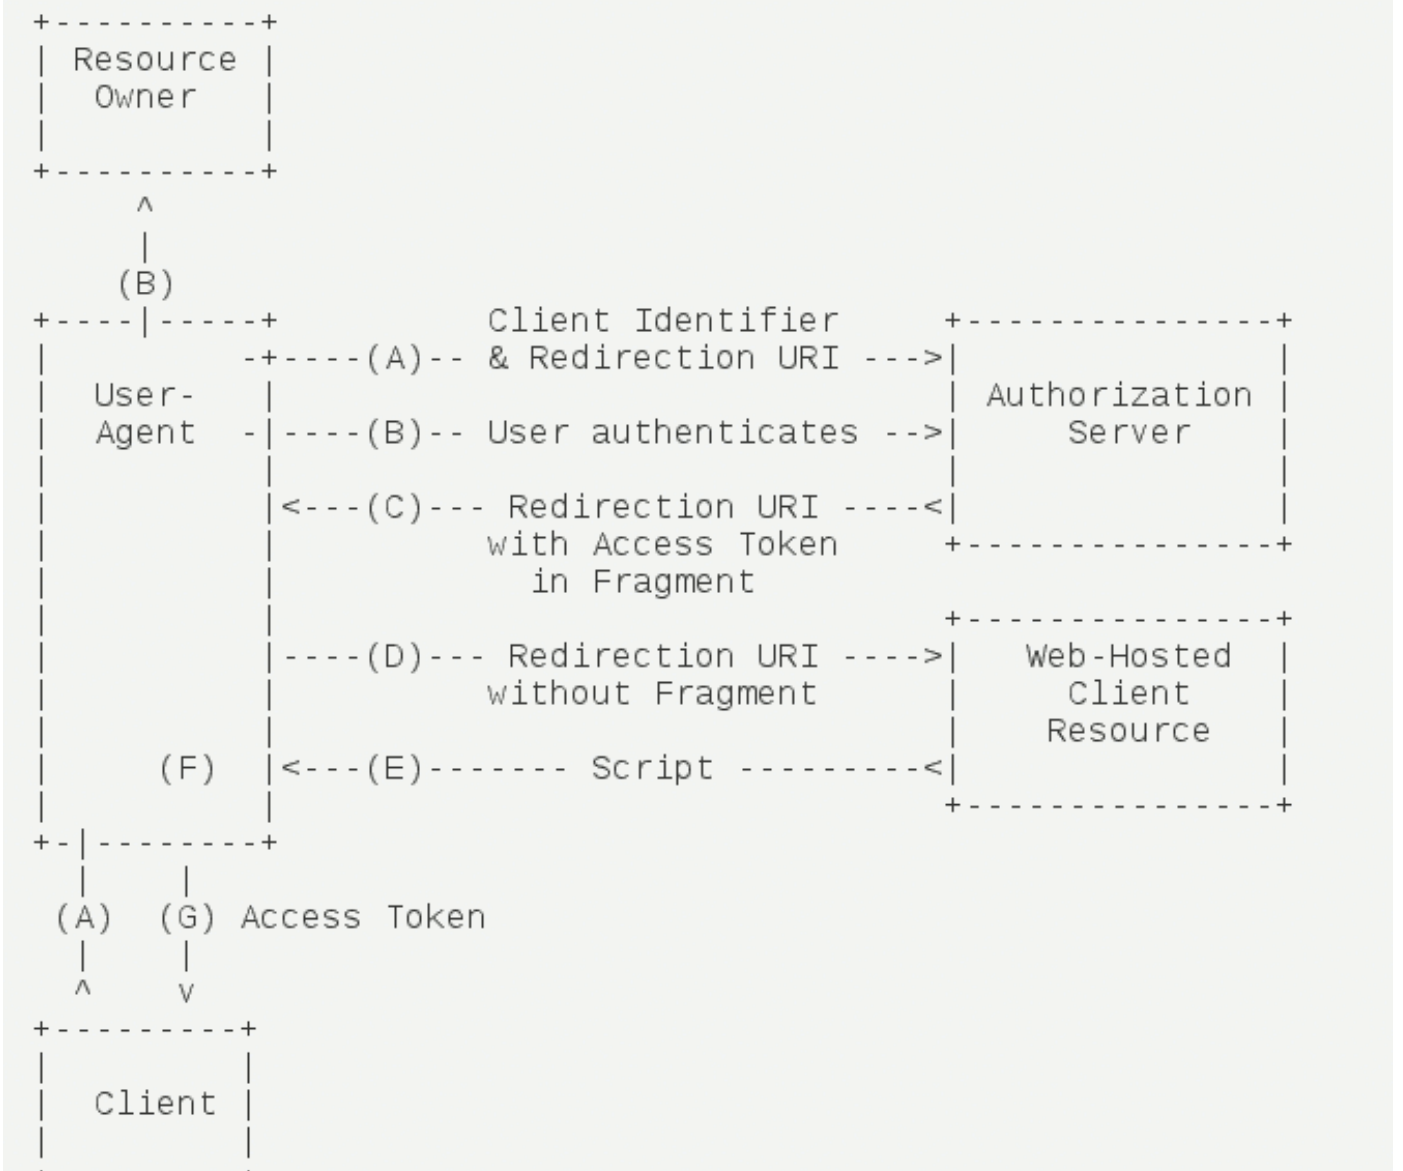
它的步骤如下:
(A)客户端将用户导向授权服务器。
(B)用户决定是否给于客户端授权。
(C)假设用户给予授权,授权服务器将用户导向客户端指定的"重定向URI",并在URI的Hash部分包含了访问令牌。
(D)浏览器向资源服务器发出请求,其中不包括上一步收到的Hash值。
(E)资源服务器返回一个网页,其中包含的代码可以获取Hash值中的令牌。
(F)浏览器执行上一步获得的脚本,提取出令牌。
(G)浏览器将令牌发给客户端。
1.A 网站提供一个链接,要求用户跳转到 B 网站,授权用户数据给 A 网站使用。
https://b.com/oauth/authorize?
response_type=token& # response_type参数为token,表示要求直接返回令牌
client_id=CLIENT_ID&
redirect_uri=CALLBACK_URL&
scope=read
2.用户跳转到 B 网站,登录后同意给予 A 网站授权。这时,B 网站就会跳回redirect_uri参数指定的跳转网址,并且把令牌作为 URL 参数,传给 A 网站。
https://a.com/callback#token=ACCESS_TOKEN #token参数就是令牌,A 网站直接在前端拿到令牌。
3.3 密码模式
如果你高度信任某个应用,RFC 6749 也允许用户把用户名和密码,直接告诉该应用。该应用就使用你的密码,申请令牌,这种方式称为密码式
在这种模式中,用户必须把自己的密码给客户端,但是客户端不得储存密码。这通常用在用户对客户端高度信任的情况下,比如客户端是操作系统的一部分,或者由一个著名公司出品。而授权服务器只有在其他授权 模式无法执行的情况下,才能考虑使用这种模式。
适用场景:自家公司搭建的授权服务器
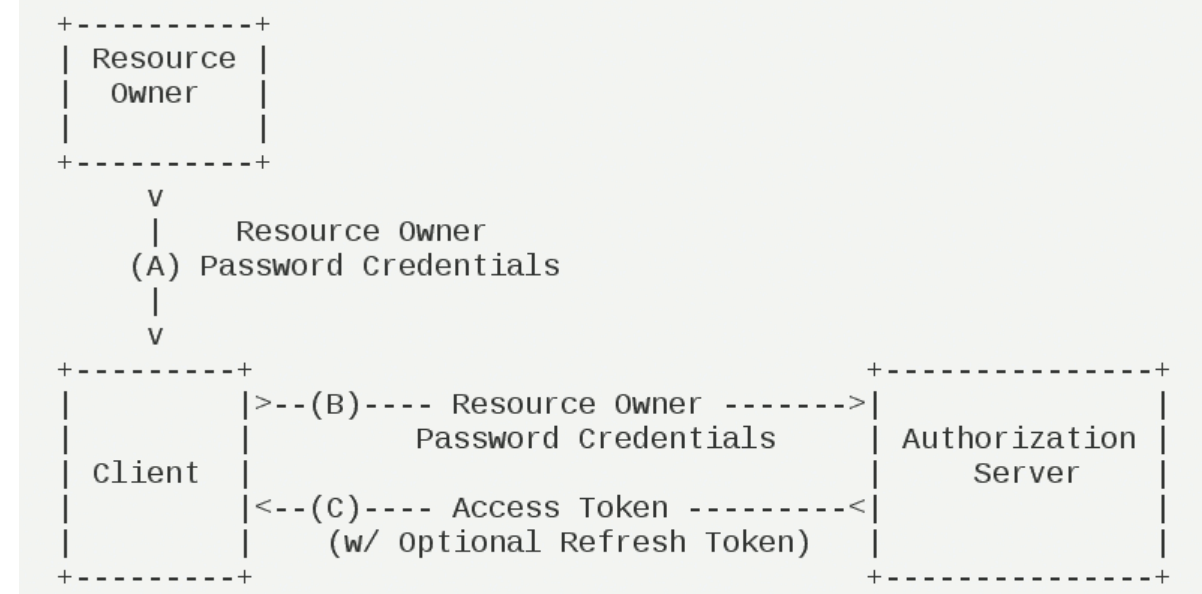
它的步骤如下:
(A)用户向客户端提供用户名和密码。
(B)客户端将用户名和密码发给授权服务器,向后者请求令牌。
(C)授权服务器确认无误后,向客户端提供访问令牌。
1.A 网站要求用户提供 B 网站的用户名和密码,拿到以后,A 就直接向 B 请求令牌。整个过程中,客户端不得保存用户的密码。
 https://oauth.b.com/token?
 grant_type=password& # 授权方式是"密码式"
 username=USERNAME&
 password=PASSWORD&
 client_id=CLIENT_ID
2.B 网站验证身份通过后,直接给出令牌。注意,这时不需要跳转,而是把令牌放在 JSON 数据里面,作为 HTTP 回应,A 因此拿到令牌。
3.4 客户端模式
客户端模式(Client Credentials Grant)指客户端以自己的名义,而不是以用户的名义,向"服务提供商"进行授权。
**适用于没有前端的命令行应用,即在命令行下请求令牌。**一般用来提供给我们完全信任的服务器端服务。
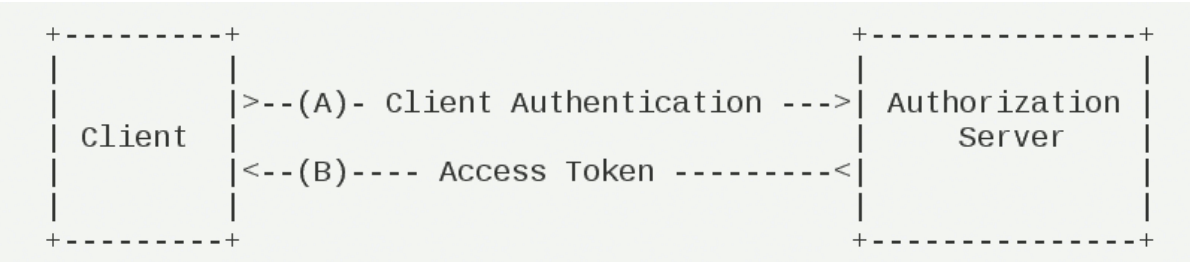
它的步骤如下:
(A)客户端向授权服务器进行身份认证,并要求一个访问令牌。
(B)授权服务器确认无误后,向客户端提供访问令牌。
1.A 应用在命令行向 B 发出请求
https://oauth.b.com/token?
grant_type=client_credentials&
client_id=CLIENT_ID&
client_secret=CLIENT_SECRET
2.B 网站验证通过以后,直接返回令牌。
{

  "access_token":"ACCESS_TOKEN",
  "token_type":"bearer",
  "expires_in":2592000,
  "scope":"all"
}
4.令牌操作
4.1 令牌使用
上述四种模式只是A网站拿到了令牌,还没有详解拿到令牌后如何使用,这一节就详解令牌的使用。
A 网站拿到令牌以后,就可以向 B 网站的 API 请求数据了。 此时,每个发到 API 的请求,都必须带有令牌。具体做法有两种
1.添加请求头,加上一个Authorization字段,令牌就放在这个字段里面。
curl ‐H "Authorization: Bearer ACCESS_TOKEN" \
"https://api.b.com"
2.添加请求参数access_token 访问API
curl "https://api.b.com?access_token=access_token"
4.2 令牌刷新
令牌的有效期到了,如果让用户重新走一遍上面的流程,再申请一个新的令牌,很可能体验不好,而且也没有必要。OAuth 2.0 允许用户自动更新令牌
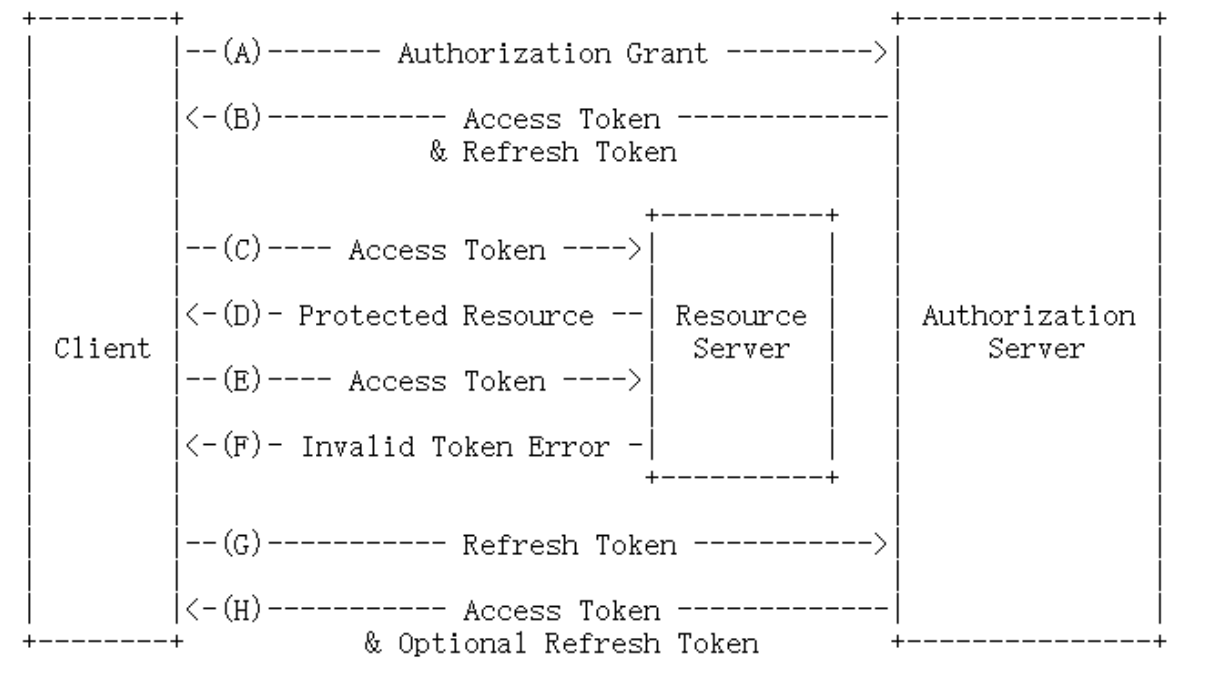
具体方法是,B 网站颁发令牌的时候,一次性颁发两个令牌,一个用于获取数据,另一个用于获取新的令牌 (refresh token 字段)。令牌到期前,用户使用 refresh token 发一个请求,去更新令牌。
 https://b.com/oauth/token?
 grant_type=refresh_token& # grant_type参数为refresh_token表示要求更新令牌
 client_id=CLIENT_ID&
 client_secret=CLIENT_SECRET&
 refresh_token=REFRESH_TOKEN # 用于更新令牌的令牌
5.Spring Security OAuth2实战
在学习SpringSecurityOAuth2之前,我们先了解一下SpringSecurity的基本概念,Spring Security是一个能够为基于Spring的企业应用系统提供声明式的安全访问控制解决方案的安全框 架。Spring Security 主要实现了Authentication(认证,解决who are you? ) 和 Access Control(访问控制,也就是what are you allowed to do?,也称为Authorization)。Spring Security在架构上将认证与授权分离,并提供了扩展点
认证(Authentication) :用户认证就是判断一个用户的身份是否合法的过程,用户去访问系统资源时系统要求验证
用户的身份信息,身份合法方可继续访问,不合法则拒绝访问。常见的用户身份认证方式有:用户名密码登录,二维码
登录,手机短信登录,指纹认证等方式。
授权(Authorization): 授权是用户认证通过根据用户的权限来控制用户访问资源的过程,拥有资源的访问权限则正
常访问,没有权限则拒绝访问。
将OAuth2和Spring Security集成,就可以得到一套完整的安全解决方案。我们可以通过Spring Security OAuth2构建一个授权服务器来验证用户身份以提供access_token,并使用这个access_token来从资源服务器请求数据。
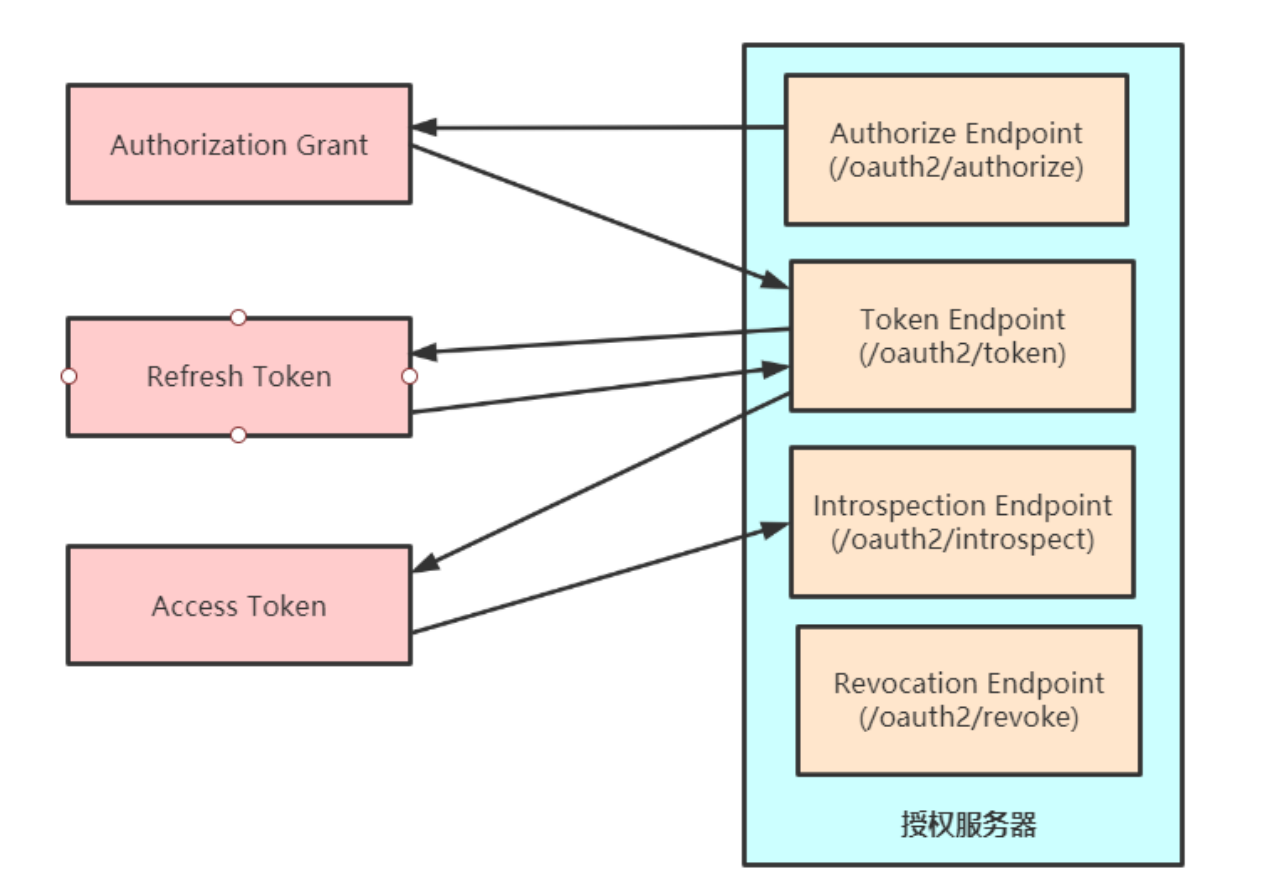
5.1 授权服务器
-
Authorize Endpoint :授权端点,进行授权
-
Token Endpoint :令牌端点,经过授权拿到对应的Token
-
Introspection Endpoint :校验端点,校验Token的合法性
-
Revocation Endpoint :撤销端点,撤销授权
5.2 整体架构
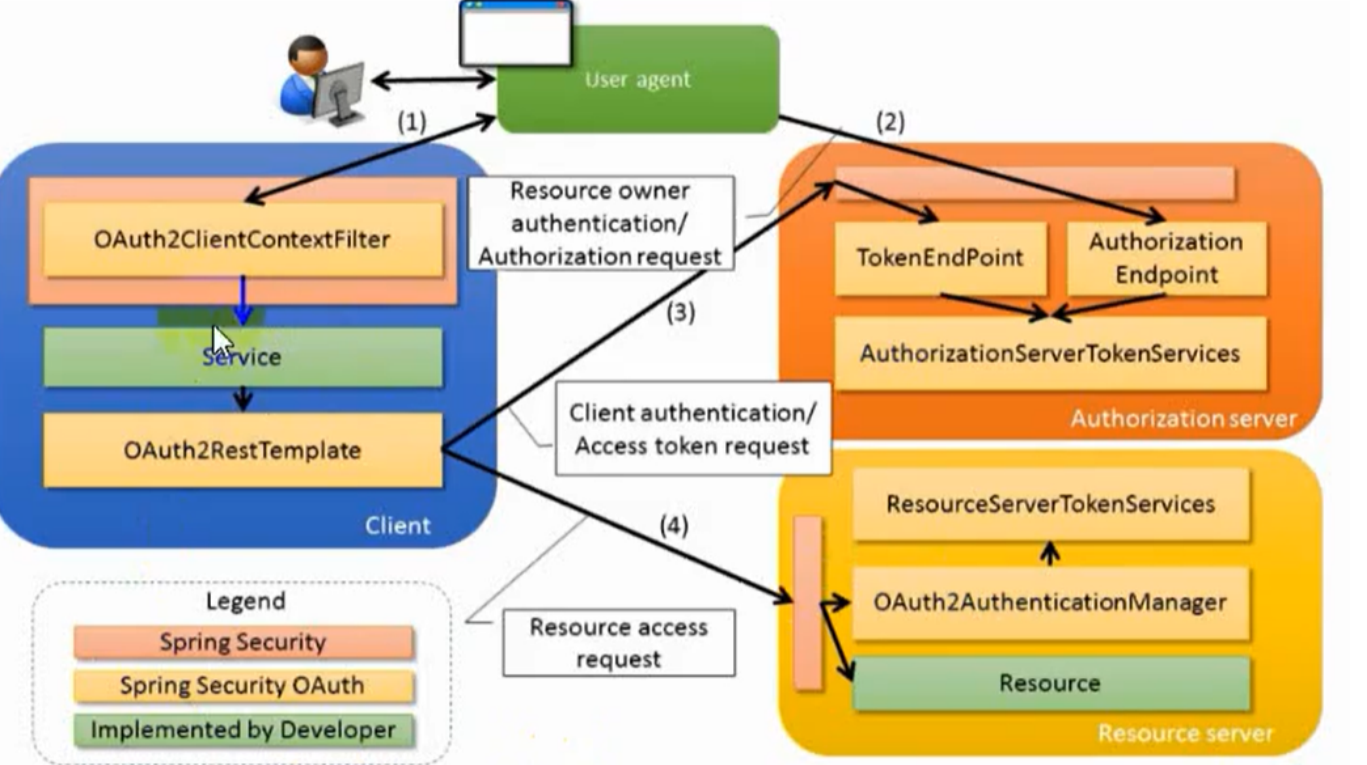
流程:
用户访问,此时没有Token。Oauth2RestTemplate会报错,这个报错信息会被 Oauth2ClientContextFilter捕获并重定向到授权服务器。
授权服务器通过Authorization Endpoint进行授权,并通过AuthorizationServerTokenServices生成授权码并返回给客户端。
客户端拿到授权码去授权服务器通过Token Endpoint调用AuthorizationServerTokenServices生成 Token并返回给客户端
客户端拿到Token去资源服务器访问资源,一般会通过Oauth2AuthenticationManager调用ResourceServerTokenServices进行校验。校验通过可以获取资源。
5.3 实战操作
5.3.1 环境搭建
1.引入依赖
    <dependencies>
        <dependency>
            <groupId>org.springframework.boot</groupId>
            <artifactId>spring-boot-starter-web</artifactId>
        </dependency>

        <dependency>
            <groupId>org.springframework.cloud</groupId>
            <artifactId>spring-cloud-starter-oauth2</artifactId>
        </dependency>


        <dependency>
            <groupId>org.springframework.boot</groupId>
            <artifactId>spring-boot-starter-test</artifactId>
            <scope>test</scope>
        </dependency>
    </dependencies>

    <dependencyManagement>
        <dependencies>
            <dependency>
                <groupId>org.springframework.cloud</groupId>
                <artifactId>spring-cloud-dependencies</artifactId>
                <version>Hoxton.SR8</version>
                <type>pom</type>
                <scope>import</scope>
            </dependency>
        </dependencies>
    </dependencyManagement>
2.配置Spring Security(不懂的可以先补一下Spring Security知识)
WebSecurityConfig
/**
 * @author wcy
 */
@Configuration
public class WebSecurityConfig  extends WebSecurityConfigurerAdapter {


    @Bean
    public PasswordEncoder passwordEncoder(){
        return new BCryptPasswordEncoder();
    }

    @Override
    public void configure(HttpSecurity httpSecurity) throws Exception {
        httpSecurity.formLogin().permitAll()
                .and().authorizeRequests()
                .antMatchers("/oauth/**").permitAll()
                .anyRequest().authenticated()
                .and().logout().permitAll()
                .and().csrf().disable();
    }

    @Bean
    @Override
    public AuthenticationManager authenticationManagerBean() throws Exception {
        return super.authenticationManagerBean();
    }
}
UserService
@Service
public class UserService implements UserDetailsService {

    @Resource
    private PasswordEncoder passwordEncoder;

    @Override
    public UserDetails loadUserByUsername(String username) throws UsernameNotFoundException {
        String password = passwordEncoder.encode("123456789");
        return new User("qianyue",password, AuthorityUtils.commaSeparatedStringToAuthorityList("admin"));

    }
}
3.配置授权服务器
/**
 * @author wcy
 */
@Configuration
@EnableAuthorizationServer
public class AuthorizationServerConfig extends AuthorizationServerConfigurerAdapter {

    @Resource
    private PasswordEncoder passwordEncoder;

    @Override
    public void configure(ClientDetailsServiceConfigurer clients) throws Exception {
        clients.inMemory()
                .withClient("client")
                .secret(passwordEncoder.encode("123123"))
                .accessTokenValiditySeconds(3600)
                .refreshTokenValiditySeconds(86400)
                .redirectUris("http://www.baidu.com")
                .scopes("all")
                .authorizedGrantTypes("implicit");

    }
}
4.配置资源服务器
/**
 * @author wcy
 */
@Configuration
@EnableResourceServer
public class ResourceServiceConfig extends ResourceServerConfigurerAdapter {

    @Override
    public void configure(HttpSecurity http) throws Exception {
        http.authorizeRequests()
                .anyRequest().authenticated()
                .and().requestMatchers().antMatchers("/user/**");
    }
}
6.编写资源 这里是拿到授权信息
/**
 * @author wcy
 */
@RestController
@RequestMapping("/user")
public class UserController {

    @RequestMapping("/getCurrentUser")
    public Object getCurrentUser(Authentication authentication){
        return authentication.getPrincipal();
    }
}
5.3.2 四种模式实操
1.授权码模式
修改资源认证服务器配置
/**
 * @author wcy
 */
@Configuration
@EnableAuthorizationServer
public class AuthorizationServerConfig extends AuthorizationServerConfigurerAdapter {

    @Resource
    private PasswordEncoder passwordEncoder;

    @Override
    public void configure(ClientDetailsServiceConfigurer clients) throws Exception {

        /**
         * authorizedGrantTypes 认证类型 authorization_code"代表授权码模式
         * scopes 作用域
         * redirectUris 重定向的地址 授权后 把授权码发在哪个地址上
         * refreshTokenValiditySeconds 刷新令牌的过期时间
         * accessTokenValiditySeconds 令牌的过期实际
         * secret 相当于第三方在资源服务器认证的密钥
         * withClient client  每个第三方都应该在资源服务器备案
         */
        clients.inMemory()
                .withClient("client")
                .secret(passwordEncoder.encode("123123"))
                .accessTokenValiditySeconds(3600)
                .refreshTokenValiditySeconds(86400)
                .redirectUris("http://www.baidu.com")
                .scopes("all")
                .authorizedGrantTypes("authorization_code");

    }
}
1.获取授权码
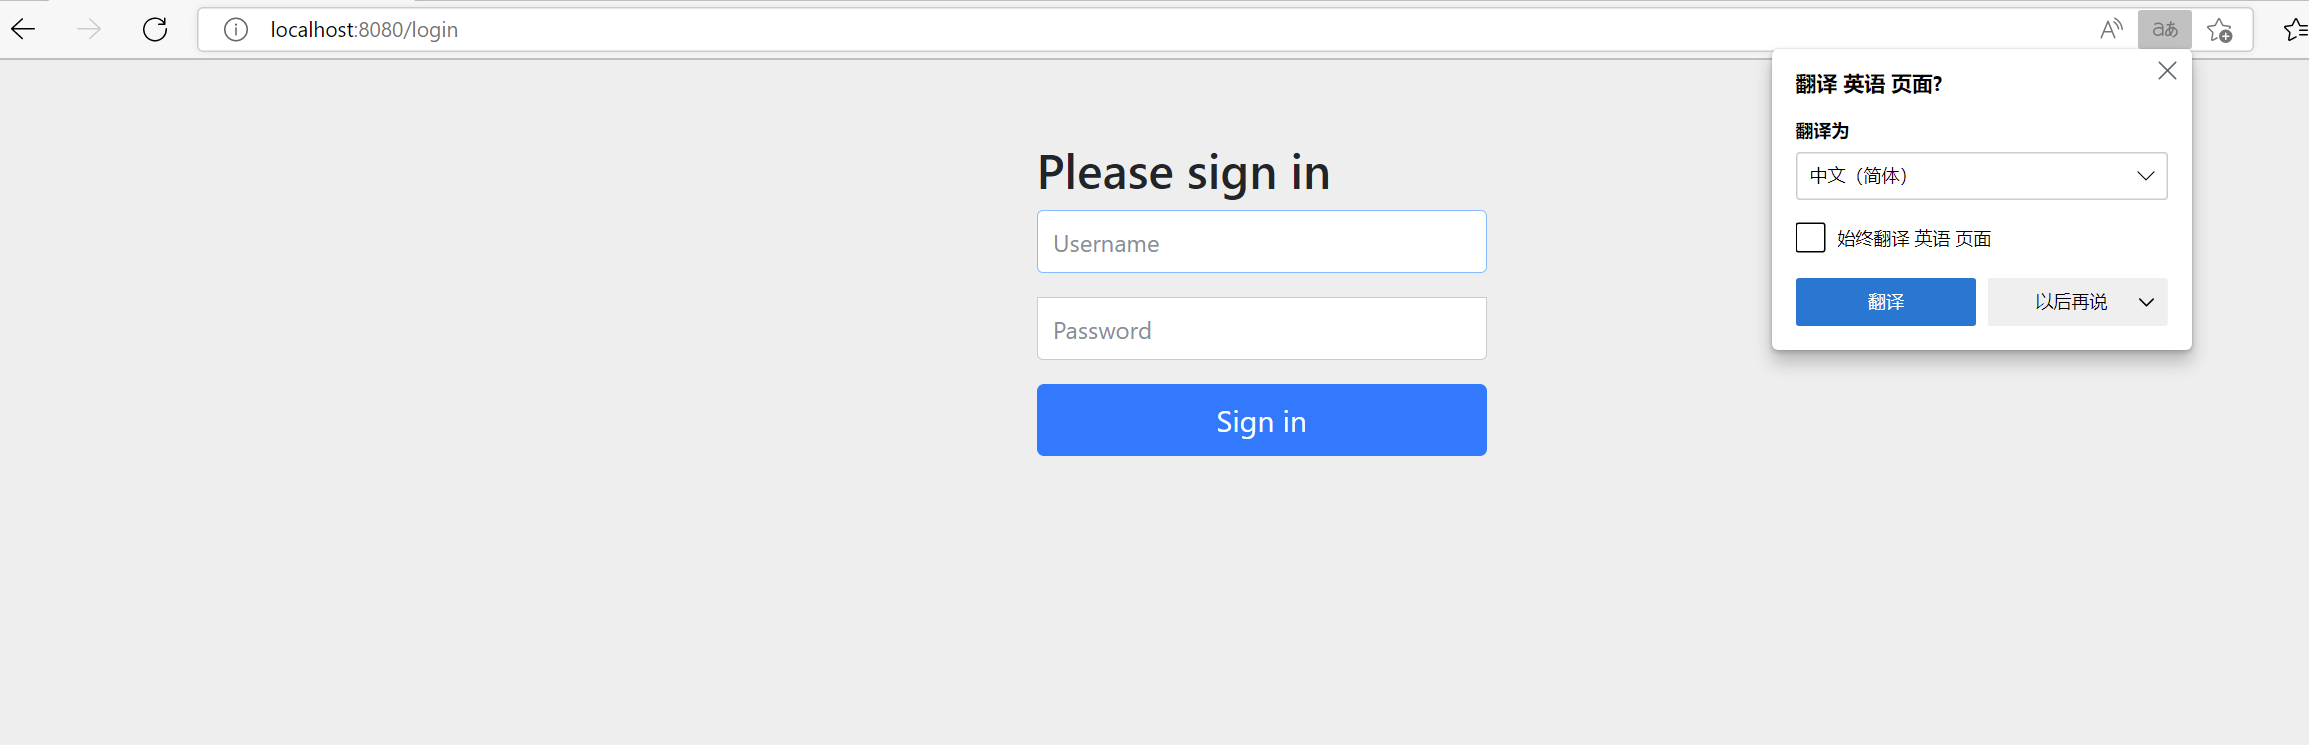
访问http://localhost:8080/oauth/authorize?response_type=code&client_id=client 会进入认证界面如下
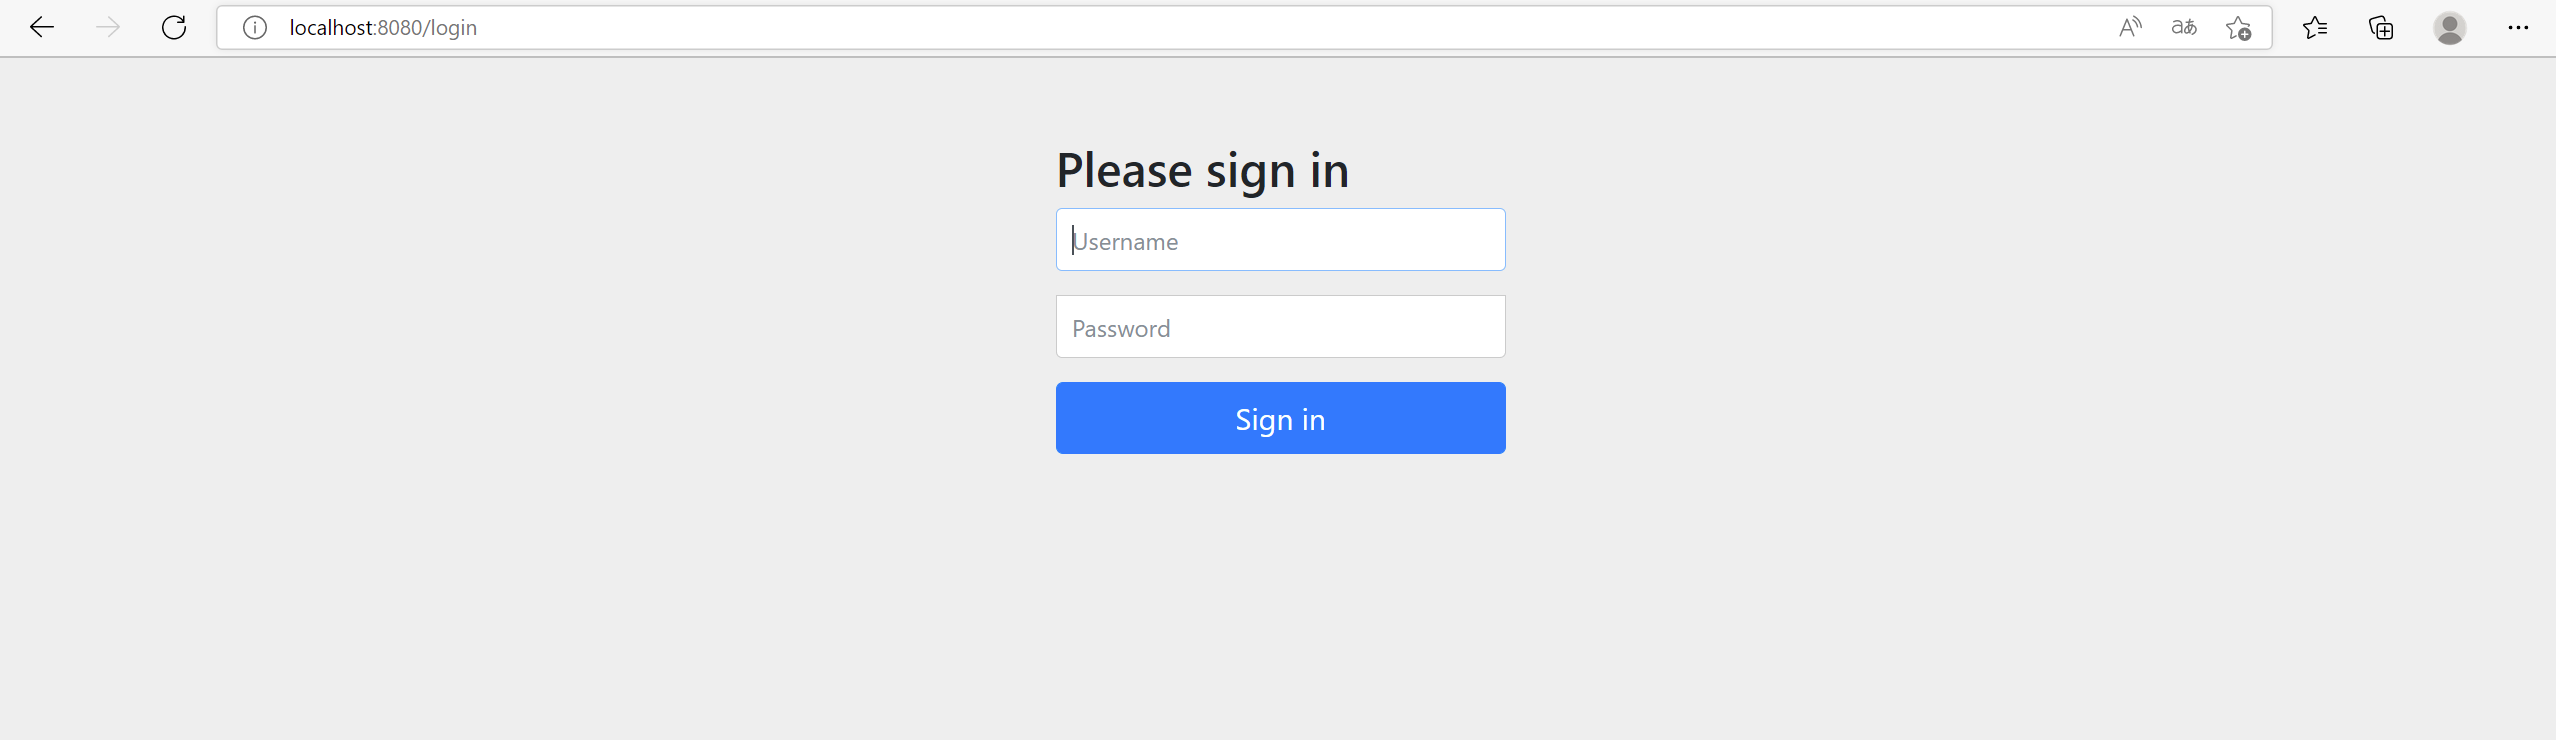
账号和密码是Spring Security那里配置的密码 我这里是qianyue 123456789 登陆后会弹出一个框,代表是否授权访问被保护的资源 选择Approve
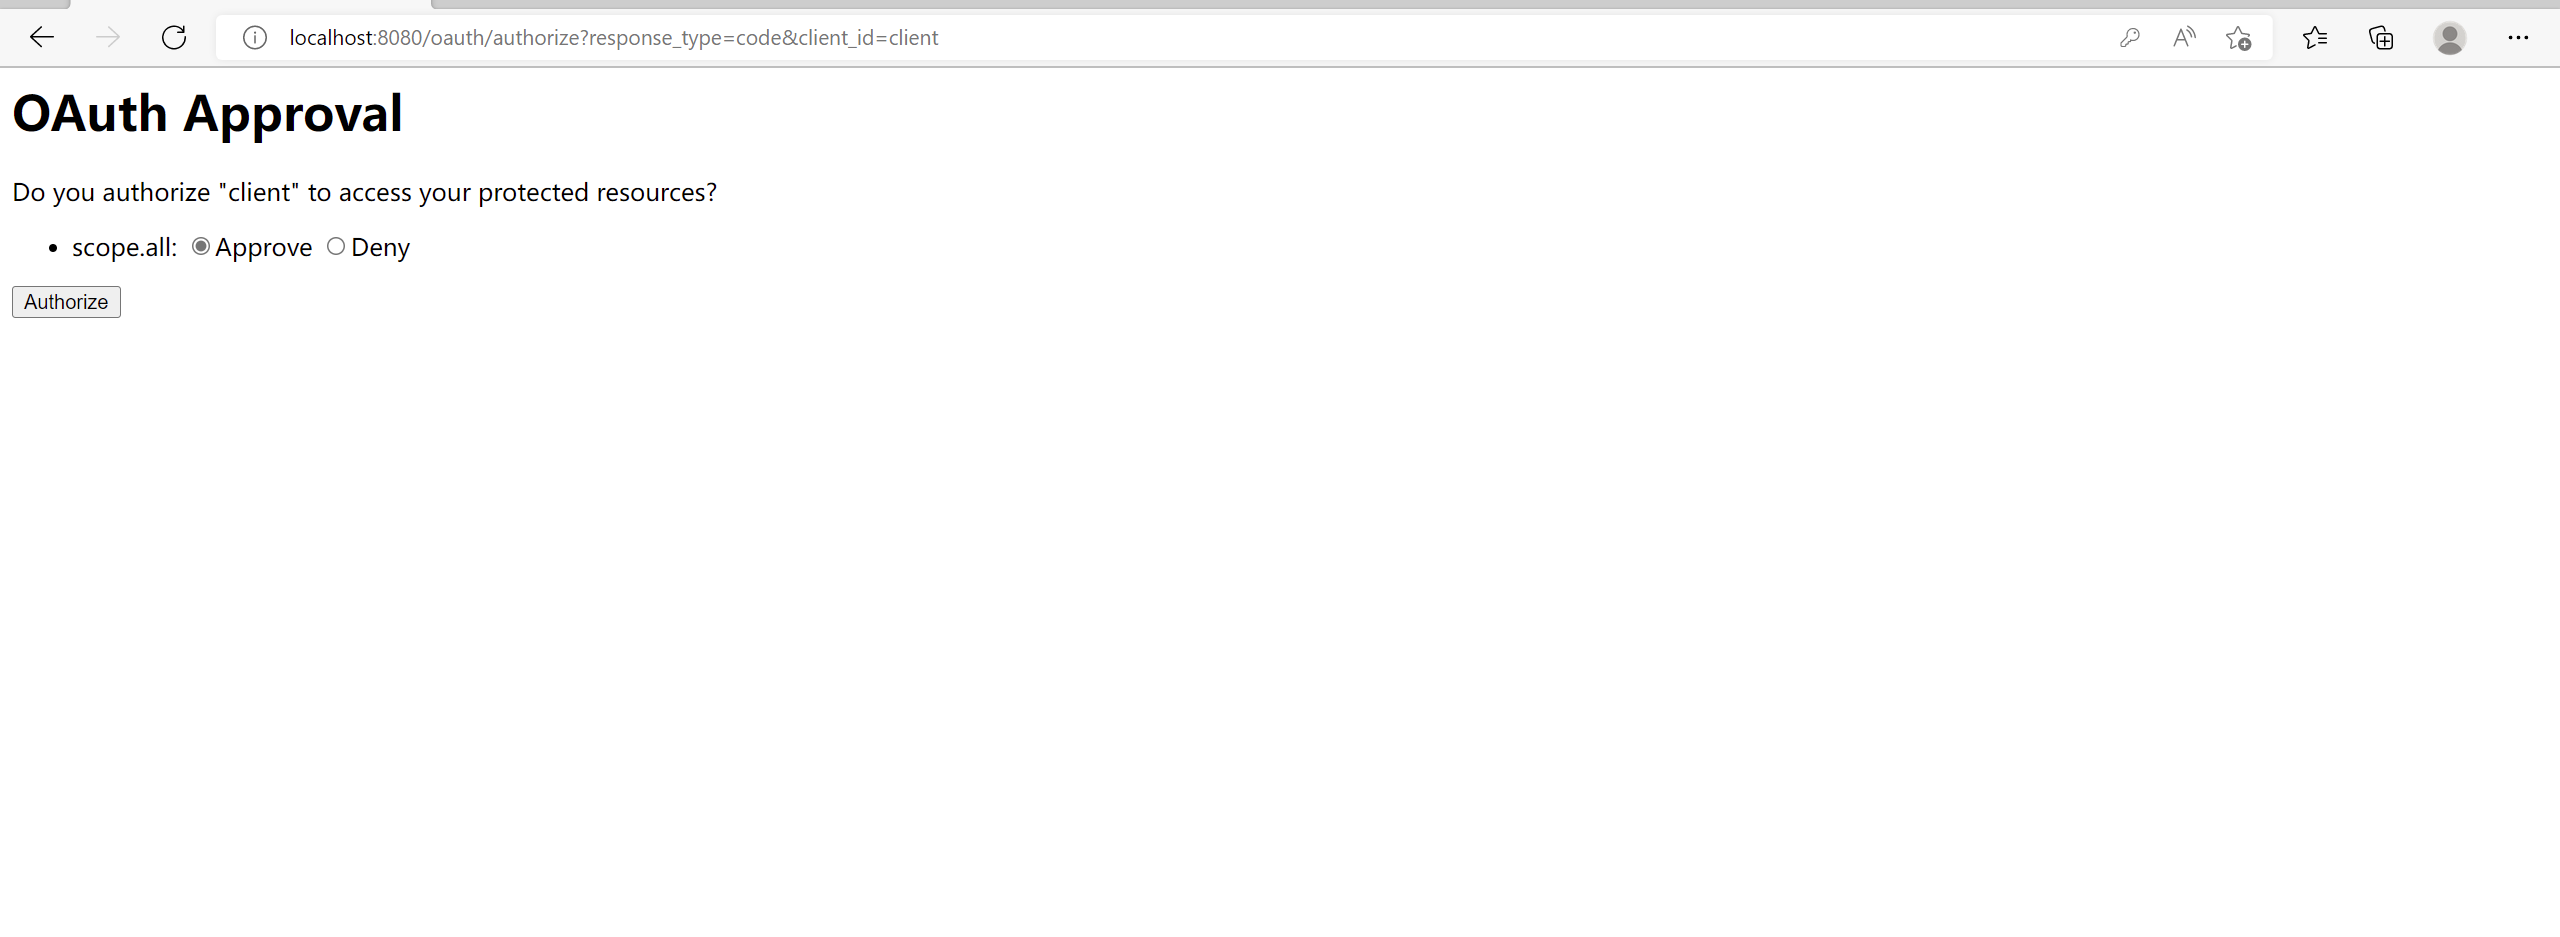
这样我们就拿到了授权码 code=dkoRnE

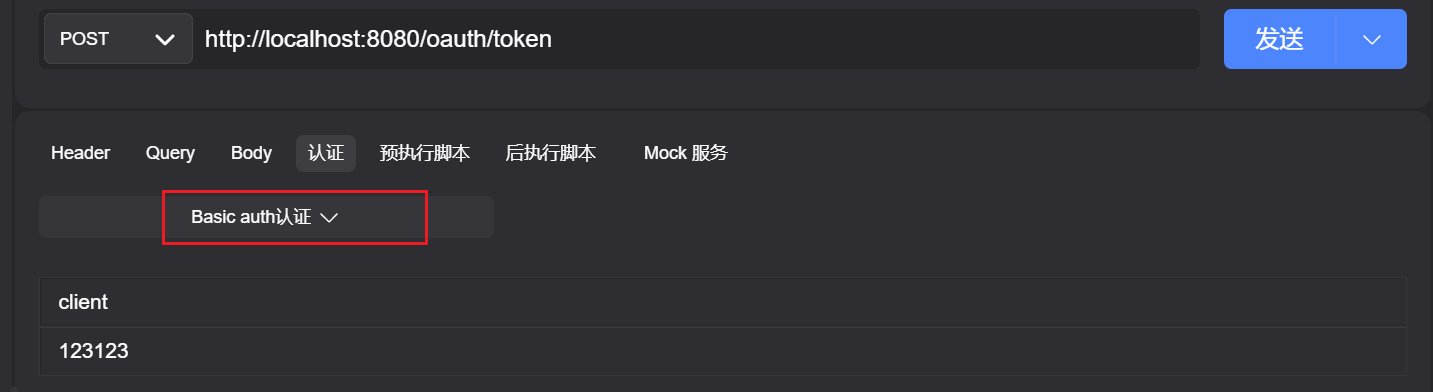
2.获取令牌
通过测试工具 访问http://localhost:8080/oauth/token 但是需要一个basic auth认证 账号是client_id 密码是 client_secret
认证
添加请求参数
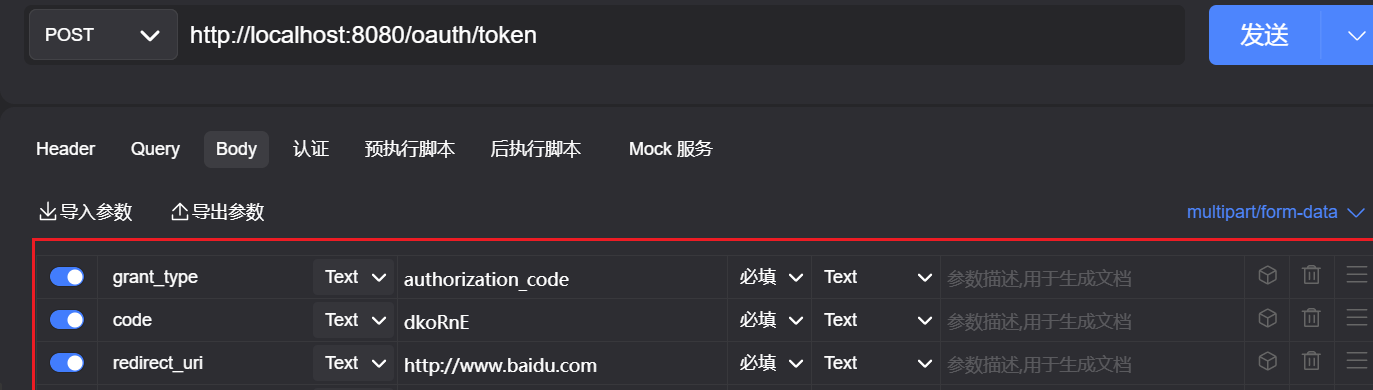
结果:拿到我们的认证信息

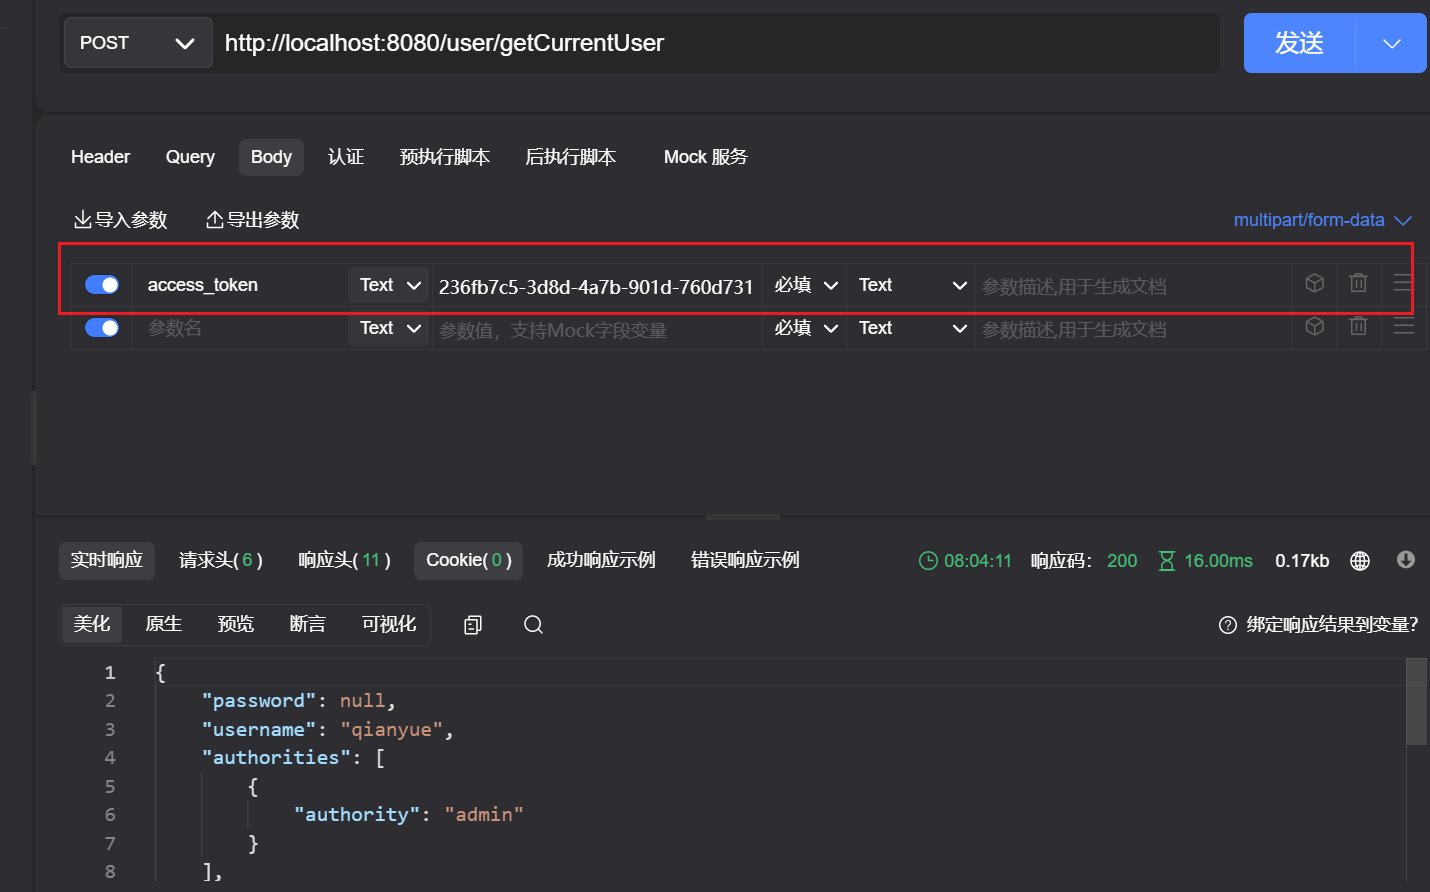
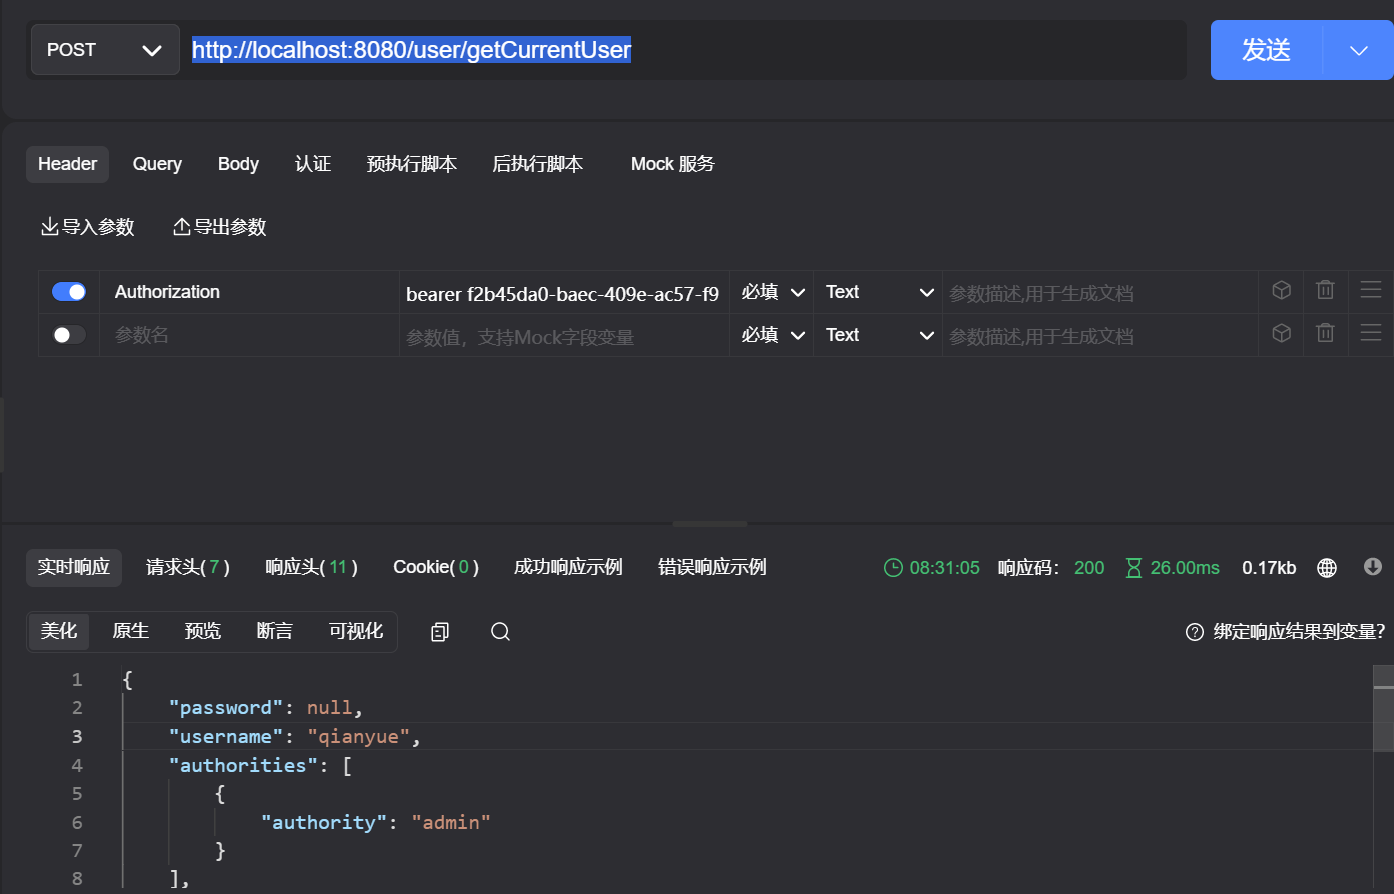
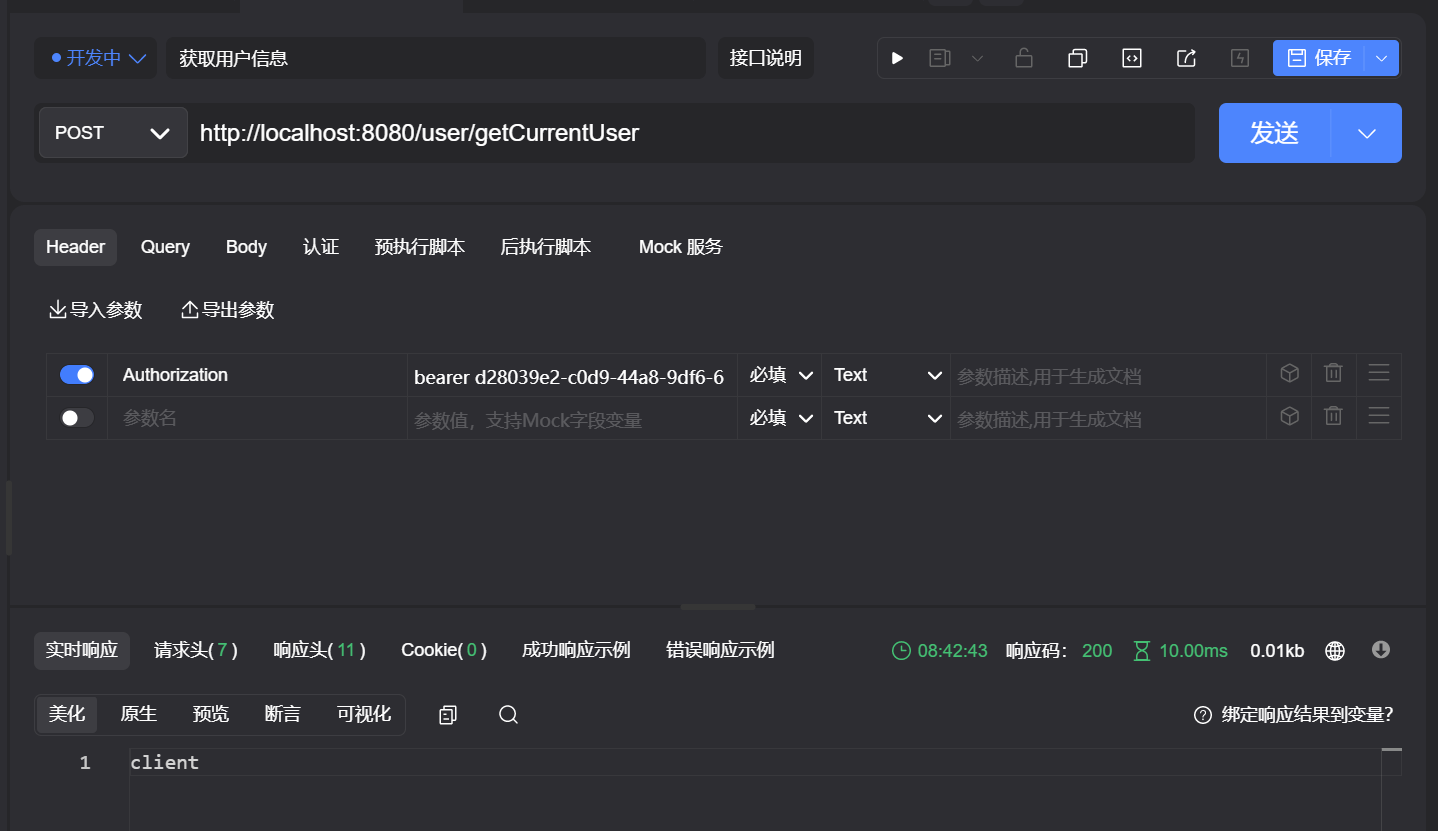
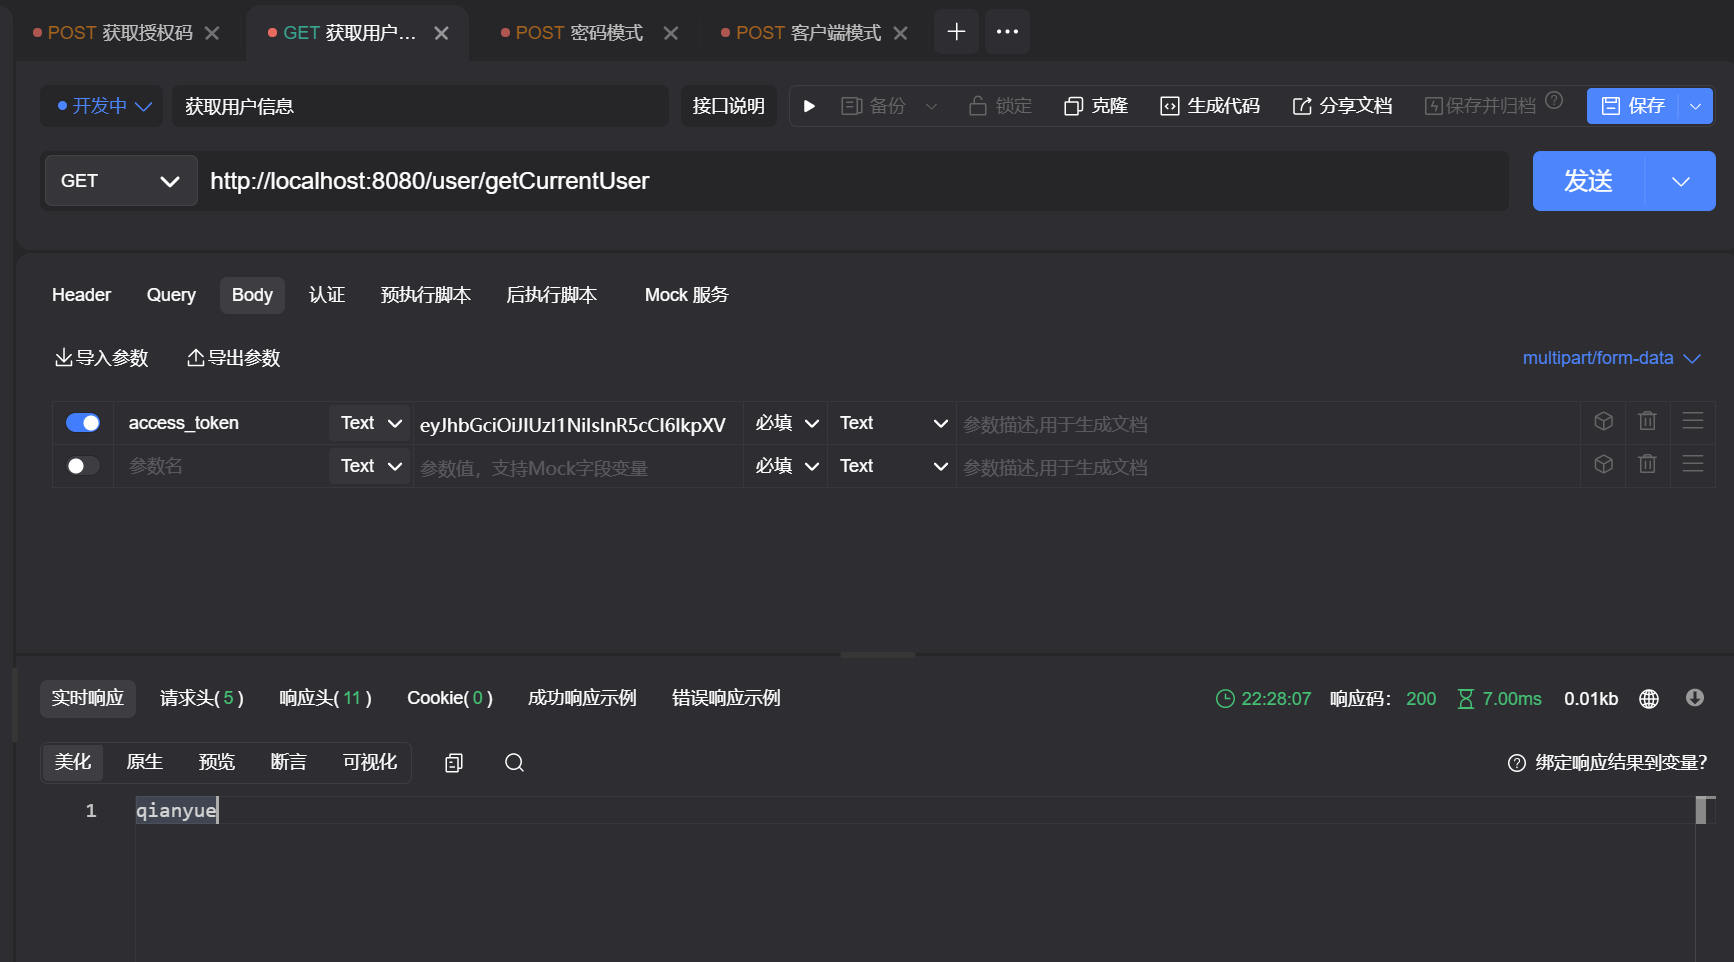
3.获取资源
(1)方式1:携带请求参数access_token 访问http://localhost:8080/user/getCurrentUser 可以看到拿到了我们的认证信息
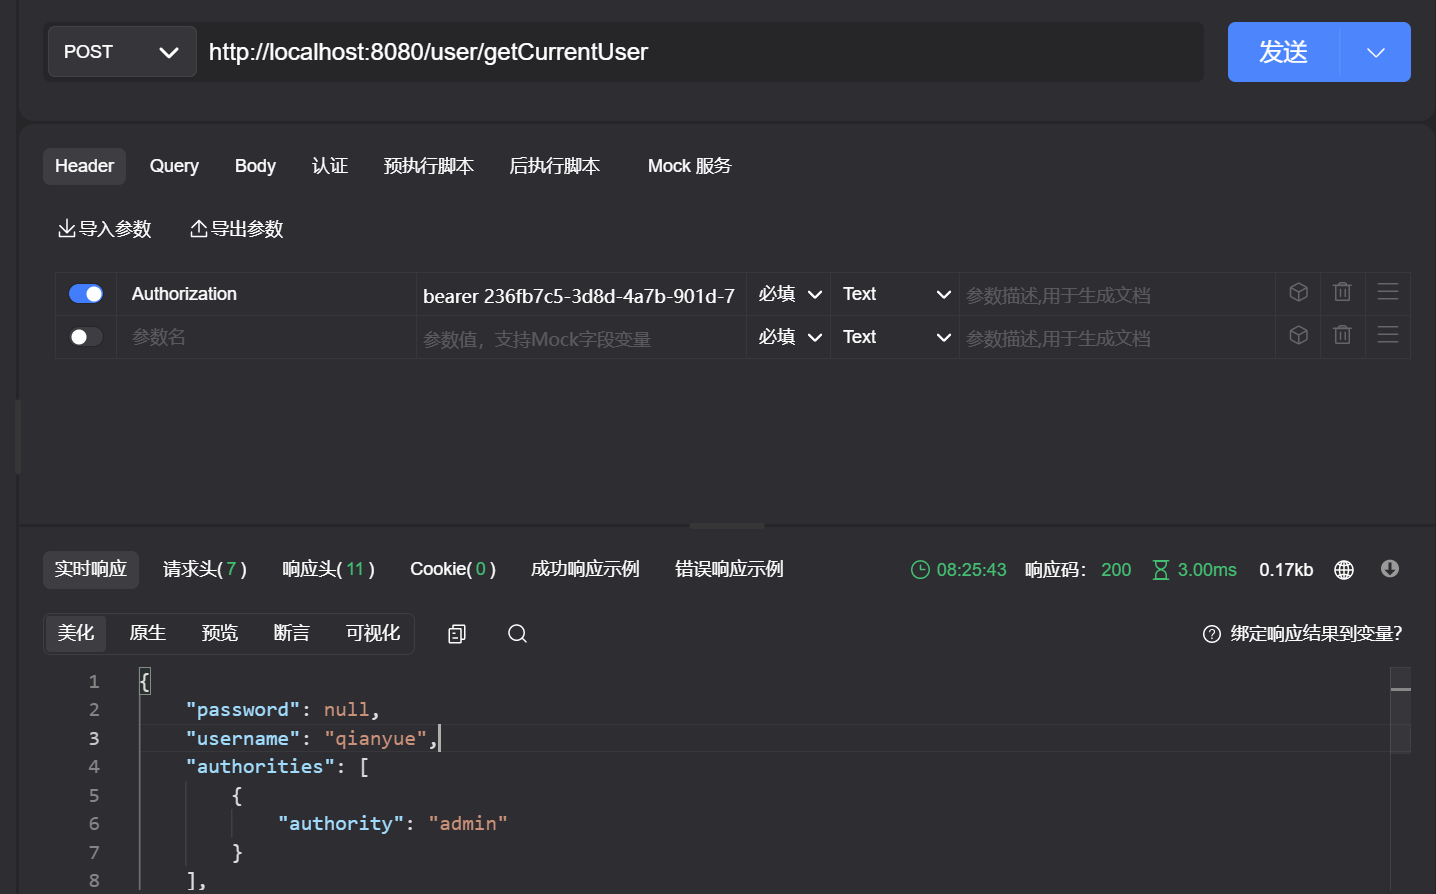
(2)方式2 添加请求头
key:Authorization value: bearer 236fb7c5-3d8d-4a7b-901d-760d73165a17 访问http://localhost:8080/user/getCurrentUser
2.简化模式
修改认证服务器配置
只需要修改authorizedGrantTypes为implicit
/**
 * @author wcy
 */
@Configuration
@EnableAuthorizationServer
public class AuthorizationServerConfig extends AuthorizationServerConfigurerAdapter {

    @Resource
    private PasswordEncoder passwordEncoder;

    @Override
    public void configure(ClientDetailsServiceConfigurer clients) throws Exception {

        /**
         * authorizedGrantTypes 认证类型 implicit 代表简化模式
         * scopes 作用域
         * redirectUris 重定向的地址 授权后 把授权码发在哪个地址上
         * refreshTokenValiditySeconds 刷新令牌的过期时间
         * accessTokenValiditySeconds 令牌的过期实际
         * secret 相当于第三方在资源服务器认证的密钥
         * withClient client  每个第三方都应该在资源服务器备案
         */
        clients.inMemory()
                .withClient("client")
                .secret(passwordEncoder.encode("123123"))
                .accessTokenValiditySeconds(3600)
                .refreshTokenValiditySeconds(86400)
                .redirectUris("http://www.baidu.com")
                .scopes("all")
                .authorizedGrantTypes("implicit");

    }
}
访问[localhost:8080/oauth/authorize? client_id=client&response_type=token&scope=all&redirect_uri=http://www.baidu.com](http://localhost:8080/oauth/authorize? client_id=client&response_type=token&scope=all&redirect_uri=http://www.baidu.com) 仍然需要去授权认证
选择同意授权

access_token以Hash的方式存放在重定向的url的farment中

使用access_token访问http://localhost:8080/user/getCurrentUser 这里只使用请求头的方式
3.密码模式
1.修改WebSecurityConfig,增加AuthenticationManager
/**
 * @author wcy
 */
@Configuration
public class WebSecurityConfig  extends WebSecurityConfigurerAdapter {


    @Bean
    public PasswordEncoder passwordEncoder(){
        return new BCryptPasswordEncoder();
    }

    @Override
    public void configure(HttpSecurity httpSecurity) throws Exception {
        httpSecurity.formLogin().permitAll()
                .and().authorizeRequests()
                .antMatchers("/oauth/**").permitAll()
                .anyRequest().authenticated()
                .and().logout().permitAll()
                .and().csrf().disable();
    }

    @Bean
    @Override
    public AuthenticationManager authenticationManagerBean() throws Exception {
        return super.authenticationManagerBean();
    }
}
2.修改认证服务器配置
/**
 * 授权服务器
 * @author wcy
 */
@Configuration
@EnableAuthorizationServer
public class AuthorizationServerConfig2 extends AuthorizationServerConfigurerAdapter {

    @Resource
    private PasswordEncoder passwordEncoder;

    @Resource
    private AuthenticationManager authenticationManager;

    @Autowired
    private UserService userService;


    @Override
    public void configure(AuthorizationServerEndpointsConfigurer endpoints) throws Exception {
                //使用密码模式配置
                 endpoints.authenticationManager(authenticationManager)
                         .reuseRefreshTokens(false)
                         .userDetailsService(userService)
                 //运行通过get/post请求
                        .allowedTokenEndpointRequestMethods(HttpMethod.GET,HttpMethod.POST);
    }

    @Override
    public void configure(AuthorizationServerSecurityConfigurer security) throws Exception {
        //允许表单提交
        security.allowFormAuthenticationForClients();
    }

    @Override
    public void configure(ClientDetailsServiceConfigurer clients) throws Exception {
                 clients.inMemory()
                .withClient("client")
                .secret(passwordEncoder.encode("123123"))
                .accessTokenValiditySeconds(3600)
                .refreshTokenValiditySeconds(86400)
                .redirectUris("http://www.baidu.com")
                .scopes("all")
//                .authorizedGrantTypes("implicit");简化模式
                .authorizedGrantTypes("password");//密码模式
//                .authorizedGrantTypes("authorization_code")授权码模式
//                .authorizedGrantTypes("client_credentials");客户端模式
//                .authorizedGrantTypes("authorization_code","implicit","password","refresh_token","client_credentials");

    }
}
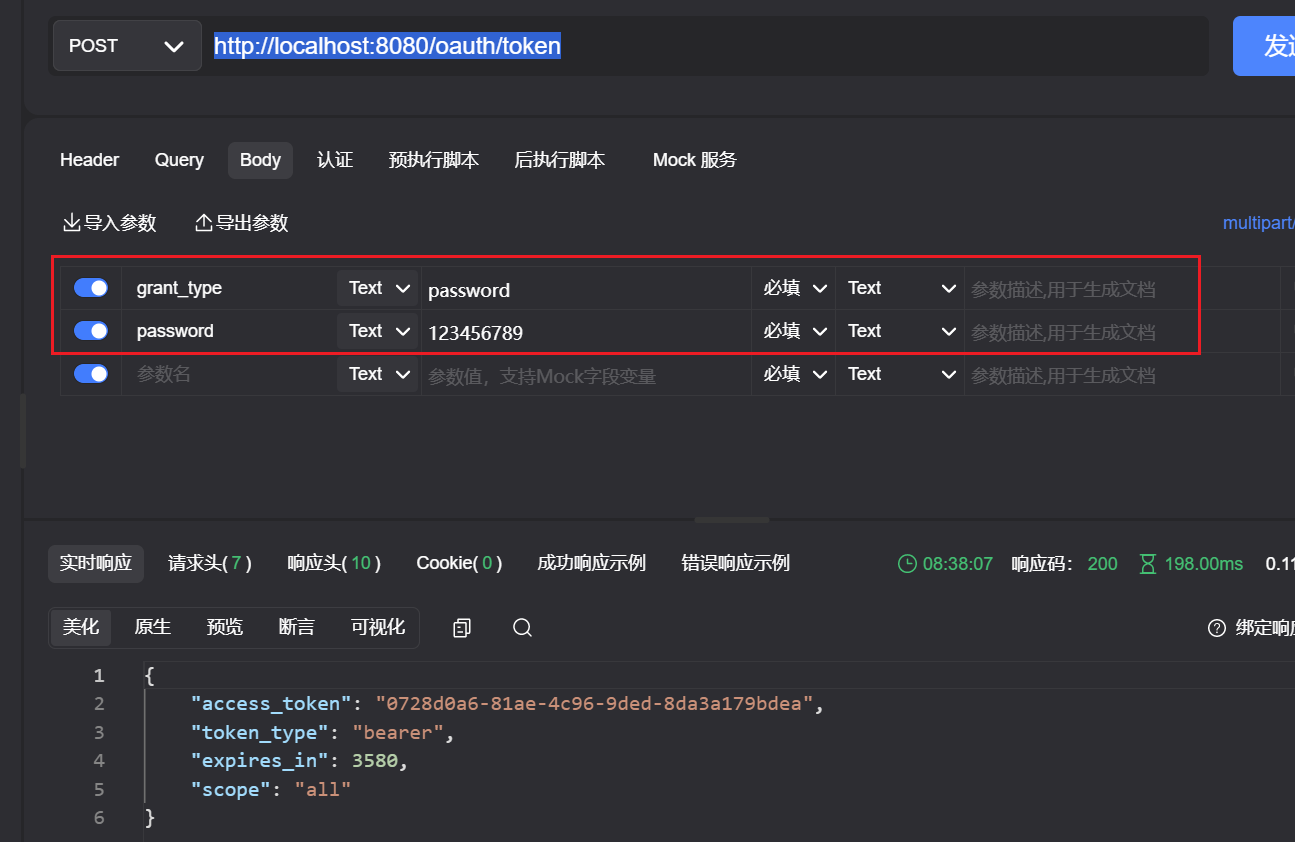
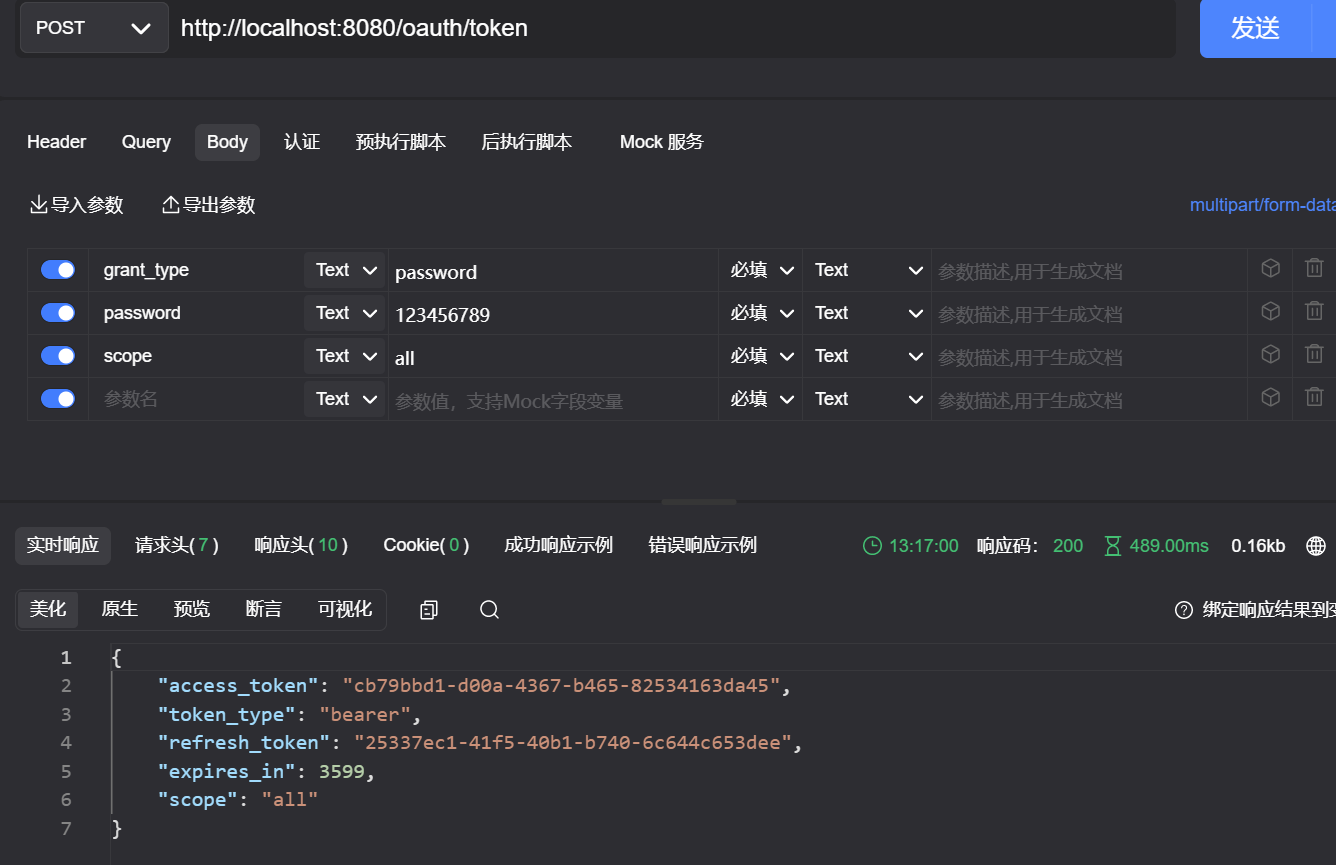
3.访问 http://localhost:8080/oauth/token 也需要basic auth认证
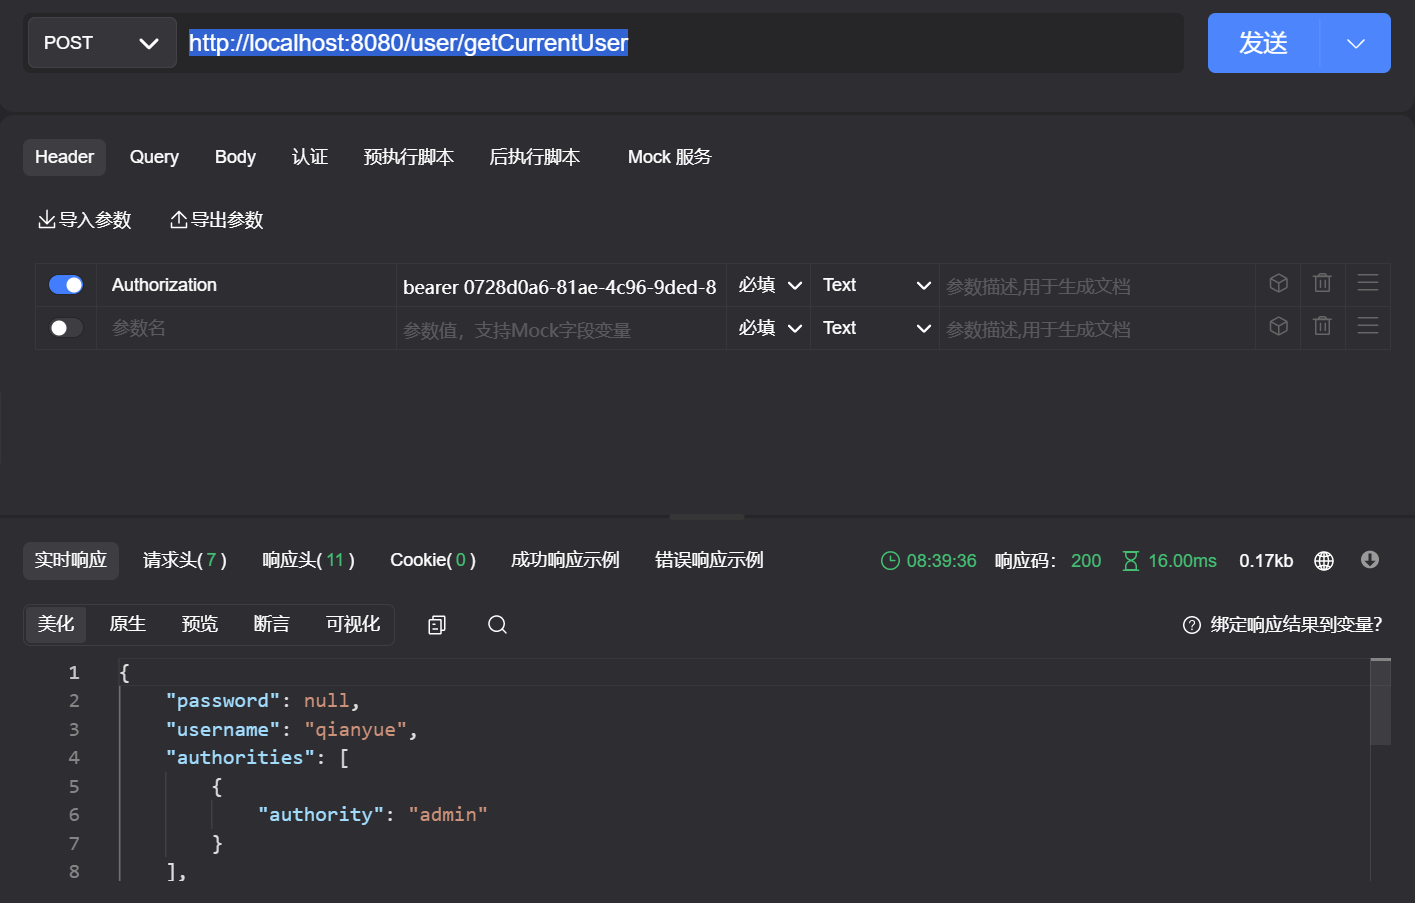
4.访问资源 http://localhost:8080/user/getCurrentUser
4.客户端模式
1.修改资源服务器配置
authorizedGrantTypes改为client_credentials
/**
 * 授权服务器
 * @author wcy
 */
@Configuration
@EnableAuthorizationServer
public class AuthorizationServerConfig2 extends AuthorizationServerConfigurerAdapter {

    @Resource
    private PasswordEncoder passwordEncoder;

    @Resource
    private AuthenticationManager authenticationManager;

    @Autowired
    private UserService userService;


    @Override
    public void configure(AuthorizationServerEndpointsConfigurer endpoints) throws Exception {
                //使用密码模式配置
                 endpoints.authenticationManager(authenticationManager)
                         .reuseRefreshTokens(false)
                         .userDetailsService(userService)
                 //运行通过get/post请求
                        .allowedTokenEndpointRequestMethods(HttpMethod.GET,HttpMethod.POST);
    }

    @Override
    public void configure(AuthorizationServerSecurityConfigurer security) throws Exception {
        //允许表单提交
        security.allowFormAuthenticationForClients();
    }

    @Override
    public void configure(ClientDetailsServiceConfigurer clients) throws Exception {
                 clients.inMemory()
                .withClient("client")
                .secret(passwordEncoder.encode("123123"))
                .accessTokenValiditySeconds(3600)
                .refreshTokenValiditySeconds(86400)
                .redirectUris("http://www.baidu.com")
                .scopes("all")
//                .authorizedGrantTypes("implicit");简化模式
//                .authorizedGrantTypes("password");//密码模式
//                .authorizedGrantTypes("authorization_code")授权码模式
              .authorizedGrantTypes("client_credentials");//客户端模式
//                .authorizedGrantTypes("authorization_code","implicit","password","refresh_token","client_credentials");

    }
}
2.获取令牌 访问http://localhost:8080/oauth/token?grant_type=client_credentials&scope=all&client_id=client&client_secret=123123
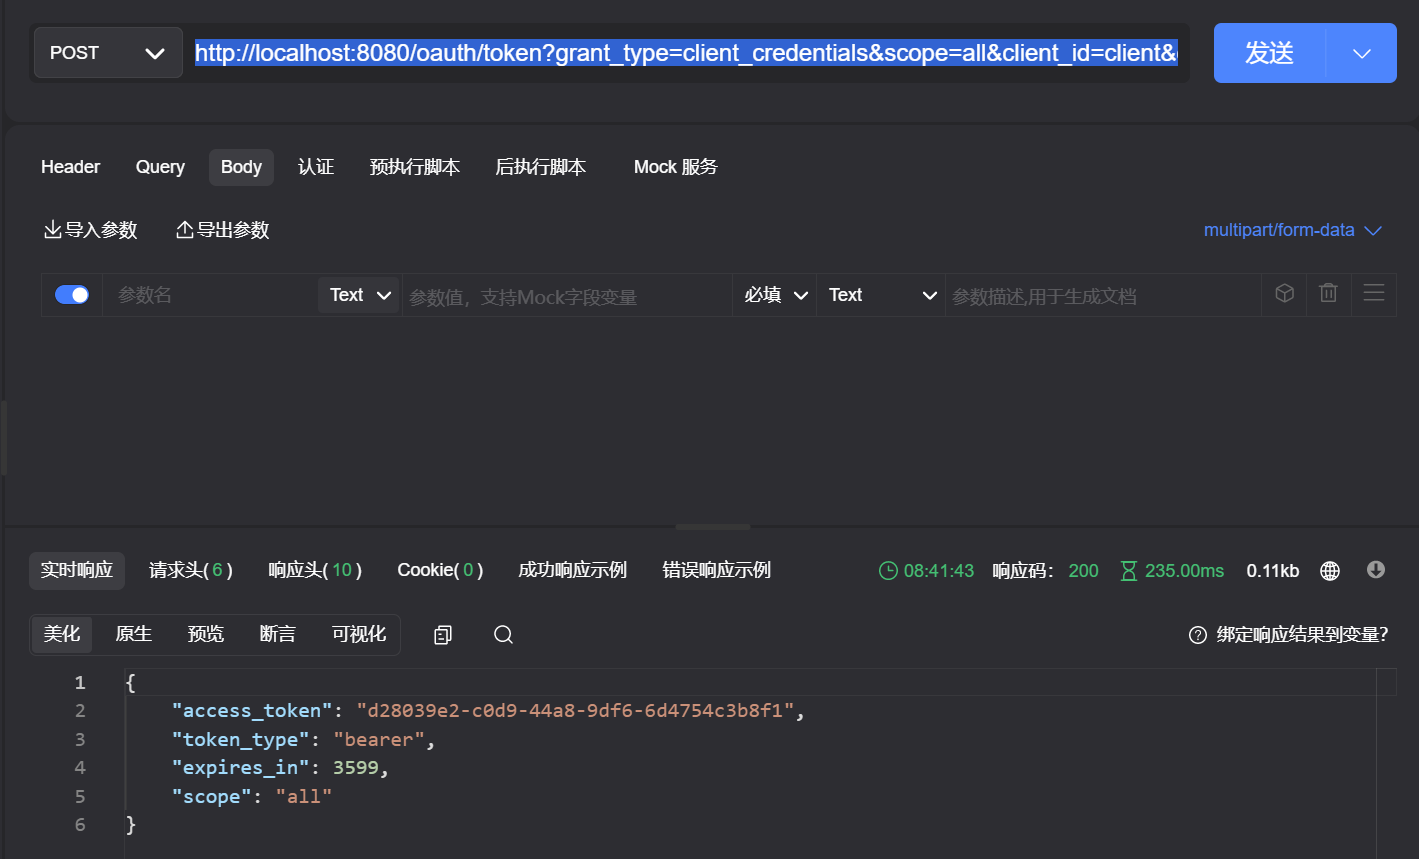
3.访问资源 客户端直接操作,没有用户信息。
5.3.2 令牌刷新
使用oauth2时,如果令牌失效了,可以使用刷新令牌通过refresh_token的授权模式再次获取access_token。 只需修改认证服务器的配置,添加refresh_token的授权模式即可。 这里使用密码模式演示
1.修改授权服务器配置
authorizedGrantTypes添加refresh_token
/**
 * 授权服务器
 * @author wcy
 */
@Configuration
@EnableAuthorizationServer
public class AuthorizationServerConfig2 extends AuthorizationServerConfigurerAdapter {

    @Resource
    private PasswordEncoder passwordEncoder;

    @Resource
    private AuthenticationManager authenticationManager;

    @Autowired
    private UserService userService;


    @Override
    public void configure(AuthorizationServerEndpointsConfigurer endpoints) throws Exception {
                //使用密码模式配置
                 endpoints.authenticationManager(authenticationManager)
                         .reuseRefreshTokens(false)
                         .userDetailsService(userService)
                 //运行通过get/post请求
                        .allowedTokenEndpointRequestMethods(HttpMethod.GET,HttpMethod.POST);
    }

    @Override
    public void configure(AuthorizationServerSecurityConfigurer security) throws Exception {
        //允许表单提交
        security.allowFormAuthenticationForClients();
    }

    @Override
    public void configure(ClientDetailsServiceConfigurer clients) throws Exception {
                 clients.inMemory()
                .withClient("client")
                .secret(passwordEncoder.encode("123123"))
                .accessTokenValiditySeconds(3600)
                .refreshTokenValiditySeconds(86400)
                .redirectUris("http://www.baidu.com")
                .scopes("all")
//                .authorizedGrantTypes("implicit");简化模式
//                .authorizedGrantTypes("password");//密码模式
//                .authorizedGrantTypes("authorization_code")授权码模式
              .authorizedGrantTypes("password","refresh_token");//客户端模式
//                .authorizedGrantTypes("authorization_code","implicit","password","refresh_token","client_credentials");

    }
}
2.访问http://localhost:8080/oauth/token 获得刷新令牌
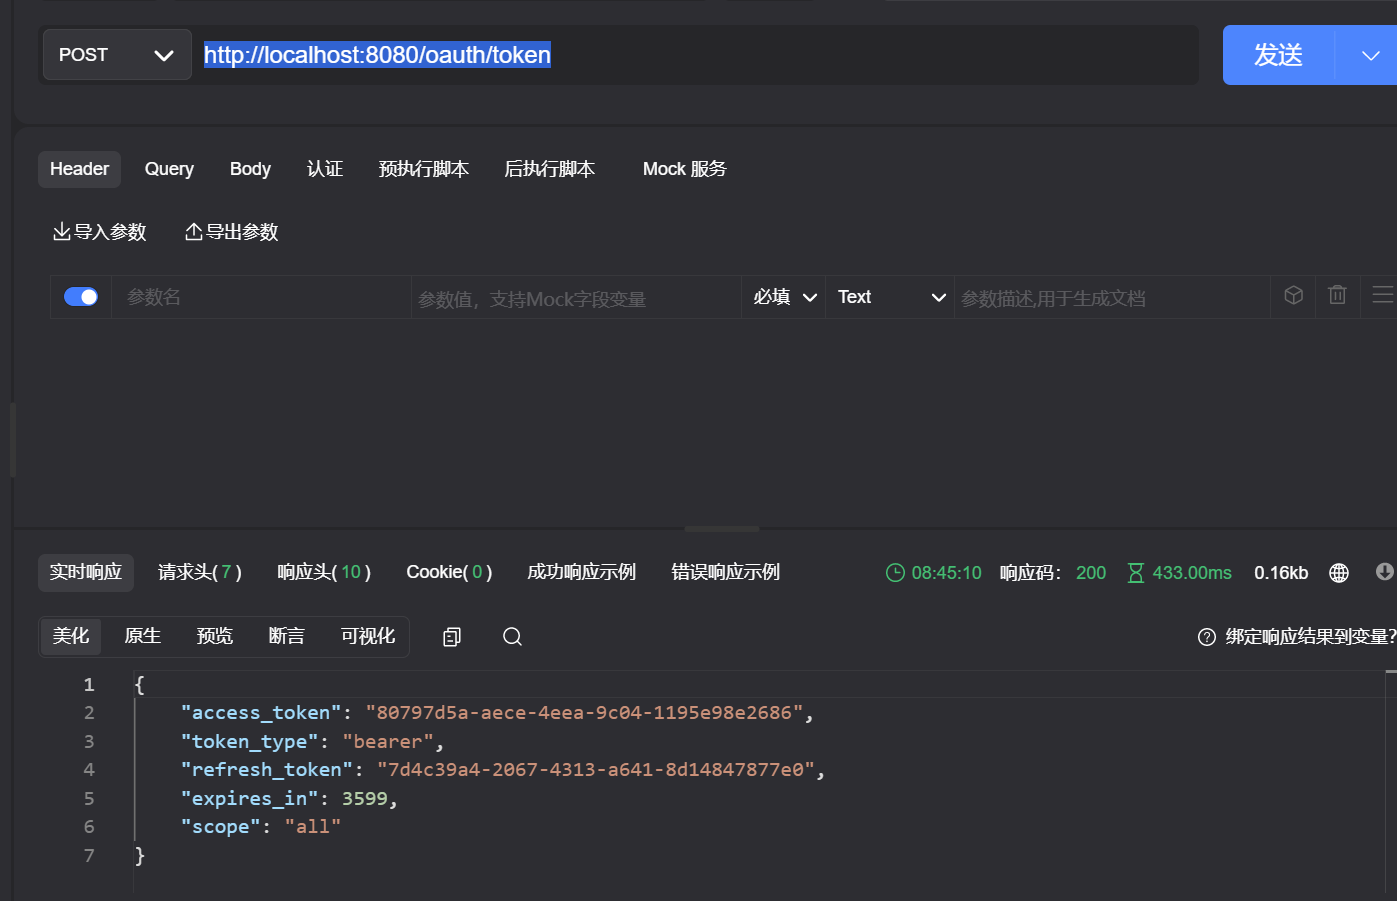

4.如果想让刷新令牌只生效一次,在资源服务器配置reuseRefreshTokens(false)
    @Override
    public void configure(AuthorizationServerEndpointsConfigurer endpoints) throws Exception {
                //使用密码模式配置
                 endpoints.authenticationManager(authenticationManager)
                         .reuseRefreshTokens(false)
                         .userDetailsService(userService)
                 //运行通过get/post请求
                        .allowedTokenEndpointRequestMethods(HttpMethod.GET,HttpMethod.POST);
    }
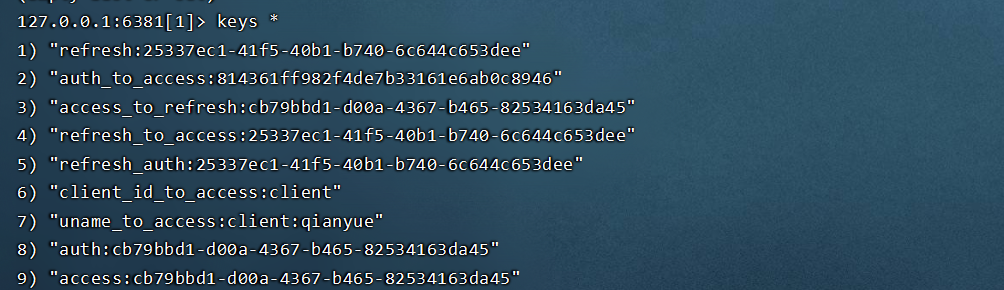
5.3.3 基于Redis存储令牌
上边使用的内存方式存储令牌,我们也可以采用redis方式存储令牌
1.引入redis依赖
        <dependency>
            <groupId>org.springframework.boot</groupId>
            <artifactId>spring-boot-starter-data-redis</artifactId>
        </dependency>
        <dependency>
            <groupId>org.apache.commons</groupId>
            <artifactId>commons-pool2</artifactId>
        </dependency>
2.yml配置redis
spring:
  redis:
    host: 192.168.26.129
    password: qianyue
    database: 1
    port: 6381
3.添加redis配置类
/**
 * @author wcy
 */
@Configuration
public class RedisConfig {

    @Resource
    private RedisConnectionFactory redisConnectionFactory;

    @Bean
    public TokenStore tokenStore(){
        return new RedisTokenStore(redisConnectionFactory);
    }
}
4.修改授权服务配置,更改为redis存储
    @Autowired
    private TokenStore tokenStore;

    @Override
    public void configure(AuthorizationServerEndpointsConfigurer endpoints) throws Exception {
                //使用密码模式配置
                 endpoints.authenticationManager(authenticationManager)
                         .tokenStore(tokenStore)//选择指定的存储方式
                         .reuseRefreshTokens(false)
                         .userDetailsService(userService)
                 //运行通过get/post请求
                        .allowedTokenEndpointRequestMethods(HttpMethod.GET,HttpMethod.POST);
    }
5.测试 密码模式获取Token 访问http://localhost:8080/oauth/token
6.查看redis的值
6.Spring Security OAuth2 整合JWT
6.1 JWT概述
6.1.1 什么是JWT
JSON Web Token(JWT)是一个开放的行业标准(RFC 7519),它定义了一种简介的、自包含的协议格式,用于在通信双方传递json对象,传递的信息经过数字签名可以被验证和信任。JWT可以使用HMAC算法或使用RSA的公钥/私钥对来签名,防止被篡改。
官网: https://jwt.io/
标准: https://tools.ietf.org/html/rfc7519
JWT令牌的优点:
-
jwt基于json,非常方便解析。
-
可以在令牌中自定义丰富的内容,易扩展。
-
通过非对称加密算法及数字签名技术,JWT防止篡改,安全性高。
-
资源服务使用JWT可不依赖授权服务即可完成授权。
缺点:
JWT令牌较长,占存储空间比较大。
6.1.2 JWT组成
一个JWT实际上就是一个字符串,它由三部分组成,头部(header)、载荷(payload)与签名(signature)
[外链图片转存失败,源站可能有防盗链机制,建议将图片保存下来直接上传(img-xwINI2FC-1653653035285)(https://com-qianyue-img.oss-cn-hangzhou.aliyuncs.com/img/image-20220526193843200.png)]
1.头部
头部用于描述关于该JWT的最基本的信息:类型(即JWT)以及签名所用的算法(如HMACSHA256或RSA)等。这也可以被表示成一个JSON对象:
{
    "alg":"HS256",
    "type":"JWT"
}
然后头部经过base64加密后,构成了JWT的第一部分
eyJ0eXAiOiJKV1QiLCJhbGciOiJIUzI1NiJ9
2.载荷
第二部分是载荷,就是存放有效信息的地方。这个名字像是特指飞机上承载的货品,这些有效信息包含三个部分:
(1)标准中注册的声明(建议但不强制使用)
iss: jwt签发者
sub: jwt所面向的用户
aud: 接收jwt的一方
exp: jwt的过期时间,这个过期时间必须要大于签发时间
nbf: 定义在什么时间之前,该jwt都是不可用的
iat: jwt的签发时间
jti: jwt的唯一身份标识,主要用来作为一次性token,从而回避重放攻击。
(2)公共的声明
公共的声明可以添加任何的信息,一般添加用户的相关信息或其他业务需要的必要信息.但不建议添加敏感信息,因为该部分在客户端可解密.
(3)私有的声明
私有声明是提供者和消费者所共同定义的声明,一般不建议存放敏感信息,因为base64是对称解密的,意味着该部分信息可以归类为明文信息
定义一个载荷:
{
  "sub": "1234567890",
  "name": "John Doe",
  "iat": 1516239022
}
然后对其进行base64加密后,得到JWT的第二部分内容
eyJzdWIiOiIxMjM0NTY3ODkwIiwibmFtZSI6IkpvaG4gRG9lIiwiaWF0IjoxNTE2MjM5MDIyfQ
3.签名
jwt的第三部分是一个签证信息,这个签证信息由三部分组成:
- header (base64后的)
- payload (base64后的)
- secret(盐,一定要保密)
这个部分需要base64加密后的header和base64加密后的payload使用.连接组成的字符串,然后通过header中声明的加密方式进行加盐secret组合加密,然后就构成了jwt的第三部分
var encodedString = base64UrlEncode(header) + '.' + base64UrlEncode(payload);

var signature = HMACSHA256(encodedString, 'luoxue'); // MBbu-tLxSVYCByAnWJ2Mf_CZ11pSJPSngbFxDVUpxsQ
注意:secret是保存在服务器端的,jwt的签发生成也是在服务器端的,secret就是用来进行jwt的 发和jwt的验证,所以,它就是你服务端的私钥,在任何场景都不应该流露出去。一旦客户端得知这个secret, 那就意味着客户端是可以自我签发jwt了。
6.2 Jwt使用
6.2.1 Jwt原理
6.2.2 JJWT
JJWT是一个提供端到端的JWT创建和验证的Java库,永远免费和开源(Apache License,版本2.0)。JJW很容易使用和理解。它被设计成一个以建筑为中心的流畅界面,隐藏了它的大部分复杂性。
1.生成JWT
快速开始:
(1)引入依赖
       <!--JWT依赖-->
        <dependency>
            <groupId>io.jsonwebtoken</groupId>
            <artifactId>jjwt</artifactId>
            <version>0.9.1</version>
        </dependency>
(2)编写测试类创建Token
    @Test
    public void test(){
        //创建一个JwtBuilder对象
        JwtBuilder jwtBuilder = Jwts.builder()
                .setId("666") //声明的标识 {”jti“:"666"}
                .setSubject("luoxue") 主体,用户{"sub":"luoxue"}
                .setIssuedAt(new Date())//创建日期{"ita":"xxxxxx"}
                .signWith(SignatureAlgorithm.HS256,"luoxue");//签名手段,参数1:算法,参数2:盐值

        String token = jwtBuilder.compact();
        System.out.println(token);

        //分别解密
        System.out.println("开始解密");
        String[] split = token.split("\\.");
        System.out.println(Base64Codec.BASE64.decodeToString(split[0]));
        System.out.println(Base64Codec.BASE64.decodeToString(split[1]));
        System.out.println(Base64Codec.BASE64.decodeToString(split[2]));


    }
(3)运行结果 可以看出 通过盐值加密后 无法解密

2.Token验证
在web应用中由服务端创建了token然后发给客户端,客户端在下次向服务端发送请求时需要携带这个token(这就好像是拿着一张门票一样),那服务端接到这个token应该解析出token中的信息 (例如用户id),根据这些信息查询数据库返回相应的结果
代码
    @Test
    public void test2(){
        String token = "eyJhbGciOiJIUzI1NiJ9.eyJqdGkiOiI2NjYiLCJzdWIiOiJsdW94dWUiLCJpYXQiOjE2NTM1NjY0MDF9.bIp5DDYa0WRlH230wLYwHn8Cs-IqhDtAtMBHpwmP6hI";
        Claims claims = Jwts.parser()
                .setSigningKey("luoxue")
                .parseClaimsJws(token)
                .getBody();

        System.out.println("id:"+claims.getId());
        System.out.println("subject"+claims.getSubject());
        System.out.println("issuedAt"+claims.getIssuedAt());
    }

假如把盐值改了或者把token改了,会发现运行时就会报错,所有解析token的过程也是验证token的过程

3.Token过期校验
有很多时候,我们并不希望签发的token是永久生效的,所以我们可以为token添加一个过期时间。原因:从服务器发出的token,服务器自己并不做记录,就存在一个弊端:服务端无法主动控制某个token的立刻失效。
代码编写
    @Test
    public void test(){
        //创建一个JwtBuilder对象
        JwtBuilder jwtBuilder = Jwts.builder()
                .setId("666")
                .setSubject("luoxue")
                .setIssuedAt(new Date())
                .setExpiration(new Date(System.currentTimeMillis()+60*1000)) //设置过期时间
                .signWith(SignatureAlgorithm.HS256,"luoxue");

        String token = jwtBuilder.compact();
        System.out.println(token);

        //分别解密
        System.out.println("开始解密");
        String[] split = token.split("\\.");
        System.out.println(Base64Codec.BASE64.decodeToString(split[0]));
        System.out.println(Base64Codec.BASE64.decodeToString(split[1]));
        System.out.println(Base64Codec.BASE64.decodeToString(split[2]));

    }
当过期了以后,再解析token

4.自定义Claims
我们刚才的例子只是存储了id和subject两个信息,如果你想存储更多的信息(例如角色)可以自定义claims
(1)加密代码
    @Test
    public void test(){
        //创建一个JwtBuilder对象
        JwtBuilder jwtBuilder = Jwts.builder()
                .setId("666")
                .setSubject("luoxue")
                .setIssuedAt(new Date())
                .setExpiration(new Date(System.currentTimeMillis()+60*1000))
                .claim("roles","admin")
                .claim("avatar","avatar.jpg")
                .signWith(SignatureAlgorithm.HS256,"luoxue");

        String token = jwtBuilder.compact();
        System.out.println(token);

        //分别解密
        System.out.println("开始解密");
        String[] split = token.split("\\.");
        System.out.println(Base64Codec.BASE64.decodeToString(split[0]));
        System.out.println(Base64Codec.BASE64.decodeToString(split[1]));
        System.out.println(Base64Codec.BASE64.decodeToString(split[2]));

    }
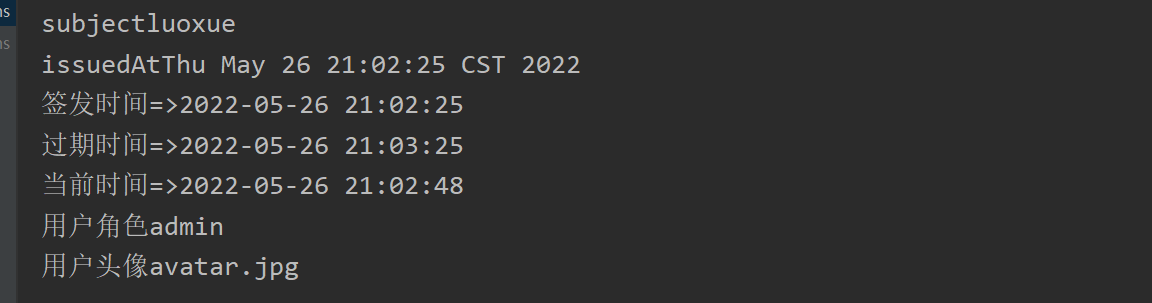
(2)解密代码
  @Test
    public void test2(){
        String token = "eyJhbGciOiJIUzI1NiJ9.eyJqdGkiOiI2NjYiLCJzdWIiOiJsdW94dWUiLCJpYXQiOjE2NTM1NzAxNDUsImV4cCI6MTY1MzU3MDIwNSwicm9sZXMiOiJhZG1pbiIsImF2YXRhciI6ImF2YXRhci5qcGcifQ.hjEK7BagqIEDOj-rMZhowoewDth-uSRKdjqXDDPbJOg";
        Claims claims = Jwts.parser()
                .setSigningKey("luoxue")
                .parseClaimsJws(token)
                .getBody();

        System.out.println("id:"+claims.getId());
        System.out.println("subject"+claims.getSubject());
        System.out.println("issuedAt"+claims.getIssuedAt());

        DateFormat sf = new SimpleDateFormat("yyyy-MM-dd HH:mm:ss");
        System.out.println("签发时间=>"+sf.format(claims.getIssuedAt()));
        System.out.println("过期时间=>"+sf.format(claims.getExpiration()));
        System.out.println("当前时间=>"+sf.format(new Date()));
        System.out.println("用户角色"+claims.get("roles"));
        System.out.println("用户头像"+claims.get("avatar"));
    }
(3)运行结果:
6.3 Spring Security OAuth2 整合JWT
说了那么多,其实都是为了我们先了解下jwt的组成和概念,方便我们Spring Security OAuth2 整合JWT
代码这里不新建项目,采用上边的Spring Security OAuth2 四种模式讲解的demo
6.3.1 实战
1.引入jwt依赖
        <dependency>
            <groupId>org.springframework.security</groupId>
            <artifactId>spring-security-jwt</artifactId>
            <version>1.0.9.RELEASE</version>
        </dependency>
2.添加jwt配置
/**
 * 采用Jwt存储Token配置
 * @author wcy
 */
@Configuration
public class JwtTokenStoreConfig {

    @Bean
    public TokenStore jwtTokenStore(){
        return new JwtTokenStore(jwtAccessTokenConverter());
    }

    @Bean
    public JwtAccessTokenConverter jwtAccessTokenConverter(){
        JwtAccessTokenConverter accessTokenConverter = new
                JwtAccessTokenConverter();
        //配置JWT使用的秘钥
        accessTokenConverter.setSigningKey("123123"); //和授权服务器的secret保持一致
        return accessTokenConverter;
    }


}
3.修改授权服务器配置
    @Autowired
    @Qualifier("jwtTokenStore")
    private TokenStore tokenStore;

    @Autowired
    private JwtAccessTokenConverter jwtAccessTokenConverter;


	    @Override
    public void configure(AuthorizationServerEndpointsConfigurer endpoints) throws Exception {
        //配置JWT的内容增强器


        endpoints.authenticationManager(authenticationManagerBean) //使用密码模式需要配置
                .tokenStore(tokenStore)  //配置存储令牌策略
                .accessTokenConverter(jwtAccessTokenConverter)
                //.tokenEnhancer(enhancerChain) //配置tokenEnhancer
                .reuseRefreshTokens(false)  //refresh_token是否重复使用
                .userDetailsService(userService) //刷新令牌授权包含对用户信息的检查
                .allowedTokenEndpointRequestMethods(HttpMethod.GET,HttpMethod.POST); //支持GET,POST请求
    }
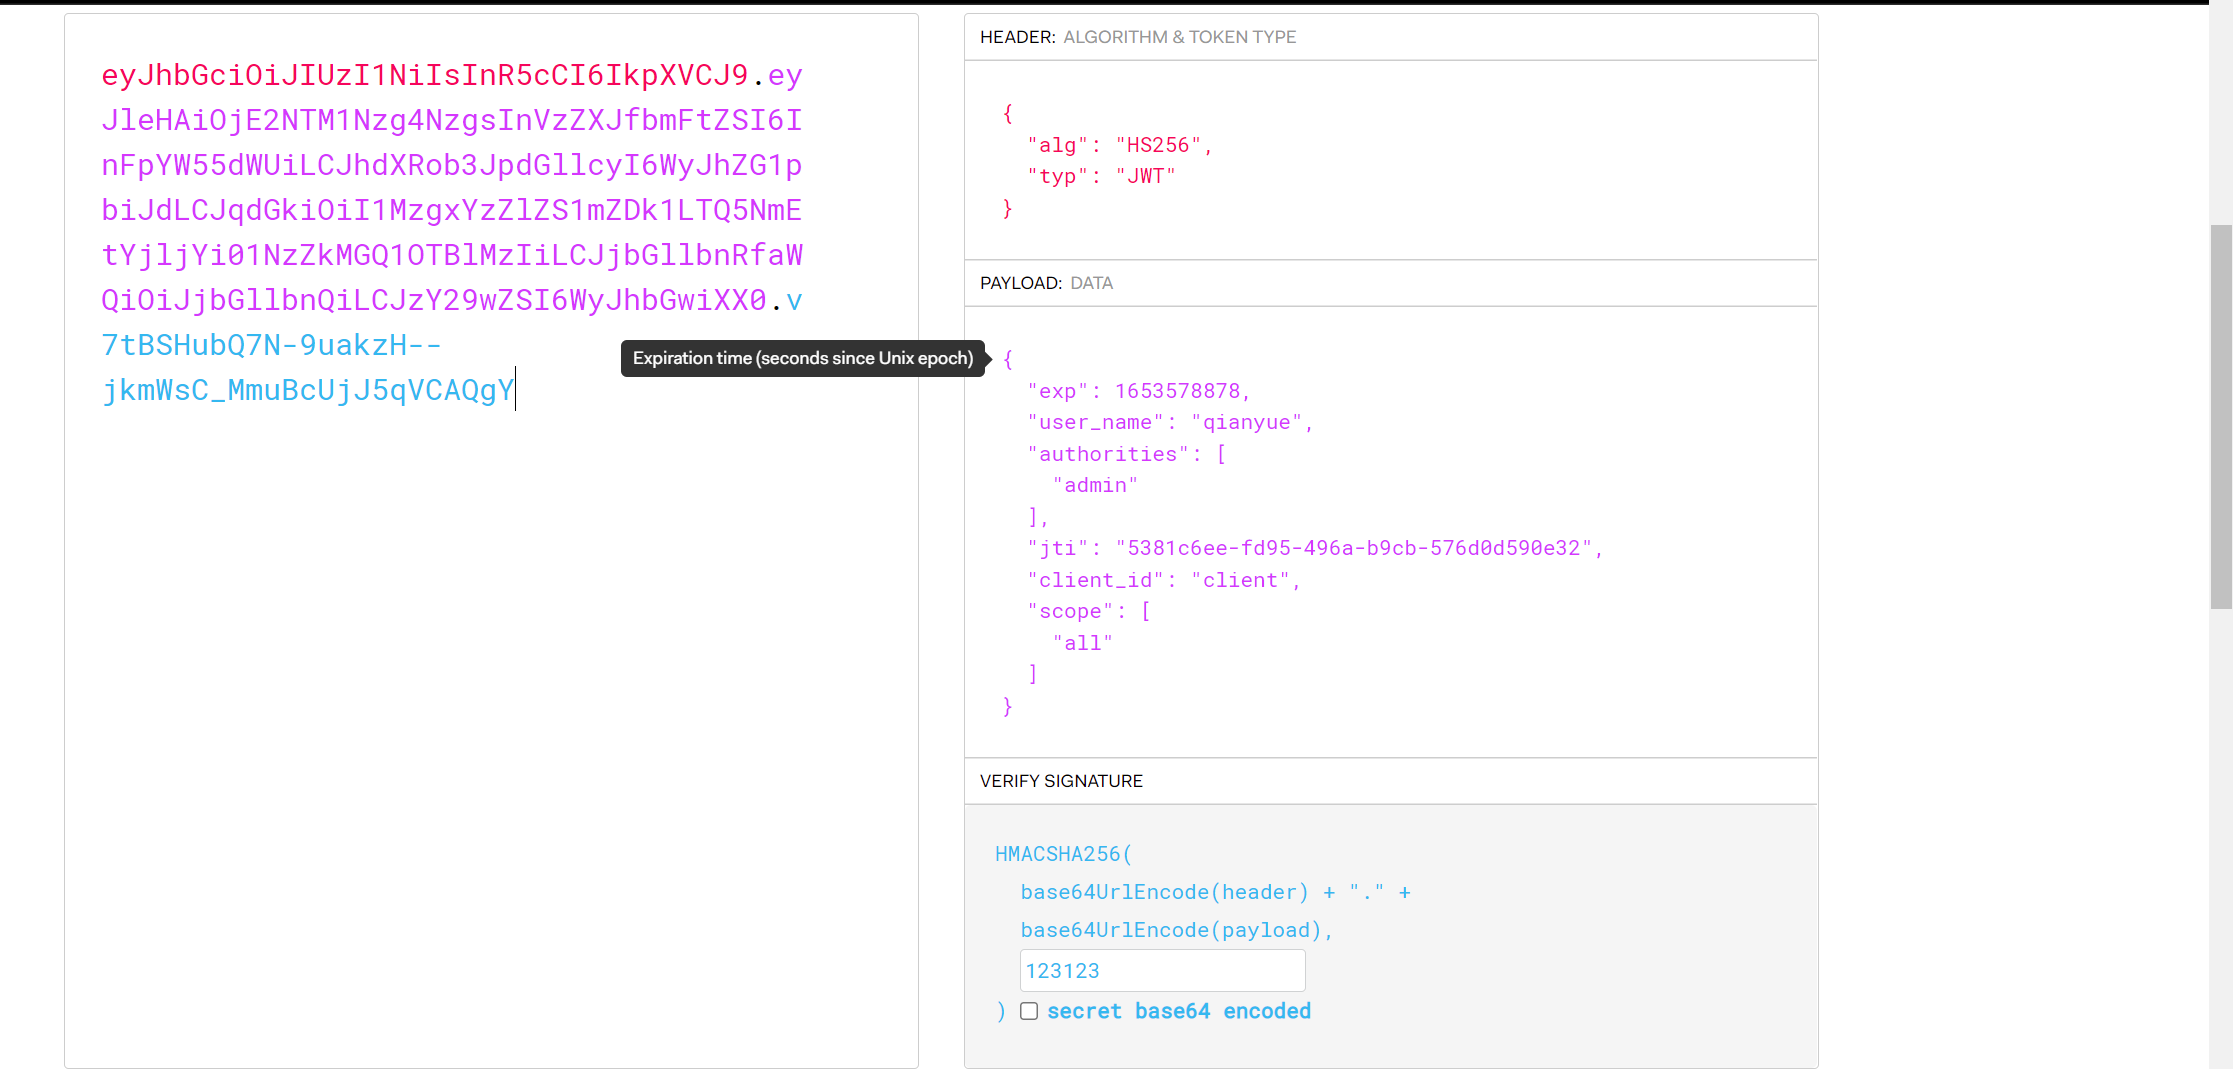
4.测试密码模式 访问http://localhost:8080/oauth/token 拿到我们的token信息

5.访问资源 访问http://localhost:8080/user/getCurrentUser
6.把Token放在jwt官网看下
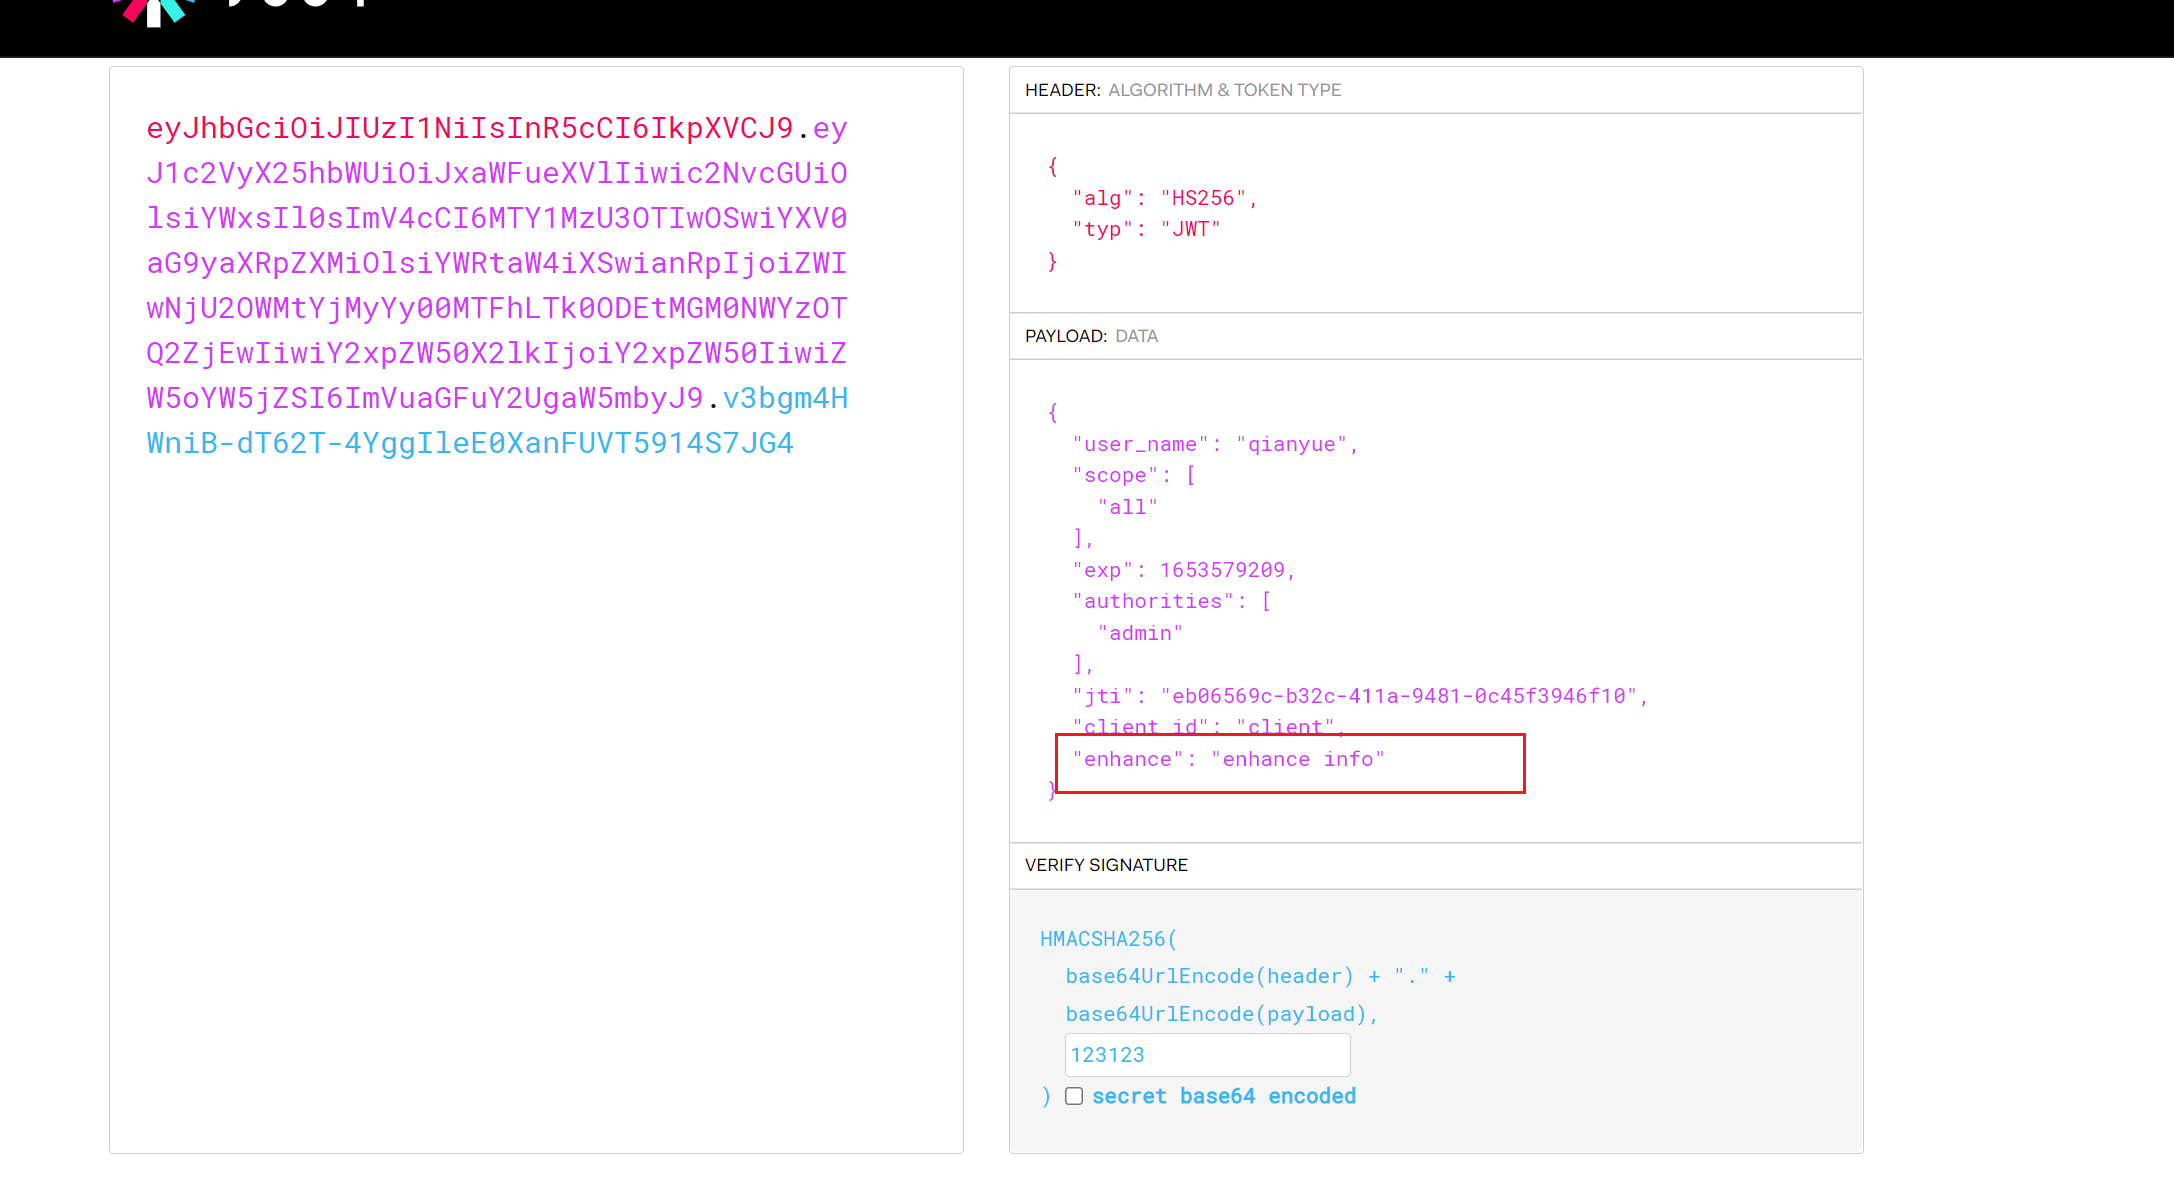
6.3.2 扩展Jwt存储内容
有时候我们需要扩展JWT中存储的内容,这里我们在JWT中扩展一个 key为enhance,value为enhance info 的数据。
1.继承TokenEnhancer实现一个JWT内容增强器
/**
 *jwt内容增强器
 * @author wcy
 */
public class JwtTokenEnhancer implements TokenEnhancer {
    @Override
    public OAuth2AccessToken enhance(OAuth2AccessToken oAuth2AccessToken, OAuth2Authentication oAuth2Authentication) {
        Map<String, Object> info = new HashMap<>();
        info.put("enhance", "enhance info");
        ((DefaultOAuth2AccessToken) oAuth2AccessToken).setAdditionalInformation(info);
        return oAuth2AccessToken;
    }
}
2.添加到Spring容器中
    @Bean
    public JwtTokenEnhancer jwtTokenEnhancer() {
        return new JwtTokenEnhancer();
    }
3.修改授权服务配置
/**
 * 授权服务器
 * @author wcy
 */
@Configuration
@EnableAuthorizationServer
public class AuthorizationServerConfig2 extends AuthorizationServerConfigurerAdapter {

    @Autowired
    private PasswordEncoder passwordEncoder;

    @Autowired
    private AuthenticationManager authenticationManagerBean;

    @Autowired
    private UserService userService;

    @Autowired
    @Qualifier("jwtTokenStore")
    private TokenStore tokenStore;

    @Autowired
    private JwtAccessTokenConverter jwtAccessTokenConverter;

    @Autowired
    private JwtTokenEnhancer jwtTokenEnhancer;

//    @Autowired
//    private JwtTokenEnhancer jwtTokenEnhancer;

    @Override
    public void configure(AuthorizationServerEndpointsConfigurer endpoints) throws Exception {
        //配置JWT的内容增强器
        //配置JWT的内容增强器
        TokenEnhancerChain enhancerChain = new TokenEnhancerChain();
        List<TokenEnhancer> delegates = new ArrayList<>();
        delegates.add(jwtTokenEnhancer);
        delegates.add(jwtAccessTokenConverter);
        enhancerChain.setTokenEnhancers(delegates);

        endpoints.authenticationManager(authenticationManagerBean) //使用密码模式需要配置
                .tokenStore(tokenStore)  //配置存储令牌策略
                .accessTokenConverter(jwtAccessTokenConverter)
                .tokenEnhancer(enhancerChain) //配置tokenEnhancer
                .reuseRefreshTokens(false)  //refresh_token是否重复使用
                .userDetailsService(userService) //刷新令牌授权包含对用户信息的检查
                .allowedTokenEndpointRequestMethods(HttpMethod.GET,HttpMethod.POST); //支持GET,POST请求
    }

    @Override
    public void configure(AuthorizationServerSecurityConfigurer security) throws Exception {
        //允许表单认证
        security.allowFormAuthenticationForClients();
    }

    @Override
    public void configure(ClientDetailsServiceConfigurer clients) throws Exception {

        /**
         *授权码模式
         *http://localhost:8080/oauth/authorize?response_type=code&client_id=client&redirect_uri=http://www.baidu.com&scope=all
         *http://localhost:8080/oauth/authorize?response_type=code&client_id=client
         *
         * password模式
         *  http://localhost:8080/oauth/token?username=fox&password=123456&grant_type=password&client_id=client&client_secret=123123&scope=all
         *
         *
         *
         *  刷新令牌
         *  http://localhost:8080/oauth/token?grant_type=refresh_token&client_id=client&client_secret=123123&refresh_token=[refresh_token值]
         */

        clients.inMemory()
                //配置client_id
                .withClient("client")
                //配置client-secret
                .secret(passwordEncoder.encode("123123"))
                //配置访问token的有效期
                .accessTokenValiditySeconds(3600)
                //配置刷新token的有效期
                .refreshTokenValiditySeconds(864000)
                //配置redirect_uri,用于授权成功后跳转
                .redirectUris("http://www.baidu.com")
                //配置申请的权限范围
                .scopes("all")
                /**
                 * 配置grant_type,表示授权类型
                 * authorization_code: 授权码
                 * password: 密码
                 * client_credentials: 客户端
                 * refresh_token: 更新令牌
                 */
                .authorizedGrantTypes("authorization_code","password","refresh_token");
    }
}
4.获取令牌 访问http://localhost:8080/oauth/token

5.把令牌放在jwt官网解析 可以看到拿到了我们的信息。
7.Spring Security OAuth2实现SSO
新建一个module oauth2-sso-demo
1.引入依赖
 <dependencies>
        <dependency>
            <groupId>org.springframework.boot</groupId>
            <artifactId>spring-boot-starter-web</artifactId>
        </dependency>

        <dependency>
            <groupId>org.springframework.cloud</groupId>
            <artifactId>spring-cloud-starter-oauth2</artifactId>
        </dependency>

        <!--JWT依赖-->
        <dependency>
            <groupId>io.jsonwebtoken</groupId>
            <artifactId>jjwt</artifactId>
            <version>0.9.1</version>
        </dependency>

        <dependency>
            <groupId>org.springframework.boot</groupId>
            <artifactId>spring-boot-starter-test</artifactId>
            <scope>test</scope>
        </dependency>

    </dependencies>
2.修改yaml配置
server:
  port: 8001
  servlet:
    session:
      cookie:
        name: OAUTH2-CLIENT-SESSIONID${server.port} #防止Cookie冲突,冲突会导致登录验证不通过
oauth2-server-url: http://localhost:8080
security:
  oauth2:
    client:
      client-id: client
      client-secret: 123123
      user-authorization-uri: ${oauth2-server-url}/oauth/authorize
      access-token-uri: ${oauth2-server-url}/oauth/token
    resource:
      jwt:
        key-uri: ${oauth2-server-url}/oauth/token_key
3.添加启动类
需要添加@EnableOAuth2Sso注解
@EnableOAuth2Sso单点登录的原理简单来说就是:标注有@EnableOAuth2Sso的OAuth2 Client应用在通过某种 OAuth2授权流程获取访问令牌后(一般是授权码流程),通过访问令牌访问userDetails用户明细这个受保护资源服务, 获取用户信息后,将用户信息转换为Spring Security上下文中的认证后凭证Authentication,从而完成标注有 @EnableOAuth2Sso的OAuth2 Client应用自身的登录认证的过程。整个过程是基于OAuth2的SSO单点登录
@SpringBootApplication
@EnableOAuth2Sso
public class SsoApplication8001 {

    public static void main(String[] args) {
        SpringApplication.run(SsoApplication8001.class,args);
    }
}
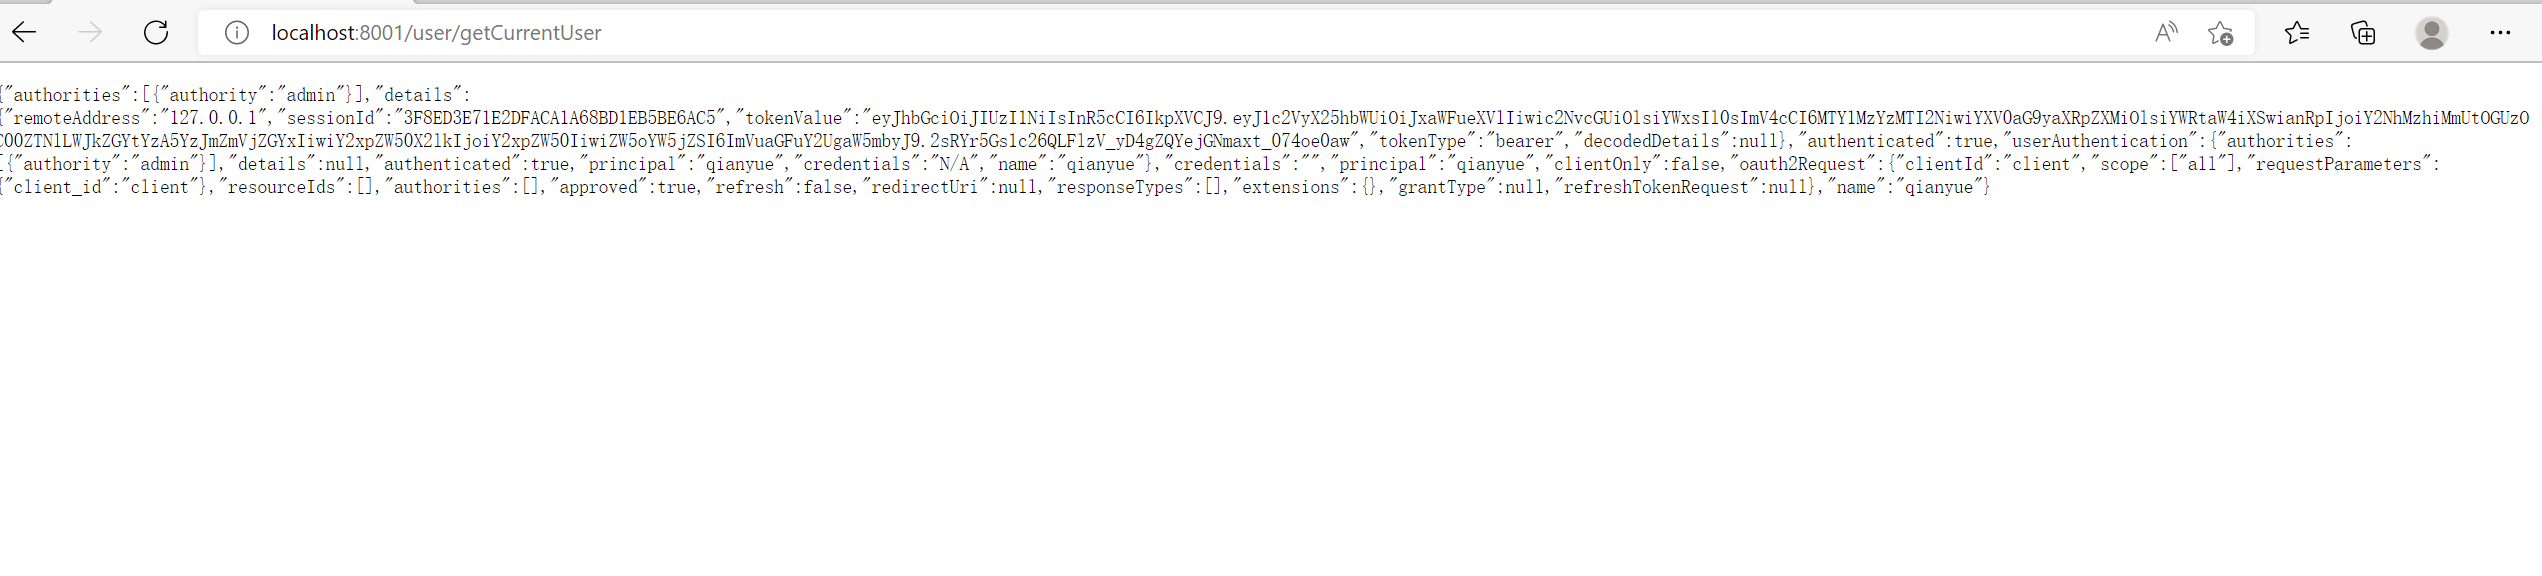
4.添加接口获取用户信息
@RestController
@RequestMapping("/user")
public class UserController {

    @RequestMapping("/getCurrentUser")
    public Object getCurrentUser(Authentication authentication) {
        return authentication;
    }

}
5.单独设置一个接口
@RestController
public class IndexController {

    @RequestMapping("/")
    public String index(){
        return "sso index ";
    }
}
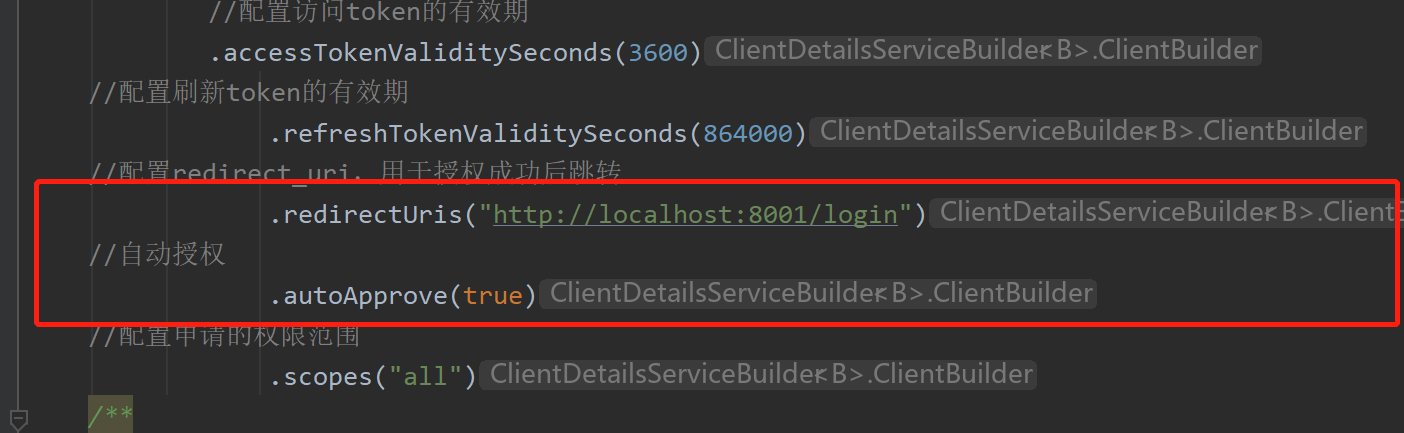
6.修改认证服务
把自动认证和回调地址改为要访问资源的地址
/**
 * 授权服务器
 * @author wcy
 */
@Configuration
@EnableAuthorizationServer
public class AuthorizationServerConfig2 extends AuthorizationServerConfigurerAdapter {

    @Autowired
    private PasswordEncoder passwordEncoder;

    @Autowired
    private AuthenticationManager authenticationManagerBean;

    @Autowired
    private UserService userService;

    @Autowired
    @Qualifier("jwtTokenStore")
    private TokenStore tokenStore;

    @Autowired
    private JwtAccessTokenConverter jwtAccessTokenConverter;

    @Autowired
    private JwtTokenEnhancer jwtTokenEnhancer;


    @Override
    public void configure(AuthorizationServerEndpointsConfigurer endpoints) throws Exception {
        //配置JWT的内容增强器
        //配置JWT的内容增强器
        TokenEnhancerChain enhancerChain = new TokenEnhancerChain();
        List<TokenEnhancer> delegates = new ArrayList<>();
        delegates.add(jwtTokenEnhancer);
        delegates.add(jwtAccessTokenConverter);
        enhancerChain.setTokenEnhancers(delegates);

        endpoints.authenticationManager(authenticationManagerBean) //使用密码模式需要配置
                .tokenStore(tokenStore)  //配置存储令牌策略
                .accessTokenConverter(jwtAccessTokenConverter)
                .tokenEnhancer(enhancerChain) //配置tokenEnhancer
                .reuseRefreshTokens(false)  //refresh_token是否重复使用
                .userDetailsService(userService) //刷新令牌授权包含对用户信息的检查
                .allowedTokenEndpointRequestMethods(HttpMethod.GET,HttpMethod.POST); //支持GET,POST请求
    }

    @Override
    public void configure(AuthorizationServerSecurityConfigurer security) throws Exception {
        //允许表单认证
        security.allowFormAuthenticationForClients()
                .tokenKeyAccess("isAuthenticated()");

    }

    @Override
    public void configure(ClientDetailsServiceConfigurer clients) throws Exception {

        /**
         *授权码模式
         *http://localhost:8080/oauth/authorize?response_type=code&client_id=client&redirect_uri=http://www.baidu.com&scope=all
         *http://localhost:8080/oauth/authorize?response_type=code&client_id=client
         *
            * password模式
         *  http://localhost:8080/oauth/token?username=fox&password=123456&grant_type=password&client_id=client&client_secret=123123&scope=all
            *
            *
            *
            *  刷新令牌
         *  http://localhost:8080/oauth/token?grant_type=refresh_token&client_id=client&client_secret=123123&refresh_token=[refresh_token值]
            */

            clients.inMemory()
            //配置client_id
            .withClient("client")
    //配置client-secret
                .secret(passwordEncoder.encode("123123"))
            //配置访问token的有效期
            .accessTokenValiditySeconds(3600)
    //配置刷新token的有效期
                .refreshTokenValiditySeconds(864000)
    //配置redirect_uri,用于授权成功后跳转
                .redirectUris("http://localhost:8001/login")
    //自动授权
                .autoApprove(true)
    //配置申请的权限范围
                .scopes("all")
    /**
     * 配置grant_type,表示授权类型
     * authorization_code: 授权码
     * password: 密码
     * client_credentials: 客户端
     * refresh_token: 更新令牌
     */
                .authorizedGrantTypes("authorization_code","password","refresh_token");
}
}
7.访问8001服务的任何一个接口都会让我们先认证
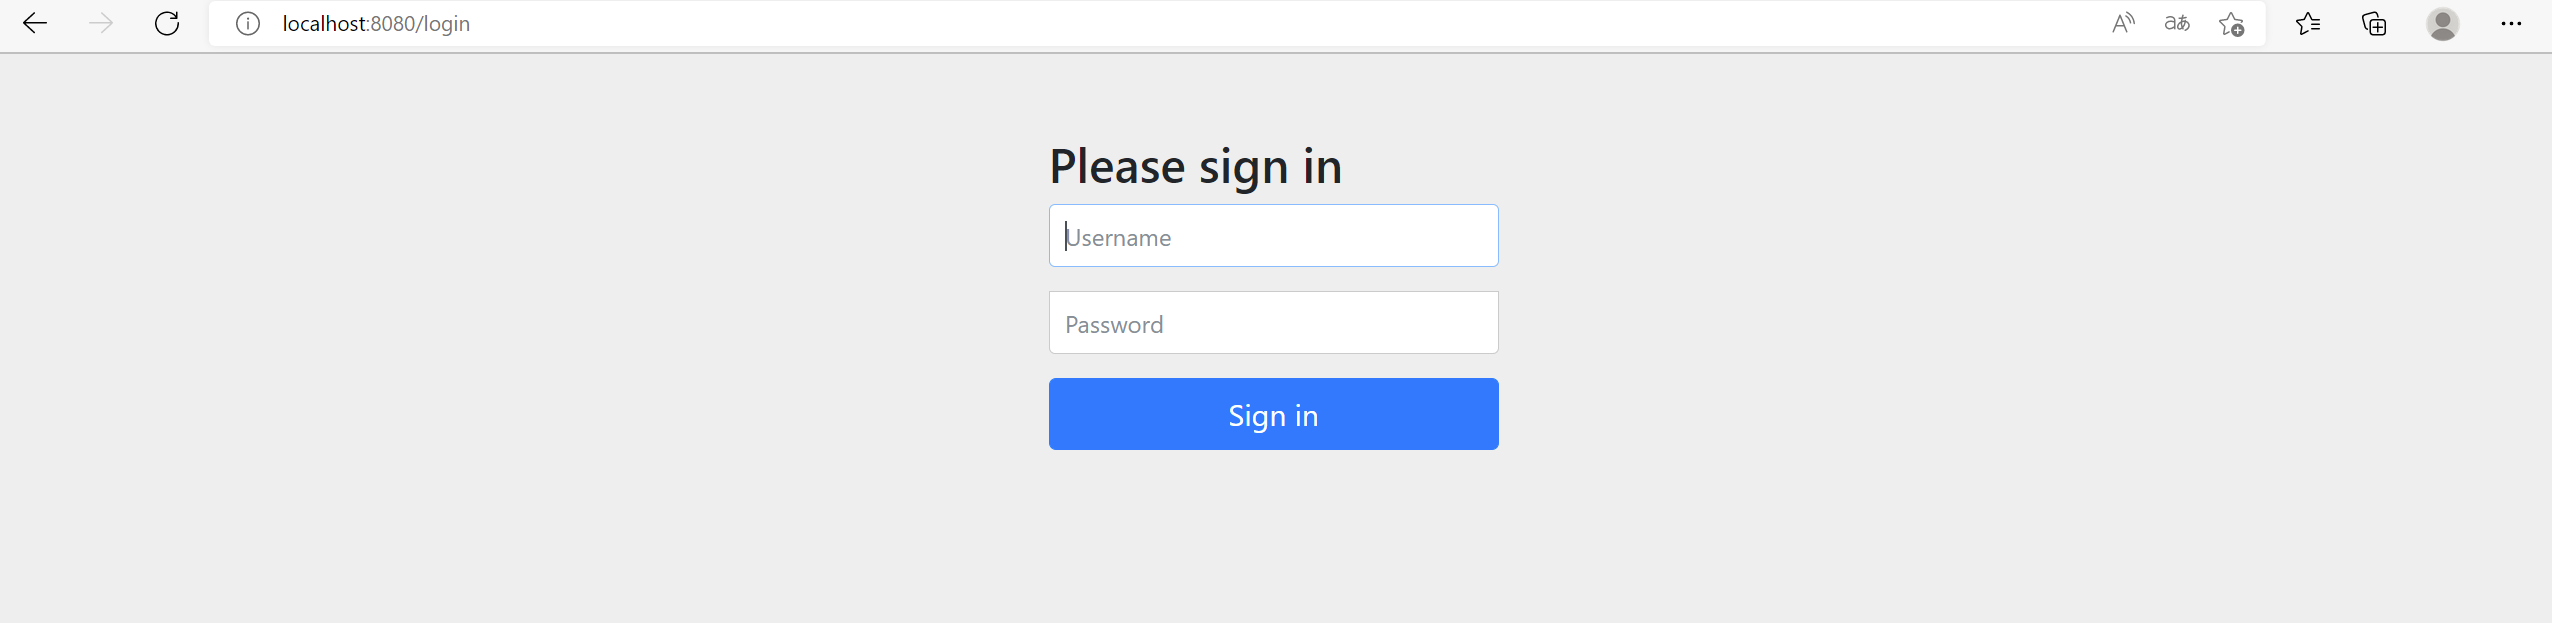
8.输入账号密码后 访问成功
9.访问localhost:8001 也无需重新认证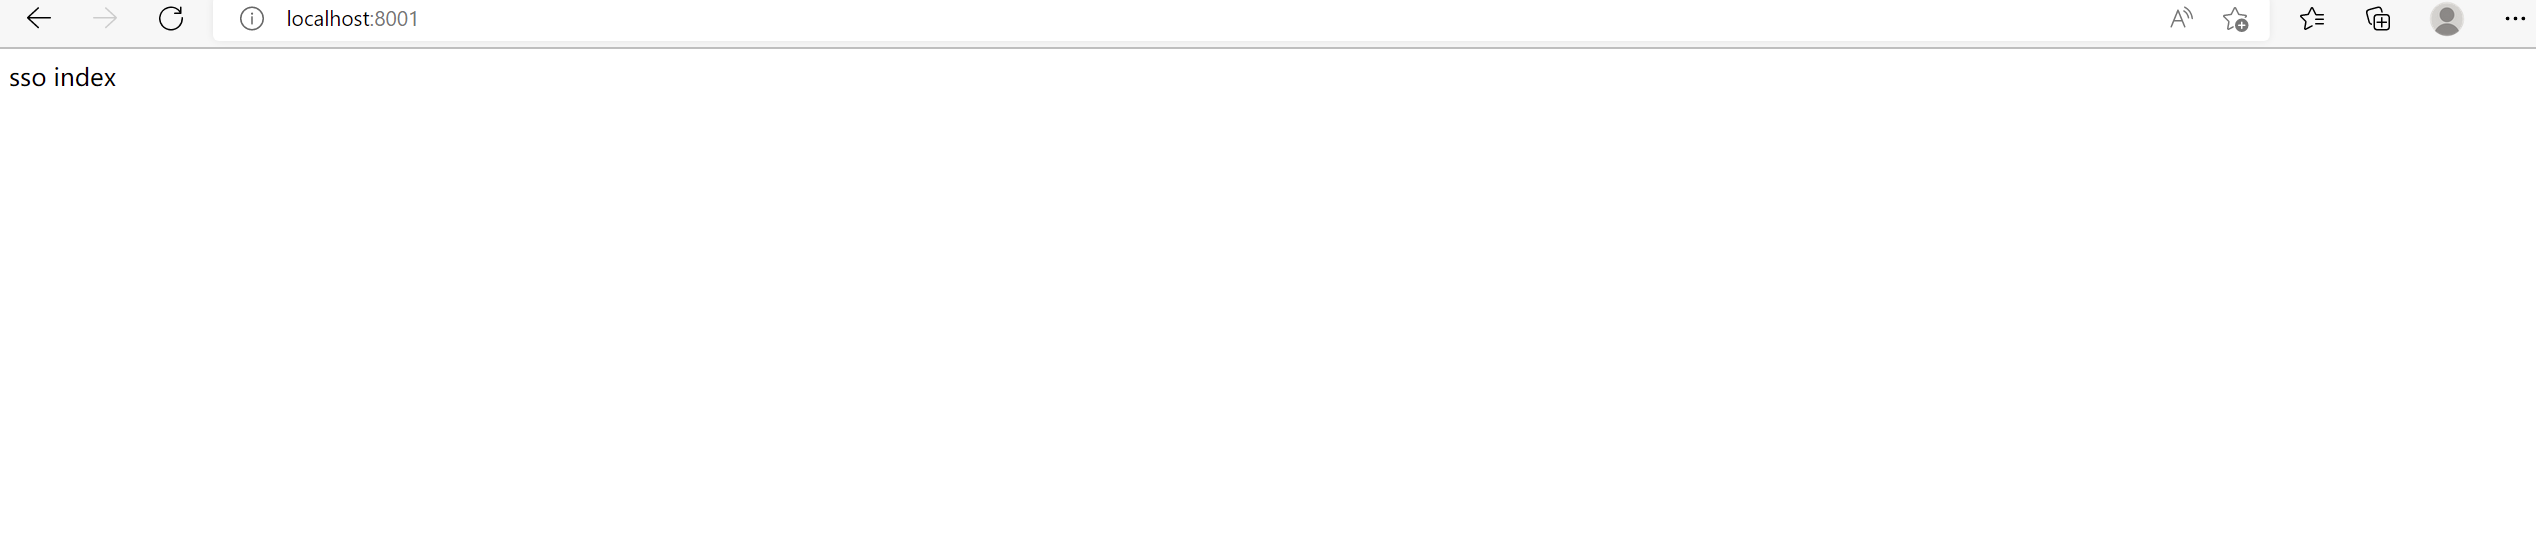
10.此时再启动8002服务(复制8001)访问localhost:8002 无需认证直接通过(在授权服务器再添加一个8002的回调地址http://localhost:8002/login)[外链图片转存失败,源站可能有防盗链机制,建议将图片保存下来直接上传(img-c6eMC2CT-1653653035289)(C:\Users\wcy\AppData\Roaming\Typora\typora-user-images\image-20220527130726336.png)]
11.说下踩的坑
如果我们回调地址设置了localhost方式,访问的时候也需要通过localhost访问,否则会报以下错误,我踩了半个小时才发现这种低级错误。


 474
474


 被折叠的 条评论
为什么被折叠?
被折叠的 条评论
为什么被折叠?
 到【灌水乐园】发言


