


一、申请证书
1.安装 Certbot 工具
Certbot 是一个由 Let’s Encrypt 提供的官方工具,用于自动化证书颁发和更新过程。首先需要添加 EPEL 库以获取 Certbot 包
sudo yum install epel-release
然后使用以下命令安装 Certbot
sudo yum install certbot python2-certbot-nginx
2.生成证书
使用 Certbot 工具生成证书。你需要运行 Certbot 命令,并提供一些必要的参数,如域名、网站的路径和验证方式
sudo certbot certonly --webroot -w /usr/share/nginx/html -d yourdomain.com --email youremail@example.com --agree-tos
- yourdomain.com 为你自己的域名,可以是二级域名
- -w 参数指定了网站的根目录,/usr/share/nginx/html是我nginx的index.html的文件路径
- –email 参数是你的电子邮件地址
- –agree-tos 参数表示你同意 Let’s Encrypt 的服务条款
注意,此时nginx应该为正常运行状态,访问域名80端口应该能正常显示界面,否则生成证书过程会报错。
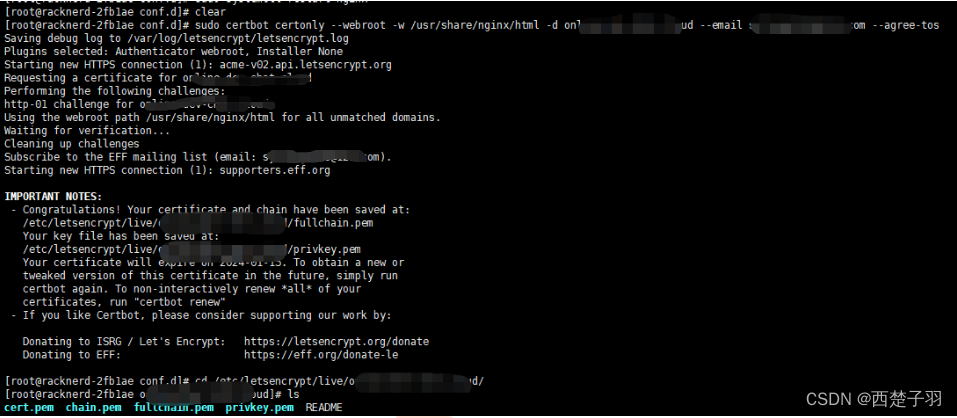 正常生成如上图,在/etc/letsencrypt/live/yourdomain.com/文件夹下会生成四个文件
- cert.pem
- chain.pem
- fullchain.pem
- privkey.pem
3.自动更新
Let’s Encrypt 的证书有效期只有90天,因此你需要设置自动更新证书的机制。Certbot 工具可以帮助你自动续期证书。你可以通过添加一个计划任务(cron job)来定期运行 Certbot 命令
sudo certbot renew --quiet
以 root 用户身份登录,输入以下命令来编辑 crontab 文件
crontab -e
在打开的 crontab 文件中,添加以下一行来设置定时任务,表示每周日的午夜(0 点 0 分)执行 certbot renew --quiet 命令
0 0 * * 0 certbot renew --quiet
你也可以根据需要自定义定时任务的执行时间
* * * * *
│ │ │ │ │
│ │ │ │ └─ 星期几(0 - 7)(星期日为 0 或 7)
│ │ │ └─── 月份中的日期(1 - 31)
│ │ └───── 月份(1 - 12)
│ └─────── 小时(0 - 23)
└───────── 分钟(0 - 59)
二、安装证书
1.修改nginx配置
在你的nginx配置文件中添加以下配置
server {
        #SSL 访问端口号为 443
        listen 443 ssl;
        #填写绑定证书的域名
        server_name yourdomain.com;
        #证书文件名称
        ssl_certificate /etc/letsencrypt/live/online.dev-chat.cloud/fullchain.pem;
        #私钥文件名称
        ssl_certificate_key /etc/letsencrypt/live/yourdomain.com/privkey.pem;
        ssl_session_timeout 5m;
        #请按照以下协议配置
        ssl_protocols TLSv1.2 TLSv1.3;
        #请按照以下套件配置,配置加密套件,写法遵循 openssl 标准。
        ssl_ciphers ECDHE-RSA-AES128-GCM-SHA256:HIGH:!aNULL:!MD5:!RC4:!DHE;
        ssl_prefer_server_ciphers on;
        location / {
           #网站主页路径。此路径仅供参考,具体请您按照实际目录操作。
           #例如,您的网站运行目录在/etc/www下,则填写/etc/www。
           # root /usr/share/nginx/html;
           # index  index.html index.htm;
		   proxy_pass 127.0.0.1:8080;
        }
    }
server {
    listen 80;
    #填写绑定证书的域名
    server_name 你的域名;
    #把http的域名请求转成https
    return 301 https://$host$request_uri;
}
注意几个要修改的地方
- yourdomain.com 修改成你的域名
- ssl_certificate 指定fullchain.pem文件路径
- ssl_certificate_key 指定privkey.pem文件路径
- proxy_pass 浏览器访问443端口时要代理的路径
2.验证配置并重启
修改完后验证配置文件是否正确,验证无误重启nginx
[root@racknerd-2fb1ae conf.d]# sudo nginx -t
nginx: the configuration file /etc/nginx/nginx.conf syntax is ok
nginx: configuration file /etc/nginx/nginx.conf test is successful
[root@racknerd-2fb1ae conf.d]# systemctl restart nginx
到这里整个过程就结束了,我们在浏览器访问我们的域名就可以发现已经变成了https
三、问题总结
1.nginx启动报错
通过输出nginx的日志文件查看相关日志
cat /var/log/nginx/error.log
2023/10/16 05:01:46 [emerg] 29204#29204: cannot load certificate “/home/nginx/ssl/cert.pem”: BIO_new_file() failed (SSL: error:0200100D:system library:fopen:Permission denied:fopen(‘/etc/letsencrypt/live/yourdomain.com/fullchain.pem’,‘r’) error:2006D002:BIO routines:BIO_new_file:system lib)
这个错误信息表示 NGINX 无法加载证书文件,出现这个错误的原因可能是以下几种情况之一
1.文件权限不正确:请确保 /etc/letsencrypt/live/yourdomain.com/fullchain.pem 文件及其父目录具有足够的权限,以便 NGINX 可以读取该文件。你可以使用以下命令查看文件的权限
ls -l /etc/letsencrypt/live/yourdomain.com/fullchain.pem
如果输出的所有者为root用户,那么这可能是导致权限被拒绝错误的原因之一,因为NGINX 进程通常以 nginx 用户和组的身份运行,这时我们就可以更改其权限
sudo chmod 644 /etc/letsencrypt/live/yourdomain.com/fullchain.pem
- 数字权限表示法中的 6 表示所有者拥有读取和写入权限(4+2),但没有执行权限(0)。
- 数字权限表示法中的 4 表示群组用户拥有读取权限,但没有写入和执行权限。
- 数字权限表示法中的 4 表示其他用户拥有读取权限,但没有写入和执行权限。
这将文件的权限设置为:所有者具有读取和写入权限,群组用户和其他用户只有读取权限。确保只有所有者可以修改该证书文件,而其他用户只能读取该文件的内容。
2.文件所有者不正确:请确保 /etc/letsencrypt/live/yourdomain.com/fullchain.pem 文件的所有者是 NGINX 进程所运行的用户。你可以使用以下命令查看文件的所有者
ls -l /etc/letsencrypt/live/yourdomain.com/fullchain.pem
并使用 chown 命令更改文件的所有者
sudo chown nginx:nginx /etc/letsencrypt/live/yourdomain.com/fullchain.pem
3.目录权限不正确:请确保 /etc/letsencrypt/live/yourdomain.com/目录及其父目录具有足够的权限,以允许 NGINX 进程访问该目录。你可以使用以下命令查看目录的权限
ls -l /etc/letsencrypt/live/yourdomain.com/fullchain.pem
并使用 chmod 命令更改目录的权限
sudo chmod 755 /etc/letsencrypt/live/yourdomain.com/fullchain.pem
- 数字权限表示法中的 7 表示所有者拥有读取、写入和执行权限(4+2+1)。
- 数字权限表示法中的 5 表示群组用户拥有读取和执行权限,但没有写入权限(4+1)。
- 数字权限表示法中的 5 表示其他用户拥有读取和执行权限,但没有写入权限(4+1)。
文件的权限设置为:所有者具有读取、写入和执行权限,群组用户和其他用户只有读取和执行权限。
4.SELinux 引起的权限问题:如果你的系统启用了 SELinux,并且 SELinux 的安全策略限制了NGINX 对该文件的访问。
首先,通过以下命令确认 SELinux 的状态,如果输出结果中的 SELinux status 为 enabled,则表示 SELinux 已启用
sestatus
然后检查 NGINX 是否被允许访问 SSL 证书。运行以下命令如果输出结果中包含类似system_u:object_r:httpd_sys_content_t:s0 的标签信息,则表示 SELinux 正确配置。如果标签信息为 unlabeled_t 或其他内容,则需要进行设置。
sudo ls -Z /etc/letsencrypt/live/yourdomain.com/fullchain.pem
接着将证书文件的 SELinux 标签设置为适当的类型。运行以下命令:
sudo chcon -Rv --type=httpd_sys_content_t /etc/letsencrypt/live/yourdomain.com/fullchain.pem
这将把 /home/nginx/ssl/cert.pem 文件及其子目录和文件的 SELinux 标签设置为 httpd_sys_content_t 类型,使 NGINX 可以访问该文件。
最后重新启动 NGINX 服务
sudo systemctl restart nginx
2.nginx配置无误访问Bad Gateway
如果碰到nginx代理端口配置文件无误但是浏览器访问502 Bad Gateway可以参考我这篇文章
nginx代理端口配置文件无误但是浏览器访问502 Bad Gateway


 1350
1350

 被折叠的 条评论
为什么被折叠?
被折叠的 条评论
为什么被折叠?
 到【灌水乐园】发言


