


分享一下我老师大神的人工智能教程!零基础,通俗易懂!http://blog.csdn.net/jiangjunshow
也欢迎大家转载本篇文章。分享知识,造福人民,实现我们中华民族伟大复兴!
本文来自http://blog.csdn.net/hellogv/
上一篇文章,主要将如何UI设计器设计TableLayout + TableRow,由于实际应用中,经常需要在代码里往TableLayout添加数据(9宫图也可以用TableLayout做出来),本文就是介绍这方面的简单使用方法。
main.xml的代码如下,用到TableLayout的ID为TableLayout01:
- <?xml version="1.0" encoding="utf-8"?>
- <LinearLayout xmlns:android="http://schemas.android.com/apk/res/android"
- android:orientation="vertical"
- android:layout_width="fill_parent"
- android:layout_height="fill_parent"
- >
- <TableLayout
- android:id="@+id/TableLayout01"
- android:layout_width="fill_parent"
- android:layout_height="wrap_content">
- </TableLayout>
- </LinearLayout>
JAVA代码如下:
- package com.LayoutDemo;
- import com.LayoutDemo.R;
- import android.app.Activity;
- import android.os.Bundle;
- import android.view.ViewGroup;
- import android.widget.TableLayout;
- import android.widget.TableRow;
- import android.widget.TextView;
- public class LayoutDemo extends Activity {
- /** Called when the activity is first created. */
- private final int WC = ViewGroup.LayoutParams.WRAP_CONTENT;
- private final int FP = ViewGroup.LayoutParams.FILL_PARENT;
- @Override
- public void onCreate(Bundle savedInstanceState) {
- super.onCreate(savedInstanceState);
- setContentView(R.layout.main);
- //新建TableLayout01的实例
- TableLayout tableLayout = (TableLayout)findViewById(R.id.TableLayout01);
- //全部列自动填充空白处
- tableLayout.setStretchAllColumns(true);
- //生成10行,8列的表格
- for(int row=0;row<10;row++)
- {
- TableRow tableRow=new TableRow(this);
- for(int col=0;col<8;col++)
- {
- //tv用于显示
- TextView tv=new TextView(this);
- tv.setText("("+col+","+row+")");
- tableRow.addView(tv);
- }
- //新建的TableRow添加到TableLayout
- tableLayout.addView(tableRow, new TableLayout.LayoutParams(FP, WC));
- }
- }
- }
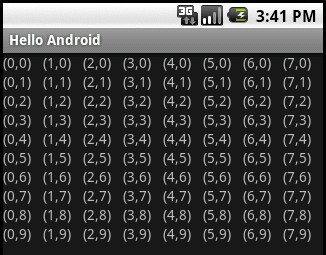
结果如下图:
给我老师的人工智能教程打call!http://blog.csdn.net/jiangjunshow


 830
830

 被折叠的 条评论
为什么被折叠?
被折叠的 条评论
为什么被折叠?
 到【灌水乐园】发言


