Numpy实现卷积神经网络前向运算

首先是卷积运算

卷积运算

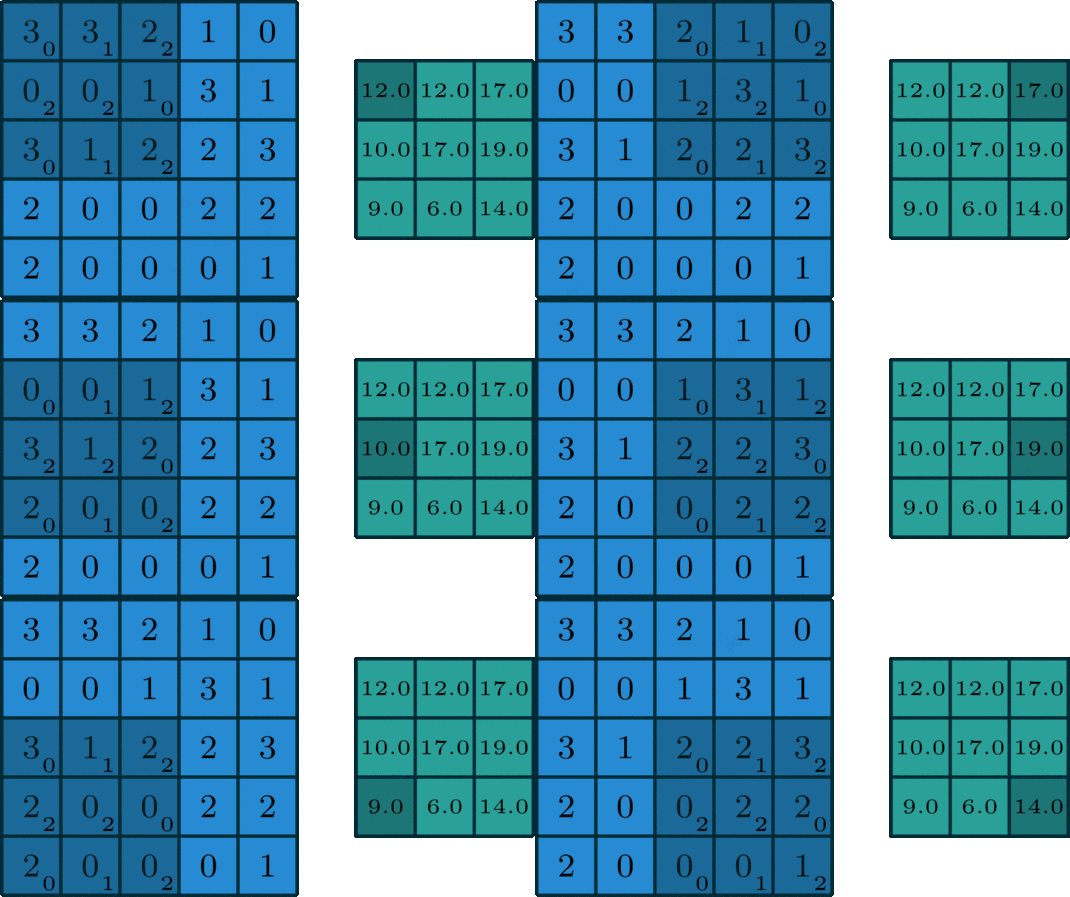
在numpy中通过im2col算法实现。

im2col

通过将输入,卷积核拉平做矩阵乘法,得到输出。

import numpy as np


def im2col(image, size, stride=1):
    N, H, W, C = image.shape
    out_h = (H - size) // stride + 1
    out_w = (W - size) // stride + 1

    col = np.zeros((N * out_h * out_w, size * size * C))
    out_size = out_h * out_w
    for h in range(out_h):
        h_start = h*stride
        h_end = h_start + size
        h_next = h*out_w
        for w in range(out_w):
            w_start = w*stride
            w_end = w_start + size
            col[h_next+w::out_size, :] = image[:, h_start:h_end, w_start:w_end, :].reshape(N, -1)
    return col


def conv_forward(X, W, stride=1, padding='same'):
    filters, size, size, C = W.shape
    if padding == 'same':
        p = size // 2
        X = np.pad(X, ((0, 0), (p, p), (p, p), (0, 0)), 'constant')

    N, H_input, W_input, C = X.shape
    col = im2col(X, size, stride)
    logit = np.dot(col, W.reshape(W.shape[0], -1).transpose())
    logit = logit.reshape((N, logit.shape[0] // N, -1))
    out_h = (H_input - size) // stride + 1
    return np.reshape(logit, (N, out_h, -1, filters))


def pooling(X, pool_size, stride=2, pooling='max'):
    N, H_input, W_input, C = X.shape
    # [N*out_size, pool_size*pool_size*C]
    col = im2col(X, pool_size, stride)
    col = col.reshape((col.shape[0], C, -1))
    out_h = (H_input - pool_size) // stride + 1
    if pooling == 'max':
        max_out = np.zeros((col.shape[0], C, 1))
        for row in range(col.shape[0]):
            for c in range(C):
                max_out[row, c, :] = np.max(col[row, c])
        return max_out.reshape((N, out_h, -1, C))
    elif pooling == 'avg':
        avg_out = np.zeros((col.shape[0], C, 1))
        for row in range(col.shape[0]):
            for c in range(C):
                avg_out[row, c, :] = np.average(col[row, c])
        return avg_out.reshape((N, out_h, -1, C))


def main():
    x_data = np.random.randn(10, 224, 224, 3)
    w = np.random.randn(16, 3, 3, 3)
    logit = conv_forward(x_data, w)


if __name__ == '__main__':
    main()


  • 0
    点赞
  • 0
    收藏
    觉得还不错? 一键收藏
  • 0
    评论
### 回答1: 在 Python 中实现卷积神经网络需要使用一些工具,例如 NumPy 库来进行矩阵运算和 TensorFlow 或 PyTorch 库来构建和训练模型。 要使用 TensorFlow 实现卷积神经网络,首先需要安装 TensorFlow 库,然后可以使用其中的函数和类来构建模型。 例如,下面是一个简单的卷积神经网络的示例代码: ```python import tensorflow as tf # 输入数据 input_data = tf.placeholder(tf.float32, [None, 28, 28, 1]) # 第一层卷积 conv1 = tf.layers.conv2d(input_data, 32, (5, 5), activation=tf.nn.relu) # 第一层池化 pool1 = tf.layers.max_pooling2d(conv1, (2, 2), (2, 2)) # 第二层卷积 conv2 = tf.layers.conv2d(pool1, 64, (5, 5), activation=tf.nn.relu) # 第二层池化 pool2 = tf.layers.max_pooling2d(conv2, (2, 2), (2, 2)) # 全连接层 fc1 = tf.layers.dense(tf.contrib.layers.flatten(pool2), 1024, activation=tf.nn.relu) # 输出层 output = tf.layers.dense(fc1, 10) ``` 在这段代码中,我们使用了 TensorFlow 中的卷积层、池化层和全连接层来构建卷积神经网络。 要训练模型,还需要定义损失函数、优化器和训练步骤。例如: ```python # 定义损失函数和优化器 loss = tf.loss ### 回答2: 卷积神经网络(Convolutional Neural Network,CNN)是一种常用于图像识别和计算机视觉任务的深度学习模型。Python提供了多个库和框架来实现卷积神经网络。 在Python中,最常用且流行的框架之一是TensorFlow。TensorFlow提供了丰富的功能以实现卷积神经网络。下面是一个简单的CNN实现步骤: 1. 导入所需的库和模块: ```python import tensorflow as tf from tensorflow.keras import datasets, layers, models ``` 2. 加载和预处理数据集: ```python (train_images, train_labels), (test_images, test_labels) = datasets.cifar10.load_data() train_images, test_images = train_images / 255.0, test_images / 255.0 ``` 3. 构建卷积神经网络模型: ```python model = models.Sequential() model.add(layers.Conv2D(32, (3, 3), activation='relu', input_shape=(32, 32, 3))) model.add(layers.MaxPooling2D((2, 2))) model.add(layers.Conv2D(64, (3, 3), activation='relu')) model.add(layers.MaxPooling2D((2, 2))) model.add(layers.Conv2D(64, (3, 3), activation='relu')) ``` 4. 添加全连接层和输出层: ```python model.add(layers.Flatten()) model.add(layers.Dense(64, activation='relu')) model.add(layers.Dense(10)) ``` 5. 编译和训练模型: ```python model.compile(optimizer='adam', loss=tf.keras.losses.SparseCategoricalCrossentropy(from_logits=True), metrics=['accuracy']) model.fit(train_images, train_labels, epochs=10, validation_data=(test_images, test_labels)) ``` 6. 预测和评估模型: ```python test_loss, test_acc = model.evaluate(test_images, test_labels, verbose=2) print('Test accuracy:', test_acc) ``` 这只是一个简单的例子,实际的卷积神经网络可能更加复杂,包括更多的卷积层、池化层和全连接层。通过调整模型的结构和参数,可以进一步优化CNN的性能。 除了TensorFlow,还有其他一些Python库和框架,如Keras、PyTorch和Caffe,也可以轻松实现卷积神经网络。每个库和框架都有自己的特点和优势,可以根据具体需求选择合适的工具。 ### 回答3: 卷积神经网络(Convolutional Neural Networks, CNN)是一种广泛应用于计算机视觉和图像识别任务的深度学习模型。Python提供了多种库和框架来实现卷积神经网络,其中最受欢迎的是TensorFlow和PyTorch。 使用Python实现卷积神经网络的一般步骤如下: 1. 数据准备:首先,需要准备用于训练和测试模型的数据集。可以使用Python的库(如NumPy和Pandas)来加载、处理和转换数据。 2. 模型搭建:在Python中,可以使用TensorFlow或PyTorch等库来定义卷积神经网络模型。首先,需要导入相关库,并创建一个模型对象。然后,可以通过添加各种层(如卷积层、池化层和全连接层)来构建模型结构。 3. 模型训练:训练卷积神经网络需要提供输入数据和相应的标签。可以使用Python的库来分割数据集为训练集和测试集,并在训练集上迭代多次以优化模型参数。通过调用模型对象的训练函数,可以实现模型的训练过程。 4. 模型评估:训练完成后,可以使用测试集数据来评估模型的性能。可以使用Python的库计算准确率和损失函数等指标。 5. 模型预测:训练好的卷积神经网络模型可以用于预测新的未知数据。通过使用训练好的模型对新数据进行前向传播,得到预测结果。 总之,Python是一种强大的编程语言,提供了多种库和框架来实现卷积神经网络。可以根据具体需求选择合适的库和框架,并按照上述步骤进行实现

“相关推荐”对你有帮助么?

  • 非常没帮助
  • 没帮助
  • 一般
  • 有帮助
  • 非常有帮助
提交
评论
添加红包

请填写红包祝福语或标题

红包个数最小为10个

红包金额最低5元

当前余额3.43前往充值 >
需支付:10.00
成就一亿技术人!
领取后你会自动成为博主和红包主的粉丝 规则
hope_wisdom
发出的红包
实付
使用余额支付
点击重新获取
扫码支付
钱包余额 0

抵扣说明:

1.余额是钱包充值的虚拟货币,按照1:1的比例进行支付金额的抵扣。
2.余额无法直接购买下载,可以购买VIP、付费专栏及课程。

余额充值