


1.1. 开发准备
当应用需要使用以下开放能力的一种或多种时,为正常调试运行应用,需要预先添加公钥指纹
- Account Kit(华为帐号服务)
- Call Kit(通话服务)
- Game Service Kit(游戏服务)
- Health Service Kit(运动健康服务)
- IAP Kit(应用内支付服务)
- Live View Kit(实况窗服务,当需要使用Push Kit时必须执行此步骤)
- Map Kit(地图服务)
- Payment Kit(华为支付服务)
- Push Kit(推送服务)
- Scan Kit(统一扫码服务)
1.1.1. 配置应用签名证书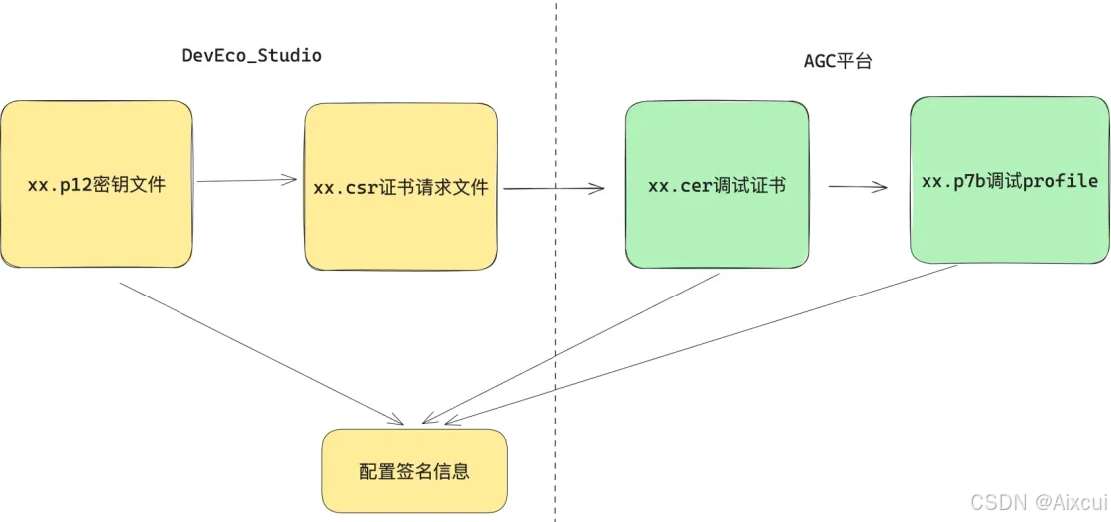
1.1.2. 在DevEco Studio工具侧生成密钥(.p12)和证书请求文件(.csr)
在主菜单栏单击Build(构建)-> Generate Key and CSR(生成私钥和证书请求文件)

选择要生成的文件目标位置并设置密码,填 Alias别名 以及First and last name之后,点击Next按钮

出现下面的弹框之后,填写CSR file文件目标位置之后,点击Finish按钮完成CSR文件创建
检查本地目录中,是否成功生成 .csr 和 .p12 文件
1.1.3. 申请调试证书
在AGC平台点击 用户与访问, 左侧点击证书管理,再点击还右侧新增证书 
在弹框中填写证书名称、选择证书类型为调试证书,选取我们在第一步生成的.csr文件,最后点击提交
会看到证书管理列表中多了一条记录![]()
最后我们点击下载按钮,把调试证书下载的本地,后来配置要用
1.1.4. 申请调试profile
进入AGC平台,点击我的项目进入到项目页,点击左侧HAP Provision Profile,点击右侧的添加按钮,弹出框内选择上一步生成的meikou_pre调试证书


点击下载按钮,把profile文件下载到本地
1.1.5. DevEco Studio工具中配置签名信息
点击文件->项目结构

点击“Signing Configs”页签。去除勾选的“Automatically generate signature”(如果是API 8和9工程,需同时勾选“Support HarmonyOS”),填写相关信息后,点击“OK”。
- Store File:密钥库文件,选择生成密钥和证书请求文件时生成的.p12文件
- Store Password:密钥库密码,需要与生成密钥和证书请求文件时设置的密钥库密码保持一致
- Key alias:密钥的别名信息,需要与生成密钥和证书请求文件时设置的别名保持一致
- Key password:密钥的密码,需要与生成密钥和证书请求文件时设置的密码保持一致
- Sign alg:固定设置为“SHA256withECDSA”
- Profile file:选择申请调试Profile时下载的.p7b文件
- Certpath file:选择申请调试证书时下载的.cer文件

1.1.6. 配置公钥指纹
- 登录AppGallery Connect,点击“我的项目”。
- 在项目列表中找到您的项目,在项目中点击您的应用/元服务。
- 在“项目设置 > 常规”页面的“应用”区域,点击“SHA256证书/公钥指纹”后的“添加公钥指纹(HarmonyOS API 9及以上)”

选择咱们添加的调试证书
- 在“选择SHA256公钥指纹”窗口,选择应用使用的证书对应的指纹,点击“确认”
1.2. 配置权限
1.2.1. 配置Client ID
把ClientId后面的数字复制一下,放到项目的module.json5文件中
"module": {
  "name": "xxx",
  "type": "entry",
  "description": "xxx",
  "mainElement": "xxx",
  "deviceTypes": [],
  "pages": "xxx",
  "abilities": [],
  "metadata": [ // 配置信息如下
    {
      "name": "client_id",
      "value": "xxx"
    }
  ]
}
1.2.2. scope权限申请
登录华为开发者联盟,选择管理中心->API服务->授权管理 ,选择目标应用的应用名称,服务选择“华为帐号服务”,选择“敏感权限”,再选择“获取您的手机号”或“获取并验证您的手机号”,点击“申请”

注:只要.p12 + .cer + .p7b三个文件保持不变,包名保持一致,任何新建项目都可以复用三个文件进行正常签名直接调试各种服务,无需重新走一遍流程
1.3. 实现华为授权登录
1.3.1. 实现流程图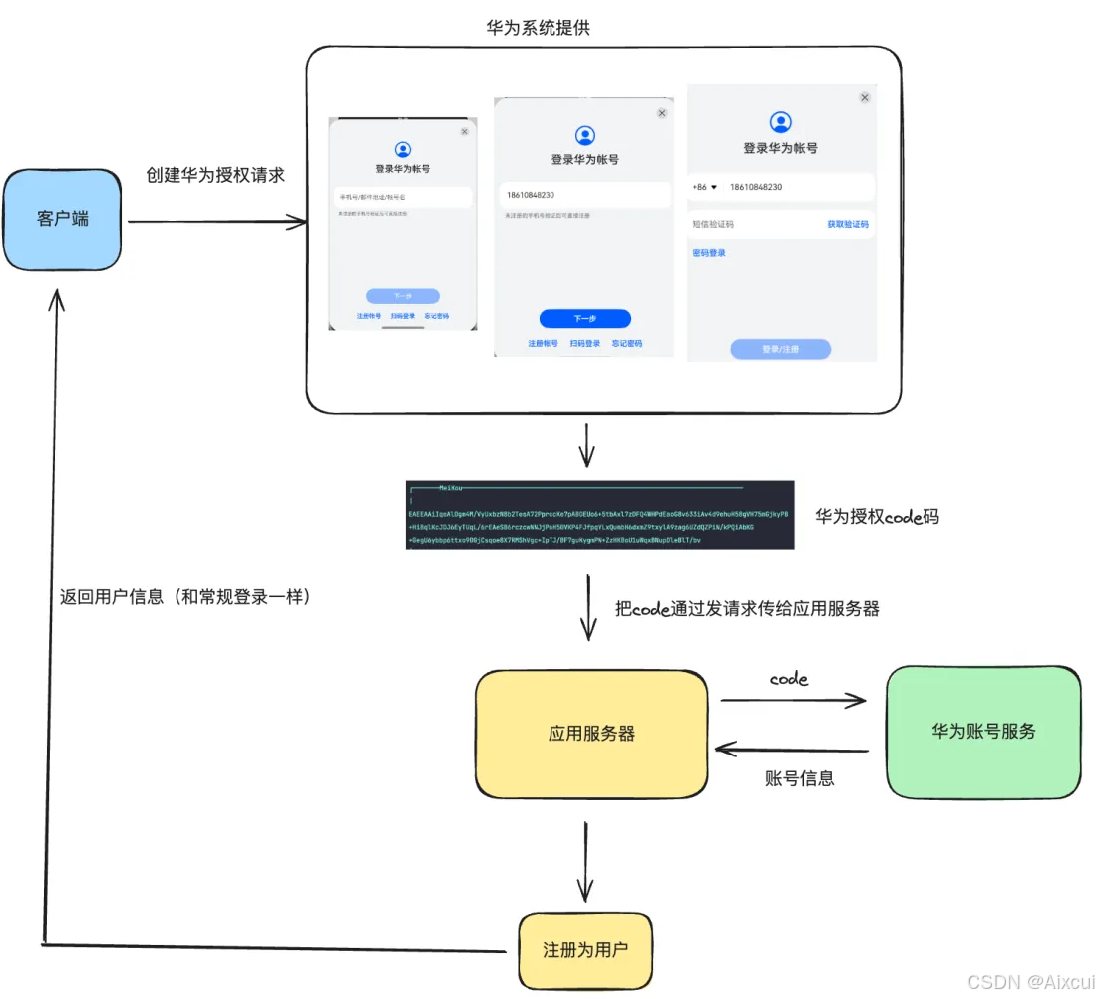
- 配置证书及权限
- 调用华为登录的 api 拉起登录界面
- 获取登录成功之后的 code(码)
- 提交给应用的后端接口
- 后端会将 code 提交给华为服务器验真
- 成功返回用户信息
- 本地拿到用户信息保存即可
1.3.2. 获取华为登录 code
1.准备登录模块
为了简化调用这里将华为登录的核心逻辑进行封装,参考的
commons/basic/src/main/ets/utils/HuaweiAuthPlugin.ets
import { authentication } from '@kit.AccountKit'

PersistentStorage.persistProp<string>('openId', '')

class HuaweiAuthPlugin {
  async requestAuth() {
    // 1. 创建一个Account Kit授权请求对象,可通过返回值设置请求参数。
    const huaweiIdProvider = new authentication.HuaweiIDProvider()
    const authCreateRequest = huaweiIdProvider.createAuthorizationWithHuaweiIDRequest()
    // 2. 添加请求参数
    authCreateRequest.scopes = ['phone', 'openid']
    authCreateRequest.permissions = ['serviceauthcode']
    authCreateRequest.forceAuthorization = true
    // 3. 执行授权请求,获取认证码
    const authController = new authentication.AuthenticationController(getContext())
    const authResponse: authentication.AuthorizationWithHuaweiIDResponse =
      await authController.executeRequest(authCreateRequest)
    const serviceauthcode = authResponse.data?.authorizationCode
    AppStorage.setOrCreate<string>('openId', authResponse.data?.openID)
    return serviceauthcode
  }

  // getHuaweiIDState  api12 支持

  async cancelAuth() {
    try {
      // 1. 创建一个Account Kit授权请求对象,可通过返回值设置请求参数。
      const huaweiIdProvider = new authentication.HuaweiIDProvider()
      const authCancelRequest = huaweiIdProvider.createCancelAuthorizationRequest()
      // 2. 取消授权
      const authController = new authentication.AuthenticationController(getContext())
      await authController.executeRequest(authCancelRequest)
      return true
    } catch (e) {
      console.log('mk-logger', JSON.stringify(e))
      return false
    }
  }
}

export const huaweiAuthPlugin = new HuaweiAuthPlugin()别忘了导出
2. 准备登录组件
features/my/src/main/ets/components/HuaweiLoginCom.ets
import { huaweiAuthPlugin } from '@mk/basic'
import { MkDialogLoading } from '@mk/basic'

@Component
export struct HuaweiLoginCom {
  dialog: CustomDialogController = new CustomDialogController({
    builder: MkDialogLoading({ message: '华为登录中' }),
    customStyle: true,
    alignment: DialogAlignment.Center
  })

  build() {
    Image($r('app.media.ic_user_huawei'))
      .width(40)
      .onClick(async () => {
       // 等待完善
      })
  }
}
3.整到登录页
features/my/src/main/ets/views/LoginView.ets
import { HuaweiLoginCom } from '../components/HuaweiLoginCom'

// 其他略
Row() {
  // 后续放置华为登录
  HuaweiLoginCom()
}
4.获取Code
Image($r('app.media.ic_user_huawei'))
  .width(40)
  .onClick(async () => {
    this.dialog.open()
    const res = await huaweiAuthPlugin.requestAuth()
    AlertDialog.show({
      message: res
    })
    this.dialog.close()
  })
1.3.3. 实现华为登录

features/my/src/main/apis/index.ets
// 华为登录
interface HuaweiLoginParams {
  code: string
  clientId: string
  clientSecret: string
}

// 演示使用,实际秘钥应该由后端通过接口返回
// 在AGC 平台获取 需要和应用的一致
// 改成你的!!!!!!!!!!
export const clientId = '111009537'
export const clientSecret = '30ac635b8516278c75582b4bdf1a6cf06827d782d5ddc1c3f97a8e31cb1e761e'

export const huaweiLoginAPI = (code: string) => {
  const data: HuaweiLoginParams = {
    clientId,
    clientSecret,
    code
  }
  return RequestAxios.post<MkUser, HuaweiLoginParams>('/login/huawei', data)
}
features/my/src/main/ets/components/HuaweiLoginCom.ets
 build() {
    Image($r('app.media.ic_user_huawei'))
      .width(40)
      .onClick(async () => {
        try {
          this.dialog.open()
          const res = await huaweiAuthPlugin.requestAuth()

          const loginRes = await huaweiLoginAPI(res as string)
          auth.saveUser(loginRes.data.result)
          router.back()

        } catch (e) {
          AlertDialog.show({ message: JSON.stringify(e, null, 2) })
        } finally {
          this.dialog.close()
        }
      })
  }
1.3.4. 调整登出逻辑
features/my/src/main/ets/views/SettingView.ets
 MkCellGroup() {
          MkCell({ label: '退出登录', hasBorder: false })
            .onClick(() => {
              AlertDialog.show({
                title: '温馨提示',
                message: '您确定退出登录吗',
                alignment: DialogAlignment.Bottom,
                primaryButton: {
                  value: '取消',
                  fontColor: $r('[basic].color.gray'),
                  action: () => {

                  }
                },
                secondaryButton: {
                  value: '确定',
                  fontColor: $r('[basic].color.red'),
                  action: () => {
                    auth.removeUser()
                    AppStorage.setOrCreate(CartCountKey, 0)
                    huaweiAuthPlugin.cancelAuth()
                    router.back()
                  }
                }
              })
            })
        }


 被折叠的 条评论
为什么被折叠?
被折叠的 条评论
为什么被折叠?
 到【灌水乐园】发言


