


MyBatis学习笔记(源码分析篇)
前言
MyBatis是一个开源的持久层映射框架,在JavaEE编程领域应用的十分广泛,下面先对MyBatis的使用进行简单的回顾,然后参照代码逐步分析其内部实现原理。如果你对MyBatis的使用还不太了解,请先阅读本系列文档的MyBatis学习笔记(基础使用篇)。
单独使用MyBatis
1) 准备实体类和接口
在进行DAO层操作时,我们一般会抽象出接口,并将查询返回的数据封装在实体类中。
// '文章'实体类(省略 getter/setter和toString,后文亦同)
public class AuthorDO implements Serializable {
    private Integer id;
    private String name;
    private Integer age;
    private SexEnum sex;
    private String email;

    private List<ArticleDO> articles;
}

// '作者'实体类
public class ArticleDO implements Serializable {
    private Integer id;
    private String title;
    private ArticleTypeEnum type;
    private String content;
    private Date createTime;

    private AuthorDO author;
}

// 查询文章的相关方法
public interface ArticleDao {
    ArticleDO findOne(@Param("id") int id);
}

// 查询作者的相关方法
public interface AuthorDao {
    AuthorDO findOne(@Param("id") int id);
}
2) 引入MyBatis及相关依赖
<dependencies>
    <!-- MyBatis框架 -->
    <dependency>
        <groupId>org.mybatis</groupId>
        <artifactId>mybatis</artifactId>
        <version>3.4.5</version>
    </dependency>

    <!-- 数据库驱动 -->
    <dependency>
        <groupId>mysql</groupId>
        <artifactId>mysql-connector-java</artifactId>
        <version>5.1.6</version>
    </dependency>

    <!-- 测试框架 -->
    <dependency>
        <groupId>junit</groupId>
        <artifactId>junit</artifactId>
        <version>4.12</version>
    </dependency>

    <!-- 日志框架 -->
    <dependency>
        <groupId>log4j</groupId>
        <artifactId>log4j</artifactId>
        <version>1.2.17</version>
    </dependency>
</dependencies>
3) 主配置文件
<!-- mybatis-congif.xml -->
<configuration>
    <properties resource="jdbc.properties"/>

    <typeAliases>
        <typeAlias alias="Article" type="xyz.coolblog.model.ArticleDO"/>
        <typeAlias alias="Author" type="xyz.coolblog.model.AuthorDO"/>
    </typeAliases>

    <typeHandlers>
        <typeHandler handler="xyz.coolblog.mybatis.ArticleTypeHandler" javaType="xyz.coolblog.constant.ArticleTypeEnum"/>
    </typeHandlers>

    <environments default="development">
        <environment id="development">
            <transactionManager type="JDBC"/>
            <dataSource type="POOLED">
                <property name="driver" value="${jdbc.driver}"/>
                <property name="url" value="${jdbc.url}"/>
                <property name="username" value="${jdbc.username}"/>
                <property name="password" value="${jdbc.password}"/>
            </dataSource>
        </environment>
    </environments>

    <mappers>
        <mapper resource="mapper/AuthorMapper.xml"/>
        <mapper resource="mapper/ArticleMapper.xml"/>
    </mappers>
</configuration>
4) 映射配置文件
<!-- AuthorMapper.xml -->
<mapper namespace="xyz.coolblog.dao.AuthorDao">

    <resultMap id="articleResult" type="Article">
        <id property="id" column="article_id" />
        <result property="title" column="title"/>
        <result property="type" column="type"/>
        <result property="content" column="content"/>
        <result property="createTime" column="create_time"/>
    </resultMap>

    <resultMap id="authorResult" type="Author">
        <id property="id" column="id"/>
        <result property="name" column="name"/>
        <result property="age" column="age"/>
        <result property="sex" column="sex" typeHandler="org.apache.ibatis.type.EnumOrdinalTypeHandler"/>
        <result property="email" column="email"/>
        <collection property="articles" ofType="Article" resultMap="articleResult"/>
    </resultMap>

    <select id="findOne" resultMap="authorResult">
        SELECT
            au.id, au.name, au.age, au.sex, au.email,
            ar.id as article_id, ar.title, ar.type, ar.content, ar.create_time
        FROM
            author au, article ar
        WHERE
            au.id = ar.author_id AND au.id = #{id}
    </select>
</mapper>


<!-- ArticleMapper.xml -->
<mapper namespace="xyz.coolblog.dao.ArticleDao">

    <resultMap id="authorResult" type="Author">
        <id property="id" column="author_id"/>
        <result property="name" column="name"/>
        <result property="age" column="age"/>
        <result property="sex" column="sex" typeHandler="org.apache.ibatis.type.EnumOrdinalTypeHandler"/>
        <result property="email" column="email"/>
    </resultMap>

    <resultMap id="articleResult" type="Article">
        <id property="id" column="id" />
        <result property="title" column="title"/>
        <result property="type" column="type" typeHandler="xyz.coolblog.mybatis.ArticleTypeHandler"/>
        <result property="content" column="content"/>
        <result property="createTime" column="create_time"/>
        <association property="author" javaType="Author" resultMap="authorResult"/>
    </resultMap>

    <select id="findOne" resultMap="articleResult">
        SELECT
            ar.id, ar.author_id, ar.title, ar.type, ar.content, ar.create_time,
            au.name, au.age, au.sex, au.email
        FROM
            article ar, author au
        WHERE
            ar.author_id = au.id AND ar.id = #{id}
    </select>
</mapper>
5) 进行简单测试
public class MyBatisTest {
    private SqlSessionFactory sqlSessionFactory;

    @Before
    public void prepare() throws IOException {
        InputStream inputStream = Resources.getResourceAsStream("mybatis-config.xml");
        sqlSessionFactory = new SqlSessionFactoryBuilder().build(inputStream);
        inputStream.close();
    }

    @Test
    public void testOne2One() {
        SqlSession session = sqlSessionFactory.openSession();
        try {
            ArticleDao articleDao = session.getMapper(ArticleDao.class);
            ArticleDO article = articleDao.findOne(1);
        } finally {
            session.close();
        }
    }

    @Test
    public void testOne2Many() {
        SqlSession session = sqlSessionFactory.openSession();
        try {
            AuthorDao authorDao = session.getMapper(AuthorDao.class);
            AuthorDO author = authorDao.findOne(1);
        } finally {
            session.close();
        }
    }
}
在Spring中使用MyBatis
1) 引入整合依赖
MyBatis和Spring是两个不相关的框架,要想把两者整合起来,则需要一个中间组件,负责加载和解析 MyBatis 相关配置,并且通过Spring提供的扩展点,将创建的DAO层对象放入到容器中。
    <!-- MyBatis-Spring整合组件 -->
    <dependency>
        <groupId>org.mybatis</groupId>
        <artifactId>mybatis-spring</artifactId>
        <version>1.3.2</version>
    </dependency>
2) 修改部分配置
<!-- application-mybatis.xml -->
<beans>
    <context:property-placeholder location="jdbc.properties"/>

    <!-- 配置数据源 -->
    <bean id="dataSource" class="org.apache.ibatis.datasource.pooled.PooledDataSource">
        <property name="driver" value="${jdbc.driver}" />
        <property name="url" value="${jdbc.url}" />
        <property name="username" value="${jdbc.username}" />
        <property name="password" value="${jdbc.password}" />
    </bean>

    <!-- 配置 SqlSessionFactory -->
    <bean id="sqlSessionFactory" class="org.mybatis.spring.SqlSessionFactoryBean">
        <!-- 配置 mybatis-config.xml 路径 -->
        <property name="configLocation" value="classpath:mybatis-config.xml"/>
        <!-- 给 SqlSessionFactory 配置数据源,这里引用上面的数据源配置 -->
        <property name="dataSource" ref="dataSource"/>
        <!-- 配置 SQL 映射文件 -->
        <property name="mapperLocations" value="mapper/*.xml"/>
    </bean>

    <!-- 配置 MapperScannerConfigurer -->
    <bean class="org.mybatis.spring.mapper.MapperScannerConfigurer">
        <!-- 配置 Dao 接口所在的包 -->
        <property name="basePackage" value="xyz.coolblog.dao"/>
    </bean>
</beans>
<!-- mybatis-config.xml -->
<configuration>
    <settings>
        <setting name="cacheEnabled" value="true"/>
    </settings>

    <typeAliases>
        <typeAlias alias="Article" type="xyz.coolblog.model.ArticleDO"/>
        <typeAlias alias="Author" type="xyz.coolblog.model.AuthorDO"/>
    </typeAliases>

    <typeHandlers>
        <typeHandler handler="xyz.coolblog.mybatis.ArticleTypeHandler" javaType="xyz.coolblog.constant.ArticleTypeEnum"/>
    </typeHandlers>
</configuration>
3) 进行测试
@RunWith(SpringJUnit4ClassRunner.class)
@ContextConfiguration("classpath:application-mybatis.xml")
public class SpringWithMyBatisTest implements ApplicationContextAware {
    private ApplicationContext applicationContext;

    /** 自动注入 AuthorDao,无需再通过 SqlSession 获取 */
    @Autowired
    private AuthorDao authorDao;

    @Autowired
    private ArticleDao articleDao;

    @Test
    public void testOne2One() {
        ArticleDO article = articleDao.findOne(1);
    }

    @Test
    public void testOne2Many() {
        AuthorDO author = authorDao.findOne(1);
    }

    @Override
    public void setApplicationContext(ApplicationContext applicationContext) throws BeansException {
        this.applicationContext = applicationContext;
    }
}
第一章 配置文件解析过程
在本章节中,将从 MyBatis 解析配置文件的过程着手进行分析,并会在分析的过程中,向大家介绍一些配置的使用方式和用途。
第一节 配置文件解析入口
在单独使用 MyBatis 时,第一步要做的事情就是根据配置文件构建SqlSessionFactory对象。
// 使用工具类 Resources 将配置文件转换为输入流
InputStream inputStream = Resources.getResourceAsStream("mybatis-config.xml");

// 使用构造器 SqlSessionFactoryBuilder 构造会话工厂
SqlSessionFactory sqlSessionFactory = new SqlSessionFactoryBuilder().build(inputStream);
显而易见,这里的 build 方法是我们分析配置文件解析过程的入口方法。
// -☆- SqlSessionFactoryBuilder
public SqlSessionFactory build(InputStream inputStream) {
    // 调用重载方法
    return build(inputStream, null, null);
}

public SqlSessionFactory build(InputStream inputStream, String environment, Properties properties) {
    try {
        // 创建配置文件解析器
        XMLConfigBuilder parser = new XMLConfigBuilder(inputStream, environment, properties);

		// 调用 parse 方法解析配置文件,生成 Configuration 对象
        return build(parser.parse());
    } catch (Exception e) {
        throw ExceptionFactory.wrapException("Error building SqlSession.", e);
    } finally {
        ErrorContext.instance().reset();
        try {
        inputStream.close();
        } catch (IOException e) {
        // Intentionally ignore. Prefer previous error.
        }
    }
}

public SqlSessionFactory build(Configuration config) {
    // 创建 DefaultSqlSessionFactory
    return new DefaultSqlSessionFactory(config);
}
从上面的代码中,我们大致可以猜出 MyBatis 配置文件是通过XMLConfigBuilder进行解析的。不过目前这里还没有非常明确的解析逻辑,所以我们继续往下看parse方法。
// -☆- XMLConfigBuilder
public Configuration parse() {
    if (parsed) {
        throw new BuilderException("Each XMLConfigBuilder can only be used once.");
    }
    parsed = true;

    // 解析配置
    parseConfiguration(parser.evalNode("/configuration"));
    return configuration;
}
到这里大家可以看到一些端倪了,注意一个 xpath 表达式/configuration。这个表达式代表的是 MyBatis 的<configuration/>标签,这里选中这个标签,并传递给parseConfiguration方法。我们继续跟下去。
private void parseConfiguration(XNode root) {
    try {
        // 解析 properties 配置
        propertiesElement(root.evalNode("properties"));

        // 解析 settings 配置,并将其转换为 Properties 对象
        Properties settings = settingsAsProperties(root.evalNode("settings"));

        // 加载 vfs
        loadCustomVfs(settings);

        // 解析 typeAliases 配置
        typeAliasesElement(root.evalNode("typeAliases"));

        // 解析 plugins 配置
        pluginElement(root.evalNode("plugins"));

        // 解析 objectFactory 配置
        objectFactoryElement(root.evalNode("objectFactory"));

        // 解析 objectWrapperFactory 配置
        objectWrapperFactoryElement(root.evalNode("objectWrapperFactory"));

        // 解析 reflectorFactory 配置
        reflectorFactoryElement(root.evalNode("reflectorFactory"));

        // settings 中的信息设置到 Configuration 对象中
        settingsElement(settings);

        // 解析 environments 配置
        environmentsElement(root.evalNode("environments"));

        // 解析 databaseIdProvider,获取并设置 databaseId 到 Configuration 对象
        databaseIdProviderElement(root.evalNode("databaseIdProvider"));

        // 解析 typeHandlers 配置
        typeHandlerElement(root.evalNode("typeHandlers"));

        // 解析 mappers 配置
        mapperElement(root.evalNode("mappers"));
    } catch (Exception e) {
        throw new BuilderException("Error parsing SQL Mapper Configuration. Cause: " + e, e);
    }
}
到此,一个 MyBatis 的解析过程就出来了,每个配置的解析逻辑都封装在了相应的方法中。在下面分析过程中,我不打算按照方法调用的顺序进行分析,我会适当进行一定的调整。同时,MyBatis 中配置较多,对于一些不常用的配置,这里会略过。那下面我们开始进行分析吧。
第二节 解析 properties 配置
解析properties节点是由propertiesElement这个方法完成的,该方法的逻辑比较简单。在分析方法源码前,先来看一下 properties 节点的配置内容。
<properties resource="jdbc.properties">
    <property name="jdbc.username" value="coolblog"/>
    <property name="hello" value="world"/>
</properties>
参照上面的配置,来分析一下 propertiesElement 的逻辑。相关分析如下。
// -☆- XMLConfigBuilder
private void propertiesElement(XNode context) throws Exception {
    if (context != null) {
        // 将子节点配置的"属性:值"转换到 defaults (Properties类型),方便后面使用
        Properties defaults = context.getChildrenAsProperties();

        // 获取 resource 和 url 属性的值
        String resource = context.getStringAttribute("resource");
        String url = context.getStringAttribute("url");

        // 不能同时配置 resource 和 url
        if (resource != null && url != null) {
            throw new BuilderException("The properties element cannot specify both a URL and a resource based property file reference.  Please specify one or the other.");
        }

        if (resource != null) {
            // 从文件系统中加载并解析属性文件 => defaults(可能会覆盖子节点中配置的属性)
            defaults.putAll(Resources.getResourceAsProperties(resource));
        } else if (url != null) {
            // 通过 url 加载并解析属性文件 => defaults(可能会覆盖子节点中配置的属性)
            defaults.putAll(Resources.getUrlAsProperties(url));
        }

		// 获取Configuration中的全局变量 => defaults
        Properties vars = configuration.getVariables();
        if (vars != null) {
            defaults.putAll(vars);
        }

		// 把 defaults 设置到 parser 和 configuration 中
        parser.setVariables(defaults);
        configuration.setVariables(defaults);
    }
}

// 扩展:将子节点的"属性:值"转换为Properties集合
public Properties getChildrenAsProperties() {
    Properties properties = new Properties();

    // 遍历子节点
    for (XNode child : getChildren()) {
        // 获取 property 节点的 name 和 value 属性
        String name = child.getStringAttribute("name");
        String value = child.getStringAttribute("value");

		// 设置属性到Properties集合中
        if (name != null && value != null) {
            properties.setProperty(name, value);
        }
    }

    return properties;
}
上面是 properties 节点解析的主要过程,不是很复杂,但需要注意一点,通过 resource 和 url 引用外部Props文件中的属性会覆盖掉子节点配置的属性。
第三节 解析 settings 配置
settings 相关配置是 MyBatis 中非常重要的配置,这些配置用于调整 MyBatis 运行时的行为。settings 配置繁多,在对这些配置不熟悉的情况下,保持默认配置即可,下面先来看一个比较简单的配置。
<settings>
    <setting name="cacheEnabled" value="true"/>
    <setting name="lazyLoadingEnabled" value="true"/>
    <setting name="autoMappingBehavior" value="PARTIAL"/>
</settings>
接下来,对照上面的配置,来分析settingsAsProperties方法源码,并不复杂,只是将setting子节点配置的属性转换为Properties而已。
// -☆- XMLConfigBuilder
private Properties settingsAsProperties(XNode context) {
    if (context == null) {
        return new Properties();
    }

    // 将子节点的"属性:值"转换为Properties集合(上节已经分析过了)
    Properties props = context.getChildrenAsProperties();

    // 创建 Configuration 类的“元信息”对象
    MetaClass metaConfig = MetaClass.forClass(Configuration.class, localReflectorFactory);

	// 遍历配置的 settings
    for (Object key : props.keySet()) {
        // 校验 Configuration 中是否存在相关属性(setXxx)
        if (!metaConfig.hasSetter(String.valueOf(key))) {
            throw new BuilderException("The setting " + key + " is not known.  Make sure you spelled it correctly (case sensitive).");
        }
    }
    return props;
}
MetaClass:用来解析目标类的一些元信息,比如类的成员变量,getter/setter 方法等。关于这个类的逻辑,请查询附录章节。
转换出来的Properties要有一个存放的地方,以使其他代码可以找到这些配置。这个存放地方就是 Configuration 对象,下面就来看一下将 settings 配置设置到 Configuration 对象中的过程。
  private void settingsElement(Properties props) {
    // 设置 autoMappingBehavior 属性,默认值为 PARTIAL
    configuration.setAutoMappingBehavior(AutoMappingBehavior.valueOf(props.getProperty("autoMappingBehavior", "PARTIAL")));
    configuration.setAutoMappingUnknownColumnBehavior(AutoMappingUnknownColumnBehavior.valueOf(props.getProperty("autoMappingUnknownColumnBehavior", "NONE")));
    // 设置 cacheEnabled 属性,默认值为 true
    configuration.setCacheEnabled(booleanValueOf(props.getProperty("cacheEnabled"), true));
    configuration.setProxyFactory((ProxyFactory) createInstance(props.getProperty("proxyFactory")));
    configuration.setLazyLoadingEnabled(booleanValueOf(props.getProperty("lazyLoadingEnabled"), false));
    configuration.setAggressiveLazyLoading(booleanValueOf(props.getProperty("aggressiveLazyLoading"), false));
    configuration.setMultipleResultSetsEnabled(booleanValueOf(props.getProperty("multipleResultSetsEnabled"), true));
    configuration.setUseColumnLabel(booleanValueOf(props.getProperty("useColumnLabel"), true));
    configuration.setUseGeneratedKeys(booleanValueOf(props.getProperty("useGeneratedKeys"), false));
    configuration.setDefaultExecutorType(ExecutorType.valueOf(props.getProperty("defaultExecutorType", "SIMPLE")));
    configuration.setDefaultStatementTimeout(integerValueOf(props.getProperty("defaultStatementTimeout"), null));
    configuration.setDefaultFetchSize(integerValueOf(props.getProperty("defaultFetchSize"), null));
    configuration.setDefaultResultSetType(resolveResultSetType(props.getProperty("defaultResultSetType")));
    configuration.setMapUnderscoreToCamelCase(booleanValueOf(props.getProperty("mapUnderscoreToCamelCase"), false));
    configuration.setSafeRowBoundsEnabled(booleanValueOf(props.getProperty("safeRowBoundsEnabled"), false));
    configuration.setLocalCacheScope(LocalCacheScope.valueOf(props.getProperty("localCacheScope", "SESSION")));
    configuration.setJdbcTypeForNull(JdbcType.valueOf(props.getProperty("jdbcTypeForNull", "OTHER")));
    configuration.setLazyLoadTriggerMethods(stringSetValueOf(props.getProperty("lazyLoadTriggerMethods"), "equals,clone,hashCode,toString"));
    configuration.setSafeResultHandlerEnabled(booleanValueOf(props.getProperty("safeResultHandlerEnabled"), true));
    configuration.setDefaultScriptingLanguage(resolveClass(props.getProperty("defaultScriptingLanguage")));
    // 解析默认的枚举处理器
    configuration.setDefaultEnumTypeHandler(resolveClass(props.getProperty("defaultEnumTypeHandler")));
    configuration.setCallSettersOnNulls(booleanValueOf(props.getProperty("callSettersOnNulls"), false));
    configuration.setUseActualParamName(booleanValueOf(props.getProperty("useActualParamName"), true));
    configuration.setReturnInstanceForEmptyRow(booleanValueOf(props.getProperty("returnInstanceForEmptyRow"), false));
    configuration.setLogPrefix(props.getProperty("logPrefix"));
    configuration.setConfigurationFactory(resolveClass(props.getProperty("configurationFactory")));
  }
上面代码就是调用 Configuration 的 setter 方法,就没太多逻辑了。重点需要注意一个resolveClass方法,它的源码如下:
// -☆- BaseBuilder
protected Class<?> resolveClass(String alias) {
    if (alias == null) {
        return null;
    }

    try {
        // 别名解析
        return resolveAlias(alias);
    } catch (Exception e) {
        throw new BuilderException("Error resolving class. Cause: " + e, e);
    }
}

// 别名注册器
protected final TypeAliasRegistry typeAliasRegistry;

 // 通过typeAliasRegistry(别名注册器)解析别名为全类名
protected Class<?> resolveAlias(String alias) {
    return typeAliasRegistry.resolveAlias(alias);
}
这里出现了一个新的类TypeAliasRegistry,用途就是将别名和类型进行映射,这样就可以用别名表示某个类了,方便使用。既然聊到了别名,那下面我们不妨看看别名的配置的解析过程。
第四节 解析 typeAliases 配置
在MyBatis中,可以为类定义一个简短的别名,在书写配置的时候使用别名来配置,MyBatis在解析配置时会自动将别名替换为对应的全类名。有两种配置方式,第一种是按包进行配置,MyBatis会扫描包路径下的所有类(忽略匿名类/接口/内部类)自动生成别名(可以配合Alias注解自定义别名)。
<typeAliases>
    <package name="xyz.coolblog.model1"/>
    <package name="xyz.coolblog.model2"/>
</typeAliases>
另一种方式是通过手动的方式,明确为某个类配置别名。
<typeAliases>
    <typeAlias alias="article" type="xyz.coolblog.model.Article" />
    <typeAlias type="xyz.coolblog.model.Author" />
</typeAliases>
下面我们来看一下两种不同的别名配置是怎样解析的。
// -☆- XMLConfigBuilder
private void typeAliasesElement(XNode parent) {
    if (parent != null) {
        for (XNode child : parent.getChildren()) {
        	// ⭐️ 从指定的包中解析别名和类型的映射
            if ("package".equals(child.getName())) {
                String typeAliasPackage = child.getStringAttribute("name");
                configuration.getTypeAliasRegistry().registerAliases(typeAliasPackage);

            // ⭐️ 从 typeAlias 节点中解析别名和类型的映射
            } else {
            	// 获取 alias 和 type 属性值,alias 不是必填项,可为空
                String alias = child.getStringAttribute("alias");
                String type = child.getStringAttribute("type");
                try {
                	// 加载 type 对应的类型
                    Class<?> clazz = Resources.classForName(type);

                    // 注册别名到类型的映射
                    if (alias == null) {
                        typeAliasRegistry.registerAlias(clazz);
                    } else {
                        typeAliasRegistry.registerAlias(alias, clazz);
                    }
                } catch (ClassNotFoundException e) {
                    throw new BuilderException("Error registering typeAlias for '" + alias + "'. Cause: " + e, e);
                }
            }
        }
    }
}
上面的代码通过一个if-else条件分支来处理两种不同的配置,这里我用⭐️标注了出来。下面我们来分别看一下这两种配置方式的解析过程,首先来看一下手动配置方式的解析过程。
1. 从 typeAlias 节点中解析并注册别名
在别名的配置中,type属性是必须要配置的,而alias属性则不是必须的。这个在配置文件的 DTD 中有规定。如果使用者未配置 alias 属性,则需要 MyBatis 自行为目标类型生成别名。对于别名为空的情况,注册别名的任务交由void registerAlias(Class<?>)方法处理。若不为空,则由void registerAlias(String, Class<?>)进行别名注册。这两个方法的分析如下:
private final Map<String, Class<?>> TYPE_ALIASES = new HashMap<String, Class<?>>();

public void registerAlias(Class<?> type) {
    // 获取全路径类名的简称
    String alias = type.getSimpleName();
    Alias aliasAnnotation = type.getAnnotation(Alias.class);
    if (aliasAnnotation != null) {
        // 从注解中取出别名
        alias = aliasAnnotation.value();
    }
    // 调用重载方法注册别名和类型映射
    registerAlias(alias, type);
}

public void registerAlias(String alias, Class<?> value) {
    if (alias == null) {
        throw new TypeException("The parameter alias cannot be null");
    }
    // 将别名转成小写
    String key = alias.toLowerCase(Locale.ENGLISH);
    /*
     * 如果 TYPE_ALIASES 中存在了某个类型映射,这里判断当前类型与映射中的类型是否一致,
     * 不一致则抛出异常,不允许一个别名对应两种类型
     */
    if (TYPE_ALIASES.containsKey(key) && TYPE_ALIASES.get(key) != null && !TYPE_ALIASES.get(key).equals(value)) {
        throw new TypeException(
            "The alias '" + alias + "' is already mapped to the value '" + TYPE_ALIASES.get(key).getName() + "'.");
    }
    // 缓存别名到类型映射
    TYPE_ALIASES.put(key, value);
}
如上,若用户为明确配置 alias 属性,MyBatis 会使用类名的小写形式作为别名。比如,全限定类名xyz.coolblog.model.Author的别名为author。若类中有@Alias注解,则从注解中取值作为别名。
2. 从指定的包中解析并注册别名
从指定的包中解析并注册别名过程主要由别名的解析和注册两步组成。下面来看一下相关代码:
public void registerAliases(String packageName) {
    // 调用重载方法注册别名
    registerAliases(packageName, Object.class);
}

public void registerAliases(String packageName, Class<?> superType) {
    ResolverUtil<Class<?>> resolverUtil = new ResolverUtil<Class<?>>();
    /*
     * 查找某个包下的父类为 superType 的类。从调用栈来看,这里的
     * superType = Object.class,所以 ResolverUtil 将查找所有的类。
     * 查找完成后,查找结果将会被缓存到内部集合中。
     */
    resolverUtil.find(new ResolverUtil.IsA(superType), packageName);
    // 获取查找结果
    Set<Class<? extends Class<?>>> typeSet = resolverUtil.getClasses();
    for (Class<?> type : typeSet) {
        // 忽略匿名类,接口,内部类
        if (!type.isAnonymousClass() && !type.isInterface() && !type.isMemberClass()) {
            // 为类型注册别名
            registerAlias(type);
        }
    }
}
上面的代码不多,相关流程也不复杂,可简单总结为下面两个步骤:
- 查找指定包下的所有类
- 遍历查找到的类型集合,为每个类型注册别名
在这两步流程中,第2步流程对应的代码上一节已经分析过了,这里不再赘述。第1步的功能理解起来不难,但是背后对应的代码有点多。限于篇幅原因,这里我不打算详细分析这一部分的代码,只做简单的流程总结。如下:
- 通过 VFS(虚拟文件系统)获取指定包下的所有文件的路径名,比如
xyz/coolblog/model/Article.class。 - 筛选以
.class结尾的文件名 - 将路径名转成全限定的类名,通过类加载器加载类名
- 对类型进行匹配,若符合匹配规则,则将其放入内部集合中
以上就是类型资源查找的过程,并不是很复杂,大家有兴趣自己看看吧。
3. 注册 MyBatis 内部类及常见类型的别名
最后,我们来看一下一些 MyBatis 内部类及一些常见类型的别名注册过程。如下:
// -☆- Configuration
public Configuration() {
    // 注册事务工厂的别名
    typeAliasRegistry.registerAlias("JDBC", JdbcTransactionFactory.class);
    // 省略部分代码,下同

    // 注册数据源的别名
    typeAliasRegistry.registerAlias("POOLED", PooledDataSourceFactory.class);

    // 注册缓存策略的别名
    typeAliasRegistry.registerAlias("FIFO", FifoCache.class);
    typeAliasRegistry.registerAlias("LRU", LruCache.class);

    // 注册日志类的别名
    typeAliasRegistry.registerAlias("SLF4J", Slf4jImpl.class);
    typeAliasRegistry.registerAlias("LOG4J", Log4jImpl.class);

    // 注册动态代理工厂的别名
    typeAliasRegistry.registerAlias("CGLIB", CglibProxyFactory.class);
    typeAliasRegistry.registerAlias("JAVASSIST", JavassistProxyFactory.class);
}

// -☆- TypeAliasRegistry
public TypeAliasRegistry() {
    // 注册 String 的别名
    registerAlias("string", String.class);

    // 注册基本类型包装类的别名
    registerAlias("byte", Byte.class);
    // 省略部分代码,下同

    // 注册基本类型包装类数组的别名
    registerAlias("byte[]", Byte[].class);

    // 注册基本类型的别名
    registerAlias("_byte", byte.class);

    // 注册基本类型包装类的别名
    registerAlias("_byte[]", byte[].class);

    // 注册 Date, BigDecimal, Object 等类型的别名
    registerAlias("date", Date.class);
    registerAlias("decimal", BigDecimal.class);
    registerAlias("object", Object.class);

    // 注册 Date, BigDecimal, Object 等数组类型的别名
    registerAlias("date[]", Date[].class);
    registerAlias("decimal[]", BigDecimal[].class);
    registerAlias("object[]", Object[].class);

    // 注册集合类型的别名
    registerAlias("map", Map.class);
    registerAlias("hashmap", HashMap.class);
    registerAlias("list", List.class);
    registerAlias("arraylist", ArrayList.class);
    registerAlias("collection", Collection.class);
    registerAlias("iterator", Iterator.class);

    // 注册 ResultSet 的别名
    registerAlias("ResultSet", ResultSet.class);
}
我记得以前配置<select/>标签的resultType属性,由于不知道有别名这回事,傻傻的使用全限定类名进行配置。当时还觉得这样配置一定不会出错吧,很放心。现在想想有点搞笑。
好了,以上就是别名解析的全部流程,大家看懂了吗?如果觉得没啥障碍的话,那继续往下看呗。
第五节 解析 plugins 配置
插件是 MyBatis 提供的一个拓展机制,通过插件机制我们可在 SQL 执行过程中的某些点上做一些自定义操作。实现一个插件需要比简单,首先需要让插件类实现Interceptor接口。然后在插件类上添加@Intercepts和@Signature注解,用于指定想要拦截的目标方法。MyBatis 允许拦截下面接口中的一些方法:
| 可拦截的类 | 类中可拦截的方法 |
|---|---|
| Executor | update/query/flushStatements/commit/rollback/getTransaction/close/isClosed |
| ParameterHandler | getParameterObject/setParameters |
| ResultSetHandler | handleResultSets/handleOutputParameters |
| StatementHandler | prepare/parameterize/batch/update/query |
比较常见的插件有分页插件、分表插件等,有兴趣的朋友可以去了解下。本节我们来分析一下插件的配置的解析过程,先来了解插件的配置。如下:
<plugins>
    <plugin interceptor="xyz.coolblog.mybatis.ExamplePlugin">
        <property name="key" value="value"/>
    </plugin>
</plugins>
解析过程分析如下:
private void pluginElement(XNode parent) throws Exception {
    if (parent != null) {
        for (XNode child : parent.getChildren()) {
            String interceptor = child.getStringAttribute("interceptor");
            // 获取配置信息
            Properties properties = child.getChildrenAsProperties();
            // 解析拦截器的类型,并创建拦截器
            Interceptor interceptorInstance = (Interceptor) resolveClass(interceptor).newInstance();
            // 设置属性
            interceptorInstance.setProperties(properties);
            // 添加拦截器到 Configuration 中
            configuration.addInterceptor(interceptorInstance);
        }
    }
}

// Configuration使用InterceptorChain来保存所有的拦截器
public void addInterceptor(Interceptor interceptor) {
    interceptorChain.addInterceptor(interceptor);
}

// InterceptorChain内部是一个ArrayList
public void addInterceptor(Interceptor interceptor) {
    interceptors.add(interceptor);
}
如上,插件解析的过程还是比较简单的。首先是获取配置,然后再解析拦截器类型,并实例化拦截器。最后向拦截器中设置属性,并将拦截器添加到 Configuration 中。好了,关于插件配置的分析就先到这,继续往下分析。
第六节 解析 environments 配置
在 MyBatis 中,事务管理器和数据源是配置在 environments 中的。它们的配置大致如下:
<environments default="development">
    <environment id="development">
        <transactionManager type="JDBC"/>
        <dataSource type="POOLED">
            <property name="driver" value="${jdbc.driver}"/>
            <property name="url" value="${jdbc.url}"/>
            <property name="username" value="${jdbc.username}"/>
            <property name="password" value="${jdbc.password}"/>
        </dataSource>
    </environment>
</environments>
接下来我们对照上面的配置进行分析,如下:
private String environment;

private void environmentsElement(XNode context) throws Exception {
    if (context != null) {
        if (environment == null) {
            // 获取 default 属性
            environment = context.getStringAttribute("default");
        }
        for (XNode child : context.getChildren()) {
            // 获取 id 属性
            String id = child.getStringAttribute("id");
            /*
             * 检测当前 environment 节点的 id 与其父节点 environments 的属性 default
             * 内容是否一致,一致则返回 true,否则返回 false
             */
            if (isSpecifiedEnvironment(id)) {
                // 解析 transactionManager 节点,逻辑和插件的解析逻辑很相似,不在赘述
                TransactionFactory txFactory = transactionManagerElement(child.evalNode("transactionManager"));
                // 解析 dataSource 节点,逻辑和插件的解析逻辑很相似,不在赘述
                DataSourceFactory dsFactory = dataSourceElement(child.evalNode("dataSource"));
                // 创建 DataSource 对象
                DataSource dataSource = dsFactory.getDataSource();
                Environment.Builder environmentBuilder = new Environment.Builder(id)
                    .transactionFactory(txFactory)
                    .dataSource(dataSource);
                // 构建 Environment 对象,并设置到 configuration 中
                configuration.setEnvironment(environmentBuilder.build());
            }
        }
    }
}
environments 配置的解析过程没什么特别之处,按部就班解析就行了,不多说了。
第七节 解析 typeHandlers 配置
我们在向数据库存取数据时,需要将数据库字段类型和 Java类型进行相互转换,处理这个转换的模块就是类型处理器TypeHandler。下面,我们来看一下类型处理器的配置方法:
<!-- 自动扫描(javaType和jdbcTyp使用@MappedTypes和@MappedJdbcTypes注解配置) -->
<typeHandlers>
    <package name="xyz.coolblog.handlers"/>
</typeHandlers>

<!-- 手动配置 -->
<typeHandlers>
    <typeHandler jdbcType="TINYINT"
            javaType="xyz.coolblog.constant.ArticleTypeEnum"
            handler="xyz.coolblog.mybatis.ArticleTypeHandler"/>
</typeHandlers>
下面开始分析代码。
private void typeHandlerElement(XNode parent) throws Exception {
    if (parent != null) {
        for (XNode child : parent.getChildren()) {
            // 从指定的包中注册 TypeHandler
            if ("package".equals(child.getName())) {
                String typeHandlerPackage = child.getStringAttribute("name");
                // 注册方法 ①
                typeHandlerRegistry.register(typeHandlerPackage);

            // 从 typeHandler 节点中解析别名到类型的映射
            } else {
                // 获取 javaType,jdbcType 和 handler 等属性值
                String javaTypeName = child.getStringAttribute("javaType");
                String jdbcTypeName = child.getStringAttribute("jdbcType");
                String handlerTypeName = child.getStringAttribute("handler");

                // 解析上面获取到的属性值
                Class<?> javaTypeClass = resolveClass(javaTypeName);
                JdbcType jdbcType = resolveJdbcType(jdbcTypeName);
                Class<?> typeHandlerClass = resolveClass(handlerTypeName);

                // 根据 javaTypeClass 和 jdbcType 值的情况进行不同的注册策略
                if (javaTypeClass != null) {
                    if (jdbcType == null) {
                        // 注册方法 ②
                        typeHandlerRegistry.register(javaTypeClass, typeHandlerClass);
                    } else {
                        // 注册方法 ③
                        typeHandlerRegistry.register(javaTypeClass, jdbcType, typeHandlerClass);
                    }
                } else {
                    // 注册方法 ④
                    typeHandlerRegistry.register(typeHandlerClass);
                }
            }
        }
    }
}
上面的代码中调用了 4 个重载的处理器注册方法,这些注册方法的逻辑不难理解,但之间的调用关系复杂,下面是它们的调用关系图。其中蓝色背景框内的方法称为开始方法,红色背景框内的方法称为终点方法,白色背景框内的方法称为中间方法。
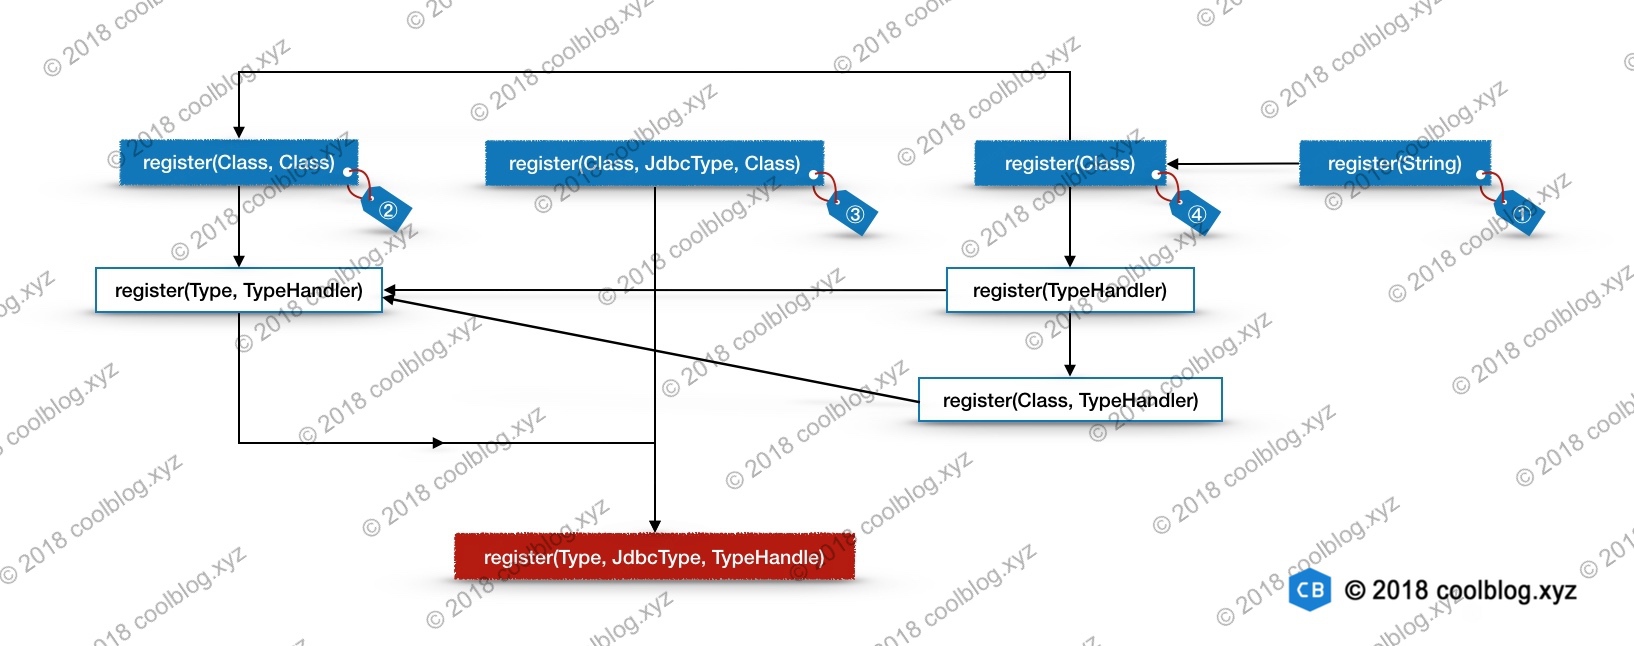
下面我会分析从每个开始方法向下分析,为了避免冗余分析,我会按照③ → ② → ④ → ①的顺序进行分析。
1. register(Class, JdbcType, Class)
当代码执行到此方法时,表示javaTypeClass != null && jdbcType != null条件成立,即明确配置了javaType和jdbcType。
public void register(Class<?> javaTypeClass, JdbcType jdbcType, Class<?> typeHandlerClass) {
    // 参数齐全,直接调用终点方法 (其中getInstance用于创建typeHandlerClass实例,优先使用javaTypeClass作为入参调用有参构造)
    register(javaTypeClass, jdbcType, getInstance(javaTypeClass, typeHandlerClass));
}

/** 类型处理器注册过程的终点 */
private void register(Type javaType, JdbcType jdbcType, TypeHandler<?> handler) {
    if (javaType != null) {
        // JdbcType 到 TypeHandler 的映射
        Map<JdbcType, TypeHandler<?>> map = TYPE_HANDLER_MAP.get(javaType);
        if (map == null || map == NULL_TYPE_HANDLER_MAP) {
            map = new HashMap<JdbcType, TypeHandler<?>>();
            // 存储 javaType 到 Map<JdbcType, TypeHandler> 的映射
            TYPE_HANDLER_MAP.put(javaType, map);
        }
        map.put(jdbcType, handler);
    }

    // 存储所有的 TypeHandler
    ALL_TYPE_HANDLERS_MAP.put(handler.getClass(), handler);
}
类型处理器的实际注册过程是在该终点方法完成的,就是把类型和处理器进行双层映射而已,外层映射是JavaType和多个JdbcType的映射,内层映射是JdbcType和TypeHandler的映射。
2. register(Class, Class)
当代码执行到此方法时,表示javaTypeClass != null && jdbcType == null条件成立,即仅设置了javaType。
public void register(Class<?> javaTypeClass, Class<?> typeHandlerClass) {
    // 调用中间方法register(Type, TypeHandler),去获取jdbcType
    register(javaTypeClass, getInstance(javaTypeClass, typeHandlerClass));
}

private <T> void register(Type javaType, TypeHandler<? extends T> typeHandler) {
    // 获取 @MappedJdbcTypes 注解(用于解析jdbcType)
    MappedJdbcTypes mappedJdbcTypes = typeHandler.getClass().getAnnotation(MappedJdbcTypes.class);
    if (mappedJdbcTypes != null) {
        // 遍历 @MappedJdbcTypes 注解中配置的值(获取所有配置的JdbcType)
        for (JdbcType handledJdbcType : mappedJdbcTypes.value()) {
            // 参数解析齐全后,调用终点方法
            register(javaType, handledJdbcType, typeHandler);
        }
        if (mappedJdbcTypes.includeNullJdbcType()) {
            // 调用终点方法,jdbcType = null
            register(javaType, null, typeHandler);
        }
    } else {
        // 调用终点方法,jdbcType = null
        register(javaType, null, typeHandler);
    }
}
上面代码主要做的事情是尝试从注解中获取JdbcType的值,然后调用终点方法注册。(注意JdbcType可以配置为NULL,详情查看MyBatis官方文档)。
3. register(Class)
当代码执行到此方法时,表示javaTypeClass == null条件成立,即javaType和jdbcType都未配置。
public void register(Class<?> typeHandlerClass) {
    boolean mappedTypeFound = false;
    // 获取 @MappedTypes 注解(用于解析javaType)
    MappedTypes mappedTypes = typeHandlerClass.getAnnotation(MappedTypes.class);
    if (mappedTypes != null) {
        // 遍历 @MappedTypes 注解中配置的值
        for (Class<?> javaTypeClass : mappedTypes.value()) {
            // 调用注册方法 ②
            register(javaTypeClass, typeHandlerClass);
            mappedTypeFound = true;
        }
    }
    if (!mappedTypeFound) {
        // 调用中间方法 register(TypeHandler)
        register(getInstance(null, typeHandlerClass));
    }
}

public <T> void register(TypeHandler<T> typeHandler) {
    boolean mappedTypeFound = false;
    // 获取 @MappedTypes 注解
    MappedTypes mappedTypes = typeHandler.getClass().getAnnotation(MappedTypes.class);
    if (mappedTypes != null) {
        for (Class<?> handledType : mappedTypes.value()) {
            // 调用中间方法 register(Type, TypeHandler)
            register(handledType, typeHandler);
            mappedTypeFound = true;
        }
    }
    // 自动发现映射类型
    if (!mappedTypeFound && typeHandler instanceof TypeReference) {
        try {
            TypeReference<T> typeReference = (TypeReference<T>) typeHandler;
            // 获取参数模板中的参数类型,并调用中间方法 register(Type, TypeHandler)
            register(typeReference.getRawType(), typeHandler);
            mappedTypeFound = true;
        } catch (Throwable t) {
        }
    }
    if (!mappedTypeFound) {
        // 调用中间方法 register(Class, TypeHandler)
        register((Class<T>) null, typeHandler);
    }
}

public <T> void register(Class<T> javaType, TypeHandler<? extends T> typeHandler) {
    // 调用中间方法 register(Type, TypeHandler)
    register((Type) javaType, typeHandler);
}
上面的代码主要用于解析javaType,优先通过@MappedTypes注解来解析,其次使用反射来获取javaType。不管是通过哪种方式,解析完成后都会调用中间方法register(Type, TypeHandler),这个方法负责解析jdbcType,在上一节已经分析过。一个负责解析 javaType,另一个负责解析 jdbcType,逻辑比较清晰了。
4. register(String)
该方法主要是用于自动扫描类型处理器,并调用其他方法注册扫描结果,注册时忽略内部类,接口,抽象类等。
public void register(String packageName) {
    ResolverUtil<Class<?>> resolverUtil = new ResolverUtil<Class<?>>();
    // 从指定包中查找 TypeHandler
    resolverUtil.find(new ResolverUtil.IsA(TypeHandler.class), packageName);
    Set<Class<? extends Class<?>>> handlerSet = resolverUtil.getClasses();
    for (Class<?> type : handlerSet) {
        // 忽略内部类,接口,抽象类等
        if (!type.isAnonymousClass() && !type.isInterface() && !Modifier.isAbstract(type.getModifiers())) {
            // 调用注册方法 ④
            register(type);
        }
    }
}
第八节 解析 mappers 配置
mappers标签主要用于指定映射信息的存放位置,这些映射信息可以是注解形式或XML配置形式。
// -☆- XMLConfigBuilder
private void mapperElement(XNode parent) throws Exception {
    if (parent != null) {
        for (XNode child : parent.getChildren()) {
            if ("package".equals(child.getName())) {
                // 获取 <package> 节点中的 name 属性
                String mapperPackage = child.getStringAttribute("name");
                // 从指定包中查找 mapper 接口,并根据 mapper 接口解析映射配置
                configuration.addMappers(mapperPackage);
            } else {
                // 获取 resource/url/class 等属性
                String resource = child.getStringAttribute("resource");
                String url = child.getStringAttribute("url");
                String mapperClass = child.getStringAttribute("class");

                // resource 不为空,且其他两者为空,则从指定路径中加载配置
                if (resource != null && url == null && mapperClass == null) {
                    ErrorContext.instance().resource(resource);
                    InputStream inputStream = Resources.getResourceAsStream(resource);
                    XMLMapperBuilder mapperParser = new XMLMapperBuilder(inputStream, configuration, resource, configuration.getSqlFragments());
                    // 解析映射文件
                    mapperParser.parse();

                // url 不为空,且其他两者为空,则通过 url 加载配置
                } else if (resource == null && url != null && mapperClass == null) {
                    ErrorContext.instance().resource(url);
                    InputStream inputStream = Resources.getUrlAsStream(url);
                    XMLMapperBuilder mapperParser = new XMLMapperBuilder(inputStream, configuration, url, configuration.getSqlFragments());
                    // 解析映射文件
                    mapperParser.parse();

                // mapperClass 不为空,且其他两者为空,则通过 mapperClass 解析映射配置
                } else if (resource == null && url == null && mapperClass != null) {
                    Class<?> mapperInterface = Resources.classForName(mapperClass);
                    // 解析映射注解
                    configuration.addMapper(mapperInterface);

                // 以上条件不满足,则抛出异常
                } else {
                    throw new BuilderException("A mapper element may only specify a url, resource or class, but not more than one.");
                }
            }
        }
    }
}
上面代码主要逻辑是遍历 mappers 的子节点,并根据节点属性值判断通过什么方式加载映射文件或映射信息。
第二章 映射文件解析过程
在本章节中,先分析映射文件中各节点(<cache>,<cache-ref>,<resultMap>, <select | insert | update | delete> 等)的解析过程,然后介绍Mapper 接口的绑定过程。在此之外,有一点需提前声明,由于MyBatis使用注解配置的局限性,下面章节都将以解析XML配置的角度来讲解,如果你学会了XML配置解析,那么理解注解配置解析当然也会非常轻松。
第一节 映射文件解析入口
在展开映射文件的解析之前,先来看一下映射文件解析入口。如下:
// -☆- XMLMapperBuilder
public void parse() {
    // 检测映射文件是否已经被解析过
    if (!configuration.isResourceLoaded(resource)) {
        // 解析 mapper 节点
        configurationElement(parser.evalNode("/mapper"));
        // 添加资源路径到“已解析资源集合”中
        configuration.addLoadedResource(resource);
        // 通过命名空间绑定 Mapper 接口
        bindMapperForNamespace();
    }

    // 处理未完成解析的节点
    parsePendingResultMaps();
    parsePendingCacheRefs();
    parsePendingStatements();
}
如上,映射文件解析入口逻辑包含三个核心操作,分别如下:
- 解析 mapper 节点
- 通过命名空间绑定 Mapper 接口
- 处理未完成解析的节点
这三个操作对应的逻辑,我将会在随后的章节中依次进行分析。下面,先来分析第一个操作对应的逻辑,下面是一个映射文件配置示例。
<mapper namespace="xyz.coolblog.dao.AuthorDao">

    <cache/>

    <resultMap id="authorResult" type="Author">
        <id property="id" column="id"/>
        <result property="name" column="name"/>
        <!-- ... -->
    </resultMap>

    <sql id="table">
        author
    </sql>

    <select id="findOne" resultMap="authorResult">
        SELECT
            id, name, age, sex, email
        FROM
            <include refid="table"/>
        WHERE
            id = #{id}
    </select>

    <!-- <insert|update|delete/> -->
</mapper>
上面是一个比较简单的映射文件,还有一些的节点没有出现在上面。以上每种配置中的每种节点的解析逻辑都封装在了相应的方法中,这些方法由 XMLMapperBuilder 类的 configurationElement 方法统一调用。
private void configurationElement(XNode context) {
    try {
        // 获取 mapper 命名空间
        String namespace = context.getStringAttribute("namespace");
        if (namespace == null || namespace.equals("")) {
            throw new BuilderException("Mapper's namespace cannot be empty");
        }

        // 设置命名空间到 builderAssistant 中
        builderAssistant.setCurrentNamespace(namespace);

        // 解析 <cache-ref> 节点
        cacheRefElement(context.evalNode("cache-ref"));

        // 解析 <cache> 节点
        cacheElement(context.evalNode("cache"));

        // 已废弃配置,这里不做分析
        parameterMapElement(context.evalNodes("/mapper/parameterMap"));

        // 解析 <resultMap> 节点
        resultMapElements(context.evalNodes("/mapper/resultMap"));

        // 解析 <sql> 节点
        sqlElement(context.evalNodes("/mapper/sql"));

        // 解析 <select>、...、<delete> 等节点
        buildStatementFromContext(context.evalNodes("select|insert|update|delete"));
    } catch (Exception e) {
        throw new BuilderException("Error parsing Mapper XML. The XML location is '" + resource + "'. Cause: " + e, e);
    }
}
下面将会先分析 <cache> 节点的解析过程,然后再分析 <cache-ref> 节点,之后会按照顺序分析其他节点的解析过程。
第二节 解析 cache 节点
MyBatis 提供了一级/二级缓存,其中一级缓存是 SqlSession 级别的,默认为开启状态。二级缓存配置在映射文件中,需要显示配置开启。
<!-- 开启二级缓存:
	eviction:FIFO表示按“先进先出”的策略淘汰缓存项
	flushInterval:缓存每隔60秒刷新一次
    size:缓存的容量为512个对象引用
	readOnly:为true表示缓存返回的对象是写安全的,即在外部修改对象不会影响到缓存内部存储对象
-->
<cache eviction="FIFO" flushInterval="60000" size="512" readOnly="true"/>
除此之外,还可以给 MyBatis 配置第三方缓存或者自己实现的缓存等。比如,我们将 Ehcache 缓存整合到 MyBatis 中,可以这样配置。
<cache type="org.mybatis.caches.ehcache.EhcacheCache"/>
    <property name="timeToIdleSeconds" value="3600"/>
    <property name="timeToLiveSeconds" value="3600"/>
    <property name="maxEntriesLocalHeap" value="1000"/>
    <property name="maxEntriesLocalDisk" value="10000000"/>
    <property name="memoryStoreEvictionPolicy" value="LRU"/>
</cache>
下面来分析一下缓存配置的解析逻辑,如下:
private void cacheElement(XNode context) throws Exception {
    if (context != null) {
        // 获取各种属性
        String type = context.getStringAttribute("type", "PERPETUAL");
        Class<? extends Cache> typeClass = typeAliasRegistry.resolveAlias(type);
        String eviction = context.getStringAttribute("eviction", "LRU");
        Class<? extends Cache> evictionClass = typeAliasRegistry.resolveAlias(eviction);
        Long flushInterval = context.getLongAttribute("flushInterval");
        Integer size = context.getIntAttribute("size");
        boolean readWrite = !context.getBooleanAttribute("readOnly", false);
        boolean blocking = context.getBooleanAttribute("blocking", false);

        // 获取子节点配置
        Properties props = context.getChildrenAsProperties();

        // 构建缓存对象
        builderAssistant.useNewCache(typeClass, evictionClass, flushInterval, size, readWrite, blocking, props);
    }
}
上面代码中,大段代码用来解析 <cache> 节点的属性和子节点,这些代码没什么好说的。缓存的构建逻辑封装在 BuilderAssistant 类的 useNewCache 方法中,下面我们来看一下该方法的逻辑。
// -☆- MapperBuilderAssistant
public Cache useNewCache(Class<? extends Cache> typeClass,
    Class<? extends Cache> evictionClass,Long flushInterval,
    Integer size,boolean readWrite,boolean blocking,Properties props) {

    // 使用建造模式构建缓存实例
    Cache cache = new CacheBuilder(currentNamespace)
        .implementation(valueOrDefault(typeClass, PerpetualCache.class))
        .addDecorator(valueOrDefault(evictionClass, LruCache.class))
        .clearInterval(flushInterval)
        .size(size)
        .readWrite(readWrite)
        .blocking(blocking)
        .properties(props)
        .build();

    // 添加缓存到 Configuration 对象中
    configuration.addCache(cache);

   // 设置当前缓存为刚创建的缓存
    currentCache = cache;
    return cache;
}
上面使用了建造模式构建 Cache 实例,Cache 实例的构建过程略为复杂,我们跟下去看看。
// -☆- CacheBuilder
public Cache build() {
    // 设置默认的缓存类型(PerpetualCache)和缓存装饰器(LruCache)
    setDefaultImplementations();

    // 通过反射创建缓存
    Cache cache = newBaseCacheInstance(implementation, id);
    // 设置子节点配置的属性
    setCacheProperties(cache);
    // 仅对内置缓存 PerpetualCache 应用装饰器
    if (PerpetualCache.class.equals(cache.getClass())) {
        // 遍历装饰器集合,应用装饰器
        for (Class<? extends Cache> decorator : decorators) {
        	// 通过反射创建装饰器实例
            cache = newCacheDecoratorInstance(decorator, cache);
            // 再次设置子节点配置的属性(for装饰器)
            setCacheProperties(cache);
        }
        // 应用标准的装饰器,比如 LoggingCache、SynchronizedCache
        cache = setStandardDecorators(cache);
    } else if (!LoggingCache.class.isAssignableFrom(cache.getClass())) {
        // 应用具有日志功能的缓存装饰器
        cache = new LoggingCache(cache);
    }
    return cache;
}
上面的构建过程流程较为复杂,这里总结一下。如下:
- 设置默认的缓存类型及装饰器
- 应用装饰器到 PerpetualCache 对象上
- 遍历装饰器类型集合,并通过反射创建装饰器实例
- 将属性设置到实例中
- 应用一些标准的装饰器
- 对非 LoggingCache 类型的缓存应用 LoggingCache 装饰器
在以上4个步骤中,最后一步的逻辑很简单,无需多说。下面按顺序分析前3个步骤对应的逻辑,如下:
private void setDefaultImplementations() {
    if (implementation == null) {
        // 设置默认的缓存实现类
        implementation = PerpetualCache.class;
        if (decorators.isEmpty()) {
            // 添加 LruCache 装饰器
            decorators.add(LruCache.class);
        }
    }
}
以上逻辑比较简单,主要做的事情是在 implementation 为空的情况下,为它设置一个默认值。如果大家仔细看前面的方法,会发现 MyBatis 做了不少判空的操作。比如:
// 判空操作1,若用户未设置 cache 节点的 type 和 eviction 属性,这里设置默认值 PERPETUAL
String type = context.getStringAttribute("type", "PERPETUAL");
String eviction = context.getStringAttribute("eviction", "LRU");

// 判空操作2,若 typeClass 或 evictionClass 为空,valueOrDefault 方法会为它们设置默认值
Cache cache = new CacheBuilder(currentNamespace)
            .implementation(valueOrDefault(typeClass, PerpetualCache.class))
            .addDecorator(valueOrDefault(evictionClass, LruCache.class))
            // 省略部分代码
            .build();
既然前面已经做了两次判空操作,implementation 不可能为空,那么 setDefaultImplementations 方法似乎没有存在的必要了。其实不然,如果有人不按套路写代码。比如:
Cache cache = new CacheBuilder(currentNamespace)
            // 忘记设置 implementation
            .build();
这里忘记设置 implementation,或人为的将 implementation 设为空。如果不对 implementation 进行判空,会导致 build 方法在构建实例时触发空指针异常,对于框架来说,出现空指针异常是很尴尬的,这是一个低级错误。这里以及之前做了这么多判空,就是为了避免出现空指针的情况,以提高框架的健壮性。好了,关于 setDefaultImplementations 方法的分析先到这,继续往下分析。
我们在使用 MyBatis 内置缓存时,一般不用为它们配置自定义属性。但使用第三方缓存时,则应按需进行配置。比如前面演示 MyBatis 整合 Ehcache 时,就为 Ehcache 配置了一些必要的属性。下面我们来看一下这部分配置是如何设置到缓存实例中的。
private void setCacheProperties(Cache cache) {
    if (properties != null) {
        /*
         * 为缓存实例生成一个“元信息”实例,forObject 方法调用层次比较深,但最终调用了
         * MetaClass 的 forClass 方法。关于 MetaClass 的源码,我在上一篇文章中已经
         * 详细分析过了,这里不再赘述。
         */
        MetaObject metaCache = SystemMetaObject.forObject(cache);
        // 遍历子节点属性
        for (Map.Entry<Object, Object> entry : properties.entrySet()) {
            String name = (String) entry.getKey();
            String value = (String) entry.getValue();
            if (metaCache.hasSetter(name)) {
                // 获取 setter 方法的参数类型
                Class<?> type = metaCache.getSetterType(name);
                /*
                 * 根据参数类型对属性值进行转换,并将转换后的值
                 * 通过 setter 方法设置到 Cache 实例中
                 */
                if (String.class == type) {
                    metaCache.setValue(name, value);
                } else if (int.class == type || Integer.class == type) {
                	/*
                	 * 此处及以下分支包含两个步骤:
                	 *   1.类型转换 → Integer.valueOf(value)
                	 *   2.将转换后的值设置到缓存实例中 → metaCache.setValue(name, value)
                	 */
                    metaCache.setValue(name, Integer.valueOf(value));
                } else if (long.class == type || Long.class == type) {
                    metaCache.setValue(name, Long.valueOf(value));
                }
                else if (short.class == type || Short.class == type) {...}
                else if (byte.class == type || Byte.class == type) {...}
                else if (float.class == type || Float.class == type) {...}
                else if (boolean.class == type || Boolean.class == type) {...}
                else if (double.class == type || Double.class == type) {...}
                else {
                    throw new CacheException("Unsupported property type for cache: '" + name + "' of type " + type);
                }
            }
        }
    }

    // 如果缓存类实现了 InitializingObject 接口,则调用 initialize 方法执行初始化逻辑
    if (InitializingObject.class.isAssignableFrom(cache.getClass())) {
        try {
            ((InitializingObject) cache).initialize();
        } catch (Exception e) {
            throw new CacheException("Failed cache initialization for '" +
                cache.getId() + "' on '" + cache.getClass().getName() + "'", e);
        }
    }
}
上面的大段代码用于对属性值进行类型转换,和设置转换后的值到 Cache 实例中。关于上面代码中出现的 MetaObject,大家可以自己尝试分析一下。最后,我们来看一下设置标准装饰器的过程。如下:
private Cache setStandardDecorators(Cache cache) {
    try {
        // 创建“元信息”对象
        MetaObject metaCache = SystemMetaObject.forObject(cache);
        if (size != null && metaCache.hasSetter("size")) {
            // 设置 size 属性,
            metaCache.setValue("size", size);
        }
        if (clearInterval != null) {
            // clearInterval 不为空,应用 ScheduledCache 装饰器
            cache = new ScheduledCache(cache);
            ((ScheduledCache) cache).setClearInterval(clearInterval);
        }
        if (readWrite) {
            // readWrite 为 true,应用 SerializedCache 装饰器
            cache = new SerializedCache(cache);
        }
        /*
         * 应用 LoggingCache,SynchronizedCache 装饰器,
         * 使原缓存具备打印日志和线程同步的能力
         */
        cache = new LoggingCache(cache);
        cache = new SynchronizedCache(cache);
        if (blocking) {
            // blocking 为 true,应用 BlockingCache 装饰器
            cache = new BlockingCache(cache);
        }
        return cache;
    } catch (Exception e) {
        throw new CacheException("Error building standard cache decorators.  Cause: " + e, e);
    }
}
以上代码为缓存应用了一些基本的装饰器,但除了 LoggingCache 和 SynchronizedCache 这两个是必要的装饰器外,其他的装饰器应用与否,取决于用户的配置。
第三节 解析 cache-ref 节点
在 MyBatis 中,二级缓存是可以共用的。这需要使用 <cache-ref> 节点配置参照缓存,比如像下面这样。
<!-- Mapper1.xml -->
<mapper namespace="xyz.coolblog.dao.Mapper1">
    <!-- Mapper1 与 Mapper2 共用一个二级缓存 -->
    <cache-ref namespace="xyz.coolblog.dao.Mapper2"/>
</mapper>

<!-- Mapper2.xml -->
<mapper namespace="xyz.coolblog.dao.Mapper2">
    <cache/>
</mapper>
接下来,我们对照上面的配置分析 cache-ref 的解析过程。如下:
private void cacheRefElement(XNode context) {
    if (context != null) {
        configuration.addCacheRef(builderAssistant.getCurrentNamespace(), context.getStringAttribute("namespace"));
        // 创建 CacheRefResolver 实例
        CacheRefResolver cacheRefResolver = new CacheRefResolver(builderAssistant, context.getStringAttribute("namespace"));
        try {
            // 解析参照缓存
            cacheRefResolver.resolveCacheRef();
        } catch (IncompleteElementException e) {
            /*
             * 这里对 IncompleteElementException 异常进行捕捉,并将 cacheRefResolver
             * 存入到 Configuration 的 incompleteCacheRefs 集合中
             */
            configuration.addIncompleteCacheRef(cacheRefResolver);
        }
    }
}
如上所示,<cache-ref> 节点的解析逻辑封装在了 CacheRefResolver 的 resolveCacheRef 方法中。
// -☆- CacheRefResolver
public Cache resolveCacheRef() {
    // 调用 builderAssistant 的 useCacheRef(cacheRefNamespace) 方法
    return assistant.useCacheRef(cacheRefNamespace);
}

// -☆- MapperBuilderAssistant
public Cache useCacheRef(String namespace) {
    if (namespace == null) {
        throw new BuilderException("cache-ref element requires a namespace attribute.");
    }
    try {
        unresolvedCacheRef = true;
        // 根据命名空间从全局配置对象(Configuration)中查找相应的缓存实例
        Cache cache = configuration.getCache(namespace);

        /*
         * 若未查找到缓存实例,此处抛出异常。这里存在两种情况导致未查找到 cache 实例,
         * 分别如下:
         *     1.使用者在 <cache-ref> 中配置了一个不存在的命名空间,
         *       导致无法找到 cache 实例
         *     2.使用者所引用的缓存实例还未创建
         */
        if (cache == null) {
            throw new IncompleteElementException("No cache for namespace '" + namespace + "' could be found.");
        }

        // 修改当前缓存为查询出来的缓存
        currentCache = cache;
        unresolvedCacheRef = false;
        return cache;
    } catch (IllegalArgumentException e) {
        throw new IncompleteElementException("No cache for namespace '" + namespace + "' could be found.", e);
    }
}
关于XML和注解中同时配置缓存的问题?
- XML和注解不能同时开启缓存。会报 IllegalArgumentException: Caches collection already contains value for org.example.dao.XxxMapper错误。因为缓存对象创建后会被添加到Configuration中,而保存所有cache对象的是一个MyBatis自定义的
StrictMap类型,该类型继承自HashMap,在put时会校验元素是否已存在。- 其中一方开启缓存,另一方不能直接使用。由于XML解析和注解解析映射配置时分别创建了两个不同的对象(XmlMapperBuilder和MapperAnnotationBuilder类型),所以它们的内部类MapperBuilderAssistant中保存的currentCache(在解析cache节点时将创建的cache对象设置到currentCache)是两个不同的引用,因此由不同对象构建的MapperStatement(不能在XML和注解中配置同一个MapperStatement),保存了各自的cache对象。从而在查找二级缓存时,只能查找配置了cache节点的那一方。
- 可以使用缓存引用来解决上述问题。因为在缓存引用解析的过程中,会查找对应的cache设置到currentCache,后续构建MapperStatement时会保存此引用。
第四节 解析 resultMap 节点
resultMap 是 MyBatis 框架中最重要的特性,主要用于映射结果,下面开始分析 resultMap 配置的解析过程。
// -☆- XMLMapperBuilder
private void resultMapElements(List<XNode> list) throws Exception {
    // 遍历 <resultMap> 节点列表
    for (XNode resultMapNode : list) {
        try {
            // 解析 resultMap 节点
            resultMapElement(resultMapNode);
        } catch (IncompleteElementException e) {
            // ignore, it will be retried
        }
    }
}

private ResultMap resultMapElement(XNode resultMapNode) throws Exception {
    // 调用重载方法(节点名称,已解析的ResultMapping)
    return resultMapElement(resultMapNode, Collections.<ResultMapping>emptyList());
}

private ResultMap resultMapElement(XNode resultMapNode, List<ResultMapping> additionalResultMappings) throws Exception {
    ErrorContext.instance().activity("processing " + resultMapNode.getValueBasedIdentifier());

    // 获取 id 属性(嵌套映射没有id属性,调用resultMapNode.getValueBasedIdentifier()生成,
    // 如id = mapper_resultMap[articleResult]_association[article_author])
    String id = resultMapNode.getStringAttribute("id", resultMapNode.getValueBasedIdentifier());

    //  获取 type 属性(获取顺序依次是type->ofType->resultType->javaType)
    String type = resultMapNode.getStringAttribute("type",
        resultMapNode.getStringAttribute("ofType",
            resultMapNode.getStringAttribute("resultType",
                resultMapNode.getStringAttribute("javaType"))));

    // 获取 extends 和 autoMapping 属性
    String extend = resultMapNode.getStringAttribute("extends");
    Boolean autoMapping = resultMapNode.getBooleanAttribute("autoMapping");

    // 解析 type 属性对应的类型
    Class<?> typeClass = resolveClass(type);
    Discriminator discriminator = null;

    // 存放解析出来的 ResultMapping
    List<ResultMapping> resultMappings = new ArrayList<ResultMapping>();

    // 将参数传入的 ResultMapping 添加进来(一般是嵌套映射的父映射)
    resultMappings.addAll(additionalResultMappings);

    // 获取并遍历 <resultMap> 的子节点列表
    List<XNode> resultChildren = resultMapNode.getChildren();
    for (XNode resultChild : resultChildren) {
        if ("constructor".equals(resultChild.getName())) {
            // 解析 constructor 标签,并生成相应的 ResultMapping
            processConstructorElement(resultChild, typeClass, resultMappings);
        } else if ("discriminator".equals(resultChild.getName())) {
            // 解析 discriminator 标签
            discriminator = processDiscriminatorElement(resultChild, typeClass, resultMappings);
        } else {
			// 解析其它标签(id/result/association/collection)
            List<ResultFlag> flags = new ArrayList<ResultFlag>();
            // 判断是否为 id 标签,如果是,则添加标记
            if ("id".equals(resultChild.getName())) {
                flags.add(ResultFlag.ID);
            }
            // 解析 id 和 result 节点,并生成相应的 ResultMapping
            resultMappings.add(buildResultMappingFromContext(resultChild, typeClass, flags));
        }
    }

    // 创建 ResultMapResolver 实例
    ResultMapResolver resultMapResolver = new ResultMapResolver(builderAssistant, id, typeClass, extend,
        discriminator, resultMappings, autoMapping);
    try {
        // 根据前面获取到的信息构建 ResultMap 对象
        return resultMapResolver.resolve();
    } catch (IncompleteElementException e) {
        /*
         * 如果发生 IncompleteElementException 异常,
         * 这里将 resultMapResolver 添加到 incompleteResultMaps 集合中
         */
        configuration.addIncompleteResultMap(resultMapResolver);
        throw e;
    }
}
上面的代码比较多,看起来有点复杂,这里总结一下:
- 获取
<resultMap>节点的各种属性 - 遍历
<resultMap>的子节点,并根据子节点名称执行相应的解析逻辑 - 构建 ResultMap 对象
- 若构建过程中发生异常,则将 resultMapResolver 添加到 incompleteResultMaps 集合中
如上流程,第1步和最后一步都是一些常规操作,无需过多解释。第2步和第3步则是接下来需要重点分析的操作,这其中,鉴别器 discriminator 不是很常用的特性,我觉得大家知道它有什么用就行了,所以就不分析了。
1. 解析 id 和 result 节点
在 <resultMap> 节点中,子节点 <id> 和 <result> 都是常规配置,比较常见。下面我们直接分析这两个节点的解析过程。
private ResultMapping buildResultMappingFromContext(XNode context, Class<?> resultType, List<ResultFlag> flags) throws Exception {

    // 获取映射的 java 属性名或构造函数形参名(property 或 name 属性配置)
    String property;
    if (flags.contains(ResultFlag.CONSTRUCTOR)) {
        property = context.getStringAttribute("name");
    } else {
        property = context.getStringAttribute("property");
    }

    // 获取其他各种属性
    String column = context.getStringAttribute("column");
    String javaType = context.getStringAttribute("javaType");
    String jdbcType = context.getStringAttribute("jdbcType");
    String nestedSelect = context.getStringAttribute("select");

    /*
     * 解析 resultMap 属性,该属性出现在 <association> 和 <collection> 节点中。
     * 若这两个节点不包含 resultMap 属性,则调用 processNestedResultMappings 方法解析嵌套 resultMap。
     */
    String nestedResultMap = context.getStringAttribute("resultMap", processNestedResultMappings(context, Collections.<ResultMapping>emptyList()));

    String notNullColumn = context.getStringAttribute("notNullColumn");
    String columnPrefix = context.getStringAttribute("columnPrefix");
    String typeHandler = context.getStringAttribute("typeHandler");
    String resultSet = context.getStringAttribute("resultSet");
    String foreignColumn = context.getStringAttribute("foreignColumn");
    boolean lazy = "lazy".equals(context.getStringAttribute("fetchType", configuration.isLazyLoadingEnabled() ? "lazy" : "eager"));

    // 解析 javaType、typeHandler 的类型以及枚举类型 JdbcType
    Class<?> javaTypeClass = resolveClass(javaType);
    Class<? extends TypeHandler<?>> typeHandlerClass = (Class<? extends TypeHandler<?>>) resolveClass(typeHandler);
    JdbcType jdbcTypeEnum = resolveJdbcType(jdbcType);

    // 构建 ResultMapping 对象
    return builderAssistant.buildResultMapping(resultType, property, column, javaTypeClass, jdbcTypeEnum, nestedSelect,
        nestedResultMap, notNullColumn, columnPrefix, typeHandlerClass, flags, resultSet, foreignColumn, lazy);
}
上面的方法主要用于获取 <id> 和 <result> 节点的属性,其中,resultMap 属性的解析过程要相对复杂一些。该属性存在于 <association> 和 <collection> 节点中。下面以 <association> 节点为例,演示该节点的两种配置方式,分别如下:
第一种配置方式是通过 resultMap 属性引用其他的 <resultMap> 节点,配置如下:
<resultMap id="articleResult" type="Article">
    <id property="id" column="id"/>
    <result property="title" column="article_title"/>
    <!-- 引用 authorResult -->
    <association property="article_author" column="article_author_id" javaType="Author" resultMap="authorResult"/>
</resultMap>

<resultMap id="authorResult" type="Author">
    <id property="id" column="author_id"/>
    <result property="name" column="author_name"/>
</resultMap>
第二种配置方式是采取 resultMap 嵌套的方式进行配置,如下:
<resultMap id="articleResult" type="Article">
    <id property="id" column="id"/>
    <result property="title" column="article_title"/>
    <!-- resultMap 嵌套 -->
    <association property="article_author" javaType="Author">
        <id property="id" column="author_id"/>
        <result property="name" column="author_name"/>
    </association>
</resultMap>
如上配置所示,<association> 的子节点也是一些结果映射配置,这些结果配置最终也会被解析成 ResultMap。
private String processNestedResultMappings(XNode context, List<ResultMapping> resultMappings) throws Exception {
    // 判断节点名称
    if ("association".equals(context.getName())
        || "collection".equals(context.getName())
        || "case".equals(context.getName())) {
        if (context.getStringAttribute("select") == null) {
            // resultMapElement 是解析 ResultMap 入口方法
            ResultMap resultMap = resultMapElement(context, resultMappings);
            // 返回 resultMap id
            return resultMap.getId();
        }
    }
    return null;
}
如上,这些嵌套映射配置也是由 resultMapElement 方法解析的,并在最后返回 resultMap.id设置到主映射中。
关于嵌套 resultMap 的解析逻辑就先分析到这,下面分析 ResultMapping 的构建过程。
public ResultMapping buildResultMapping(Class<?> resultType, String property, String column, Class<?> javaType,JdbcType jdbcType,
    String nestedSelect, String nestedResultMap, String notNullColumn, String columnPrefix,Class<? extends TypeHandler<?>> typeHandler,
    List<ResultFlag> flags, String resultSet, String foreignColumn, boolean lazy) {

    /* 解析javaType(获取java属性名对应set方法的返回类型)
	 * 若 javaType 为空,这里根据 property 的属性进行解析。
	 * 关于下面方法中的参数,这里说明一下:
     *   - resultType:即 <resultMap type="xxx"/> 中的 type 属性,即映射的类名
     *   - property:即 <result property="xxx"/> 中的 property 属性,即映射的属性名
     */
    Class<?> javaTypeClass = resolveResultJavaType(resultType, property, javaType);

    // 解析 TypeHandler
    TypeHandler<?> typeHandlerInstance = resolveTypeHandler(javaTypeClass, typeHandler);

    /*
     * 解析 column = {property1=column1, property2=column2} 的情况,
     * 这里会将 column 拆分成多个 ResultMapping
     */
    List<ResultMapping> composites = parseCompositeColumnName(column);

    // 通过建造模式构建 ResultMapping
    return new ResultMapping.Builder(configuration, property, column, javaTypeClass)
        .jdbcType(jdbcType)
        .nestedQueryId(applyCurrentNamespace(nestedSelect, true))
        .nestedResultMapId(applyCurrentNamespace(nestedResultMap, true))
        .resultSet(resultSet)
        .typeHandler(typeHandlerInstance)
        .flags(flags == null ? new ArrayList<ResultFlag>() : flags)
        .composites(composites)
        .notNullColumns(parseMultipleColumnNames(notNullColumn))
        .columnPrefix(columnPrefix)
        .foreignColumn(foreignColumn)
        .lazy(lazy)
        .build();
}

// -☆- ResultMapping.Builder
public ResultMapping build() {
    // 将 flags 和 composites 两个集合变为不可修改集合
    resultMapping.flags = Collections.unmodifiableList(resultMapping.flags);
    resultMapping.composites = Collections.unmodifiableList(resultMapping.composites);
    // 如果未配置 typeHandler 属性,则从 TypeHandlerRegistry 中获取相应 TypeHandler
    resolveTypeHandler();
    validate();
    return resultMapping;
}
ResultMapping 的构建过程不是很复杂,主要过程说明如下:
- 获取映射属性名的 java 类型。
- 根据配置的 typeHandler 属性创建类型处理器实例。
- 处理复合 column。
- 通过建造器构建 ResultMapping 实例。
关于上面方法中出现的一些方法调用,这里接不跟下去分析了,大家可以自己看看。
2. 解析 constructor 节点
constructor节点用于自定义映射对象的构造过程,可以通过有参构造来初始化构造的对象。有如下Java类。
public class ArticleDO {
    public ArticleDO(Integer id, String title, String content) {
        this.id = id;
        this.title = title;
        this.content = content;
    }
    // ...
}
ArticleDO 的构造方法对应的配置如下:
<constructor>
    <idArg column="id" name="id"/>
    <arg column="title" name="title"/>
    <arg column="content" name="content"/>
</constructor>
下面分析 constructor 节点的解析过程。
private void processConstructorElement(XNode resultChild, Class<?> resultType, List<ResultMapping> resultMappings) throws Exception {
    // 获取子节点列表
    List<XNode> argChildren = resultChild.getChildren();
    for (XNode argChild : argChildren) {
        List<ResultFlag> flags = new ArrayList<ResultFlag>();
        // 向 flags 中添加 CONSTRUCTOR 标志
        flags.add(ResultFlag.CONSTRUCTOR);
        if ("idArg".equals(argChild.getName())) {
            // 向 flags 中添加 ID 标志
            flags.add(ResultFlag.ID);
        }
        // 构建 ResultMapping,上一节已经分析过
        resultMappings.add(buildResultMappingFromContext(argChild, resultType, flags));
    }
}
首先是获取并遍历子节点列表,然后为每个子节点创建 flags 集合,并添加 CONSTRUCTOR 标志。对于 idArg 节点,额外添加 ID 标志。最后一步则是构建 ResultMapping,该步逻辑前面已经分析过,这里就不多说了。
3. ResultMap 对象构建过程分析
分析完 <resultMap> 的子节点 <id>,<result> 以及 <constructor> 的解析过程,下面来看看 ResultMap 实例的构建过程。下面是之前分析过的 ResultMap 构建的入口。
private ResultMap resultMapElement(XNode resultMapNode, List<ResultMapping> additionalResultMappings) throws Exception {

    // 获取 resultMap 节点中的属性
    // ...

    // 解析 resultMap 对应的类型
    // ...

    // 遍历 resultMap 节点的子节点,构建 ResultMapping 对象
    // ...

    // 创建 ResultMap 解析器
    ResultMapResolver resultMapResolver = new ResultMapResolver(builderAssistant, id, typeClass, extend,
        discriminator, resultMappings, autoMapping);
    try {
        // 根据前面获取到的信息构建 ResultMap 对象
        return resultMapResolver.resolve();
    } catch (IncompleteElementException e) {
        configuration.addIncompleteResultMap(resultMapResolver);
        throw e;
    }
}
ResultMap 的构建逻辑封装在 ResultMapResolver 的 resolve 方法中,下面从该方法进行分析。
// -☆- ResultMapResolver
public ResultMap resolve() {
    return assistant.addResultMap(this.id, this.type, this.extend, this.discriminator, this.resultMappings, this.autoMapping);
}
上面的方法将构建 ResultMap 实例的任务委托给了 MapperBuilderAssistant 的 addResultMap,我们跟进到这个方法中看看。
// -☆- MapperBuilderAssistant
public ResultMap addResultMap(
    String id, Class<?> type, String extend, Discriminator discriminator,
    List<ResultMapping> resultMappings, Boolean autoMapping) {

    // 为 ResultMap 的 id 和 extend 属性值拼接命名空间
    id = applyCurrentNamespace(id, false);
    extend = applyCurrentNamespace(extend, true);

    // 合并扩展 ResultMap
    if (extend != null) {
        // 如果 extend 的结果集还未解析,则抛出 IncompleteElementException 异常
        if (!configuration.hasResultMap(extend)) {
            throw new IncompleteElementException("Could not find a parent resultmap with id '" + extend + "'");
        }

        // 从 Configuration 中获取所有扩展 ResultMapping
        ResultMap resultMap = configuration.getResultMap(extend);
        List<ResultMapping> extendedResultMappings = new ArrayList<ResultMapping>(resultMap.getResultMappings());

        // 如果主映射已存在该 resultMapping,则将扩展中的移除
        extendedResultMappings.removeAll(resultMappings);

        // 检测主映射是否有构造器 (即resultMappings 集合中是否包含 CONSTRUCTOR 标志的元素)
        boolean declaresConstructor = false;
        for (ResultMapping resultMapping : resultMappings) {
            if (resultMapping.getFlags().contains(ResultFlag.CONSTRUCTOR)) {
                declaresConstructor = true;
                break;
            }
        }

        // 如果主映射存在构造器,则移除扩展中的构造器
        if (declaresConstructor) {
            Iterator<ResultMapping> extendedResultMappingsIter = extendedResultMappings.iterator();
            while (extendedResultMappingsIter.hasNext()) {
                if (extendedResultMappingsIter.next().getFlags().contains(ResultFlag.CONSTRUCTOR)) {
                    extendedResultMappingsIter.remove();
                }
            }
        }

        // 合并扩展映射到主映射中
        resultMappings.addAll(extendedResultMappings);
    }

    // 构建 ResultMap
    ResultMap resultMap = new ResultMap.Builder(configuration, id, type, resultMappings, autoMapping)
        .discriminator(discriminator)
        .build();
    configuration.addResultMap(resultMap);
    return resultMap;
}
上面的方法主要用于合并 extend 属性指定的扩展映射,并删除一些多余的映射列。随后,通过建造模式构建 ResultMap 实例。
// -☆- ResultMap
public ResultMap build() {
    if (resultMap.id == null) {
        throw new IllegalArgumentException("ResultMaps must have an id");
    }

    // 保存所有被映射的数据库列名(大写形式)
    resultMap.mappedColumns = new HashSet<String>();
    // 保存所有被映射的java属性名
    resultMap.mappedProperties = new HashSet<String>();
    // 保存所有的id标记映射列(如果没有一个列有id标记,则把所有列都当作id列)
    resultMap.idResultMappings = new ArrayList<ResultMapping>();
    // 保存所有的构造器映射列(并按照构造方法参数列表的顺序进行排序)
    resultMap.constructorResultMappings = new ArrayList<ResultMapping>();
    // 保存所有的非构造器映射列
    resultMap.propertyResultMappings = new ArrayList<ResultMapping>();
    // 保存所有的构造器参数名
    final List<String> constructorArgNames = new ArrayList<String>();

    // 遍历所有 ResultMapping
    for (ResultMapping resultMapping : resultMap.resultMappings) {
        // 检测是否存在嵌套查询
        resultMap.hasNestedQueries = resultMap.hasNestedQueries || resultMapping.getNestedQueryId() != null;
        // 检测是否存在嵌套映射
        resultMap.hasNestedResultMaps =
            resultMap.hasNestedResultMaps || (resultMapping.getNestedResultMapId() != null && resultMapping.getResultSet() == null);

        // 将 column 转换成大写,并添加到 mappedColumns 集合中
        final String column = resultMapping.getColumn();
        if (column != null) {
            resultMap.mappedColumns.add(column.toUpperCase(Locale.ENGLISH));
        } else if (resultMapping.isCompositeResult()) {
            // 复合列的特殊处理
            for (ResultMapping compositeResultMapping : resultMapping.getComposites()) {
                final String compositeColumn = compositeResultMapping.getColumn();
                if (compositeColumn != null) {
                    resultMap.mappedColumns.add(compositeColumn.toUpperCase(Locale.ENGLISH));
                }
            }
        }

        // 添加属性 property 到 mappedProperties 集合中
        final String property = resultMapping.getProperty();
        if (property != null) {
            resultMap.mappedProperties.add(property);
        }

        // 检测当前 resultMapping 是否包含 CONSTRUCTOR 标志
        if (resultMapping.getFlags().contains(ResultFlag.CONSTRUCTOR)) {
            // 添加 resultMapping 到 constructorResultMappings 中
            resultMap.constructorResultMappings.add(resultMapping);
            // 添加属性(constructor 节点的 name 属性)到 constructorArgNames 中
            if (resultMapping.getProperty() != null) {
                constructorArgNames.add(resultMapping.getProperty());
            }
        } else {
            // 添加 resultMapping 到 propertyResultMappings 中
            resultMap.propertyResultMappings.add(resultMapping);
        }

        if (resultMapping.getFlags().contains(ResultFlag.ID)) {
            // 添加 resultMapping 到 idResultMappings 中
            resultMap.idResultMappings.add(resultMapping);
        }
    }

    // 如果没有一个列有id标记,则把所有列都当作id列
    if (resultMap.idResultMappings.isEmpty()) {
        resultMap.idResultMappings.addAll(resultMap.resultMappings);
    }
    if (!constructorArgNames.isEmpty()) {
        // 获取实际的构造方法参数列表(解析@Param注解获取实际配置的形参名(通过参数数量和类型来进行匹配构造器))
        final List<String> actualArgNames = argNamesOfMatchingConstructor(constructorArgNames);
        if (actualArgNames == null) {
            throw new BuilderException("Error in result map '" + resultMap.id
                + "'. Failed to find a constructor in '"
                + resultMap.getType().getName() + "' by arg names " + constructorArgNames
                + ". There might be more info in debug log.");
        }

        // 对 constructorResultMappings 按照构造方法参数列表的顺序进行排序
        Collections.sort(resultMap.constructorResultMappings, new Comparator<ResultMapping>() {
            @Override
            public int compare(ResultMapping o1, ResultMapping o2) {
                int paramIdx1 = actualArgNames.indexOf(o1.getProperty());
                int paramIdx2 = actualArgNames.indexOf(o2.getProperty());
                return paramIdx1 - paramIdx2;
            }
        });
    }

    // 将以下这些集合变为不可修改集合
    resultMap.resultMappings = Collections.unmodifiableList(resultMap.resultMappings);
    resultMap.idResultMappings = Collections.unmodifiableList(resultMap.idResultMappings);
    resultMap.constructorResultMappings = Collections.unmodifiableList(resultMap.constructorResultMappings);
    resultMap.propertyResultMappings = Collections.unmodifiableList(resultMap.propertyResultMappings);
    resultMap.mappedColumns = Collections.unmodifiableSet(resultMap.mappedColumns);
    return resultMap;
}
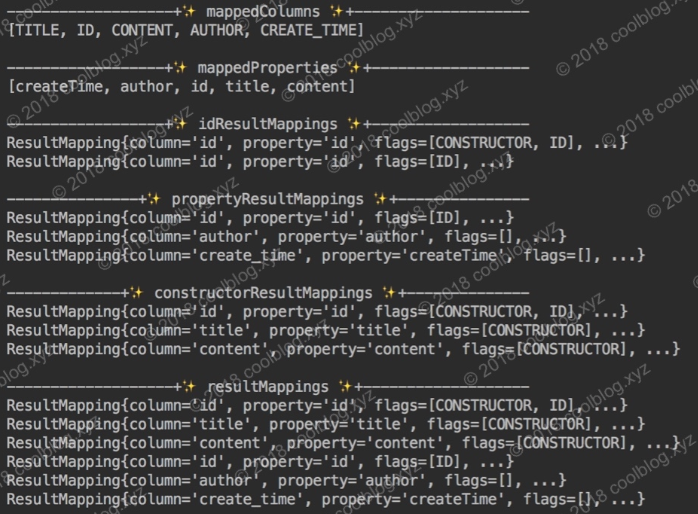
以上代码看起来很复杂,但实际上只是将 ResultMapping 实例及属性分别存储到不同的集合中而已。写点代码测试一下,并把这些集合的内容打印到控制台上,大家直观感受一下。先定义一个映射文件,如下:
<mapper namespace="xyz.coolblog.dao.ArticleDao">
    <resultMap id="articleResult" type="xyz.coolblog.model.Article">
        <constructor>
            <idArg column="id" name="id"/>
            <arg column="title" name="title"/>
            <arg column="content" name="content"/>
        </constructor>
        <id property="id" column="id"/>
        <result property="author" column="author"/>
        <result property="createTime" column="create_time"/>
    </resultMap>
</mapper>
测试代码如下:
public class ResultMapTest {

    @Test
    public void printResultMapInfo() throws Exception {
        Configuration configuration = new Configuration();
        String resource = "mapper/ArticleMapper.xml";
        InputStream inputStream = Resources.getResourceAsStream(resource);
        XMLMapperBuilder builder = new XMLMapperBuilder(inputStream, configuration, resource, configuration.getSqlFragments());
        builder.parse();

        ResultMap resultMap = configuration.getResultMap("articleResult");

        System.out.println("\n-------------------+✨ mappedColumns ✨+--------------------");
        System.out.println(resultMap.getMappedColumns());

        System.out.println("\n------------------+✨ mappedProperties ✨+------------------");
        System.out.println(resultMap.getMappedProperties());

        System.out.println("\n------------------+✨ idResultMappings ✨+------------------");
        resultMap.getIdResultMappings().forEach(rm -> System.out.println(simplify(rm)));

        System.out.println("\n---------------+✨ propertyResultMappings ✨+---------------");
        resultMap.getPropertyResultMappings().forEach(rm -> System.out.println(simplify(rm)));

        System.out.println("\n-------------+✨ constructorResultMappings ✨+--------------");
        resultMap.getConstructorResultMappings().forEach(rm -> System.out.println(simplify(rm)));

        System.out.println("\n-------------------+✨ resultMappings ✨+-------------------");
        resultMap.getResultMappings().forEach(rm -> System.out.println(simplify(rm)));

        inputStream.close();
    }

    /** 简化 ResultMapping 输出结果 */
    private String simplify(ResultMapping resultMapping) {
        return String.format("ResultMapping{column='%s', property='%s', flags=%s, ...}",
            resultMapping.getColumn(), resultMapping.getProperty(), resultMapping.getFlags());
    }
}
结果如下:
第五节 解析 sql 节点
<sql> 节点用来定义一些可重复使用的 SQL 语句片段,如表名,或表的列名等。在映射文件中,可以通过 <include> 节点引用 <sql> 节点定义的内容。下面是 <sql> 节点的使用方式,如下:
<!--定义一个sql节点,id为table,内容为“article”-->
<sql id="table">
    article
</sql>

<!--定义一个带占位符的sql节点,占位符可以从全局属性中解析,也可以从include标签的属性解析-->
<sql id="table">
    ${table_prefix}_article
</sql>

<!--通过include标签引用定义的sql节点-->
<select id="findOne" resultType="Article">
    SELECT id, title
      FROM <include refid="table"/>
     WHERE id = #{id}
</select>
下面分析一下 sql 节点的解析过程,如下:
private void sqlElement(List<XNode> list) throws Exception {
    if (configuration.getDatabaseId() != null) {
        // 调用 sqlElement 解析 <sql> 节点
        sqlElement(list, configuration.getDatabaseId());
    }

    // 再次调用 sqlElement,不同的是,这次调用,该方法的第二个参数为 null
    sqlElement(list, null);
}
这里需注意下 databaseId 属性的特殊处理,后面会多次用到。MyBatis一般采用 两次调用的方式来处理databaseId 问题,第一次带上下文中的数据库厂商调用,第二次使用NULL调用。即优先解析匹配数据库厂商标识的标签,如果不存在匹配的,则解析不带数据库厂商标识的标签。继续往下分析。
private void sqlElement(List<XNode> list, String requiredDatabaseId) throws Exception {
    for (XNode context : list) {
        // 获取 id 和 databaseId 属性
        String databaseId = context.getStringAttribute("databaseId");
        String id = context.getStringAttribute("id");

        // id = currentNamespace + "." + id
        id = builderAssistant.applyCurrentNamespace(id, false);

        // 检测当前 databaseId 和 requiredDatabaseId 是否一致
        if (databaseIdMatchesCurrent(id, databaseId, requiredDatabaseId)) {
            // 将 <id, XNode> 键值对缓存到 sqlFragments 中
            sqlFragments.put(id, context);
        }
    }
}
首先是获取 <sql> 节点的 id 和 databaseId 属性,然后为 id 属性值拼接命名空间。最后,通过检测当前 databaseId 和 requiredDatabaseId 是否一致,来决定保存还是忽略当前的 <sql> 节点。
下面,我们来看一下 databaseId 的匹配逻辑是怎样的。
private boolean databaseIdMatchesCurrent(String id, String databaseId, String requiredDatabaseId) {
    if (requiredDatabaseId != null) {
        // 当前 databaseId 和目标 databaseId 不一致时,返回 false
        if (!requiredDatabaseId.equals(databaseId)) {
            return false;
        }
    } else {
        // 如果目标 databaseId 为空,但当前 databaseId 不为空。两者不一致,返回 false
        if (databaseId != null) {
            return false;
        }
        /*
         * 如果当前 <sql> 节点的 id 与之前的 <sql> 节点重复,且先前节点
         * databaseId 不为空。则忽略当前节点,并返回 false
         */
        if (this.sqlFragments.containsKey(id)) {
            XNode context = this.sqlFragments.get(id);
            if (context.getStringAttribute("databaseId") != null) {
                return false;
            }
        }
    }
    return true;
}
下面总结一下 databaseId 的匹配规则。
- databaseId 与 requiredDatabaseId 不一致,即失配,返回 false
- 当前节点与之前的节点出现 id 重复的情况,若之前的
<sql>节点 databaseId 属性不为空,返回 false。 - 若以上两条规则均匹配失败,此时返回 true
在上面三条匹配规则中,第二条规则稍微难理解一点。这里简单分析一下,考虑下面这种配置。
<!-- databaseId 不为空 -->
<sql id="table" databaseId="mysql">
    article
</sql>

<!-- databaseId 为空 -->
<sql id="table">
    article
</sql>
在上面配置中,两个 <sql> 节点的 id 属性值相同,databaseId 属性不一致。假设 configuration.databaseId = mysql,第一次调用 sqlElement 方法,第一个 <sql> 节点对应的 XNode 会被放入到 sqlFragments 中。第二次调用 sqlElement 方法时,requiredDatabaseId 参数为空。由于 sqlFragments 中已包含了一个 id 节点,且该节点的 databaseId 不为空,此时匹配逻辑返回 false,第二个节点不会被保存到 sqlFragments。
第六节 解析 statement 节点
Statement节点指 SQL 语句节点,包括用于查询的<select>节点,以及执行更新和其它类型语句<update>、<insert>和<delete>节点,四者配置方式非常相似,因此放在一起进行解析。
private void buildStatementFromContext(List<XNode> list) {
    if (configuration.getDatabaseId() != null) {
        // 调用重载方法构建 Statement
        buildStatementFromContext(list, configuration.getDatabaseId());
    }
    // 调用重载方法构建 Statement,requiredDatabaseId 参数为空
    buildStatementFromContext(list, null);
}

private void buildStatementFromContext(List<XNode> list, String requiredDatabaseId) {
    for (XNode context : list) {
        // 创建 Statement 建造类
        final XMLStatementBuilder statementParser = new XMLStatementBuilder(configuration, builderAssistant, context, requiredDatabaseId);
        try {
            // 解析 Statement 节点,并将解析结果存储到 configuration 的 mappedStatements 集合中
            statementParser.parseStatementNode();
        } catch (IncompleteElementException e) {
            // 解析失败,将解析器放入 configuration 的 incompleteStatements 集合中
            configuration.addIncompleteStatement(statementParser);
        }
    }
}
上面的解析方法没有什么实质性的解析逻辑,我们继续往下分析。
public void parseStatementNode() {
    // 获取 id 和 databaseId 属性
    String id = context.getStringAttribute("id");
    String databaseId = context.getStringAttribute("databaseId");

    // 根据 databaseId 进行检测,检测逻辑和上一节基本一致,这里不再赘述
    if (!databaseIdMatchesCurrent(id, databaseId, this.requiredDatabaseId)) {
        return;
    }

    // 获取各种属性
    Integer fetchSize = context.getIntAttribute("fetchSize");
    Integer timeout = context.getIntAttribute("timeout");
    String parameterMap = context.getStringAttribute("parameterMap");
    String parameterType = context.getStringAttribute("parameterType");
    Class<?> parameterTypeClass = resolveClass(parameterType);
    String resultMap = context.getStringAttribute("resultMap");
    String resultType = context.getStringAttribute("resultType");
    String lang = context.getStringAttribute("lang");
    LanguageDriver langDriver = getLanguageDriver(lang);

    // 通过别名解析 resultType 对应的类型
    Class<?> resultTypeClass = resolveClass(resultType);
    String resultSetType = context.getStringAttribute("resultSetType");

    // 解析 Statement 类型,默认为 PREPARED
    StatementType statementType = StatementType.valueOf(context.getStringAttribute("statementType", StatementType.PREPARED.toString()));

    // 解析 ResultSetType
    ResultSetType resultSetTypeEnum = resolveResultSetType(resultSetType);

    // 获取节点的名称,比如 <select> 节点名称为 select
    String nodeName = context.getNode().getNodeName();
    // 根据节点名称解析 SqlCommandType
    SqlCommandType sqlCommandType = SqlCommandType.valueOf(nodeName.toUpperCase(Locale.ENGLISH));
    boolean isSelect = sqlCommandType == SqlCommandType.SELECT;
    boolean flushCache = context.getBooleanAttribute("flushCache", !isSelect);
    boolean useCache = context.getBooleanAttribute("useCache", isSelect);
    boolean resultOrdered = context.getBooleanAttribute("resultOrdered", false);

    // 解析 <include> 节点
    XMLIncludeTransformer includeParser = new XMLIncludeTransformer(configuration, builderAssistant);
    includeParser.applyIncludes(context.getNode());

    // 解析 <selectKey> 节点
    processSelectKeyNodes(id, parameterTypeClass, langDriver);

    // 解析 SQL 语句
    SqlSource sqlSource = langDriver.createSqlSource(configuration, context, parameterTypeClass);
    String resultSets = context.getStringAttribute("resultSets");
    String keyProperty = context.getStringAttribute("keyProperty");
    String keyColumn = context.getStringAttribute("keyColumn");

    KeyGenerator keyGenerator;
    String keyStatementId = id + SelectKeyGenerator.SELECT_KEY_SUFFIX;
    keyStatementId = builderAssistant.applyCurrentNamespace(keyStatementId, true);
    if (configuration.hasKeyGenerator(keyStatementId)) {
        // 获取 KeyGenerator 实例
        keyGenerator = configuration.getKeyGenerator(keyStatementId);
    } else {
        // 创建 KeyGenerator 实例
        keyGenerator = context.getBooleanAttribute("useGeneratedKeys",
            configuration.isUseGeneratedKeys() && SqlCommandType.INSERT.equals(sqlCommandType)) ? Jdbc3KeyGenerator.INSTANCE : NoKeyGenerator.INSTANCE;
    }

    /*
     * 构建 MappedStatement 对象,并将该对象存储到
     * Configuration 的 mappedStatements 集合中
     */
    builderAssistant.addMappedStatement(id, sqlSource, statementType, sqlCommandType,
        fetchSize, timeout, parameterMap, parameterTypeClass, resultMap, resultTypeClass,
        resultSetTypeEnum, flushCache, useCache, resultOrdered,
        keyGenerator, keyProperty, keyColumn, databaseId, langDriver, resultSets);
}
上面的代码中大都是用来获取节点属性,以及解析部分属性等,抛去这部分代码,以上代码做的事情如下。
- 解析
<include>节点。 - 解析
<selectKey>节点。 - 解析 SQL,获取 SqlSource。
- 构建 MappedStatement 实例。
以上流程对应的代码比较复杂,每个步骤都能分析出一些东西来,下面我会每个步骤都进行分析。
1. 解析 include 节点
<include> 节点的解析逻辑封装在 applyIncludes 中,该方法的代码如下:
public void applyIncludes(Node source) {
    // 创建一个临时 Properties,保存 configuration 中的变量
    Properties variablesContext = new Properties();
    Properties configurationVariables = configuration.getVariables();
    if (configurationVariables != null) {
        variablesContext.putAll(configurationVariables);
    }

    // 调用重载方法处理 <include> 节点(注意使用了variablesContext,这样就不会污染configuration中的数据了)
    applyIncludes(source, variablesContext, false);
}
由于解析 include 节点时会向 Properties 中添加新的元素,为了防止全局属性被污染,因此先创建了一个临时的 Properties,传给重载 applyIncludes 方法的使用。
private void applyIncludes(Node source, final Properties variablesContext, boolean included) {

    // ⭐️ 第一个条件分支
    if (source.getNodeName().equals("include")) {

        /*
         * 获取 <sql> 节点。若 refid 中包含属性占位符 ${},
         * 则需先将属性占位符替换为对应的属性值
         */
        Node toInclude = findSqlFragment(getStringAttribute(source, "refid"), variablesContext);

        /*
         * 解析 <include> 的子节点 <property>,并将解析结果与 variablesContext 融合,
         * 然后返回融合后的 Properties。若 <property> 节点的 value 属性中存在占位符 ${},
         * 则将占位符替换为对应的属性值
         */
        Properties toIncludeContext = getVariablesContext(source, variablesContext);

        /*
         * 这里是一个递归调用,用于将 <sql> 节点内容中出现的属性占位符 ${} 替换为对应的
         * 属性值。这里要注意一下递归调用的参数:
         *
         *  - toInclude:<sql> 节点对象
         *  - toIncludeContext:<include> 子节点 <property> 的解析结果与
         *                      全局变量融合后的结果
         */
        applyIncludes(toInclude, toIncludeContext, true);

        /*
         * 如果 <sql> 和 <include> 节点不在一个文档中,
         * 则从其他文档中将 <sql> 节点引入到 <include> 所在文档中
         */
        if (toInclude.getOwnerDocument() != source.getOwnerDocument()) {
            toInclude = source.getOwnerDocument().importNode(toInclude, true);
        }
        // 将 <include> 节点替换为 <sql> 节点
        source.getParentNode().replaceChild(toInclude, source);
        while (toInclude.hasChildNodes()) {
            // 将 <sql> 中的内容插入到 <sql> 节点之前
            toInclude.getParentNode().insertBefore(toInclude.getFirstChild(), toInclude);
        }

        /*
         * 前面已经将 <sql> 节点的内容插入到 dom 中了,
         * 现在不需要 <sql> 节点了,这里将该节点从 dom 中移除
         */
        toInclude.getParentNode().removeChild(toInclude);

    // ⭐️ 第二个条件分支
    } else if (source.getNodeType() == Node.ELEMENT_NODE) {
        if (included && !variablesContext.isEmpty()) {
            NamedNodeMap attributes = source.getAttributes();
            for (int i = 0; i < attributes.getLength(); i++) {
                Node attr = attributes.item(i);
                // 将 source 节点属性中的占位符 ${} 替换成具体的属性值
                attr.setNodeValue(PropertyParser.parse(attr.getNodeValue(), variablesContext));
            }
        }

        NodeList children = source.getChildNodes();
        for (int i = 0; i < children.getLength(); i++) {
            // 递归调用
            applyIncludes(children.item(i), variablesContext, included);
        }

    // ⭐️ 第三个条件分支
    } else if (included && source.getNodeType() == Node.TEXT_NODE && !variablesContext.isEmpty()) {
        // 将文本(text)节点中的属性占位符 ${} 替换成具体的属性值
        source.setNodeValue(PropertyParser.parse(source.getNodeValue(), variablesContext));
    }
}
上面的代码由三个分支语句,外加两个递归调用组成,理解起来有一定难度,下面将结合案例来进行讲解。
<mapper namespace="xyz.coolblog.dao.ArticleDao">
    <sql id="table">
        ${table_name}
    </sql>

    <select id="findOne" resultType="xyz.coolblog.dao.ArticleDO">
        SELECT
            id, title
        FROM
            <include refid="table">
                <property name="table_name" value="article"/>
            </include>
        WHERE id = #{id}
    </select>
</mapper>
我们先来看一下 applyIncludes 方法第一次被调用时的状态,如下:
参数值:
source = <select> 节点
节点类型:ELEMENT_NODE
variablesContext = [ ]  // 无内容
included = false

执行流程:
1. 进入条件分支2
2. 获取 <select> 子节点列表
3. 遍历子节点列表,将子节点作为参数,进行递归调用
第一次调用 applyIncludes 方法,source = <select>,代码进入条件分支2。在该分支中,首先要获取 <select> 节点的子节点列表。可获取到的子节点如下:
| 编号 | 子节点 | 类型 | 描述 |
|---|---|---|---|
| 1 | SELECT id, title FROM | TEXT_NODE | 文本节点 |
| 2 | <include refid="table"/> | ELEMENT_NODE | 普通节点 |
| 3 | WHERE id = #{id} | TEXT_NODE | 文本节点 |
在获取到子节点类列表后,接下来要做的事情是遍历列表,然后将子节点作为参数进行递归调用。在上面三个子节点中,子节点1和子节点3都是文本节点,调用过程一致。下面先来看下子节点1的调用过程,如下:
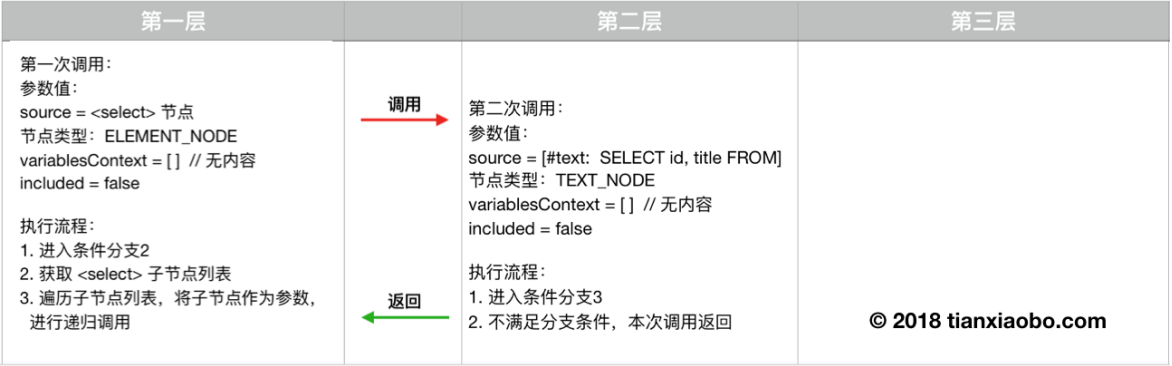
然后我们在看一下子节点2的调用过程,如下:
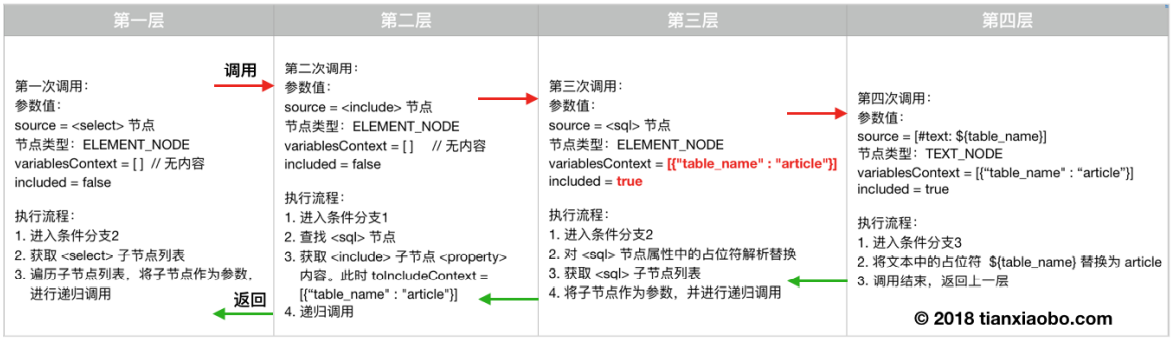
2. 解析 selectKey 节点
<selectKey>可以在主语句执行之前或之后执行额外的查询操作。一般用于在插入数据前查询主键值,这对一些不支持主键自增的数据库来说非常实用。
<insert id="saveAuthor">
    <selectKey keyProperty="id" resultType="int" order="BEFORE">
        select author_seq.nextval from dual
    </selectKey>
    insert into Author
        (id, name, password)
    values
        (#{id}, #{username}, #{password})
</insert>
下面我们来看一下 <selectKey> 节点的解析过程。
private void processSelectKeyNodes(String id, Class<?> parameterTypeClass, LanguageDriver langDriver) {
    List<XNode> selectKeyNodes = context.evalNodes("selectKey");

    // 处理 databaseId 问题(逻辑与之前一致)
    if (configuration.getDatabaseId() != null) {
        parseSelectKeyNodes(id, selectKeyNodes, parameterTypeClass, langDriver, configuration.getDatabaseId());
    }
    parseSelectKeyNodes(id, selectKeyNodes, parameterTypeClass, langDriver, null);

    // 将 <selectKey> 节点从 dom 树中移除
    removeSelectKeyNodes(selectKeyNodes);
}
selectkey节点解析完成后,会被从 dom 树中移除,这样后续可以更专注的解析 <insert> 或 <update> 节点中的 SQL,无需再额外处理 <selectKey> 节点。
private void parseSelectKeyNodes(String parentId, List<XNode> list, Class<?> parameterTypeClass,
    LanguageDriver langDriver, String skRequiredDatabaseId) {
    for (XNode nodeToHandle : list) {
        // id = parentId + !selectKey,比如 saveUser!selectKey
        String id = parentId + SelectKeyGenerator.SELECT_KEY_SUFFIX;
        // 获取 <selectKey> 节点的 databaseId 属性
        String databaseId = nodeToHandle.getStringAttribute("databaseId");
        // 匹配 databaseId
        if (databaseIdMatchesCurrent(id, databaseId, skRequiredDatabaseId)) {
            // 解析 <selectKey> 节点
            parseSelectKeyNode(id, nodeToHandle, parameterTypeClass, langDriver, databaseId);
        }
    }
}

// 实际解析逻辑
private void parseSelectKeyNode(String id, XNode nodeToHandle, Class<?> parameterTypeClass,
    LanguageDriver langDriver, String databaseId) {

    // 获取各种属性
    String resultType = nodeToHandle.getStringAttribute("resultType");
    Class<?> resultTypeClass = resolveClass(resultType);
    StatementType statementType = StatementType.valueOf(nodeToHandle.getStringAttribute("statementType", StatementType.PREPARED.toString()));
    String keyProperty = nodeToHandle.getStringAttribute("keyProperty");
    String keyColumn = nodeToHandle.getStringAttribute("keyColumn");
    boolean executeBefore = "BEFORE".equals(nodeToHandle.getStringAttribute("order", "AFTER"));

    // 设置默认值
    boolean useCache = false;
    boolean resultOrdered = false;
    KeyGenerator keyGenerator = NoKeyGenerator.INSTANCE;
    Integer fetchSize = null;
    Integer timeout = null;
    boolean flushCache = false;
    String parameterMap = null;
    String resultMap = null;
    ResultSetType resultSetTypeEnum = null;

    // 创建 SqlSource
    SqlSource sqlSource = langDriver.createSqlSource(configuration, nodeToHandle, parameterTypeClass);

    // <selectKey> 节点中只能配置 SELECT 查询语句,
    SqlCommandType sqlCommandType = SqlCommandType.SELECT;

    // 构建 MappedStatement,并将 MappedStatement ,添加到 Configuration 的 mappedStatements map 中
    builderAssistant.addMappedStatement(id, sqlSource, statementType, sqlCommandType,
        fetchSize, timeout, parameterMap, parameterTypeClass, resultMap, resultTypeClass,
        resultSetTypeEnum, flushCache, useCache, resultOrdered,
        keyGenerator, keyProperty, keyColumn, databaseId, langDriver, null);

    // 拼接Id,查询上一步添加的 MappedStatement
    id = builderAssistant.applyCurrentNamespace(id, false);
    MappedStatement keyStatement = configuration.getMappedStatement(id, false);

    // 创建 SelectKeyGenerator,并添加到 keyGenerators map 中
    configuration.addKeyGenerator(id, new SelectKeyGenerator(keyStatement, executeBefore));
}
以上代码比较重要的步骤如下:
- 创建 SqlSource 实例
- 构建并缓存 MappedStatement 实例
- 构建并缓存 SelectKeyGenerator 实例
第1步和第2步调用的是公共逻辑,其他地方也会调用,这两步对应的源码后续会分两节进行讲解。第3步则是创建一个 SelectKeyGenerator 实例,SelectKeyGenerator 创建的过程本身没什么好说的,所以就不多说了。
3. 解析 SQL 语句
前面分析了 <include> 和 <selectKey> 节点的解析过程,这两个节点解析完成后,都会以不同的方式从 dom 树中消失。所以目前的 SQL 语句节点由一些文本节点和普通节点组成,比如 <if>、<where> 等。那下面我们来看一下移除掉 <include> 和 <selectKey> 节点后的 SQL 语句节点是如何解析的。
// -☆- XMLLanguageDriver
public SqlSource createSqlSource(Configuration configuration, XNode script, Class<?> parameterType) {
    XMLScriptBuilder builder = new XMLScriptBuilder(configuration, script, parameterType);
    return builder.parseScriptNode();
}

// -☆- XMLScriptBuilder
public SqlSource parseScriptNode() {
    // 解析 SQL 语句节点
    MixedSqlNode rootSqlNode = parseDynamicTags(context);
    SqlSource sqlSource = null;
    // 根据 isDynamic 状态创建不同的 SqlSource
    if (isDynamic) {
        sqlSource = new DynamicSqlSource(configuration, rootSqlNode);
    } else {
        sqlSource = new RawSqlSource(configuration, rootSqlNode, parameterType);
    }
    return sqlSource;
}
SQL 语句的解析逻辑被封装在了 XMLScriptBuilder 类的 parseScriptNode 方法中。该方法首先会调用 parseDynamicTags 解析 SQL 语句节点,在解析过程中,会判断节点是是否包含一些动态标记,比如 ${} 占位符以及动态 SQL 节点等。若包含动态标记,则会将 isDynamic 设为 true。后续可根据 isDynamic 创建不同的 SqlSource。下面,我们来看一下 parseDynamicTags 方法的逻辑。
/** 该方法用于初始化 nodeHandlerMap 集合,该集合后面会用到 */
private void initNodeHandlerMap() {
    nodeHandlerMap.put("trim", new TrimHandler());
    nodeHandlerMap.put("where", new WhereHandler());
    nodeHandlerMap.put("set", new SetHandler());
    nodeHandlerMap.put("foreach", new ForEachHandler());
    nodeHandlerMap.put("if", new IfHandler());
    nodeHandlerMap.put("choose", new ChooseHandler());
    nodeHandlerMap.put("when", new IfHandler());
    nodeHandlerMap.put("otherwise", new OtherwiseHandler());
    nodeHandlerMap.put("bind", new BindHandler());
}

protected MixedSqlNode parseDynamicTags(XNode node) {
    List<SqlNode> contents = new ArrayList<SqlNode>();
    NodeList children = node.getNode().getChildNodes();
    // 遍历子节点
    for (int i = 0; i < children.getLength(); i++) {
        XNode child = node.newXNode(children.item(i));
        if (child.getNode().getNodeType() == Node.CDATA_SECTION_NODE || child.getNode().getNodeType() == Node.TEXT_NODE) {
            // 获取文本内容
            String data = child.getStringBody("");
            TextSqlNode textSqlNode = new TextSqlNode(data);
            // 若文本中包含 ${} 占位符,也被认为是动态节点
            if (textSqlNode.isDynamic()) {
                contents.add(textSqlNode);
                // 设置 isDynamic 为 true
                isDynamic = true;
            } else {
                // 创建 StaticTextSqlNode
                contents.add(new StaticTextSqlNode(data));
            }

        // child 节点是 ELEMENT_NODE 类型,比如 <if>、<where> 等
        } else if (child.getNode().getNodeType() == Node.ELEMENT_NODE) {
            // 获取节点名称,比如 if、where、trim 等
            String nodeName = child.getNode().getNodeName();
            // 根据节点名称获取 NodeHandler
            NodeHandler handler = nodeHandlerMap.get(nodeName);
            /*
             * 如果 handler 为空,表明当前节点对与 MyBatis 来说,是未知节点。
             * MyBatis 无法处理这种节点,故抛出异常
             */
            if (handler == null) {
                throw new BuilderException("Unknown element <" + nodeName + "> in SQL statement.");
            }
            // 处理 child 节点,生成相应的 SqlNode
            handler.handleNode(child, contents);

            // 设置 isDynamic 为 true
            isDynamic = true;
        }
    }
    return new MixedSqlNode(contents);
}
上面的代码主要是用来判断节点是否包含一些动态标记,比如 ${} 占位符以及动态 SQL 节点等。这里,不管是动态 SQL 节点还是静态 SQL 节点,我们都可以把它们看成是 SQL 片段,一个 SQL 语句由多个 SQL 片段组成。在解析过程中,这些 SQL 片段被存储在 contents 集合中。最后,该集合会被传给 MixedSqlNode 构造方法,用于创建 MixedSqlNode 实例。从 MixedSqlNode 类名上可知,它会存储多种类型的 SqlNode。除了上面代码中已出现的几种 SqlNode 实现类,还有一些 SqlNode 实现类未出现在上面的代码中。但它们也参与了 SQL 语句节点的解析过程,这里我们来看一下这些幕后的 SqlNode 类。
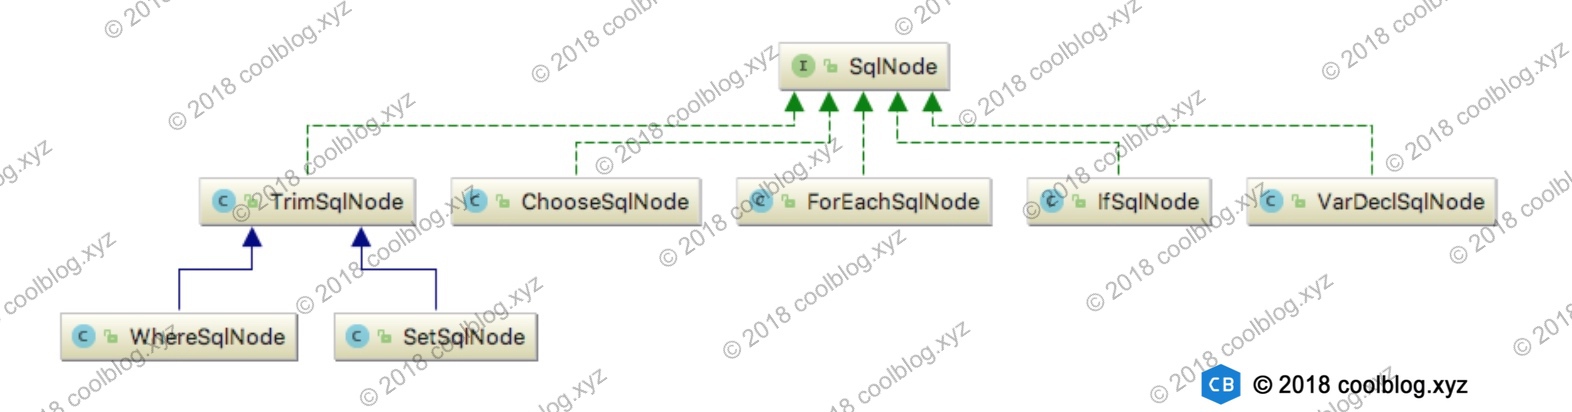
上面的 SqlNode 实现类用于处理不同的动态 SQL 逻辑,这些 SqlNode 是如何生成的呢?答案是由各种 NodeHandler 生成。我们再回到上面的代码中,可以看到这样一句代码:
handler.handleNode(child, contents);
该代码用于处理动态 SQL 节点,并生成相应的 SqlNode。下面来简单分析一下 WhereHandler 的代码。
/** 定义在 XMLScriptBuilder 中 */
private class WhereHandler implements NodeHandler {

    public WhereHandler() {
    }

    @Override
    public void handleNode(XNode nodeToHandle, List<SqlNode> targetContents) {
        // 调用 parseDynamicTags 解析 <where> 节点
        MixedSqlNode mixedSqlNode = parseDynamicTags(nodeToHandle);
        // 创建 WhereSqlNode
        WhereSqlNode where = new WhereSqlNode(configuration, mixedSqlNode);
        // 添加到 targetContents
        targetContents.add(where);
    }
}
如上,handleNode 方法内部会再次调用 parseDynamicTags 解析 <where> 节点中的内容(即子标签),这样又会生成一个 MixedSqlNode 对象。最终,整个 SQL 语句节点会生成一个具有树状结构的 MixedSqlNode。如下图:
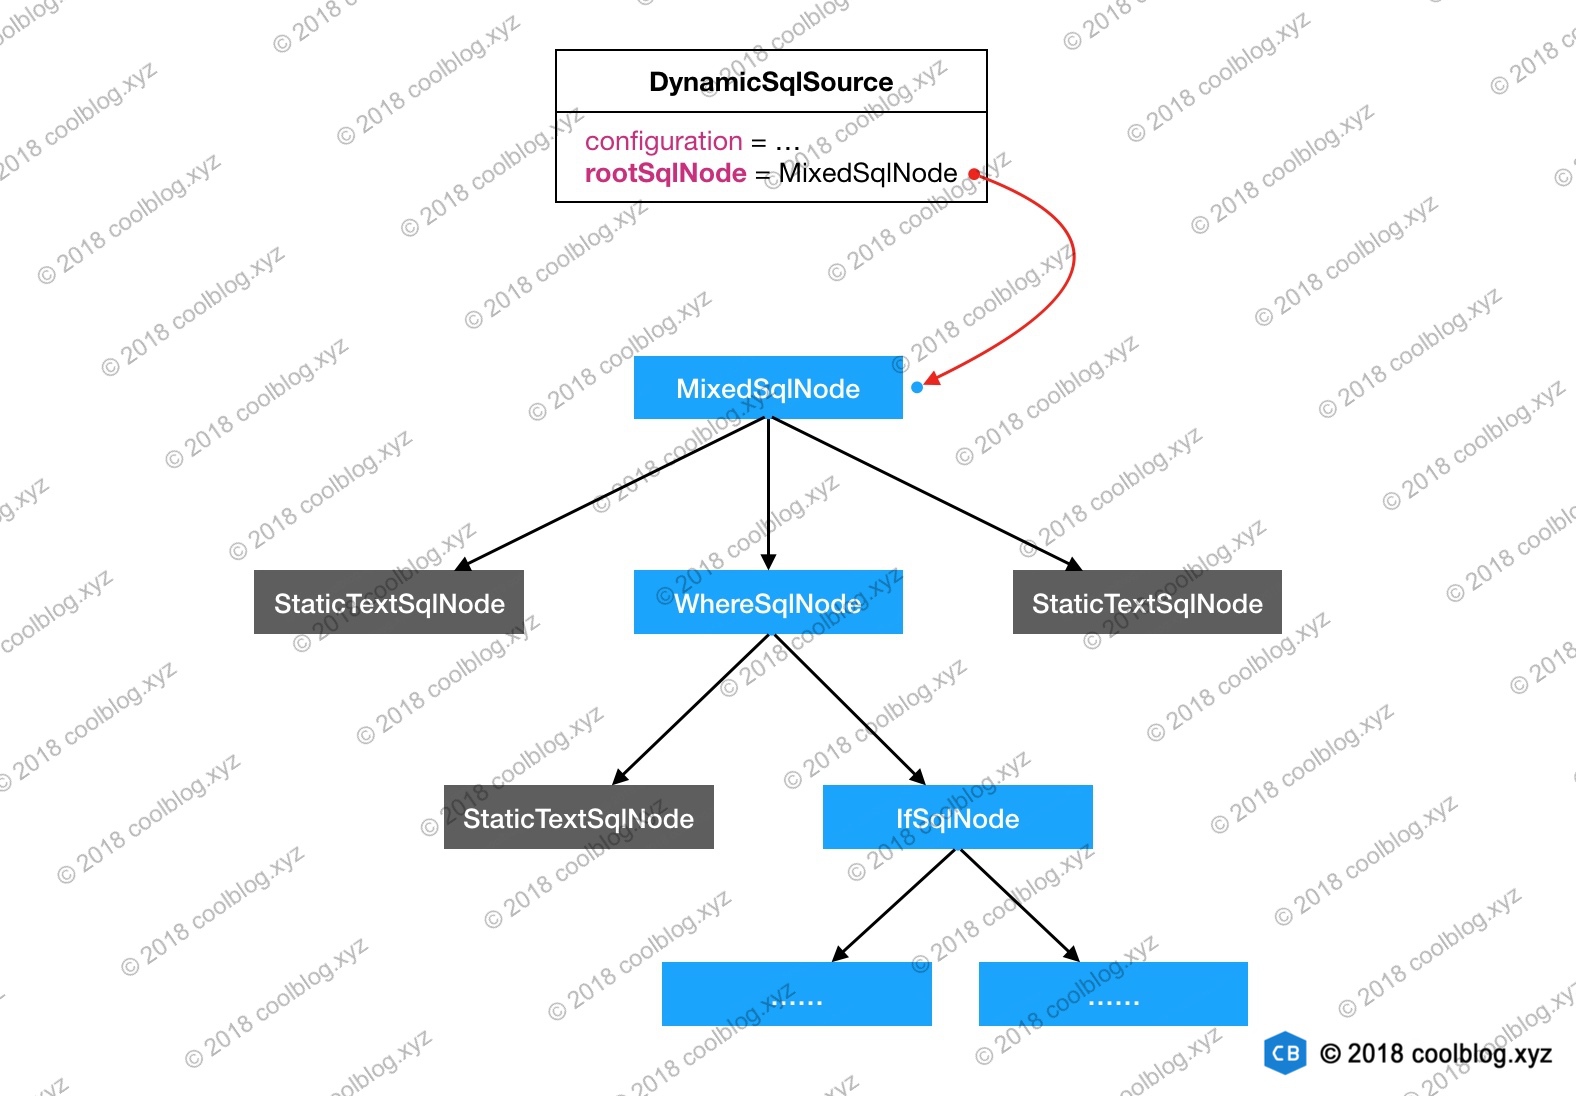
到此,SQL 语句的解析过程就分析完了。现在,我们已经将 XML 配置解析了 SqlSource,但这还没有结束。SqlSource 中只能记录 SQL 语句信息,除此之外,这里还有一些额外的信息需要记录。因此,我们需要一个类能够同时存储 SqlSource 和其他的信息。这个类就是 MappedStatement。下面我们来看一下它的构建过程。
4. 构建 MappedStatement
SQL 语句节点可以定义很多属性,这些属性和属性值最终存储在 MappedStatement 中。下面我们看一下 MappedStatement 的构建过程是怎样的。
public MappedStatement addMappedStatement(
    String id, SqlSource sqlSource, StatementType statementType,
    SqlCommandType sqlCommandType,Integer fetchSize, Integer timeout,
    String parameterMap, Class<?> parameterType,String resultMap,
    Class<?> resultType, ResultSetType resultSetType, boolean flushCache,
    boolean useCache, boolean resultOrdered, KeyGenerator keyGenerator,
    String keyProperty,String keyColumn, String databaseId,
    LanguageDriver lang, String resultSets) {

    if (unresolvedCacheRef) {
        throw new IncompleteElementException("Cache-ref not yet resolved");
    }

    id = applyCurrentNamespace(id, false);
    boolean isSelect = sqlCommandType == SqlCommandType.SELECT;

    // 创建建造器,设置各种属性(注意这里使用了MapperBuilderAssistant.currentCache)
    MappedStatement.Builder statementBuilder = new MappedStatement.Builder(configuration, id, sqlSource, sqlCommandType)
        .resource(resource).fetchSize(fetchSize).timeout(timeout)
        .statementType(statementType).keyGenerator(keyGenerator)
        .keyProperty(keyProperty).keyColumn(keyColumn).databaseId(databaseId)
        .lang(lang).resultOrdered(resultOrdered).resultSets(resultSets)
        .resultMaps(getStatementResultMaps(resultMap, resultType, id))
        .flushCacheRequired(valueOrDefault(flushCache, !isSelect))
        .resultSetType(resultSetType).useCache(valueOrDefault(useCache, isSelect))
        .cache(currentCache);

    // 获取或创建 ParameterMap
    ParameterMap statementParameterMap = getStatementParameterMap(parameterMap, parameterType, id);
    if (statementParameterMap != null) {
        statementBuilder.parameterMap(statementParameterMap);
    }

    // 构建 MappedStatement,没有什么复杂逻辑,不跟下去了
    MappedStatement statement = statementBuilder.build();

    // 添加 MappedStatement 到 configuration 的 mappedStatements 集合中
    configuration.addMappedStatement(statement);
    return statement;
}
上面就是 MappedStatement的构建过程,逻辑比较简单,没什么好说的。但有一个地方需要注意,构建时用了MapperBuilderAssistant类中的currentCache,改变量是局部的,导致了名称空间相同的XML和注解的缓存配置不能共享。
第七节 mapper接口的绑定过程分析
映射文件解析完成后,并不意味着整个解析过程就结束了。此时还需要通过命名空间绑定 mapper 接口,这样才能将映射文件中的 SQL 语句和 mapper 接口中的方法绑定在一起,后续即可通过调用 mapper 接口方法执行与之对应的 SQL 语句。下面我们来分析一下 mapper 接口的绑定过程。
// -☆- XMLMapperBuilder
private void bindMapperForNamespace() {
    // 获取映射文件的命名空间
    String namespace = builderAssistant.getCurrentNamespace();
    if (namespace != null) {
        Class<?> boundType = null;
        try {
            // 根据命名空间获取Mapper接口(命名空间是一个全类名)
            boundType = Resources.classForName(namespace);
        } catch (ClassNotFoundException e) {
        }
        if (boundType != null) {
            // 检测当前 mapper 类是否被绑定过
            if (!configuration.hasMapper(boundType)) {
                configuration.addLoadedResource("namespace:" + namespace);
                // 绑定 mapper 类
                configuration.addMapper(boundType);
            }
        }
    }
}

// -☆- Configuration
public <T> void addMapper(Class<T> type) {
    // 通过 MapperRegistry 绑定 mapper 类
    mapperRegistry.addMapper(type);
}

// -☆- MapperRegistry
public <T> void addMapper(Class<T> type) {
    if (type.isInterface()) {
        if (hasMapper(type)) {
            throw new BindingException("Type " + type + " is already known to the MapperRegistry.");
        }
        boolean loadCompleted = false;
        try {
            /*
             * 将 type 和 MapperProxyFactory 进行绑定(MapperProxyFactory 可为 mapper 接口生成代理类)
             */
            knownMappers.put(type, new MapperProxyFactory<T>(type));

            // 创建注解解析器。在 MyBatis 中,有 XML 和 注解两种配置方式可选
            MapperAnnotationBuilder parser = new MapperAnnotationBuilder(config, type);

            // 解析注解中的信息
            parser.parse();
            loadCompleted = true;
        } finally {
            if (!loadCompleted) {
                knownMappers.remove(type);
            }
        }
    }
}
以上就是 Mapper 接口的绑定过程。这里简单一下:
- 获取命名空间,并根据命名空间解析 mapper 类型
- 将 type 和 MapperProxyFactory 实例存入 knownMappers 中
- 解析注解中的信息
以上步骤中,第3步的逻辑较多。如果大家看懂了映射文件的解析过程,那么注解的解析过程也就不难理解了,这里就不深入分析了。好了,Mapper 接口的绑定过程就先分析到这。
第八节 处理未完成解析的节点
在解析某些节点的过程中,如果这些节点引用了其他一些未被解析的配置,会导致当前节点解析工作无法进行下去。对于这种情况,MyBatis 的做法是抛出 IncompleteElementException 异常。外部逻辑会捕捉这个异常,并将节点对应的解析器放入 incomplet* 集合中。下面我们来看一下 MyBatis 是如何处理未完成解析的节点。
// -☆- XMLMapperBuilder 映射文件的解析入口
public void parse() {
    // 省略部分代码

    // 解析 mapper 节点
    configurationElement(parser.evalNode("/mapper"));

    // 处理未完成解析的节点
    parsePendingResultMaps();
    parsePendingCacheRefs();
    parsePendingStatements();
}
从上面的源码中可以知道有三种节点在解析过程中可能会出现不能完成解析的情况,相关代码逻辑类似,下面以 parsePendingCacheRefs 方法为例进行分析,看一下如何配置映射文件会导致 <cache-ref> 节点无法完成解析。
<!-- 映射文件1 -->
<mapper namespace="xyz.coolblog.dao.Mapper1">
    <!-- 引用映射文件2中配置的缓存 -->
    <cache-ref namespace="xyz.coolblog.dao.Mapper2"/>
</mapper>

<!-- 映射文件2 -->
<mapper namespace="xyz.coolblog.dao.Mapper2">
    <cache/>
</mapper>
假设 MyBatis 先解析映射文件1,然后再解析映射文件2。按照这样的解析顺序,映射文件1中的 <cache-ref> 节点就无法完成解析,因为它所引用的缓存还未被解析。当映射文件2解析完成后,MyBatis 会调用 parsePendingCacheRefs 方法处理在此之前未完成解析的 <cache-ref> 节点。具体的逻辑如下:
private void parsePendingCacheRefs() {
    // 获取 CacheRefResolver 列表
    Collection<CacheRefResolver> incompleteCacheRefs = configuration.getIncompleteCacheRefs();
    synchronized (incompleteCacheRefs) {
        Iterator<CacheRefResolver> iter = incompleteCacheRefs.iterator();
        // 通过迭代器遍历列表
        while (iter.hasNext()) {
            try {
                // 尝试解析 <cache-ref> 节点,若解析失败,则抛出 IncompleteElementException,
                iter.next().resolveCacheRef();
                // 移除 CacheRefResolver 对象。如果代码能执行到此处,表明已成功解析了 <cache-ref> 节点
                iter.remove();
            } catch (IncompleteElementException e) {
                /*
                 * 如果再次发生 IncompleteElementException 异常,表明当前映射文件中并没有
                 * <cache-ref> 所引用的缓存。有可能所引用的缓存在后面的映射文件中,所以这里
                 * 不能将解析失败的 CacheRefResolver 从集合中删除
                 */
            }
        }
    }
}
第三章 SQL的执行过程
本章节较为详细的介绍了 MyBatis 执行 SQL 的过程,包括但不限于 Mapper 接口代理类的生成、接口方法的解析、SQL 语句的解析、运行时参数的绑定、查询结果自动映射、关联查询、嵌套映射、懒加载等。下面一张图总结了MyBatis执行SQL的过程中涉及到的主要组件,把MyBatis框架分了为数层,每层都有相应的功能,其中 MyBatis 框架层又可细分为会话层、执行器层、JDBC处理层等。
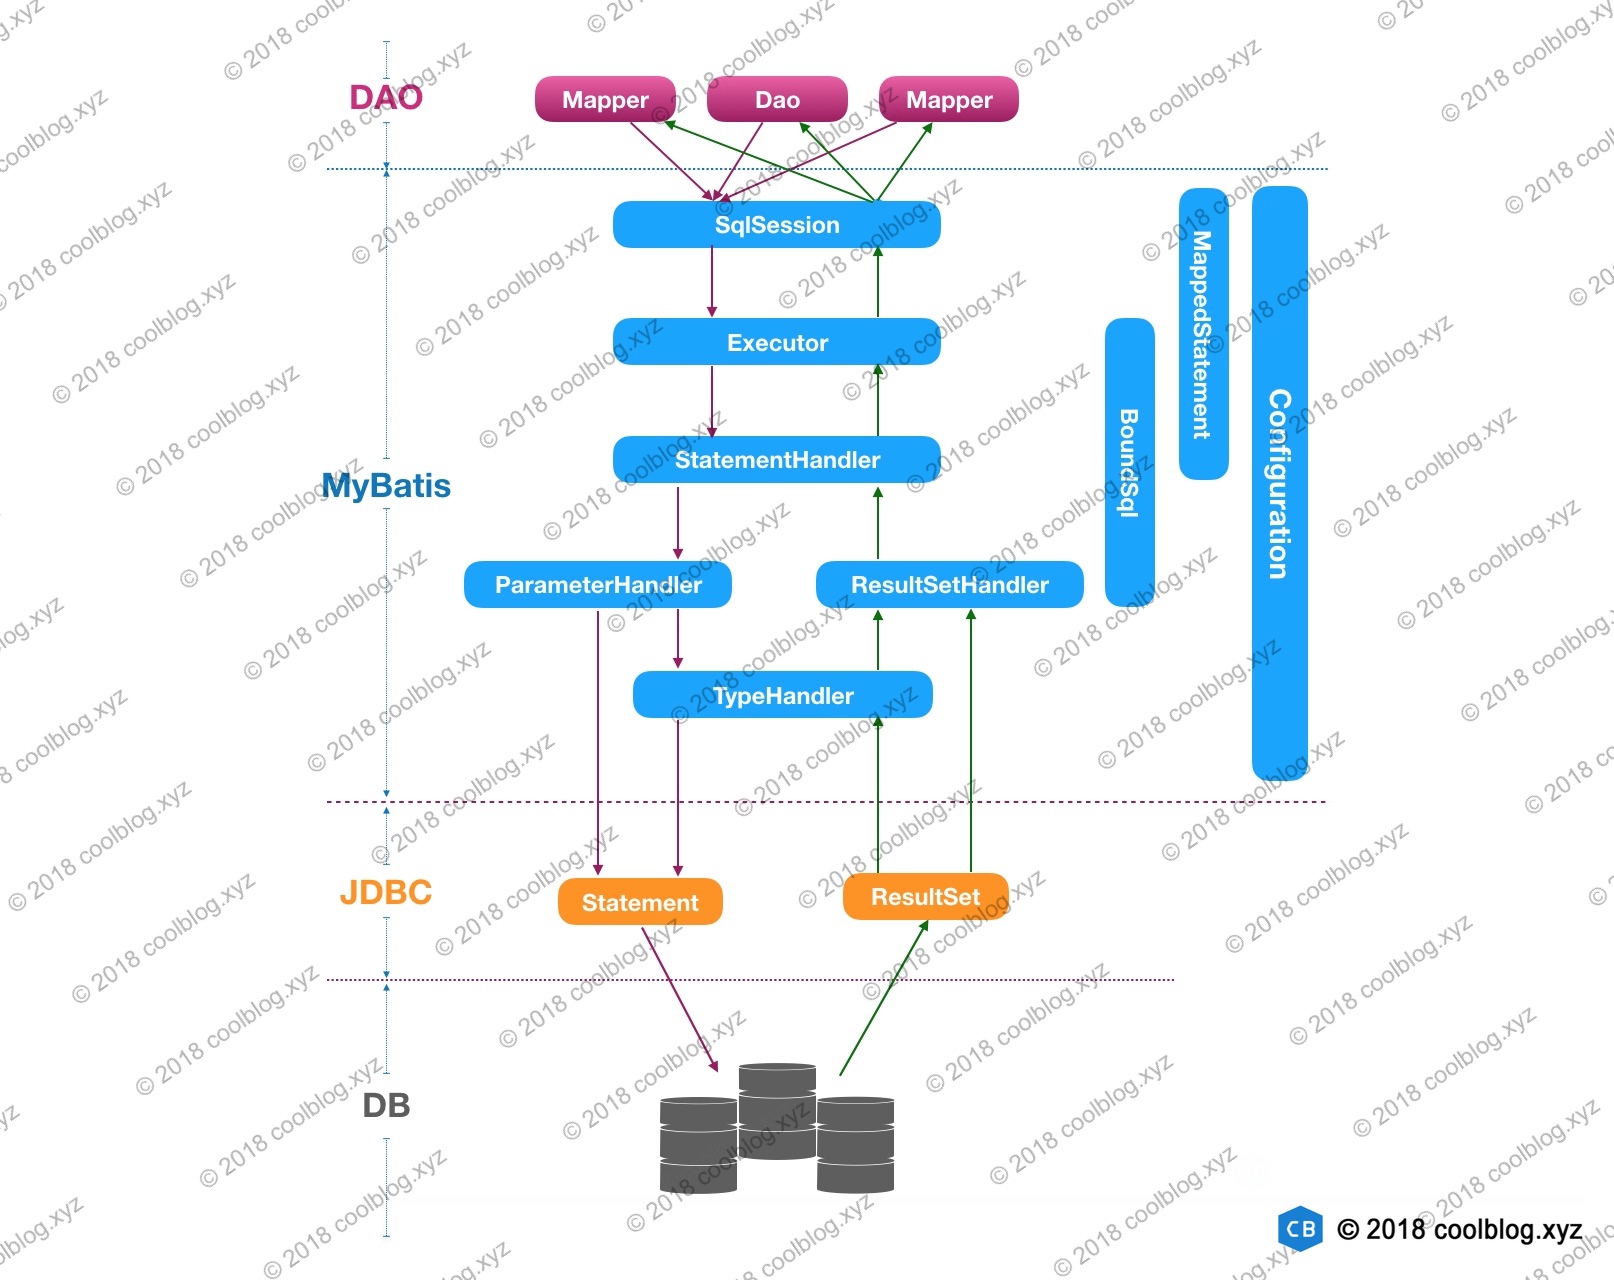
最外层是与我们业务代码打交道的DAO层,也称为 Mapper 层,通过动态代理技术,简化了用户的持久层操作,主要做了接口方法解析、参数转换等工作。会话层主要封装了执行器,提供了各种语义清晰的方法,供使用者调用。执行器层用于协调其它组件以及实现一些公共逻辑,如一二级缓存、获取连接、转换和设置参数、映射结果集等,做的事情较多。JDCB处理层主要是与 JDBC 层面的接口打交道。
除此之外,一些其它组件也起到了重要的作用。如 ParameterHandler 和 ResultSetHandler,一个负责向 SQL 中设置运行时参数,另一个负责处理 SQL 执行结果,它们俩可以看做是 StatementHandler 辅助类。
最后看一下右边横跨数层的类,Configuration 是一个全局配置类,很多地方都依赖它。MappedStatement 对应 SQL 配置,包含了 SQL 配置的相关信息。BoundSql 中包含了已完成解析的 SQL 语句,以及运行时参数等。
下面我们将从一个简单案例开始,逐步分析上述提到的一些组件。
第一节 SQL执行入口分析
在单独使用 MyBatis 进行数据库操作时,我们通常都会先调用 SqlSession 接口的 getMappe方法为我们的 Mapper 接口生成实现类,然后就可以通过 Mapper 进行数据库操作了。
// 1. 生成Mapper接口实现类(通过JDK动态代理的方式)
ArticleMapper articleMapper = session.getMapper(ArticleMapper.class);

// 2. 通过Mapper执行操作
Article article = articleMapper.findOne(1);
在执行操作时,方法调用会被代理逻辑拦截。在代理逻辑中可根据方法名及方法归属接口获取到当前方法对应的 SQL 以及其他一些信息,拿到这些信息即可进行数据库操作。下面就来看看实现类是如何生成的,以及代理逻辑是怎么样的?
1. 为 Mapper 接口创建代理对象
首先从 DefaultSqlSession 的 getMapper 方法开始看起,如下:
// -☆- DefaultSqlSession
public <T> T getMapper(Class<T> type) {
    return configuration.<T>getMapper(type, this);
}

// -☆- Configuration
public <T> T getMapper(Class<T> type, SqlSession sqlSession) {
    return mapperRegistry.getMapper(type, sqlSession);
}

// -☆- MapperRegistry
public <T> T getMapper(Class<T> type, SqlSession sqlSession) {
    // 从 knownMappers 中获取与 type 对应的 MapperProxyFactory
	// knownMappers 是在解析 <mappers> 节点时,调用 MapperRegistry 的 addMapper 方法初始化的
    final MapperProxyFactory<T> mapperProxyFactory = (MapperProxyFactory<T>) knownMappers.get(type);
    if (mapperProxyFactory == null) {
        throw new BindingException("Type " + type + " is not known to the MapperRegistry.");
    }
    try {
        // 创建代理对象
        return mapperProxyFactory.newInstance(sqlSession);
    } catch (Exception e) {
        throw new BindingException("Error getting mapper instance. Cause: " + e, e);
    }
}
经过连续的简单调用后,获取到了Mapper接口对应 MapperProxyFactory 对象,然后就可调用工厂方法为 Mapper 接口生成代理对象了
// -☆- MapperProxyFactory
public T newInstance(SqlSession sqlSession) {
    /*
     * 创建 MapperProxy 对象。
	   MapperProxy 实现了 InvocationHandler 接口,代理逻辑封装在此类中
     */
    final MapperProxy<T> mapperProxy = new MapperProxy<T>(sqlSession, mapperInterface, methodCache);
    return newInstance(mapperProxy);
}

protected T newInstance(MapperProxy<T> mapperProxy) {
    // 通过 JDK 动态代理创建代理对象
    return (T) Proxy.newProxyInstance(mapperInterface.getClassLoader(), new Class[]{mapperInterface}, mapperProxy);
}
上面的代码首先创建了一个 MapperProxy 对象,该对象实现了 InvocationHandler 接口。然后将对象作为参数传给重载方法,并在重载方法中调用 JDK 动态代理接口为 Mapper 生成代理对象。
到此,关于 Mapper 接口代理对象的创建过程就分析完了。现在我们的 ArticleMapper 接口指向的代理对象已经创建完毕,下面就可以调用接口方法进行数据库操作了。由于接口方法会被代理逻辑拦截,所以下面我们把目光聚焦在代理逻辑上面,看看代理逻辑会做哪些事情。
2. 执行代理逻辑
Mapper 接口方法的代理逻辑实现的比较简单,首先会对拦截的方法进行一些检测,以决定是否执行后续的数据库操作。
public Object invoke(Object proxy, Method method, Object[] args) throws Throwable {
    try {
        // 如果方法是定义在 Object 类中的,则直接调用
        if (Object.class.equals(method.getDeclaringClass())) {
            return method.invoke(this, args);

        /*
         * 下面的代码最早出现在 mybatis-3.4.2 版本中,用于支持 JDK 1.8 中的
         * 新特性 - 默认方法。这段代码的逻辑就不分析了,有兴趣的同学可以
         * 去 Github 上看一下相关的相关的讨论(issue #709),链接如下:
         *
         *   https://github.com/mybatis/mybatis-3/issues/709
         */
        } else if (isDefaultMethod(method)) {
            return invokeDefaultMethod(proxy, method, args);
        }
    } catch (Throwable t) {
        throw ExceptionUtil.unwrapThrowable(t);
    }

    // 从缓存中获取 MapperMethod 对象,若缓存未命中,则创建 MapperMethod 对象
    final MapperMethod mapperMethod = cachedMapperMethod(method);

    // 调用 execute 方法执行 SQL
    return mapperMethod.execute(sqlSession, args);
}
如上,代理逻辑会首先检测被拦截的方法是不是定义在 Object 中的,比如 equals、hashCode 方法等。对于这类方法,直接执行即可。除此之外,MyBatis 从 3.4.2 版本开始,对 JDK 1.8 接口的默认方法提供了支持,具体就不分析了。完成相关检测后,紧接着从缓存中获取或者创建 MapperMethod 对象,然后通过该对象中的 execute 方法执行 SQL。在分析 execute 方法之前,我们先来看一下 MapperMethod 对象的创建过程。MapperMethod 的创建过程看似普通,但却包含了一些重要的逻辑,所以不能忽视。
2.1 创建 MapperMethod 对象|获取形参
本节来分析一下 MapperMethod 的构造方法,看看它的构造方法中都包含了哪些逻辑。如下:
public class MapperMethod {

    private final SqlCommand command;
    private final MethodSignature method;

    public MapperMethod(Class<?> mapperInterface, Method method, Configuration config) {
        // 创建 SqlCommand 对象,该对象包含一些和 SQL 相关的信息
        this.command = new SqlCommand(config, mapperInterface, method);
        // 创建 MethodSignature 对象,从类名中可知,该对象包含了被拦截方法的一些信息
        this.method = new MethodSignature(config, mapperInterface, method);
    }
}
如上,MapperMethod 构造方法的逻辑很简单,主要是创建 SqlCommand 和 MethodSignature 对象。这两个对象分别记录了不同的信息,这些信息在后续的方法调用中都会被用到。下面我们深入到这两个类的构造方法中,探索它们的初始化逻辑。
1) 创建 SqlCommand 对象
前面说了 SqlCommand 中保存了一些和 SQL 相关的信息,那具体有哪些信息呢?答案在下面的代码中。
public static class SqlCommand {

    private final String name;
    private final SqlCommandType type;

    public SqlCommand(Configuration configuration, Class<?> mapperInterface, Method method) {
        final String methodName = method.getName();
        final Class<?> declaringClass = method.getDeclaringClass();

        // 查找 MappedStatement。
		// 先拼接 statementId:接口全类名.方法名,在当前接口查找。未找到则递归父接口查找。
        MappedStatement ms = resolveMappedStatement(mapperInterface, methodName, declaringClass, configuration);

        // 检测当前方法是否有对应的 MappedStatement
        if (ms == null) {
            // 检测当前方法是否有 @Flush 注解
            if (method.getAnnotation(Flush.class) != null) {
                // 设置 name 和 type 变量
                name = null;
                type = SqlCommandType.FLUSH;
            } else {
                // 若 ms == null 且方法无 @Flush 注解,此时抛出异常。
                throw new BindingException("Invalid bound statement (not found): "
                    + mapperInterface.getName() + "." + methodName);
            }
        } else {
            // 设置 name 和 type 变量
            name = ms.getId();
            type = ms.getSqlCommandType();
            if (type == SqlCommandType.UNKNOWN) {
                throw new BindingException("Unknown execution method for: " + name);
            }
        }
    }
}
如上,SqlCommand 的构造方法主要用于初始化它的两个成员变量。代码不是很长,逻辑也不难理解,就不多说了。继续往下看。
2) 创建 MethodSignature 对象
MethodSignature 即方法签名,顾名思义,该类保存了一些和目标方法相关的信息。比如目标方法的返回类型,目标方法的参数列表信息等。下面,我们来分析一下 MethodSignature 的构造方法。
public static class MethodSignature {

    private final boolean returnsMany;
    private final boolean returnsMap;
    private final boolean returnsVoid;
    private final boolean returnsCursor;
    private final Class<?> returnType;
    private final String mapKey;
    private final Integer resultHandlerIndex;
    private final Integer rowBoundsIndex;
    private final ParamNameResolver paramNameResolver;

    public MethodSignature(Configuration configuration, Class<?> mapperInterface, Method method) {

        // 通过反射解析方法返回类型
        Type resolvedReturnType = TypeParameterResolver.resolveReturnType(method, mapperInterface);
        if (resolvedReturnType instanceof Class<?>) {
            this.returnType = (Class<?>) resolvedReturnType;
        } else if (resolvedReturnType instanceof ParameterizedType) {
            this.returnType = (Class<?>) ((ParameterizedType) resolvedReturnType).getRawType();
        } else {
            this.returnType = method.getReturnType();
        }

        // 检测返回值类型是否是 void、集合或数组、Cursor、Map 等
        this.returnsVoid = void.class.equals(this.returnType);
        this.returnsMany = configuration.getObjectFactory().isCollection(this.returnType) || this.returnType.isArray();
        this.returnsCursor = Cursor.class.equals(this.returnType);

        // 解析 @MapKey 注解,获取注解内容
        this.mapKey = getMapKey(method);
        this.returnsMap = this.mapKey != null;

        // 获取 RowBounds 参数在参数列表中的位置,如果参数列表中包含多个 RowBounds 参数,此方法会抛出异常
        this.rowBoundsIndex = getUniqueParamIndex(method, RowBounds.class);
        // 获取 ResultHandler 参数在参数列表中的位置
        this.resultHandlerIndex = getUniqueParamIndex(method, ResultHandler.class);

        // 解析参数列表
        this.paramNameResolver = new ParamNameResolver(configuration, method);
    }
}
上面的代码用于检测目标方法的返回类型,以及解析目标方法参数列表。其中,检测返回类型的目的是为避免查询方法返回错误的类型。比如我们要求接口方法返回一个对象,结果却返回了对象集合,这会导致类型转换错误。关于返回值类型的解析过程先说到这,下面分析参数列表的解析过程。
public class ParamNameResolver {

    private static final String GENERIC_NAME_PREFIX = "param";
    private final SortedMap<Integer, String> names;

    public ParamNameResolver(Configuration config, Method method) {
        // 获取参数类型列表
        final Class<?>[] paramTypes = method.getParameterTypes();

        // 获取参数及参数对应的注解
        final Annotation[][] paramAnnotations = method.getParameterAnnotations();

        // 定义临时map
        final SortedMap<Integer, String> map = new TreeMap<Integer, String>();

        // 获取参数个数,并遍历
        int paramCount = paramAnnotations.length;
        for (int paramIndex = 0; paramIndex < paramCount; paramIndex++) {
            // 检测当前的参数类型是否为 RowBounds 或 ResultHandler,是则跳过
            if (isSpecialParameter(paramTypes[paramIndex])) {
                continue;
            }

            // 给参数起个名字
            // 1. 优先使用@Param注解中配置的名字
            String name = null;
            for (Annotation annotation : paramAnnotations[paramIndex]) {
                if (annotation instanceof Param) {
                    hasParamAnnotation = true;
                    // 获取 @Param 注解内容
                    name = ((Param) annotation).value();
                    break;
                }
            }

            // name 为空,表明未给参数配置 @Param 注解
            if (name == null) {
                // 检测是否设置了 useActualParamName 全局配置
                if (config.isUseActualParamName()) {
                    /*
                     * 2. 通过反射获取参数名称。此种方式要求 JDK 版本为 1.8+,
                     * 且要求编译时加入 -parameters 参数,否则获取到的参数名
                     * 仍然是 arg1, arg2, ..., argN
                     */
                    name = getActualParamName(method, paramIndex);
                }
                if (name == null) {
                    /*
                     * 3. 使用 map.size() 返回值作为名称,思考一下为什么不这样写:
                     *   name = String.valueOf(paramIndex);
                     * 因为如果参数列表中包含 RowBounds 或 ResultHandler,这两个参数
                     * 会被忽略掉,这样将导致名称不连续。
                     *
                     * 比如参数列表 (int p1, int p2, RowBounds rb, int p3)
                     *  - 期望得到名称列表为 ["0", "1", "2"]
                     *  - 实际得到名称列表为 ["0", "1", "3"]
                     */
                    name = String.valueOf(map.size());
                }
            }

            // 存储 paramIndex 到 name 的映射
            map.put(paramIndex, name);
        }
        names = Collections.unmodifiableSortedMap(map);
    }
}
以上就是方法参数列表的解析过程,解析完毕后,可得到参数下标到参数名的映射关系,这些映射关系最终存储在 ParamNameResolver 的 names 成员变量中。这些映射关系将会在后面的代码中被用到,大家留意一下。
下面写点代码测试一下 ParamNameResolver 的解析逻辑。如下:
public class ParamNameResolverTest {

    @Test
    public void test() throws NoSuchMethodException, NoSuchFieldException, IllegalAccessException {
        Configuration config = new Configuration();
        config.setUseActualParamName(false);
        Method method = ArticleMapper.class.getMethod("select", Integer.class, String.class, RowBounds.class, Article.class);

        ParamNameResolver resolver = new ParamNameResolver(config, method);
        Field field = resolver.getClass().getDeclaredField("names");
        field.setAccessible(true);
        // 通过反射获取 ParamNameResolver 私有成员变量 names
        Object names = field.get(resolver);

        System.out.println("names: " + names);
    }

    class ArticleMapper {
        public void select(@Param("id") Integer id, @Param("author") String author, RowBounds rb, Article article) {}
    }
}
测试结果如下:
names: {0=id, 1=author, 3=2} //3=2???其中的3表示第三个参数,2表示没有配置@Param注解,也没打开UseActualParamName开关,所以取了当前map.size()作为参数名
到此,关于 MapperMethod 的初始化逻辑就分析完了,继续往下分析。
2.2 执行 execute 方法|转换实参
前面已经分析了 MapperMethod 的初始化过程,现在 MapperMethod 创建好了。那么,接下来要做的事情是调用 MapperMethod 的 execute 方法,执行 SQL。代码如下:
// -☆- MapperMethod
public Object execute(SqlSession sqlSession, Object[] args) {
    Object result;

    // 根据 SQL 类型执行相应的数据库操作
    switch (command.getType()) {
        case INSERT: {
            // 对用户传入的参数进行转换,下同
            Object param = method.convertArgsToSqlCommandParam(args);
            // 执行插入操作,rowCountResult 方法用于处理返回值
            result = rowCountResult(sqlSession.insert(command.getName(), param));
            break;
        }
        case UPDATE: {
            Object param = method.convertArgsToSqlCommandParam(args);
            // 执行更新操作
            result = rowCountResult(sqlSession.update(command.getName(), param));
            break;
        }
        case DELETE: {
            Object param = method.convertArgsToSqlCommandParam(args);
            // 执行删除操作
            result = rowCountResult(sqlSession.delete(command.getName(), param));
            break;
        }
        case SELECT:
            // 根据目标方法的返回类型进行相应的查询操作
            if (method.returnsVoid() && method.hasResultHandler()) {
                /*
                 * 如果方法返回值为 void,但参数列表中包含 ResultHandler,表明使用者
                 * 想通过 ResultHandler 的方式获取查询结果,而非通过返回值获取结果
                 */
                executeWithResultHandler(sqlSession, args);
                result = null;
            } else if (method.returnsMany()) {
                // 执行查询操作,并返回多个结果
                result = executeForMany(sqlSession, args);
            } else if (method.returnsMap()) {
                // 执行查询操作,并将结果封装在 Map 中返回
                result = executeForMap(sqlSession, args);
            } else if (method.returnsCursor()) {
                // 执行查询操作,并返回一个 Cursor 对象
                result = executeForCursor(sqlSession, args);
            } else {
                Object param = method.convertArgsToSqlCommandParam(args);
                // 执行查询操作,并返回一个结果
                result = sqlSession.selectOne(command.getName(), param);
            }
            break;
        case FLUSH:
            // 执行刷新操作
            result = sqlSession.flushStatements();
            break;
        default:
            throw new BindingException("Unknown execution method for: " + command.getName());
    }

    // 如果方法的返回值为基本类型,而返回值却为 null,此种情况下应抛出异常
    if (result == null && method.getReturnType().isPrimitive() && !method.returnsVoid()) {
        throw new BindingException("Mapper method '" + command.getName()
            + " attempted to return null from a method with a primitive return type (" + method.getReturnType()
            + ").");
    }
    return result;
}
如上,execute 方法主要由一个 switch 语句组成,用于根据 SQL 类型执行相应的数据库操作。该方法的逻辑清晰,不需要太多的分析。不过在上面的方法中 convertArgsToSqlCommandParam 方法出现次数比较频繁,这里分析一下:
// -☆- MapperMethod
public Object convertArgsToSqlCommandParam(Object[] args) {
    return paramNameResolver.getNamedParams(args);
}

public Object getNamedParams(Object[] args) {
    final int paramCount = names.size();
    if (args == null || paramCount == 0) {
        return null;
    } else if (!hasParamAnnotation && paramCount == 1) {
        /*
         * 如果方法参数列表无 @Param 注解,且仅有一个非特别参数,则返回该参数的值。
         * 比如如下方法:
         *     List findList(RowBounds rb, String name)
         * names 如下:
         *     names = {1 : "0"}
         * 此种情况下,返回 args[names.firstKey()],即 args[1] -> name
         */
        return args[names.firstKey()];
    } else {
        final Map<String, Object> param = new ParamMap<Object>();
        int i = 0;
        for (Map.Entry<Integer, String> entry : names.entrySet()) {
            // 添加 <参数名, 参数值> 键值对到 param 中
            param.put(entry.getValue(), args[entry.getKey()]);
            // genericParamName = param + index。比如 param1, param2, ... paramN
            final String genericParamName = GENERIC_NAME_PREFIX + String.valueOf(i + 1);
            /*
             * 检测 names 中是否包含 genericParamName,什么情况下会包含?答案如下:
             *
             *   使用者显式将参数名称配置为 param1,即 @Param("param1")
             */
            if (!names.containsValue(genericParamName)) {
                // 添加 <param*, value> 到 param 中
                param.put(genericParamName, args[entry.getKey()]);
            }
            i++;
        }
        return param;
    }
}
上节中讲解的 ParamNameResolver 构造函数建立了形参索引和参数名的映射names,而本节的 getNamedParams 方法根据names从传入的实参对象中取参数值返回。有两种情形:
- 单个非特殊参数且无@Param注解。直接返回传入的实参对象。
- 有@Param参数或存在多个参数。逐个添加*[参数名-参数值]*到 ParamMap 后返回。同时为参数名添加一份固定名称paramXxx。
第二节 查询语句的执行过程分析
在JDBC中,将SELECT语句归类为查询语句,将其它一些语句(如UPDATE、DDL等)归类为更新语句。在本节中,先对查询语句的执行流程进行讲解。从上节MapperMathod代码可以看到,查询语句根据返回值类型以及是否使用ResultHandler处理结果大致分为了以下几类:
- executeWithResultHandler
- executeForMany
- executeForMap
- executeForCursor
- …
这些方法在内部都是调用了 SqlSession 中的 selectXxxx 方法,比如 selectList、selectMap、selectCursor 等。而其中最常用的 selectList 被 selectOne 方法调用。因此我们从该方法来看看查询语句执行的主体流程。
1. 查询语句执行主流程
在 MapperMethod 执行查询语句时,当返回值不是List、Map或Cursor且没有使用结果处理器时,会调用 selectOne 方法进行查询。
// -☆- DefaultSqlSession
public <T> T selectOne(String statement, Object parameter) {
    // selectOne内部调用 selectList 获取结果
    List<T> list = this.<T>selectList(statement, parameter);

    // 查询后对结果集数量进行判断:如果 <=0 返回 NULL, ==1 返回第一个结果, >1直接报错,单查询不应该返回多行结果
    if (list.size() == 1) {
        return list.get(0);
    } else if (list.size() > 1) {
        throw new TooManyResultsException(
            "Expected one result (or null) to be returned by selectOne(), but found: " + list.size());
    } else {
        return null;
    }
}
下面我们来看看 selectList 方法的实现。
// -☆- DefaultSqlSession
public <E> List<E> selectList(String statement, Object parameter) {
    // 调用重载方法,设置默认的RowBounds
    return this.selectList(statement, parameter, RowBounds.DEFAULT);
}

private final Executor executor;

public <E> List<E> selectList(String statement, Object parameter, RowBounds rowBounds) {
    try {
        // 1. 获取 MappedStatement
        MappedStatement ms = configuration.getMappedStatement(statement);

        // 2. 调用 Executor 实现类中的 query 方法
        return executor.query(ms, wrapCollection(parameter), rowBounds, Executor.NO_RESULT_HANDLER);
    } catch (Exception e) {
        throw ExceptionFactory.wrapException("Error querying database.  Cause: " + e, e);
    } finally {
        ErrorContext.instance().reset();
    }
}
这里注意一下执行器 Executor,这是MyBatis中的一个重要组件。Executor 是一个接口,它的实现类如下:

具体使用哪个Excutor实现类,可以在打开会话(openSession)时指定,也可以在MyBatis全局配置文件中修改默认的执行器类型。Excutor 默认为SimpleExcutor。如果开启了全局属性cacheEnabled,则还会被CachingExcutor所装饰(详情见newExecutor方法)。
// -☆- CachingExecutor
public <E> List<E> query(MappedStatement ms, Object parameterObject, RowBounds rowBounds, ResultHandler resultHandler) throws SQLException {
    // 1. 获取 BoundSql
    BoundSql boundSql = ms.getBoundSql(parameterObject);

    // 2. 创建 CacheKey
    CacheKey key = createCacheKey(ms, parameterObject, rowBounds, boundSql);

    // 3. 调用重载方法
    return query(ms, parameterObject, rowBounds, resultHandler, key, boundSql);
}
上面的代码用于获取 BoundSql 对象,创建 CacheKey 对象,然后再将这两个对象传给重载方法。关于 BoundSql 的获取过程较为复杂,我将在下一节进行分析。CacheKey 以及接下来即将出现的一二级缓存将会独立成文进行分析。
上面的方法和 SimpleExecutor 父类 BaseExecutor 中的实现没什么区别,有区别的地方在于这个方法所调用的重载方法。我们继续往下看。
// -☆- CachingExecutor
public <E> List<E> query(MappedStatement ms, Object parameterObject, RowBounds rowBounds, ResultHandler resultHandler, CacheKey key, BoundSql boundSql) throws SQLException {
    // 1. 从 MappedStatement 中获取缓存引用(在解析SQL语句节点生成MappedStatement时,保存了解析器中currentCache)
    Cache cache = ms.getCache();

    // 若映射文件中未配置缓存或参照缓存,此时 cache = null
    if (cache != null) {
        // 检查是否需要刷新缓存
        flushCacheIfRequired(ms);
        // 当前MS开启了缓存,且未使用结果处理器
        if (ms.isUseCache() && resultHandler == null) {
            // 存储过程特殊处理
            ensureNoOutParams(ms, boundSql);
            // 2. 从事务缓存管理器的缓存区中查询二级缓存
            List<E> list = (List<E>) tcm.getObject(cache, key);
            if (list == null) {
                // 3. 若缓存未命中,则调用被装饰类的 query 方法
                list = delegate.<E>query(ms, parameterObject, rowBounds, resultHandler, key, boundSql);

                // 4. 存储查询结果到二级缓存暂存区
                tcm.putObject(cache, key, list); // issue #578 and #116
            }
            return list;
        }
    }
    // 3. 调用被装饰类的 query 方法
    return delegate.<E>query(ms, parameterObject, rowBounds, resultHandler, key, boundSql);
}
上面的代码涉及到了二级缓存,若二级缓存为空,或未命中,则调用被装饰类的 query 方法。下面来看一下 BaseExecutor 的中签名相同的 query 方法是如何实现的。
// -☆- BaseExecutor
public <E> List<E> query(MappedStatement ms, Object parameter, RowBounds rowBounds, ResultHandler resultHandler, CacheKey key, BoundSql boundSql) throws SQLException {
    if (closed) {
        throw new ExecutorException("Executor was closed.");
    }
    if (queryStack == 0 && ms.isFlushCacheRequired()) {
        clearLocalCache();
    }
    List<E> list;
    try {
        queryStack++;
        // 从一级缓存中获取缓存项
        list = resultHandler == null ? (List<E>) localCache.getObject(key) : null;
        if (list != null) {
            // 存储过程相关处理逻辑,本文不分析存储过程,故该方法不分析了
            handleLocallyCachedOutputParameters(ms, key, parameter, boundSql);
        } else {
            // 一级缓存未命中,则从数据库中查询
            list = queryFromDatabase(ms, parameter, rowBounds, resultHandler, key, boundSql);
        }
    } finally {
        queryStack--;
    }
    if (queryStack == 0) {
        // 从一级缓存中延迟加载嵌套查询结果
        for (DeferredLoad deferredLoad : deferredLoads) {
            deferredLoad.load();
        }
        deferredLoads.clear();
        if (configuration.getLocalCacheScope() == LocalCacheScope.STATEMENT) {
            clearLocalCache();
        }
    }
    return list;
}
如上,上面的方法主要用于从一级缓存中查找查询结果。若缓存未命中,再向数据库进行查询。在上面的代码中,出现了一个新的类 DeferredLoad,这个类用于延迟加载,后面将会分析。现在先来看一下 queryFromDatabase 方法的实现。
// -☆- BaseExecutor
private <E> List<E> queryFromDatabase(MappedStatement ms, Object parameter, RowBounds rowBounds,
    ResultHandler resultHandler, CacheKey key, BoundSql boundSql) throws SQLException {
    List<E> list;
    // 向缓存中存储一个占位符(用于解决关联查询循环问题)
    localCache.putObject(key, EXECUTION_PLACEHOLDER);
    try {
        // 调用 doQuery 进行查询
        list = doQuery(ms, parameter, rowBounds, resultHandler, boundSql);
    } finally {
        // 移除占位符
        localCache.removeObject(key);
    }
    // 缓存查询结果
    localCache.putObject(key, list);
    if (ms.getStatementType() == StatementType.CALLABLE) {
        localOutputParameterCache.putObject(key, parameter);
    }
    return list;
}
抛开缓存操作,queryFromDatabase 最终还会调用 doQuery 进行查询。下面我们继续进行跟踪。
// -☆- SimpleExecutor
public <E> List<E> doQuery(MappedStatement ms, Object parameter, RowBounds rowBounds, ResultHandler resultHandler, BoundSql boundSql) throws SQLException {
    Statement stmt = null;
    try {
        Configuration configuration = ms.getConfiguration();
        // 1. 创建 StatementHandler
        StatementHandler handler = configuration.newStatementHandler(wrapper, ms, parameter, rowBounds, resultHandler, boundSql);
        // 2. 创建 Statement
        stmt = prepareStatement(handler, ms.getStatementLog());
        // 3. 执行查询操作
        return handler.<E>query(stmt, resultHandler);
    } finally {
        // 4. 关闭 Statement
        closeStatement(stmt);
    }
}
我们先跳过 StatementHandler 和 Statement 创建过程,这两个对象的创建过程会在后面进行说明。这里先看看Statement的 query 方法是怎样实现的。这里选择 PreparedStatementHandler 为例进行分析,至于 SimpleStatementHandler 和 CallableStatementHandler 分别用来处理非预编译SQL和存储过程的,用的比较少,就不分析了。
首先经过 RoutingStatementHandler 进行路由,进入到 PreparedStatementHandler 中。
  @Override
  public <E> List<E> query(Statement statement, ResultHandler resultHandler) throws SQLException {
    return delegate.query(statement, resultHandler);
  }
PreparedStatementHandler 逻辑非常简单,调用JDBC 的原生api执行SQL,然后调用结果集处理器处理结果。
// -☆- PreparedStatementHandler
public <E> List<E> query(Statement statement, ResultHandler resultHandler) throws SQLException {
    PreparedStatement ps = (PreparedStatement) statement;
    // 执行 SQL
    ps.execute();
    // 处理执行结果
    return resultSetHandler.<E>handleResultSets(ps);
}
到此,SQL是执行完毕了,但结果集处理是MyBatis中最复杂的一个部分,将会在后面重点进行讲解。现在,我们先看下之前跳过的获取 BoundSql 的过程,这也非常的重要。
2. 获取 BoundSql
在XML或注解中配置的原始SQL语句,可能带有字符串替换标记${}或动态标签,如 <if>、<where> 等。这些SQL语句会在应用启动时会被解析为动态SQL源,解析过程在前面的章节已经分析过,不再赘述。后续在每次执行SQL时,都必须先根据实际参数从动态SQL源解析出能被JDBC Api执行的BoundSql,这个过程叫动态SQL解析。
简单来说,就是按部就班的执行一遍动态SQL源中的语法树节点,从每个节点中获取实际的SQL片段,最终拼接为一个完整的SQL语句。这个完整的 SQL 以及其他的一些信息最终会存储在 BoundSql 对象中。下面我们来看一下 BoundSql 类的成员变量信息,如下:
// 一个可以直接被JDBC Api执行的完整 SQL 语句,可能会包含问号 ? 占位符
private final String sql;
// 参数映射列表,SQL 中的每个 #{xxx} 占位符都会被解析成相应的 ParameterMapping 对象
private final List<ParameterMapping> parameterMappings;
// 运行时参数,即用户传入的参数
private final Object parameterObject;
// 附加参数集合,用于存储一些额外的信息,比如 datebaseId 等
private final Map<String, Object> additionalParameters;
// additionalParameters 的元信息对象
private final MetaObject metaParameters;
接下来,开始分析 BoundSql 的构建过程,首先从 MappedStatement 的 getBoundSql 方法看起,代码如下:
// -☆- MappedStatement 通过实际参数获取BoundSql
public BoundSql getBoundSql(Object parameterObject) {

    // 调用 sqlSource 的 getBoundSql 获取 BoundSql
    // 1. 如果是 RawSqlSource ,则调用其内部 StaticSqlSource 的 getBoundSql 方法直接new一个即可
    // 2. 如果是 DynamicSqlSource ,则进行语法树解析
    BoundSql boundSql = sqlSource.getBoundSql(parameterObject);
    List<ParameterMapping> parameterMappings = boundSql.getParameterMappings();
    if (parameterMappings == null || parameterMappings.isEmpty()) {
        /*
         * 创建新的 BoundSql,这里的 parameterMap 是 ParameterMap 类型。 由<ParameterMap> 节点进行配置,该节点已经废弃,不推荐使用。
         * 默认情况下,parameterMap.getParameterMappings() 返回空集合
         */
        boundSql = new BoundSql(configuration, boundSql.getSql(), parameterMap.getParameterMappings(), parameterObject);
    }

    // check for nested result maps in parameter mappings (issue #30)
    for (ParameterMapping pm : boundSql.getParameterMappings()) {
      String rmId = pm.getResultMapId();
      if (rmId != null) {
        ResultMap rm = configuration.getResultMap(rmId);
        if (rm != null) {
          hasNestedResultMaps |= rm.hasNestedResultMaps();
        }
      }
    }

    return boundSql;
}
上述代码主要是调用了SQL源的getBoundSql方法来获取BoundSql,然后对参数映射列表做一些处理,这些配置都不常用了,这里不做深入分析,而SQL源的getBoundSql才是我们的重点。由上文分析的动态标签解析流程可知,这些的SQL源一般为 RawSqlSource 或 DynamicSqlSource。前者直接调用其内部 StaticSqlSource 的 getBoundSql 方法直接new一个即可,后者才是真正进行语法树的解析。下面对这个 DynamicSqlSource 进行分析。
// -☆- DynamicSqlSource
public BoundSql getBoundSql(Object parameterObject) {
    // 创建 DynamicContext
    DynamicContext context = new DynamicContext(configuration, parameterObject);

    // ※ 解析 SQL 片段,并将解析结果存储到 DynamicContext 中
    rootSqlNode.apply(context);

    SqlSourceBuilder sqlSourceParser = new SqlSourceBuilder(configuration);
    Class<?> parameterType = parameterObject == null ? Object.class : parameterObject.getClass();
    /*
     * ※ 构建 StaticSqlSource,在此过程中将 sql 语句中的占位符 #{} 替换为问号 ?, 并为每个占位符构建相应的 ParameterMapping
     */
    SqlSource sqlSource = sqlSourceParser.parse(context.getSql(), parameterType, context.getBindings());

    // 调用 StaticSqlSource 的 getBoundSql 获取 BoundSql
    BoundSql boundSql = sqlSource.getBoundSql(parameterObject);

    // 将 DynamicContext 的 ContextMap 中的内容拷贝到 BoundSql 中
    for (Map.Entry<String, Object> entry : context.getBindings().entrySet()) {
        boundSql.setAdditionalParameter(entry.getKey(), entry.getValue());
    }
    return boundSql;
}
如上,DynamicSqlSource 的 getBoundSql 方法的代码看起来不多,但是逻辑却并不简单。该方法由数个步骤组成,这里总结一下:
- 创建 DynamicContext
- 解析 SQL 片段,并将解析结果存储到 DynamicContext 中
- 解析 SQL 语句,并构建 StaticSqlSource
- 调用 StaticSqlSource 的 getBoundSql 获取 BoundSql
- 将 DynamicContext 的 ContextMap 中的内容拷贝到 BoundSql 中
如上5个步骤中,第5步为常规操作,就不多说了,其他步骤将会在接下来章节中一一进行分析。按照顺序,我们先来分析 DynamicContext 的实现。
2.1 DynamicContext
DynamicContext 是 SQL 语句构建的上下文,每个 SQL 片段解析完成后,都会将解析结果存入 DynamicContext 中。待所有的 SQL 片段解析完毕后,一条完整的 SQL 语句就会出现在 DynamicContext 对象中。下面我们来看一下 DynamicContext 类的定义。
public class DynamicContext {

    public static final String PARAMETER_OBJECT_KEY = "_parameter";
    public static final String DATABASE_ID_KEY = "_databaseId";

    // 用于存储一些额外的信息,比如运行时参数 和 databaseId
    private final ContextMap bindings;
    // 用于存放 SQL 片段的解析结果
    private final StringBuilder sqlBuilder = new StringBuilder();

    public DynamicContext(Configuration configuration, Object parameterObject) {
        // 创建 ContextMap
        if (parameterObject != null && !(parameterObject instanceof Map)) {
            MetaObject metaObject = configuration.newMetaObject(parameterObject);
            bindings = new ContextMap(metaObject);
        } else {
            bindings = new ContextMap(null);
        }

        // 存放运行时参数 parameterObject 以及 databaseId
        bindings.put(PARAMETER_OBJECT_KEY, parameterObject);
        bindings.put(DATABASE_ID_KEY, configuration.getDatabaseId());
    }

    // 省略部分代码
}
如上,其中 sqlBuilder 变量用于存放 SQL 片段的解析结果,bindings 则用于存储一些额外的信息,比如运行时参数 和 databaseId 等。bindings 类型为 ContextMap,ContextMap 定义在 DynamicContext 中,是一个静态内部类。该类继承自 HashMap,并覆写了 get 方法。它的代码如下:
static class ContextMap extends HashMap<String, Object> {

    private MetaObject parameterMetaObject;

    public ContextMap(MetaObject parameterMetaObject) {
        this.parameterMetaObject = parameterMetaObject;
    }

    @Override
    public Object get(Object key) {
        String strKey = (String) key;
        // 检查是否包含 strKey,若包含则直接返回
        if (super.containsKey(strKey)) {
            return super.get(strKey);
        }

        if (parameterMetaObject != null) {
            // 从运行时参数中查找结果
            return parameterMetaObject.getValue(strKey);
        }

        return null;
    }
}
DynamicContext 对外提供了两个接口,用于操作 sqlBuilder。分别如下:
public void appendSql(String sql) {
    sqlBuilder.append(sql);
    sqlBuilder.append(" ");
}

public String getSql() {
    return sqlBuilder.toString().trim();
}
以上就是对 DynamicContext 的简单介绍,DynamicContext 的源码不难理解,这里就不多说了。继续往下分析。
2.2 解析 SQL 片段
对于一个包含了 ${} 占位符,或 <if>、<where> 等标签的 SQL,在解析的过程中,会被分解成多个片段。每个片段都有对应的类型,每种类型的片段都有不同的解析逻辑。在源码中,片段这个概念等价于 sql 节点,即 SqlNode。SqlNode 是一个接口,它有众多的实现类。其继承体系如下:
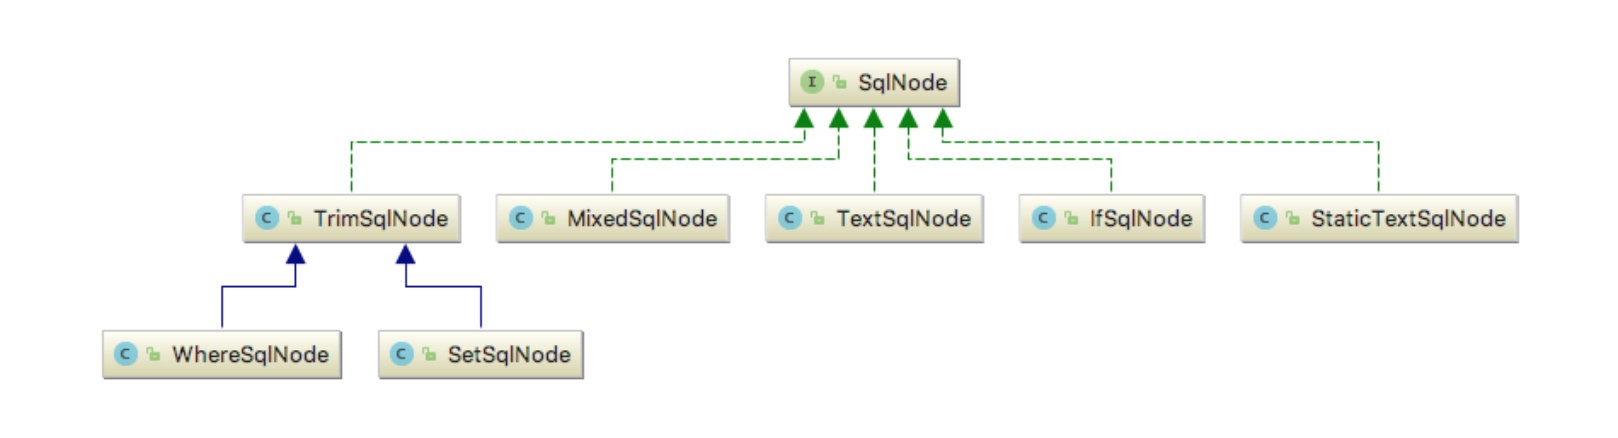
上图只画出了部分的实现类,还有一小部分没画出来,不过这并不影响接下来的分析。在众多实现类中,StaticTextSqlNode 用于存储静态文本,TextSqlNode 用于存储带有 ${} 占位符的普通文本,IfSqlNode 则用于存储 <if> 节点的内容。MixedSqlNode 内部维护了一个 SqlNode 集合,用于存储各种各样的 SqlNode。接下来,我将会对 MixedSqlNode 、StaticTextSqlNode、TextSqlNode、IfSqlNode、WhereSqlNode 以及 TrimSqlNode 等进行分析,其他的实现类请大家自行分析。
public class MixedSqlNode implements SqlNode {
    private final List<SqlNode> contents;

    public MixedSqlNode(List<SqlNode> contents) {
        this.contents = contents;
    }

    @Override
    public boolean apply(DynamicContext context) {
        // 遍历 SqlNode 集合
        for (SqlNode sqlNode : contents) {
            // 调用 salNode 对象本身的 apply 方法解析 sql
            sqlNode.apply(context);
        }
        return true;
    }
}
MixedSqlNode 可以看做是 SqlNode 实现类对象的容器,凡是实现了 SqlNode 接口的类都可以存储到 MixedSqlNode 中,包括它自己。MixedSqlNode 解析方法 apply 逻辑比较简单,即遍历 SqlNode 集合,并调用其他 SalNode 实现类对象的 apply 方法解析 sql。那下面我们来看看其他 SalNode 实现类的 apply 方法是怎样实现的。
public class StaticTextSqlNode implements SqlNode {

    private final String text;

    public StaticTextSqlNode(String text) {
        this.text = text;
    }

    @Override
    public boolean apply(DynamicContext context) {
        context.appendSql(text);
        return true;
    }
}
StaticTextSqlNode 用于存储静态文本,所以它不需要什么解析逻辑,直接将其存储的 SQL 片段添加到 DynamicContext 中即可。StaticTextSqlNode 的实现比较简单,看起来很轻松。下面分析一下 TextSqlNode。
public class TextSqlNode implements SqlNode {

    private final String text;
    private final Pattern injectionFilter;

    @Override
    public boolean apply(DynamicContext context) {
        // 创建 ${} 占位符解析器
        GenericTokenParser parser = createParser(new BindingTokenParser(context, injectionFilter));
        // 解析 ${} 占位符,并将解析结果添加到 DynamicContext 中
        context.appendSql(parser.parse(text));
        return true;
    }

    private GenericTokenParser createParser(TokenHandler handler) {
        // 创建占位符解析器,GenericTokenParser 是一个通用解析器,并非只能解析 ${}
        return new GenericTokenParser("${", "}", handler);
    }

    // 对${}中的内容进行处理替换
    private static class BindingTokenParser implements TokenHandler {

        private DynamicContext context;
        private Pattern injectionFilter;

        public BindingTokenParser(DynamicContext context, Pattern injectionFilter) {
            this.context = context;
            this.injectionFilter = injectionFilter;
        }

        @Override
        public String handleToken(String content) {
            Object parameter = context.getBindings().get("_parameter");
            if (parameter == null) {
                context.getBindings().put("value", null);
            } else if (SimpleTypeRegistry.isSimpleType(parameter.getClass())) {
                context.getBindings().put("value", parameter);
            }
            // 通过 ONGL 从用户传入的参数中获取结果
            Object value = OgnlCache.getValue(content, context.getBindings());
            String srtValue = (value == null ? "" : String.valueOf(value));
            // 通过正则表达式检测 srtValue 有效性
            checkInjection(srtValue);
            return srtValue;
        }
    }
}
GenericTokenParser 是一个通用的标记解析器,用于解析形如
${xxx},#{xxx}等标记。GenericTokenParser 负责将标记中的内容抽取出来,并将标记内容交给相应的 TokenHandler 去处理。BindingTokenParser 负责解析标记内容,并将解析结果返回给 GenericTokenParser,用于替换${xxx}标记。举个例子说明一下吧,如下。我们有这样一个 SQL 语句,用于从 article 表中查询某个作者所写的文章。如下:
SELECT * FROM article WHERE author = '${author}'假设我们我们传入的 author 值为 tianxiaobo,那么该 SQL 最终会被解析成如下的结果:
SELECT * FROM article WHERE author = 'tianxiaobo'并且在替换时,可以支持传入的正则表达式进行校验,防止SQL注入问题。
分析完 TextSqlNode 的逻辑,接下来,分析 IfSqlNode 的实现。
public class IfSqlNode implements SqlNode {

    private final ExpressionEvaluator evaluator;
    private final String test;
    private final SqlNode contents;

    public IfSqlNode(SqlNode contents, String test) {
        this.test = test;
        this.contents = contents;
        this.evaluator = new ExpressionEvaluator();
    }

    @Override
    public boolean apply(DynamicContext context) {
        // 通过 ONGL 评估 test 表达式的结果
        if (evaluator.evaluateBoolean(test, context.getBindings())) {
            // 若 test 表达式中的条件成立,则调用其他节点的 apply 方法进行解析
            contents.apply(context);
            return true;
        }
        return false;
    }
}
IfSqlNode 对应的是 <if test='xxx'> 节点,<if> 节点是日常开发中使用频次比较高的一个节点。它的具体用法我想大家都很熟悉了,这里就不多啰嗦。IfSqlNode 的 apply 方法逻辑并不复杂,首先是通过 ONGL 检测 test 表达式是否为 true,如果为 true,则调用其他节点的 apply 方法继续进行解析。需要注意的是 <if> 节点中也可嵌套其他的动态节点,并非只有纯文本。因此 contents 变量遍历指向的是 MixedSqlNode,而非 StaticTextSqlNode。
关于 IfSqlNode 就说到这,接下来分析 WhereSqlNode 的实现。
public class WhereSqlNode extends TrimSqlNode {

    /** 前缀列表 */
    private static List<String> prefixList = Arrays.asList("AND ", "OR ", "AND\n", "OR\n", "AND\r", "OR\r", "AND\t", "OR\t");

    public WhereSqlNode(Configuration configuration, SqlNode contents) {
        // 调用父类的构造方法
        super(configuration, contents, "WHERE", prefixList, null, null);
    }
}
在 MyBatis 中,WhereSqlNode 和 SetSqlNode 都是基于 TrimSqlNode 实现的,所以上面的代码看起来很简单。WhereSqlNode 对应于 <where> 节点,关于该节点的用法以及它的应用场景,大家请自行查阅资料。我在分析源码的过程中,默认大家已经知道了该节点的用途和应用场景。
接下来,我们把目光聚焦在 TrimSqlNode 的实现上。
public class TrimSqlNode implements SqlNode {

    private final SqlNode contents;
    private final String prefix;
    private final String suffix;
    private final List<String> prefixesToOverride;
    private final List<String> suffixesToOverride;
    private final Configuration configuration;

   // 省略构造方法

    @Override
    public boolean apply(DynamicContext context) {
        // 创建具有过滤功能的 DynamicContext
        FilteredDynamicContext filteredDynamicContext = new FilteredDynamicContext(context);
        // 解析节点内容
        boolean result = contents.apply(filteredDynamicContext);
        // 过滤掉前缀和后缀
        filteredDynamicContext.applyAll();
        return result;
    }
}
如上,apply 方法首选调用了其他 SqlNode 的 apply 方法解析节点内容,这步操作完成后,FilteredDynamicContext 中会得到一条 SQL 片段字符串。接下里需要做的事情是过滤字符串前缀后和后缀,并添加相应的前缀和后缀。这个事情由 FilteredDynamicContext 负责,FilteredDynamicContext 是 TrimSqlNode 的私有内部类。我们去看一下它的代码。
private class FilteredDynamicContext extends DynamicContext {

    private DynamicContext delegate;
    /** 构造方法会将下面两个布尔值置为 false */
    private boolean prefixApplied;
    private boolean suffixApplied;
    private StringBuilder sqlBuffer;

    // 省略构造方法

    public void applyAll() {
        sqlBuffer = new StringBuilder(sqlBuffer.toString().trim());
        String trimmedUppercaseSql = sqlBuffer.toString().toUpperCase(Locale.ENGLISH);
        if (trimmedUppercaseSql.length() > 0) {
            // 引用前缀和后缀,也就是对 sql 进行过滤操作,移除掉前缀或后缀
            applyPrefix(sqlBuffer, trimmedUppercaseSql);
            applySuffix(sqlBuffer, trimmedUppercaseSql);
        }
        // 将当前对象的 sqlBuffer 内容添加到代理类中
        delegate.appendSql(sqlBuffer.toString());
    }

    // 省略部分方法

    private void applyPrefix(StringBuilder sql, String trimmedUppercaseSql) {
        if (!prefixApplied) {
            // 设置 prefixApplied 为 true,以下逻辑仅会被执行一次
            prefixApplied = true;
            if (prefixesToOverride != null) {
                for (String toRemove : prefixesToOverride) {
                    // 检测当前 sql 字符串是否包含 toRemove 前缀,比如 'AND ', 'AND\t'
                    if (trimmedUppercaseSql.startsWith(toRemove)) {
                        // 移除前缀
                        sql.delete(0, toRemove.trim().length());
                        break;
                    }
                }
            }

            // 插入前缀,比如 WHERE
            if (prefix != null) {
                sql.insert(0, " ");
                sql.insert(0, prefix);
            }
        }
    }

    // 该方法逻辑与 applyPrefix 大同小异,大家自行分析
    private void applySuffix(StringBuilder sql, String trimmedUppercaseSql) {...}
}
在上面的代码中,我们重点关注 applyAll 和 applyPrefix 方法,其他的方法大家自行分析。applyAll 方法的逻辑比较简单,首先从 sqlBuffer 中获取 SQL 字符串。然后调用 applyPrefix 和 applySuffix 进行过滤操作。最后将过滤后的 SQL 字符串添加到被装饰的类中。applyPrefix 方法会首先检测 SQL 字符串是不是以 "AND ","OR ",或 “AND\n”, “OR\n” 等前缀开头,若是则将前缀从 sqlBuffer 中移除。然后将前缀插入到 sqlBuffer 的首部,整个逻辑就结束了。下面写点代码简单验证一下,如下:
public class SqlNodeTest {

    @Test
    public void testWhereSqlNode() throws IOException {
        String sqlFragment = "AND id = #{id}";
        MixedSqlNode msn = new MixedSqlNode(Arrays.asList(new StaticTextSqlNode(sqlFragment)));
        WhereSqlNode wsn = new WhereSqlNode(new Configuration(), msn);
        DynamicContext dc = new DynamicContext(new Configuration(), new ParamMap<>());
        wsn.apply(dc);
        System.out.println("解析前:" + sqlFragment);
        System.out.println("解析后:" + dc.getSql());
    }
}
测试结果如下:
解析前:AND id = #{id}
解析后:WHERE  id = #{id}
2.3 解析 #{} 占位符
经过前面的解析,我们已经能从 DynamicContext 获取到完整的 SQL 语句了。但这并不意味着解析过程就结束了,因为当前的 SQL 语句中还有一种占位符没有处理,即 #{}。与 ${} 占位符的处理方式不同,MyBatis 并不会直接将 #{} 占位符替换为相应的参数值。#{} 占位符的解析逻辑这里先不多说,等相应的源码分析完了,答案就明了了。
#{} 占位符的解析逻辑是包含在 SqlSourceBuilder 的 parse 方法中,该方法最终会将解析后的 SQL 以及其他的一些数据封装到 StaticSqlSource 中。下面,一起来看一下 SqlSourceBuilder 的 parse 方法。
// -☆- SqlSourceBuilder
public SqlSource parse(String originalSql, Class<?> parameterType, Map<String, Object> additionalParameters) {
    // 创建 #{} 占位符处理器
    ParameterMappingTokenHandler handler = new ParameterMappingTokenHandler(configuration, parameterType, additionalParameters);
    // 创建 #{} 占位符解析器
    GenericTokenParser parser = new GenericTokenParser("#{", "}", handler);
    // 解析 #{} 占位符,并返回解析结果
    String sql = parser.parse(originalSql);
    // 封装解析结果到 StaticSqlSource 中,并返回
    return new StaticSqlSource(configuration, sql, handler.getParameterMappings());
}
如上,GenericTokenParser 的用途上一节已经介绍过了,就不多说了。接下来,我们重点关注 #{} 占位符处理器 ParameterMappingTokenHandler 的逻辑。
public String handleToken(String content) {
    // 获取 content 的对应的 ParameterMapping
    parameterMappings.add(buildParameterMapping(content));
    // 返回 ?
    return "?";
}
ParameterMappingTokenHandler 的 handleToken 方法看起来比较简单,但实际上并非如此。GenericTokenParser 负责将 #{} 占位符中的内容抽取出来,并将抽取出的内容传给 handleToken 方法。handleToken 负责将传入的参数解析成对应的 ParameterMapping 对象,这步操作由 buildParameterMapping 方法完成。下面我们看一下 buildParameterMapping 的源码。
private ParameterMapping buildParameterMapping(String content) {
    // 1. 将 #{xxx} 占位符中的内容解析成 Map。
    /* 如 #{age,javaType=int,jdbcType=NUMERIC,typeHandler=MyTypeHandler} 将会被转换为
       {
           "property": "age",
           "typeHandler": "MyTypeHandler",
           "jdbcType": "NUMERIC",
           "javaType": "int"
       }
      parseParameterMapping 内部依赖 ParameterExpression 对字符串进行解析,ParameterExpression 的逻辑不是很复杂,这里就不分析了。大家若有兴趣,可自行分析
    */
    Map<String, String> propertiesMap = parseParameterMapping(content);

    // 2. 获取 property ,即"age"
    String property = propertiesMap.get("property");

    // 3. 获取属性的类型
    Class<?> propertyType;
    // metaParameters 为 DynamicContext 成员变量 bindings 的元信息对象
    if (metaParameters.hasGetter(property)) {
        propertyType = metaParameters.getGetterType(property);
    /*
     * parameterType 是运行时参数的类型。如果用户传入的是单个参数,比如 Article 对象,此时
     * parameterType 为 Article.class。如果用户传入的多个参数,比如 [id = 1, author = "coolblog"],
     * MyBatis 会使用 ParamMap 封装这些参数,此时 parameterType 为 ParamMap.class。如果
     * parameterType 有相应的 TypeHandler,这里则把 parameterType 设为 propertyType
     */
    } else if (typeHandlerRegistry.hasTypeHandler(parameterType)) {
        propertyType = parameterType;
    } else if (JdbcType.CURSOR.name().equals(propertiesMap.get("jdbcType"))) {
        propertyType = java.sql.ResultSet.class;
    } else if (property == null || Map.class.isAssignableFrom(parameterType)) {
        // 如果 property 为空,或 parameterType 是 Map 类型,则将 propertyType 设为 Object.class
        propertyType = Object.class;
    } else {
        // 代码逻辑走到此分支中,表明 parameterType 是一个自定义的类,比如 Article,此时为该类创建一个元信息对象
        MetaClass metaClass = MetaClass.forClass(parameterType, configuration.getReflectorFactory());
        // 检测参数对象有没有与 property 想对应的 getter 方法
        if (metaClass.hasGetter(property)) {
            // 获取成员变量的类型
            propertyType = metaClass.getGetterType(property);
        } else {
            propertyType = Object.class;
        }
    }

    // -------------------------- 分割线 ---------------------------

    ParameterMapping.Builder builder = new ParameterMapping.Builder(configuration, property, propertyType);

    // 将 propertyType 赋值给 javaType
    Class<?> javaType = propertyType;
    String typeHandlerAlias = null;

    // 遍历 propertiesMap,逐个解析参数
    for (Map.Entry<String, String> entry : propertiesMap.entrySet()) {
        String name = entry.getKey();
        String value = entry.getValue();
        if ("javaType".equals(name)) {
            // 如果用户明确配置了 javaType,则以用户的配置为准
            javaType = resolveClass(value);
            builder.javaType(javaType);
        } else if ("jdbcType".equals(name)) {
            // 解析 jdbcType
            builder.jdbcType(resolveJdbcType(value));
        } else if ("mode".equals(name)) {...}
        else if ("numericScale".equals(name)) {...}
        else if ("resultMap".equals(name)) {...}
        else if ("typeHandler".equals(name)) {
        	typeHandlerAlias = value;
        }
        else if ("jdbcTypeName".equals(name)) {...}
        else if ("property".equals(name)) {...}
        else if ("expression".equals(name)) {
            throw new BuilderException("Expression based parameters are not supported yet");
        } else {
            throw new BuilderException("An invalid property '" + name + "' was found in mapping #{" + content
                + "}.  Valid properties are " + parameterProperties);
        }
    }
    if (typeHandlerAlias != null) {
        // 解析 TypeHandler
        builder.typeHandler(resolveTypeHandler(javaType, typeHandlerAlias));
    }

    // 构建 ParameterMapping 对象
    return builder.build();
}
如上,buildParameterMapping 代码很多,逻辑看起来很复杂。但是它做的事情却不是很多,只有3件事情。如下:
- 解析 content
- 解析 propertyType,对应分割线之上的代码
- 构建 ParameterMapping 对象,对应分割线之下的代码
buildParameterMapping 代码比较多,不太好理解,下面写个示例演示一下。如下:
public class SqlSourceBuilderTest {

    @Test
    public void test() {
        // 带有复杂 #{} 占位符的参数,接下里会解析这个占位符
        String sql = "SELECT * FROM Author WHERE age = #{age,javaType=int,jdbcType=NUMERIC}";
        SqlSourceBuilder sqlSourceBuilder = new SqlSourceBuilder(new Configuration());
        SqlSource sqlSource = sqlSourceBuilder.parse(sql, Author.class, new HashMap<>());
        BoundSql boundSql = sqlSource.getBoundSql(new Author());

        System.out.println(String.format("SQL: %s\n", boundSql.getSql()));
        System.out.println(String.format("ParameterMappings: %s", boundSql.getParameterMappings()));
    }
}

public class Author {
    private Integer id;
    private String name;
    private Integer age;

    // 省略 getter/setter
}
测试结果如下:
SQL: SELECT * FROM Author WHERE age = ?

ParameterMappings: [ParameterMapping{property='age', mode=IN, javaType=class java.lang.Integer, jdbcType=NUMERIC, numericScale=null, resultMapId='null', jdbcTypeName='null', expression='null'}]
正如测试结果所示,SQL 中的 #{age, …} 占位符被替换成了问号 ?。#{age, …} 也被解析成了一个 ParameterMapping 对象。
本节的最后,我们再来看一下 StaticSqlSource 的创建过程。如下:
public class StaticSqlSource implements SqlSource {

    private final String sql;
    private final List<ParameterMapping> parameterMappings;
    private final Configuration configuration;

    public StaticSqlSource(Configuration configuration, String sql) {
        this(configuration, sql, null);
    }

    public StaticSqlSource(Configuration configuration, String sql, List<ParameterMapping> parameterMappings) {
        this.sql = sql;
        this.parameterMappings = parameterMappings;
        this.configuration = configuration;
    }

    @Override
    public BoundSql getBoundSql(Object parameterObject) {
        // 创建 BoundSql 对象
        return new BoundSql(configuration, sql, parameterMappings, parameterObject);
    }
}
上面代码没有什么太复杂的地方,从上面代码中可以看出 BoundSql 的创建过程也很简单。正因为前面经历了这么复杂的解析逻辑,BoundSql 的创建过程才会如此简单。到此,关于 BoundSql 构建的过程就分析完了,稍作休息,我们进行后面的分析。
3. 创建 StatementHandler
StatementHandler 接口是 Mybatis 源码与 JDBC 接口的边界,往上调用 MyBatis 的参数处理器和结果集处理器填充参数和处理结果集,往下直接操作 JDBC Api 来创建 Statement 对象并执行SQL语句。其实现类与 JDBC 中三类 Stetement 十分相似,继承体系如下图。
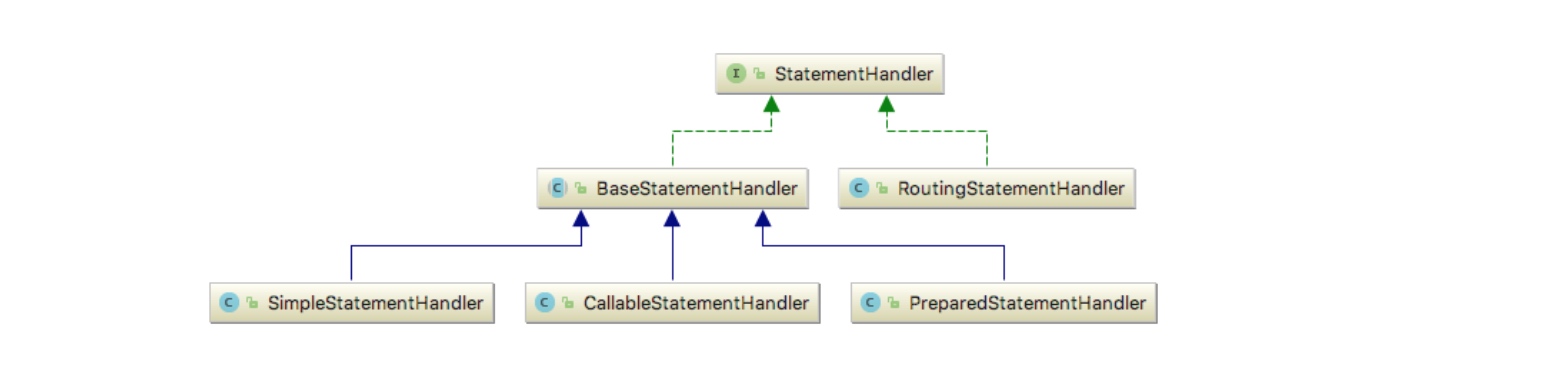
首先派生一个抽象类 BaseStatementHandler 处理公共逻辑,然后三个具体的实现类分别对应 JDBC 三种不同的 Statement 。除外之外,额外增加了一个实现类 RoutingStatementHandler,起路由作用(其实并没有什么卵用,可能是为了后续扩展吧)。
下面看下 StatementHandler 的创建过程,为了实现拦截逻辑,和执行器等组件的创建过程类似,统一放在了 Configuration 中创建。
// -☆- Configuration
public StatementHandler newStatementHandler(Executor executor, MappedStatement mappedStatement,
    Object parameterObject, RowBounds rowBounds, ResultHandler resultHandler, BoundSql boundSql) {

    // 创建具有路由功能的 RoutingStatementHandler
    StatementHandler statementHandler = new RoutingStatementHandler(executor, mappedStatement, parameterObject, rowBounds, resultHandler, boundSql);

    // 应用插件到 StatementHandler 上
    statementHandler = (StatementHandler) interceptorChain.pluginAll(statementHandler);

    return statementHandler;
}
关于 MyBatis 的插件机制,后面独立成文进行讲解,这里就不分析了。下面分析一下 RoutingStatementHandler。
public class RoutingStatementHandler implements StatementHandler {

    private final StatementHandler delegate;

    public RoutingStatementHandler(Executor executor, MappedStatement ms, Object parameter, RowBounds rowBounds,
        ResultHandler resultHandler, BoundSql boundSql) {

        // 根据 StatementType 创建不同的 StatementHandler
        switch (ms.getStatementType()) {
            case STATEMENT:
                delegate = new SimpleStatementHandler(executor, ms, parameter, rowBounds, resultHandler, boundSql);
                break;
            case PREPARED:
                delegate = new PreparedStatementHandler(executor, ms, parameter, rowBounds, resultHandler, boundSql);
                break;
            case CALLABLE:
                delegate = new CallableStatementHandler(executor, ms, parameter, rowBounds, resultHandler, boundSql);
                break;
            default:
                throw new ExecutorException("Unknown statement type: " + ms.getStatementType());
        }
    }

    // 其他方法逻辑均由别的 StatementHandler 代理完成,就不贴代码了
}
基本就是根据之前解析好的 StatementType 类型创建对应的 StatementHandler ,没有什么特殊的逻辑。如果未在Mapper文件中的SQL语句标签修改 statementType 属性,则默认创建 PreparedStatementHandler 。关于 StatementHandler 创建的过程就先分析到这,StatementHandler 创建完成了,后续要做到事情是创建 Statement,以及将运行时参数和 Statement 进行绑定。
4. 设置运行时参数
JDBC 提供了三种 Statement 接口,分别是 Statement、PreparedStatement 和 CallableStatement。他们的关系如下:

其中,Statement 接口提供了执行 SQL,获取执行结果等基本功能。PreparedStatement 在此基础上,对 IN 类型的参数提供了支持,使得我们可以使用运行时参数替换 SQL 中的问号 ? 占位符,而不用手动拼接 SQL。CallableStatement 则是 在 PreparedStatement 基础上,对 OUT 类型的参数提供了支持,该种类型的参数用于保存存储过程输出的结果。
下面以最常用的 PreparedStatement 的创建为例分析,根据前文分析的 selectOne 方法可知,Statement 是在 Executor 的 prepareStatement 方法中创建的,先来看看这个方法。
// -☆- SimpleExecutor
private Statement prepareStatement(StatementHandler handler, Log statementLog) throws SQLException {
    Statement stmt;
    // 获取数据库连接
    Connection connection = getConnection(statementLog);
    // 创建 Statement
    stmt = handler.prepare(connection, transaction.getTimeout());
    // 为 Statement 设置 IN 参数
    handler.parameterize(stmt);
    return stmt;
}
首先获取连接,然后创建 Statement ,最后设置参数,等待后续的执行操作,这和 JDBC 操作非常相似。下面来看看 PreparedStatement 具体是怎样创建的。
// -☆- PreparedStatementHandler
public Statement prepare(Connection connection, Integer transactionTimeout) throws SQLException {
    Statement statement = null;
    try {
        // 创建 Statement
        statement = instantiateStatement(connection);
        // 设置超时和 FetchSize
        setStatementTimeout(statement, transactionTimeout);
        setFetchSize(statement);
        return statement;
    } catch (SQLException e) {
        closeStatement(statement);
        throw e;
    } catch (Exception e) {
        closeStatement(statement);
        throw new ExecutorException("Error preparing statement.  Cause: " + e, e);
    }
}

protected Statement instantiateStatement(Connection connection) throws SQLException {
    String sql = boundSql.getSql();
    // 根据条件调用不同的 prepareStatement 方法创建 PreparedStatement
    if (mappedStatement.getKeyGenerator() instanceof Jdbc3KeyGenerator) {
        String[] keyColumnNames = mappedStatement.getKeyColumns();
        if (keyColumnNames == null) {
            return connection.prepareStatement(sql, PreparedStatement.RETURN_GENERATED_KEYS);
        } else {
            return connection.prepareStatement(sql, keyColumnNames);
        }
    } else if (mappedStatement.getResultSetType() != null) {
        return connection.prepareStatement(sql, mappedStatement.getResultSetType().getValue(), ResultSet.CONCUR_READ_ONLY);
    } else {
        return connection.prepareStatement(sql);
    }
}
如上,PreparedStatement 的创建过程没什么复杂的地方,就不多说了。下面分析运行时参数是如何被设置到 SQL 中的过程。
// -☆- PreparedStatementHandler
public void parameterize(Statement statement) throws SQLException {
    // 通过参数处理器 ParameterHandler 设置运行时参数到 PreparedStatement 中
    parameterHandler.setParameters((PreparedStatement) statement);
}

public class DefaultParameterHandler implements ParameterHandler {
    private final TypeHandlerRegistry typeHandlerRegistry;
    private final MappedStatement mappedStatement;
    private final Object parameterObject;
    private final BoundSql boundSql;
    private final Configuration configuration;

    public void setParameters(PreparedStatement ps) {
        // 从 BoundSql 中获取 ParameterMapping 列表,每个 ParameterMapping 与原始 SQL 中的 #{xxx} 占位符一一对应
        List<ParameterMapping> parameterMappings = boundSql.getParameterMappings();
        if (parameterMappings != null) {
            for (int i = 0; i < parameterMappings.size(); i++) {
                ParameterMapping parameterMapping = parameterMappings.get(i);
                // 检测参数类型,排除掉 mode 为 OUT 类型的 parameterMapping
                if (parameterMapping.getMode() != ParameterMode.OUT) {
                    Object value;
                    // 获取属性名
                    String propertyName = parameterMapping.getProperty();
                    // 检测 BoundSql 的 additionalParameters 是否包含 propertyName
                    if (boundSql.hasAdditionalParameter(propertyName)) {
                        value = boundSql.getAdditionalParameter(propertyName);
                    } else if (parameterObject == null) {
                        value = null;

                    // 检测运行时参数是否有相应的类型解析器
                    } else if (typeHandlerRegistry.hasTypeHandler(parameterObject.getClass())) {
                        // 若运行时参数的类型有相应的类型处理器 TypeHandler,则将 parameterObject 设为当前属性的值。
                        value = parameterObject;
                    } else {
                        // 为用户传入的参数 parameterObject 创建元信息对象
                        MetaObject metaObject = configuration.newMetaObject(parameterObject);
                        // 从用户传入的参数中获取 propertyName 对应的值
                        value = metaObject.getValue(propertyName);
                    }

                    // ---------------------分割线---------------------

                    TypeHandler typeHandler = parameterMapping.getTypeHandler();
                    JdbcType jdbcType = parameterMapping.getJdbcType();
                    if (value == null && jdbcType == null) {
                        // 此处 jdbcType = JdbcType.OTHER
                        jdbcType = configuration.getJdbcTypeForNull();
                    }
                    try {
                        // 由类型处理器 typeHandler 向 ParameterHandler 设置参数
                        typeHandler.setParameter(ps, i + 1, value, jdbcType);
                    } catch (TypeException e) {
                        throw new TypeException(...);
                    } catch (SQLException e) {
                        throw new TypeException(...);
                    }
                }
            }
        }
    }
}
如上代码,分割线以上的大段代码用于获取 #{xxx} 占位符属性所对应的运行时参数。分割线以下的代码则是获取 #{xxx} 占位符属性对应的 TypeHandler,并在最后通过 TypeHandler 将运行时参数值设置到 PreparedStatement 中。
5. 参数转换和设置小结
下面对之前参数转换和设置的过程做一个小结,假设我们有这样一条 SQL 语句:
SELECT * FROM author WHERE name = #{name} AND age = #{age}
这个 SQL 语句中包含两个 #{} 占位符,在运行时这两个占位符会被解析成两个 ParameterMapping 对象。如下:
ParameterMapping{property='name', mode=IN, javaType=class java.lang.String, jdbcType=null, ...}
ParameterMapping{property='age', mode=IN, javaType=class java.lang.Integer, jdbcType=null, ...}
#{} 占位符解析完毕后,得到的 SQL 如下:
SELECT * FROM Author WHERE name = ? AND age = ?
这里假设下面这个方法与上面的 SQL 对应:
Author findByNameAndAge(@Param("name") String name, @Param("age") Integer age)
该方法的参数列表会被 ParamNameResolver 解析成一个 map,如下:
{
    0: "name",
    1: "age"
}
假设该方法在运行时有如下的调用:
findByNameAndAge("tianxiaobo", 20)
此时,需要再次借助 ParamNameResolver 力量。这次我们将参数名和运行时的参数值绑定起来,得到如下的映射关系。
{
    "name": "tianxiaobo",
    "age": 20,
    "param1": "tianxiaobo",
    "param2": 20
}
下一步,我们要将运行时参数设置到 SQL 中。由于原 SQL 经过解析后,占位符信息已经被擦除掉了,我们无法直接将运行时参数 SQL 中。不过好在,这些占位符信息被记录在了 ParameterMapping 中了,MyBatis 会将 ParameterMapping 会按照 #{} 的解析顺序存入到 List 中。这样我们通过 ParameterMapping 在列表中的位置确定它与 SQL 中的哪个 ? 占位符相关联。同时通过 ParameterMapping 中的 property 字段,我们到“参数名与参数值”映射表中查找具体的参数值。这样,我们就可以将参数值准确的设置到 SQL 中了,此时 SQL 如下:
SELECT * FROM Author WHERE name = "tianxiaobo" AND age = 20
整个流程如下图所示。
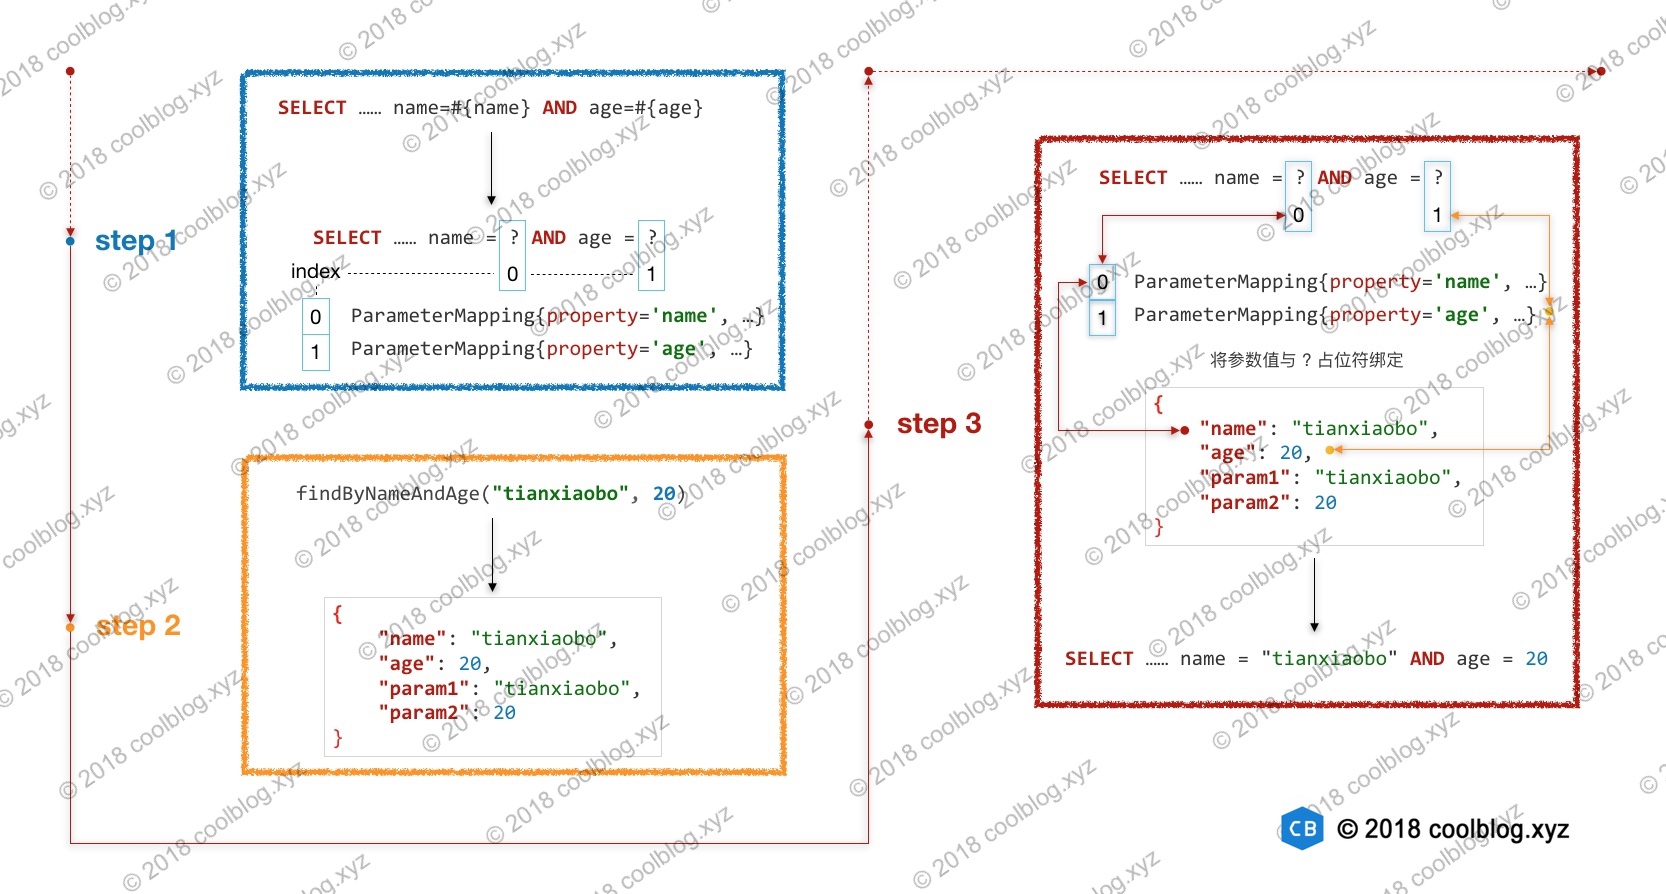
当运行时参数被设置到 SQL 中 后,下一步要做的事情是执行 SQL,然后处理 SQL 执行结果。对于更新操作,数据库一般返回一个 int 行数值,表示受影响行数,这个处理起来比较简单。但对于查询操作,返回的结果类型多变,处理方式也很复杂。接下来,我们就来看看 MyBatis 是如何处理查询结果的。
6. 处理查询结果
MyBatis 可以将查询结果,即结果集 ResultSet 自动映射成实体类对象。这样使用者就无需再手动操作结果集,并将数据填充到实体类对象中。这可大大降低开发的工作量,提高工作效率。
6.1 结果集映射主流程
在 MyBatis 中,结果集的处理工作由结果集处理器 ResultSetHandler 执行。ResultSetHandler 是一个接口,它只有一个实现类 DefaultResultSetHandler。结果集的处理入口方法是 handleResultSets,下面来看一下该方法的实现。
public List<Object> handleResultSets(Statement stmt) throws SQLException {

    final List<Object> multipleResults = new ArrayList<Object>();

    int resultSetCount = 0;
    // 获取第一个结果集
    ResultSetWrapper rsw = getFirstResultSet(stmt);

    List<ResultMap> resultMaps = mappedStatement.getResultMaps();
    int resultMapCount = resultMaps.size();
    validateResultMapsCount(rsw, resultMapCount);

    while (rsw != null && resultMapCount > resultSetCount) {
        ResultMap resultMap = resultMaps.get(resultSetCount);
        // 处理结果集
        handleResultSet(rsw, resultMap, multipleResults, null);
        // 获取下一个结果集
        rsw = getNextResultSet(stmt);
        cleanUpAfterHandlingResultSet();
        resultSetCount++;
    }

    // 以下逻辑均与多结果集有关,就不分析了,代码省略
    String[] resultSets = mappedStatement.getResultSets();
    if (resultSets != null) {...}

    return collapseSingleResultList(multipleResults);
}

private ResultSetWrapper getFirstResultSet(Statement stmt) throws SQLException {
    // 获取结果集
    ResultSet rs = stmt.getResultSet();
    while (rs == null) {
        /*
         * 移动 ResultSet 指针到下一个上,有些数据库驱动可能需要使用者
         * 先调用 getMoreResults 方法,然后才能调用 getResultSet 方法
         * 获取到第一个 ResultSet
         */
        if (stmt.getMoreResults()) {
            rs = stmt.getResultSet();
        } else {
            if (stmt.getUpdateCount() == -1) {
                break;
            }
        }
    }
    /*
     * 这里并不直接返回 ResultSet,而是将其封装到 ResultSetWrapper 中。
     * ResultSetWrapper 中包含了 ResultSet 一些元信息,比如列名称、每列对应的 JdbcType、
     * 以及每列对应的 Java 类名(class name,譬如 java.lang.String)等。
     */
    return rs != null ? new ResultSetWrapper(rs, configuration) : null;
}
如上,该方法首先从 Statement 中获取第一个结果集,然后调用 handleResultSet 方法对该结果集进行处理。一般情况下,如果我们不调用存储过程,不会涉及到多结果集的问题。由于存储过程并不是很常用,所以关于多结果集的处理逻辑我就不分析了。下面,我们把目光聚焦在单结果集的处理逻辑上。
private void handleResultSet(ResultSetWrapper rsw, ResultMap resultMap, List<Object> multipleResults, ResultMapping parentMapping) throws SQLException {
    try {
        if (parentMapping != null) {
            // 多结果集相关逻辑,不分析了
            handleRowValues(rsw, resultMap, null, RowBounds.DEFAULT, parentMapping);
        } else {
            /*
             * 检测 resultHandler 是否为空。ResultHandler 是一个接口,使用者可实现该接口,
             * 这样我们可以通过 ResultHandler 自定义接收查询结果的动作。比如我们可将结果存储到
             * List、Map 亦或是 Set,甚至丢弃,这完全取决于大家的实现逻辑。
             */
            if (resultHandler == null) {
                // 创建默认的结果处理器(默认是将结果存储在List中)
                DefaultResultHandler defaultResultHandler = new DefaultResultHandler(objectFactory);
                // 处理结果集的行数据
                handleRowValues(rsw, resultMap, defaultResultHandler, rowBounds, null);
                multipleResults.add(defaultResultHandler.getResultList());
            } else {
                // 处理结果集的行数据
                handleRowValues(rsw, resultMap, resultHandler, rowBounds, null);
            }
        }
    } finally {
        // issue #228 (close resultsets)
        closeResultSet(rsw.getResultSet());
    }
}
在上面代码中,出镜率最高的 handleRowValues 方法,该方法用于处理结果集中的数据。下面来看一下这个方法的逻辑。
public void handleRowValues(ResultSetWrapper rsw, ResultMap resultMap, ResultHandler<?> resultHandler,
        RowBounds rowBounds, ResultMapping parentMapping) throws SQLException {

    if (resultMap.hasNestedResultMaps()) {
        ensureNoRowBounds();
        checkResultHandler();
        // 处理嵌套映射
        handleRowValuesForNestedResultMap(rsw, resultMap, resultHandler, rowBounds, parentMapping);
    } else {
        // 处理简单映射
        handleRowValuesForSimpleResultMap(rsw, resultMap, resultHandler, rowBounds, parentMapping);
    }
}
如上,handleRowValues 方法中针对两种映射方式进行了处理。一种是嵌套映射,另一种是简单映射。嵌套是指 ResultMap 的子标签也存在 ResultMap,有内联嵌套映射和外引用嵌套映射两种情形,后面将会进行分析。这里先来简单映射的处理逻辑。
private void handleRowValuesForSimpleResultMap(ResultSetWrapper rsw, ResultMap resultMap,
        ResultHandler<?> resultHandler, RowBounds rowBounds, ResultMapping parentMapping) throws SQLException {

    DefaultResultContext<Object> resultContext = new DefaultResultContext<Object>();
    // 1. 根据 RowBounds 定位到指定行记录
    skipRows(rsw.getResultSet(), rowBounds);
    // 2. 检测是否还有更多行的数据需要处理
    while (shouldProcessMoreRows(resultContext, rowBounds) && rsw.getResultSet().next()) {
        // 3. 获取经过鉴别器处理后的 ResultMap
        ResultMap discriminatedResultMap = resolveDiscriminatedResultMap(rsw.getResultSet(), resultMap, null);
        // 4. 从 resultSet 中获取结果(即由某行数据封装出来的对象)
        Object rowValue = getRowValue(rsw, discriminatedResultMap);
        // 5. 存储结果到 ResultHandler 中
        storeObject(resultHandler, resultContext, rowValue, parentMapping, rsw.getResultSet());
    }
}
在如上几个步骤中,鉴别器相关的逻辑就不分析了,不是很常用。先来分析第一个步骤对应的代码逻辑。如下:
private void skipRows(ResultSet rs, RowBounds rowBounds) throws SQLException {
    // 检测 rs 的类型,不同的类型行数据定位方式是不同的
    if (rs.getType() != ResultSet.TYPE_FORWARD_ONLY) {
        if (rowBounds.getOffset() != RowBounds.NO_ROW_OFFSET) {
            // 直接定位到 rowBounds.getOffset() 位置处
            rs.absolute(rowBounds.getOffset());
        }
    } else {
        for (int i = 0; i < rowBounds.getOffset(); i++) {
            // 通过多次调用 rs.next() 方法实现行数据定位。 当 Offset 数值很大时,这种效率很低下
            rs.next();
        }
    }
}
这段逻辑主要用于处理 RowBounds ,来跳过前 rowBounds.getOffset() 行,效率并不高,能不能尽量不用。
第二个步骤主要是通过 JDBCApi resultSet.next()来遍历剩余的结果集,需要注意的是,如果结果集被关闭或者解析被终止或解析到足够的结果行则停止遍历。
// resultSet.isClosed() 用于检测结果集是否关闭,只有在未关闭时才继续解析后续结果
// shouldProcessMoreRows用于进行其它两项检测
while (shouldProcessMoreRows(resultContext, rowBounds) && !resultSet.isClosed() && resultSet.next()) {
    // ...
}

// context.isStopped() 判断上下文中的停止标记,可以在ResultHandler中获取并修改
// context.getResultCount() < rowBounds.getLimit() 解析到足够的记录数后退出解析
private boolean shouldProcessMoreRows(ResultContext<?> context, RowBounds rowBounds) {
    return !context.isStopped() && context.getResultCount() < rowBounds.getLimit();
}
第五个步骤主要是存储解析出来的对象到 Resulthandler 中,并同步上下文信息。
  private void storeObject(ResultHandler<?> resultHandler, DefaultResultContext<Object> resultContext, Object rowValue, ResultMapping parentMapping, ResultSet rs) throws SQLException {
    if (parentMapping != null) {
      // 多结果集相关,不分析了
      linkToParents(rs, parentMapping, rowValue);
    } else {
      // 存储结果
      callResultHandler(resultHandler, resultContext, rowValue);
    }
  }

  private void callResultHandler(ResultHandler<?> resultHandler, DefaultResultContext<Object> resultContext, Object rowValue) {
    // 同步 resultContext
    resultContext.nextResultObject(rowValue);

    // 调用 resultHandler 的 handleResult 方法进行存储(或者可以自定义其它处理方式)
    ((ResultHandler<Object>) resultHandler).handleResult(resultContext);
  }

  public void nextResultObject(T resultObject) {
    resultCount++; // 已解析记录数
    this.resultObject = resultObject; // 当前解析的结果
  }

  @Override
  public void handleResult(ResultContext<?> context) {
    // DefaultResultHandler的结果处理方式 ==> 添加结果到 list 中
    list.add(context.getResultObject());
  }
除此之外,如果 Mapper 接口方法返回值为 Map 类型,此时则需要另一种 ResultHandler 实现类处理结果,即 DefaultMapResultHandler。
// DefaultMapResultHandler 把结果存储在MAP中
@Override
  public void handleResult(ResultContext<? extends V> context) {
    final V value = context.getResultObject();
    final MetaObject mo = MetaObject.forObject(value, objectFactory, objectWrapperFactory, reflectorFactory);
    // TODO is that assignment always true?
    final K key = (K) mo.getValue(mapKey);
    mappedResults.put(key, value);
  }
最后再着重分析下第四步, ResultSet 的映射过程,如下:
private Object getRowValue(ResultSetWrapper rsw, ResultMap resultMap) throws SQLException {
    // 用于处理懒加载
    final ResultLoaderMap lazyLoader = new ResultLoaderMap();

    // 1. 创建实体类对象,比如 Article 对象
    Object rowValue = createResultObject(rsw, resultMap, lazyLoader, null);
    if (rowValue != null && !hasTypeHandlerForResultObject(rsw, resultMap.getType())) {
        final MetaObject metaObject = configuration.newMetaObject(rowValue);
        boolean foundValues = this.useConstructorMappings;

        // 检测是否应该自动映射结果集
        if (shouldApplyAutomaticMappings(resultMap, false)) {
            // 2.进行自动映射
            foundValues = applyAutomaticMappings(rsw, resultMap, metaObject, null) || foundValues;
        }

        // 3. 手动映射:根据 <resultMap> 节点中配置的映射关系进行映射
        foundValues = applyPropertyMappings(rsw, resultMap, metaObject, lazyLoader, null) || foundValues;

        foundValues = lazyLoader.size() > 0 || foundValues;
        rowValue = foundValues || configuration.isReturnInstanceForEmptyRow() ? rowValue : null;
    }
    return rowValue;
}
在上面的方法中,重要的逻辑已经注释出来了。有三处代码的逻辑比较复杂,接下来按顺序进行分节说明。首先分析实体类的创建过程。
6.2 创建实体类对象
MyBatis支持多种方式创建实体类对象,并在在创建时织入懒加载处理逻辑。代码如下:
// -☆- DefaultResultSetHandler
private Object createResultObject(ResultSetWrapper rsw, ResultMap resultMap, ResultLoaderMap lazyLoader, String columnPrefix) throws SQLException {

    this.useConstructorMappings = false;
    final List<Class<?>> constructorArgTypes = new ArrayList<Class<?>>();
    final List<Object> constructorArgs = new ArrayList<Object>();

    // 1. 调用重载方法创建实体类对象
    Object resultObject = createResultObject(rsw, resultMap, constructorArgTypes, constructorArgs, columnPrefix);

    // 2. 下面代码用于织入懒加载处理逻辑
    if (resultObject != null && !hasTypeHandlerForResultObject(rsw, resultMap.getType())) {
        // 遍历 ResultMappings 检查是否有懒加载
        final List<ResultMapping> propertyMappings = resultMap.getPropertyResultMappings();
        for (ResultMapping propertyMapping : propertyMappings) {
            // 如果开启了延迟加载,则为 resultObject 生成代理类
            if (propertyMapping.getNestedQueryId() != null && propertyMapping.isLazy()) {
                /*
                 * 创建代理类,默认使用 Javassist 框架生成代理类。由于实体类通常不会实现接口,
                 * 所以不能使用 JDK 动态代理 API 为实体类生成代理。
                 */
                resultObject = configuration.getProxyFactory()
                    .createProxy(resultObject, lazyLoader, configuration, objectFactory, constructorArgTypes, constructorArgs);
                break;
            }
        }
    }
    this.useConstructorMappings = resultObject != null && !constructorArgTypes.isEmpty();
    return resultObject;
}
重点注意,懒加载的处理逻辑是在此处织入的,后续章节会对懒加载再进行详细分析,先来看看 MyBatis 创建实体类对象的具体过程。
private Object createResultObject(ResultSetWrapper rsw, ResultMap resultMap, List<Class<?>> constructorArgTypes, List<Object> constructorArgs, String columnPrefix) throws SQLException {

    final Class<?> resultType = resultMap.getType();
    final MetaClass metaType = MetaClass.forClass(resultType, reflectorFactory);
    // 获取 <constructor> 节点对应的 ResultMapping
    final List<ResultMapping> constructorMappings = resultMap.getConstructorResultMappings();

    /*
     * 1. 检测是否有与返回值类型相对应的 TypeHandler,若有则直接从
     * 通过 TypeHandler 从结果集中提取数据,并生成返回值对象
     */
    if (hasTypeHandlerForResultObject(rsw, resultType)) {
        // 通过 TypeHandler 获取提取,并生成返回值对象
        return createPrimitiveResultObject(rsw, resultMap, columnPrefix);
    } else if (!constructorMappings.isEmpty()) {
        /*
         * 2. 通过 <constructor> 节点配置的映射信息从 ResultSet 中提取数据,
         * 然后将这些数据传给指定构造方法,即可创建实体类对象
         */
        return createParameterizedResultObject(rsw, resultType, constructorMappings, constructorArgTypes, constructorArgs, columnPrefix);
    } else if (resultType.isInterface() || metaType.hasDefaultConstructor()) {
        // 3. 通过 ObjectFactory 调用目标类的默认构造方法创建实例
        return objectFactory.create(resultType);
    } else if (shouldApplyAutomaticMappings(resultMap, false)) {
        // 4. 通过自动映射查找合适的构造方法创建实例
        return createByConstructorSignature(rsw, resultType, constructorArgTypes, constructorArgs, columnPrefix);
    }
    throw new ExecutorException("Do not know how to create an instance of " + resultType);
}
如上,createResultObject 方法中包含了4种创建实体类对象的方式。一般情况下,若无特殊要求,MyBatis 会通过 ObjectFactory 调用默认构造方法创建实体类对象。ObjectFactory 是一个接口,大家可以实现这个接口,以按照自己的逻辑控制对象的创建过程。到此,实体类对象已经创建好了,接下里要做的事情是将结果集中的数据映射到实体类对象中。
6.3 自动配置映射
在 MyBatis 中,全局自动映射行为有三种等级。如下:
NONE:禁用自动映射。仅对手动配置的列进行映射。PARTIAL:默认值。如果存在嵌套映射,则关闭自动映射,防止数据映射错误。FULL:对所有未进行手动配置的列进行自动映射。
这可以通过配置 <resultMap> 节点的 autoMapping 属性来进行修改。下面来看看具体的代码实现:
private boolean shouldApplyAutomaticMappings(ResultMap resultMap, boolean isNested) {
    // 检测 <resultMap> 是否配置了 autoMapping 属性
    if (resultMap.getAutoMapping() != null) {
        // 首先以 autoMapping 属性为准
        return resultMap.getAutoMapping();
    } else {
        if (isNested) {
            // 对于嵌套 resultMap,仅当全局的映射行为为 FULL 时,才进行自动映射
            return AutoMappingBehavior.FULL == configuration.getAutoMappingBehavior();
        } else {
            // 对于普通的 resultMap,只要全局的映射行为不为 NONE,即可进行自动映射
            return AutoMappingBehavior.NONE != configuration.getAutoMappingBehavior();
        }
    }
}
如上,该方法用于检测是否应为当前结果集应用自动映射,逻辑不难理解,接下来分析 MyBatis 如何进行自动映射。
private boolean applyAutomaticMappings(ResultSetWrapper rsw, ResultMap resultMap, MetaObject metaObject, String columnPrefix) throws SQLException {

    // 1. 获取 UnMappedColumnAutoMapping 列表(即为没有配置手动映射的列创建自动映射)
    List<UnMappedColumnAutoMapping> autoMapping = createAutomaticMappings(rsw, resultMap, metaObject, columnPrefix);

    // 2. 进行自动映射
    boolean foundValues = false;
    if (!autoMapping.isEmpty()) {
        for (UnMappedColumnAutoMapping mapping : autoMapping) {
            // 2.1 通过 TypeHandler 从结果集中获取指定列的数据
            final Object value = mapping.typeHandler.getResult(rsw.getResultSet(), mapping.column);
            if (value != null) {
                foundValues = true;
            }
            if (value != null || (configuration.isCallSettersOnNulls() && !mapping.primitive)) {
                // 2.2 通过元信息对象设置 value 到实体类对象的指定字段上
                metaObject.setValue(mapping.property, value);
            }
        }
    }
    return foundValues;
}
首先对未手工配置的列生成映射配置UnMappedColumnAutoMapping,该类定义在 DefaultResultSetHandler 内部,如下:
private static class UnMappedColumnAutoMapping {
    private final String column;
    private final String property;
    private final TypeHandler<?> typeHandler;
    private final boolean primitive;

    public UnMappedColumnAutoMapping(String column, String property, TypeHandler<?> typeHandler, boolean primitive) {
        this.column = column;
        this.property = property;
        this.typeHandler = typeHandler;
        this.primitive = primitive;
    }
}
然后使用该配置逐一进行映射。映射过程即通过 TypeHandler 从结果集获取值,然后通过 value 的 MetaObject 对象设置该值到对象中。下面再来看一下生成 UnMappedColumnAutoMapping 集合的过程,如下:
// -☆- DefaultResultSetHandler
private List<UnMappedColumnAutoMapping> createAutomaticMappings(ResultSetWrapper rsw, ResultMap resultMap, MetaObject metaObject, String columnPrefix) throws SQLException {
    // 生成key,从缓存中获取 UnMappedColumnAutoMapping 列表
    final String mapKey = resultMap.getId() + ":" + columnPrefix;
    List<UnMappedColumnAutoMapping> autoMapping = autoMappingsCache.get(mapKey);

    // 缓存未命中
    if (autoMapping == null) {
        autoMapping = new ArrayList<UnMappedColumnAutoMapping>();

        // 1. 从结果集获取未手工配置的列名
        final List<String> unmappedColumnNames = rsw.getUnmappedColumnNames(resultMap, columnPrefix);
        for (String columnName : unmappedColumnNames) {

            // 2. 列名前缀处理
            String propertyName = columnName;
            if (columnPrefix != null && !columnPrefix.isEmpty()) {
                if (columnName.toUpperCase(Locale.ENGLISH).startsWith(columnPrefix)) {
                    // 属性名去掉前缀
                    propertyName = columnName.substring(columnPrefix.length());
                } else {
                    // 不映射非对应前缀的列名
                    continue;
                }
            }

            // 3. 匹配属性名。根据配置是否进行下划线转为驼峰。比如 AUTHOR_NAME -> authorName
            final String property = metaObject.findProperty(propertyName, configuration.isMapUnderscoreToCamelCase());

            // 如果实体类存在对应的属性则继续生成映射配置,否则视配置进行处理
            if (property != null && metaObject.hasSetter(property)) {
                // 再次检测该列名是否已经手工配置了(防止去掉前缀后属性名撞车,覆盖手工配置的属性)
                if (resultMap.getMappedProperties().contains(property)) {
                    continue;
                }

                // 4. 获取属性对应的类型
                final Class<?> propertyType = metaObject.getSetterType(property);

                // 判断该类型是否有对应的类型处理器
                if (typeHandlerRegistry.hasTypeHandler(propertyType, rsw.getJdbcType(columnName))) {
                    // 5. 获取类型处理器
                    final TypeHandler<?> typeHandler = rsw.getTypeHandler(propertyType, columnName);

                    // 6. 封装上面获取到的信息到 UnMappedColumnAutoMapping 对象中
                    autoMapping.add(new UnMappedColumnAutoMapping(columnName, property, typeHandler, propertyType.isPrimitive()));
                } else {
                    // 如果没有对应的类型处理器,MyBatis不知道怎么映射。根据配置选择抛出异常、仅写日志或啥也不做。默认为啥也不做。
                    configuration.getAutoMappingUnknownColumnBehavior()
                        .doAction(mappedStatement, columnName, property, propertyType);
                }
            } else {
                // 列名没有对应的属性名,也不知道要怎么映射。
                configuration.getAutoMappingUnknownColumnBehavior()
                    .doAction(mappedStatement, columnName, (property != null) ? property : propertyName, null);
            }
        }

        // 写入缓存
        autoMappingsCache.put(mapKey, autoMapping);
    }
    return autoMapping;
}
以上步骤中,除了第一步,其他都是常规操作,无需过多说明。下面来分析第一个步骤的逻辑,如下:
// -☆- ResultSetWrapper
public List<String> getUnmappedColumnNames(ResultMap resultMap, String columnPrefix) throws SQLException {
    // 先到缓存看看(unMappedColumnNamesMap是RSW的成员变量)
    List<String> unMappedColumnNames = unMappedColumnNamesMap.get(getMapKey(resultMap, columnPrefix));

    // 缓存没有
    if (unMappedColumnNames == null) {
        // 1. 加载已映射与未映射列名到缓存
        loadMappedAndUnmappedColumnNames(resultMap, columnPrefix);

        // 2. 获取未映射列名
        unMappedColumnNames = unMappedColumnNamesMap.get(getMapKey(resultMap, columnPrefix));
    }
    return unMappedColumnNames;
}

private void loadMappedAndUnmappedColumnNames(ResultMap resultMap, String columnPrefix) throws SQLException {
    List<String> mappedColumnNames = new ArrayList<String>();
    List<String> unmappedColumnNames = new ArrayList<String>();

    // 前缀转为大写,忽略大小写匹配
    final String upperColumnPrefix = columnPrefix == null ? null : columnPrefix.toUpperCase(Locale.ENGLISH);

    // 1. 为 <resultMap> 中的列名拼接前缀
    final Set<String> mappedColumns = prependPrefixes(resultMap.getMappedColumns(), upperColumnPrefix);

    // 遍历 columnNames,columnNames 是 ResultSetWrapper 的成员变量,保存了当前结果集中的所有列名
    for (String columnName : columnNames) {
        // 结果集中列名转为大写,忽略大小写匹配
        final String upperColumnName = columnName.toUpperCase(Locale.ENGLISH);

        // 检测已映射列名集合中是否包含当前列名
        if (mappedColumns.contains(upperColumnName)) {
            // 2.1 包含则存入 mappedColumnNames 集合
            mappedColumnNames.add(upperColumnName);
        } else {
            // 2.2 不包含则存入 unmappedColumnNames 集合
            unmappedColumnNames.add(columnName);
        }
    }

    // 缓存列名集合
    mappedColumnNamesMap.put(getMapKey(resultMap, columnPrefix), mappedColumnNames);
    unMappedColumnNamesMap.put(getMapKey(resultMap, columnPrefix), unmappedColumnNames);
}
如上,已映射列名与未映射列名的分拣逻辑并不复杂。
6.4 手工配置映射
到此为止,自动映射配置的创建过程已分析完毕,接下来看看手工配置的映射。
// -☆- DefaultResultSetHandler
private boolean applyPropertyMappings(ResultSetWrapper rsw, ResultMap resultMap, MetaObject metaObject,ResultLoaderMap lazyLoader, String columnPrefix) throws SQLException {

    // 1. 获取手工配置的列名(自动映射可能分拣过,有缓存)
    final List<String> mappedColumnNames = rsw.getMappedColumnNames(resultMap, columnPrefix);

    boolean foundValues = false;

    // 获取 ResultMap 中所有的属性映射,并遍历
    final List<ResultMapping> propertyMappings = resultMap.getPropertyResultMappings();
    for (ResultMapping propertyMapping : propertyMappings) {
        // 2. 拼接列名前缀,得到完整列名
        String column = prependPrefix(propertyMapping.getColumn(), columnPrefix);
        // 如果是关联查询,可能是 {prop1=col1, prop2=col2} 形式,不能这样简单处理,先重置拼接的列名
        if (propertyMapping.getNestedResultMapId() != null) {
            column = null;
        }

        /*
         * 下面的 if 分支由三个或条件组合而成,三个条件的含义如下:
         *   条件一:检测 column 是否为 {prop1=col1, prop2=col2} 形式,该种形式的 column 一般用于关联查询
         *   条件二:检测当前列名是否被包含在已映射的列名集合中,若包含则可进行数据集映射操作
         *   条件三:多结果集相关,暂不分析
         */
        if (propertyMapping.isCompositeResult()
            || (column != null && mappedColumnNames.contains(column.toUpperCase(Locale.ENGLISH)))
            || propertyMapping.getResultSet() != null) {

            // 2. 从结果集中获取指定列的数据
            Object value = getPropertyMappingValue(rsw.getResultSet(), metaObject, propertyMapping, lazyLoader, columnPrefix);

            // 3. 获取映射的属性名 issue #541 make property optional
            final String property = propertyMapping.getProperty();
            // 3.1 ResultMapping 未配置 property ,不知道映射到哪里去,直接跳过
            if (property == null) {
                continue;

            // 3,2 若获取到的值为 DEFERED,则延迟加载该值
            } else if (value == DEFERED) {
                foundValues = true;
                continue;
            }

            // 设置 foundValues 标记
            if (value != null) {
                foundValues = true;
            }

            // 3.3 将获取到的值设置到实体类对象中 (如果不是基本类型,根据参数判断是否要把NULL设置进去)
            if (value != null || (configuration.isCallSettersOnNulls() && !metaObject.getSetterType(property)
                                  .isPrimitive())) {

                // 将获取到的值设置到实体类对象中
                metaObject.setValue(property, value);
            }
        }
    }
    return foundValues;
}

private Object getPropertyMappingValue(ResultSet rs, MetaObject metaResultObject, ResultMapping propertyMapping,ResultLoaderMap lazyLoader, String columnPrefix) throws SQLException {
    if (propertyMapping.getNestedQueryId() != null) {
        // 获取关联查询结果(后续章节分析)
        return getNestedQueryMappingValue(rs, metaResultObject, propertyMapping, lazyLoader, columnPrefix);
    } else if (propertyMapping.getResultSet() != null) {
        // 多结果集逻辑,暂不分析
        addPendingChildRelation(rs, metaResultObject, propertyMapping);
        return DEFERED;
    } else {
        // 使用类型处理器从结果集获取列数据
        final TypeHandler<?> typeHandler = propertyMapping.getTypeHandler();
        final String column = prependPrefix(propertyMapping.getColumn(), columnPrefix);
        return typeHandler.getResult(rs, column);
    }
}
如上,首先从 ResultSetWrapper 中获取已映射列名集合 mappedColumnNames,从 ResultMap 获取映射对象 ResultMapping 集合。然后遍历 ResultMapping 集合,再此过程中调用 getPropertyMappingValue 获取指定指定列的数据,最后将获取到的数据设置到实体类对象中。到此,基本的结果集映射过程就分析完了。下面章节将分析之前提到的获取关联查询的结果。
6.5 关联查询
在进行数据库查询时,经常会碰到一对一和一对多的查询场景。如查询 USER_INFO(pk:USER_ID) 中用户的基本信息时,去同步查询 USER_FUND(pk:USER_ID) 中该用户的总资产,就是一对一查询。如果同步查询 USER_FUND_DETAIL(pk:USER_ID,FUND_CLS) 中用户的资产明细,则是一对多查询。MyBatis为这两种场景提供了四种解决方案:
- 定制VO类。为每个特殊的结果集定义一个对应的VO对象,直接使用简单映射配置来映射所有列。优点是映射配置简单,缺点是VO类增多、内存数据冗余。
- 嵌套映射。在 ResultMap 中嵌套另一个 ResultMap 来映射到无类型处理器的成员变量中。虽然减少了VO类和内存数据冗余,但映射配置变得复杂。
- 关联查询。通过多次单表查询来替代复杂的关联查询,把多次查询结果通过多次简单映射来映射到一个复杂的对象中。优点是SQL语句简单,缺点是存在"1+N"问题,性能影响较大。
- 多结果集。通过存储过程返回多个结果集,映射到多个VO对象。
其中,定制VO类使用的是简单映射,前文已经做了详细分析,嵌套映射将会在下一章节讲解,而多结果集使用较少,本文暂不分析。下面先来看看上文提到的关联查询。关联查询相关的标签有<association> 和<collection>,分别用作一对一和一对多查询,如果你对这两种方式的使用还不太了解,可以先阅读本系列文章的基础使用篇。
我们从之前提到的 getNestedQueryMappingValue 方法开始分析,如下:
private Object getNestedQueryMappingValue(ResultSet rs, MetaObject metaResultObject, ResultMapping propertyMapping, ResultLoaderMap lazyLoader, String columnPrefix) throws SQLException {
    // 1. 获取关联查询需要用到的信息及关联查询对应的 MappedStatement。
    // 关联查询ID:命名空间 + <association> 的 select 属性值
    final String nestedQueryId = propertyMapping.getNestedQueryId();
    // 将关联查询的值映射到该属性
    final String property = propertyMapping.getProperty();
    // 根据 nestedQueryId 获取关联查询的 MappedStatement
    final MappedStatement nestedQuery = configuration.getMappedStatement(nestedQueryId);
    // 关联查询参数类型(单一参数则为对应的实际类型,复合参数则默认为Map,可通过关联查询的MS的parameterType修改为VO类
	final Class<?> nestedQueryParameterType = nestedQuery.getParameterMap().getType();

    // 2. 从结果集获取关联查询参数(逻辑与主查询的参数转换类似,参数值由 column 属性指定结果集中的列数据)
    final Object nestedQueryParameterObject = prepareParameterForNestedQuery(rs, propertyMapping, nestedQueryParameterType, columnPrefix);

    Object value = null;

    // 仅在参数不为NULL的时候才进行关联查询
    if (nestedQueryParameterObject != null) {
        // 3. 查询前准备:获取 BoundSql、创建缓存key、获取结果类型
        final BoundSql nestedBoundSql = nestedQuery.getBoundSql(nestedQueryParameterObject);
        final CacheKey key = executor.createCacheKey(nestedQuery, nestedQueryParameterObject, RowBounds.DEFAULT, nestedBoundSql);
        final Class<?> targetType = propertyMapping.getJavaType();

        // 检查一级缓存是否保存了关联查询结果
        if (executor.isCached(nestedQuery, key)) {
            // 4.1 如果一级缓存存在,则走延迟加载逻辑。
            //     一般是添加到执行器的延迟加载队列,与前面设置的缓存占位符配合,可解决关联查询死循环问题。
            //     如果缓存中确实存在查询结果且不是缓存占位符,则直接设置到对象中
            executor.deferLoad(nestedQuery, metaResultObject, property, key, targetType);
            value = DEFERED;
        } else {
            // 创建结果加载器(用于执行查询和映射结果列,同时,也为了方便后面懒加载触发时执行查询)
            final ResultLoader resultLoader = new ResultLoader(configuration, executor, nestedQuery, nestedQueryParameterObject, targetType, key, nestedBoundSql);

            // 检测当前属性是否需要懒加载
            if (propertyMapping.isLazy()) {
                // 4.2 添加懒加载相关的对象到 loaderMap 集合中
                lazyLoader.addLoader(property, metaResultObject, resultLoader);
                value = DEFERED;
            } else {
                // 4.3 直接执行关联查询
                value = resultLoader.loadResult();
            }
        }
    }

    // 5. 返回关联查询结果或 DEFERRED
    return value;
}
首先看看从结果集获取关联查询参数的过程。
  private Object prepareParameterForNestedQuery(ResultSet rs, ResultMapping resultMapping, Class<?> parameterType, String columnPrefix) throws SQLException {
    // 判断是否为复合参数
    if (resultMapping.isCompositeResult()) {
      // 复合参数转换
      return prepareCompositeKeyParameter(rs, resultMapping, parameterType, columnPrefix);
    } else {
      // 单一参数转换(直接查找类型处理器从结果集取列数据)
      return prepareSimpleKeyParameter(rs, resultMapping, parameterType, columnPrefix);
    }
  }

  private Object prepareSimpleKeyParameter(ResultSet rs, ResultMapping resultMapping, Class<?> parameterType, String columnPrefix) throws SQLException {
    final TypeHandler<?> typeHandler;
    // 1. 获取类型处理器
    if (typeHandlerRegistry.hasTypeHandler(parameterType)) {
      typeHandler = typeHandlerRegistry.getTypeHandler(parameterType);
    } else {
      typeHandler = typeHandlerRegistry.getUnknownTypeHandler();
    }
    // 2. 使用类型处理器从结果集取列数据
    return typeHandler.getResult(rs, prependPrefix(resultMapping.getColumn(), columnPrefix));
  }

  private Object prepareCompositeKeyParameter(ResultSet rs, ResultMapping resultMapping, Class<?> parameterType, String columnPrefix) throws SQLException {
    // 1. 创建参数对象(HashMap或实体类),并创建对应的 MetaObject 对象
    final Object parameterObject = instantiateParameterObject(parameterType);
    final MetaObject metaObject = configuration.newMetaObject(parameterObject);

    // 2. 遍历复合参数的映射配置,从结果集取列数据填充参数对象
    boolean foundValues = false;
    for (ResultMapping innerResultMapping : resultMapping.getComposites()) {
      final Class<?> propType = metaObject.getSetterType(innerResultMapping.getProperty());
      final TypeHandler<?> typeHandler = typeHandlerRegistry.getTypeHandler(propType);
      final Object propValue = typeHandler.getResult(rs, prependPrefix(innerResultMapping.getColumn(), columnPrefix));
      // issue #353 & #560 do not execute nested query if key is null
      if (propValue != null) {
        metaObject.setValue(innerResultMapping.getProperty(), propValue);
        foundValues = true;
      }
    }

    // 如果取到了列数据则返回封装的参数,否则返回NULL
    return foundValues ? parameterObject : null;
  }
接着分析关联查询的懒加载机制。懒加载在此处仅是将关联查询相关信息添加到 loaderMap 集合中而已。
// -☆- ResultLoaderMap
public void addLoader(String property, MetaObject metaResultObject, ResultLoader resultLoader) {
    // 将属性名转为大写
    String upperFirst = getUppercaseFirstProperty(property);
    if (!upperFirst.equalsIgnoreCase(property) && loaderMap.containsKey(upperFirst)) {
        throw new ExecutorException("Nested lazy loaded result property '" + property +
                                    "' for query id '" + resultLoader.mappedStatement.getId() +
                                    " already exists in the result map. The leftmost property of all lazy loaded properties must be unique within a result map.");
    }
    // 创建 LoadPair,并将 <大写属性名,LoadPair对象> 键值对添加到 loaderMap 中
    loaderMap.put(upperFirst, new LoadPair(property, metaResultObject, resultLoader));
}
那么懒加载是如何触发的呢?又是谁触发的呢?答案在实体类的代理对象, 回顾之前创建实体类对象时,MyBatis 会为需要延迟加载的类生成代理类,代理逻辑会拦截实体类的方法调用。
private Object createResultObject(ResultSetWrapper rsw, ResultMap resultMap, ResultLoaderMap lazyLoader, String columnPrefix) throws SQLException {
	// ...

    // 默认使用 Javassist 框架生成代理类
    resultObject = configuration.getProxyFactory().createProxy(resultObject, lazyLoader, configuration, objectFactory, constructorArgTypes, constructorArgs);

    // ...

    return resultObject;
}

// ========== JavassistProxyFactory.java ================

@Override
public Object createProxy(Object target, ResultLoaderMap lazyLoader, Configuration configuration, ObjectFactory objectFactory, List<Class<?>> constructorArgTypes, List<Object> constructorArgs) {
    // 调用内部类 EnhancedResultObjectProxyImpl 创建代理,该类实现类 MethodHandler 接口
    return EnhancedResultObjectProxyImpl.createProxy(target, lazyLoader, configuration, objectFactory, constructorArgTypes, constructorArgs);
}

public static Object createProxy(Object target, ResultLoaderMap lazyLoader, Configuration configuration, ObjectFactory objectFactory, List<Class<?>> constructorArgTypes, List<Object> constructorArgs) {
    final Class<?> type = target.getClass();
    // 创建方法拦截处理器
    EnhancedResultObjectProxyImpl callback = new EnhancedResultObjectProxyImpl(type, lazyLoader, configuration, objectFactory, constructorArgTypes, constructorArgs);

    // 调用重载函数创建代理对象
    Object enhanced = crateProxy(type, callback, constructorArgTypes, constructorArgs);

    // 拷贝代理对象的属性到 resultObject
    PropertyCopier.copyBeanProperties(type, target, enhanced);
    return enhanced;
}

static Object crateProxy(Class<?> type, MethodHandler callback, List<Class<?>> constructorArgTypes, List<Object> constructorArgs) {

    // 1. 创建 javassist 的 ProxyFactory
    ProxyFactory enhancer = new ProxyFactory();

    // 2. 设置被代理的类
    enhancer.setSuperclass(type);

    // Java序列化机制特殊处理
    try {
        type.getDeclaredMethod(WRITE_REPLACE_METHOD);
        // ObjectOutputStream will call writeReplace of objects returned by writeReplace
        if (LogHolder.log.isDebugEnabled()) {
            LogHolder.log.debug(WRITE_REPLACE_METHOD + " method was found on bean " + type + ", make sure it returns this");
        }
    } catch (NoSuchMethodException e) {
        enhancer.setInterfaces(new Class[]{WriteReplaceInterface.class});
    } catch (SecurityException e) {
        // nothing to do here
    }

    // 3. 创建代理
    Object enhanced;
    Class<?>[] typesArray = constructorArgTypes.toArray(new Class[constructorArgTypes.size()]);
    Object[] valuesArray = constructorArgs.toArray(new Object[constructorArgs.size()]);
    try {
        enhanced = enhancer.create(typesArray, valuesArray);
    } catch (Exception e) {
        throw new ExecutorException("Error creating lazy proxy.  Cause: " + e, e);
    }

    // 4. 设置方法拦截处理器 为 EnhancedResultObjectProxyImpl 对象
    ((Proxy) enhanced).setHandler(callback);
    return enhanced;
}
EnhancedResultObjectProxyImpl 类的具体代理逻辑,我们可以看看它的invoke方法。
// -☆- EnhancedResultObjectProxyImpl
public Object invoke(Object enhanced, Method method, Method methodProxy, Object[] args) throws Throwable {
    final String methodName = method.getName();
    try {
        synchronized (lazyLoader) {
            if (WRITE_REPLACE_METHOD.equals(methodName)) {
                // 针对JAVA序列化机制 writeReplace 方法的处理逻辑,与延迟加载无关,不分析了
                if (WRITE_REPLACE_METHOD.equals(methodName)) {
                    Object original;
                    if (constructorArgTypes.isEmpty()) {
                      original = objectFactory.create(type);
                    } else {
                      original = objectFactory.create(type, constructorArgTypes, constructorArgs);
                    }
                    PropertyCopier.copyBeanProperties(type, enhanced, original);
                    if (lazyLoader.size() > 0) {
                      return new JavassistSerialStateHolder(original, lazyLoader.getProperties(), objectFactory, constructorArgTypes, constructorArgs);
                    } else {
                      return original;
                }
            } else {
                if (lazyLoader.size() > 0 && !FINALIZE_METHOD.equals(methodName)) {
                    // 1. 如果 aggressive 为 true,或触发方法(默认为equals,clone,hashCode,toString)被调用,则触发所有的属性懒加载
                    if (aggressive || lazyLoadTriggerMethods.contains(methodName)) {
                        lazyLoader.loadAll();

                     // 2. 如果使用者显示调用了 setter 方法,则将相应的懒加载类从 loaderMap 中移除
                    } else if (PropertyNamer.isSetter(methodName)) {
                        final String property = PropertyNamer.methodToProperty(methodName);
                        lazyLoader.remove(property);

                    /// 3. 某个属性的 getter 方法被调用,则触发该属性的延懒加载
                    } else if (PropertyNamer.isGetter(methodName)) {
                        final String property = PropertyNamer.methodToProperty(methodName);
                        // 检测该属性是否有相应的 LoadPair 对象
                        if (lazyLoader.hasLoader(property)) {
                            lazyLoader.load(property);
                        }
                    }
                }
            }
        }

        // 调用被代理类的方法
        return methodProxy.invoke(enhanced, args);
    } catch (Throwable t) {
        throw ExceptionUtil.unwrapThrowable(t);
    }
}
接下来,我们来看看延迟加载逻辑是怎样实现的。
// -☆- ResultLoaderMap
public boolean load(String property) throws SQLException {
    // 从 loaderMap 中移除 property 所对应的 LoadPair
    LoadPair pair = loaderMap.remove(property.toUpperCase(Locale.ENGLISH));
    if (pair != null) {
        // 加载结果
        pair.load();
        return true;
    }
    return false;
}

// -☆- LoadPair
public void load() throws SQLException {
    if (this.metaResultObject == null) {
        throw new IllegalArgumentException("metaResultObject is null");
    }
    if (this.resultLoader == null) {
        throw new IllegalArgumentException("resultLoader is null");
    }

    // 调用重载方法
    this.load(null);
}

public void load(final Object userObject) throws SQLException {
    // 若 metaResultObject 和 resultLoader 为 null,则创建相关对象。
    if (this.metaResultObject == null || this.resultLoader == null) {
       if (this.mappedParameter == null) {
          throw new ExecutorException("Property [" + this.property + "] cannot be loaded because "
                  + "required parameter of mapped statement ["
                  + this.mappedStatement + "] is not serializable.");
        }

        final Configuration config = this.getConfiguration();
        final MappedStatement ms = config.getMappedStatement(this.mappedStatement);
        if (ms == null) {
          throw new ExecutorException("Cannot lazy load property [" + this.property
                  + "] of deserialized object [" + userObject.getClass()
                  + "] because configuration does not contain statement ["
                  + this.mappedStatement + "]");
        }

        this.metaResultObject = config.newMetaObject(userObject);
        this.resultLoader = new ResultLoader(config, new ClosedExecutor(), ms, this.mappedParameter,
                metaResultObject.getSetterType(this.property), null, null);
    }

    // 线程安全检测
    if (this.serializationCheck == null) {
        final ResultLoader old = this.resultLoader;
        // 重新创建新的 ResultLoader 和 ClosedExecutor,ClosedExecutor 是非线程安全的
        this.resultLoader = new ResultLoader(old.configuration, new ClosedExecutor(), old.mappedStatement, old.parameterObject, old.targetType, old.cacheKey, old.boundSql);
    }

    // 调用 ResultLoader 的 loadResult 方法加载结果,并通过 metaResultObject 设置结果到实体类对象中
    this.metaResultObject.setValue(property, this.resultLoader.loadResult());
}
上面的代码比较多,但是没什么特别的逻辑,下面看一下 ResultLoader 的 loadResult 方法逻辑是怎样的。
public Object loadResult() throws SQLException {
    // 执行关联查询
    List<Object> list = selectList();
    // 抽取结果
    resultObject = resultExtractor.extractObjectFromList(list, targetType);
    return resultObject;
}

private <E> List<E> selectList() throws SQLException {
    Executor localExecutor = executor;
    if (Thread.currentThread().getId() != this.creatorThreadId || localExecutor.isClosed()) {
        localExecutor = newExecutor();
    }
    try {
        // 通过 Executor 执行查询,这个之前已经分析过了
        return localExecutor.<E>query(mappedStatement, parameterObject, RowBounds.DEFAULT,
                                      Executor.NO_RESULT_HANDLER, cacheKey, boundSql);
    } finally {
        if (localExecutor != executor) {
            localExecutor.close(false);
        }
    }
}
如上,我们在 ResultLoader 中终于看到了执行关联查询的代码,即 selectList 方法中的逻辑。该方法在内部通过 Executor 进行查询。至于查询结果的抽取过程,代码贴在下面,了解下即可。
public Object extractObjectFromList(List<Object> list, Class<?> targetType) {
    Object value = null;
    // 如果 targetType 是list,则直接返回
    if (targetType != null && targetType.isAssignableFrom(list.getClass())) {
        value = list;

    // 其它类型集合
    } else if (targetType != null && objectFactory.isCollection(targetType)) {
        value = objectFactory.create(targetType);
        MetaObject metaObject = configuration.newMetaObject(value);
        metaObject.addAll(list);

    // 数组。list转数组
    } else if (targetType != null && targetType.isArray()) {
        Class<?> arrayComponentType = targetType.getComponentType();
        Object array = Array.newInstance(arrayComponentType, list.size());
        if (arrayComponentType.isPrimitive()) {
            for (int i = 0; i < list.size(); i++) {
                Array.set(array, i, list.get(i));
            }
            value = array;
        } else {
            value = list.toArray((Object[])array);
        }

    // 其它类型。取第一个值,没有则为null,如果>1则报错
    } else {
        if (list != null && list.size() > 1) {
            throw new ExecutorException("Statement returned more than one row, where no more than one was expected.");
        } else if (list != null && list.size() == 1) {
            value = list.get(0);
        }
    }
    return value;
}
6.6 嵌套映射
第三节 更新语句的执行过程分析
MyBatis 中更新语句指的是除查询之外的所有语句,包括插入、删除、修改及数据库定义语句(DDL)等。它们在处理上大同小异,与查询语句相比,最大的区别是查询结果的映射变的非常简单,其次是在缓存方面,更新语句刷新缓存的时机也不同,当然还有其它一些不同点,都将会在这节一一讲解。
1. 更新语句执行主流程
首先,我们还是从 MapperMethod 的 execute 方法开始看起,这里根据不同的命令类型,处理参数后路由到 SqlSession 的不同入口。
// -☆-  MapperMethod
public Object execute(SqlSession sqlSession, Object[] args) {
    Object result;
    switch (command.getType()) {
        // 执行插入语句
        case INSERT: {
            Object param = method.convertArgsToSqlCommandParam(args);
            result = rowCountResult(sqlSession.insert(command.getName(), param));
            break;
        }
        // 执行更新语句
        case UPDATE: {
            Object param = method.convertArgsToSqlCommandParam(args);
            result = rowCountResult(sqlSession.update(command.getName(), param));
            break;
        }
        // 执行删除语句
        case DELETE: {
            Object param = method.convertArgsToSqlCommandParam(args);
            result = rowCountResult(sqlSession.delete(command.getName(), param));
            break;
        }
        case SELECT:
            // ...
            break;
        case FLUSH:
            // ...
            break;
        default:
            throw new BindingException("Unknown execution method for: " + command.getName());
    }
    if (result == null && method.getReturnType().isPrimitive() && !method.returnsVoid()) {...}
    return result;
}
因为三种类型的语句对JDBC来说是不区分的,因此都在内部调用 SqlSession 的 update 方法来进行下一步的处理。在 update 方法中,从全局配置中获取 MappedStatement 后,调用执行器的 update 方法来执行SQL。
// -☆- DefaultSqlSession
public int insert(String statement, Object parameter) {
    return update(statement, parameter);
}

public int delete(String statement, Object parameter) {
    return update(statement, parameter);
}

public int update(String statement, Object parameter) {
    try {
        dirty = true;
        // 获取 MappedStatement
        MappedStatement ms = configuration.getMappedStatement(statement);
        // 调用 Executor 的 update 方法
        return executor.update(ms, wrapCollection(parameter));
    } catch (Exception e) {
        throw ExceptionFactory.wrapException("Error updating database.  Cause: " + e, e);
    } finally {
        ErrorContext.instance().reset();
    }
}
如果全局属性 cacheEnabled 开启,则会先进入到执行器的装饰器类 CachingExecutor,再进入到基类 BaseExecutor ,最后调用子类的具体实现。装饰器类和基类中都仅执行了各自的缓存刷新逻辑,是否刷新取决于具体的配置。
// -☆- CachingExecutor
public int update(MappedStatement ms, Object parameterObject) throws SQLException {
    // 1. 刷新二级缓存
    flushCacheIfRequired(ms);

    // 2. 委托给被装饰的类执行
    return delegate.update(ms, parameterObject);
}

// -☆- BaseExecutor
public int update(MappedStatement ms, Object parameter) throws SQLException {
    if (closed) {
        throw new ExecutorException("Executor was closed.");
    }

    // 1. 刷新一级缓存
    clearLocalCache();

    // 2. 调用子类的具体实现
    return doUpdate(ms, parameter);
}


// ------------------------------------------------------------------
// *************CachingExecutor 中二级缓存刷新逻辑*********************
// 当全局缓存开关打开后才会开启二级缓存,应用装饰类
// 每次执行SQL时是否刷新二级缓存,取决于MS的flushCache属性
// SELECT命令默认为false,INSERT/UPDATE/DELETE命令默认为true
  private void flushCacheIfRequired(MappedStatement ms) {
    Cache cache = ms.getCache();
    if (cache != null && ms.isFlushCacheRequired()) {
      tcm.clear(cache);
    }
  }

// *********** BaseExecutor 中一级缓存刷新逻辑 ***************
// UPDATE语句/提交事务/回滚事务始终刷新一级缓存
// SELECT语句,一般在主查询前,如果配置了 flushCache 属性为true,则会刷新一级缓存。
//             还有在主查询之后,如果 缓存范围为 STATEMENT,则会刷新一级缓存
//             注意:子查询始终不会刷新一级缓存。
查询语句要分缓存作用范围 SESSION 和 STATEMENT
// SESSION:
  @Override
  public void clearLocalCache() {
    if (!closed) {
      localCache.clear();
      localOutputParameterCache.clear();
    }
  }
下面分析 BaseExecutor 的 doUpdate 方法,该方法是一个抽象方法,默认情况下,使用的实现类是 SimpleExecutor ,这可以通过全局属性配置或在打开会话时进行设置。
// -☆- SimpleExecutor
public int doUpdate(MappedStatement ms, Object parameter) throws SQLException {
    Statement stmt = null;
    try {
        Configuration configuration = ms.getConfiguration();
        // 1. 创建 StatementHandler
        StatementHandler handler = configuration.newStatementHandler(this, ms, parameter, RowBounds.DEFAULT, null, null);
        // 2. 创建 Statement(包括获取连接与设置参数)
        stmt = prepareStatement(handler, ms.getStatementLog());
        // 3. 调用 StatementHandler 的 update 方法
        return handler.update(stmt);
    } finally {
        closeStatement(stmt);
    }
}
前两步已经分析过,这里就不重复分析了。下面分析 PreparedStatementHandler 的 update 方法。
// -☆- PreparedStatementHandler
public int update(Statement statement) throws SQLException {
    PreparedStatement ps = (PreparedStatement) statement;
    // 1. 执行 SQL
    ps.execute();

    // 2. 从结果集获取受影响行数
    int rows = ps.getUpdateCount();

    // 3. 获取自增主键的值,并将值填入到参数对象中
    Object parameterObject = boundSql.getParameterObject();
    KeyGenerator keyGenerator = mappedStatement.getKeyGenerator();
    keyGenerator.processAfter(executor, mappedStatement, ps, parameterObject);
    return rows;
}
如上,前两步调用 JDBCApi 执行 SQL 和获取更新结果(影响的行数),逻辑非常简单。第三步为自增主键值的回填,实现逻辑封装在 KeyGenerator 的实现类中,下面一起来看看。
2. KeyGenerator
KeyGenerator 是一个接口,目前它有三个实现类:
-
Jdbc3KeyGenerator:用于获取插入时自增列自动增长生成的数据。 -
SelectKeyGenerator:某些数据库不支持自增主键,需要手动填写主键字段,此时需要借助 SelectKeyGenerator 获取主键值。 -
NoKeyGenerator:这是一个空实现,没什么可说的。
2.1 Jdbc3KeyGenerator
先来分析 Jdbc3KeyGenerator 的源码,配置可参考本系列文档的基础使用篇。
public class Jdbc3KeyGenerator implements KeyGenerator {

  /**
   * A shared instance.
   *
   * @since 3.4.3
   */
  public static final Jdbc3KeyGenerator INSTANCE = new Jdbc3KeyGenerator();

  private static final String MSG_TOO_MANY_KEYS = "Too many keys are generated. There are only %d target objects. "
      + "You either specified a wrong 'keyProperty' or encountered a driver bug like #1523.";

  @Override
  public void processBefore(Executor executor, MappedStatement ms, Statement stmt, Object parameter) {
    // do nothing
    // 使用数据库生成主键不需要提前查询
  }

  @Override
  public void processAfter(Executor executor, MappedStatement ms, Statement stmt, Object parameter) {
    // 支持批量生成主键
    processBatch(ms, stmt, parameter);
  }

  public void processBatch(MappedStatement ms, Statement stmt, Object parameter) {
    // 1. 获取 MS 的 keyPropertie属性
    final String[] keyProperties = ms.getKeyProperties();
    if (keyProperties == null || keyProperties.length == 0) {
      return;
    }

    // 2. 获取GK结果集
    // 使用JDBCApi获取主查询返回的 GeneratedKeys 结果集(简称GK结果集)
    try (ResultSet rs = stmt.getGeneratedKeys()) {
      // 获取GK结果集 ResultSet 的元数据
      final ResultSetMetaData rsmd = rs.getMetaData();
      // 获取全局配置
      final Configuration configuration = ms.getConfiguration();
      if (rsmd.getColumnCount() < keyProperties.length) {
        // Error?
      } else {
        // 3. 从GK结果集取数据回填
        assignKeys(configuration, rs, rsmd, keyProperties, parameter);
      }
    } catch (Exception e) {
      throw new ExecutorException("Error getting generated key or setting result to parameter object. Cause: " + e, e);
    }
  }

  @SuppressWarnings("unchecked")
  private void assignKeys(Configuration configuration, ResultSet rs, ResultSetMetaData rsmd, String[] keyProperties,
      Object parameter) throws SQLException {

    if (parameter instanceof ParamMap || parameter instanceof StrictMap) {
      // 1. Multi-param or single param with @Param
      assignKeysToParamMap(configuration, rs, rsmd, keyProperties, (Map<String, ?>) parameter);
    } else if (parameter instanceof ArrayList && !((ArrayList<?>) parameter).isEmpty()
        && ((ArrayList<?>) parameter).get(0) instanceof ParamMap) {
      // 2. Multi-param or single param with @Param in batch operation
      assignKeysToParamMapList(configuration, rs, rsmd, keyProperties, ((ArrayList<ParamMap<?>>) parameter));
    } else {
      // 3. Single param without @Param
      assignKeysToParam(configuration, rs, rsmd, keyProperties, parameter);
    }
  }

  // Single param without @Param
  private void assignKeysToParam(Configuration configuration, ResultSet rs, ResultSetMetaData rsmd,
      String[] keyProperties, Object parameter) throws SQLException {
    Collection<?> params = collectionize(parameter);
    if (params.isEmpty()) {
      return;
    }
    List<KeyAssigner> assignerList = new ArrayList<>();
    for (int i = 0; i < keyProperties.length; i++) {
      assignerList.add(new KeyAssigner(configuration, rsmd, i + 1, null, keyProperties[i]));
    }
    Iterator<?> iterator = params.iterator();
    while (rs.next()) {
      if (!iterator.hasNext()) {
        throw new ExecutorException(String.format(MSG_TOO_MANY_KEYS, params.size()));
      }
      Object param = iterator.next();
      assignerList.forEach(x -> x.assign(rs, param));
    }
  }

  // Multi-param or single param with @Param in batch operation
  private void assignKeysToParamMapList(Configuration configuration, ResultSet rs, ResultSetMetaData rsmd,
      String[] keyProperties, ArrayList<ParamMap<?>> paramMapList) throws SQLException {
    Iterator<ParamMap<?>> iterator = paramMapList.iterator();
    List<KeyAssigner> assignerList = new ArrayList<>();
    long counter = 0;
    while (rs.next()) {
      if (!iterator.hasNext()) {
        throw new ExecutorException(String.format(MSG_TOO_MANY_KEYS, counter));
      }
      ParamMap<?> paramMap = iterator.next();
      if (assignerList.isEmpty()) {
        for (int i = 0; i < keyProperties.length; i++) {
          assignerList
              .add(getAssignerForParamMap(configuration, rsmd, i + 1, paramMap, keyProperties[i], keyProperties, false)
                  .getValue());
        }
      }
      assignerList.forEach(x -> x.assign(rs, paramMap));
      counter++;
    }
  }

  // Multi-param or single param with @Param
  private void assignKeysToParamMap(Configuration configuration, ResultSet rs, ResultSetMetaData rsmd,
      String[] keyProperties, Map<String, ?> paramMap) throws SQLException {
    if (paramMap.isEmpty()) {
      return;
    }
    Map<String, Entry<Iterator<?>, List<KeyAssigner>>> assignerMap = new HashMap<>();
    for (int i = 0; i < keyProperties.length; i++) {
      Entry<String, KeyAssigner> entry = getAssignerForParamMap(configuration, rsmd, i + 1, paramMap, keyProperties[i],
          keyProperties, true);
      Entry<Iterator<?>, List<KeyAssigner>> iteratorPair = assignerMap.computeIfAbsent(entry.getKey(),
          k -> entry(collectionize(paramMap.get(k)).iterator(), new ArrayList<>()));
      iteratorPair.getValue().add(entry.getValue());
    }
    long counter = 0;
    while (rs.next()) {
      for (Entry<Iterator<?>, List<KeyAssigner>> pair : assignerMap.values()) {
        if (!pair.getKey().hasNext()) {
          throw new ExecutorException(String.format(MSG_TOO_MANY_KEYS, counter));
        }
        Object param = pair.getKey().next();
        pair.getValue().forEach(x -> x.assign(rs, param));
      }
      counter++;
    }
  }

  private Entry<String, KeyAssigner> getAssignerForParamMap(Configuration config, ResultSetMetaData rsmd,
      int columnPosition, Map<String, ?> paramMap, String keyProperty, String[] keyProperties, boolean omitParamName) {
    boolean singleParam = paramMap.values().stream().distinct().count() == 1;
    int firstDot = keyProperty.indexOf('.');
    if (firstDot == -1) {
      if (singleParam) {
        return getAssignerForSingleParam(config, rsmd, columnPosition, paramMap, keyProperty, omitParamName);
      }
      throw new ExecutorException("Could not determine which parameter to assign generated keys to. "
          + "Note that when there are multiple parameters, 'keyProperty' must include the parameter name (e.g. 'param.id'). "
          + "Specified key properties are " + ArrayUtil.toString(keyProperties) + " and available parameters are "
          + paramMap.keySet());
    }
    String paramName = keyProperty.substring(0, firstDot);
    if (paramMap.containsKey(paramName)) {
      String argParamName = omitParamName ? null : paramName;
      String argKeyProperty = keyProperty.substring(firstDot + 1);
      return entry(paramName, new KeyAssigner(config, rsmd, columnPosition, argParamName, argKeyProperty));
    } else if (singleParam) {
      return getAssignerForSingleParam(config, rsmd, columnPosition, paramMap, keyProperty, omitParamName);
    } else {
      throw new ExecutorException("Could not find parameter '" + paramName + "'. "
          + "Note that when there are multiple parameters, 'keyProperty' must include the parameter name (e.g. 'param.id'). "
          + "Specified key properties are " + ArrayUtil.toString(keyProperties) + " and available parameters are "
          + paramMap.keySet());
    }
  }

  private Entry<String, KeyAssigner> getAssignerForSingleParam(Configuration config, ResultSetMetaData rsmd,
      int columnPosition, Map<String, ?> paramMap, String keyProperty, boolean omitParamName) {
    // Assume 'keyProperty' to be a property of the single param.
    String singleParamName = nameOfSingleParam(paramMap);
    String argParamName = omitParamName ? null : singleParamName;
    return entry(singleParamName, new KeyAssigner(config, rsmd, columnPosition, argParamName, keyProperty));
  }

  private static String nameOfSingleParam(Map<String, ?> paramMap) {
    // There is virtually one parameter, so any key works.
    return paramMap.keySet().iterator().next();
  }

  private static Collection<?> collectionize(Object param) {
    if (param instanceof Collection) {
      return (Collection<?>) param;
    } else if (param instanceof Object[]) {
      return Arrays.asList((Object[]) param);
    } else {
      return Arrays.asList(param);
    }
  }

  private static <K, V> Entry<K, V> entry(K key, V value) {
    // Replace this with Map.entry(key, value) in Java 9.
    return new AbstractMap.SimpleImmutableEntry<>(key, value);
  }

  private class KeyAssigner {
    private final Configuration configuration;
    private final ResultSetMetaData rsmd;
    private final TypeHandlerRegistry typeHandlerRegistry;
    private final int columnPosition;
    private final String paramName;
    private final String propertyName;
    private TypeHandler<?> typeHandler;

    protected KeyAssigner(Configuration configuration, ResultSetMetaData rsmd, int columnPosition, String paramName,
        String propertyName) {
      super();
      this.configuration = configuration;
      this.rsmd = rsmd;
      this.typeHandlerRegistry = configuration.getTypeHandlerRegistry();
      this.columnPosition = columnPosition;
      this.paramName = paramName;
      this.propertyName = propertyName;
    }

    protected void assign(ResultSet rs, Object param) {
      if (paramName != null) {
        // If paramName is set, param is ParamMap
        param = ((ParamMap<?>) param).get(paramName);
      }
      MetaObject metaParam = configuration.newMetaObject(param);
      try {
        if (typeHandler == null) {
          if (metaParam.hasSetter(propertyName)) {
            Class<?> propertyType = metaParam.getSetterType(propertyName);
            typeHandler = typeHandlerRegistry.getTypeHandler(propertyType,
                JdbcType.forCode(rsmd.getColumnType(columnPosition)));
          } else {
            throw new ExecutorException("No setter found for the keyProperty '" + propertyName + "' in '"
                + metaParam.getOriginalObject().getClass().getName() + "'.");
          }
        }
        if (typeHandler == null) {
          // Error?
        } else {
          Object value = typeHandler.getResult(rs, columnPosition);
          metaParam.setValue(propertyName, value);
        }
      } catch (SQLException e) {
        throw new ExecutorException("Error getting generated key or setting result to parameter object. Cause: " + e,
            e);
      }
    }
  }
}
2.2 SelectKeyGenerator
再来看看 SelectKeyGenerator 的源码,在执行更新语句前事先查询出Key,或在更新语句执行完后回填key。
public class SelectKeyGenerator implements KeyGenerator {

  public static final String SELECT_KEY_SUFFIX = "!selectKey";
  private final boolean executeBefore;
  private final MappedStatement keyStatement;

  public SelectKeyGenerator(MappedStatement keyStatement, boolean executeBefore) {
    this.executeBefore = executeBefore;
    this.keyStatement = keyStatement;
  }

  @Override
  public void processBefore(Executor executor, MappedStatement ms, Statement stmt, Object parameter) {
    // 在 BaseStatementHandler 的构造器中调用
    // 如果是“执行前调用”则执行SelectKey逻辑
    if (executeBefore) {
      processGeneratedKeys(executor, ms, parameter);
    }
  }

  @Override
  public void processAfter(Executor executor, MappedStatement ms, Statement stmt, Object parameter) {
    // 在 Statement 执行SQL语句之后调用
    // 如果是“执行后调用”则执行SelectKey逻辑
    if (!executeBefore) {
      processGeneratedKeys(executor, ms, parameter);
    }
  }

  private void processGeneratedKeys(Executor executor, MappedStatement ms, Object parameter) {
    try {
      if (parameter != null && keyStatement != null && keyStatement.getKeyProperties() != null) {

        // 1, 获取MS的 keyProperty 属性、全局配置,并为实参创建MetaObject对象
        String[] keyProperties = keyStatement.getKeyProperties();
        final Configuration configuration = ms.getConfiguration();
        final MetaObject metaParam = configuration.newMetaObject(parameter);


        if (keyProperties != null) {
          // 2. 创建执行器,执行SQL语句。Do not close keyExecutor. The transaction will be closed by parent executor.
          Executor keyExecutor = configuration.newExecutor(executor.getTransaction(), ExecutorType.SIMPLE);
          List<Object> values = keyExecutor.query(keyStatement, parameter, RowBounds.DEFAULT, Executor.NO_RESULT_HANDLER);

          // 3. 获取 SelectKey 查询结果,并创建MetaObject对象
          if (values.size() == 0) {
            throw new ExecutorException("SelectKey returned no data.");
          } else if (values.size() > 1) {
            throw new ExecutorException("SelectKey returned more than one value.");
          } else {
            MetaObject metaResult = configuration.newMetaObject(values.get(0));

            // 4. 设置 SelectKey 查询结果到主查询结果中
            if (keyProperties.length == 1) {
              // 4.1 映射到单个属性
              if (metaResult.hasGetter(keyProperties[0])) {
                // SelectKey 查询结果有多列,取对应列
                setValue(metaParam, keyProperties[0], metaResult.getValue(keyProperties[0]));
              } else {
                // SelectKey 查询结果刚好是需要的列
                // no getter for the property - maybe just a single value object.so try that
                setValue(metaParam, keyProperties[0], values.get(0));
              }
            } else {
              // 4.2 映射到多个属性
              handleMultipleProperties(keyProperties, metaParam, metaResult);
            }
          }
        }
      }
    } catch (ExecutorException e) {
      throw e;
    } catch (Exception e) {
      throw new ExecutorException("Error selecting key or setting result to parameter object. Cause: " + e, e);
    }
  }

  private void handleMultipleProperties(String[] keyProperties,
      MetaObject metaParam, MetaObject metaResult) {
    // 1. 获取 MS 的 keyColumn 属性
    String[] keyColumns = keyStatement.getKeyColumns();

    if (keyColumns == null || keyColumns.length == 0) {
      // 2.1 keyColumn 属性未配置,则用 keyProperty 从结果集取值映射
      // no key columns specified, just use the property names
      for (String keyProperty : keyProperties) {
        setValue(metaParam, keyProperty, metaResult.getValue(keyProperty));
      }
    } else {
      //2.2  keyColumn 属性配置了,进行对应位置映射
      if (keyColumns.length != keyProperties.length) {
        throw new ExecutorException("If SelectKey has key columns, the number must match the number of key properties.");
      }
      for (int i = 0; i < keyProperties.length; i++) {
        setValue(metaParam, keyProperties[i], metaResult.getValue(keyColumns[i]));
      }
    }
  }

  private void setValue(MetaObject metaParam, String property, Object value) {
    if (metaParam.hasSetter(property)) {
      // 使用MetaObject工具类设置属性
      metaParam.setValue(property, value);
    } else {
      throw new ExecutorException("No setter found for the keyProperty '" + property + "' in " + metaParam.getOriginalObject().getClass().getName() + ".");
    }
  }
}
3. 处理更新结果
更新语句的执行结果是一个整型值,表示本次更新所影响的行数,处理逻辑非常简单。
// -☆-  MapperMethod
private Object rowCountResult(int rowCount) {
    final Object result;

    if (method.returnsVoid()) {
        // 方法返回类型为 void,则不用返回结果,这里将结果置空
        result = null;
    } else if (Integer.class.equals(method.getReturnType()) || Integer.TYPE.equals(method.getReturnType())) {
        // 方法返回类型为 Integer 或 int,直接赋值返回即可
        result = rowCount;
    } else if (Long.class.equals(method.getReturnType()) || Long.TYPE.equals(method.getReturnType())) {
        // 如果返回值类型为 Long 或者 long,这里强转一下即可
        result = (long) rowCount;
    } else if (Boolean.class.equals(method.getReturnType()) || Boolean.TYPE.equals(method.getReturnType())) {
        // 方法返回类型为布尔类型,若 rowCount > 0,则返回 ture,否则返回 false
        result = rowCount > 0;
    } else {
        throw new BindingException(...);
    }
    return result;
}
第四章 其它源码分析
第一节 内置数据源
MyBatis 支持三种类型的数据源配置,分别是UNPOOLED、POOLED 和 JNDI。其中UNPOOED 是一种无连接缓存的数据源实现,每次都向数据库获取新连接。而 POOLED 在 UNPOOLED 的基础上加入了连接池技术,获取连接时更加高效。另外,为了能够在 EJB 或应用服务器上运行,还引入了 JNDI 类型的配置,但使用较少,稍作了解即可。
1. 数据源工厂
MyBatis 在解析 environment 节点时,会一并解析内嵌的 dataSource 节点,根据不同类型的配置,创建不同类型的数据源工厂。
  private DataSourceFactory dataSourceElement(XNode context) throws Exception {
    if (context != null) {
      // 获取数据源类型
      String type = context.getStringAttribute("type");

      // 获取数据源属性
      Properties props = context.getChildrenAsProperties();

      // 创建数据源工厂类
      DataSourceFactory factory = (DataSourceFactory) resolveClass(type).newInstance();

      // 设置数据源的属性
      factory.setProperties(props);

      // 返回数据源工厂(后续会使用该工厂获取数据源并构建 Environment 对象,设置到 configuration 中)
      return factory;
    }
    throw new BuilderException("Environment declaration requires a DataSourceFactory.");
  }
如果type属性配置的类型是 UNPOOLED ,则会创建 UnpooledDataSourceFactory ,下面来看看它的源码。
public class UnpooledDataSourceFactory implements DataSourceFactory {

  private static final String DRIVER_PROPERTY_PREFIX = "driver.";
  private static final int DRIVER_PROPERTY_PREFIX_LENGTH = DRIVER_PROPERTY_PREFIX.length();

  protected DataSource dataSource;

  public UnpooledDataSourceFactory() {
    // 创建一个无连接池的数据源实现
    this.dataSource = new UnpooledDataSource();
  }

  @Override
  public void setProperties(Properties properties) {
    Properties driverProperties = new Properties();

    // 为 dataSource 创建元信息对象
    MetaObject metaDataSource = SystemMetaObject.forObject(dataSource);

    // 遍历子节点配置的属性
    for (Object key : properties.keySet()) {
      // 获取属性名
      String propertyName = (String) key;

      // -1 驱动的集合属性:以 driver. 开头,可以配置多个
      if (propertyName.startsWith(DRIVER_PROPERTY_PREFIX)) {
        // 获取属性值,先存到 driverProperties 中
        String value = properties.getProperty(propertyName);
        driverProperties.setProperty(propertyName.substring(DRIVER_PROPERTY_PREFIX_LENGTH), value);

      // -2 普通属性:检查是否有 Setter 方法
      } else if (metaDataSource.hasSetter(propertyName)) {
        // 获取属性值并进行类型转换
        String value = (String) properties.get(propertyName);
        Object convertedValue = convertValue(metaDataSource, propertyName, value);

        // 通过工具类设置到数据源实例中
        metaDataSource.setValue(propertyName, convertedValue);

      // -3 无法设置的属性,直接报错
      } else {
        throw new DataSourceException("Unknown DataSource property: " + propertyName);
      }
    }

    // 设置数据源的驱动属性(集合类型)
    if (driverProperties.size() > 0) {
      metaDataSource.setValue("driverProperties", driverProperties);
    }
  }

  @Override
  public DataSource getDataSource() {
    return dataSource;
  }

  private Object convertValue(MetaObject metaDataSource, String propertyName, String value) {
    Object convertedValue = value;
    // 获取属性对应的Setter方法类型
    Class<?> targetType = metaDataSource.getSetterType(propertyName);

    // 强转为对应类型
    if (targetType == Integer.class || targetType == int.class) {
      convertedValue = Integer.valueOf(value);
    } else if (targetType == Long.class || targetType == long.class) {
      convertedValue = Long.valueOf(value);
    } else if (targetType == Boolean.class || targetType == boolean.class) {
      convertedValue = Boolean.valueOf(value);
    }
    return convertedValue;
  }

}
如果type属性配置的类型是 POOLED,则会创建 PooledDataSourceFactory。PooledDataSourceFactory 继承自 UnpooledDataSourceFactory,复用了父类的逻辑,因此它的实现很简单。
public class PooledDataSourceFactory extends UnpooledDataSourceFactory {

    public PooledDataSourceFactory() {
        // 创建支持连接池的数据源实例
        this.dataSource = new PooledDataSource();
    }
}
如果type属性配置的类型是 JNDI,则会创建 JndiDataSourceFactory,从容器上下文查找数据源。
public class JndiDataSourceFactory implements DataSourceFactory {

  public static final String INITIAL_CONTEXT = "initial_context";
  public static final String DATA_SOURCE = "data_source";
  public static final String ENV_PREFIX = "env.";

  private DataSource dataSource;

  @Override
  public void setProperties(Properties properties) {
    try {
      InitialContext initCtx;

      // 获取 env. 开头的属性
      Properties env = getEnvProperties(properties);

      // 初始化容器上下文
      if (env == null) {
        initCtx = new InitialContext();
      } else {
        initCtx = new InitialContext(env);
      }

      // -1 先使用 initial_context 属性查找 Context,再从 Context 中查找数据源
      if (properties.containsKey(INITIAL_CONTEXT) && properties.containsKey(DATA_SOURCE)) {
        Context ctx = (Context) initCtx.lookup(properties.getProperty(INITIAL_CONTEXT));
        dataSource = (DataSource) ctx.lookup(properties.getProperty(DATA_SOURCE));

      // -2 直接使用 data_source 属性查找容器中的数据源
      } else if (properties.containsKey(DATA_SOURCE)) {
        dataSource = (DataSource) initCtx.lookup(properties.getProperty(DATA_SOURCE));
      }

    } catch (NamingException e) {
      throw new DataSourceException("There was an error configuring JndiDataSourceTransactionPool. Cause: " + e, e);
    }
  }

  @Override
  public DataSource getDataSource() {
    return dataSource;
  }

  private static Properties getEnvProperties(Properties allProps) {
    final String PREFIX = ENV_PREFIX;
    Properties contextProperties = null;

    // 遍历子节点配置的属性
    for (Entry<Object, Object> entry : allProps.entrySet()) {
      // 获取key和value
      String key = (String) entry.getKey();
      String value = (String) entry.getValue();

      // 如果是以 env. 开头,则设置到 contextProperties 集合
      if (key.startsWith(PREFIX)) {
        if (contextProperties == null) {
          contextProperties = new Properties();
        }
        contextProperties.put(key.substring(PREFIX.length()), value);
      }
    }

    return contextProperties;
  }

}
2.UnpooledDataSource
UnpooledDataSource 是对 JDBC 获取连接的一层简单封装,不具有池化特性,无需提供连接池功能,因此它的实现非常简单。
// -☆- UnpooledDataSource
public Connection getConnection() throws SQLException {
	return doGetConnection(username, password);
}

private Connection doGetConnection(String username, String password) throws SQLException {
    Properties props = new Properties();

    // 把创建数据源工厂时设置的驱动属性添加到 props
    if (driverProperties != null) {
        props.putAll(driverProperties);
    }

    // 添加 user 配置
    if (username != null) {
        props.setProperty("user", username);
    }

    // 添加 password 配置
    if (password != null) {
        props.setProperty("password", password);
    }

    // 调用重载方法
    return doGetConnection(props);
}

private Connection doGetConnection(Properties properties) throws SQLException {
    // 1. 初始化驱动
    initializeDriver();

    // 2. 获取连接
    Connection connection = DriverManager.getConnection(url, properties);

    // 3. 配置连接,包括自动提交以及事务等级
    configureConnection(connection);
    return connection;
}

private synchronized void initializeDriver() throws SQLException {
    // 检测缓存中是否包含了与 driver 对应的驱动实例
    if (!registeredDrivers.containsKey(driver)) {
        Class<?> driverType;
        try {
            // 1. 获取驱动类型
            if (driverClassLoader != null) {
                // 使用 driverClassLoader 加载驱动
                driverType = Class.forName(driver, true, driverClassLoader);
            } else {
                // 通过其他 ClassLoader 加载驱动
                driverType = Resources.classForName(driver);
            }

            // 2. 通过反射创建驱动实例
            Driver driverInstance = (Driver) driverType.newInstance();

            /*
             * 3. 注册驱动,注意这里是将 Driver 代理类 DriverProxy 对象注册到 DriverManager 中的,
             * 而非 Driver 对象本身。DriverProxy 中并没什么特别的逻辑,就不分析。
             */
            DriverManager.registerDriver(new DriverProxy(driverInstance));

            // 缓存驱动类名和实例
            registeredDrivers.put(driver, driverInstance);
        } catch (Exception e) {
            throw new SQLException("Error setting driver on UnpooledDataSource. Cause: " + e);
        }
    }
}

private void configureConnection(Connection conn) throws SQLException {
    if (defaultNetworkTimeout != null) {
      conn.setNetworkTimeout(Executors.newSingleThreadExecutor(), defaultNetworkTimeout);
    }

    if (autoCommit != null && autoCommit != conn.getAutoCommit()) {
        // 设置自动提交
        conn.setAutoCommit(autoCommit);
    }

    if (defaultTransactionIsolationLevel != null) {
        // 设置事务隔离级别
        conn.setTransactionIsolation(defaultTransactionIsolationLevel);
    }
}
如上,将一些配置信息放入到 Properties 对象中,然后将数据库连接和 Properties 对象传给 DriverManager 的 getConnection 方法即可获取到数据库连接。
3.PooledDataSource
PooledDataSource 是一个支持连接池的数据源实现,从性能上来说,要优于 UnpooledDataSource。
3.1 辅助类介绍
为了实现连接池的功能,PooledDataSource 抽象了两个辅助类 PoolState 和 PooledConnection。PoolState 用于记录连接池运行时的状态,比如连接获取次数,无效连接数量等。除此之外,还定义了两个 PooledConnection 集合,分别用于存储空闲连接和活跃连接。
public class PoolState {
    protected PooledDataSource dataSource;

    // 空闲连接列表
    protected final List<PooledConnection> idleConnections = new ArrayList<PooledConnection>();
    // 活跃连接列表
    protected final List<PooledConnection> activeConnections = new ArrayList<PooledConnection>();

    // 从连接池中获取连接的次数
    protected long requestCount = 0;
    // 请求连接总耗时(单位:毫秒)
    protected long accumulatedRequestTime = 0;
    // 连接执行时间总耗时
    protected long accumulatedCheckoutTime = 0;
    // 执行时间超时的连接数
    protected long claimedOverdueConnectionCount = 0;
    // 超时时间累加值
    protected long accumulatedCheckoutTimeOfOverdueConnections = 0;
    // 等待时间累加值
    protected long accumulatedWaitTime = 0;
    // 等待次数
    protected long hadToWaitCount = 0;
    // 无效连接数
    protected long badConnectionCount = 0;

    // ...
}
PooledConnection 内部包含一个真实的连接和一个 Connection 的代理,代理的拦截逻辑为 PooledConnection 的 invoke 方法,后面将会讲解。除此之外,其内部也定义了一些字段,用于记录数据库连接的一些运行时状态。
class PooledConnection implements InvocationHandler {
    private static final String CLOSE = "close";
    private static final Class<?>[] IFACES = new Class<?>[]{Connection.class};

    private final int hashCode;
    private final PooledDataSource dataSource;

    // 真实的数据库连接
    private final Connection realConnection;
    // 数据库连接代理
    private final Connection proxyConnection;

    // 从连接池中取出连接时的时间戳
    private long checkoutTimestamp;
    // 数据库连接创建时间
    private long createdTimestamp;
    // 数据库连接最后使用时间
    private long lastUsedTimestamp;
    // connectionTypeCode = (url + username + password).hashCode()
    private int connectionTypeCode;
    // 表示连接是否有效
    private boolean valid;

    public PooledConnection(Connection connection, PooledDataSource dataSource) {
        this.hashCode = connection.hashCode();
        this.realConnection = connection;
        this.dataSource = dataSource;
        this.createdTimestamp = System.currentTimeMillis();
        this.lastUsedTimestamp = System.currentTimeMillis();
        this.valid = true;

        // 创建 Connection 的代理类对象
        this.proxyConnection = (Connection) Proxy.newProxyInstance(Connection.class.getClassLoader(), IFACES, this);
    }

    @Override
    public Object invoke(Object proxy, Method method, Object[] args) throws Throwable {...}

    //...
}
3.2 获取连接
PooledDataSource 会对数据库连接进行缓存,获取连接时可能会遇到多种情况,请看图。
下面我们深入到源码中一探究竟。
public Connection getConnection() throws SQLException {
    // 返回 Connection 的代理对象
    return popConnection(dataSource.getUsername(), dataSource.getPassword()).getProxyConnection();
}

private PooledConnection popConnection(String username, String password) throws SQLException {
    boolean countedWait = false;
    PooledConnection conn = null;
    long t = System.currentTimeMillis();
    int localBadConnectionCount = 0;

    while (conn == null) {
        synchronized (state) {
            // 检测空闲连接集合(idleConnections)是否为空
            if (!state.idleConnections.isEmpty()) {
                // idleConnections 不为空,表示有空闲连接可以使用
                conn = state.idleConnections.remove(0);
            } else {
                /*
                 * 暂无空闲连接可用,但如果活跃连接数还未超出限制
                 *(poolMaximumActiveConnections),则可创建新的连接
                 */
                if (state.activeConnections.size() < poolMaximumActiveConnections) {
                    // 创建新连接
                    conn = new PooledConnection(dataSource.getConnection(), this);

                } else {    // 连接池已满,不能创建新连接
                    // 取出运行时间最长的连接
                    PooledConnection oldestActiveConnection = state.activeConnections.get(0);
                    // 获取运行时长
                    long longestCheckoutTime = oldestActiveConnection.getCheckoutTime();
                    // 检测运行时长是否超出限制,即超时
                    if (longestCheckoutTime > poolMaximumCheckoutTime) {
                        // 累加超时相关的统计字段
                        state.claimedOverdueConnectionCount++;
                        state.accumulatedCheckoutTimeOfOverdueConnections += longestCheckoutTime;
                        state.accumulatedCheckoutTime += longestCheckoutTime;

                        // 从活跃连接集合中移除超时连接
                        state.activeConnections.remove(oldestActiveConnection);
                        // 若连接未设置自动提交,此处进行回滚操作
                        if (!oldestActiveConnection.getRealConnection().getAutoCommit()) {
                            try {
                                oldestActiveConnection.getRealConnection().rollback();
                            } catch (SQLException e) {...}
                        }
                        /*
                         * 创建一个新的 PooledConnection,注意,
                         * 此处复用 oldestActiveConnection 的 realConnection 变量
                         */
                        conn = new PooledConnection(oldestActiveConnection.getRealConnection(), this);
                        /*
                         * 复用 oldestActiveConnection 的一些信息,注意 PooledConnection 中的
                         * createdTimestamp 用于记录 Connection 的创建时间,而非 PooledConnection
                         * 的创建时间。所以这里要复用原连接的时间信息。
                         */
                        conn.setCreatedTimestamp(oldestActiveConnection.getCreatedTimestamp());
                        conn.setLastUsedTimestamp(oldestActiveConnection.getLastUsedTimestamp());

                        // 设置连接为无效状态
                        oldestActiveConnection.invalidate();

                    } else {    // 运行时间最长的连接并未超时
                        try {
                            if (!countedWait) {
                                state.hadToWaitCount++;
                                countedWait = true;
                            }
                            long wt = System.currentTimeMillis();
                            // 当前线程进入等待状态
                            state.wait(poolTimeToWait);
                            state.accumulatedWaitTime += System.currentTimeMillis() - wt;
                        } catch (InterruptedException e) {
                            break;
                        }
                    }
                }
            }
            if (conn != null) {
                /*
                 * 检测连接是否有效,isValid 方法除了会检测 valid 是否为 true,
                 * 还会通过 PooledConnection 的 pingConnection 方法执行 SQL 语句,
                 * 检测连接是否可用。pingConnection 方法的逻辑不复杂,大家可以自行分析。
                 * 另外,官方文档在介绍 POOLED 类型数据源时,也介绍了连接有效性检测方面的
                 * 属性,有三个:poolPingQuery,poolPingEnabled 和
                 * poolPingConnectionsNotUsedFor。关于这三个属性,大家可以查阅官方文档
                 */
                if (conn.isValid()) {
                    if (!conn.getRealConnection().getAutoCommit()) {
                        // 进行回滚操作
                        conn.getRealConnection().rollback();
                    }
                    conn.setConnectionTypeCode(assembleConnectionTypeCode(dataSource.getUrl(), username, password));
                    // 设置统计字段
                    conn.setCheckoutTimestamp(System.currentTimeMillis());
                    conn.setLastUsedTimestamp(System.currentTimeMillis());
                    state.activeConnections.add(conn);
                    state.requestCount++;
                    state.accumulatedRequestTime += System.currentTimeMillis() - t;
                } else {
                    // 连接无效,此时累加无效连接相关的统计字段
                    state.badConnectionCount++;
                    localBadConnectionCount++;
                    conn = null;
                    if (localBadConnectionCount > (poolMaximumIdleConnections
                        + poolMaximumLocalBadConnectionTolerance)) {
                        throw new SQLException(...);
                    }
                }
            }
        }

    }

    if (conn == null) {
        throw new SQLException(...);
    }

    return conn;
}
3.3 回收连接
相比于获取连接,回收连接的逻辑要简单的多。回收连接成功与否只取决于空闲连接集合的状态,所需处理情况很少,因此比较简单。
protected void pushConnection(PooledConnection conn) throws SQLException {
    synchronized (state) {
        // 从活跃连接池中移除连接
        state.activeConnections.remove(conn);
        if (conn.isValid()) {
            // 空闲连接集合未满
            if (state.idleConnections.size() < poolMaximumIdleConnections
                && conn.getConnectionTypeCode() == expectedConnectionTypeCode) {
                state.accumulatedCheckoutTime += conn.getCheckoutTime();

                // 回滚未提交的事务
                if (!conn.getRealConnection().getAutoCommit()) {
                    conn.getRealConnection().rollback();
                }

                // 创建新的 PooledConnection
                PooledConnection newConn = new PooledConnection(conn.getRealConnection(), this);
                state.idleConnections.add(newConn);
                // 复用时间信息
                newConn.setCreatedTimestamp(conn.getCreatedTimestamp());
                newConn.setLastUsedTimestamp(conn.getLastUsedTimestamp());

                // 将原连接置为无效状态
                conn.invalidate();

                // 通知等待的线程
                state.notifyAll();

            } else {    // 空闲连接集合已满
                state.accumulatedCheckoutTime += conn.getCheckoutTime();
                // 回滚未提交的事务
                if (!conn.getRealConnection().getAutoCommit()) {
                    conn.getRealConnection().rollback();
                }

                // 关闭数据库连接
                conn.getRealConnection().close();
                conn.invalidate();
            }
        } else {
            state.badConnectionCount++;
        }
    }
}
上面代码首先将连接从活跃连接集合中移除,然后再根据空闲集合是否有空闲空间进行后续处理。如果空闲集合未满,此时复用原连接的字段信息创建新的连接,并将其放入空闲集合中即可。若空闲集合已满,此时无需回收连接,直接关闭即可。
我们知道获取连接的方法 popConnection 是由 getConnection 方法调用的,那回收连接的方法 pushConnection 是由谁调用的呢?答案是 PooledConnection 中的代理逻辑。相关代码如下:
// -☆- PooledConnection
public Object invoke(Object proxy, Method method, Object[] args) throws Throwable {
    String methodName = method.getName();
    // 检测 close 方法是否被调用,若被调用则拦截之
    if (CLOSE.hashCode() == methodName.hashCode() && CLOSE.equals(methodName)) {
        // 将回收连接中,而不是直接将连接关闭
        dataSource.pushConnection(this);
        return null;
    } else {
        try {
            // 检查连接是否有效(注意:执行Object中定义的方法不检查,如toString不应该报错)
            if (!Object.class.equals(method.getDeclaringClass())) {
                checkConnection();
            }

            // 调用真实连接的目标方法
            return method.invoke(realConnection, args);
        } catch (Throwable t) {
            throw ExceptionUtil.unwrapThrowable(t);
        }
    }
}
代理对象中的方法被调用时,如果判断是 close 方法,那么MyBatis 并不会直接调用真实连接的 close 方法关闭连接,而是调用 pushConnection 方法回收连接。同时会唤醒处于睡眠中的线程,使其恢复运行。
第二节 缓存原理
第三节 插件机制
为了增加框架的灵活性,让开发者可以根据实际需求对框架进行扩展,MyBatis 在 Configuration 中对下面四个类进行统一实例化,以植入拦截逻辑。
- Executor (update, query, flushStatements, commit, rollback, getTransaction, close, isClosed)
- ParameterHandler (getParameterObject, setParameters)
- ResultSetHandler (handleResultSets, handleOutputParameters)
- StatementHandler (prepare, parameterize, batch, update, query)
如果我们想要拦截 Executor 的 query 方法,那么可以这样定义插件,首先实现 Interceptor 接口,然后配置插件的拦截点。
@Intercepts({
    @Signature(
        type = Executor.class,
        method = "query",
etRealConnection().rollback();
                            } catch (SQLException e) {...}
                        }
                        /*
                         * 创建一个新的 PooledConnection,注意,
                         * 此处复用 oldestActiveConnection 的 realConnection 变量
                         */
                        conn = new PooledConnection(oldestActiveConnection.getRealConnection(), this);
                        /*
                         * 复用 oldestActiveConnection 的一些信息,注意 PooledConnection 中的
                         * createdTimestamp 用于记录 Connection 的创建时间,而非 PooledConnection
                         * 的创建时间。所以这里要复用原连接的时间信息。
                         */
                        conn.setCreatedTimestamp(oldestActiveConnection.getCreatedTimestamp());
                        conn.setLastUsedTimestamp(oldestActiveConnection.getLastUsedTimestamp());

                        // 设置连接为无效状态
                        oldestActiveConnection.invalidate();

                    } else {    // 运行时间最长的连接并未超时
                        try {
                            if (!countedWait) {
                                state.hadToWaitCount++;
                                countedWait = true;
                            }
                            long wt = System.currentTimeMillis();
                            // 当前线程进入等待状态
                            state.wait(poolTimeToWait);
                            state.accumulatedWaitTime += System.currentTimeMillis() - wt;
                        } catch (InterruptedException e) {
                            break;
                        }
                    }
                }
            }
            if (conn != null) {
                /*
                 * 检测连接是否有效,isValid 方法除了会检测 valid 是否为 true,
                 * 还会通过 PooledConnection 的 pingConnection 方法执行 SQL 语句,
                 * 检测连接是否可用。pingConnection 方法的逻辑不复杂,大家可以自行分析。
                 * 另外,官方文档在介绍 POOLED 类型数据源时,也介绍了连接有效性检测方面的
                 * 属性,有三个:poolPingQuery,poolPingEnabled 和
                 * poolPingConnectionsNotUsedFor。关于这三个属性,大家可以查阅官方文档
                 */
                if (conn.isValid()) {
                    if (!conn.getRealConnection().getAutoCommit()) {
                        // 进行回滚操作
                        conn.getRealConnection().rollback();
                    }
                    conn.setConnectionTypeCode(assembleConnectionTypeCode(dataSource.getUrl(), username, password));
                    // 设置统计字段
                    conn.setCheckoutTimestamp(System.currentTimeMillis());
                    conn.setLastUsedTimestamp(System.currentTimeMillis());
                    state.activeConnections.add(conn);
                    state.requestCount++;
                    state.accumulatedRequestTime += System.currentTimeMillis() - t;
                } else {
                    // 连接无效,此时累加无效连接相关的统计字段
                    state.badConnectionCount++;
                    localBadConnectionCount++;
                    conn = null;
                    if (localBadConnectionCount > (poolMaximumIdleConnections
                        + poolMaximumLocalBadConnectionTolerance)) {
                        throw new SQLException(...);
                    }
                }
            }
        }

    }

    if (conn == null) {
        throw new SQLException(...);
    }

    return conn;
}
3.3 回收连接
相比于获取连接,回收连接的逻辑要简单的多。回收连接成功与否只取决于空闲连接集合的状态,所需处理情况很少,因此比较简单。
protected void pushConnection(PooledConnection conn) throws SQLException {
    synchronized (state) {
        // 从活跃连接池中移除连接
        state.activeConnections.remove(conn);
        if (conn.isValid()) {
            // 空闲连接集合未满
            if (state.idleConnections.size() < poolMaximumIdleConnections
                && conn.getConnectionTypeCode() == expectedConnectionTypeCode) {
                state.accumulatedCheckoutTime += conn.getCheckoutTime();

                // 回滚未提交的事务
                if (!conn.getRealConnection().getAutoCommit()) {
                    conn.getRealConnection().rollback();
                }

                // 创建新的 PooledConnection
                PooledConnection newConn = new PooledConnection(conn.getRealConnection(), this);
                state.idleConnections.add(newConn);
                // 复用时间信息
                newConn.setCreatedTimestamp(conn.getCreatedTimestamp());
                newConn.setLastUsedTimestamp(conn.getLastUsedTimestamp());

                // 将原连接置为无效状态
                conn.invalidate();

                // 通知等待的线程
                state.notifyAll();

            } else {    // 空闲连接集合已满
                state.accumulatedCheckoutTime += conn.getCheckoutTime();
                // 回滚未提交的事务
                if (!conn.getRealConnection().getAutoCommit()) {
                    conn.getRealConnection().rollback();
                }

                // 关闭数据库连接
                conn.getRealConnection().close();
                conn.invalidate();
            }
        } else {
            state.badConnectionCount++;
        }
    }
}
上面代码首先将连接从活跃连接集合中移除,然后再根据空闲集合是否有空闲空间进行后续处理。如果空闲集合未满,此时复用原连接的字段信息创建新的连接,并将其放入空闲集合中即可。若空闲集合已满,此时无需回收连接,直接关闭即可。
我们知道获取连接的方法 popConnection 是由 getConnection 方法调用的,那回收连接的方法 pushConnection 是由谁调用的呢?答案是 PooledConnection 中的代理逻辑。相关代码如下:
// -☆- PooledConnection
public Object invoke(Object proxy, Method method, Object[] args) throws Throwable {
    String methodName = method.getName();
    // 检测 close 方法是否被调用,若被调用则拦截之
    if (CLOSE.hashCode() == methodName.hashCode() && CLOSE.equals(methodName)) {
        // 将回收连接中,而不是直接将连接关闭
        dataSource.pushConnection(this);
        return null;
    } else {
        try {
            // 检查连接是否有效(注意:执行Object中定义的方法不检查,如toString不应该报错)
            if (!Object.class.equals(method.getDeclaringClass())) {
                checkConnection();
            }

            // 调用真实连接的目标方法
            return method.invoke(realConnection, args);
        } catch (Throwable t) {
            throw ExceptionUtil.unwrapThrowable(t);
        }
    }
}
代理对象中的方法被调用时,如果判断是 close 方法,那么MyBatis 并不会直接调用真实连接的 close 方法关闭连接,而是调用 pushConnection 方法回收连接。同时会唤醒处于睡眠中的线程,使其恢复运行。
第二节 缓存原理
第三节 插件机制
为了增加框架的灵活性,让开发者可以根据实际需求对框架进行扩展,MyBatis 在 Configuration 中对下面四个类进行统一实例化,以植入拦截逻辑。
- Executor (update, query, flushStatements, commit, rollback, getTransaction, close, isClosed)
- ParameterHandler (getParameterObject, setParameters)
- ResultSetHandler (handleResultSets, handleOutputParameters)
- StatementHandler (prepare, parameterize, batch, update, query)
如果我们想要拦截 Executor 的 query 方法,那么可以这样定义插件,首先实现 Interceptor 接口,然后配置插件的拦截点。
@Intercepts({
    @Signature(
        type = Executor.class,
        method = "query",
        args ={MappedStatement.class, Object.class, RowBounds.class, ResultHandler.cla


 278
278


 被折叠的 条评论
为什么被折叠?
被折叠的 条评论
为什么被折叠?
 到【灌水乐园】发言


