


文章目录
requests库安装和导入
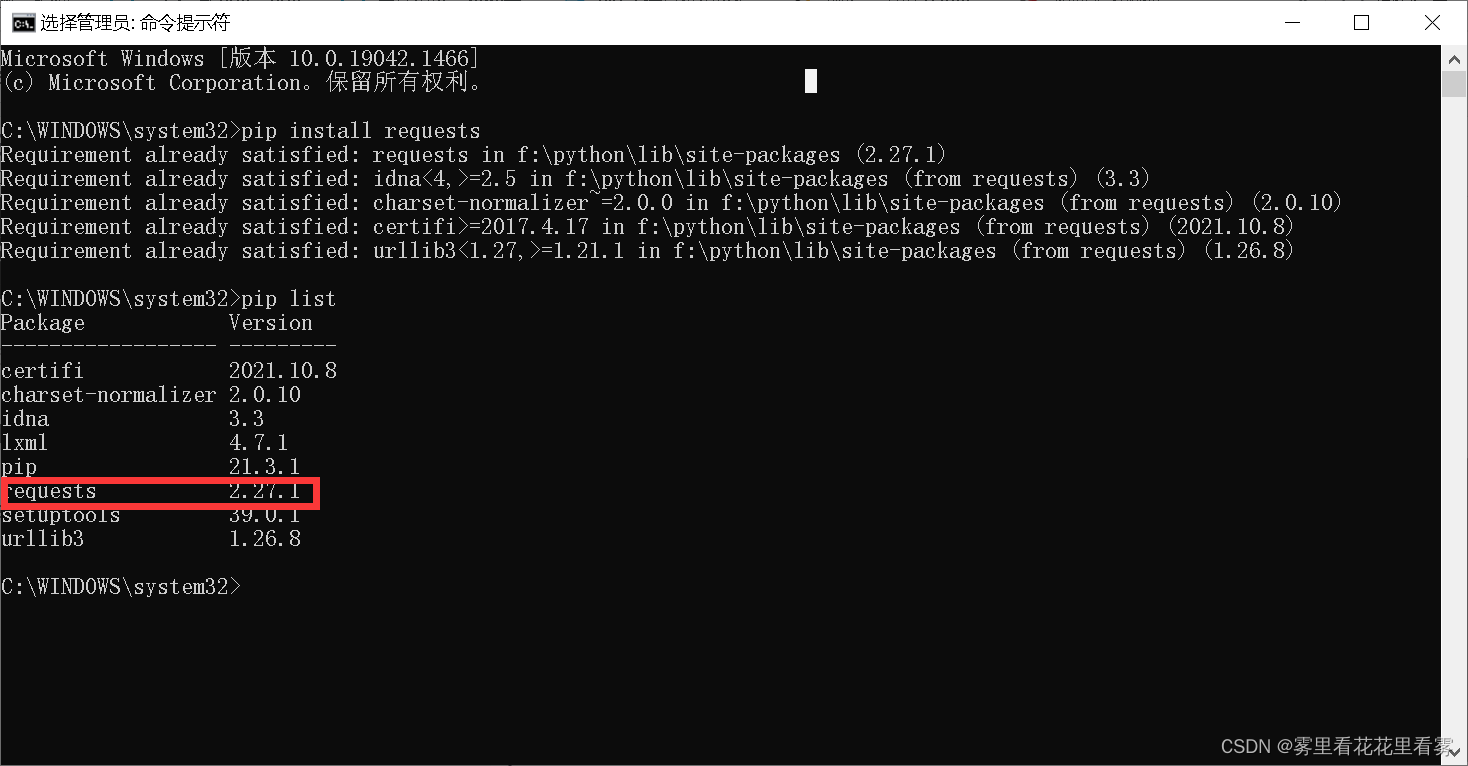
第一步:cmd打开命令行,使用如下命令安装requests库。
pip install requests
由于我的安装过了,所以如下:

如果提示你pip版本需要更新,按照提示的指令输入即可更新。
第二步:cmd使用如下命令,验证requests库安装完成。
pip list
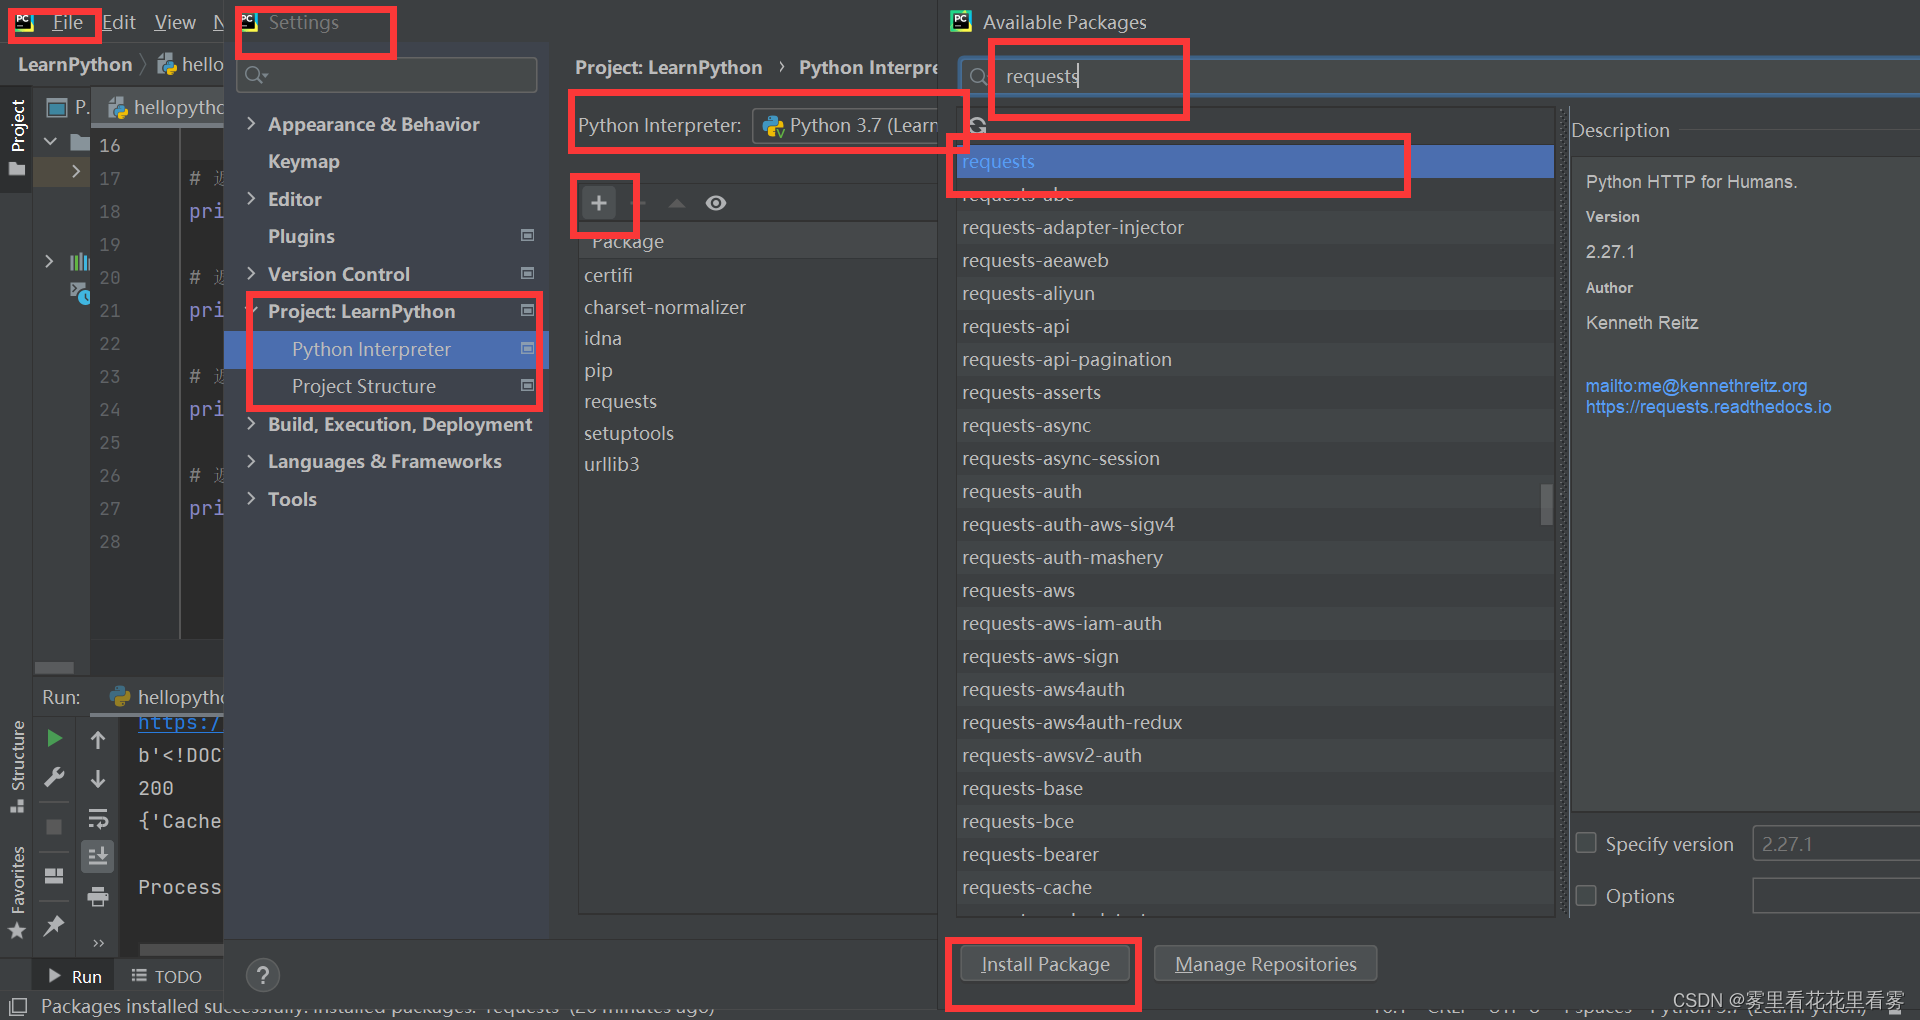
第三步:在pycharm中,点击file——settings——project——python interpreter——点击+号——搜索requests——install package!
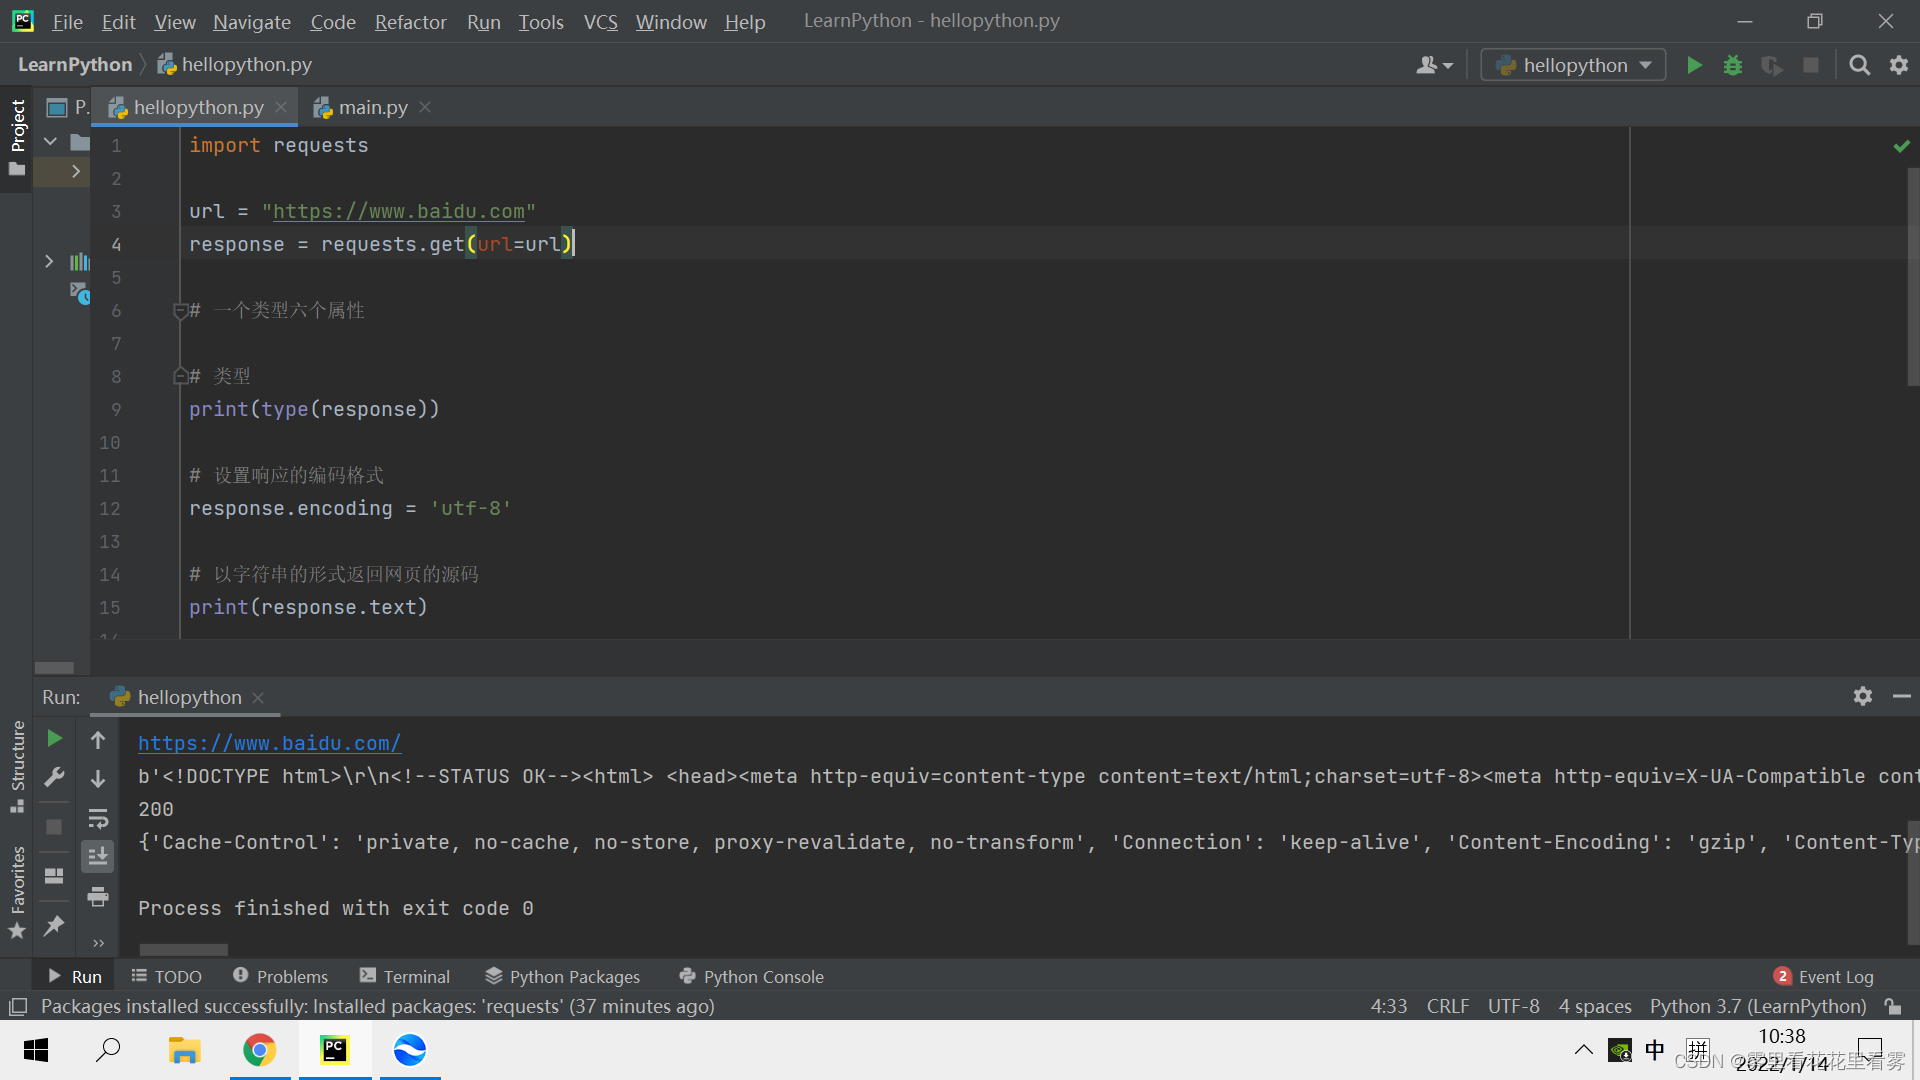
第四步:在你写的.py文件中,使用如下命令导入即可。
import requests
requests库的一个类型六个属性
import requests

url = "https://www.baidu.com"
response = requests.get(url=url)

# 一个类型六个属性

# 类型
print(type(response))

# 设置响应的编码格式
response.encoding = 'utf-8'

# 以字符串的形式返回网页的源码
print(response.text)

# 返回一个url地址
print(response.url)

# 返回的是二进制数据
print(response.content)

# 返回相应的状态码
print(response.status_code)

# 返回的响应头
print(response.headers)
输出结果如下:
<class 'requests.models.Response'>
<!DOCTYPE html>
<!--STATUS OK--><html> <head><meta http-equiv=content-type content=text/html;charset=utf-8><meta http-equiv=X-UA-Compatible content=IE=Edge><meta content=always name=referrer><link rel=stylesheet type=text/css href=https://ss1.bdstatic.com/5eN1bjq8AAUYm2zgoY3K/r/www/cache/bdorz/baidu.min.css><title>百度一下,你就知道</title></head> <body link=#0000cc> <div id=wrapper> <div id=head> <div class=head_wrapper> <div class=s_form> <div class=s_form_wrapper> <div id=lg> <img hidefocus=true src=//www.baidu.com/img/bd_logo1.png width=270 height=129> </div> <form id=form name=f action=//www.baidu.com/s class=fm> <input type=hidden name=bdorz_come value=1> <input type=hidden name=ie value=utf-8> <input type=hidden name=f value=8> <input type=hidden name=rsv_bp value=1> <input type=hidden name=rsv_idx value=1> <input type=hidden name=tn value=baidu><span class="bg s_ipt_wr"><input id=kw name=wd class=s_ipt value maxlength=255 autocomplete=off autofocus=autofocus></span><span class="bg s_btn_wr"><input type=submit id=su value=百度一下 class="bg s_btn" autofocus></span> </form> </div> </div> <div id=u1> <a href=http://news.baidu.com name=tj_trnews class=mnav>新闻</a> <a href=https://www.hao123.com name=tj_trhao123 class=mnav>hao123</a> <a href=http://map.baidu.com name=tj_trmap class=mnav>地图</a> <a href=http://v.baidu.com name=tj_trvideo class=mnav>视频</a> <a href=http://tieba.baidu.com name=tj_trtieba class=mnav>贴吧</a> <noscript> <a href=http://www.baidu.com/bdorz/login.gif?login&tpl=mn&u=http%3A%2F%2Fwww.baidu.com%2f%3fbdorz_come%3d1 name=tj_login class=lb>登录</a> </noscript> <script>document.write('<a href="http://www.baidu.com/bdorz/login.gif?login&tpl=mn&u='+ encodeURIComponent(window.location.href+ (window.location.search === "" ? "?" : "&")+ "bdorz_come=1")+ '" name="tj_login" class="lb">登录</a>');
</script> <a href=//www.baidu.com/more/ name=tj_briicon class=bri style="display: block;">更多产品</a> </div> </div> </div> <div id=ftCon> <div id=ftConw> <p id=lh> <a href=http://home.baidu.com>关于百度</a> <a href=http://ir.baidu.com>About Baidu</a> </p> <p id=cp>©2017 Baidu <a href=http://www.baidu.com/duty/>使用百度前必读</a> <a href=http://jianyi.baidu.com/ class=cp-feedback>意见反馈</a> 京ICP证030173号 <img src=//www.baidu.com/img/gs.gif> </p> </div> </div> </div> </body> </html>
https://www.baidu.com/
b'<!DOCTYPE html>\r\n<!--STATUS OK--><html> <head><meta http-equiv=content-type content=text/html;charset=utf-8><meta http-equiv=X-UA-Compatible content=IE=Edge><meta content=always name=referrer><link rel=stylesheet type=text/css href=https://ss1.bdstatic.com/5eN1bjq8AAUYm2zgoY3K/r/www/cache/bdorz/baidu.min.css><title>\xe7\x99\xbe\xe5\xba\xa6\xe4\xb8\x80\xe4\xb8\x8b\xef\xbc\x8c\xe4\xbd\xa0\xe5\xb0\xb1\xe7\x9f\xa5\xe9\x81\x93</title></head> <body link=#0000cc> <div id=wrapper> <div id=head> <div class=head_wrapper> <div class=s_form> <div class=s_form_wrapper> <div id=lg> <img hidefocus=true src=//www.baidu.com/img/bd_logo1.png width=270 height=129> </div> <form id=form name=f action=//www.baidu.com/s class=fm> <input type=hidden name=bdorz_come value=1> <input type=hidden name=ie value=utf-8> <input type=hidden name=f value=8> <input type=hidden name=rsv_bp value=1> <input type=hidden name=rsv_idx value=1> <input type=hidden name=tn value=baidu><span class="bg s_ipt_wr"><input id=kw name=wd class=s_ipt value maxlength=255 autocomplete=off autofocus=autofocus></span><span class="bg s_btn_wr"><input type=submit id=su value=\xe7\x99\xbe\xe5\xba\xa6\xe4\xb8\x80\xe4\xb8\x8b class="bg s_btn" autofocus></span> </form> </div> </div> <div id=u1> <a href=http://news.baidu.com name=tj_trnews class=mnav>\xe6\x96\xb0\xe9\x97\xbb</a> <a href=https://www.hao123.com name=tj_trhao123 class=mnav>hao123</a> <a href=http://map.baidu.com name=tj_trmap class=mnav>\xe5\x9c\xb0\xe5\x9b\xbe</a> <a href=http://v.baidu.com name=tj_trvideo class=mnav>\xe8\xa7\x86\xe9\xa2\x91</a> <a href=http://tieba.baidu.com name=tj_trtieba class=mnav>\xe8\xb4\xb4\xe5\x90\xa7</a> <noscript> <a href=http://www.baidu.com/bdorz/login.gif?login&tpl=mn&u=http%3A%2F%2Fwww.baidu.com%2f%3fbdorz_come%3d1 name=tj_login class=lb>\xe7\x99\xbb\xe5\xbd\x95</a> </noscript> <script>document.write(\'<a href="http://www.baidu.com/bdorz/login.gif?login&tpl=mn&u=\'+ encodeURIComponent(window.location.href+ (window.location.search === "" ? "?" : "&")+ "bdorz_come=1")+ \'" name="tj_login" class="lb">\xe7\x99\xbb\xe5\xbd\x95</a>\');\r\n </script> <a href=//www.baidu.com/more/ name=tj_briicon class=bri style="display: block;">\xe6\x9b\xb4\xe5\xa4\x9a\xe4\xba\xa7\xe5\x93\x81</a> </div> </div> </div> <div id=ftCon> <div id=ftConw> <p id=lh> <a href=http://home.baidu.com>\xe5\x85\xb3\xe4\xba\x8e\xe7\x99\xbe\xe5\xba\xa6</a> <a href=http://ir.baidu.com>About Baidu</a> </p> <p id=cp>©2017 Baidu <a href=http://www.baidu.com/duty/>\xe4\xbd\xbf\xe7\x94\xa8\xe7\x99\xbe\xe5\xba\xa6\xe5\x89\x8d\xe5\xbf\x85\xe8\xaf\xbb</a> <a href=http://jianyi.baidu.com/ class=cp-feedback>\xe6\x84\x8f\xe8\xa7\x81\xe5\x8f\x8d\xe9\xa6\x88</a> \xe4\xba\xacICP\xe8\xaf\x81030173\xe5\x8f\xb7 <img src=//www.baidu.com/img/gs.gif> </p> </div> </div> </div> </body> </html>\r\n'
200
{'Cache-Control': 'private, no-cache, no-store, proxy-revalidate, no-transform', 'Connection': 'keep-alive', 'Content-Encoding': 'gzip', 'Content-Type': 'text/html', 'Date': 'Fri, 14 Jan 2022 02:09:13 GMT', 'Last-Modified': 'Mon, 23 Jan 2017 13:24:45 GMT', 'Pragma': 'no-cache', 'Server': 'bfe/1.0.8.18', 'Set-Cookie': 'BDORZ=27315; max-age=86400; domain=.baidu.com; path=/', 'Transfer-Encoding': 'chunked'}
post一般是表单请求,如果你直接在百度搜一个东西,那是get请求奥!
requests库的get请求
首先将代码写出来,然后根据代码给大家将对应的知识点,算是入门。
import requests

url = "https://www.baidu.com/s?"

headers = {
    'User-Agent': 'Mozilla/5.0 (Windows NT 10.0; Win64; x64) AppleWebKit/537.36 (KHTML, like Gecko) Chrome/97.0.4692.71 Safari/537.36'
}

data = {
    'wd': '北京'
}

# url请求路径 params参数 kwargs字典
response = requests.get(url=url, params=data, headers=headers)

# 参数使用params传递,且参数无需url encode编码 ,且参数也不需要对象定制,请求资源路径中的?可加可不加

print(response.text)

第一步:首先来看requests库的get方法使用及参数含义。
response = requests.get(url=url, params=data, headers=headers)
url表示请求路径,params表示参数,kwargs表示字典。
参数使用params传递,且参数无需url encode编码 ,且参数也不需要对象定制,请求资源路径中的?可加可不加。
第二步:下面演示一下,这三个参数怎么传递。
接下来的讲解,学过前端的应该都知道怎么弄吧?
右键检查——选择如下——然后刷新
这个地方是我们请求的url!
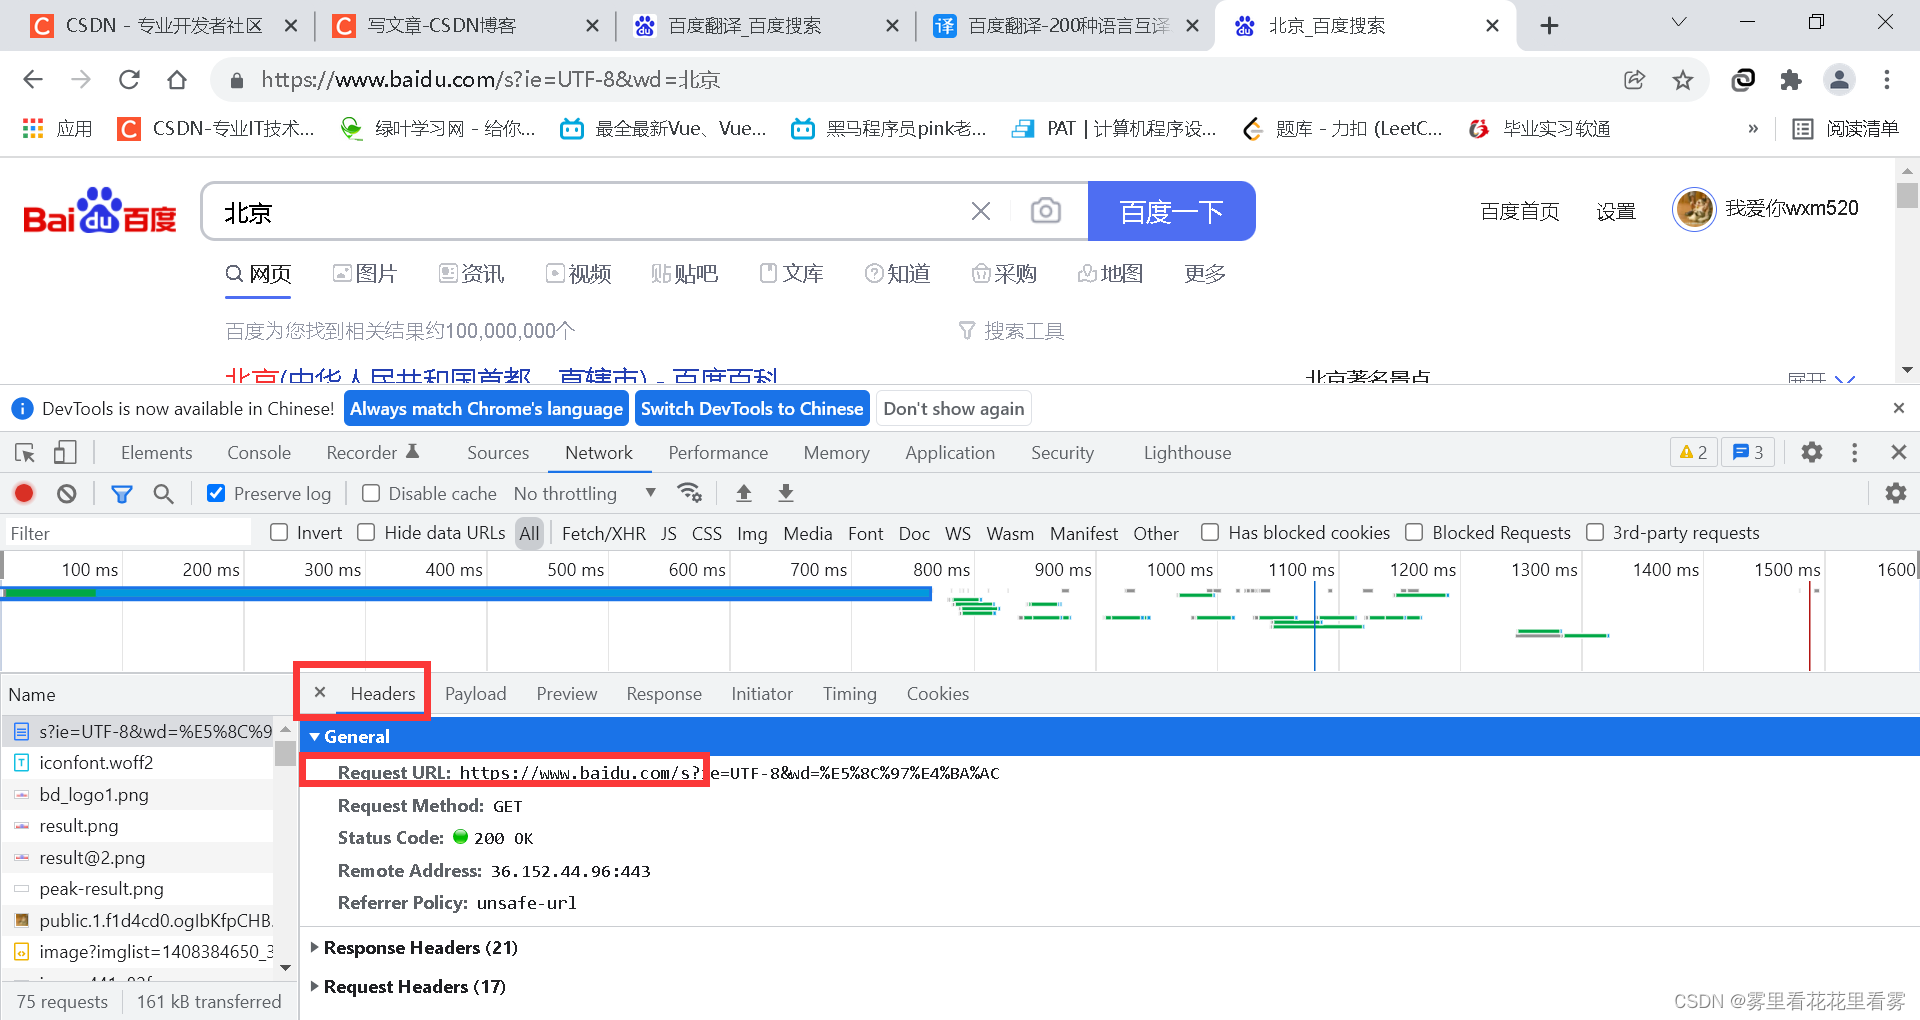
这个地方是我们传递的数据params!
可能很多人会找From Data,这个地方应该是PayLoad,注意一下!
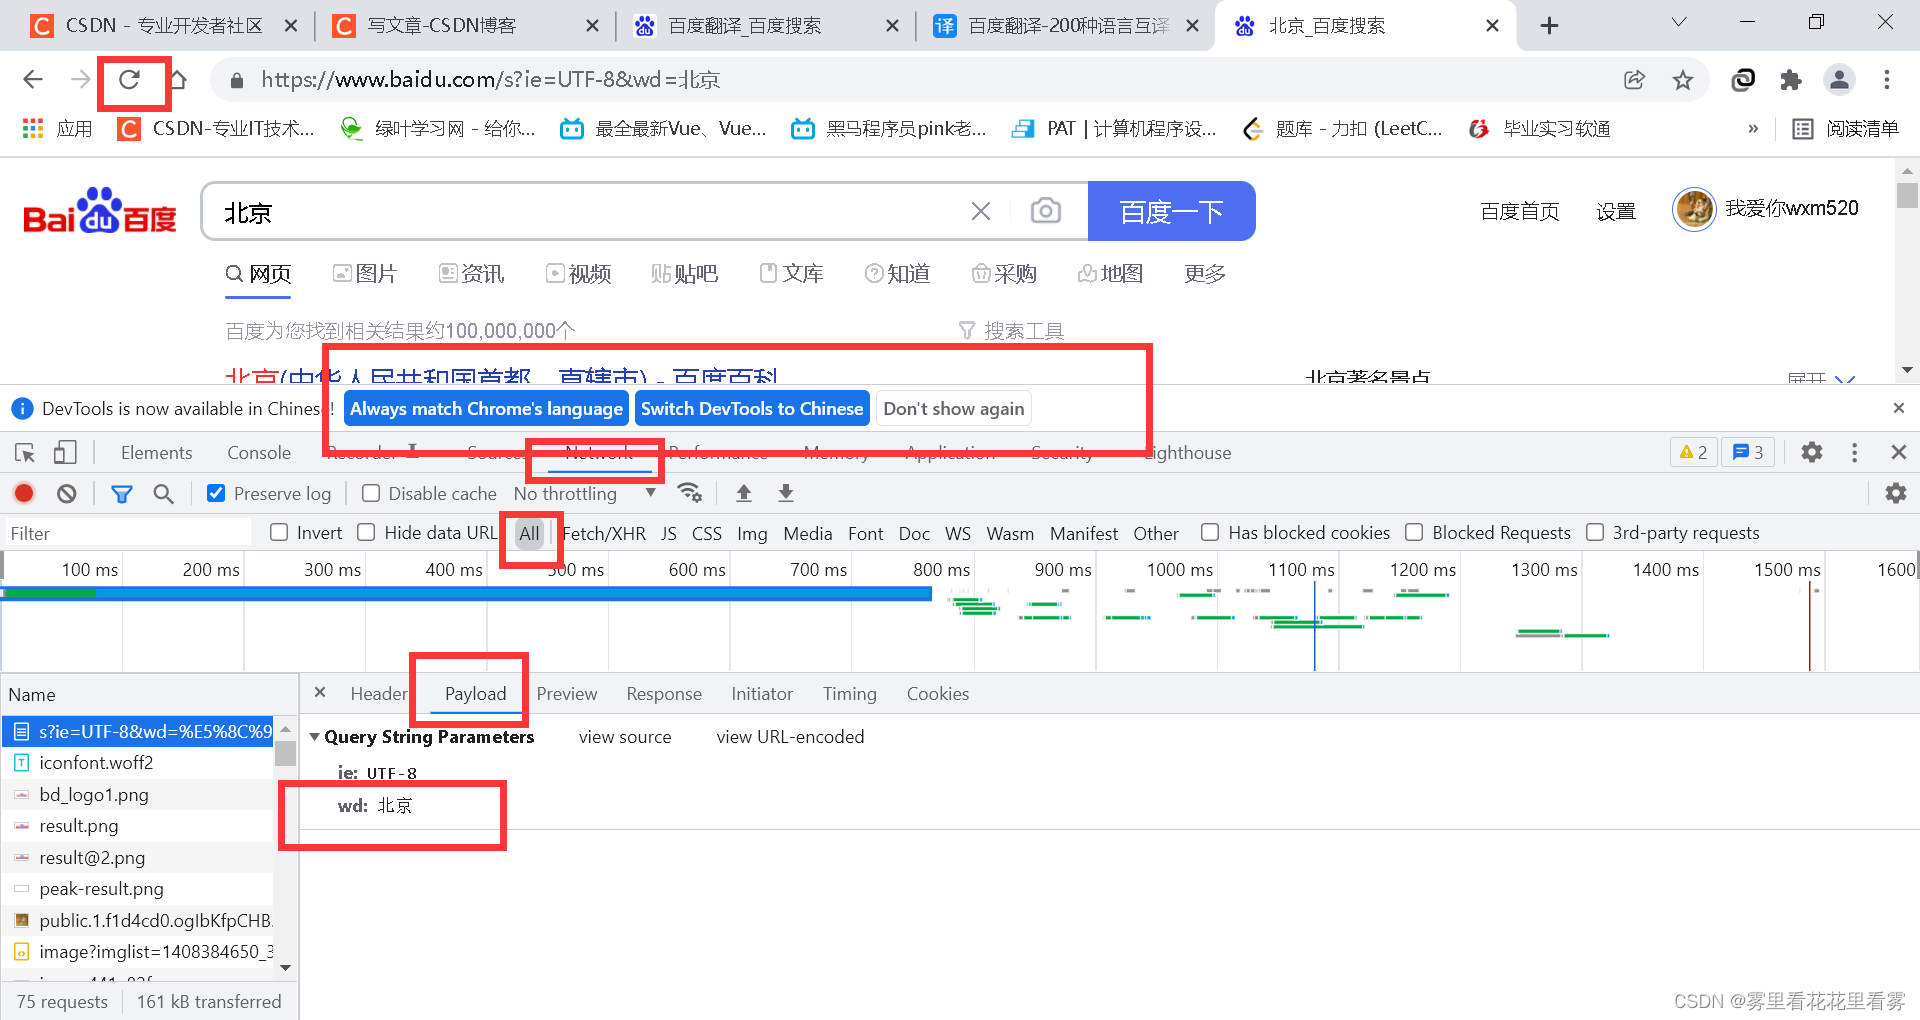
这个地方是我们传递的字典!
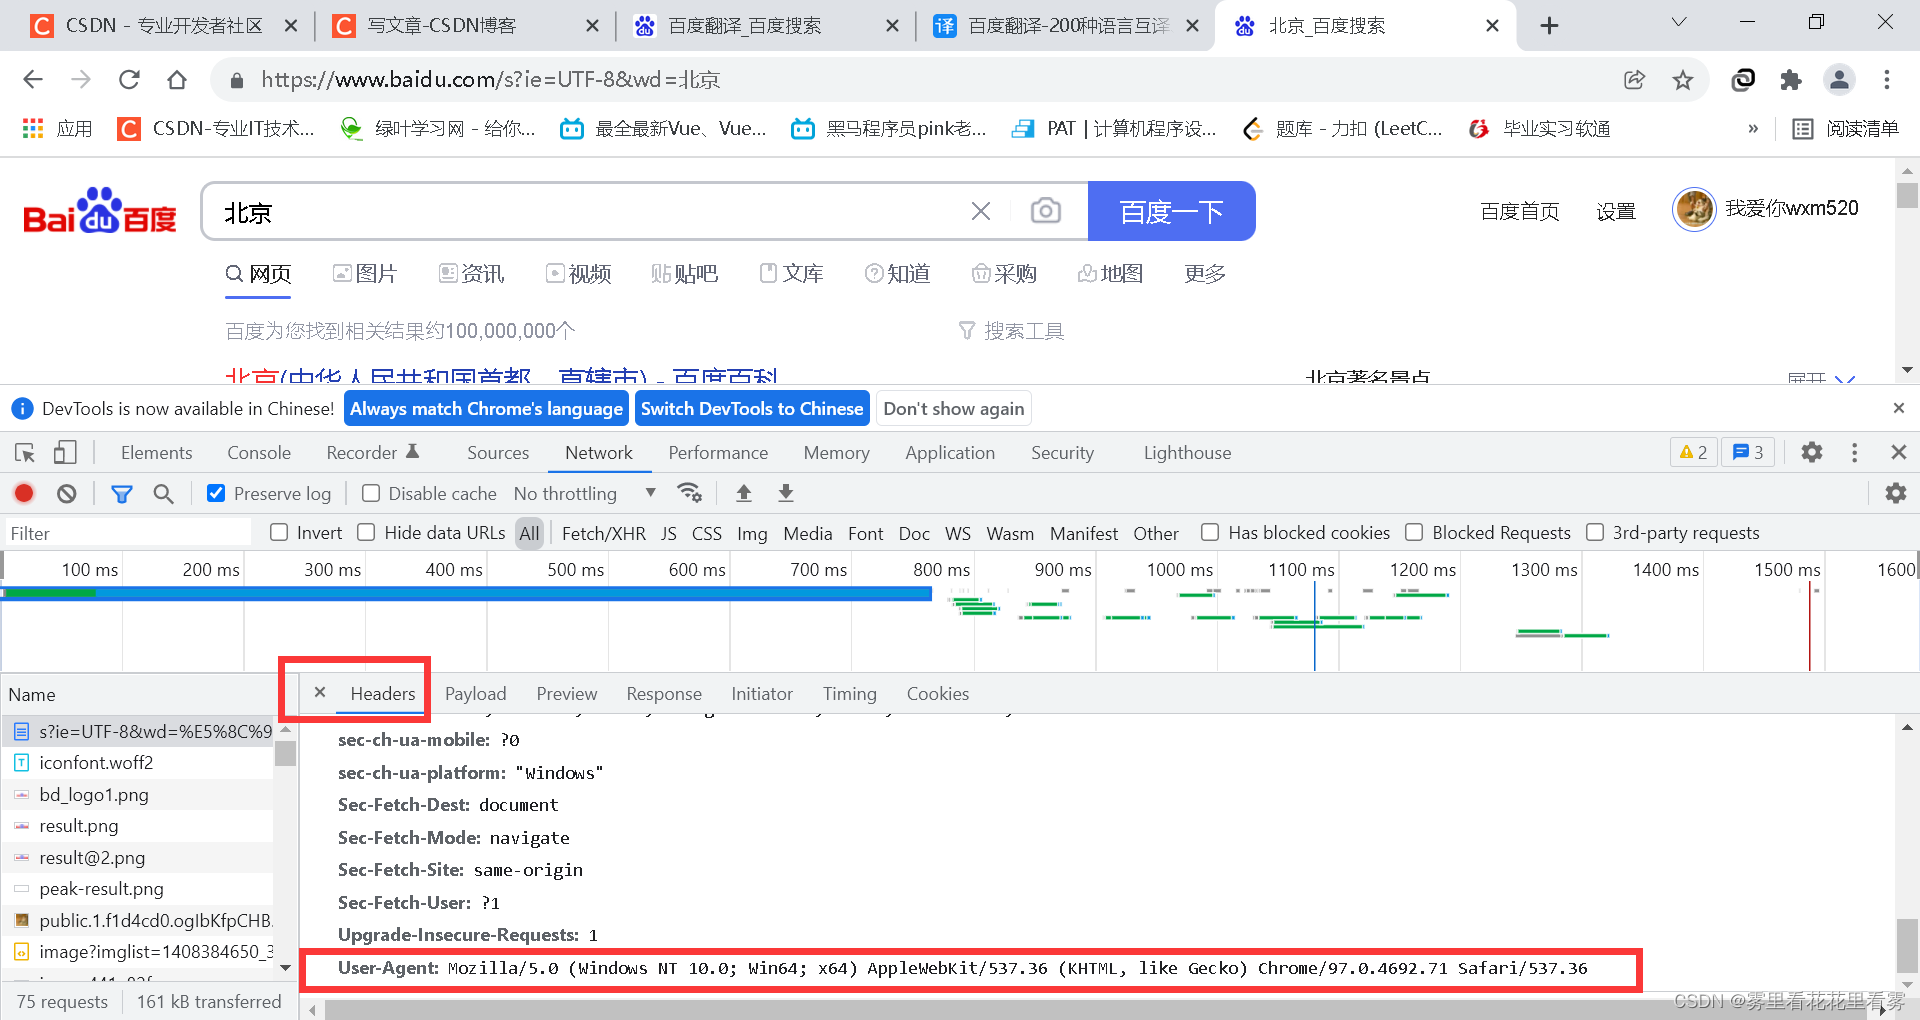
选择下面的user agent,其中有我们的浏览器相关信息。
在上述中,应该注意,由于get的后两个其实都是用python中的字典的形式存储的,所以获取数据后,注意一下格式。
第三步:我们来看看有没有数据,可以在输出地方,使用ctrl + f来搜索验证我们想要的内容在不在。

requests库的post请求
首先将代码写出来,然后根据代码给大家将对应的知识点,算是入门。
import requests

url = "https://fanyi.baidu.com/sug"

headers = {
    'User-Agent': 'Mozilla/5.0 (Windows NT 10.0; Win64; x64) AppleWebKit/537.36 (KHTML, like Gecko) Chrome/97.0.4692.71 Safari/537.36'
}

data = {
    'kw': 'eye'
}

# url请求路径 data请求参数 kwargs字典
response = requests.post(url=url, data=data, headers=headers)

# 参数使用data传递,且参数无需url encode编码 ,且参数也不需要对象定制

print(response.text)
输出结果:
{"errno":0,"data":[{"k":"eye","v":"n. \u773c\u775b; \u89c6\u529b; \u773c\u72b6\u7269; \u98ce\u7eaa\u6263\u6263\u773c vt. \u5b9a\u775b\u5730\u770b; \u6ce8\u89c6; \u5ba1\u89c6; \u7ec6\u770b"},{"k":"Eye","v":"[\u4eba\u540d] \u827e; [\u5730\u540d] [\u82f1\u56fd] \u827e\u4f0a"},{"k":"EYE","v":"abbr. European Year of the Environment \u6b27\u6d32\u73af\u5883\u5e74; Iwas"},{"k":"eyed","v":"adj. \u6709\u773c\u7684"},{"k":"eyer","v":"n. \u6ce8\u89c6\u7684\u4eba"}]}
第一步:首先来看requests库的post方法使用及参数含义。
response = requests.post(url=url, data=data, headers=headers)
这里的参数和get方法还有点不同,我们想看详细的话可以这样看,在pycharm中选中方法,即可看到提示。
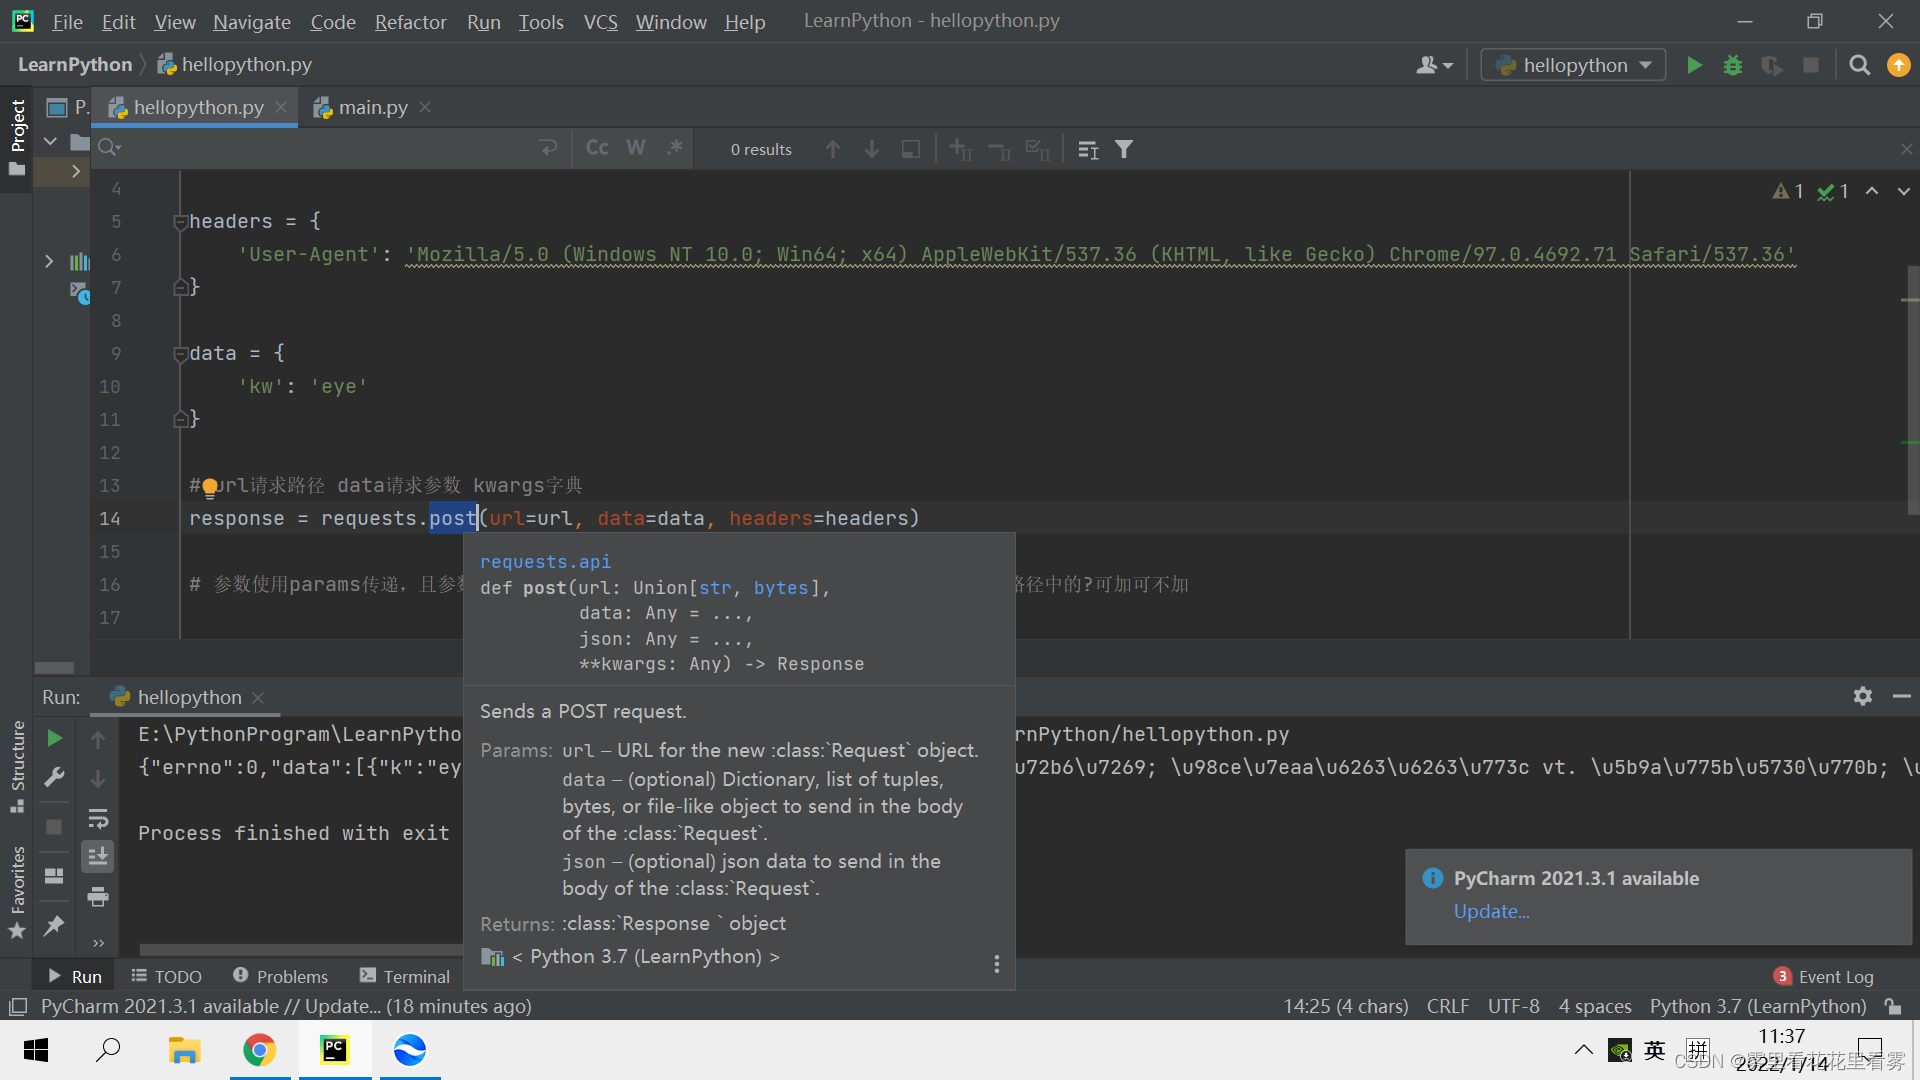
url表示的是请求路径,data表示的是请求参数,kwargs表示的是字典。
其实难点在于怎么找这个url奥!!即哪一个是我们想要的url!!下面以百度翻译为例!!
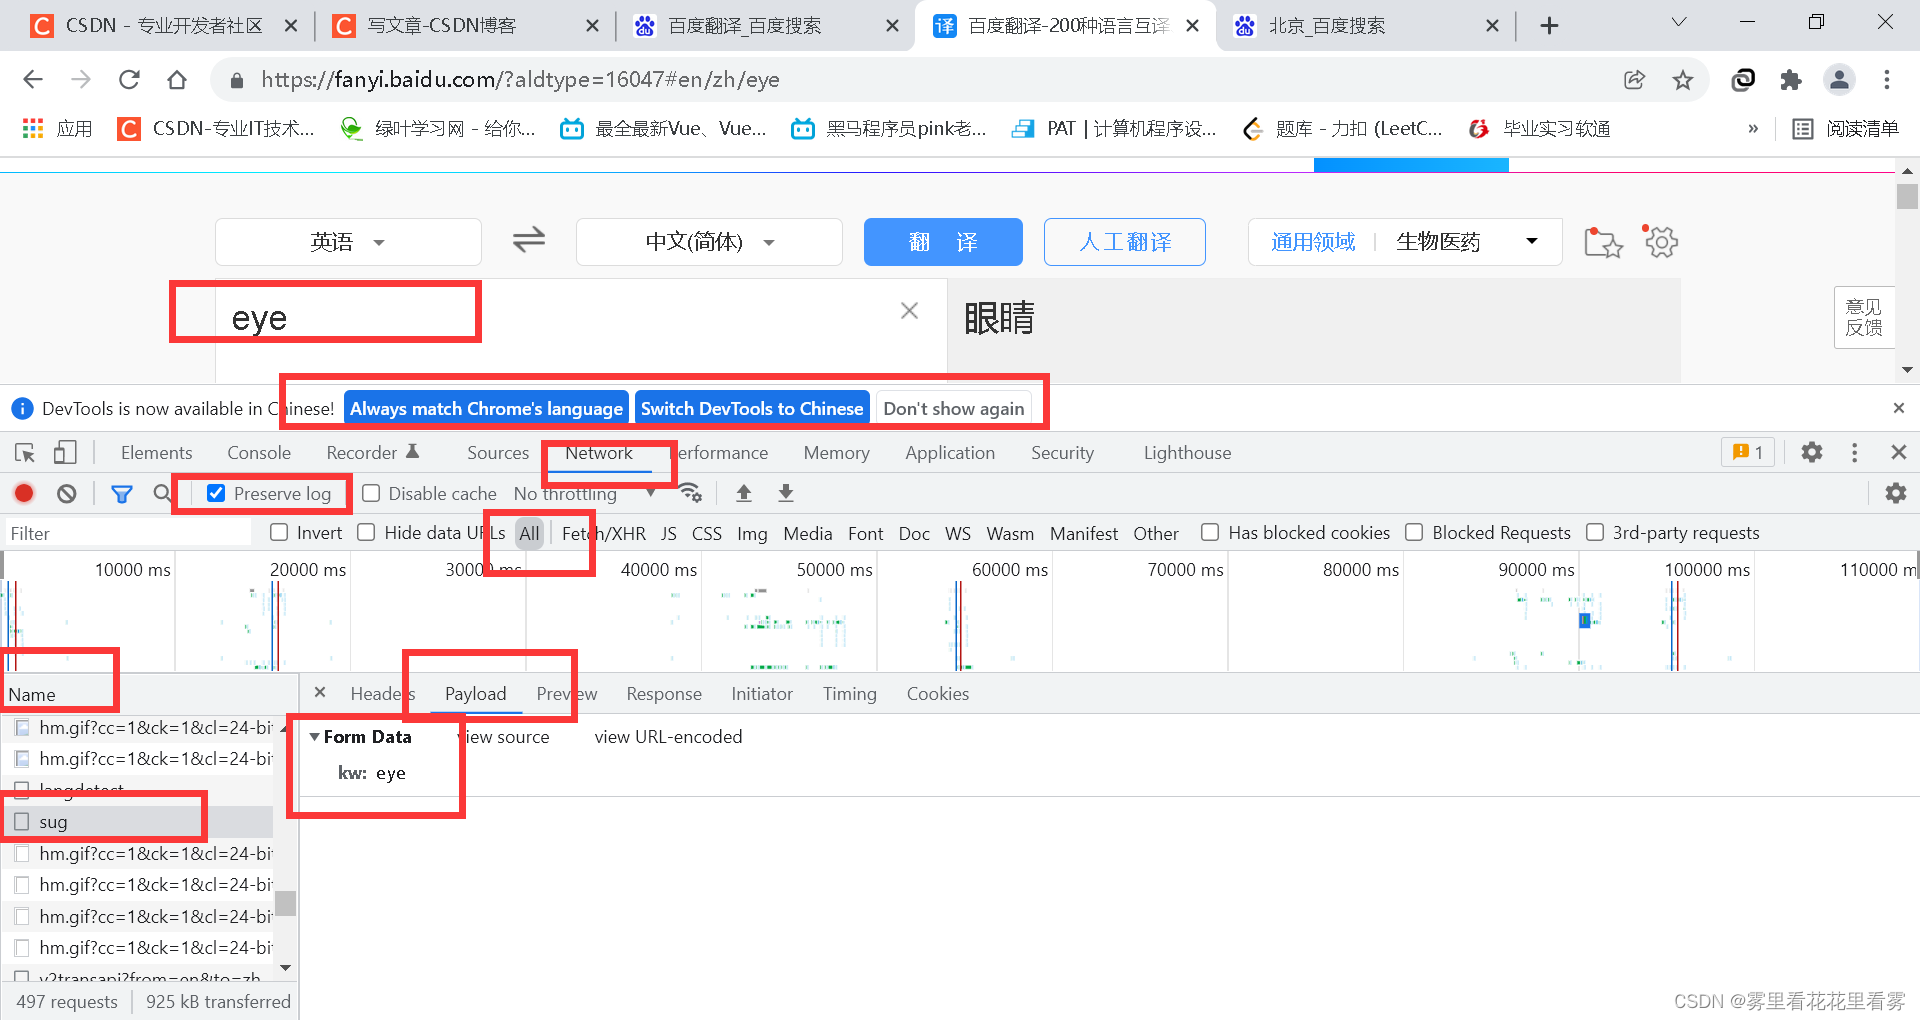
我圈起来的这些地方,一定要注意,选中Preserve log!!
就在左边的Name中找,如果其对应的这个PayLoad中的kw和我们搜索的一致,那就是的啦!!!
第二步,可能返回的数据我们也看不懂,那就转换成json的格式来看就行啦!!
import requests
import json

url = "https://fanyi.baidu.com/sug"

headers = {
    'User-Agent': 'Mozilla/5.0 (Windows NT 10.0; Win64; x64) AppleWebKit/537.36 (KHTML, like Gecko) Chrome/97.0.4692.71 Safari/537.36'
}

data = {
    'kw': 'eye'
}

# url请求路径 data请求参数 kwargs字典
response = requests.post(url=url, data=data, headers=headers)

obj = json.loads(response.text, encoding='utf-8')

print(obj)
输出结果:
{'errno': 0, 'data': [{'k': 'eye', 'v': 'n. 眼睛; 视力; 眼状物; 风纪扣扣眼 vt. 定睛地看; 注视; 审视; 细看'}, {'k': 'Eye', 'v': '[人名] 艾; [地名] [英国] 艾伊'}, {'k': 'EYE', 'v': 'abbr. European Year of the Environment 欧洲环境年; Iwas'}, {'k': 'eyed', 'v': 'adj. 有眼的'}, {'k': 'eyer', 'v': 'n. 注视的人'}]}
requests库的代理
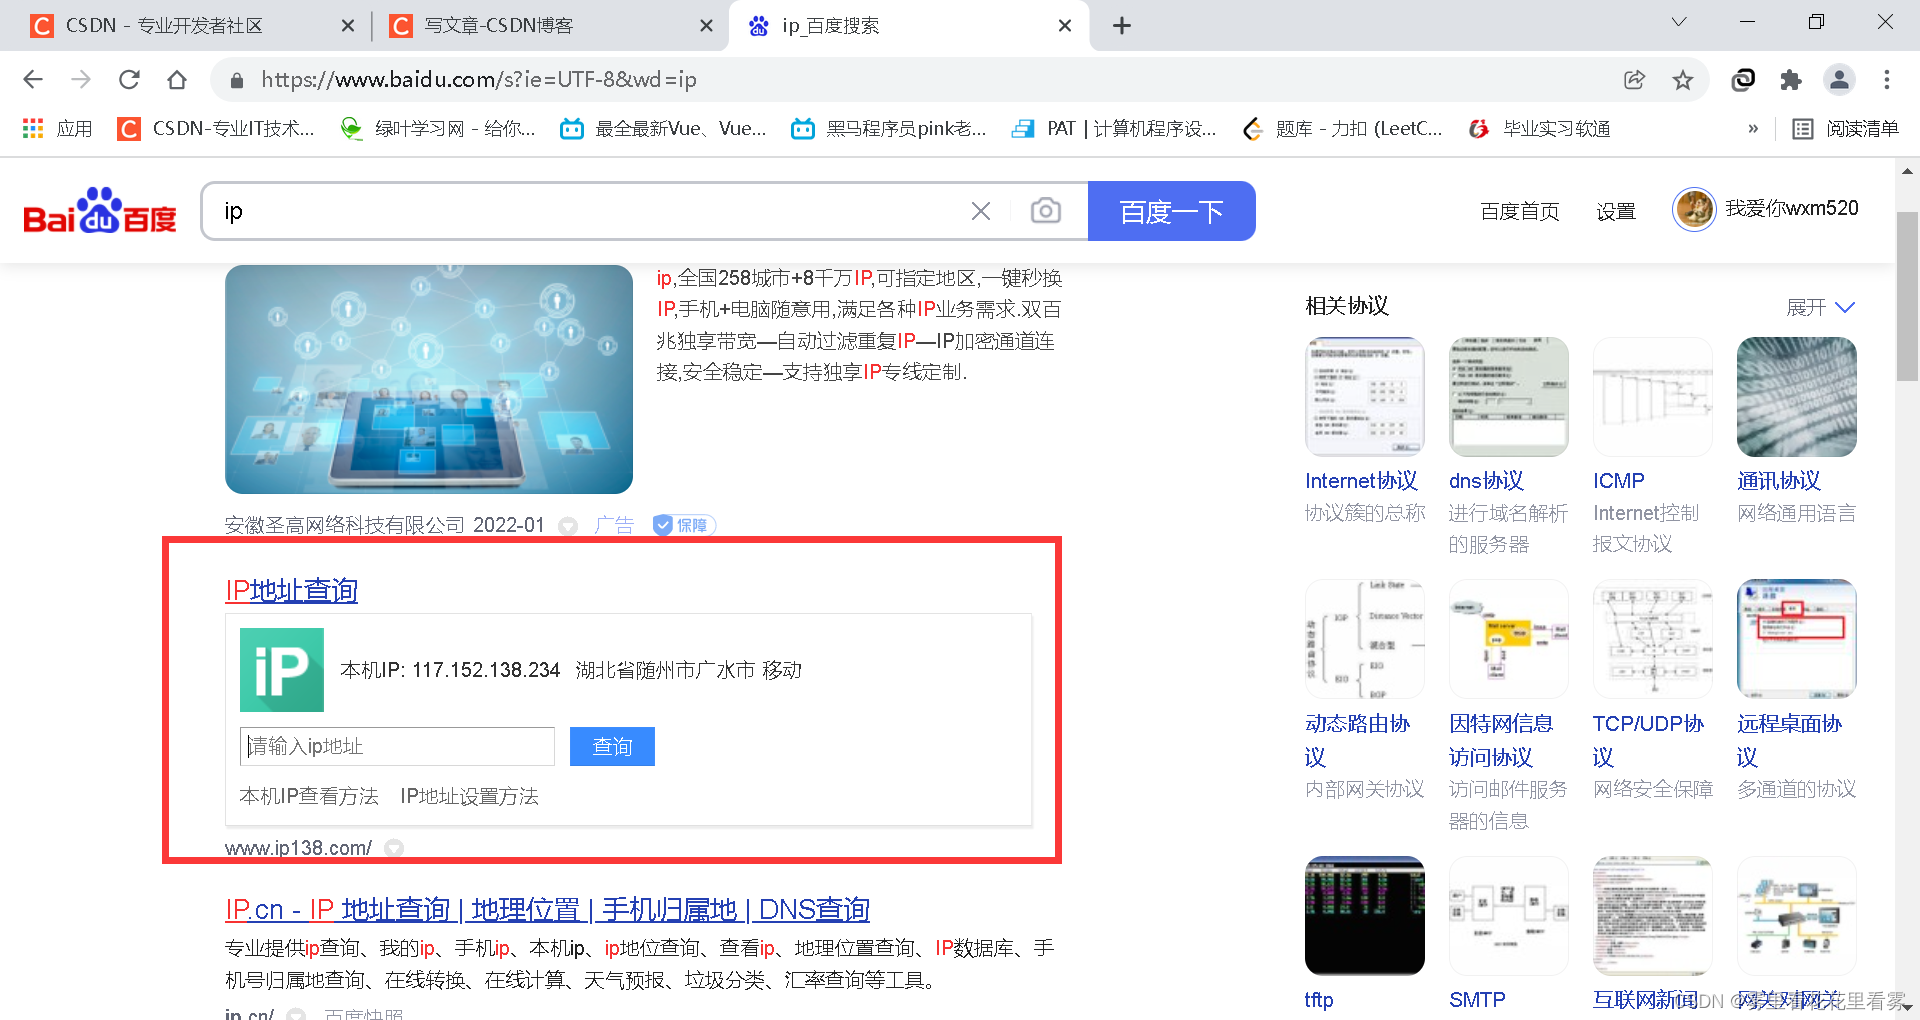
代理主要处理的是,我们在模拟浏览器给服务器发送请求的时候,我们高速的快速的高频次的访问某个网站,那样的话网站会崩溃的,所以会把我们的ip封掉,那我们怎么办呢?换ip地址就好啦!
import requests
url = "https://www.baidu.com/s?"
headers = {
'User-Agent': 'Mozilla/5.0 (Windows NT 10.0; Win64; x64) AppleWebKit/537.36 (KHTML, like Gecko) Chrome/97.0.4692.71 Safari/537.36'
}
data = {
'wd': 'ip'
}
response = requests.get(url=url, params=data, headers=headers)
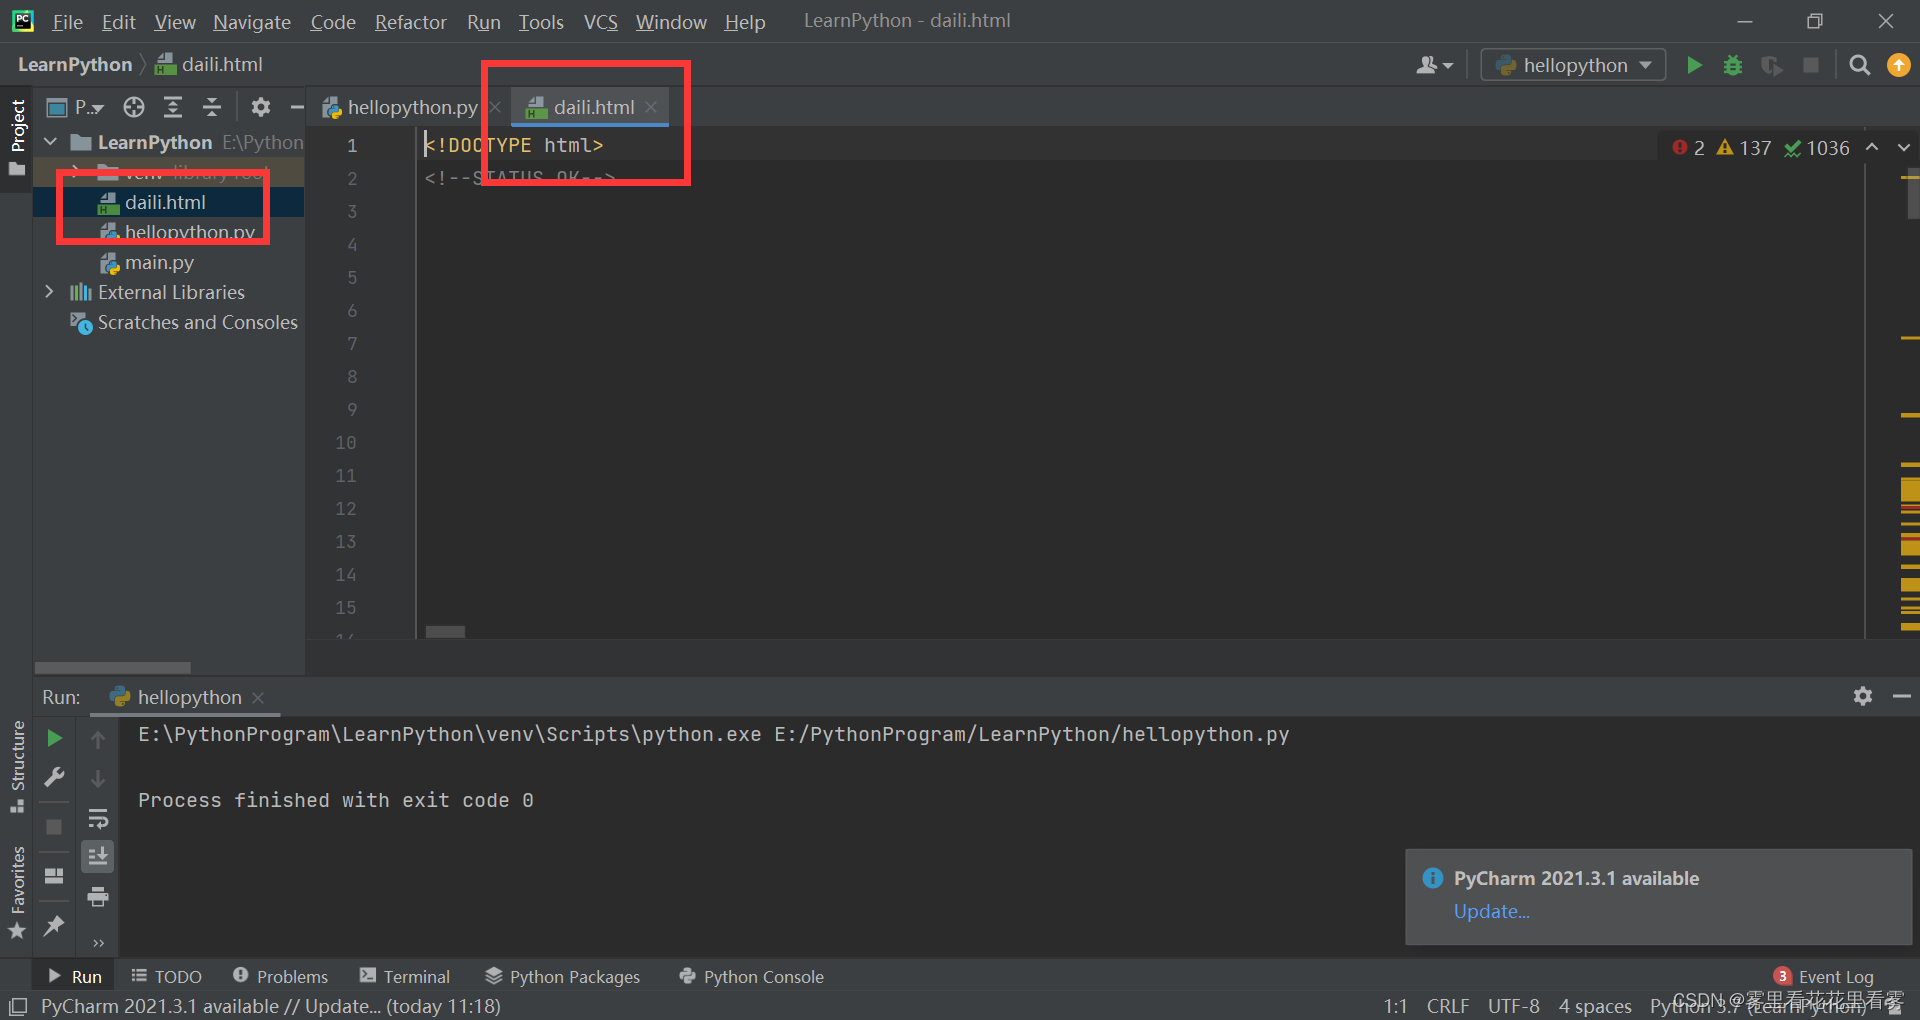
with open('daili.html', 'w', encoding='utf-8') as fp:
fp.write(response.text)
就会发现写了这个文件!
requests库的cookie
我们是以古诗文网为例!
我们现在想要实现的功能就是,不用登录,直接进入内部的页面。
# 通过登录进入主页面

# 通过找登录接口 我们发现需要的参数很多
"""
__VIEWSTATE: 9Y4yHRQS2k2z739MJJ/8Z0sKfZNltkFId83Z8jCtY3g00xYgg9bsv5oK+KT5DypNl37KWa0IyB+uOwrRPBvTybqGLDdd0chyrWLxhhlHBeAGWL/SLTGYfOh5L1M=
__VIEWSTATEGENERATOR: C93BE1AE
from: http://so.gushiwen.cn/user/collect.aspx
email: 13237153218
pwd: wxm20010428
code: PDBG
denglu: 登录
"""

# 我们观察到__VIEWSTATE __VIEWSTATEGENERATOR code是一个可以变化的量

# __VIEWSTATE __VIEWSTATEGENERATOR 看不到的数据一般都是在页面的源码中
# 我们观察到其在页面源码中 所以我们需要获取页面源码 然后进行解析就可以获取了
# code是验证码


import requests

# 登录url页面

url = 'https://so.gushiwen.cn/user/login.aspx?from=http://so.gushiwen.cn/user/collect.aspx'
headers = {
    'User-Agent': 'Mozilla/5.0 (Windows NT 10.0; Win64; x64) AppleWebKit/537.36 (KHTML, like Gecko) Chrome/97.0.4692.71 Safari/537.36'
}
response = requests.get(url=url, headers=headers)
# print(response.text)

# 解析页面源码 然后获取__VIEWSTATE __VIEWSTATEGENERATOR

from bs4 import BeautifulSoup

soup = BeautifulSoup(response.text, 'lxml')

# 获取__VIEWSTATE
viewstate = soup.select('#__VIEWSTATE')[0].attrs.get('value')

# 获取__VIEWSTATEGENERATOR
viewstategenerator = soup.select('#__VIEWSTATEGENERATOR')[0].attrs.get('value')

# print(viewstate)
# print(viewstategenerator)

# 获取验证码图片

code = soup.select('#imgCode')[0].attrs.get('src')
# print(code)

code_url = 'https://so.gushiwen.cn' + code

# print(code_url)

# 获取验证码的图片后 下载到本地 然后观察验证码 观察之后 然后在控制台输入这个验证码 就将这个值给code
# 怎么下载???

# import urllib.request
# 此处和后面的请求不是同一个请求 验证码就变了
# urllib.request.urlretrieve(url=code_url, filename='code.jpg')
# request里面有一个方法session() 通过session的返回值就能使请求变成一个对象
session = requests.session()
response_code = session.get(code_url)
# 注意此处使用二进制数据 因为我们要是图片的下载
content_code = response_code.content

with open('code.jpg', 'wb') as fp:
    fp.write(content_code)

code_name = input('请输入验证码:')

# 点击登录

url_post = 'https://so.gushiwen.cn/user/login.aspx?from=http%3a%2f%2fso.gushiwen.cn%2fuser%2fcollect.aspx'

data_post = {
    '__VIEWSTATE': viewstate,
    '__VIEWSTATEGENERATOR': viewstategenerator,
    'from': 'http://so.gushiwen.cn/user/collect.aspx',
    'email': '13237153218',
    'pwd': 'wxm20010428',
    'code': code_name,
    'denglu': '登录',
}

response_post = session.post(url=url_post, headers=headers, data=data_post)

with open('gushiwen.html', 'w', encoding='utf-8') as fp:
    fp.write(response_post.text)
首先我们打开这个古诗文网的登录页面(假设已经都注册过了),现在我们要输入正确的账号,错误的密码,正确的验证码,点击登录,但是在提示后不要点击确定,否则页面会跳转,然后抓到这个登录所需要的参数。
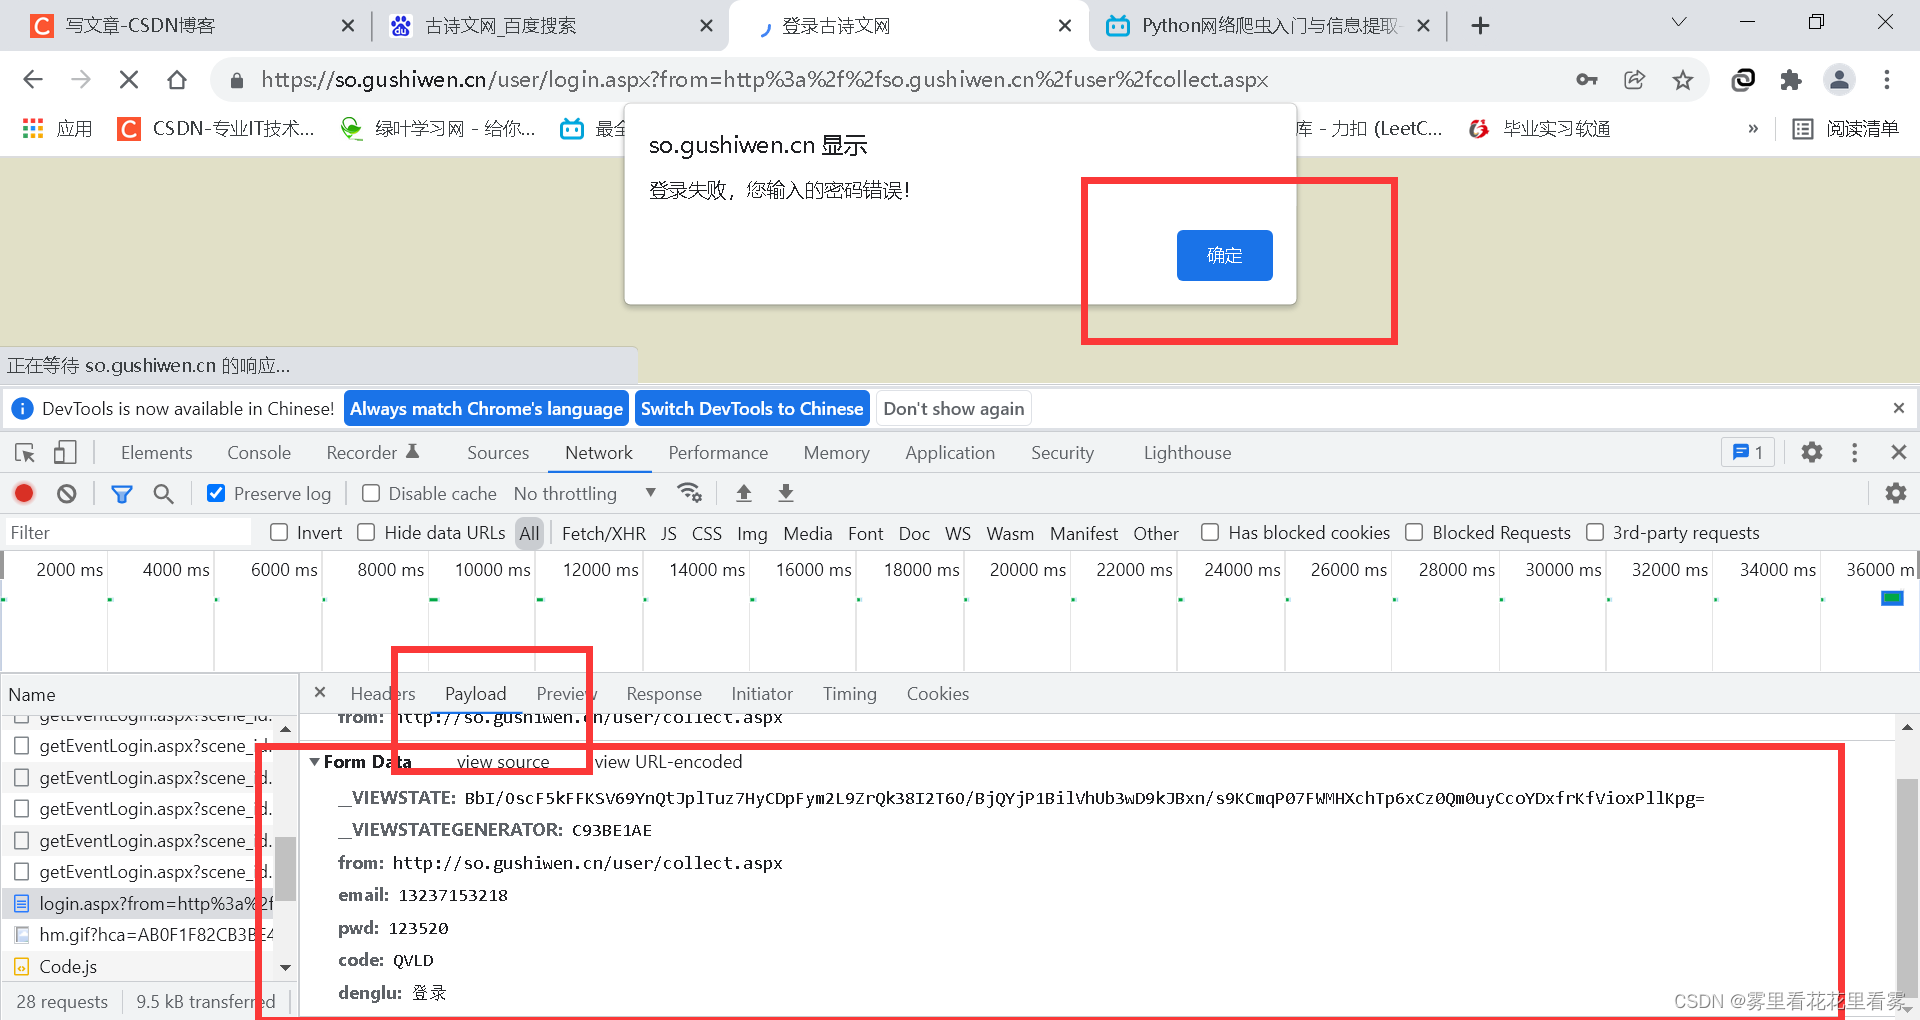
观察参数后,先找到变化的参数,再试图去获取变化的参数,而且一般这种看不见的参数,一般就是在源码中,我们点击查看源码,然后ctrl+F搜索看不见的参数,找到其位置。
然后我们模拟浏览器给服务器发送请求,获取网页源代码后,使用bs4解析源代码,然后相应变化的参数后,再发送请求即可!
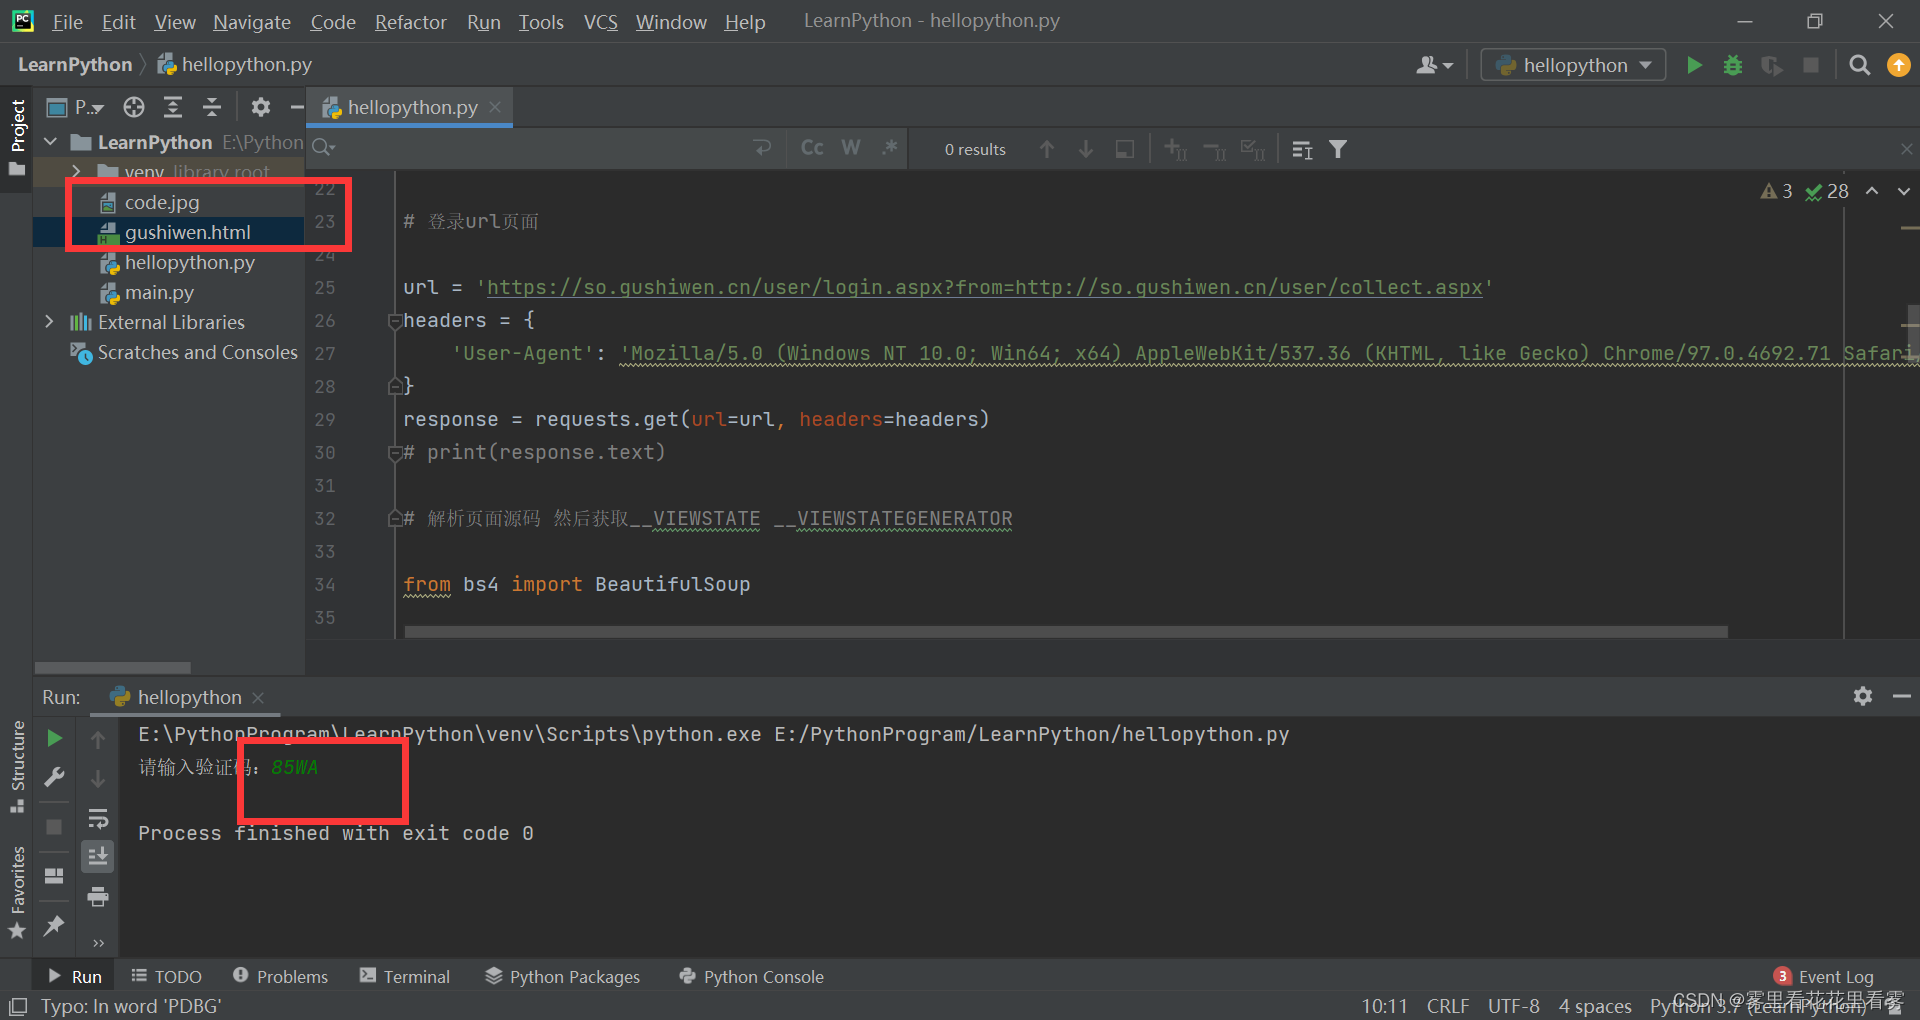
此处会生成两个文件,并且code.jpg,在运行的时候如果加载不出来,那就去项目的文件夹中查找。
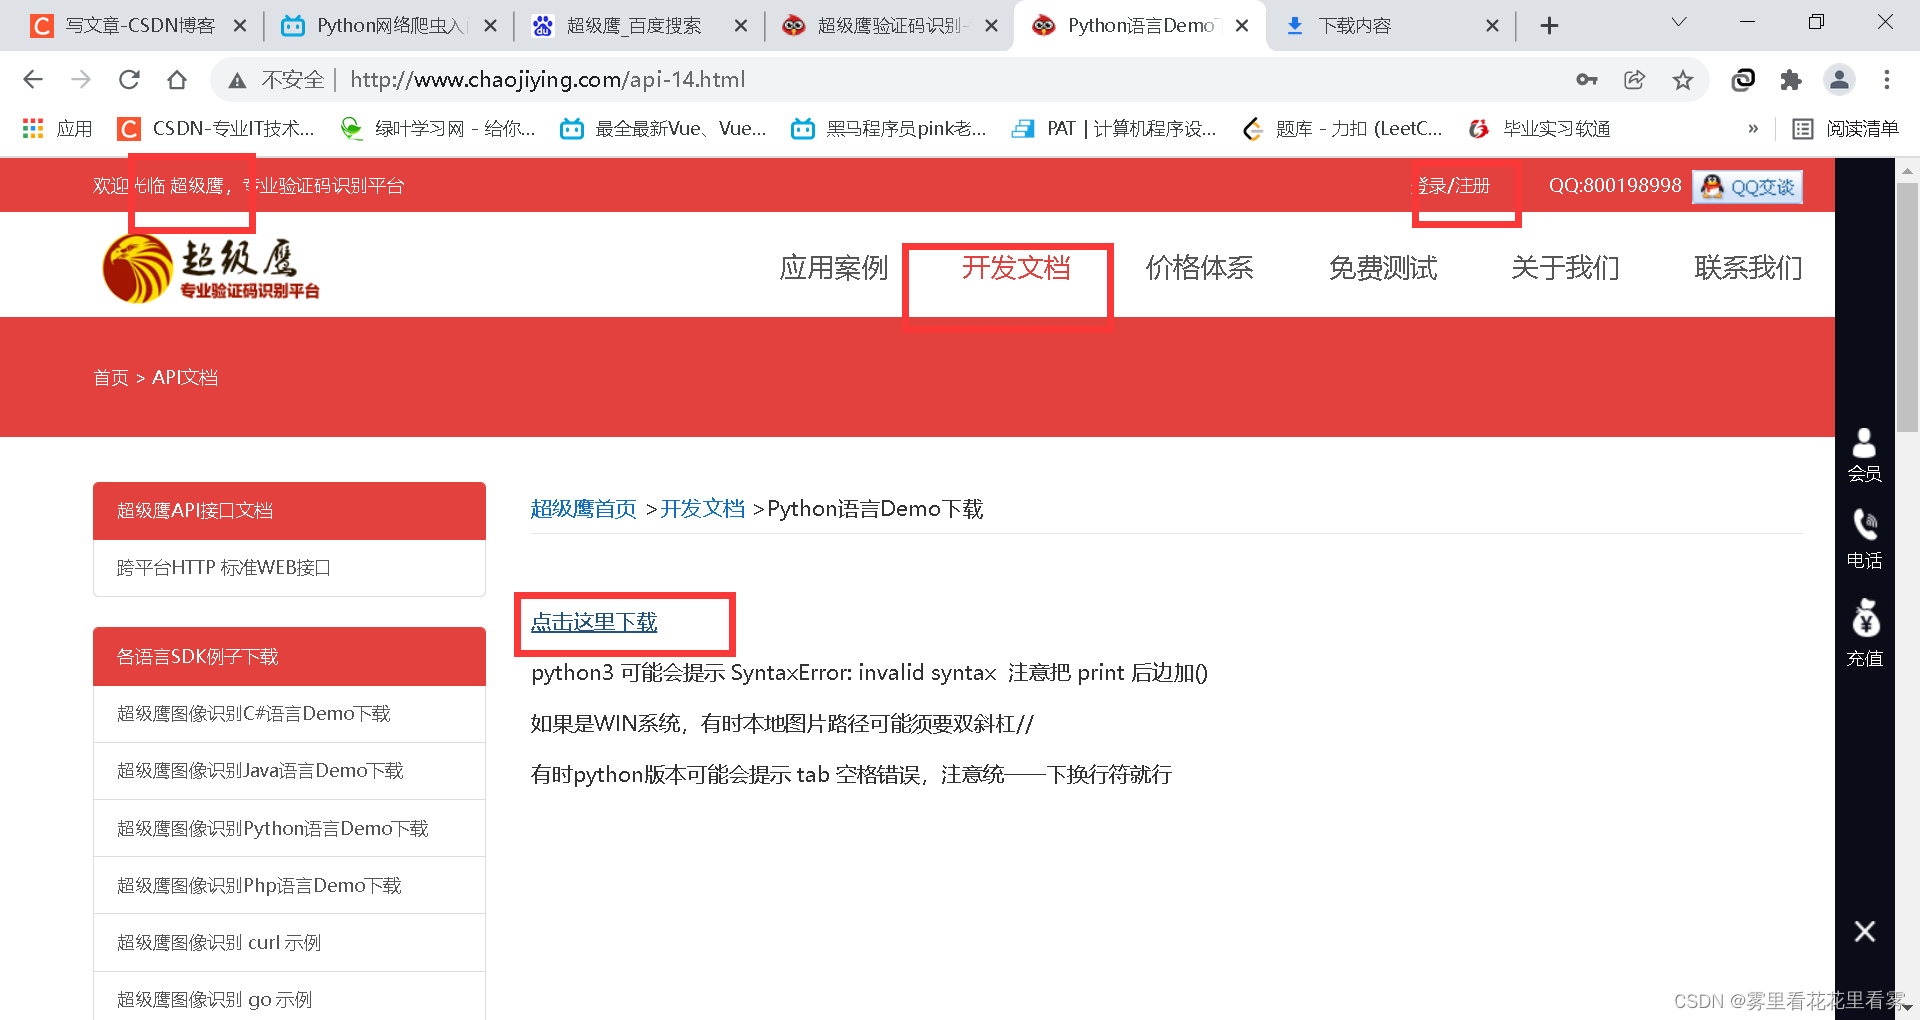
自动识别验证码
超级鹰!下载python开发文档,并且将.py和一个图片复制到项目中!
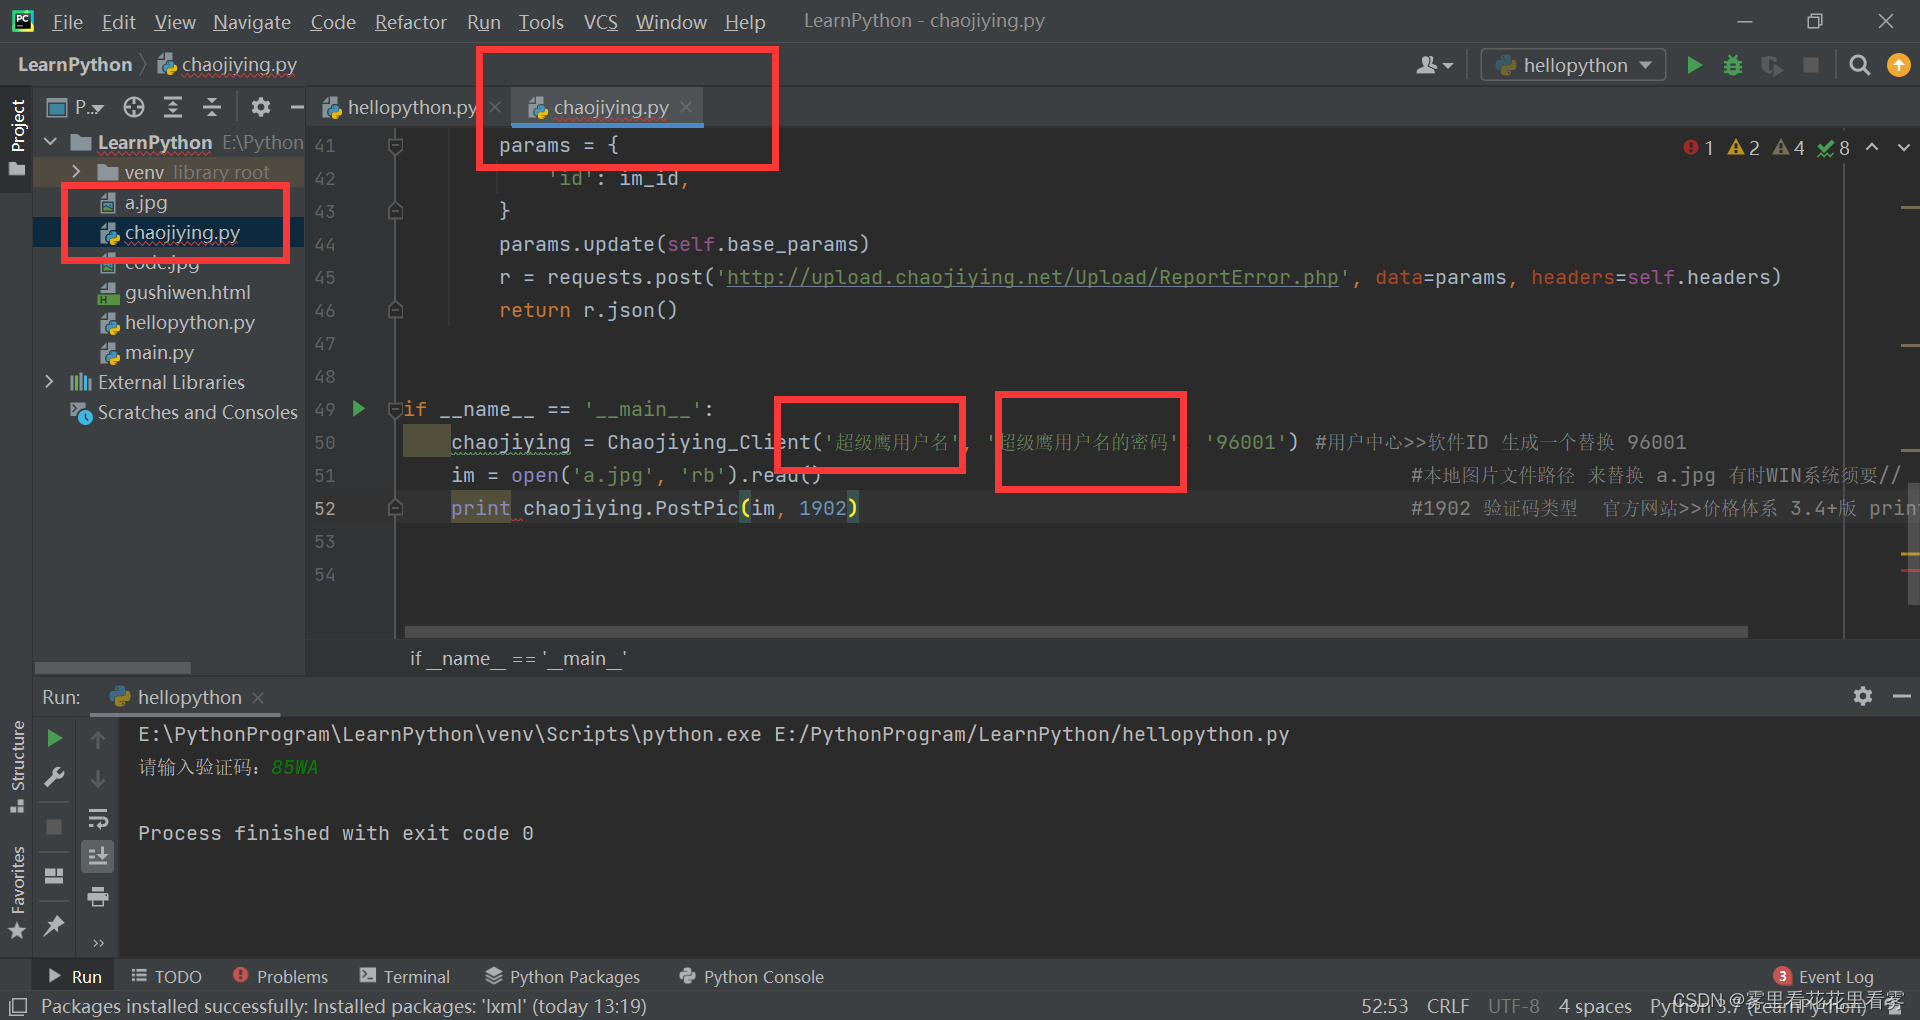
打开后,看一下.py文件,更改用户名和密码上去!
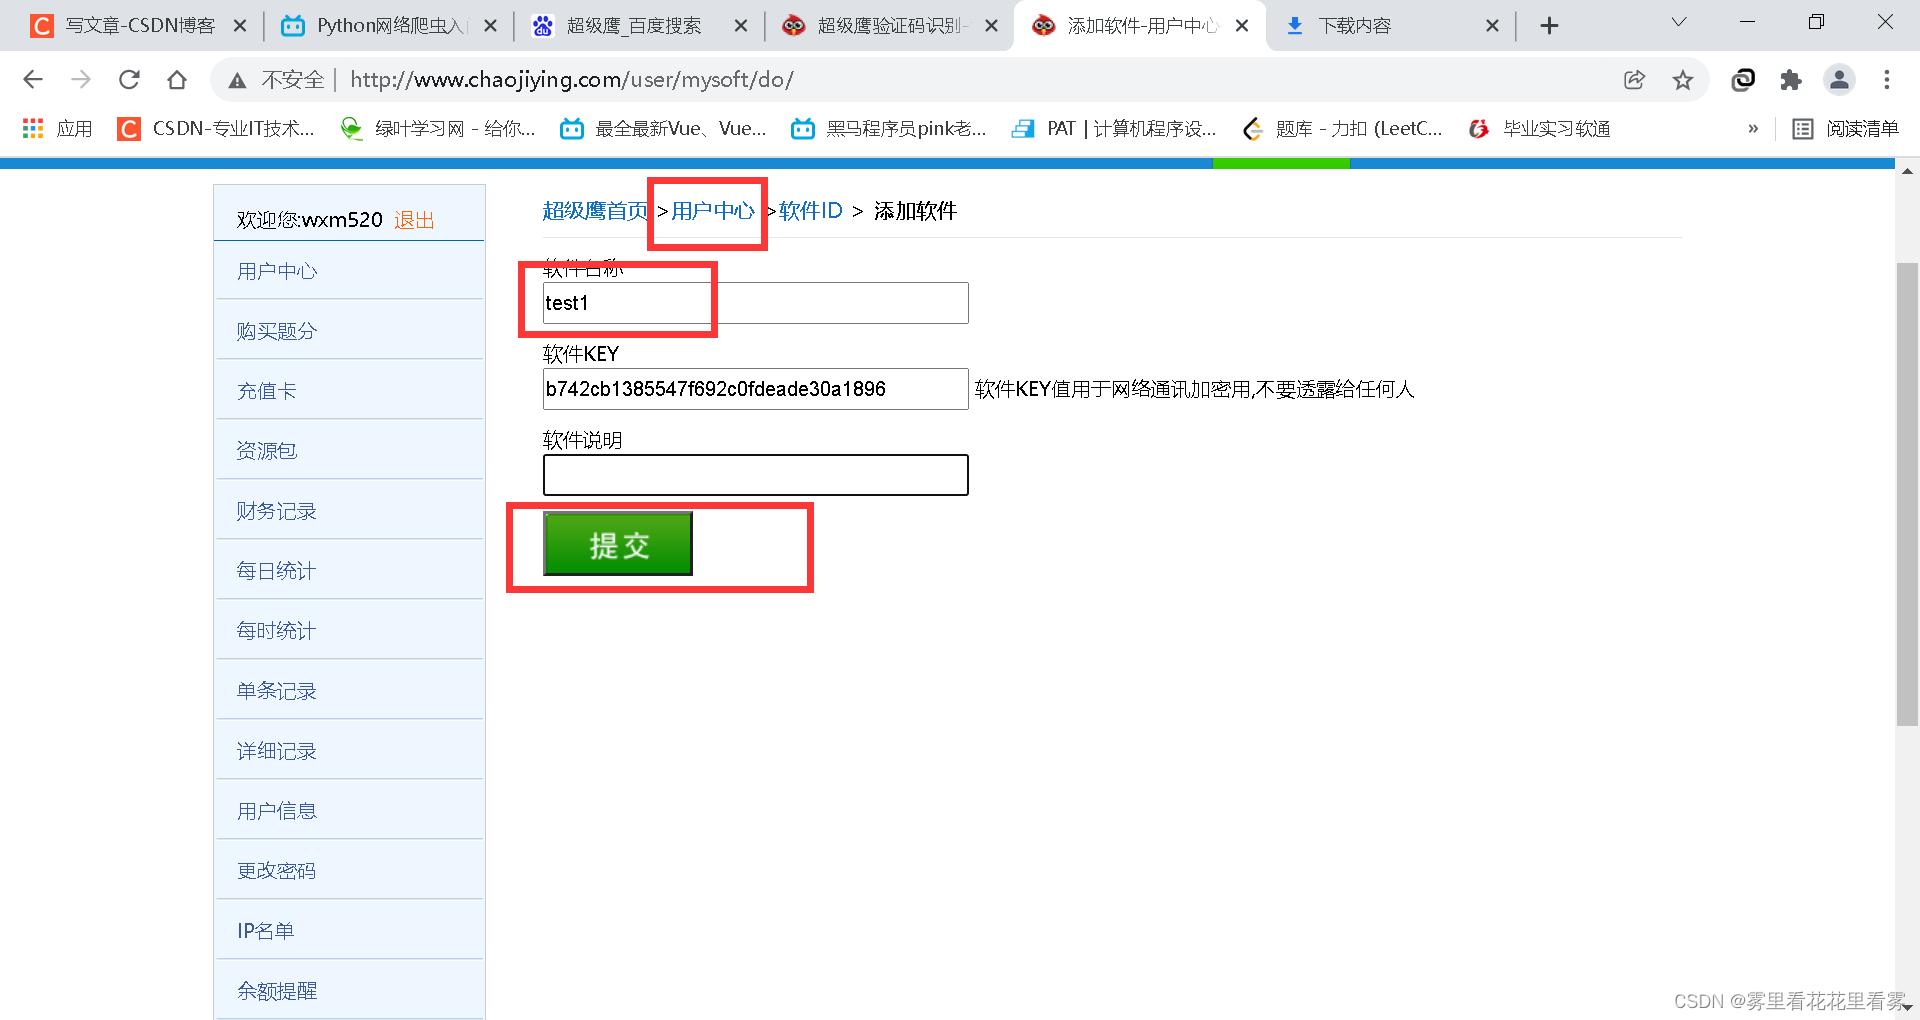
根据其中的提示更改这个用户ID
但是由于我没有充钱,没给我返回哈哈哈哈哈!
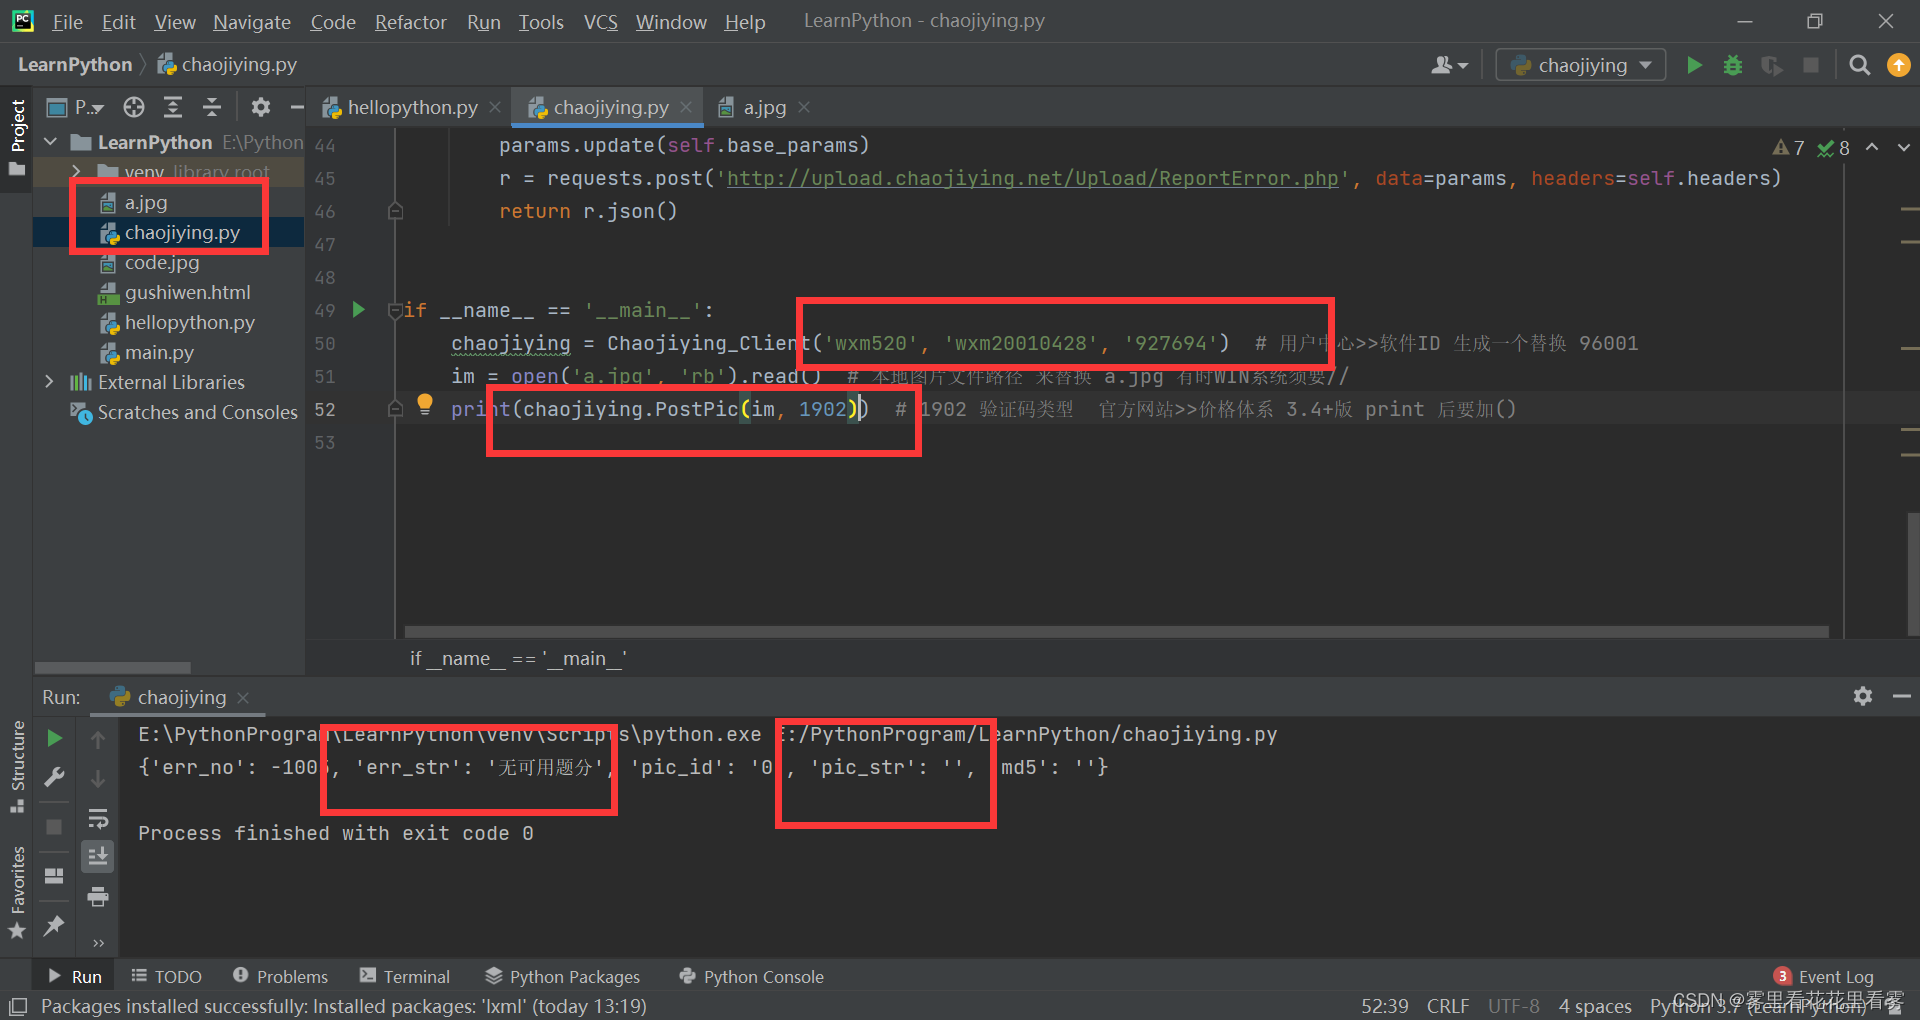
大家可以去第三方平台搞验证码识别平台!!


 219
219


 被折叠的 条评论
为什么被折叠?
被折叠的 条评论
为什么被折叠?
 到【灌水乐园】发言


