


一、目的
因学习需要,使用Java进行Arcgis二次开发。当前对arcgis进行二次开发使用的语言基本是C#,使用Java对Arcgis进行二次开发的很少。于是使用java在idea上进行Arcgis二次开发,给入门的同学做参考,我自己也处于入门阶段,有错漏的地方也请大佬赐教。
二、准备
1.idea2017.3.7
2.jdk1.8.0_131_32
3.Arcobjects10.2的jar包
4.Arcobjects java api文档
5.官方示例代码
说明:开发所使用的jdk必须为32位的,Arcobjects的jar包,.Arcobjects java api文档和官方示例代码均在安装Arcgis for Desktop和Arcobjects Sdk for Java后可以找得到,具体可见
链接: https://blog.csdn.net/qq_43792037/article/details/123568082.
三、操作
3.1 创建一个普通的Java项目
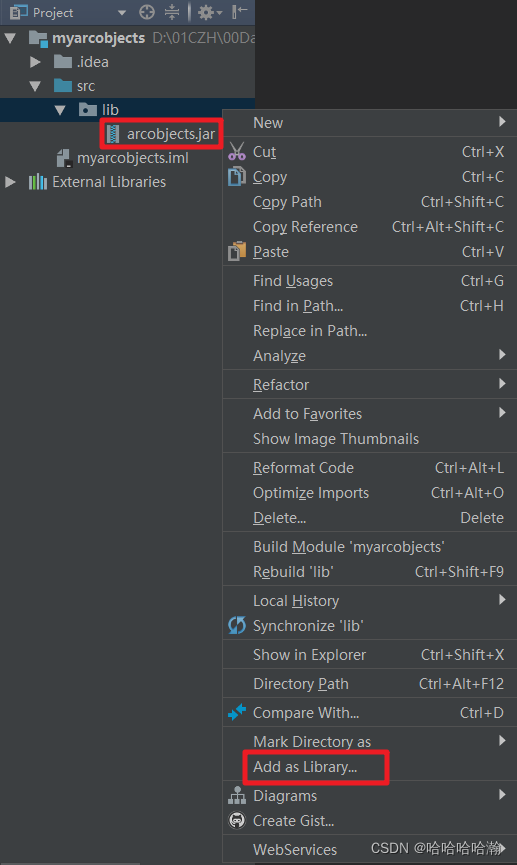
3.2 添加依赖
将Arcobjects.jar添加到项目依赖中
3.3 新建一个GIS应用程序类
3.3.1 创建一个类AppView
public class AppView extends JFrame {

    JPanel mainPanel = null;// 主面板
    JPanel rightPanel = null;// 右侧面板
    MapBean mapBean = null;// 地图组件
    ToolbarBean toolbarBean = null;// 工具栏
    IToolbarPalette toolbarPalette = null;// 右键工具菜单
    TOCBean tocBean = null;// 图层

    public AppView() throws Exception {
        // 界面名字
        setTitle("arcObjects二次开发");
        // 创建界面
        buildFrame();
        // 设置大小
        setSize(900,600);
        // 初始化toolbar
        initToolBar();
        // 设置关闭界面即停止程序
        setDefaultCloseOperation(JFrame.EXIT_ON_CLOSE);
        // 设置界面可被看见
        setVisible(true);
    }
}
3.3.2 添加initToolBar方法,初始化工具栏
    private void initToolBar() {
        try {
            tocBean.setBuddyControl(mapBean);
            toolbarBean.setBuddyControl(mapBean);

            // 设置图层可以移动
            tocBean.setEnableLayerDragDrop(true);

            // 对toolbarPalette菜单添加按钮
            toolbarPalette = new ToolbarPalette();
            toolbarPalette.addItem(new ControlsSelectTool(), 0, -1);// 选择
            toolbarPalette.addItem(new ControlsNewCircleTool(), 0, -1);// 画⚪
            toolbarPalette.addItem(new ControlsNewCurveTool(), 0, -1);// 曲线
            toolbarPalette.addItem(new ControlsNewEllipseTool(), 0, -1);// 椭圆
            toolbarPalette.addItem(new ControlsNewLineTool(), 0, -1);// 线
            toolbarPalette.addItem(new ControlsNewPolygonTool(), 0, -1);// 多边形
            toolbarPalette.addItem(new ControlsNewRectangleTool(), 0, -1);// 矩形
            toolbarPalette.addItem(new ControlsNewFreeHandTool(), 0, -1);// 任意线
            toolbarPalette.addItem(new ControlsEditingEditTool(), 0, -1);// 编辑

            // 按钮,0,-1,是否开始分组,组间间隔,是否在按钮旁边显示文字
            toolbarBean.addItem(new ControlsOpenDocCommand(),0,-1,true,0,esriCommandStyles.esriCommandStyleIconOnly);// 添加打开文件按钮
            toolbarBean.addItem(new ControlsMapZoomInTool(),0,-1,true,0,esriCommandStyles.esriCommandStyleIconOnly);// 放大
            toolbarBean.addItem(new ControlsMapZoomOutTool(),0,-1,false,0,esriCommandStyles.esriCommandStyleIconOnly);// 缩小
            toolbarBean.addItem(new ControlsMapFullExtentCommand(),0,-1,false,0,esriCommandStyles.esriCommandStyleIconOnly);// 全图
            toolbarBean.addItem(new ControlsMapPanTool(),0,-1,false,0,esriCommandStyles.esriCommandStyleIconOnly);// 拖拽
            toolbarBean.addItem(new ControlsSelectFeaturesTool(), 0, -1, true, 0, esriCommandStyles.esriCommandStyleIconOnly);// 选择
            toolbarBean.addItem(new ControlsClearSelectionCommand(), 0, -1, false, 0, esriCommandStyles.esriCommandStyleIconOnly);// 清除选择
            toolbarBean.addItem(toolbarPalette,0,-1,true,0,1);
            // 设置toolbar的按钮可移动
//            toolbarBean.setCustomize(true);
        } catch (IOException e) {
            e.printStackTrace();
        }
    }
3.3.3 添加buildFrame方法,初始化窗体
    public void buildFrame() throws Exception {
        // 初始化操作
        EngineInitializer.initializeVisualBeans();
        UIManager.setLookAndFeel(UIManager.getSystemLookAndFeelClassName());
        initializeArcGISLicenses();

        tocBean = new TOCBean();

        // 对右侧面板添加元素
        rightPanel = new JPanel();
        mapBean = new MapBean();
        rightPanel.setLayout(new BorderLayout());
        rightPanel.add(mapBean, BorderLayout.CENTER);

        // 对主面板添加元素
        mainPanel = new JPanel();
        mainPanel.setLayout(new BorderLayout());
        mainPanel.add(tocBean, BorderLayout.WEST);
        mainPanel.add(rightPanel,BorderLayout.CENTER);
        toolbarBean = new ToolbarBean();
        toolbarBean.setSize(650,50);
        mainPanel.add(toolbarBean,BorderLayout.NORTH);
        mainPanel.setBorder(BorderFactory.createEmptyBorder(5,5,5,5));

        getContentPane().add(mainPanel, BorderLayout.CENTER);
    }
3.3.3 添加initializeArcGISLicenses方法,初始化licenses
没有初始化licenses,GIS项目无法运行,这是官方代码,抄就完事了。
    public static void initializeArcGISLicenses() {
        try {
            AoInitialize ao = new AoInitialize();
            if (ao.isProductCodeAvailable(esriLicenseProductCode.esriLicenseProductCodeEngine)
                    == esriLicenseStatus.esriLicenseAvailable)
                ao.initialize(esriLicenseProductCode.esriLicenseProductCodeEngine);
            else if (ao.isProductCodeAvailable(esriLicenseProductCode.esriLicenseProductCodeBasic)
                    == esriLicenseStatus.esriLicenseAvailable)
                ao.initialize(esriLicenseProductCode.esriLicenseProductCodeBasic);
            else if (ao.isProductCodeAvailable(esriLicenseProductCode.esriLicenseProductCodeStandard)
                    == esriLicenseStatus.esriLicenseAvailable)
                ao.initialize(esriLicenseProductCode.esriLicenseProductCodeStandard);
            else if (ao.isProductCodeAvailable(esriLicenseProductCode.esriLicenseProductCodeAdvanced)
                    == esriLicenseStatus.esriLicenseAvailable)
                ao.initialize(esriLicenseProductCode.esriLicenseProductCodeAdvanced);
        } catch (Exception e) {e.printStackTrace();}
    }
3.3.4 添加main方法
public static void main(String[] args) throws Exception {
    AppView view = new AppView();
}
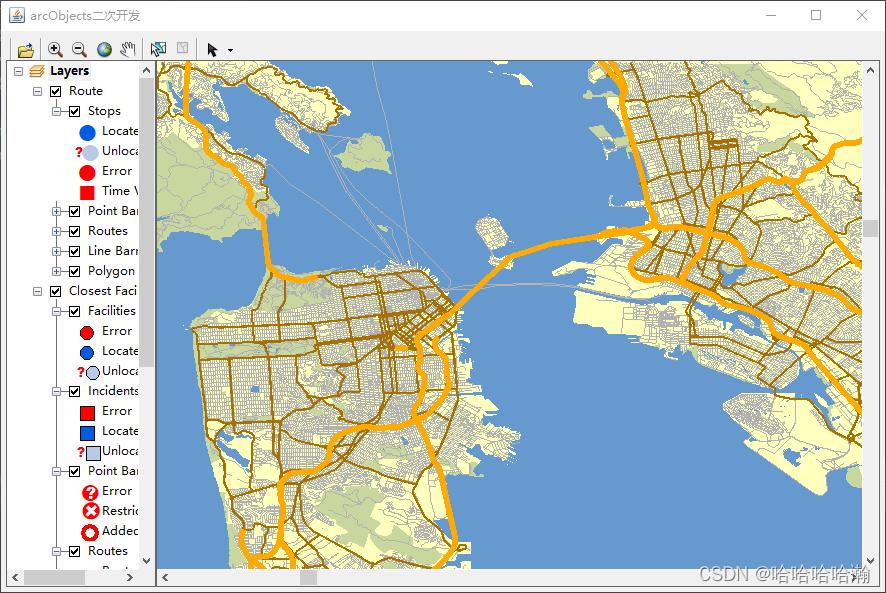
四、结果
大功告成
完整代码可下载: https://download.csdn.net/download/qq_43792037/84999256.


 1379
1379


 被折叠的 条评论
为什么被折叠?
被折叠的 条评论
为什么被折叠?
 到【灌水乐园】发言


