


目录
第 1 步:下载 json 文件导入 ComfyUI 修改并保存 API 格式
第 3 步:修改 generate_image 方法、创建对应变量
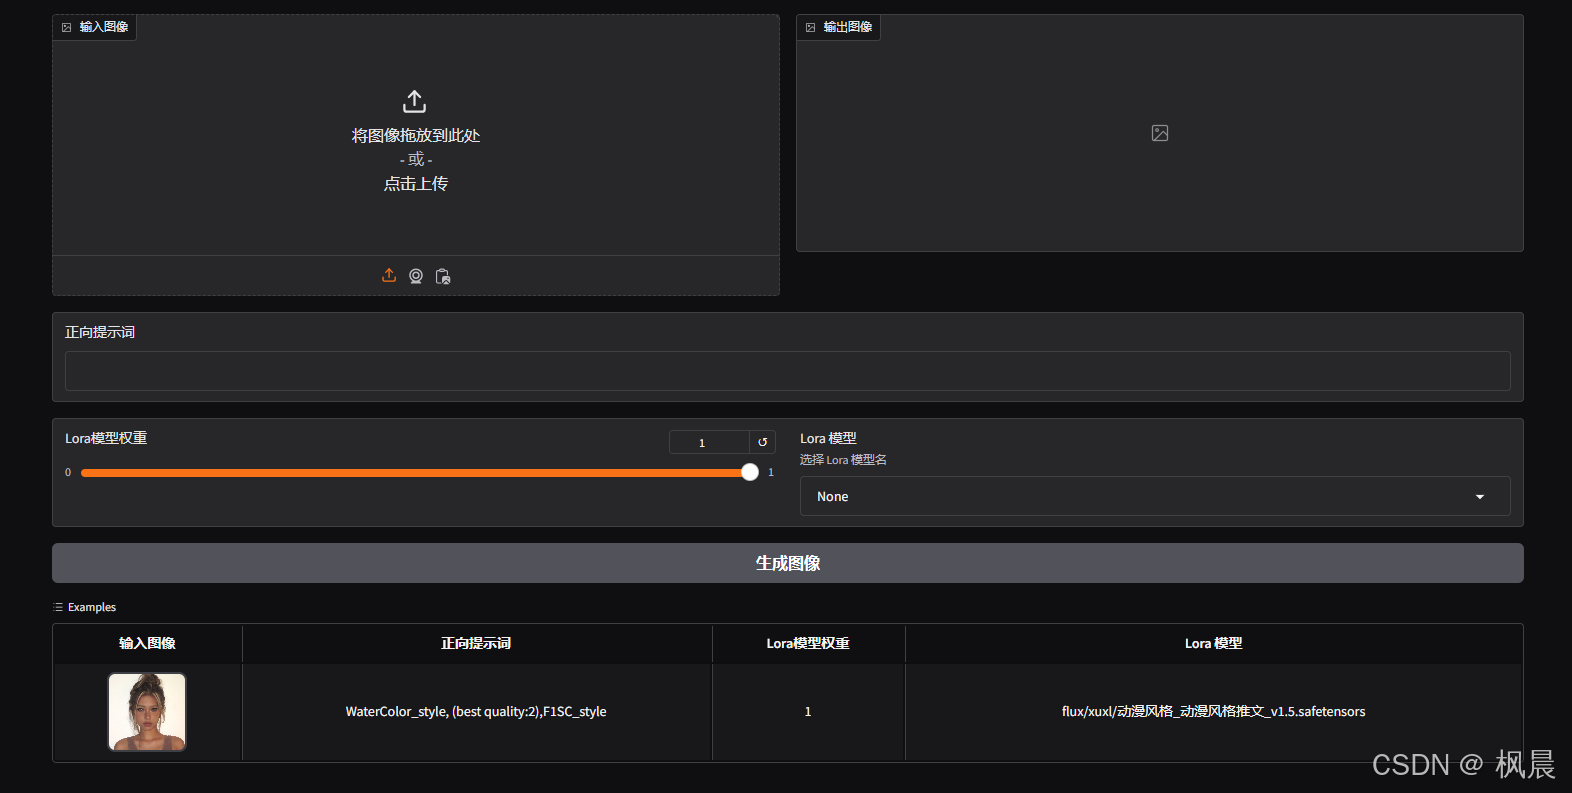
效果图:
环境搭建:
新建终端,启动虚拟环境 ,安装 grdio 依赖项
pip install requests Pillow gradio numpy #安装grdio依赖项源码:
import json
import os
import time
import random
import gradio as gr
import requests
from PIL import Image
cached_seed = 0
PORT_gradio = 4586
img_count = 0
URL = "/prompt"
OUTPUT_DIR = "/ComfyUI/output"
INPUT_DIR = "/ComfyUI/input_api"
workflow = "/comfy-gradio-api/json/AIC.json"
LOADED_MODELS_DIR = "/ComfyUI/models/loras"
def get_available_lora_models():
lora_models = ["None"]
for root, dirs, files in os.walk(LOADED_MODELS_DIR):
for file in files:
if file.endswith('.safetensors'):
relative_path = os.path.relpath(os.path.join(root, file), LOADED_MODELS_DIR)
lora_models.append(relative_path.replace(os.sep, '/'))
return lora_models
def start_queue(prompt_workflow):
p = {"prompt": prompt_workflow}
data = json.dumps(p).encode('utf-8')
requests.post(URL, data=data)
def update_seed(prompt,seed_id,prefix):
global cached_seed
if cached_seed == prompt[f"{seed_id}"]["inputs"]["seed"]:
return get_latest_image_by_prefix(OUTPUT_DIR, f"{prefix}")
cached_seed = prompt[f"{seed_id}"]["inputs"]["seed"]
def preprocess_image(input_image):
# """
# 对输入的图像进行预处理,这里主要是将图像等比例缩放,使其最小边为512像素,
# 返回预处理后的图像对象。
# """
image = Image.fromarray(input_image)
min_side = min(image.size)
scale_factor = 512 / min_side
new_size = (round(image.size[0] * scale_factor), round(image.size[1] * scale_factor))
return image
def save_processed_image(processed_image):
# """
# 保存预处理后的图像到指定目录(INPUT_DIR),处理文件名冲突问题(通过序号递增保证唯一性),
# 返回保存后的图像路径。
# """
global img_count
save_name = f'test_api_{str(img_count).zfill(4)}.jpg'
save_path = os.path.join(INPUT_DIR, save_name)
while os.path.exists(save_path):
img_count += 1
save_name = f'test_api_{str(img_count).zfill(4)}.jpg'
save_path = os.path.join(INPUT_DIR, save_name)
processed_image.save(save_path)
return save_path
def get_latest_image_by_prefix(folder, prefix):
files = os.listdir(folder)
image_files = [f for f in files if f.lower().endswith(('.png', '.jpg', '.jpeg')) and f.startswith(prefix)]
image_files.sort(key=lambda x: os.path.getmtime(os.path.join(folder, x)))
latest_image = os.path.join(folder, image_files[-1]) if image_files else None
return latest_image
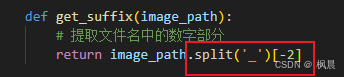
# 提取文件名中的数字部分
def get_suffix(image_path):
return image_path.split('_')[-2]
def wait_for_new_images(*prefixes):
if not prefixes:
raise ValueError("At least one prefix must be provided.")
previous_images = {prefix: get_latest_image_by_prefix(OUTPUT_DIR, prefix) for prefix in prefixes}
previous_counts = {prefix: get_suffix(previous_images[prefix]) for prefix in prefixes}
print("Waiting for new images to be generated...")
while True:
latest_images = {prefix: get_latest_image_by_prefix(OUTPUT_DIR, prefix) for prefix in prefixes}
latest_counts = {prefix: get_suffix(latest_images[prefix]) for prefix in prefixes}
for prefix in prefixes:
print(f"{prefix}_count: {latest_counts[prefix]}")
if latest_counts[prefixes[0]] != previous_counts[prefixes[0]] and all(latest_counts[prefix] == latest_counts[prefixes[0]] for prefix in prefixes):
print("New images detected!")
print("Previous images:", previous_images)
print("Latest images:", latest_images)
return latest_images
time.sleep(1)
def get_example():
return [
["/comfy-gradio-api/example_.jpg", "WaterColor_style, (best quality:2),F1SC_style", 1, "flux/xuxl/动漫风格_动漫风格推文_v1.5.safetensors"]
]
def generate_image(input_image,prompt_text,strength_model,lora_name):
with open(workflow, "r") as file_json:
prompt = json.load(file_json)
prompt["83"]["inputs"]["text"] = prompt_text
prompt["76"]["inputs"]["strength_model"] = strength_model
prompt["76"]["inputs"]["lora_name"] = lora_name
prompt["55"]["inputs"]["seed"] = random.randint(1, 1000000000000000)
processed_image = preprocess_image(input_image)
print("save_path = save_processed_image(processed_image)")
save_path = save_processed_image(processed_image)
# 将保存后的图像路径更新到工作流配置中相应位置(假设'42'节点需要该图像路径,根据实际调整)
prompt["88"]["inputs"]["image"] = save_path
update_seed(prompt,55,"flux_a")
# 启动工作流任务队列
print("start_queue(prompt)")
start_queue(prompt)
output_images=wait_for_new_images("flux_a")
return output_images["flux_a"]
一、generate_image方法代码修改
第 1 步:下载 json 文件导入 ComfyUI 修改并保存 API 格式
打开ComfyUI,导入 json,检查是否是 save Image 节点,并修改保存输出图像的前缀名 gradio/Flux_lora/xxx
注意:xxx 需要区别与其他重命名文件,例如文件中有 flux_a 前缀命名的图片,xxx 不能只是 flux,要取名为区别与 flux_a 的 flux_b,否则读取的图片会乱。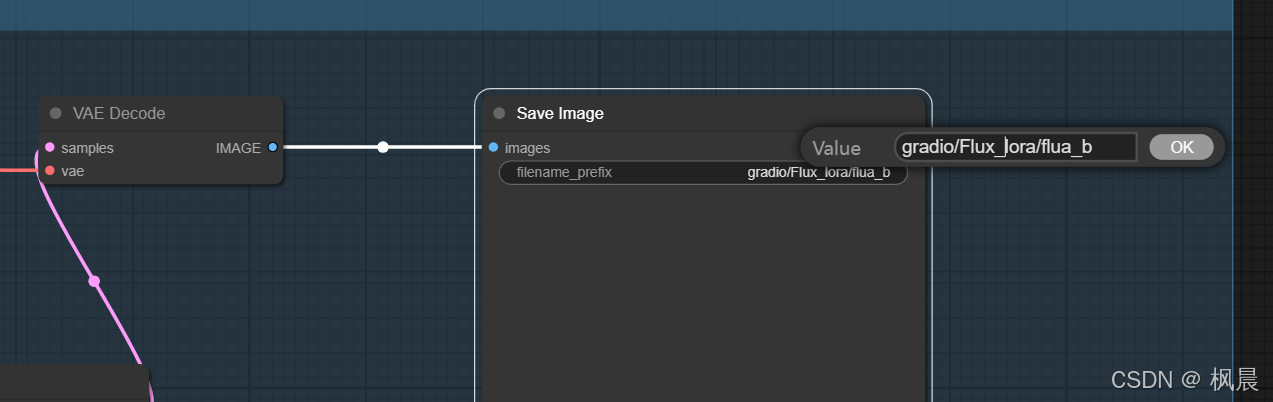
第 2 步:将 API 格式的 json 保存到服务器,修改URL,workflow等参数
URL:ComfyUI启动地址
INPUT_DIR:ComFyUI 上传图片存放地址
OUTPUT_DIR:图像输出地址
workflow:工作流json保存地址
LOADED_MODELS_DIR:模型保存地址
URL = "/prompt"
OUTPUT_DIR = "/ComfyUI/output"
INPUT_DIR = "/ComfyUI/input_api"
workflow =  "/comfy-gradio-api/json/AIC_.json"
LOADED_MODELS_DIR = "/ComfyUI/models/loras"
第 3 步:修改 generate_image 方法、创建对应变量
1、加入开放的变量参数,对应修改即可,记得加入形参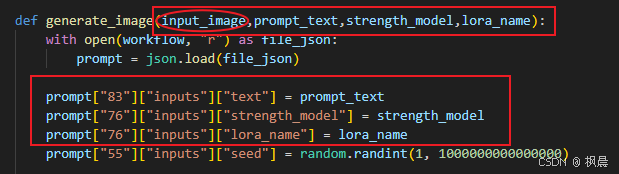

注意:如果是文生图,删掉 input_image 和下列 4 行图像处理保存代码即可。
图生图则保留,并修改输入图像对应的 API 号,多图输入时再加 4 行即可。
processed_image = preprocess_image(input_image)
# 保存预处理后的图像,并处理文件名冲突问题,获取保存路径
print("save_path = save_processed_image(processed_image)")
save_path = save_processed_image(processed_image)
# 将保存后的图像路径更新到工作流配置中相应位置(假设'42'节点需要该图像路径,根据实际调整)
prompt["12"]["inputs"]["image"] = save_path
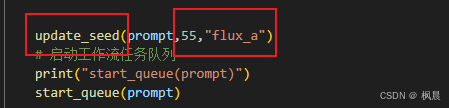
2、seed 种子刷新
大部分情况是都要加的,没有就会一直输出同一张图,找到工作流 json 中对应的 seed 的号码,这里是 55,并修改,输出文件的前缀,flux_b。有的工作流 json 里面可能没有 seed 选项,删掉这行代码即可
3、修改生1图还是生多图
(1)、生成一张图片时,修改一个前缀
修改代码为:
output_images=wait_for_new_images("flux_a")
return output_images["flux_a"]
(2)、生成多张图片时,修改返回值加入多个前缀,注意要返回 list
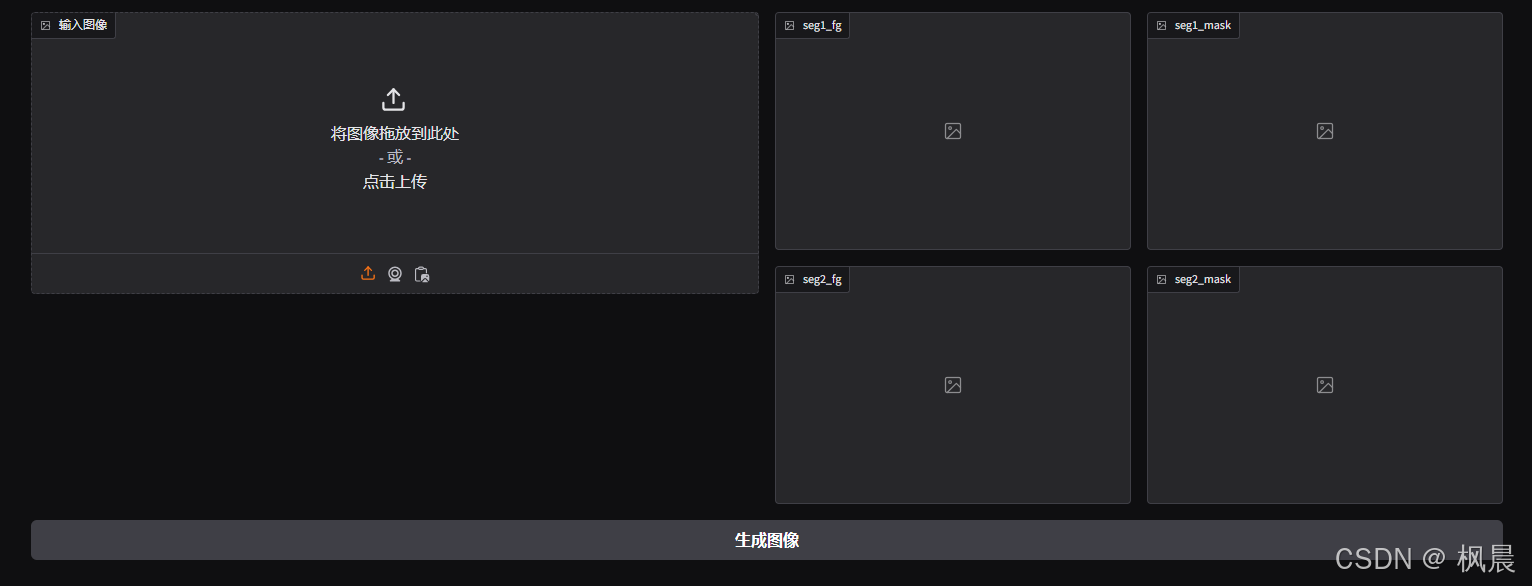
修改代码为:
output_images = wait_for_new_images("seg1_fg", "seg1_mask", "seg2_fg","seg2_mask")
    output_images_list = [output_images[prefix] for prefix in ["seg1_fg", "seg1_mask", "seg2_fg", "seg2_mask"]]
    return tuple(output_images_list)
二、gradio界面修改
def create_gradio_interface():
with gr.Blocks() as demo:
with gr.Row():
# 图像输入组件和输出图像组件保持平行
with gr.Column(scale=1):
image_input = gr.Image(label="输入图像", type="numpy")
with gr.Column(scale=1):
output_image = gr.Image(label="输出图像")
with gr.Row():
prompt_input = gr.Textbox(label="正向提示词")
# 创建一行用于其他输入组件
with gr.Row():
strength_model = gr.Slider(minimum=0, maximum=1, step=0.01, value=1, label="Lora模型权重")
lora_name=gr.Dropdown(choices=get_available_lora_models(), label="Lora 模型", info="选择 Lora 模型名")
# 提交按钮
submit_button = gr.Button("生成图像")
gr.Examples(
examples=get_example(),
fn=generate_image,
inputs=[image_input, prompt_input, strength_model,lora_name],
outputs=output_image,
cache_examples=True,
)
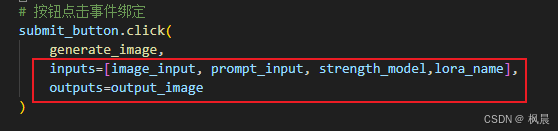
# 按钮点击事件绑定
submit_button.click(
generate_image,
inputs=[image_input, prompt_input, strength_model,lora_name],
outputs=output_image
)
demo.launch(
server_name="0.0.0.0",
server_port=PORT_gradio,
allowed_paths=["/ComfyUI/output", "/tmp"]
)
if __name__ == "__main__":
create_gradio_interface()1、block 布局,加入或删除需要开放的参数,开始布局。
(1)、gr.Row() 组件水平排列
使用 Row 函数会将组件按照水平排列,但是在 Row 函数块里面的组件都会保持同等高度
(2)、gr.Colum() 组件垂直排列
组件通常是垂直排列,我们可以通过 Row 函数和 Column 函数生成不同复杂的布局。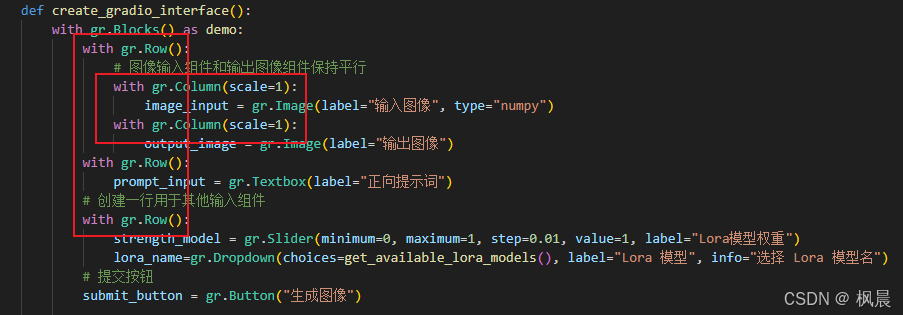
(3)、gr.Image 图像框
(4)、gr.Textbox 用户输入框
(5)、gr.Slider 值的输入,滑条。value(默认值),
(6)、gr.Dropdown 用户选择框,choices=get_available_lora_models(),提取可选择的模型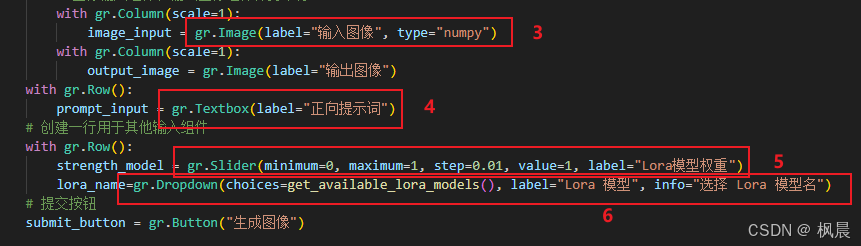
2、绑定变量
注意:按钮点击事件绑定变量尽量要与 generate_image 方法形参顺序相同,不然有可能输出不了图像

3、增加 gradio 示例 gr.Examples
添加方法 get_example(),返回的值的顺序要和绑定变量的顺序一样
def get_example():
    return [
        ["/comfy-gradio-api/example_.jpg", "WaterColor_style, (best quality:2),F1SC_style", 1, "flux/xuxl/动漫风格_动漫风格推文_v1.5.safetensors"]
    ]
  #修改返回值,顺序要和绑定变量的顺序一样
gr.Examples(
        examples=get_example(),
        fn=generate_image,
        inputs=[image_input, prompt_input, strength_model,lora_name],
        outputs=output_image,
        cache_examples=True,
        )
效果:

4、修改 gradio 访问权限
demo.launch(
        server_name="0.0.0.0",
        server_port=PORT_gradio,
        allowed_paths=["/ComfyUI/output", "/tmp"]
    )
到这里,恭喜你,就已经初步完成了简单的测试 demo 搭建,如果对你有帮助,期待你的点赞!!!
三、报错解决
错误 1:Gradio 读取图片一直读取不到
情况 1:输出图片的后缀 num 未读取正确,如下图:
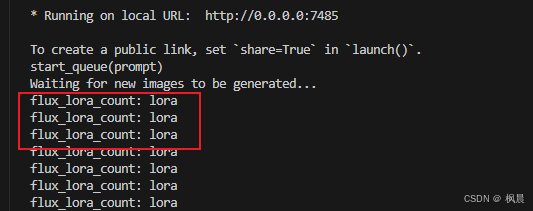
原因:ComfyUI 生成图片格式后缀方式偶然会不一样,有时候 00001_.jpg 有时候 00001.jpg
解决方法:修改提取后缀方法,这个改为-1
错误 2:Gradio 生成图像显示问题
情况 1:Gradio 无法将生成的图像文件从移动到 Gradio 的缓存目录
解决方法:修改launch() 方法的allowed_paths 参数: 你可以通过向launch() 方法添加allowed_paths 参数,明确允许 Gradio 访问你的输出目录/home/Intern/liuld/ComfyUI/output。在你的gr.Interface 的launch() 方法中添加allowed_paths 参数,修改为如下:
demo.launch(
        server_name="0.0.0.0",
        server_port=PORT_gradio,
        allowed_paths=["/ComfyUI/output", "/tmp"]
    )
这样,Gradio 将允许访问/ComfyUI/output 目录中的文件。
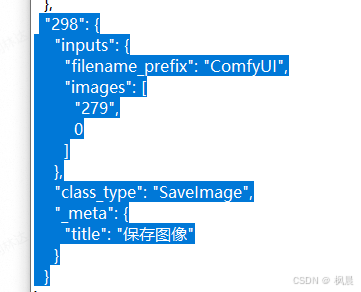
情况 2:ComUI 的组件后端图像不是保存图像组件,是预览图像组件,gradio 不能找到文件
解决方法:更换组件为保存图像,并保存 json 的 API 格式,打开复制后端的信息将其更换即可
错误 3:端口号占用 
解决方法 1:查询占用端口的进程号:lsof -i :1563
删除后台进程 kill -9 3467673(PID)
解决方法 2:执行 kill.py
修改 gradio 监听端口,运行 kill.py
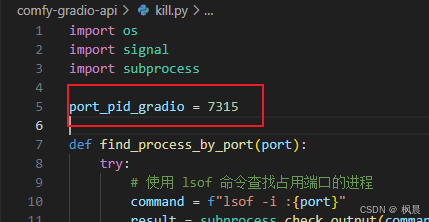
kill.py代码如下:
import os
import signal
import subprocess

port_pid_gradio = 7315
def find_process_by_port(port):
    try:
        # 使用 lsof 命令查找占用端口的进程
        command = f"lsof -i :{port}"
        result = subprocess.check_output(command, shell=True, stderr=subprocess.PIPE).decode("utf-8")

        # 检查输出是否为空,空表示没有进程占用端口
        if not result:
            print(f"No process found using port {port}.")
            return None

        # 获取进程信息,获取进程ID(PID)
        for line in result.splitlines():
            if 'LISTEN' in line:  # 只关注处于监听状态的进程
                parts = line.split()
                pid = int(parts[1])  # 获取 PID
                print(f"Process found with PID: {pid}")
                return pid
    except subprocess.CalledProcessError:
        print(f"No process found using port {port}.")
        return None

def kill_process(pid):
    try:
        os.kill(pid, signal.SIGKILL)  # 发送 SIGKILL 信号终止进程
        print(f"Process {pid} has been killed successfully.")
    except ProcessLookupError:
        print(f"Process {pid} not found.")
    except PermissionError:
        print(f"No permission to kill process {pid}.")

def main():

    pid = find_process_by_port(port_pid_gradio)
    if pid:
        kill_process(pid)

if __name__ == "__main__":
    main()
欢迎 点赞👍 | 收藏⭐ | 评论✍ | 关注🤗


 被折叠的 条评论
为什么被折叠?
被折叠的 条评论
为什么被折叠?
 到【灌水乐园】发言


