


Spring boot集成RabbitMQ的简单使用与应用(发送邮件)
总的来说:就是你生产一个消息发送给交换机,交换机按照规则(配置类)消费消息。
1.简单使用
1.1 Direct模式
- 配置类
@Configuration
public class DirectConfig {

    //配置消息队列
    @Bean
    Queue directQueue(){
        return new Queue("fanle-queue");
    }

    //如果使用的是direct模式,则下面两个bean可以省略

    //配置交换机
    @Bean
    DirectExchange directExchange(){
        //参数1:交换机的名称  参数2:队列重启后是否删除  参数3:队列长期不用是否自动删除
        return new DirectExchange("fanle-direct",true,false);
    }


    //将消息队列和交换机绑定
    @Bean
    Binding directBinding(){
        return BindingBuilder.bind(directQueue()).to(directExchange()).with("direct");
    }

}
- 消费者
@Component
public class DirectReceiver {

    //监听消息队列
    @RabbitListener(queues = "fanle-queue")
    public void directHandler(String msg){
        System.out.println("msg = " + msg);
    }
}
- 生产者
public void direct() {
    //- 点对点,直接发送到队列上,不需要交换机参与
    rabbitTemplate.convertAndSend("fanle-queue","hello fanle");
}
1.2 Fanout模式
- 配置类
@Configuration
public class FanoutConfig {

    @Bean
    Queue queueOne(){
        return new Queue("queue-one");
    }

    @Bean
    Queue queueTwo(){
        return new Queue("queue-two");
    }

    //- fanout的交换机
    @Bean
    FanoutExchange fanoutExchange(){
        return new FanoutExchange("fanle-fanout",true,false);
    }

    //- 将两个队列分别与交换机绑定
    @Bean
    Binding bindingOne(){
        return BindingBuilder.bind(queueOne()).to(fanoutExchange());
    }

    @Bean
    Binding bindingTwo(){
        return BindingBuilder.bind(queueTwo()).to(fanoutExchange());
    }
}
- 消费者
@Component
public class FanoutReceiver {

    @RabbitListener(queues = "queue-one")
    public void handlerOne(String msg){
        System.out.println("handlerOne----" + msg);
    }

    @RabbitListener(queues = "queue-two")
    public void handlerTwo(String msg){
        System.out.println("handlerTwo---" + msg);
    }
}
- 生产者
public void fanout(){
    //- fanout模式相当于广播,所以消息只需要发送到交换机上,两个消息队列都能收到
    rabbitTemplate.convertAndSend("fanle-fanout",null,"hello fanout");
}
1.3 Topic模式
- 配置类
@Configuration
public class TopicConfig {

    @Bean
    Queue xiaomi(){
        return new Queue("xiaomi");
    }

    @Bean
    Queue huawei(){
        return new Queue("huawei");
    }

    @Bean
    Queue phone(){
        return new Queue("phone");
    }

    @Bean
    TopicExchange topicExchange(){
        return new TopicExchange("fanle-topic",true,false);
    }

    @Bean
    Binding xiaomiBinding(){
        //- 将标签(routingKey)为 xiaomi.XXX的消息发送到xiaomi队列
        return BindingBuilder.bind(xiaomi()).to(topicExchange()).with("xiaomi.#");
    }

    @Bean
    Binding huaweiBinding(){
        //- 将标签(routingKey)为 huawei.XXX的消息发送到huawei队列
        return BindingBuilder.bind(huawei()).to(topicExchange()).with("huawei.#");
    }

    @Bean
    Binding phoneBinding(){
        //- 将标签(routingKey)为 XXX.phone.XXX的消息发送到phone队列
        return BindingBuilder.bind(phone()).to(topicExchange()).with("#.phone.#");
    }


}
- 消费者
@Component
public class TopicReceiver {

    @RabbitListener(queues = "xiaomi")
    public void xiaomi(String msg){
        System.out.println("xiaomi------" + msg);
    }

    @RabbitListener(queues = "huawei")
    public void huawei(String msg){
        System.out.println("huawei-------" + msg);
    }

    @RabbitListener(queues = "phone")
    public void phone(String msg){
        System.out.println("phone-------" + msg);
    }
}
- 生产者
public void topic(){
        rabbitTemplate.convertAndSend("fanle-topic","xiaomi.news","小米手机才能收到的小米新闻");
        rabbitTemplate.convertAndSend("fanle-topic","huawei.news","华为手机才能收到的华为新闻");
        rabbitTemplate.convertAndSend("fanle-topic","xiaomi.phone.news","小米手机和手机才能收到的新闻");
        rabbitTemplate.convertAndSend("fanle-topic","huawei.phone.news","华为手机和手机才能收到的新闻");
}
1.4 Header模式
- 配置类
@Configuration
public class HeaderConfig {

    @Bean
    Queue queueAge(){
        return new Queue("queue-age");
    }

    @Bean
    Queue queueName(){
        return new Queue("queue-name");
    }

    @Bean
    HeadersExchange headersExchange(){
        return new HeadersExchange("fanle-headers",true,false);
    }

    @Bean
    Binding bindingAge(){
        Map<String, Object> map=  new HashMap<>();
        map.put("age",99);
        //- match():当消息头中包含age并且它的值为99,才会路由到age队列
        return BindingBuilder.bind(queueAge()).to(headersExchange()).whereAny(map).match();
    }

    @Bean
    Binding bindingName(){
        //- exist():消息头中存在name属性就可以转发到name队列
        return BindingBuilder.bind(queueName()).to(headersExchange()).whereAny("name").exist();
    }


}
- 消费者
@Component
public class HeaderReceiver {

    @RabbitListener(queues = "queue-age")
    public void age(String msg){
        System.out.println("age------" + msg);
    }

    @RabbitListener(queues = "queue-name")
    public void name(String msg){
        System.out.println("name------" + msg);
    }
}
- 生产者
public void header(){
        //Name队列只要name属性存在于消息头中即可
        Message nameMsg = MessageBuilder.withBody("hello name".getBytes(StandardCharsets.UTF_8)).setHeader("name","fanle").build();
        rabbitTemplate.send("fanle-headers",null,nameMsg);
        //Age队列需要消息的消息头中有age属性,并且要它的value值为99
        Message ageMsg = MessageBuilder.withBody("hello age".getBytes(StandardCharsets.UTF_8)).setHeader("age",88).build();
        Message ageMsg = MessageBuilder.withBody("hello age".getBytes(StandardCharsets.UTF_8)).setHeader("age",99).build();
        rabbitTemplate.send("fanle-headers",null,ageMsg);
}
2.应用
以springboot发送邮件为例:
- 引入依赖
<dependency>
    <groupId>org.springframework.boot</groupId>
    <artifactId>spring-boot-starter-mail</artifactId>
</dependency>
- 配置文件
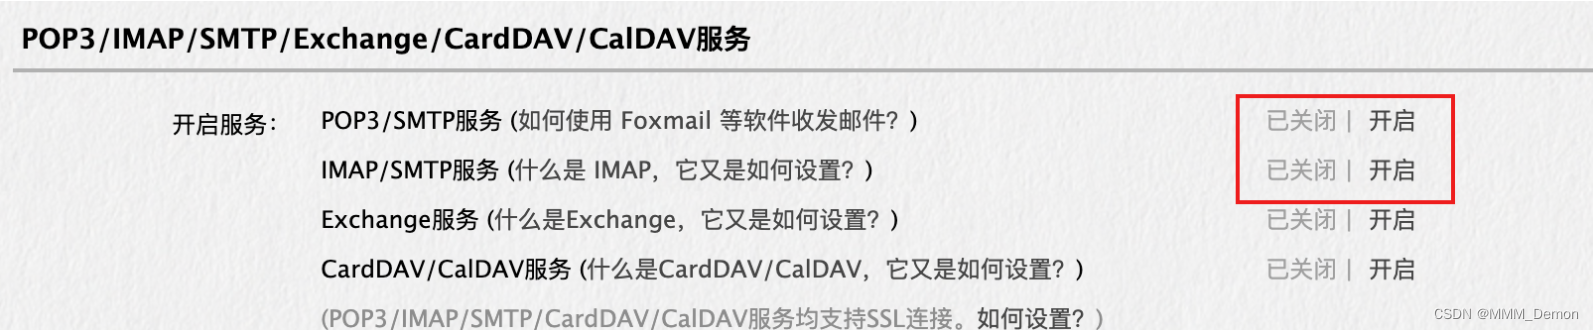
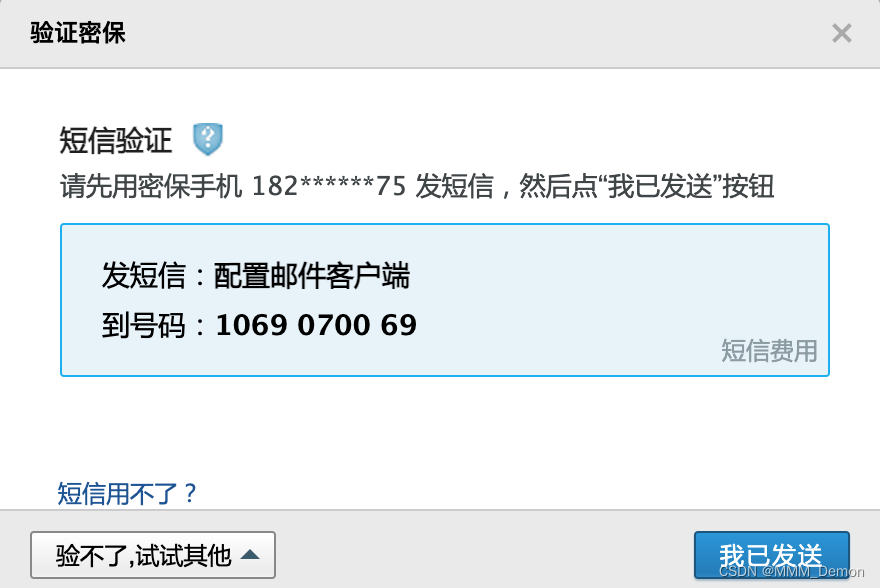
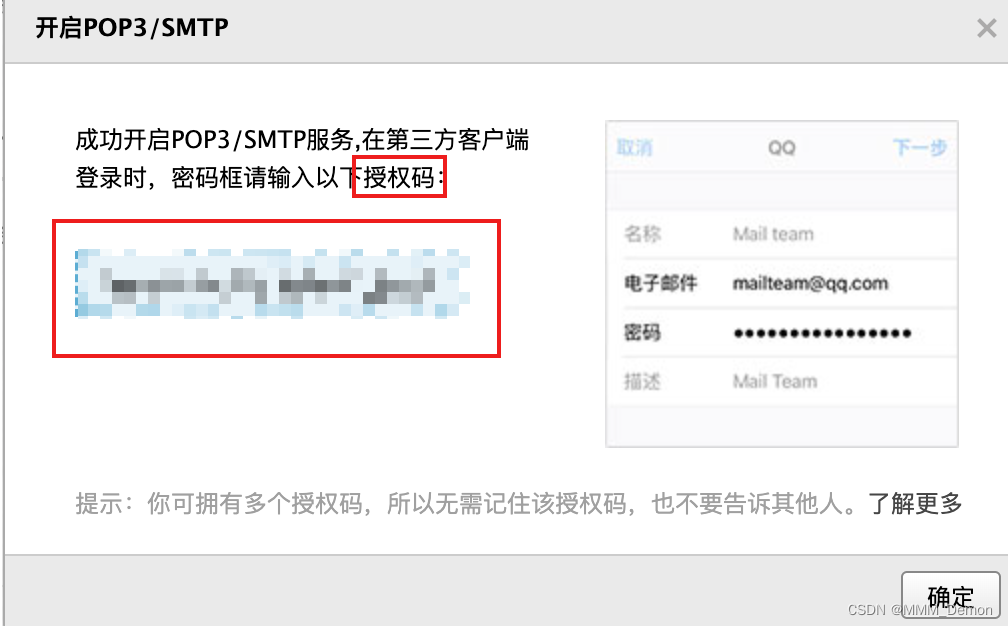
怎么找授权码:以QQ邮箱为例
进入QQ邮箱网页端,设置→账户
spring:
  mail:
    host: smtp.qq.com
    username: 邮箱名
    password: 授权码
    default-encoding: utf-8
    port: 465
    properties:
      mail:
        smtp:
          socketFactory:
            class: javax.net.ssl.SSLSocketFactory
        debug: true
- 配置类
@Configuration
public class RabbitMQConfig {
    @Bean
    public Queue emailQueue() {
        return new Queue("email-queue", true);
    }

    @Bean
    public FanoutExchange emailExchange() {
        return new FanoutExchange("email-exchange", true, false);
    }

    @Bean
    public Binding bindingEmailDirect() {
        return BindingBuilder.bind(emailQueue()).to(emailExchange());
    }

}
- 消费者
@Component
@RabbitListener(queues = EMAIL_QUEUE)
public class EmailConsumer {

    /**
     * 邮箱号
     */
    @Value("${spring.mail.username}")
    private String email;

    @Autowired
    private JavaMailSender javaMailSender;

    @RabbitHandler
    public void process(byte[] data) {
        EmailDTO emailDTO = JSON.parseObject(new String(data), EmailDTO.class);
        SimpleMailMessage message = new SimpleMailMessage();
        message.setFrom(email);
        message.setTo(emailDTO.getEmail());
        message.setSubject(emailDTO.getSubject());
        message.setText(emailDTO.getContent());
        javaMailSender.send(message);
    }
}
- 生产者
@Override
public void sendCode(String username) {
      // 校验账号是否合法
      if (!checkEmail(username)) {
        throw new BizException("请输入正确邮箱");
      }
      // 生成六位随机验证码发送
      String code = getRandomCode();
      // 发送验证码
      EmailDTO emailDTO = EmailDTO.builder()
        .email(username)
        .subject("验证码")
        .content("您的验证码为 " + code + " 有效期15分钟,请不要告诉他人哦!")
        .build();
      rabbitTemplate.convertAndSend("email-exchange", "*", new Message(JSON.toJSONBytes(emailDTO), new MessageProperties()));
      // 将验证码存入redis,设置过期时间为15分钟
      redisService.set(USER_CODE_KEY + username, code, CODE_EXPIRE_TIME);
}


 1886
1886


 被折叠的 条评论
为什么被折叠?
被折叠的 条评论
为什么被折叠?
 到【灌水乐园】发言


