


 本文详细介绍了SpringBoot的使用,包括快速创建项目、静态资源管理、Thymeleaf模板引擎的配置与应用、数据库整合(JDBC、Druid、MyBatis)、SpringSecurity和Shiro安全框架的集成,以及Swagger API文档的生成。同时,讨论了SpringBoot的自动装配原理、多环境配置、任务调度和邮件服务。通过实例展示了SpringBoot在实际开发中的应用和配置细节。
SpringBoot
- 概述
- 一.使用idea快速创建一个SpringBoot项目
- 二.关于springBoot的静态资源
-
-
-
- 【源码分析】静态资源的默认配置:在webMvcAutoConfiguration.class下的 addResourceHandler函数是用来控制静态资源的。
- 1.如何直接访问springBoot中的静态资源
- 2.如何自定义(注册)静态资源路径(自定义路径后springboot的四个默认访问路径将失效)
- 3.三种访问静态资源的方法
- 4关于直接访问和通过controller间接访问权限(也是static 和templates 路径下访问的分析)
- 5关于视图解析器(只在controller的return时才会调用视图解析器)
- 6.静态资源拦截器(已经过时)
- 7.WebMvcConfigurer 静态资源拦截器(已经过时)
- 【附加内容】application.properties中配置:一些小技巧
-
-
- 三.WebMvcConfig相关的自定义配置(难点)
- SpringBoot中的配置类
- 四.SpringBoot自动装配
- 五.使用yaml来代替xml
- 六.多环境配置和配置文件存入路径
- 七、在springboot中使用thymeleaf模板引擎
- 八、在前端界面使用bootstrap样式。
- 九、springboot整合数据库
- 10.SpringSecurity的整合(重要,没学好)
- 11.Shiro学习笔记(在maven中使用shiro)
- 十二、swagger
- 十三、springBoot进阶
- 【拓展】在jetty环境下运行springboot
- 【拓展】如何将一个maven项目变成springboot项目
概述
1.SpringBoot是什么?
1.SpringBoot是一个JavaWeb的开发框架,和SpringMVC类似。
一.使用idea快速创建一个SpringBoot项目
1.new Project中选择项目配置

2.添加依赖

3.创建的框架结构如下所示

4.创建一个controller/HelloController.java来测试SpringBoot的功能

---------先部署服务器

---------再在浏览器上访问 http://localhost:8080/hello.

二.关于springBoot的静态资源
访问静态资源是可以分为可以分为三种情况:
未使用thymeleaf时:
使用了thymeleaf但没有开启视图解析器: 如 return “index.html”
使用了thymeleaf且开启了视图解析器:如return “index”
【源码分析】静态资源的默认配置:在webMvcAutoConfiguration.class下的 addResourceHandler函数是用来控制静态资源的。
1.默认配置一:使用webjars(要导入依赖):如/META-INF/resources/webjars/hello路径下内容只要写/webjars/hello就行。
2.默认配置二:1.配置了静态资源的查找位置(static,public,resources等),2.简化写法:如/static/hello只要写/hello
        public void addResourceHandlers(ResourceHandlerRegistry registry) {

            if (!this.resourceProperties.isAddMappings()) {
   //1.如果resourceProperties被自定义了,默认配置将失效
                logger.debug("Default resource handling disabled");
            } else {
   //2.否则就继续使用默认配置
            	//默认配置一:3.使用了webjars的配置:如/META-INF/resources/webjars/hello路径下内容只要写/webjars/hello就行。
                this.addResourceHandler(registry, "/webjars/**", "classpath:/META-INF/resources/webjars/");
                //默认配置二:4.resourceProperties配置:如<kbd>/static/hello</kbd>只要写<kbd>/hello</kbd>
                this.addResourceHandler(registry, this.mvcProperties.getStaticPathPattern(), (registration) -> {

                    registration.addResourceLocations(this.resourceProperties.getStaticLocations());
                    if (this.servletContext != null) {

                        ServletContextResource resource = new ServletContextResource(this.servletContext, "/");
                        registration.addResourceLocations(new Resource[]{
   resource});
                    }

                });
            }
        }
1.如何直接访问springBoot中的静态资源
1.什么是直接访问静态资源?
我把不通过controller层调用而是直接通过http://localhost:8080/hello.html来访问静态资源称为直接访问。
2.把hello.html文件直接放在templates文件下会发现,为什么无论是用
http://localhost:8080/hello.html 还是用http://localhost:8080/templates/hello.html都无法访问静态资源?
原因 是在springBoot中不允许访问这个路径。根据Resource源文件,如下图,springboot只有以下四种存放路径,且优先级如下(其中classpath:就是src.main.resources目录):
classpath:/META-INF/resources>classpath:/resources>classpath:/static>classpath:/public。也就是说在没有自定义的情况下,我们只有把静态资源放在这四个路径下,我们才能直接通过http://localhost:8080/hello.html来访问。
-----------------在项目中位置图
2.注意:thymeleaf只是给sprinbboot添加了一个视图解析器。当我们开启了thymeleaf之后springboot中的默认静态资源路径并没有发生改变,我们通过return "/index.html"还是可以访问static的内容(不会开启视图解析器),但是如果是return "index"就是访问templates/index.html(会开启视图解析器)。


2.如何自定义(注册)静态资源路径(自定义路径后springboot的四个默认访问路径将失效)
(1)在application.properties中配置
使用自定义静态资源路径我们就能直接用http://localhost:8080/xxx.html访问templates下文件了,
#application.properties
spring.resources.static-locations=classpath:templates/
(2)通过继承WebMvcConfigurationSupport (@Configuration)来注册静态资源路径
@Configuration
public class WebMvcConfig extends WebMvcConfigurationSupport {

	//静态资源注册(不进行资源注册将无法使用)
	@Override//实现抽象类的抽象方法
	protected void addResourceHandlers(ResourceHandlerRegistry registry) {

		registry.addResourceHandler("/tttt/**").addResourceLocations("classpath:/templates/");
		super.addResourceHandlers(registry);
	}

//	//自己配置视图解析器
//	@Override
//	protected void configureViewResolvers(ViewResolverRegistry registry) {

//		InternalResourceViewResolver viewResolver = new InternalResourceViewResolver();
//		viewResolver.setPrefix("/");
//		viewResolver.setSuffix(".html");
//		registry.viewResolver(viewResolver);
//		super.configureViewResolvers(registry);
//	}
}
3.三种访问静态资源的方法
(1)直接访问静态资源(如上)
(2)通过@Controller和@GetMappering("")来跳转(通过服务器访问)

【注意】:当导入了thymeleaf依赖后,它会自带templates/ 和 .html视图解析器。我们可以通过 return "hello"来直接访问templates/hello.html。但是访问不了默认配置中的内容了(如static,public等)。
(3)通过实现WebMvcConfigurer(@Configuration)来跳转(重要)
使用WebMvcConfigurer实现类能够使用http://localhost:8080/t1来直接访问templates/test1.html文件,相当于简化版的getMappering()。
@Configuration
public class MyMvcConfig implements WebMvcConfigurer {

	@Override
	public void addViewControllers(ViewControllerRegistry registry){

		registry.addViewController("/h2").setViewName("./hello.html");
	}
}
--------未使用thymeleaf的效果图

【注意】:当导入了thymeleaf依赖后,它会自带templates/ 和 .html视图解析器。我们可以通过 return "hello"来直接访问templates/hello.html
--------使用thymeleaf后的效果图

(4)通过继承WebMvcConfigurationSupport (@Configuration)来添加静态资源路径并修改访问的url(重要,注册静态资源路径)
@Configuration
public class WebMvcConfig2 extends WebMvcConfigurationSupport {

	//静态资源注册(不进行资源注册将无法使用)
	@Override
	protected void addResourceHandlers(ResourceHandlerRegistry registry) {

		registry.addResourceHandler("/abcdefg/**").addResourceLocations("classpath:/templates/");
		super.addResourceHandlers(registry);
	}
	//自己配置视图解析器
	@Override
	protected void configureViewResolvers(ViewResolverRegistry registry) {

		InternalResourceViewResolver viewResolver = new InternalResourceViewResolver();
		viewResolver.setPrefix("abcdefg/");
		viewResolver.setSuffix(".html");
		registry.viewResolver(viewResolver);
		super.configureViewResolvers(registry);
	}
}
----------未使用thymeleaf

4关于直接访问和通过controller间接访问权限(也是static 和templates 路径下访问的分析)
1.static是springboot的四个默认路径之一,我们是可以直接访问或通过controller层调用访问的。
2.templates是一个比较特别的文件夹,和Tomcat的WEB-INF文件夹类似。为了使得数据安全,我们无法直接访问,而是要满足这两个条件才能访问:参考文章
1、先导入thymeleaf依赖
2、再通过controller层来访问(其内置视图解析器:/templates/+.html)。
3.值得注意的是,我们不能直接或间接访问 静态资源路径和templates之外 的任何路径。
5关于视图解析器(只在controller的return时才会调用视图解析器)
【注意】springboot是没有自带视图解析器的,但是thymeleaf自带了视图解析器,当我们导入了thymeleaf之后就有了一个默认的视图解析器。/templates/+.html
5_1.使用thymeleaf视图解析器
只要在项目中导入thymeleaf依赖之后,在
templates/下开启了视图解析器(/templates/+.html)。
需要注意的是,导入thymeleaf只是开启了templates的间接访问权限,我们仍然可以直接访问springboot默认四个位置的静态资源。
        <dependency>
            <groupId>org.thymeleaf</groupId>
            <artifactId>thymeleaf-spring5</artifactId>
            <version>3.0.12.RELEASE</version>
        </dependency>
5_2.自己配置视图解析器
方法一:在application.yml中配置
#加前缀
spring.mvc.view.prefix=/
#加后缀
spring.mvc.view.suffix=.html
方法二:继承WebMvcConfigurationSupport(@Configuration)(重要)
@Configuration
public class WebMvcConfig2 extends WebMvcConfigurationSupport {

	//静态资源注册(不进行资源注册将无法使用)
	@Override
	protected void addResourceHandlers(ResourceHandlerRegistry registry) {

		registry.addResourceHandler("/abcdefg/**").addResourceLocations("classpath:/templates/");
		super.addResourceHandlers(registry);
	}
	//自己配置视图解析器
	@Override
	protected void configureViewResolvers(ViewResolverRegistry registry) {

		InternalResourceViewResolver viewResolver = new InternalResourceViewResolver();
		viewResolver.setPrefix("abcdefg/");
		viewResolver.setSuffix(".html");
		registry.viewResolver(viewResolver);
		super.configureViewResolvers(registry);
	}
}
6.静态资源拦截器(已经过时)
@Configuration
public class MyMvcConfig2 extends WebMvcConfigurerAdapter {
   //使用拦截器(已过时)
	@Override
	public void addCorsMappings(CorsRegistry registry) {

		registry.addMapping("/**")
				.allowedOrigins("*")
				.allowCredentials(true)
				.allowedMethods("GET", "POST", "DELETE", "PUT")
				.maxAge(3600);
	}
}
7.WebMvcConfigurer 静态资源拦截器(已经过时)
…
【附加内容】application.properties中配置:一些小技巧
1.修改端口号

---------结果展示

2.给访问地址加上前后缀
#加前缀
spring.mvc.view.prefix=/
#加后缀
spring.mvc.view.suffix=.html
三.WebMvcConfig相关的自定义配置(难点)
------------常用模板如下
@EnableWebMvc
@Configuration
public class WebMvcConfig implements WebMvcConfigurer {


    @Override
    public void configureMessageConverters(List<HttpMessageConverter<?>> list) {

      ...
    }
}
WebMvcConfigurer:实现如拦截器,页面跳转,静态资源,默认静态资源处理器,视图解析器,跨域,信息转换功能。
3.1 WebMvcConfigurer接口
public interface WebMvcConfigurer {

    void configurePathMatch(PathMatchConfigurer var1);

    void configureContentNegotiation(ContentNegotiationConfigurer var1);

    void configureAsyncSupport(AsyncSupportConfigurer var1);

    void configureDefaultServletHandling(DefaultServletHandlerConfigurer var1);/* 默认静态资源处理器 */

    void addFormatters(FormatterRegistry var1);

    void addInterceptors(InterceptorRegistry var1);/* 拦截器配置:用户登录状态的拦截,日志的拦截等 */

    void addResourceHandlers(ResourceHandlerRegistry var1);/*静态资源处理*/

    void addCorsMappings(CorsRegistry var1);/* 解决跨域问题 */

    void addViewControllers(ViewControllerRegistry var1);/* 视图跳转控制器 */

    void configureViewResolvers(ViewResolverRegistry var1);/*视图解析器*/

    void addArgumentResolvers(List<HandlerMethodArgumentResolver> var1);

    void addReturnValueHandlers(List<HandlerMethodReturnValueHandler> var1);

    void configureMessageConverters(List<HttpMessageConverter<?>> var1);

    void extendMessageConverters(List<HttpMessageConverter<?>> var1);

    void configureHandlerExceptionResolvers(List<HandlerExceptionResolver> var1);

    void extendHandlerExceptionResolvers(List<HandlerExceptionResolver> var1);

    Validator getValidator();

    MessageCodesResolver getMessageCodesResolver();
}
----------------------例如:
SpringMVC配置的主要工作,由WebMvcConfigurationSupport和用户提供的WebMvcConfigurer配置器实现。而使用@EnableWebMvc就相当于继承了WebMvcConfigurationSupport。
@EnableWebMvc
@Configuration
public class WebMvcConfig implements WebMvcConfigurer {


    //1、WebMvcConfigurer是spring-webmvc中的一种替传统的xml配置文件形式进行针对进行框架配置,
    // 如拦截器,页面跳转,静态资源,默认静态资源处理器,视图解析器,跨域,信息转换
    //2、已经过时不被推荐了,现在推荐implement WebMvcConfigurer或继承WebMvcConfigurationSupport
    @Override
    public void configureMessageConverters(List<HttpMessageConverter<?>> list) {

        MappingJackson2HttpMessageConverter jsonConverter = new MappingJackson2HttpMessageConverter();

        // Long ToStringSerializer
        ObjectMapper objectMapper = jsonConverter.getObjectMapper();
        SimpleModule simpleModule = new SimpleModule();
        simpleModule.addSerializer(Long.class, ToStringSerializer.instance);
        simpleModule.addSerializer(Long.TYPE, ToStringSerializer.instance);
        objectMapper.registerModule(simpleModule);

        // MediaType
        List<MediaType> mediaTypes = new ArrayList<>(jsonConverter.getSupportedMediaTypes());
        mediaTypes.add(MediaType.ALL);
        mediaTypes.add(MediaType.TEXT_PLAIN);
        mediaTypes.add(MediaType.MULTIPART_FORM_DATA);

        jsonConverter.setSupportedMediaTypes(mediaTypes);
        list.add(jsonConverter);
    }
}
3.2 WebMvcConfigurationSupport类
继承WebMvcConfigurationSupport类就相当于在xml中原本要添加处理器映射器、处理器适配器等的一系列操作。
@Configuration
public class WebMvcConfig2 extends WebMvcConfigurationSupport {

	//静态资源注册(不进行资源注册将无法使用)
	@Override
	protected void addResourceHandlers(ResourceHandlerRegistry registry) {

		registry.addResourceHandler("/abcdefg/**").addResourceLocations("classpath:/templates/");
		super.addResourceHandlers(registry);
	}
	//自己配置视图解析器
	@Override
	protected void configureViewResolvers(ViewResolverRegistry registry) {

		InternalResourceViewResolver viewResolver = new InternalResourceViewResolver();
		viewResolver.setPrefix("abcdefg/");
		viewResolver.setSuffix(".html");
		registry.viewResolver(viewResolver);
		super.configureViewResolvers(registry);
	}
}
-----------------例二
@Configuration
public class WebMvcConfiguration extends WebMvcConfigurationSupport {

	//实现页面跳转和路由分级功能
	public void addViewControllers(ViewControllerRegistry registry) {


        registry.addViewController("topay").setViewName("ToPay/topay");

        registry.addViewController("topay1").setViewName("ToPay/topay1");

        registry.addViewController("topay2").setViewName("ToPay/topay2");

        registry.addViewController("topay3").setViewName("ToPay/topay3");

        registry.addViewController("topay4").setViewName("ToPay/topay4");

        super.addViewControllers(registry);
        registry.addViewController("app/topay").setViewName("ToPay/topay");//第一级

		registry.addViewController("app/c/topay1").setViewName("ToPay/topay1");//第二级

		registry.addViewController("app/topay/mn").setViewName("ToPay/topay");//第一级

 		registry.addViewController("app/topay/c/topay1").setViewName("ToPay/topay1")
    }

}
3.3 @EnableWebMvc
@Retention(RetentionPolicy.RUNTIME)
@Target({
   ElementType.TYPE})
@Documented
@Import({
   DelegatingWebMvcConfiguration.class})//public class DelegatingWebMvcConfiguration extends WebMvcConfigurationSupport
public @interface EnableWebMvc {

}
3.4WebMvcConfigurerAdapter(已过时)
SpringBoot中的配置类
使用@ConfigurationProperties得到配置类,可以实现如同在yml中进行配置一样的效果。
四.SpringBoot自动装配
在spring中,我们通常需要添加@ComponentScan(basePackages = “com.junjun.pojo”)来导入要用的bean,相当于<context:component-scan base-package=“com.junjun.pojo”/>。
值得注意的是在springboot中的@SpringBootApplication中包含了@ComponentScan(basePackages = “xxx”)这个注解(默认扫描被标注的类的路径下),因此我们不用手动添加@ComponentScan这个注解了。
1.使用@Component注入bean,然后用@Autowired实现自动装配
@Component//这里是在Spring中注册bean
public class Dog {

	@Value("旺财")
	private String name;
	@Value("3")
	private Integer age;
	public Dog(){
   }
	//setter和getter好像可以省略
}
【注意】SpringBoot内部已经默认导入了约束和开启了注解支持
-------在test文件中进行测试
@SpringBootTest
class Test3ApplicationTests {

	@Autowired
	private Dog dog;
	@Test
	void contextLoads() {

		System.out.println(dog);
	}
}
2.使用@Configuration和@Bean来注册bean,然后使用@autowired来实现自动装配
相当于在xml中注册,这种方式常用于把框架中已经存在的类注册bean,,因为自己定义的类通常会使用@Component在定义时就一步注册,这样会更加方便简单。
--------------------config/ConfigBean.java
@Configuration
public class ConfigBean {

	@Bean
	public RestTemplate getRestTemplate(){

		return new RestTemplate();
	}
}
3.使用yml文档实现自动装配(重点)
--------dog类
【注意】dog一定要有setter方法,不然会报错无法将yaml中内容自动注入到属性中去
public class Dog {

	private String name;
	private Integer age;
	public Dog(){
   }
	public void setName(String name) {
   this.name = name;}
	public void setAge(Integer age) {
   this.age = age;}
}
---------person类
@ConfigurationProperties注解是用来查找application.yml中的person的。
@Component
@ConfigurationProperties(prefix = "person")
public class Person {

	private String name;
	private Integer age;
	private Boolean happy;
	private Date birth;
	private Map<String,Object> maps;
	private List<Object> lists;
//	@Autowired
	private Dog dog;
	public Person(){
   }
	public void setName(String name) {
   this.name = name;}
	public void setAge(Integer age) {
   this.age = age;}
	public void setHappy(Boolean happy) {
   this.happy = happy;}
	public void setBirth(Date birth) {
   this.birth = birth;}
	public void setMaps(Map<String, Object> maps) {
   this.maps = maps;}
	public void setLists(List<Object> lists) {
   this.lists = lists;}
	public void setDog(Dog dog) {
   this.dog = dog;}
	@Override
	public String toString() {

		return "Person{" +
				"name='" + name + '\'' +
				", age=" + age +
				", happy=" + happy +
				", birth=" + birth +
				", maps=" + maps +
				", lists=" + lists +
				", dog=" + dog +
				'}';
	}
}
-------application.yaml中的内容
注意在SpringBoot中该yaml文档只有命名为application.yaml才能被SpringBoot自动扫入
#application.yaml---实现自动装配
person:
  name: junjun
  age: 3
  happy: false
  maps: {
   k1:v1,k2:v2}
  dog:
    name: 旺财
    age: 3
---------test包中的测试程序
@SpringBootTest
class Test3ApplicationTests {

	@Autowired
	private Person person;
	@Test
	void contextLoads() {

		System.out.println(person);
	}
}
4.使用properties文档实现自动装配
--------dog类
【注意】dog一定要有setter方法,不然会报错无法将yaml中内容自动注入到属性中去
public class Dog {

	private String name;
	private Integer age;
	public Dog(){
   }
	public void setName(String name) {
   this.name = name;}
	public void setAge(Integer age) {
   this.age = age;}
}
---------person类
【注意】如果文件名是application.properties,那么SpringBoot能自动找到这个文件,我们完全可以不用写注解@PropertySource(value=“classpath:aa.properties”)
@Component
@PropertySource(value="classpath:aa.properties")//1.引用aa.properties文件资源
public class Person {

	@Value("${name}")//使用e
	private String name;
	private Integer age;
	private Boolean happy;
	private Date birth;
	private Map<String,Object> maps;
	private List<Object> lists;
//	@Autowired
	private Dog dog;
	public Person(){
   }
	public void setName(String name) {
   this.name = name;}
	public void setAge(Integer age) {
   this.age = age;}
	public void setHappy(Boolean happy) {
   this.happy = happy;}
	public void setBirth(Date birth) {
   this.birth = birth;}
	public void setMaps(Map<String, Object> maps) {
   this.maps = maps;}
	public void setLists(List<Object> lists) {
   this.lists = lists;}
	public void setDog(Dog dog) {
   this.dog = dog;}
	@Override
	public String toString() {

		return "Person{" +
				"name='" + name + '\'' +
				", age=" + age +
				", happy=" + happy +
				", birth=" + birth +
				", maps=" + maps +
				", lists=" + lists +
				", dog=" + dog +
				'}';
	}
}
-------properties文件中的内容
【注意】如果文件名是application.properties,那么SpringBoot能自动找到这个文件资源
//aa.properties
name=junjun
--------测试文件
@SpringBootTest
class Test3ApplicationTests {

	@Autowired//将本字段person实现了自动装配,这里能够将dog中的属性也自动装配哦,非常方便。
	private Person person;

	@Test
	void contextLoads() {

		//本字段person实现了自动装配,结果是:Person{name='君哥', age=4, happy=false, birth=null, maps={k1v1=, k2v2=}, lists=null, dog=com.junjun.test3.pojo.Dog@70f822e}
		System.out.println(person);
		//newPerson是通过无参构造方法创建出来的,并没有实现自动装配(即没有传入application.yaml中的内容),因此所有这里的结果是Person{name='null', age=null, happy=null, birth=null, maps=null, lists=null, dog=null}
		System.out.println(new Person());
	}
}
【注意】如果出现乱码等问题,就把properties的文件编码格式改成UTF-8,说不定能解决

【提高】SpringBoot自动装配的原理分析
1.启动器(SpringBoot的启动场景)
如spring-boot-starter-web,它就会帮我们自动导入web环境的所有依赖:
        <dependency>
            <groupId>org.springframework.boot</groupId>
            <artifactId>spring-boot-starter-web</artifactId>
        </dependency>
2. SpringBoot注解分析
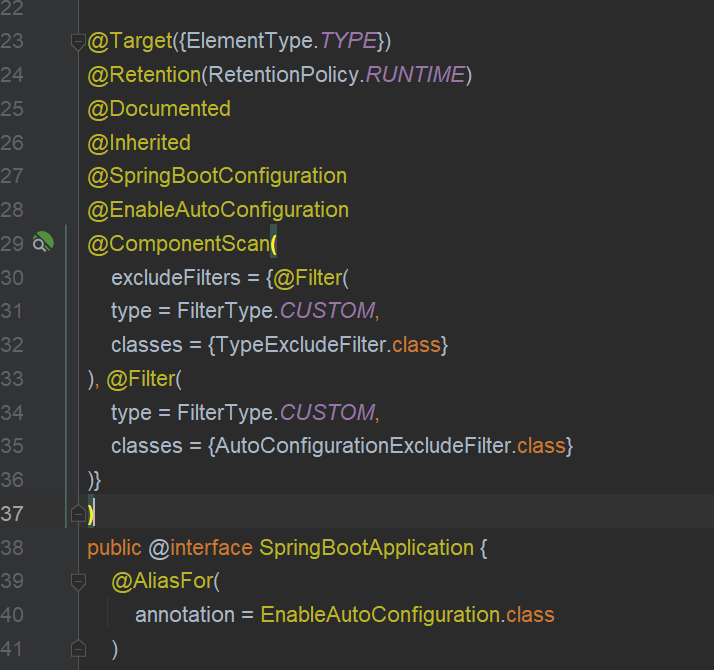 >可见SpringBoo主要是由7个注解组成。 >1.在springboot中的@SpringBootApplication中包含了@ComponentScan(basePackages = "xxx")这个注解(默认扫描被标注的类的路径下),因此我们不用手动添加@ComponentScan这个注解了,同样Springmvc下的< mvc:annotation-driven/>也被实现了。
五.使用yaml来代替xml
yaml与xml优劣对比

1.yaml能够用来保存k-v键值对&&2.yaml可以保存对象数据
# 1.yaml能够用来保存k-v键值对
person1: 毛毛
# 2.yaml可以保存对象数据,如下两种写法都是用来保存一个叫做张三的人。
person2:
  name: 张三
  sex: 男
person3: {
   name: 张三,sex: 男}
3.yaml可以用来给实体类赋值
person:
  name: junjun
  age: 3
  happy: false
  maps: {
   k1:v1,k2:v2}
  dog:
    name: 旺财
    age: 3
4.yaml可以用高级语法来赋值
person:
  name: ${
   person.name:君哥}#若person.name不存在就用君哥,存在就报错??
  id: 017${
   random.uuid}#如'99357b9f-e3e5-4140-9e39-c7fe1dd04f3e'
  pwa: $
最低0.47元/天 解锁文章


 861
861

 被折叠的 条评论
为什么被折叠?
被折叠的 条评论
为什么被折叠?
 到【灌水乐园】发言


