


一、git地址和环境版本
(1)Git地址:https://github.com/react-native-camera/react-native-camera/tree/master
(2)node版本:14 +
(3)react-native版本:0.72
二、环境配置
(1)先安装插件
npm i react-native-camera
(2)在 android/setting.gradle 添加如下代码
include ':react-native-camera'
project(':react-native-camera').projectDir = new File(rootProject.projectDir,   '../node_modules/react-native-camera/android')
图例:

(3)在 android/app 目录下build.gradle 添加如下数据
- 在
android.defaultConfig中添加下面一行代码:
missingDimensionStrategy 'react-native-camera', 'mlkit'
图例:

- 在
dependencies中添加下面一行代码:
implementation project(':react-native-camera')
图例:

- 在最下面添加一行如下代码:
apply plugin: 'com.google.android.gms.strict-version-matcher-plugin'
图例:

(4)在android 目录下的build.gradle 文件中的dependencies对象中添加一行代码:
classpath("com.google.android.gms:strict-version-matcher-plugin:1.2.1")
图例:

(5)如果报错Invariant Violation: ViewPropTypes has been removed from React Native. Migrate to ViewPropTypes expo ,则报错解决如下:
- 安装
npm install deprecated-react-native-prop-types - 进入
node_modules/react-native/index.js,从第436行开始修改:
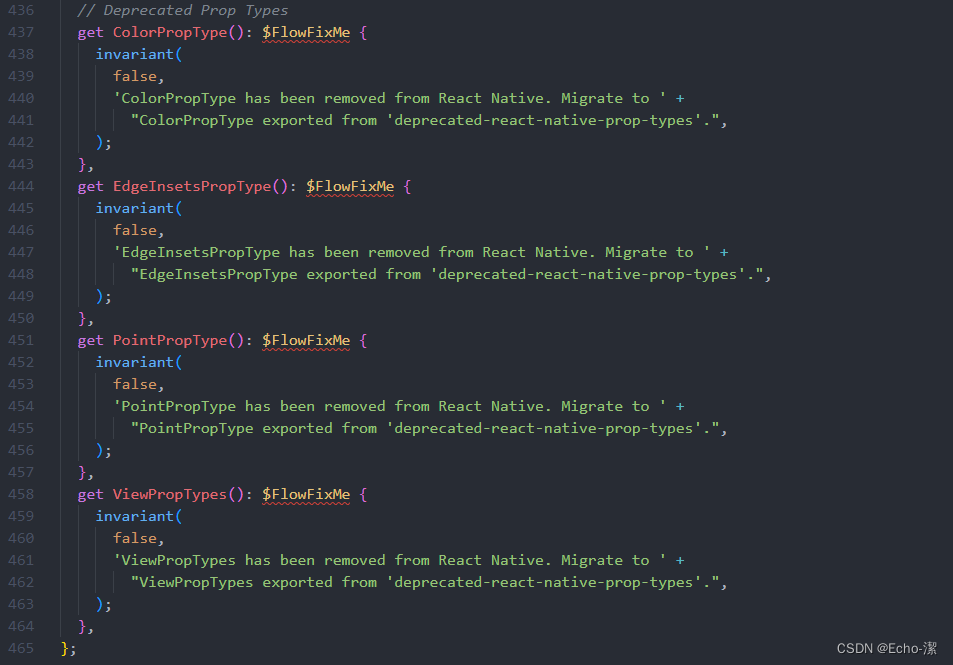
修改为:
  // Deprecated Prop Types
  get ColorPropType(): $FlowFixMe {
    return require("deprecated-react-native-prop-types").ColorPropType
  },
  get EdgeInsetsPropType(): $FlowFixMe {
    return require("deprecated-react-native-prop-types").EdgeInsetsPropType
  },
  get PointPropType(): $FlowFixMe {
    return require("deprecated-react-native-prop-types").PointPropType
  },
  get ViewPropTypes(): $FlowFixMe {
    return require("deprecated-react-native-prop-types").ViewPropTypes
  },
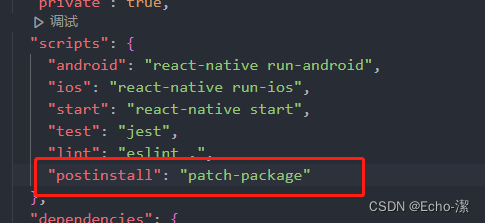
- 执行
npx patch-package react-native命令保存补丁。 - 在
package.json文件中加入 ,"postinstall": "patch-package",如下图:
三、react-native-camera 使用,直接上代码:
// 请勿直接粘贴使用,这是我项目中删减下来只关于识别人脸部分的代码

import { RNCamera } from 'react-native-camera';

export default class LoginCode extends Component {
  constructor(props) {
    super(props);
    this.state = {
      RNCameraType: RNCamera.Constants.Type.front,
      canDetectFaces: true,
      facePath: '', // type= 8 上传人脸图片返回的图片路径
    };
  }
  // 拍照
  takePhoto = async () => {
    const options = {
      quality: 0.5,
      base64: true,
      width: setWidthDp(1027),
      height: setHeightDp(426),
    };
    if (this.camera) {
      const data = await this.camera.takePictureAsync(options);
      console.log('data: ', data);
      // this._faceLogin(data)
    }
  };
  //改方法用于是否检测到人脸信息
  onFacesDetected = ({ faces }) => {
    console.log('faces: ', faces);
    if (faces.length > 0) {
      // 检测到人脸就拍下来,停止检测
      setTimeout(() => {
        this.takePhoto();
      }, 1000);
      this.setState({
        canDetectFaces: false,
      });
    } else {
      this.setState({
        canDetectFaces: true,
      });
    }
  };
  onFaceDetectionError = state => {
    console.warn('Faces detection error:', state);
  };

  render () {
    return (
      <View style={styles.container}>
        <ImageBackground
          source={require('@/assets/images/background/main_background.png')}
          style={styles.backgroundImageBg}>
          <View style={styles.cameraWarp}>
            <RNCamera
              ref={cam => {
                this.camera = cam;
              }} // 用于获取拍照录像函数
              type={this.state.RNCameraType}
              style={[styles.preview]}
              orientation={RNCamera.Constants.Orientation.landscapeRight} // 改变摄像头方向
              faceDetectionLandmarks={
                RNCamera.Constants.FaceDetection.Landmarks.all
              }
              onFacesDetected={
                this.state.canDetectFaces ? this.onFacesDetected : null
              }
              onFaceDetectionError={this.onFaceDetectionError}
              faceDetectionMode={
                RNCamera.Constants.FaceDetection.Mode.accurate
              }
            />
          </View>
        </ImageBackground>
      </View >
    )
  }
}

const styles = StyleSheet.create({
  container: {
    flex: 1,
  },
  backgroundImageBg: {
    flex: 1,
    resizeMode: 'cover',
  },
  cameraWarp: {
    position: 'absolute',
    width: setWidthDp(1027),
    height: setHeightDp(426),
    top: setWidthDp(110),
    zIndex: 99,
    backgroundColor: 'rgba(0,0,0,0.5)',
  },
  preview: {
    width: setWidthDp(1027),
    height: setHeightDp(426),
    justifyContent: 'center',
    alignItems: 'center',
    overflow: 'hidden',
  },
})
上面组件使用的属性解析:
ref属性: 用于获取RNCamera组件的引用,以便在其他地方调用拍照和录像的函数。type属性: 指定相机的类型,这里使用了this.state.RNCameraType来动态设置相机类型。orientation属性: 用于设置相机的方向,这里设置为RNCamera.Constants.Orientation.landscapeRight,表示横向右侧。faceDetectionLandmarks属性: 用于指定人脸检测时要检测的特征点,这里设置为
RNCamera.Constants.FaceDetection.Landmarks.all,表示检测所有特征点。onFacesDetected属性: 当检测到人脸时触发的回调函数,通过this.state.canDetectFaces来判断是否启用人脸检测,如果为true则调用this.onFacesDetected函数。onFaceDetectionError属性: 当人脸检测发生错误时触发的回调函数,调用this.onFaceDetectionError函数处理错误。faceDetectionMode属性: 用于设置人脸检测的模式,这里设置为RNCamera.Constants.FaceDetection.Mode.accurate,表示使用准确模式进行人脸检测。- 通过使用
RNCamera组件和相关属性,你可以在React Native应用中实现相机功能,并进行人脸检测。


 2981
2981


 被折叠的 条评论
为什么被折叠?
被折叠的 条评论
为什么被折叠?
 到【灌水乐园】发言


