


ESPHome 是一款专为简化 ESP 板管理而设计的工具,借助它,无需复杂编程,仅通过简洁且功能强大的配置文件,就能轻松掌控 ESP8266/ESP32 系统,还能利用 Home Assistant 实现远程操控。ESPHome 兼容性出色,支持 ESP8266、ESP32、RP2040 等多种开发平台,并且与上百种传感器和控制组件无缝适配,助力用户快速搭建 DIY 智能家居系统。
工作原理:ESPHome 会读取 YAML 配置文件,据此生成自定义固件,然后将其安装到 ESP 设备上。只要在 ESPHome 配置中添加设备或传感器,这些内容便会自动同步显示在 Home Assistant 的操作界面里,极大地简化了智能家居设备的配置与管理流程。
零.项目背景
家人买了个电动晾衣架,遥控的,按理来说是能直接接入米家的,没想到是阉割版的,遥控模具有配对按钮,但是电路板没有对应原件,每次都要拿遥控按不方便,于是打算加一个语音控制。
一. 硬件准备
1. ESP8266
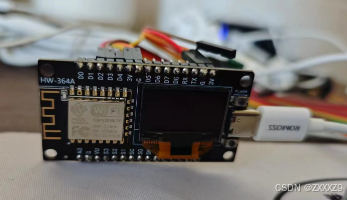
我这个是带OLED版的,SPI引脚看商家,不过屏幕非刚需
2. LD3320语音识别模块
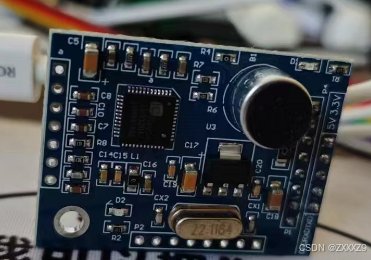
有SPI版和串口版,串口版就是多了个主控,直接和8266串口通信就可以了,比较省事
3. 射频发射和接收模块
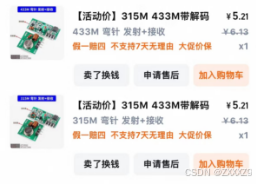
如果不知道自家用的是315还是433就都买吧,反正几块钱,不过便宜的射频距离就比较短,要么自己焊天线
4.逻辑分析仪

用于分析射频信号
二. 软件准备
1.esp8266接入esphome
以DHT11、ESP8266为例介绍ESPHome在Home Assistant中的应用
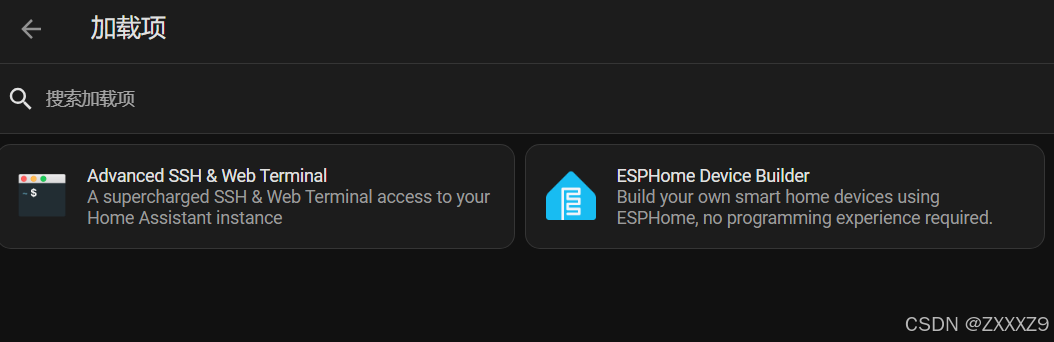
用homeassistant的su或者os版本才有加载项,在docker版没有,不能编译
2.逻辑分析仪的使用
参考 [应用ESP8266控制433M无线遥控电动幕布]
(https://blog.csdn.net/qq_31400983/article/details/131710721)
3.esp8266代码
esphome:
name: esp80266
friendly_name: esp80266
esp8266:
board: esp01_1m
external_components:
- source:
type: git
url: https://github.com/esphome/esphome.git
ref: main
components: [uart]
# Enable logging
logger:
baud_rate: 0 # 将串口日志波特率设置为 0,禁用串口日志输出
#level: INFO # 设置日志级别,可根据需要调整
# Enable Home Assistant API
api:
encryption:
key: "t0Gm/4xUrwPvx36RUgT3Xh8YkXP81YLY9LDwLg0kd0k="
ota:
- platform: esphome
password: "123456"
wifi:
ssid: "XXX"
password: "12345678"
# Enable fallback hotspot (captive portal) in case wifi connection fails
ap:
ssid: "Esp80266 Fallback Hotspot"
password: "88888888"
uart:
tx_pin: 5 # 根据实际连接修改TX引脚
rx_pin: 4 # 根据实际连接修改RX引脚
baud_rate: 9600 # 波特率,需与单片机设置一致
debug:
direction: RX
dummy_receiver: true
after:
delimiter: "\r\n"
sequence:
- lambda: |-
// 将接收到的字节数据转换为字符串
std::string str(bytes.begin(), bytes.end());
if (str.compare("A1\r\n") == 0) {
id(oled_display).fill(COLOR_OFF);
id(display_text).publish_state("打开 L5");
id(switch_l3).turn_on();
id(switch_l3l2).execute();
} else if (str.compare("A2\r\n") == 0) {
id(oled_display).fill(COLOR_OFF);
id(display_text).publish_state("关闭 L1");
id(switch_l1).turn_on();
} else if (str.compare("A3\r\n") == 0) {
id(oled_display).fill(COLOR_OFF);
id(display_text).publish_state("照明 L4");
id(switch_l4).turn_on();
} else if (str.compare("A4\r\n") == 0) {
id(oled_display).fill(COLOR_OFF);
id(display_text).publish_state("收衣服 A4");
id(switch_l4).turn_on();
id(switch_l4r4l3r3l2r2).execute();
} else if (str.compare("A5\r\n") == 0) {
id(oled_display).fill(COLOR_OFF);
id(display_text).publish_state("收起来 A5");
id(switch_l1).turn_on();
id(switch_l1r1l4r4).execute();
} else if (str.compare("A6\r\n") == 0) {
id(oled_display).fill(COLOR_OFF);
id(display_text).publish_state("照明 L4a");
id(switch_l4).turn_on();
}
# if (str.compare("L1\r\n") == 0) {
# id(oled_display).fill(COLOR_OFF);
# id(display_text).publish_state("上升 L1");
# id(switch_l1).turn_on();
# } else if (str.compare("L2\r\n") == 0) {
# id(oled_display).fill(COLOR_OFF);
# id(display_text).publish_state("停止 L2");
# id(switch_l2).turn_on();
# } else if (str.compare("L3\r\n") == 0) {
# id(oled_display).fill(COLOR_OFF);
# id(display_text).publish_state("调试 L3");
# id(switch_l3).turn_on();
# } else if (str.compare("L4\r\n") == 0) {
# id(oled_display).fill(COLOR_OFF);
# id(display_text).publish_state("照明 L4");
# id(switch_l4).turn_on();
# } else if (str.compare("R1\r\n") == 0) {
# id(oled_display).fill(COLOR_OFF);
# id(display_text).publish_state("上升 R1");
# id(switch_r1).turn_on();
# } else if (str.compare("R2\r\n") == 0) {
# id(oled_display).fill(COLOR_OFF);
# id(display_text).publish_state("停止 R2");
# id(switch_r2).turn_on();
# } else if (str.compare("R3\r\n") == 0) {
# id(oled_display).fill(COLOR_OFF);
# id(display_text).publish_state("调试 R3");
# id(switch_r3).turn_on();
# } else if (str.compare("R4\r\n") == 0) {
# id(oled_display).fill(COLOR_OFF);
# id(display_text).publish_state("照明 R4");
# id(switch_r4).turn_on();
# }else if (str.compare("A1\r\n") == 0) {
# id(oled_display).fill(COLOR_OFF);
# id(display_text).publish_state("上升 A1");
# id(switch_l1).turn_on();
# id(switch_l1r1).execute();
# }else if (str.compare("A2\r\n") == 0) {
# id(oled_display).fill(COLOR_OFF);
# id(display_text).publish_state("停止 A2");
# id(switch_l2).turn_on();
# id(switch_l2r2).execute();
# }else if (str.compare("A3\r\n") == 0) {
# id(oled_display).fill(COLOR_OFF);
# id(display_text).publish_state("调试 A3");
# id(switch_l3).turn_on();
# id(switch_l3r3).execute();
# }else if (str.compare("A4\r\n") == 0) {
# id(oled_display).fill(COLOR_OFF);
# id(display_text).publish_state("照明 A4");
# id(switch_l4).turn_on();
# id(switch_l4r4).execute();
# }else if (str.compare("A5\r\n") == 0) {
# id(oled_display).fill(COLOR_OFF);
# id(display_text).publish_state("下降 A5");
# id(switch_l3).turn_on();
# id(switch_l3r3l2r2).execute();
# }else if (str.compare("L5\r\n") == 0) {
# id(oled_display).fill(COLOR_OFF);
# id(display_text).publish_state("下降 L5");
# id(switch_l3).turn_on();
# id(switch_l3l2).execute();
# }else if (str.compare("R5\r\n") == 0) {
# id(oled_display).fill(COLOR_OFF);
# id(display_text).publish_state("下降 R5");
# id(switch_r3).turn_on();
# id(switch_r3r2).execute();
# }else if (str.compare("A6\r\n") == 0) {
# id(oled_display).fill(COLOR_OFF);
# id(display_text).publish_state("关掉");
# id(switch_l1).turn_on();
# id(switch_l1r1l4r4).execute();
# }else if (str.compare("A7\r\n") == 0) {
# id(oled_display).fill(COLOR_OFF);
# id(display_text).publish_state("收衣服");
# id(switch_l4).turn_on();
# id(switch_l4r4l3r3l2r2).execute();
# }
remote_transmitter:
pin: 2
carrier_duty_percent: 100%
# 配置 I2C 总线,用于连接 OLED 屏幕
i2c:
sda: 14
scl: 12
scan: true
# 配置 OLED 显示
display:
- platform: ssd1306_i2c
model: "SSD1306 128x64"
address: 0x3C
id: oled_display
#update_interval: 10ms # 缩短更新间隔,提高实时性
lambda: |-
it.fill(COLOR_OFF);
it.print(15, 15, id(my_font), id(display_text).state.c_str());
# 配置字体
font:
- file: "SIMHEI.TTF" # 用SSH访问esphome 可以直接把电脑的字体拖进去用
id: my_font
size: 25
glyphs: [打开关闭晾衣服收起来上升停止下降照明调试1234567890LRA,"\u0020"]
text_sensor:
- platform: template
name: "Display Text"
id: display_text
script:
- id: switch_l1r1
then:
- delay: 500ms
- lambda: |-
id(switch_r1).turn_on();
- id: switch_l2r2
then:
- delay: 500ms
- lambda: |-
id(switch_r2).turn_on();
- id: switch_l3r3
then:
- delay: 500ms
- lambda: |-
id(switch_r3).turn_on();
- id: switch_l4r4
then:
- delay: 500ms
- lambda: |-
id(switch_r4).turn_on();
- id: switch_l3l2
then:
- delay: 13000ms
- lambda: |-
id(switch_l2).turn_on();
- id: switch_r3r2
then:
- delay: 13000ms
- lambda: |-
id(switch_r2).turn_on();
- id: switch_l3r3l2r2
then:
- delay: 500ms
- lambda: |-
id(switch_r3).turn_on();
- delay: 13000ms
- lambda: |-
id(switch_l2).turn_on();
- delay: 500ms
- lambda: |-
id(switch_r2).turn_on();
- id: switch_l4r4l3r3l2r2
then:
- delay: 500ms
- lambda: |-
id(switch_r4).turn_on();
- delay: 500ms
- lambda: |-
id(switch_l3).turn_on();
- delay: 500ms
- lambda: |-
id(switch_r3).turn_on();
- delay: 13000ms
- lambda: |-
id(switch_l2).turn_on();
- delay: 500ms
- lambda: |-
id(switch_r2).turn_on();
- id: switch_l1r1l4r4
then:
- delay: 500ms
- lambda: |-
id(switch_r1).turn_on();
- delay: 500ms
- lambda: |-
id(switch_l4).turn_on();
- delay: 500ms
- lambda: |-
id(switch_r4).turn_on();
switch:
- platform: template
name: "Send Data"
id: send_data
turn_on_action:
- uart.write: "Hello, Serial Device!\n"
- platform: template
name: Right Pole up
id: switch_r1
turn_on_action:
- remote_transmitter.transmit_rc_switch_raw:
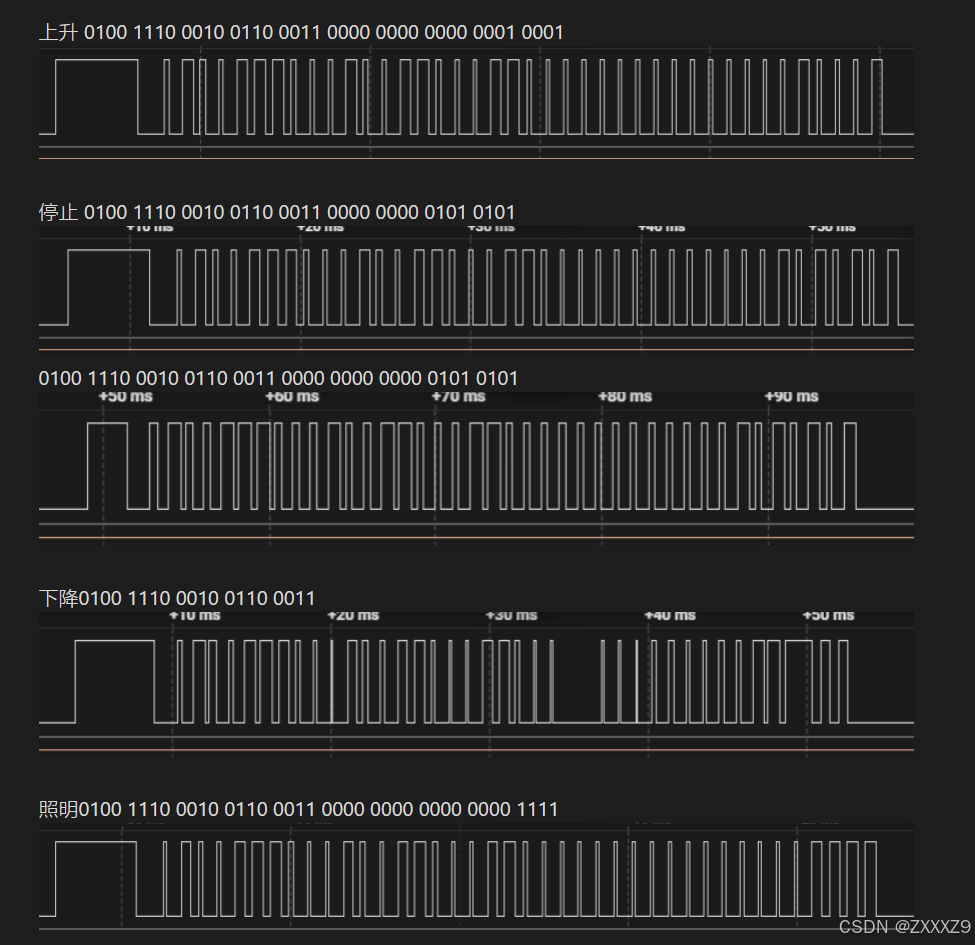
code: '0100111000100110001100000000000000010001'
protocol:
pulse_length: 350
sync: [14, 4]
zero: [1, 2]
one: [2, 1]
repeat:
times: 5
wait_time: 7500us
- platform: template
name: Right Pole Stop
id: switch_r2
turn_on_action:
- remote_transmitter.transmit_rc_switch_raw:
code: '0100111000100110001100000000000001010101'
protocol:
pulse_length: 350
sync: [14, 4]
zero: [1, 2]
one: [2, 1]
repeat:
times: 5
wait_time: 7500us
- platform: template
name: Right Pole down
id: switch_r3
turn_on_action:
- remote_transmitter.transmit_rc_switch_raw:
code: '0100111000100110001100000000000000110011'
protocol:
pulse_length: 350
sync: [14, 4]
zero: [1, 2]
one: [2, 1]
repeat:
times: 5
wait_time: 7500us
- platform: template
name: Right Light
id: switch_r4
turn_on_action:
- remote_transmitter.transmit_rc_switch_raw:
code: '0100111000100110001100000000000000001111'
protocol:
pulse_length: 350
sync: [14, 4]
zero: [1, 2]
one: [2, 1]
repeat:
times: 5
wait_time: 7500us
- platform: template
name: Left Pole up
id: switch_l1
turn_on_action:
- remote_transmitter.transmit_rc_switch_raw:
code: '1101110110001110000100100000000000010001'
protocol:
pulse_length: 350
sync: [14, 4]
zero: [1, 2]
one: [2, 1]
repeat:
times: 5
wait_time: 7500us
- platform: template
name: Left Pole Stop
id: switch_l2
turn_on_action:
- remote_transmitter.transmit_rc_switch_raw:
code: '1101110110001110000100100000000001010101'
protocol:
pulse_length: 350
sync: [14, 4]
zero: [1, 2]
one: [2, 1]
repeat:
times: 5
wait_time: 7500us
- platform: template
name: Left Pole down
id: switch_l3
turn_on_action:
- remote_transmitter.transmit_rc_switch_raw:
code: '1101110110001110000100100000000000110011'
protocol:
pulse_length: 350
sync: [14, 4]
zero: [1, 2]
one: [2, 1]
repeat:
times: 5
wait_time: 7500us
- platform: template
name: Left Light
id: switch_l4
turn_on_action:
- remote_transmitter.transmit_rc_switch_raw:
code: '1101110110001110000100100000000000001111'
protocol:
pulse_length: 350
sync: [14, 4]
zero: [1, 2]
one: [2, 1]
repeat:
times: 5
wait_time: 7500us
4.单片机部分代码
// 处理函数
void User_handle(uint8 dat)
{
    if (dat >= BTN_1_CODE && dat <= BTN_6_CODE)
    {
        // 根据 dat 的值直接输出对应的字符串
        switch (dat)
        {
            case BTN_1_CODE:
                PrintCom("A1\r\n");
                break;
            case BTN_2_CODE:
                PrintCom("A2\r\n");
                break;
            case BTN_3_CODE:
                PrintCom("A3\r\n");
                break;
            case BTN_4_CODE:
                PrintCom("A4\r\n");
                break;
            case BTN_5_CODE:
                PrintCom("A5\r\n");
                break;
            case BTN_6_CODE:
                PrintCom("A6\r\n");
                break;
        }
    }
    else
    {
        // 其他无效指令的处理
        // PrintCom("无效指令\r\n");
    }
}
uint8 code sRecog[DATE_A][DATE_B] = {
									"da kai",\
									"guan bi",\
									"zhao ming",\
									"shou yi fu",\
									"shou qi lai",\
									"kai deng"
									};
									//打开
									//关闭
									//照明
									//收衣服
									//收起来
									//开灯
uint8 code pCode[DATE_A] = {
							BTN_1_CODE,\
							BTN_2_CODE,\
							BTN_3_CODE,\
							BTN_4_CODE,\
							BTN_5_CODE,\
							BTN_6_CODE};
							/*添加识别码,用户修改*/


 被折叠的 条评论
为什么被折叠?
被折叠的 条评论
为什么被折叠?
 到【灌水乐园】发言


