


大家好,我是皮皮猫吖!
每文一言:愿新年,胜旧年!
本篇文章:
主要是关于C#制作简单的串口助手,实现串口之间收发数据。本篇文章制作的串口助手存在一个中文乱码问题,后期文章会解决这个问题。【后期文章:C#实现串口助手,解决中文乱码问题】
功能一:串口简单实现【C#制作的串口向主流的串口助手发送数据】
功能三:C#扫描串口助手
正文如下:
一、串口简单实现【C#制作的串口向主流的串口助手发送数据】
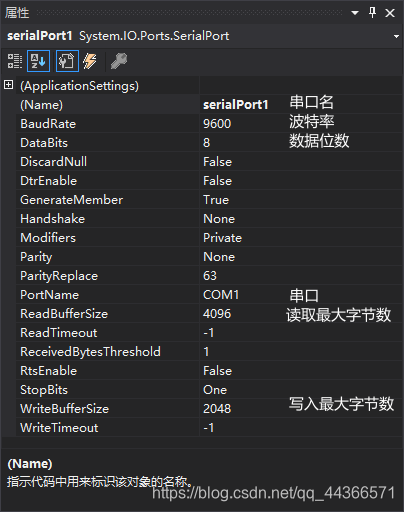
1)设置串口控件
2)通过串口发送数据
using System;
using System.Collections.Generic;
using System.ComponentModel;
using System.Data;
using System.Drawing;
using System.Linq;
using System.Text;
using System.Threading.Tasks;
using System.Windows.Forms;

namespace WindowsFormsApp5
{
    public partial class Form1 : Form
    {
        public Form1()
        {
            InitializeComponent();
        }

        //窗体创建初始化函数
        private void Form1_Load(object sender, EventArgs e)
        {
            //存储下拉框中的内容
            string str;
            for(int i = 0; i < 256; i++)
            {
                //把0-255个数字装换成十六进制,同时变为大写
                //toString(参数1),根据参数的不同,可转换为任意进制的数据
                str = i.ToString("x").ToUpper();

                //如果得到数字的长度是1位的话,就需要在最前面加上一个0,比如0的十六进制应该是00
                if(str.Length == 1)
                {
                    //str是一位数的时候,在前面添加一个“0”
                    str = "0" + str;
                }
                //在数字的前面加上0x,变为真正的十六进制数据
                comboBox1.Items.Add("0x" + str);

            }
            //初始化多选框的值
            comboBox1.Text = "0x00";
        }

        //按键单击函数
        private void button1_Click(object sender, EventArgs e)
        {
            //存储当前下拉框选中的内容
            string data = comboBox1.Text;

            //把字符分开,截取获得十六进制的数据,去掉0x
            string convertdata = data.Substring(2, 2);

            //定义一个数组
            byte[] buffer = new byte[1];//一个字节

            //将字符串,转换为byte类型的变量,buffer[0]存储的是十六进制的数据
            buffer[0] = Convert.ToByte(convertdata, 16);

            //防止异常出错
            try
            {
                serialPort1.Open();
                //里面需要的是字节数组
                //0:从数组的第几位开始读取
                //1:读取几个数据
                serialPort1.Write(buffer, 0, 1);
                serialPort1.Close();
            }
            catch//出错就执行此代码
            {
                //串口打开了,写数据时出错,要关闭串口,等待下一次使用
                //串口都没有找到,串口未找到,串口出错
                if (serialPort1.IsOpen)
                    //如果写数据出错,此时的窗口状态时打开的,关闭串口
                    serialPort1.Close();

                MessageBox.Show("端口错误", "错误");
            }

        }
    }
}
3)由于手上没有单品机设备,我使用了虚拟串口进行模拟,很香,完全可以实现串口通信。
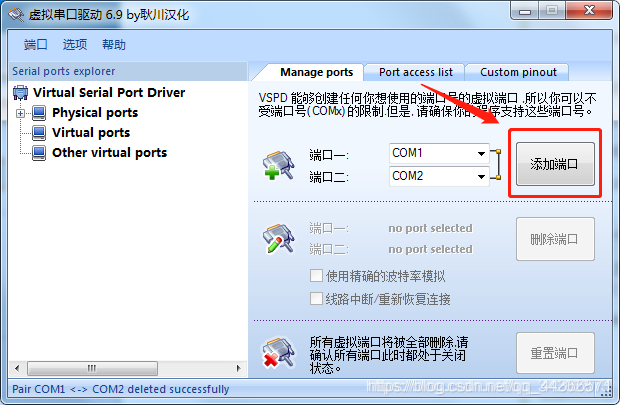
① 关于VSPD(虚拟串口)的安装在上一篇文章里面【vspd虚拟串口安装】,这里不做详细描述,直接使用vspd虚拟串口:
- 【注意】:
- VSPD是以串口的形式添加的,这里的COM1,COM2成对,COM1的数据只能发送给COM2,COM2会自动接收来自COM1的数据
② 串口助手效果
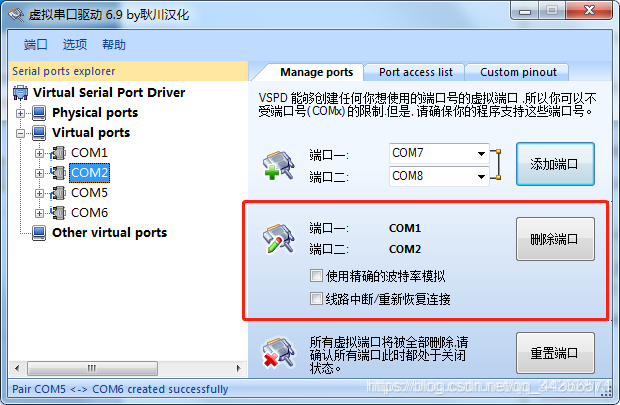
③ 使用完,删除虚拟串口
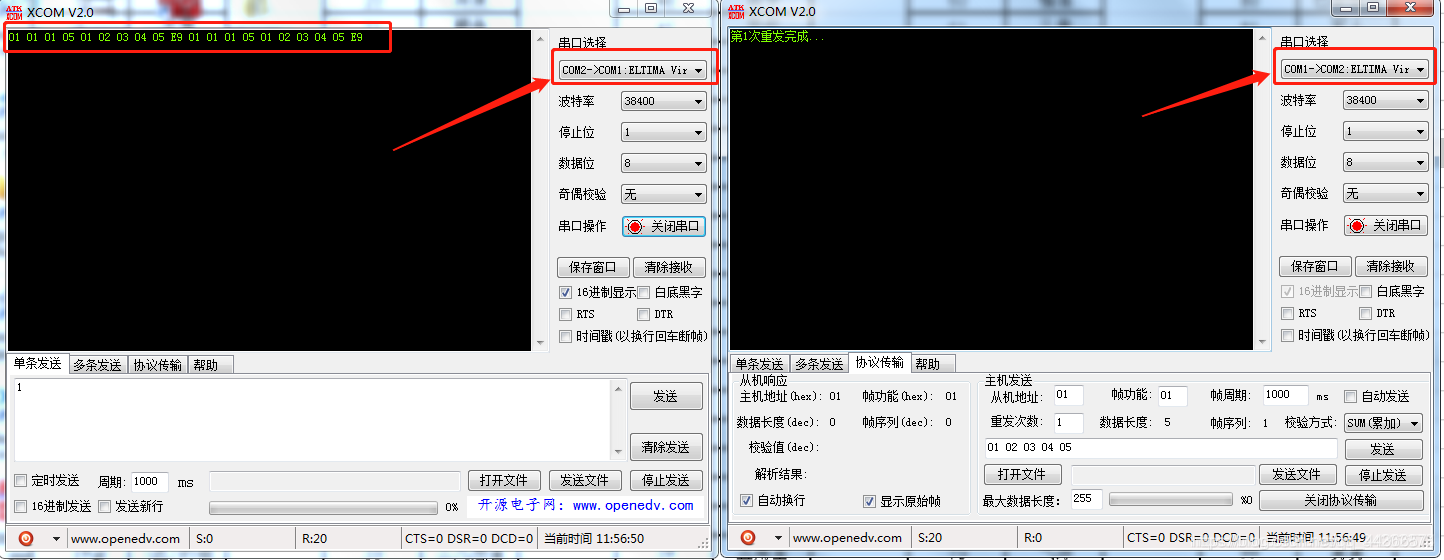
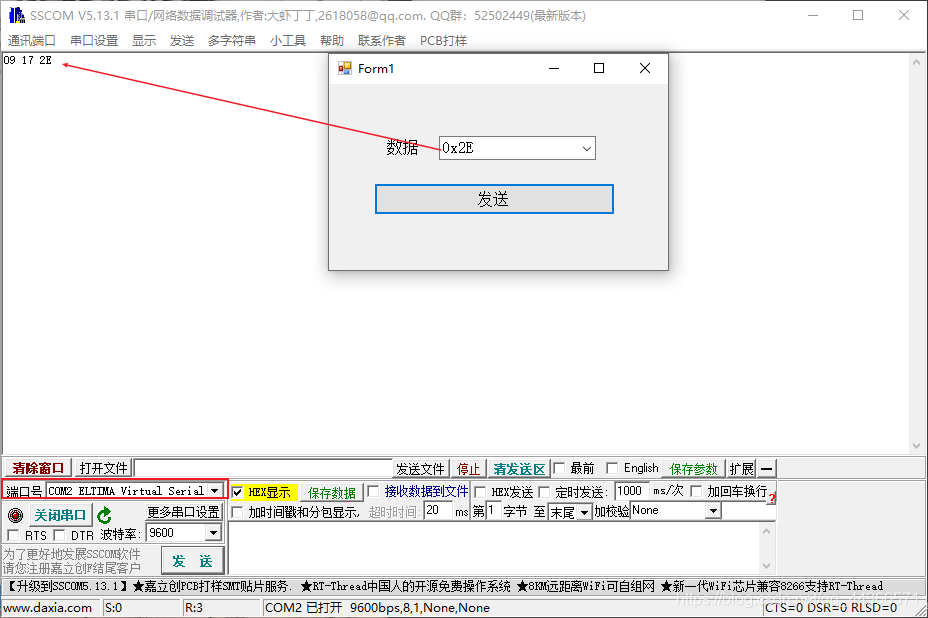
④ 本项目中,Visual Studio模拟的是COM1端口,需要使用vspd虚拟串口软件创建一个虚拟的COM2,设置为COM1向COM2发送数据,即可看到如下效果【C#串口助手向其他串口助手【下面有串口助手链接】发送数据】:
二、C#实现简易串口助手【发送、接收数据】
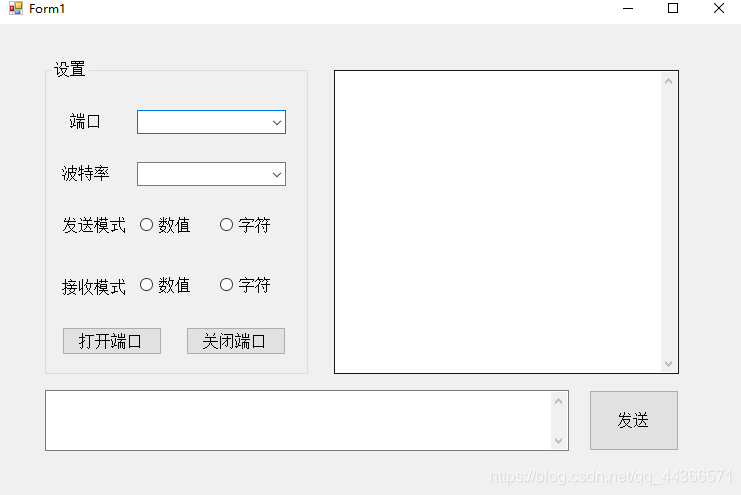
1)串口视图化
① 基本控件
- groupBox1:带标题的框
- label:文本
- radioButton:单选
- comboBox:多选框
- panel【容器】:面板(内置单选框,面板内的单选框会相互影响,与面板外的单选框无相互影响)
- button:按钮
- textbox:
- scrollbars:vertical、both、horizontal设置滚动条属性
- Multiline:true / false 文本可以跨越多行
- serialPort:串口
2)通过串口发送、接收数据
- 代码
using System;
using System.Collections.Generic;
using System.ComponentModel;
using System.Data;
using System.Drawing;
using System.IO.Ports;
using System.Linq;
using System.Text;
using System.Threading.Tasks;
using System.Windows.Forms;

namespace SerialPort_2
{
    public partial class Form1 : Form
    {
        public Form1()
        {
            InitializeComponent();
            System.Windows.Forms.Control.CheckForIllegalCrossThreadCalls = false;
        }

        private void label1_Click(object sender, EventArgs e)
        {

        }


        //窗体初始化
        private void Form1_Load(object sender, EventArgs e)
        {
            //窗体加载前
            for (int i = 0; i < 20; i++)
            {
                //添加串口信息
                comboBox1.Items.Add("COM" + i.ToString());

            }
            //设置串口为COM1
            comboBox1.Text = "COM1";

            //设置默认波特率为9600
            comboBox2.Text = "9600";


            //手动设置串口的接收回调函数
            //当串口中有数据发送过来的时候,默认会调用回调函数
            serialPort1.DataReceived += new SerialDataReceivedEventHandler(port_DataReceived);

            button3.Enabled = false;
        }


        //串口接收数据回调函数
        private void port_DataReceived(Object sender, SerialDataReceivedEventArgs e)
        {
            //如果接收模式为字符模式
            if (radioButton3.Checked)
            {
                //读取串口中的数据:以字符串方式进行接收
                String str = serialPort1.ReadExisting();
                //在文本框中添加内容
                textBox1.AppendText(str);
            }
            else//接收模式为数值接收
            {

                byte data;

                //读取串口中的数据:读取到的是int类型的数据,需要进行一次转换。强转为byte类型
                data = (byte)serialPort1.ReadByte();

                //把data数据,转换为16进制的字符串,再转换为字符全大写
                String str = Convert.ToString(data, 16).ToUpper();

                //如果是一位数据的话,需要再数据的前面进行补0
                //比如说串口中的数据为155
                //读取到的数值为   0x0e.0x05
                textBox1.AppendText("0x" + (str.Length == 1 ? "0" + str : str) + " ");
            }
        }

        //打开串口按钮
        private void button1_Click(object sender, EventArgs e)
        {
            try
            {
                //设置串口号
                serialPort1.PortName = comboBox1.Text;

                //设置波特率:将字符串转换为10进制类型数据
                //参数1:需要转换的字符串
                //参数2:默认(10进制),可以是x(十六进制)
                serialPort1.BaudRate = Convert.ToInt32(comboBox2.Text, 10);

                //打开串口
                serialPort1.Open();

                //设置打开串口为非点击状态:打开串口不可用
                button1.Enabled = false;
                //关闭串口按钮为可以点击状态:关闭串口可用
                button2.Enabled = true;
            }
            catch
            {
                MessageBox.Show("串口打开错误,请检查...", "错误");
            }
        }

        //关闭串口按钮
        private void button2_Click(object sender, EventArgs e)
        {
            try
            {
                //关闭串口
                serialPort1.Close();

                //打开串口可点击
                button1.Enabled = true;
                //关闭串口不可点击
                button2.Enabled = false;
            }
            catch
            {
                MessageBox.Show("串口关闭错误,请检查...", "错误");
            }
        }

        //发送数据按钮
        private void button3_Click(object sender, EventArgs e)
        {
            byte[] Data = new byte[1];
            //判断串口是否打开
            if (serialPort1.IsOpen)
            {
                //判断发送域是否有数据
                if (textBox2.Text != "")
                {

                    //以字符形式发送数据
                    if (!radioButton1.Checked)
                    {
                        try
                        {
                            //向串口中写入数据
                            serialPort1.WriteLine(textBox2.Text);
                        }
                        catch (Exception err)
                        {
                            //向串口写入数据发生错误
                            MessageBox.Show("串口写入数据错误", "错误");
                            //关闭串口
                            serialPort1.Close();

                            //打开串口按钮开启
                            button1.Enabled = true;
                            //关闭串口按钮关闭
                            button2.Enabled = false;
                        }
                    }
                    else
                    {
                        //以数值形式发送数据

                        //防止用于输入的个数为奇数个
                        for (int i = 0; i < (textBox2.Text.Length - textBox2.Text.Length % 2) / 2; i++)
                        {
                            //将字符串转换为16进制的数值
                            Data[0] = Convert.ToByte(textBox2.Text.Substring(i * 2, 2), 16);
                            //向串口中写入数据
                            serialPort1.Write(Data, 0, 1);

                        }
                        if (textBox2.Text.Length % 2 != 0)
                        {
                            //
                            Data[0] = Convert.ToByte(textBox2.Text.Substring(textBox2.Text.Length - 1, 1), 16);
                            //发送数据
                            serialPort1.Write(Data, 0, 1);
                        }
                    }

                }
            }
        }


        private void textBox2_TextChanged(object sender, EventArgs e)
        {
            if (textBox2.Text == "")
            {
                button3.Enabled = false;
            }
            else
            {
                button3.Enabled = true;
            }
        }

        private void textBox1_TextChanged(object sender, EventArgs e)
        {
            //保持文本框的滚动条移动到最下方
            textBox1.ScrollToCaret();
        }
    }
}
3)效果如下:
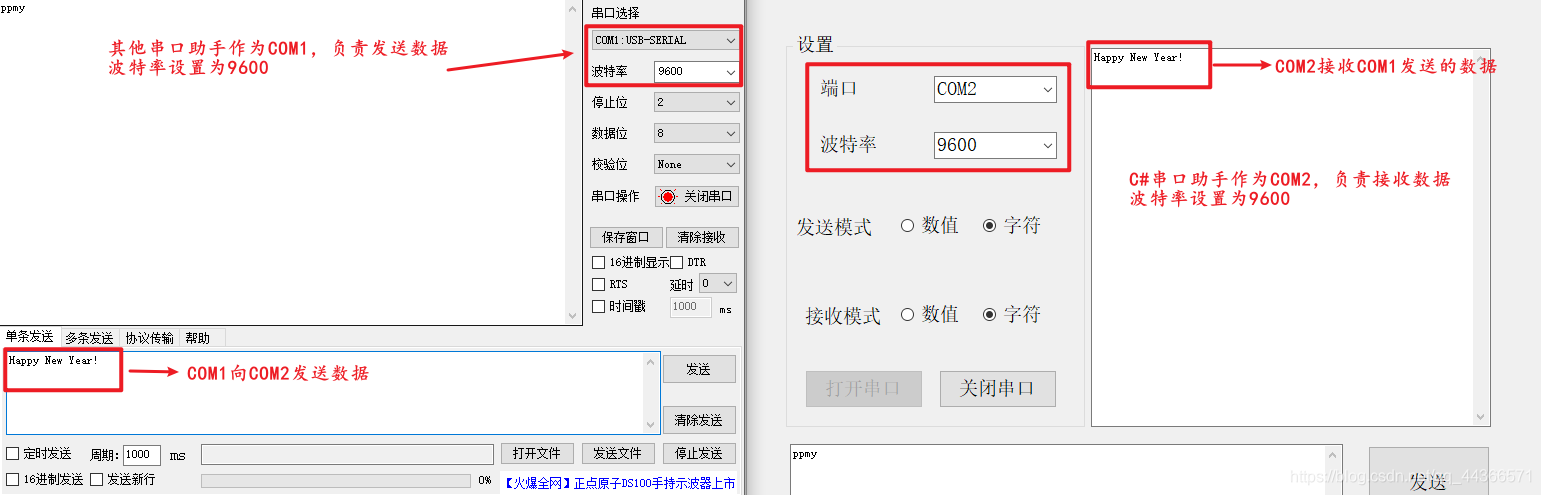
① C#打开串口COM1,其他串口助手打开COM2。C#串口助手向其他串口助手发送数据,其他串口助手接收到C#串口助手发送的数据。情况如下图:
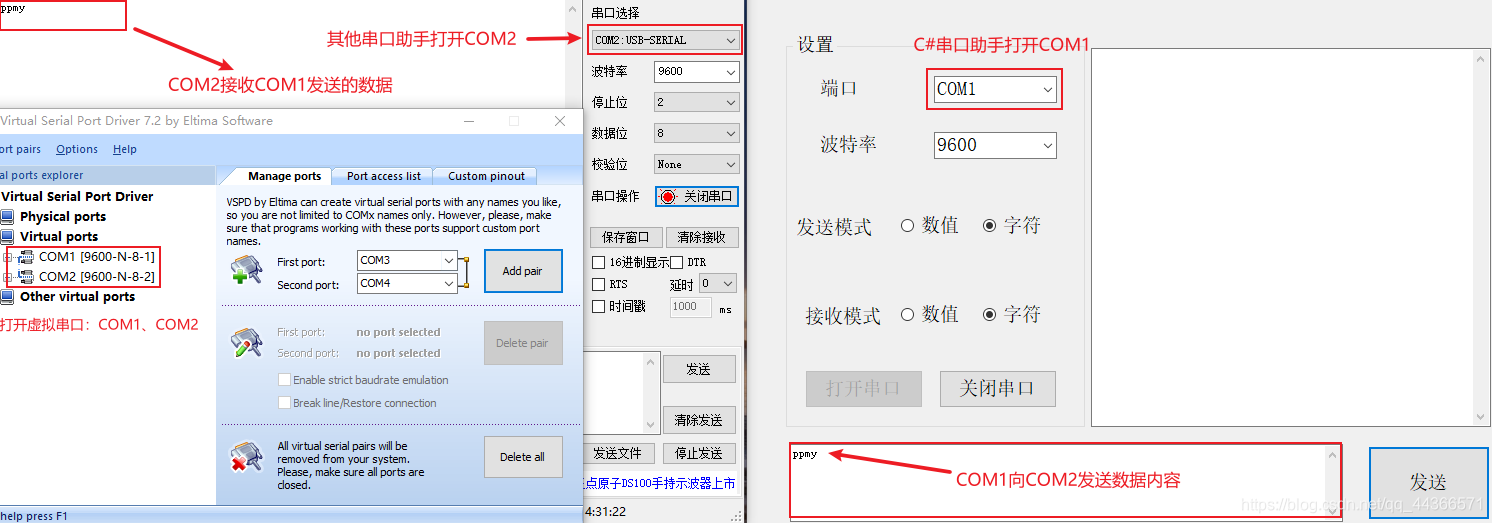
② C#打开串口COM2,其他串口助手打开COM1。其他串口助手向C#串口助手发送数据,C#串口助手接收其他串口助手发送的数据。情况如下图:
4)注意:
① 使用串口之前,需要设置串口的波特率,只有当两个串口的波特率相同的时候,发送的数据才可以接收到
② 发送串口需要和接收串口设置一定的发送数据和接收数据的规则:接收数据模式,发送数据模式
③ 此串口助手有一个小缺点是,中文会出现乱码,在后续文章中会进行改正
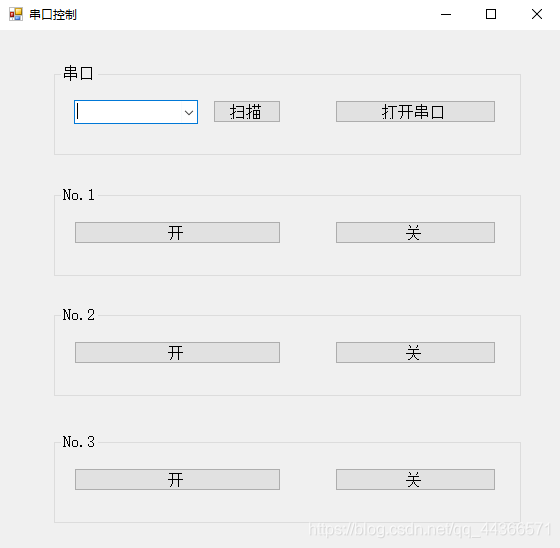
三、C#扫描串口助手
1)串口视图化
① 基本控件
- label:文本
- button:按钮
- groupBox:带标题的框
- comboBox:下拉框
- serialPort:串口
2)代码
- 【注意】:
- 扫描按键的部分设计非常的巧妙。一个一个的试探哪一个串口是打开的,是通过异常试探的方式来实现串口扫描的功能的。然后把打开的串口的名字,加入到comboBox里面即可。本串口助手只扫描到COM20,可以自行更改扫描的上限。
using System;
using System.Collections.Generic;
using System.ComponentModel;
using System.Data;
using System.Drawing;
using System.IO.Ports;
using System.Linq;
using System.Text;
using System.Threading.Tasks;
using System.Windows.Forms;
namespace SerialPort_3
{
public partial class Form1 : Form
{
public Form1()
{
InitializeComponent();
}
private void Form1_Load(object sender, EventArgs e)
{
//扫描当前哪个串口是打开状态
SearchAndAddSerialToComboBox(serialPort1, comboBox1);
}
//串口打开 / 关闭按钮
private void button2_Click(object sender, EventArgs e)
{
//如果当前串口是打开的
if (serialPort1.IsOpen)
{
try
{
//关闭串口
serialPort1.Close();
radioButton1.Checked = false;
}
catch
{
}
//文字设置为打开串口
button2.Text = "打开串口";
}
else
{
try
{
//此时串口是关闭状态:连接当前扫描到的串口
serialPort1.PortName = comboBox1.Text;
//打开指定串口号的串口
serialPort1.Open();
radioButton1.Checked = true;
//按钮设置为关闭串口
button2.Text = "关闭串口";
}
catch
{
MessageBox.Show("串口打开失败", "错误");
}
}
}
//扫描按键的作用:扫描当前电脑中,串口打开状态
private void SearchAndAddSerialToComboBox(SerialPort MySerialPort, ComboBox comboBox)
{
string buffer;
//清除下拉框的内容
comboBox.Items.Clear();
//获取当前计算机打开的串口
for(int i = 1; i < 20; i++)
{
try
{
buffer = "COM" + i.ToString();
//假设COM+i是打开状态
MySerialPort.PortName = buffer;
//如果当前串口真的处于打开状态,会成功开启串口;否则会打开串口失败,直接跳到catch那边
MySerialPort.Open();
//把打开的串口名字,添加到下拉框中
comboBox.Items.Add(buffer);
//关闭打开的串口
MySerialPort.Close();
}
catch
{
}
}
}
private void button1_Click(object sender, EventArgs e)
{
SearchAndAddSerialToComboBox(serialPort1, comboBox1);
}
//向串口写入数据
private void writeByteToSerialPort(byte data)
{
//封装这写入的数据
byte[] buffer = new byte[1] {data};
if (serialPort1.IsOpen)
{
try
{
//向串口中写入数值数据
serialPort1.Write(buffer, 0, 1);
}
catch
{
MessageBox.Show("串口发送数据错误", "错误");
}
}
}
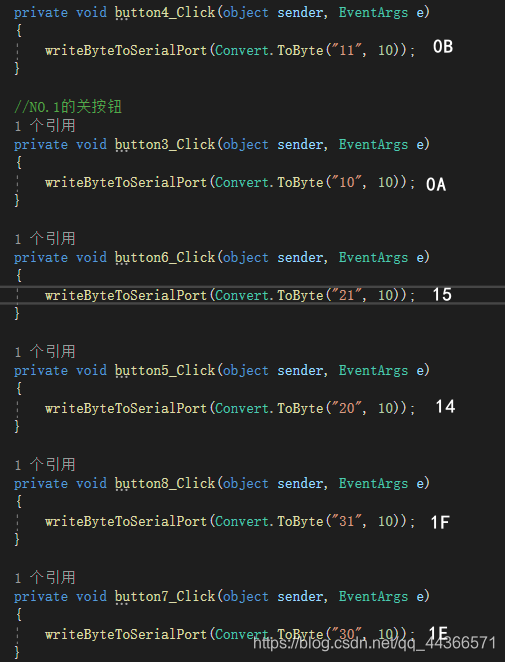
//NO.1的开按钮
private void button4_Click(object sender, EventArgs e)
{
writeByteToSerialPort(Convert.ToByte("11", 10));
}
//NO.1的关按钮
private void button3_Click(object sender, EventArgs e)
{
writeByteToSerialPort(Convert.ToByte("10", 10));
}
private void button6_Click(object sender, EventArgs e)
{
writeByteToSerialPort(Convert.ToByte("21", 10));
}
private void button5_Click(object sender, EventArgs e)
{
writeByteToSerialPort(Convert.ToByte("20", 10));
}
private void button8_Click(object sender, EventArgs e)
{
writeByteToSerialPort(Convert.ToByte("31", 10));
}
private void button7_Click(object sender, EventArgs e)
{
writeByteToSerialPort(Convert.ToByte("30", 10));
}
}
}
3)实现效果
① 其他串口助手占用COM1端口,C#串口助手只扫描到COM2

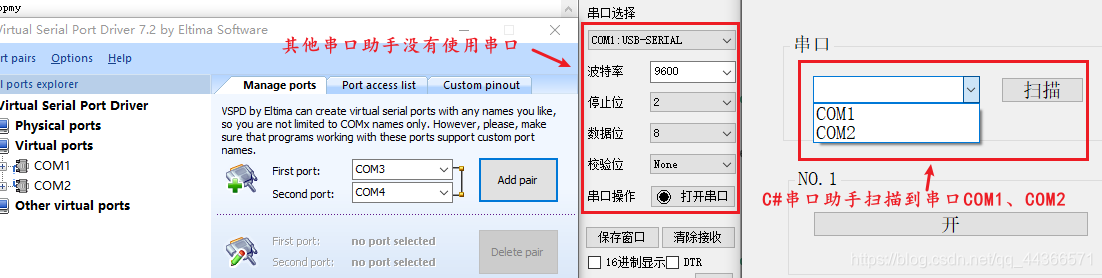
② 其他串口助手不使用串口,C#串口助手扫描到COM1、COM2
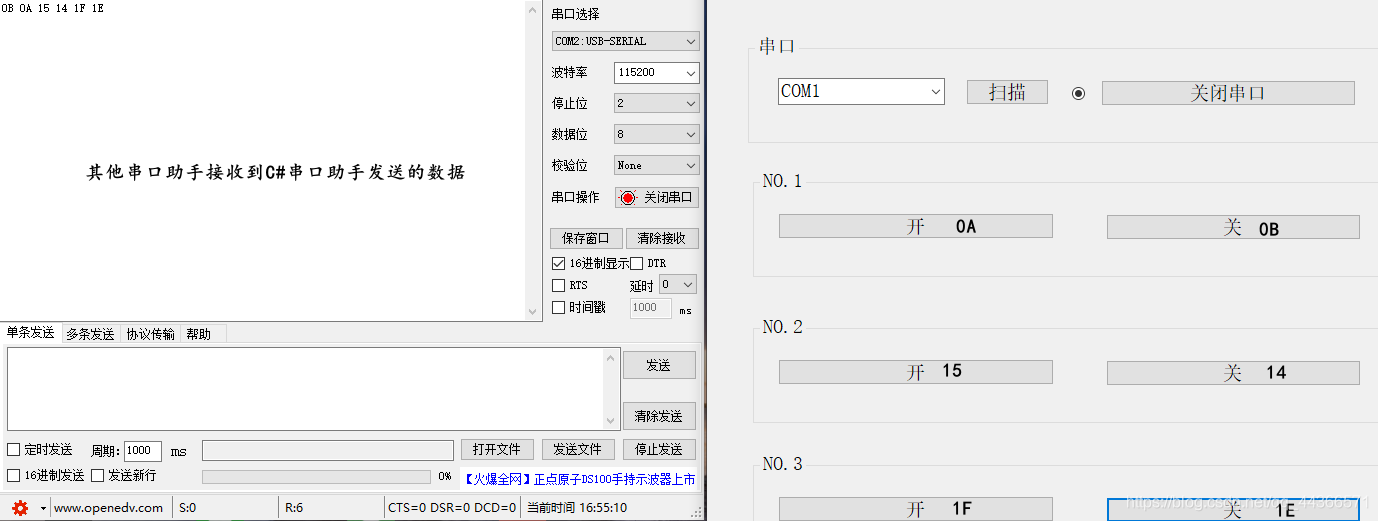
③ C#串口助手向其他串口助手发送数据:
十进制:11、10、21、20、31、30
十六进制:0B、0A、15、14、1F、1E
4)注意
① 主要是如何实现串口助手的扫描。使用异常的方式,来搜索电脑上面可以使用的串口,通过试错的方式找到可以使用的串口助手。
其他串口助手资源链接:https://pan.baidu.com/s/1agi_IXcSI3L4URVlDzDXUw
提取码:x9i3
希望本篇文章对大家有所帮助,后续会继续分享C#串口助手相关知识…
如果文章内容有错误的地方,请在留言处留下你的见解,方便大家共同学习。谢谢。
作者:皮皮猫吖
`


 2190
2190


 被折叠的 条评论
为什么被折叠?
被折叠的 条评论
为什么被折叠?
 到【灌水乐园】发言


