


系列文章目录
一、说明:
spEl语法说明==>官方文档
- Spring Cache是一项缓存
- 可以注解就达到缓存效果
- 小编的案例是基于springboot,整合是redis
官网springcache介绍目录:
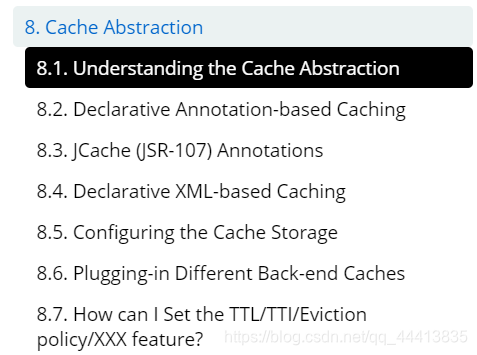
官网的注解一共有5个,如图:
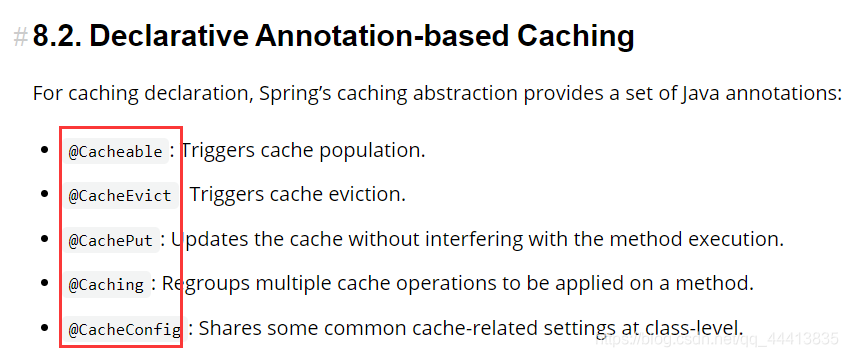
小编给他翻译下
| 注解 | 说明 |
|---|---|
| @Cacheable | 触发将数据保存到缓存的操作(启动缓存) |
| @CacheEvict | 触发将数据从缓存删除的操纵(失效模式) |
| @CachePut | 不影响方法执行更新缓存(双写模式) |
| @Caching: | 组合以上多个操作(点击注解看源码就知道了,组合注解) |
| @CacheConfig | 在类级别共享缓存的相同配置 |
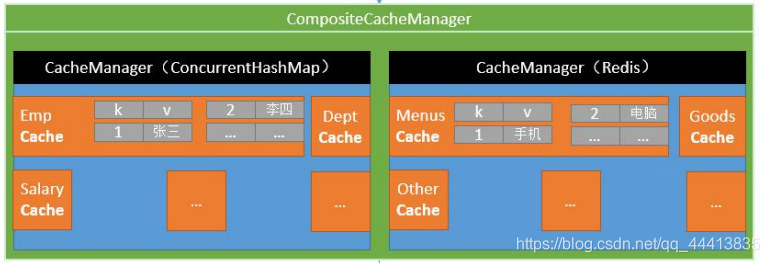
概念图:
二、原理梳理
2.1、 比较重要的源码类
- CacheAutoConfiguration 缓存的自动配置
- 小编用的类型是redis所以看
RedisCacheConfiguration - CacheManager 缓存管理者
- 小编是类型是redis所以看
RedisCacheManager - CacheProperties 缓存默认配置
- idea搜索的方法 双击shift 或者 ctrl n
2.2、 原理说明:
流程说明:

 CacheAutoConfiguration  =>  RedisCacheConfiguration =>
 自动配置了RedisCacheManager =>  初始化所有的缓存 =>
 每个缓存决定使用什么配置=>
 =>如果RredisCacheConfiguration有就用已有的,没有就用默认配置(CacheProperties)
 =>想改缓存的配置,只要给容器中放一个RredisCacheConfiguration即可
 =>就会应用到当前RedisCacheManager管理的所有缓存分区中
三、默认缓存的数据类型
在默认配置下,springcache给我们缓存的试用jdk序列化过的数据
我们通常是缓存Json字符串,因为使用Json能跨语言,跨平台进行交互
所以我们要修改他的默认配置,包括ttl(过期时间)、存储格式、等…
四、整合
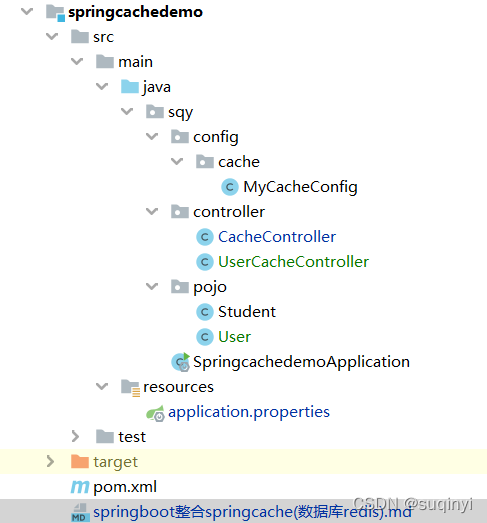
项目结构:
4.1、引入依赖
<!--spring-boot-starter-data-redis-->
<dependency>
    <groupId>org.springframework.boot</groupId>
    <artifactId>spring-boot-starter-data-redis</artifactId>
</dependency>

<!--spring cache-->
<dependency>
    <groupId>org.springframework.boot</groupId>
    <artifactId>spring-boot-starter-cache</artifactId>
</dependency>
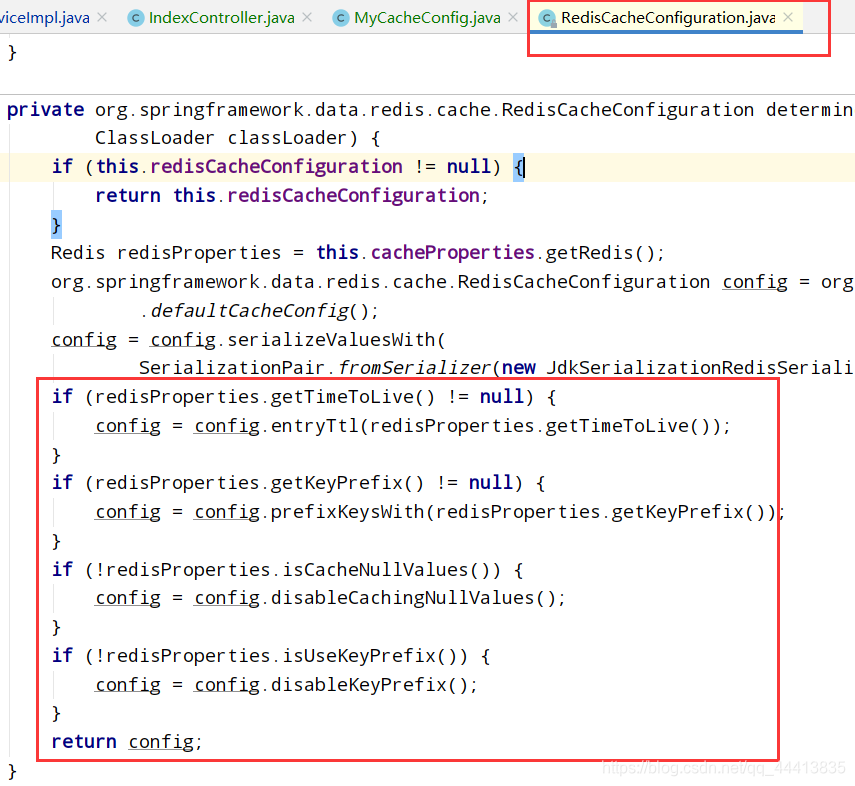
4.2、先看下配置源码是怎么样的
RedisCacheConfiguration
4.3、创建配置类(照猫画虎)
注意事项:要让原本配置文件的一些配置生效
开启属性绑定配置的功能
@EnableConfigurationProperties(CacheProperties.class)
MyCacheConfig
package sqy.config.cache;

import org.springframework.boot.autoconfigure.cache.CacheProperties;
import org.springframework.boot.context.properties.EnableConfigurationProperties;
import org.springframework.cache.annotation.EnableCaching;
import org.springframework.context.annotation.Bean;
import org.springframework.context.annotation.Configuration;
import org.springframework.data.redis.cache.RedisCacheConfiguration;
import org.springframework.data.redis.serializer.GenericJackson2JsonRedisSerializer;
import org.springframework.data.redis.serializer.RedisSerializationContext;
import org.springframework.data.redis.serializer.StringRedisSerializer;


/**
 * @author suqinyi
 * @Date 2022/1/13 -更新
 */
@EnableConfigurationProperties(CacheProperties.class)//开启属性绑定配置的功能
@Configuration //配置类
@EnableCaching //开启缓存功能
public class MyCacheConfig {

//    第一种、从容器里面拿
//    @Autowired
//    CacheProperties cacheProperties;

    /**
     * 配置文件中的很多东西没用上
     *      1、原来和配置文件绑定的配置类是这个样子的
     *          @ConfigurationProperties(
     *              prefix = "spring.cache"
     *          )
     *          public class CacheProperties
     *
     *      2、要让他生效
     *          @EnableConfigurationProperties(CacheProperties.class)//开启属性绑定配置的功能
     *
     */

    //第二种、因为注入了容器,参数属性spring会自己去容器里面找 (CacheProperties cacheProperties)
    @Bean
    RedisCacheConfiguration redisCacheConfiguration(CacheProperties cacheProperties){

        RedisCacheConfiguration config = RedisCacheConfiguration.defaultCacheConfig();
//        config=config.entryTtl();
        config= config.serializeKeysWith(RedisSerializationContext.SerializationPair.fromSerializer(new StringRedisSerializer()));
        /**
         * GenericFastJsonRedisSerializer   fastjson家族的
         * GenericJackson2JsonRedisSerializer   spring自带的 package org.springframework.data.redis.serializer;
         */
        //指定序列化-Jackson
        config = config.serializeValuesWith(RedisSerializationContext.SerializationPair.fromSerializer(new GenericJackson2JsonRedisSerializer()));
        //指定序列化-fastjson
        //config= config.serializeValuesWith(RedisSerializationContext.SerializationPair.fromSerializer(new GenericFastJsonRedisSerializer()));


        //从所以配置中取出redis的配置
        CacheProperties.Redis redisProperties = cacheProperties.getRedis();
        //将配置文件中所有的配置都生效(之间从源码里面拷 RedisCacheConfiguration)
        if (redisProperties.getTimeToLive() != null) {
            config = config.entryTtl(redisProperties.getTimeToLive());
        }
        if (redisProperties.getKeyPrefix() != null) {
            config = config.prefixKeysWith(redisProperties.getKeyPrefix());
        }
        if (!redisProperties.isCacheNullValues()) {
            config = config.disableCachingNullValues();
        }
        if (!redisProperties.isUseKeyPrefix()) {
            config = config.disableKeyPrefix();
        }
        return config;

    }
}
4.4、配置文件(application.properties)
#类型指定redis
spring.cache.type=redis

#一个小时,以毫秒为单位
spring.cache.redis.time-to-live=3600000
#给缓存的建都起一个前缀。  如果指定了前缀就用我们指定的,如果没有就默认使用缓存的名字作为前缀,一般不指定
#spring.cache.redis.key-prefix=CACHE_
#指定是否使用前缀
spring.cache.redis.use-key-prefix=true
#是否缓存空值,防止缓存穿透
spring.cache.redis.cache-null-values=true
4.5、使用
在方法上标注注解就可以
4.5.1、@Cacheable(开启缓存功能)
将查询到的结果存入缓存
注意事项
- 有对应的缓存就不进入方法 [需要返回值,没有返回值缓存空值]
- @Cacheable并没有单独的失效时间的方法。
- 但是可以在CacheManager配置,在+上自动刷新的功能,但是这样的的操作比较繁琐。如果不设置,只有统一的过期时间很容易导致缓存雪崩的问题
01、有返回缓存
	/**
     * TODO @Cacheable并没有单独的失效时间的方法。
     *      但是可以在CacheManager配置,在+上自动刷新的功能,但是这样的的操作比较繁琐。
     *      如果不设置,只有统一的过期时间很容易导致缓存雪崩的问题。
     *
     * @Cacheable开启缓存功能 有对应的缓存就不进入方法 [需要返回值,没有返回值缓存空值]
     * value = "student", 【key ="#root.methodName" 或 key = "'名称'" 或 key = "#传入的参数" 或  key = "#接收参数的实体.属性"
     * 更多方式看spEl语法 】
     * <p>
     * student是分区名字
     * #root.methodName是spEl语法 也就是方法名 testCache
     * <p>
     * 在redis里面 他的存储就是 student::testCache
     * 同一个业务类型是数据放在同一个分区,树形结构,
     * 类如:a包里面有b,c。  b和c就是具体缓存。a就是名称空间
     * @Cacheable(value = {"student"},key ="#root.method.name" ,sync = true)
     * sync = true	这个属性的意思是加锁,解决缓存击穿问题
     */
    //localhost:8080/testCache
    @Cacheable(value = "student", key = "#root.method.name")
    @GetMapping("/saveCache01")
    public HashMap<String, List<Student>> saveCache01() {
        System.out.println("方法saveCache01执行");
        HashMap<String, List<Student>> map = new HashMap<String, List<Student>>();
        List<Student> studentList = new ArrayList<>();
        studentList.add(new Student("ssm", "888888"));
        studentList.add(new Student("boot", "123456"));
        studentList.add(new Student("cloud", "741147"));
        map.put("studentList", studentList);
        System.out.println("缓存成功");
        return map;
    }
02、无返回值,或者返回空,缓存空值
/**
     * 1、返回值为void 缓存空值
     * 2、返回null 缓存空值
     * TODO 【NullValue】
     *  sr+org.springframework.cache . support.NullValue xp
     */
    @Cacheable(value = "student", key = "#root.method.name")
    @GetMapping("/saveCache02")
    public void saveCache02() {
        System.out.println("方法saveCache02执行");
        HashMap<String, List<Student>> map = new HashMap<String, List<Student>>();
        List<Student> studentList = new ArrayList<>();
        studentList.add(new Student("ssm", "888888"));
        studentList.add(new Student("boot", "123456"));
        studentList.add(new Student("cloud", "741147"));
        map.put("studentList", studentList);
        System.out.println("缓存成功");
    }
4.5.2、@CacheEvict(失效模式)
简单的说:就是你执行了修改/删除的操作,他会将缓存里面数据给清除
第一种、删除单个
	 /**
     * 失效模式(可以叫删除模式)
     * value = "student",key = "'saveCache01'" 注意单引号
     * student是分区名字
     * saveCache01是缓存的key值。使用@Cacheable缓存的时候spEl我们指定的方法名
     * todo @CacheEvict(value = "student",allEntries = true)  allEntries = true表示删除student分区下所有数据
     */
    @CacheEvict(value = "student", key = "'saveCache01'")//缓存 失效模式
    @GetMapping("/updateData")
    public void updateData() {
        System.out.println("执行失效模式,删除缓存");
    }
第二种、删除多个,将整个分区的缓存都清除
好比说 a下面有b和c 。将b和c一起删除
所以:同一业务\同一类型缓存的数据要放在同一的分区下面
	//1、失效模式
	//2、allEntries = true 删除分区所有的数据
 	@CacheEvict(value = "category",allEntries = true)
    @Transactional
    @Override
    public void updateCascade(CategoryEntity category) {
		//service的业务代码

	}
4.5.3、@Caching(组合使用)
源码:
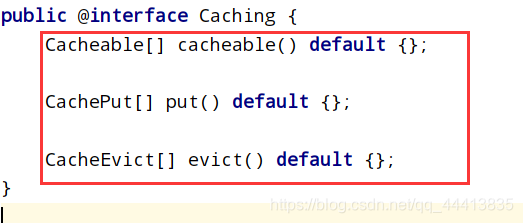
比如说要让哪个分区下面的哪个缓存失效(删除)
	/**
     * TODO @Caching 组合注解 允许在同一方法上使用多个嵌套的 @Cacheable、@CachePut和@CacheEvict
     * value ==> student分区
     * key   ==> saveCache01 缓存的key名称
     * 个人感觉还是使用@CacheEvict的删除分区里面全部的缓存方便点
     */
    @Caching(evict = {
            @CacheEvict(value = "student", key = "'saveCache01'"),
            @CacheEvict(value = "student", key = "'saveCache02'")
    })
    @GetMapping("/selectEvict")
    public void selectEvict() {
        System.out.println("组合注解=>指定分区下失效的key");
    }
4.5.4、@CachePut(双写模式)
/**
     *  @CachePut
     * 根据返回值更新缓存,【双写模式】,用得比较少,这边就不搞了
     */
    @CachePut
    @GetMapping("/testPut")
    public void testPut() {
        System.out.println("双写模式");
    }
4.5.5、redisTemplate获取数据方法
- 这边使用的是StringRedisTemplate
- 没使用RedisTemplate因为没去重构序列化器
	@Autowired
    StringRedisTemplate redisTemplate;//采用string的序列化构造器


	 @GetMapping("/getCache")
    public void getCache() {
        HashMap<String, List<Student>> map = new HashMap<String, List<Student>>();
        List<Student> studentList = new ArrayList<>();
        studentList.add(new Student("ssm", "888888"));
        studentList.add(new Student("boot", "123456"));
        studentList.add(new Student("cloud", "741147"));
        map.put("studentList", studentList);
        redisTemplate.opsForValue().set("student::saveCache03", String.valueOf(map));
        System.out.println("获取缓存");
        String s = redisTemplate.opsForValue().get("student::saveCache03");
        System.out.println(s);
    }
4.5.6、测试效果
01、

02、

03、

04、

五、简单实战案例
实体类:
package sqy.pojo;

import org.springframework.stereotype.Component;

/**
 * @author suqinyi
 * @Date 2022/1/21
 * user表
 */
//@Component
public class User {

    private String id;//主键
    private String userName;//用户名
    private String password;//密码

	//get /set /构造、tostring...省略
}
实战测试:
package sqy.controller;

import org.springframework.cache.annotation.*;
import org.springframework.web.bind.annotation.PostMapping;
import org.springframework.web.bind.annotation.RequestBody;
import org.springframework.web.bind.annotation.RestController;
import sqy.pojo.User;

import java.io.IOException;

/**
 * @author suqinyi
 * @Date 2022/1/21
 * springCache的实战使用【sqy测】--- TODO 缓存数据不要去数据库直接改数据!!!
 */
@RestController
@CacheConfig(cacheNames = "user")//指定缓存空间的名称
//@Lazy//懒加载--这个有毒测试着玩,用于注入的service
public class UserCacheController {


    /**
     * todo 说明
     *
     * @Cacheable 必须要有返回【实体、list、map】-- 用于 查询
     * @CachePut 必须要有返回【实体、list、map】-- 用于 新增、修改
     * @CacheEvict 返回值为void--用于 删除
     * @CacheConfig 配置      --通常用于指定缓存空间名称较多
     * @Cacheable 组合注解  [ cacheable() 、put()、evict() ] 存、加、删
     */
//    private static List<User> list = new ArrayList<>();


    //模拟从数据库获取到数据
    private User getUserData01() {
        User user = new User("001", "userOO1", "123456");
        return user;
    }
    //模拟从数据库获取到数据
    private User getUserData02() {
        User user = new User("002", "userOO2", "789456");
        return user;
    }


    /**
     * 主键查询--这个缓存是在service做,测试案例我就之间在controller写了
     * 名称空间value 在controller统一指定了
     * 缓存key为 名称空间::id
     *
     * @Cacheable(key = "#qvo.id",unless = "#result!=null" )
     * unless = "#result!=null" 返回的结果不为空才缓存
     * 这个方法不缓存空值
     * localhost:8080/findById
     * post  json  {"id":"1"}
     */
    @PostMapping("/findById")
    @Cacheable(key = "#qvo.id")
    public User findById(@RequestBody User qvo) {
        System.out.println("执行方法-findById");
        //查到数据
        if ("001".equals(qvo.getId())) {
            User user = getUserData01();
            return user;
        } else {
            return null;
        }
    }


    /**
     * 用户名查询
     * 名称空间value 在controller统一指定了
     * 缓存key为 名称空间::id
     * 这个查询缓存空值  sr+org.springframework.cache . support.NullValue xp
     * localhost:8080/findByName
     * post json {"userName":"userOO1"}
     */
    @PostMapping("/findByName")
    @Cacheable(key = "#qvo.userName")
    public User findByName(@RequestBody User qvo) {
        System.out.println("执行方法-findByName");
        //查到数据
        if ("userOO1".equals(qvo.getUserName())) {
            User user = getUserData01();
            return user;
        } else {
            return null;
        }
    }


    /**
     * 新增数据-测试 @Caching组合注解
     * 缓存新增的id和用户名
     * condition = "#result != null" 当结果不为空时缓存
     * localhost:8080/userSave
     * post json  {"id":"002","userName":"user002"}
     */
    @PostMapping("/userSave")
    @Caching(put = {
            @CachePut(key = "#result.id", condition = "#result != null"),
            @CachePut(key = "#result.userName", condition = "#result != null")
    })
    public User userSave(@RequestBody User vo) throws IOException {
        if ("002".equals(vo.getId()) && "user002".equals(vo.getUserName())) {
            //1、存入数据库 2、查询数据返回
            System.out.println(vo);
            return vo;
        } else {
            return null;
        }
    }

    /**
     * 修改数据-测试 @Caching组合注解---
     * 【有双写模式@CachePut 和 失效模式@CacheEvict 】
     * 缓存新增的id和用户名
     * condition = "#result != null" 当结果不为空时缓存
     *
     *  localhost:8080/userUpdate
     *  post json  {"id":"002","userName":"user003"}
     */
    @PostMapping("/userUpdate")
    @Caching(put = {
            @CachePut(key = "#result.id", condition = "#result != null"),
            @CachePut(key = "#result.userName", condition = "#result != null")
    })
    public User userUpdate(@RequestBody User vo) {
        //将原本2号数据user002改成user003
        if ("002".equals(vo.getId()) && "user003".equals(vo.getUserName())) {
            //查数据
            User user = getUserData02();
            //更新
            user.setUserName(vo.getUserName());
            user.setPassword(vo.getPassword());
            return user;
        } else {
            return null;
        }
    }


    /**
     * 删除数据
     * 缓存新增的id和用户名
     * condition = "#result != null" 当结果不为空时缓存
     * localhost:8080/userDel
     * post json {"id":"001","userName":"user001"}
     *
     */
    @PostMapping("/userDel")
    @Caching(evict = {
            @CacheEvict(key = "#vo.id"),
            @CacheEvict(key = "#vo.userName")
    })
    public void userDel(@RequestBody User vo) throws Exception {
        //删除1号数据
        if ("001".equals(vo.getId()) && "user001".equals(vo.getUserName())) {
            //1、查数据
            User user = getUserData01();
            System.out.println(user);
            //2、删除  ...
        } else {
            throw new Exception("id不是1,不能删");
        }
    }

    /**
     * 查询-有缓存就查缓存,不走方法
     * localhost:8080/findUser
     * post josn {"id":"001","userName":"user001"}
     */
    @PostMapping("/findUser")
    public void findUser(@RequestBody User vo) throws Exception {
        if ("001".equals(vo.getId())) {
            User user = this.findById(vo);
            System.out.println("findById==>" + user);
        }
        if ("user001".equals(vo.getUserName())) {
            User user = this.findByName(vo);
            System.out.println("findByName==>" + user);
        }
    }

}
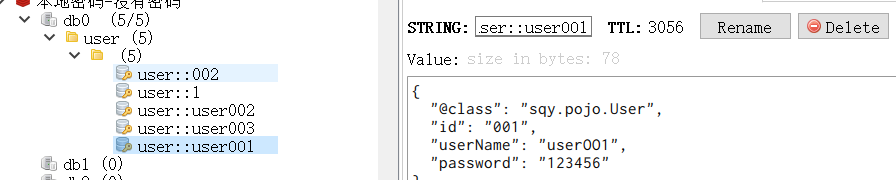
效果:
六、小归纳
@Cacheable
     代表当前方法的结果需要缓存
      如果缓存种有,方法不用调用
      如果缓存中没有,就会调用方法,将方法的结果放入缓存

      @Cacheable(value = {"category"})
      		每一个需要缓存的数据都来指定要放到那个名字缓存。[缓存的分区(推荐按照业务类型划分)]

      默认行为
          1、缓存中有,方法不用调用
          2、key默认生成,缓存的名字::SimpleKey [](自主生成的key值)
          3、缓存value的值,默认采用jdk序列化机制,将序列化后的数据存到redis
          4、默认的ttl时间是 -1 代表永不过期

      自定义操作:
          1)、指定生成的缓存使用的key:      使用key属性指定,接收一个spEl表达式
                    spEl语法说明==>官方表达式地址说明:https://docs.spring.io/spring-framework/docs/current/reference/html/integration.html#cache-spel-context

          2)、指定缓存的数据的存活时间:      在配置文件中修改ttl
          3)、将数据保存为json (因为json跨平台跨语言能交互)
          	  源码类
             	 CacheAutoConfiguration
              	 RedisCacheConfiguration
七 、Spring-Cache的不足:
SpringCache对读模式都进行处理,解决了缓存击穿,缓存穿透,缓存雪崩的问题
但是对写模式并没有去处理
读模式(SpringCache都处理了)
- 缓存穿透:查询一个null数据。
解决方法:缓存空数据。 spring.cache.redis.use-key-prefix=true - 缓存击穿:大量并发进来,查询一个正好过期的数据。
解决方法:加锁 :默认是无加锁的; sync = true(加锁,解决缓存击穿) - 缓存雪崩:大量的key同时过期
解决方法:加随机时间 (很容易弄巧成拙,要注意) spring.cache.redis.time-to-live=3600000
写模式(SpringCache没有管)
我们该如何解决(3种方式)
- 读写加锁
- 引入中间件Canal,感知到mysql的更新去更新
- 读多写多的,直接去数据库查询
八、个人推荐:
- 如果集成最后要配置缓存管理。
要加锁、加自动过期等配置 - 当然还有其他选择如:
redis、
redisson 分布式、
caffeine 这个会增大服务器压力、
Guava 是Google Fuava中的一个内存缓存模块、
Ehcache 是一个Java实现的开源分布式缓存框、
JBoss Cache 分布式
…
九、小结:
常规数据:(读多写少,即使性、一致性要求不高的的数据)
完成可以使用spring-cache,写模式(是要缓存的数据有过期时间就足够了)
特殊数据: 特殊设计


 354
354


 被折叠的 条评论
为什么被折叠?
被折叠的 条评论
为什么被折叠?
 到【灌水乐园】发言


