


SpringBoot事件监听器发布顺序
- ApplicationStartingEvent在运行开始时发送,但在进行任何处理之前(侦听器和初始化程序的注册除外)发送。
- 在创建上下文之前,将发送ApplicationEnvironmentPreparedEvent.
- 准备ApplicationContext并调用Applicat ionContextInitializers之后, 将发送ApplicationContextInitializedEvent
- 读取完配置类后发送ApplicationPreparedEvent。
- 在刷新上下文之后但在调用任何应用程序和命令行运行程序之前,将发送ApplicationStartedEvent.
- 紧随其后发送带有LivenessState.CORRECT的AvailabilityChangeEvent, 以指示该应用程序被视为处于活动状态。
- 在调用任何应用程序和命令行运行程序之后,将发送ApplicationReadyEvent。
- 紧随其后发送ReadabilityState.ACCEPTINGTRAFFIC的AvailabilityChangeEvent, 以指示应用程序己准备就绪,可以处理请求
- 如果启动时发生异常,则发送ApplicationFailedEvent
SpringApplication的构造方法
	public SpringApplication(ResourceLoader resourceLoader, Class<?>... primarySources) {
		// 设置资源加载器为null
		this.resourceLoader = resourceLoader;
		// 断言加载资源类不能为null(Application)
		Assert.notNull(primarySources, "PrimarySources must not be null");
		// 将primarySources数组转换为List,最后放到LinkedHashSet集合中
		this.primarySources = new LinkedHashSet<>(Arrays.asList(primarySources));
		//【1.1 推断应用类型,后面会根据类型初始化对应的环境。常用的一般都是servlet环境 】
        //从classpath下做一个推断,推断当前应用的类型
		this.webApplicationType = WebApplicationType.deduceFromClasspath();
		//【1.2 初始化classpath下 META-INF/spring.factories中已配置的ApplicationContextInitializer 】
       //ApplicationContextInitializer 是Spring框架的类, 这个类的主要目的就是在ConfigurableApplicationContext 调用refresh()方法之前,回调这个类的initialize方法。
//通过ConfigurableApplicationContext 的实例获取容器的环境Environment,从而实现对配置文件的修改完善等工作。

		setInitializers((Collection) getSpringFactoriesInstances(ApplicationContextInitializer.class));
		//【1.3 初始化classpath下所有已配置的 ApplicationListener 】
        //ApplicationListener 的加载过程和上面的 ApplicationContextInitializer 类的加载过程是一样的,不多说了。
//至于 ApplicationListener 是spring的事件监听器,典型的观察者模式,通过ApplicationEvent 类和 ApplicationListener 接口,可以实现对spring容器全生命周期的监听,
//当然也可以自定义监听事件
		setListeners((Collection) getSpringFactoriesInstances(ApplicationListener.class));
		//【1.4 根据调用栈,推断出 main 方法的类名 】==> com.nieyp.Application
        //com.nieyp为包名
		this.mainApplicationClass = deduceMainApplicationClass();
	}
deduceFromClasspath()
public enum WebApplicationType {

	/**
	 * 应用程序不是web应用,也不应该用web服务器去启动
	 */
	NONE,

	/**
	 * 应用程序应作为基于servlet的web应用程序运行,并应启动嵌入式servlet web(tomcat)服务器。
	 */
	SERVLET,

	/**
	 * 应用程序应作为 reactive web应用程序运行,并应启动嵌入式 reactive web服务器。
	 */
	REACTIVE;

	private static final String[] SERVLET_INDICATOR_CLASSES = { "javax.servlet.Servlet",
			"org.springframework.web.context.ConfigurableWebApplicationContext" };

	private static final String WEBMVC_INDICATOR_CLASS = "org.springframework.web.servlet.DispatcherServlet";

	private static final String WEBFLUX_INDICATOR_CLASS = "org.springframework.web.reactive.DispatcherHandler";

	private static final String JERSEY_INDICATOR_CLASS = "org.glassfish.jersey.servlet.ServletContainer";

	private static final String SERVLET_APPLICATION_CONTEXT_CLASS = "org.springframework.web.context.WebApplicationContext";

	private static final String REACTIVE_APPLICATION_CONTEXT_CLASS = "org.springframework.boot.web.reactive.context.ReactiveWebApplicationContext";

	/**
	 * 判断 应用的类型
	 * NONE: 应用程序不是web应用,也不应该用web服务器去启动
	 * SERVLET: 应用程序应作为基于servlet的web应用程序运行,并应启动嵌入式servlet web(tomcat)服务器。
	 * REACTIVE: 应用程序应作为 reactive web应用程序运行,并应启动嵌入式 reactive web服务器。
	 */
	static WebApplicationType deduceFromClasspath() {
		// classpath下必须存在org.springframework.web.reactive.DispatcherHandler
		if (ClassUtils.isPresent(WEBFLUX_INDICATOR_CLASS, null) && !ClassUtils.isPresent(WEBMVC_INDICATOR_CLASS, null)
				&& !ClassUtils.isPresent(JERSEY_INDICATOR_CLASS, null)) {
			return WebApplicationType.REACTIVE;
		}

        //     SERVLET_INDICATOR_CLASSES = { "javax.servlet.Servlet",
			"org.springframework.web.context.ConfigurableWebApplicationContext" };
		for (String className : SERVLET_INDICATOR_CLASSES) {
			if (!ClassUtils.isPresent(className, null)) {
				return WebApplicationType.NONE;
			}
		}
		// classpath环境下存在javax.servlet.Servlet或者org.springframework.web.context.ConfigurableWebApplicationContext
		return WebApplicationType.SERVLET;
	}


返回类型是WebApplicationType的枚举类型, WebApplicationType 有三个枚举,三个枚举的解释如其中注释

具体的判断逻辑如下:

WebApplicationType.REACTIVE classpath下存在org.springframework.web.reactive.DispatcherHandler

WebApplicationType.SERVLET classpath下存在javax.servlet.Servlet或者org.springframework.web.context.ConfigurableWebApplicationContext

WebApplicationType.NONE 不满足以上条件。
总结:
- 获取启动类:根据启动类加载IOC容器
- 获取web应用类型
- spring.factories读取了对外扩展的ApplicationContextInitializer, ApplicationListener
- 读取ApplicationListener监听器
- 将main方法所在的类放入mainApplicationClass
run方法
总体流程介绍
- 记录启动开始事件
- 开启handless
- 发布1.ApplicationStartingEvent事件
- 封装命令行参数ApplicationArguments
- 读取环境配置信息
- 根据webApplicationType创建环境变量信息
- 配置环境变量
- 将现有环境信息设置为@configurationProperties的数据源,并且放在第一位
- 发布2.ApplicationEnvironmentPreparedEvent
- 将Spring.main的配置绑定到SpringApplication属性上
- 将现有环境信息,设置@configurationProperties的数据源,更新并且放在第一位
- 设置忽略bean:spring:beaninfo:ignore
- 打印Banner
- 实例化Spring上下文AnnotationConfigServletWebServerApplicationContext
- 初始化失败分析器
- 准备上下文
- 调用ApplicationContextInitializer
- 发布3.ApplicationContextInitializedEvent
- 打印启动信息和profile.active信息
- 将ApplicationArguments,printedBanner注册为Bean
- 设置不允许同名Bean
- 设置是否懒加载Bean
- 读取启动类为BeanDefinition
- 将SpringBoot的监听器添加到context发布4.ApplicationPreparedEvent
- 后面的属于spring源码部分,这个不在介绍
概述
- 第一步:获取并启动监听器
- 第二步:构造容器环境
- 第三步:初始化应用上下文
- 第四步:刷新上下文前的准备阶段
- 第五步:刷新上下文
- 第六步:刷新上下文后的扩展接口
public ConfigurableApplicationContext run(String... args) {
		//时间监控
		StopWatch stopWatch = new StopWatch();
		stopWatch.start();
		ConfigurableApplicationContext context = null;
		Collection<SpringBootExceptionReporter> exceptionReporters = new ArrayList<>();

		configureHeadlessProperty();
		//获取spring.factories中的监听器变量,args为指定的参数数组,默认为当前类SpringApplication
		//第一步:获取并启动监听器EventPublishingRunListener启动事件发布监听器,主要用来发布启动事件
        //springBoot框架中最早执行的监听器
		SpringApplicationRunListeners listeners = getRunListeners(args);
		listeners.starting();
		try {
			ApplicationArguments applicationArguments = new DefaultApplicationArguments(
					args);
			//第二步:构造容器环境
			ConfigurableEnvironment environment = prepareEnvironment(listeners,
					applicationArguments);
			//设置需要忽略的bean
			configureIgnoreBeanInfo(environment);
			//打印banner
			Banner printedBanner = printBanner(environment);
			//第三步:初始化应用上下文
			context = createApplicationContext();
			    //实例化SpringBootExceptionReporter.class,用来支持报告关于启动的错误
			exceptionReporters = getSpringFactoriesInstances(
					SpringBootExceptionReporter.class,
					new Class[] { ConfigurableApplicationContext.class }, context);
			//第四步:刷新上下文前的准备阶段
			prepareContext(context, environment, listeners, applicationArguments,
					printedBanner);
			//第五步:刷新应用上下文
			refreshContext(context);
			//第六步:刷新容器后的扩展接口
			afterRefresh(context, applicationArguments);
			stopWatch.stop();
			if (this.logStartupInfo) {
				new StartupInfoLogger(this.mainApplicationClass)
						.logStarted(getApplicationLog(), stopWatch);
			}
			listeners.started(context);
			callRunners(context, applicationArguments);
		}
		catch (Throwable ex) {
			handleRunFailure(context, ex, exceptionReporters, listeners);
			throw new IllegalStateException(ex);
		}

		try {
			listeners.running(context);
		}
		catch (Throwable ex) {
			handleRunFailure(context, ex, exceptionReporters, null);
			throw new IllegalStateException(ex);
		}
		return context;
	}
第一步:获取并启动监听器
事件机制在Spring中是很重要的一部分内容,通过事件机制我们可以监听Spring容器中正在发生的一些事件,同样也可以自定义监听事件。

Spring的事件为Bean和Bean之间的消息传递提供支持。

当一个对象处理完某种任务后,通知另外的对象进行某些处理,常用的场景有进行某些操作后发送通知,消息、邮件等情况。
	private SpringApplicationRunListeners getRunListeners(String[] args) {
		Class<?>[] types = new Class<?>[] { SpringApplication.class, String[].class };
		return new SpringApplicationRunListeners(logger,
                //加载spring.factories,完成SpringApplicationRunlistener实例化工作----===>EventPublishingRunListener
				getSpringFactoriesInstances(SpringApplicationRunListener.class, types, this, args));
	}

//然后调用EventPublishingRunListener的starting方法
isteners.starting();

SpringApplicationRunListeners负责在SpringBoot启动的不同阶段广播出不同的消息,传递给ApplicationListsner监听器实现类
第二步:构造应用的上下文环境
应用上下文环境包括什么呢?

包括计算机的环境,Java环境,Spring的运行环境,Spring项目的配置(在SpringBoot中就是那个熟悉的application.properties/yaml)等等。
SpringBoot之Environment中有明确介绍,这里不再说明
第三步:初始化应用上下文
- 在SpringBoot工程中,应用类型分为三种,如下代码所示。
public enum WebApplicationType {

	/**
	 * The application should not run as a web application and should not start an
	 * embedded web server.
	 *
	 * 应用程序不是web应用,也不应该用web服务器去启动
	 */
	NONE,

	/**
	 * The application should run as a servlet-based web application and should start an
	 * embedded servlet web server.
	 *
	 * 应用程序应作为基于servlet的web应用程序运行,并应启动嵌入式servlet web(tomcat)服务器。
	 */
	SERVLET,

	/**
	 * The application should run as a reactive web application and should start an
	 * embedded reactive web server.
	 *
	 * 应用程序应作为 reactive web应用程序运行,并应启动嵌入式 reactive web服务器。
	 */
	REACTIVE;
}
- 对应三种应用类型,SpringBoot项目有三种对应的应用上下文,我们以web工程为例,即其上下文为AnnotationConfigServletWebServerApplicationContext。
public class SpringApplication {

	protected ConfigurableApplicationContext createApplicationContext() {
		Class<?> contextClass = this.applicationContextClass;
		if (contextClass == null) {
			try {
				switch (this.webApplicationType) {
				case SERVLET:
					// AnnotationConfigServletWebServerApplicationContext
					contextClass = Class.forName(DEFAULT_SERVLET_WEB_CONTEXT_CLASS);
					break;
				case REACTIVE:
					// AnnotationConfigReactiveWebServerApplicationContext
					contextClass = Class.forName(DEFAULT_REACTIVE_WEB_CONTEXT_CLASS);
					break;
				default:
					// AnnotationConfigApplicationContext
					contextClass = Class.forName(DEFAULT_CONTEXT_CLASS);
				}
			}
			catch (ClassNotFoundException ex) {
				throw new IllegalStateException(
						"Unable create a default ApplicationContext, please specify an ApplicationContextClass", ex);
			}
		}
		// 不但初始化了AnnotationConfigServletWebServerApplicationContext类,也就是我们的上下文context
		// 同样也触发了GenericApplicationContext类的构造函数,从而IoC容器也创建了。
		return (ConfigurableApplicationContext) BeanUtils.instantiateClass(contextClass);
	}
}
用上下文可以理解成IoC容器的高级表现形式,应用上下文确实是在IoC容器的基础上丰富了一些高级功能。

应用上下文对IoC容器是持有的关系。他的一个属性beanFactory就是IoC容器(DefaultListableBeanFactory)。

所以他们之间是持有,和扩展的关系。

接下来看GenericApplicationContext类
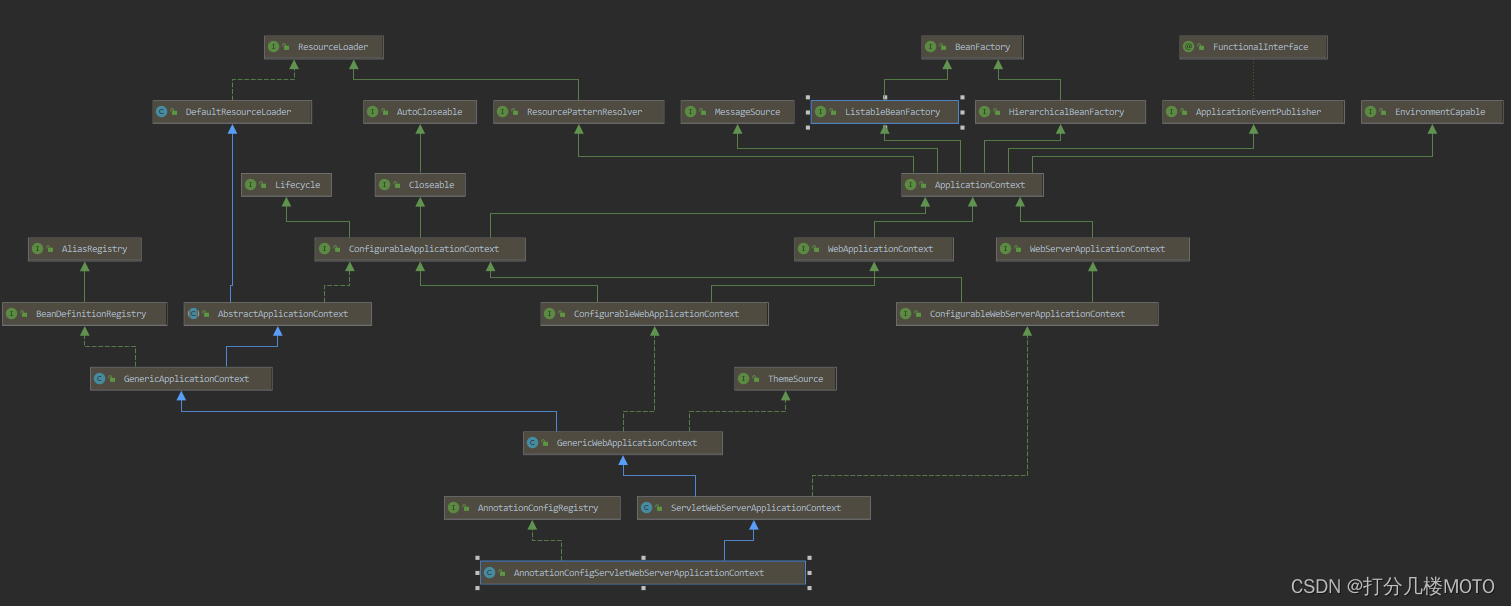
public class GenericApplicationContext extends AbstractApplicationContext implements BeanDefinitionRegistry {

	private final DefaultListableBeanFactory beanFactory;

	@Nullable
	private ResourceLoader resourceLoader;

	private boolean customClassLoader = false;

	private final AtomicBoolean refreshed = new AtomicBoolean();


	/**
	 * Create a new GenericApplicationContext.
	 * @see #registerBeanDefinition
	 * @see #refresh
	 */
	public GenericApplicationContext() {
		this.beanFactory = new DefaultListableBeanFactory();
	}

	/**
	 * Create a new GenericApplicationContext with the given DefaultListableBeanFactory.
	 * @param beanFactory the DefaultListableBeanFactory instance to use for this context
	 * @see #registerBeanDefinition
	 * @see #refresh
	 */
	public GenericApplicationContext(DefaultListableBeanFactory beanFactory) {
		Assert.notNull(beanFactory, "BeanFactory must not be null");
		this.beanFactory = beanFactory;
	}

//beanFactory正是在AnnotationConfigServletWebServerApplicationContext实现的接口GenericApplicationContext中定义的。
//在上面createApplicationContext()方法中的,BeanUtils.instantiateClass(contextClass) 这个方法中,不但初始化了AnnotationConfigServletWebServerApplicationContext类,
//也就是我们的上下文context,同样也触发了GenericApplicationContext类的构造函数,从而IoC容器也创建了。
//仔细看他的构造函数,有没有发现一个很熟悉的类DefaultListableBeanFactory,没错,DefaultListableBeanFactory就是IoC容器真实面目了。
//在后面的refresh()方法分析中,DefaultListableBeanFactory是无处不在的存在感。
//debug跳过createApplicationContext()方法。

如上图所示,context就是我们熟悉的上下文(也有人称之为容器,都可以,看个人爱好和理解),beanFactory就是我们所说的IoC容器的真实面孔了。
细细感受下上下文和容器的联系和区别,对于我们理解源码有很大的帮助。
在我们学习过程中,我们也是将上下文和容器严格区分开来的。
第四步:刷新上下文前的准备阶段
- 前面我们介绍了SpringBoot 启动流程run()方法的前三步,接下来再来介绍:第四步:刷新应用上下文前的准备阶段。也就是prepareContext()方法。
	private void prepareContext(ConfigurableApplicationContext context, ConfigurableEnvironment environment,
			SpringApplicationRunListeners listeners, ApplicationArguments applicationArguments, Banner printedBanner) {
		// 设置容器环境
		context.setEnvironment(environment);
		// 执行容器后置处理
		postProcessApplicationContext(context);
		// 执行容器中的 ApplicationContextInitializer 包括spring.factories和通过三种方式自定义的
		applyInitializers(context);
		// 向各个监听器发送容器已经准备好的事件
		listeners.contextPrepared(context);
		if (this.logStartupInfo) {
			logStartupInfo(context.getParent() == null);
			logStartupProfileInfo(context);
		}
		// Add boot specific singleton beans
		// 将main函数中的args参数封装成单例Bean,注册进容器
		ConfigurableListableBeanFactory beanFactory = context.getBeanFactory();
		beanFactory.registerSingleton("springApplicationArguments", applicationArguments);
		// 将 printedBanner 也封装成单例,注册进容器
		if (printedBanner != null) {
			beanFactory.registerSingleton("springBootBanner", printedBanner);
		}
		if (beanFactory instanceof DefaultListableBeanFactory) {
			((DefaultListableBeanFactory) beanFactory)
					.setAllowBeanDefinitionOverriding(this.allowBeanDefinitionOverriding);
		}
		if (this.lazyInitialization) {
			context.addBeanFactoryPostProcessor(new LazyInitializationBeanFactoryPostProcessor());
		}
		// Load the sources
		Set<Object> sources = getAllSources();
		Assert.notEmpty(sources, "Sources must not be empty");
		// 加载我们的启动类,将启动类注入容器,加载成BeanDefinition
		load(context, sources.toArray(new Object[0]));
		// 发布容器已加载事件
		listeners.contextLoaded(context);
	}
- 首先看这行 Set sources = getAllSources();在getAllSources()中拿到了我们的启动类。我们重点讲解这行 load(context, sources.toArray(new Object[0]));
	protected void load(ApplicationContext context, Object[] sources) {
		if (logger.isDebugEnabled()) {
			logger.debug("Loading source " + StringUtils.arrayToCommaDelimitedString(sources));
		}
		//创建 BeanDefinitionLoader
		BeanDefinitionLoader loader = createBeanDefinitionLoader(getBeanDefinitionRegistry(context), sources);
		if (this.beanNameGenerator != null) {
			loader.setBeanNameGenerator(this.beanNameGenerator);
		}
		if (this.resourceLoader != null) {
			loader.setResourceLoader(this.resourceLoader);
		}
		if (this.environment != null) {
			loader.setEnvironment(this.environment);
		}
		loader.load();
	}
- getBeanDefinitionRegistry()
	private BeanDefinitionRegistry getBeanDefinitionRegistry(ApplicationContext context) {
		// 将我们前文创建的上下文强转为BeanDefinitionRegistry,他们之间是有继承关系的。
		if (context instanceof BeanDefinitionRegistry) {
			return (BeanDefinitionRegistry) context;
		}
		if (context instanceof AbstractApplicationContext) {
			return (BeanDefinitionRegistry) ((AbstractApplicationContext) context).getBeanFactory();
		}
		throw new IllegalStateException("Could not locate BeanDefinitionRegistry");
	}

//这里将我们前文创建的上下文强转为BeanDefinitionRegistry,他们之间是有继承关系的。
//BeanDefinitionRegistry定义了很重要的方法registerBeanDefinition(),该方法将BeanDefinition注册进//DefaultListableBeanFactory容器的beanDefinitionMap中。
- createBeanDefinitionLoader()
	BeanDefinitionLoader(BeanDefinitionRegistry registry, Object... sources) {
		Assert.notNull(registry, "Registry must not be null");
		Assert.notEmpty(sources, "Sources must not be empty");
		this.sources = sources;
		// 注解形式的Bean定义读取器 比如:@Configuration @Bean @Component @Controller @Service等等
		this.annotatedReader = new AnnotatedBeanDefinitionReader(registry);
		// XML形式的Bean定义读取器
		this.xmlReader = new XmlBeanDefinitionReader(registry);
		if (isGroovyPresent()) {
			this.groovyReader = new GroovyBeanDefinitionReader(registry);
		}
		// 类路径扫描器
		this.scanner = new ClassPathBeanDefinitionScanner(registry);
		// 扫描器添加排除过滤器
		this.scanner.addExcludeFilter(new ClassExcludeFilter(sources));
	}

//先记住上面的三个属性,上面三个属性在,BeanDefinition的Resource定位,和BeanDefinition的注册中起到了很重要的作用。
- loader.load()
private int load(Object source) {
		Assert.notNull(source, "Source must not be null");
		// 从Class加载,当前我们的主类会按Class加载。
		if (source instanceof Class<?>) {
			return load((Class<?>) source);
		}
		// 从Resource加载
		if (source instanceof Resource) {
			return load((Resource) source);
		}
		// 从Package加载
		if (source instanceof Package) {
			return load((Package) source);
		}
		// 从 CharSequence加载
		if (source instanceof CharSequence) {
			return load((CharSequence) source);
		}
		throw new IllegalArgumentException("Invalid source type " + source.getClass());
	}
- 当前我们的主类会按Class加载,继续跟进load()方法。
	private int load(Class<?> source) {
		if (isGroovyPresent() && GroovyBeanDefinitionSource.class.isAssignableFrom(source)) {
			// Any GroovyLoaders added in beans{} DSL can contribute beans here
			GroovyBeanDefinitionSource loader = BeanUtils.instantiateClass(source, GroovyBeanDefinitionSource.class);
			load(loader);
		}
		// 判断主类是不是存在@Component注解,主类@SpringBootApplication是一个组合注解,包含@Component。
		if (isComponent(source)) {
			// 将启动类的BeanDefinition注册进beanDefinitionMap
			this.annotatedReader.register(source);
			return 1;
		}
		return 0;
	}
isComponent(source)判断主类是不是存在@Component注解,主类@SpringBootApplication是一个组合注解,包含@Component。

this.annotatedReader.register(source);跟进register()方法,最终进到AnnotatedBeanDefinitionReader类的doRegisterBean()方法。
	public void register(Class<?>... componentClasses) {
		for (Class<?> componentClass : componentClasses) {
			registerBean(componentClass);
		}
	}

	<T> void doRegisterBean(Class<T> annotatedClass, @Nullable Supplier<T> instanceSupplier, @Nullable String name,
			@Nullable Class<? extends Annotation>[] qualifiers, BeanDefinitionCustomizer... definitionCustomizers) {

		// 将指定的类 封装为AnnotatedGenericBeanDefinition
		AnnotatedGenericBeanDefinition abd = new AnnotatedGenericBeanDefinition(annotatedClass);
		if (this.conditionEvaluator.shouldSkip(abd.getMetadata())) {
			return;
		}

		abd.setInstanceSupplier(instanceSupplier);
		// 获取该类的 scope 属性
		ScopeMetadata scopeMetadata = this.scopeMetadataResolver.resolveScopeMetadata(abd);
		abd.setScope(scopeMetadata.getScopeName());
		String beanName = (name != null ? name : this.beanNameGenerator.generateBeanName(abd, this.registry));

		AnnotationConfigUtils.processCommonDefinitionAnnotations(abd);
		if (qualifiers != null) {
			for (Class<? extends Annotation> qualifier : qualifiers) {
				if (Primary.class == qualifier) {
					abd.setPrimary(true);
				}
				else if (Lazy.class == qualifier) {
					abd.setLazyInit(true);
				}
				else {
					abd.addQualifier(new AutowireCandidateQualifier(qualifier));
				}
			}
		}
		for (BeanDefinitionCustomizer customizer : definitionCustomizers) {
			customizer.customize(abd);
		}

		BeanDefinitionHolder definitionHolder = new BeanDefinitionHolder(abd, beanName);
		definitionHolder = AnnotationConfigUtils.applyScopedProxyMode(scopeMetadata, definitionHolder, this.registry);
		// 将该BeanDefinition注册到IoC容器的beanDefinitionMap中
		BeanDefinitionReaderUtils.registerBeanDefinition(definitionHolder, this.registry);
	}


//在该方法中将主类封装成AnnotatedGenericBeanDefinition
//BeanDefinitionReaderUtils.registerBeanDefinition(definitionHolder, this.registry);方法将BeanDefinition注册进//beanDefinitionMap

	public static void registerBeanDefinition(
			BeanDefinitionHolder definitionHolder, BeanDefinitionRegistry registry)
			throws BeanDefinitionStoreException {

		// Register bean definition under primary name.
		// primary name 其实就是id吧
		String beanName = definitionHolder.getBeanName();
		// 注册这个 Bean
		registry.registerBeanDefinition(beanName, definitionHolder.getBeanDefinition());

		// Register aliases for bean name, if any.
		// 然后就是注册别名
		// 如果还有别名的话,也要根据别名全部注册一遍,不然根据别名就会找不到 Bean 了
		String[] aliases = definitionHolder.getAliases();
		if (aliases != null) {
			for (String alias : aliases) {
				// alias -> beanName 保存它们的别名信息,这个很简单,用一个 map 保存一下就可以了,
				// 获取的时候,会先将 alias 转换为 beanName,然后再查找
				registry.registerAlias(beanName, alias);
			}
		}
	}
- registerBeanDefinition()
	@Override
	public void registerBeanDefinition(String beanName, BeanDefinition beanDefinition)
			throws BeanDefinitionStoreException {

		Assert.hasText(beanName, "Bean name must not be empty");
		Assert.notNull(beanDefinition, "BeanDefinition must not be null");

		if (beanDefinition instanceof AbstractBeanDefinition) {
			try {
				// 最后一次校验了
				// 对bean的Overrides进行校验,还不知道会在哪处理这些overrides
				((AbstractBeanDefinition) beanDefinition).validate();
			}
			catch (BeanDefinitionValidationException ex) {
				throw new BeanDefinitionStoreException(beanDefinition.getResourceDescription(), beanName,
						"Validation of bean definition failed", ex);
			}
		}
		// existing? 还记得 “允许 bean 覆盖” 这个配置吗?allowBeanDefinitionOverriding
		// 之后会看到,所有的 Bean 注册后会放入这个 beanDefinitionMap 中;
		// 判断是否存在重复名字的bean,之后看允不允许override
		// 以前使用synchronized实现互斥访问,现在采用ConcurrentHashMap
		BeanDefinition existingDefinition = this.beanDefinitionMap.get(beanName);
		// 处理重复名称的 Bean 定义的情况
		if (existingDefinition != null) {
			if (!isAllowBeanDefinitionOverriding()) {
				// 如果不允许覆盖的话,抛异常
				// 如果该类不允许 Overriding 直接抛出异常
				throw new BeanDefinitionStoreException(beanDefinition.getResourceDescription(), beanName,
						"Cannot register bean definition [" + beanDefinition + "] for bean '" + beanName +
						"': There is already [" + existingDefinition + "] bound.");
			}
			else if (existingDefinition.getRole() < beanDefinition.getRole()) {
				// e.g. was ROLE_APPLICATION, now overriding with ROLE_SUPPORT or ROLE_INFRASTRUCTURE
				// log...用框架定义的 Bean 覆盖用户自定义的 Bean
				if (logger.isWarnEnabled()) {
					logger.warn("Overriding user-defined bean definition for bean '" + beanName +
							"' with a framework-generated bean definition: replacing [" +
							existingDefinition + "] with [" + beanDefinition + "]");
				}
			}
			else if (!beanDefinition.equals(existingDefinition)) {
				// log...用新的 Bean 覆盖旧的 Bean
				if (logger.isInfoEnabled()) {
					logger.info("Overriding bean definition for bean '" + beanName +
							"' with a different definition: replacing [" + existingDefinition +
							"] with [" + beanDefinition + "]");
				}
			}
			else {
				// log...用同等的 Bean 覆盖旧的 Bean,这里指的是 equals 方法返回 true 的 Bean
				if (logger.isDebugEnabled()) {
					logger.debug("Overriding bean definition for bean '" + beanName +
							"' with an equivalent definition: replacing [" + existingDefinition +
							"] with [" + beanDefinition + "]");
				}
			}
			// 覆盖
			// 注册进beanDefinitionMap
			this.beanDefinitionMap.put(beanName, beanDefinition);
		}
		else {
			// 判断是否已经有其他的 Bean 开始初始化了.
			// 注意,"注册Bean" 这个动作结束,Bean 依然还没有初始化,我们后面会有大篇幅说初始化过程,
			// 在 Spring 容器启动的最后,会 预初始化 所有的 singleton beans
			if (hasBeanCreationStarted()) {
				// Cannot modify startup-time collection elements anymore (for stable iteration)
				synchronized (this.beanDefinitionMap) {
					this.beanDefinitionMap.put(beanName, beanDefinition);
					List<String> updatedDefinitions = new ArrayList<>(this.beanDefinitionNames.size() + 1);
					updatedDefinitions.addAll(this.beanDefinitionNames);
					updatedDefinitions.add(beanName);
					this.beanDefinitionNames = updatedDefinitions;
					if (this.manualSingletonNames.contains(beanName)) {
						Set<String> updatedSingletons = new LinkedHashSet<>(this.manualSingletonNames);
						updatedSingletons.remove(beanName);
						this.manualSingletonNames = updatedSingletons;
					}
				}
			}
			else {
				// 最正常的应该是进到这个分支。
				// Still in startup registration phase
				// 如果仍处于启动注册阶段,注册进beanDefinitionMap
				// 将 BeanDefinition 放到这个 map 中,这个 map 保存了所有的 BeanDefinition
				this.beanDefinitionMap.put(beanName, beanDefinition);
				// 这是个 ArrayList,所以会按照 bean 配置的顺序保存每一个注册的 Bean 的名字
				this.beanDefinitionNames.add(beanName);
				// 这是个 LinkedHashSet,代表的是手动注册的 singleton bean,
				// 注意这里是 remove 方法,到这里的 Bean 当然不是手动注册的
				// 手动指的是通过调用以下方法注册的 bean :
				//     registerSingleton(String beanName, Object singletonObject)
				// 这不是重点,解释只是为了不让大家疑惑。Spring 会在后面"手动"注册一些 Bean,
				// 如 "environment"、"systemProperties" 等 bean,我们自己也可以在运行时注册 Bean 到容器中的
				this.manualSingletonNames.remove(beanName);
			}
			// 这个不重要,在预初始化的时候会用到,不必管它。
			this.frozenBeanDefinitionNames = null;
		}

		if (existingDefinition != null || containsSingleton(beanName)) {
			resetBeanDefinition(beanName);
		}
		else if (isConfigurationFrozen()) {
			clearByTypeCache();
		}
	}

//最终来到DefaultListableBeanFactory类的registerBeanDefinition()方法,DefaultListableBeanFactory类还熟悉吗?
//相信大家一定非常熟悉这个类了。
//DefaultListableBeanFactory是IoC容器的具体产品。
//仔细看这个方法registerBeanDefinition(),首先会检查是否已经存在,如果存在并且不允许被覆盖则直接抛出异常。
//不存在的话就直接注册进beanDefinitionMap中。
//debug跳过prepareContext()方法,可以看到,启动类的BeanDefinition已经注册进来了。

第五步:刷新上下文
- 这一步可以看Spring源码解析部分,不再详细介绍
首先我们要知道到IoC容器的初始化过程,主要分下面三步:

1 BeanDefinition的Resource定位

2 BeanDefinition的载入

3 向IoC容器注册BeanDefinition

在上一小节介绍了prepareContext()方法,在准备刷新阶段做了什么工作。

接下来我们主要从refresh()方法中总结IoC容器的初始化过程。

从run方法的,refreshContext()方法一路跟下去,最终来到AbstractApplicationContext类的refresh()方法。
@Override
	public void refresh() throws BeansException, IllegalStateException {
		// 同步的方法;
		// 来个锁,不然 refresh() 还没结束,你又来个启动或销毁容器的操作,那不就乱套了嘛
		synchronized (this.startupShutdownMonitor) {
			// Prepare this context for refreshing.
			// 准备工作,包括设置启动时间,是否激活标识位
			// 初始化属性源(property source)配置;

			// 准备工作,记录下容器的启动时间、标记“已启动”状态、处理配置文件中的占位符
			/**
			 * 前戏,做容器刷新前的准备工作
			 * 1.设置容器的启动时间
			 * 2.设置活跃状态为true
			 * 3.设置关闭状态为false
			 * 4.获取Environment对象,并加载当前系统的属性值到Environment对象中
			 * 5.准备监听器和事件的集合对象,默认为空的集合
			 */
			// 刷新上下文环境
			prepareRefresh();

			// Tell the subclass to refresh the internal bean factory.
			// 返回一个factory 为什么需要返回一个工厂
			// 因为要对工厂进行初始化
			// 创建容器对象:DefaultListableBeanFactory
			// 加载xml配置文件的属性值到当前工厂中,最重要的就是BeanDefinition;

			// 这步比较关键,这步完成后,配置文件就会解析成一个个 Bean 定义,注册到 BeanFactory 中,
			// 当然,这里说的 Bean 还没有初始化,只是配置信息都提取出来了,
			// 注册也只是将这些信息都保存到了注册中心(说到底核心是一个 beanName-> beanDefinition 的 map)

			// 这里是在子类中启动 refreshBeanFactory() 的地方
			ConfigurableListableBeanFactory beanFactory = obtainFreshBeanFactory();

			// Prepare the bean factory for use in this context.
			// 准备工厂
			// beanFactory的准备工作,对各种属性进行填充;
			// 设置 BeanFactory 的类加载器,添加几个 BeanPostProcessor,手动注册几个特殊的 bean
			// 准备bean工厂,以便在此上下文中使用
			prepareBeanFactory(beanFactory);

			try {
				// Allows post-processing of the bean factory in context subclasses.
				// 子类覆盖方法做额外的处理,此处我们自己一般不做任何扩展工作,但是可以查看web中的代码,是有具体实现的;

				// 【这里需要知道 BeanFactoryPostProcessor 这个知识点,Bean 如果实现了此接口,
				// 那么在容器初始化以后,Spring 会负责调用里面的 postProcessBeanFactory 方法。】
				// 这里是提供给子类的扩展点,到这里的时候,所有的 Bean 都加载、注册完成了,但是都还没有初始化
				// 具体的子类可以在这步的时候添加一些特殊的 BeanFactoryPostProcessor 的实现类或做点什么事
				// 设置 beanFactory 的后置处理
				// postProcessBeanFactory()方法向上下文中添加了一系列的Bean的后置处理器。
				// 后置处理器工作的时机是在所有的beanDefinition加载完成之后,bean实例化之前执行。
				// 简单来说Bean的后置处理器可以修改BeanDefinition的属性信息。
				postProcessBeanFactory(beanFactory);

				// Invoke factory processors registered as beans in the context.
				// 在spring的环境中去执行已经被注册的factory processors
				// 设置执行自定义的ProcessBeanFactory和spring内部自己定义的
				// 调用各种beanFactory处理器;

				// 调用 BeanFactoryPostProcessor 各个实现类的 postProcessBeanFactory(factory) 方法

				// 调用 BeanFactory 的后处理器,这些处理器是在Bean 定义中向容器注册的
				invokeBeanFactoryPostProcessors(beanFactory);

				// Register bean processors that intercept bean creation.
				// 注册BeanPostProcessor
				// 注册bean处理器,这里只是注册功能,真正调用的是getBean方法;

				// 注册 BeanPostProcessor 的实现类,注意看和 BeanFactoryPostProcessor 的区别
				// 此接口两个方法: postProcessBeforeInitialization 和 postProcessAfterInitialization
				// 两个方法分别在 Bean 初始化之前和初始化之后得到执行。注意,到这里 Bean 还没初始化;

				// 注册Bean的后处理器,在Bean创建过程中调用
				registerBeanPostProcessors(beanFactory);

				// Initialize message source for this context.
				// 为上下文初始化message源,即不同语言的消息体,国际化处理,在springmvc的时候通过国际化的代码重点讲;

				// 初始化当前 ApplicationContext 的事件广播器,这里也不展开了
				// 初始化当前 ApplicationContext 的 MessageSource,国际化这里就不展开说了,不然没完没了了

				//对上下文中的消息源进行初始化
				initMessageSource();

				// Initialize event multicaster for this context.
				// 初始化应用事件广播器
				// 初始化事件监听多路广播器
				// 初始化上下文中的事件机制
				initApplicationEventMulticaster();

				// Initialize other special beans in specific context subclasses.
				// 留给子类来初始化其他的bean;

				// 从方法名就可以知道,典型的模板方法(钩子方法),
				// 具体的子类可以在这里初始化一些特殊的 Bean(在初始化 singleton beans 之前)

				//初始化其他特殊的Bean
				onRefresh();

				// Check for listener beans and register them.
				// 在所有注册的bean中查找listener bean,注册到消息广播器中;

				// 注册事件监听器,监听器需要实现 ApplicationListener 接口。这也不是我们的重点,过

				// 检查监听Bean并且将这些监听Bean向容器注册
				registerListeners();

				// Instantiate all remaining (non-lazy-init) singletons.
				// new 对象 单例
				// 初始化剩下的单实例(非懒加载的);

				// 重点,重点,重点
				// 初始化所有的 singleton beans
				//(lazy-init 的除外)
				// 实例化所有的(non-lazy-init)单例bean
				finishBeanFactoryInitialization(beanFactory);

				// Last step: publish corresponding event.
				// 完成刷新过程,通知生命周期处理器lifecycleProcessor刷新过程,同时发出ContextRefreshEvent通知别人;

				// 最后,广播事件,ApplicationContext 初始化完成
				// 发布容器事件,结束Refresh过程
				finishRefresh();
			}

			catch (BeansException ex) {
				if (logger.isWarnEnabled()) {
					logger.warn("Exception encountered during context initialization - " +
							"cancelling refresh attempt: " + ex);
				}

				// Destroy already created singletons to avoid dangling resources.
				// 销毁已经初始化的 singleton 的 Beans,以免有些 bean 会一直占用资源
				destroyBeans();

				// Reset 'active' flag.
				// 把异常往外抛
				cancelRefresh(ex);

				// Propagate exception to caller.
				throw ex;
			}

			finally {
				// Reset common introspection caches in Spring's core, since we
				// might not ever need metadata for singleton beans anymore...
				resetCommonCaches();
			}
		}
	}
- obtainFreshBeanFactory()
//在启动流程的第三步:初始化应用上下文中,我们创建了应用的上下文,并触发了GenericApplicationContext类的构造方法如下所示,
//创建了beanFactory,也就是创建了DefaultListableBeanFactory类。

public class GenericApplicationContext extends AbstractApplicationContext implements BeanDefinitionRegistry {

	private final DefaultListableBeanFactory beanFactory;

	@Nullable
	private ResourceLoader resourceLoader;

	private boolean customClassLoader = false;

	private final AtomicBoolean refreshed = new AtomicBoolean();


	/**
	 * Create a new GenericApplicationContext.
	 * @see #registerBeanDefinition
	 * @see #refresh
	 */
	public GenericApplicationContext() {
		this.beanFactory = new DefaultListableBeanFactory();
	}
}

//obtainFreshBeanFactory()方法,其实就是拿到我们之前创建的beanFactory。
	/**
	 * 主要做了三个工作:
	 * 1.刷新beanFactory
	 * 2.获取beanFactory
	 * 3.返回beanFactory
	 */
	protected ConfigurableListableBeanFactory obtainFreshBeanFactory() {
		// 初始化BeanFactory,并进行XML文件读取,并将得到的BeanFactory记录在当前实体的属性中;

		// 关闭旧的 BeanFactory (如果有),创建新的 BeanFactory,加载 Bean 定义、注册 Bean 等等
		// 刷新BeanFactory
		refreshBeanFactory();

		// 返回当前实体的beanFactory属性;

		// 返回刚刚创建的 BeanFactory
		// 获取beanFactory
		ConfigurableListableBeanFactory beanFactory = getBeanFactory();
		if (logger.isDebugEnabled()) {
			logger.debug("Bean factory for " + getDisplayName() + ": " + beanFactory);
		}
		return beanFactory;
	}

	@Override
	protected final void refreshBeanFactory() throws IllegalStateException {
		// 表示GenericApplicationContext只允许刷新一次
		// java J.U.C并发包中很重要的一个原子类AtomicBoolean。
		// 通过该类的compareAndSet()方法,可以实现一段代码绝对只实现一次的功能。
		if (!this.refreshed.compareAndSet(false, true)) {
			throw new IllegalStateException(
					"GenericApplicationContext does not support multiple refresh attempts: just call 'refresh' once");
		}
		this.beanFactory.setSerializationId(getId());
	}
TIPS:
1,AbstractApplicationContext类有两个子类实现了refreshBeanFactory(),但是在前面第三步初始化上下文的时候,实例化了GenericApplicationContext类,
所以没有进入AbstractRefreshableApplicationContext中的refreshBeanFactory()方法。
2,this.refreshed.compareAndSet(false, true)
这行代码在这里表示:GenericApplicationContext只允许刷新一次
这行代码,很重要,不是在Spring中很重要,而是这行代码本身。
首先看一下this.refreshed属性:
private final AtomicBoolean refreshed = new AtomicBoolean();
java J.U.C并发包中很重要的一个原子类AtomicBoolean。通过该类的compareAndSet()方法可以实现一段代码绝对只实现一次的功能。
- prepareBeanFactory(beanFactory)
	protected void prepareBeanFactory(ConfigurableListableBeanFactory beanFactory) {
		// Tell the internal bean factory to use the context's class loader etc.
		// 设置beanFactory的classloader为当前context的classloader;
		// 设置 BeanFactory 的类加载器,我们知道 BeanFactory 需要加载类,也就需要类加载器,
		// 这里设置为加载当前 ApplicationContext 类的类加载器
		// 配置类加载器:默认使用当前上下文的类加载器
		beanFactory.setBeanClassLoader(getClassLoader());
		// 设置beanFactory的表达式语言处理器;
		// 设置 BeanExpressionResolver
		// 配置EL表达式:在Bean初始化完成,填充属性的时候会用到
		beanFactory.setBeanExpressionResolver(new StandardBeanExpressionResolver(beanFactory.getBeanClassLoader()));
		// 为beanFactory增加一个默认的propertyEditor,这个主要是对bean的属性等设置管理的一个工具类
		// 添加属性编辑器 PropertyEditor
		beanFactory.addPropertyEditorRegistrar(new ResourceEditorRegistrar(this, getEnvironment()));

		// Configure the bean factory with context callbacks.
		// 添加beanPostProcessor,ApplicationContextAwareProcessor此类用来完成某些Aware对象的注入;
		// 添加一个 BeanPostProcessor,这个 processor 比较简单:
		// 实现了 Aware 接口的 beans 在初始化的时候,这个 processor 负责回调,
		// 这个我们很常用,如我们会为了获取 ApplicationContext 而 implement ApplicationContextAware
		// 注意:它不仅仅回调 ApplicationContextAware,
		// 还会负责回调 EnvironmentAware、ResourceLoaderAware 等,看下源码就清楚了
		// 添加Bean的后置处理器
		beanFactory.addBeanPostProcessor(new ApplicationContextAwareProcessor(this));
		// 设置要忽略自动装配的接口,很多同学理解不了为什么此处要对这些接口进行忽略,原因非常简单,这些接口的实现是由容器通过set方法进行注入的
		// 所以,在使用autoWire进行注入的时候需要将这些接口进行忽略;
		// 下面几行的意思就是,如果某个 bean 依赖于以下几个接口的实现类,在自动装配的时候忽略它们,
		// Spring 会通过其他方式来处理这些依赖。
		// 忽略装配以下指定的类
		beanFactory.ignoreDependencyInterface(EnvironmentAware.class);
		beanFactory.ignoreDependencyInterface(EmbeddedValueResolverAware.class);
		beanFactory.ignoreDependencyInterface(ResourceLoaderAware.class);
		beanFactory.ignoreDependencyInterface(ApplicationEventPublisherAware.class);
		beanFactory.ignoreDependencyInterface(MessageSourceAware.class);
		beanFactory.ignoreDependencyInterface(ApplicationContextAware.class);

		// BeanFactory interface not registered as resolvable type in a plain factory.
		// MessageSource registered (and found for autowiring) as a bean.
		// 设置几个自动装配的特殊规则,当在进行IOC初始化的时候,如果有多个实现,那么就使用指定的对象进行注入
		/**
		 * 下面几行就是为特殊的几个 bean 赋值,如果有 bean 依赖了以下几个,会注入这边相应的值,
		 * 之前我们说过,"当前 ApplicationContext 持有一个 BeanFactory",这里解释了第一行。
		 * ApplicationContext 还继承了 ResourceLoader、ApplicationEventPublisher、MessageSource
		 * 所以对于这几个依赖,可以赋值为 this,注意 this 是一个 ApplicationContext
		 * 那这里怎么没看到为 MessageSource 赋值呢?那是因为 MessageSource 被注册成为了一个普通的 bean
		 */
		// 将以下类注册到 beanFactory(DefaultListableBeanFactory) 的resolvableDependencies属性中
		beanFactory.registerResolvableDependency(BeanFactory.class, beanFactory);
		beanFactory.registerResolvableDependency(ResourceLoader.class, this);
		beanFactory.registerResolvableDependency(ApplicationEventPublisher.class, this);
		beanFactory.registerResolvableDependency(ApplicationContext.class, this);

		// Register early post-processor for detecting inner beans as ApplicationListeners.
		// 注册BPP;
		// 这个 BeanPostProcessor 也很简单,在 bean 实例化后,如果是 ApplicationListener 的子类,
		// 那么将其添加到 listener 列表中,可以理解成:注册 事件监听器
		// 将早期后处理器注册为application监听器,用于检测内部bean
		beanFactory.addBeanPostProcessor(new ApplicationListenerDetector(this));


		// Detect a LoadTimeWeaver and prepare for weaving, if found.
		// 增加对AspectJ的支持,在java中织入分为三种方式,分为编译器织入,类加载器织入,运行期织入,编译器织入是指在java编译器,采用特殊的编译器,将切面织入到java类中,
		// 而类加载器织入则指通过特殊的类加载器,在类字节码加载到JVM时,织入切面,运行期织入则是采用cglib和jdk进行切面的织入
		// AspectJ提供了两种织入方式,第一种是通过特殊编译器,在编译器,将AspectJ语言编写的切面类织入到java类中,第二种是类加载器织入,就是下面的load time waving.
		// 这里涉及到特殊的 bean,名为:loadTimeWeaver,这不是我们的重点,忽略它
		// tips: ltw 是 AspectJ 的概念,指的是在运行期进行织入,这个和 Spring AOP 不一样,感兴趣的读者请参考我写的关于 AspectJ 的另一篇文章 https://www.javadoop.com/post/aspectj
		// 如果当前BeanFactory包含loadTimeWeaver Bean,说明存在类加载期织入AspectJ,则把当前BeanFactory交给类加载期BeanPostProcessor实现类LoadTimeWeaverAwareProcessor来处理,
		// 从而实现类加载期织入AspectJ的目的。
		if (beanFactory.containsBean(LOAD_TIME_WEAVER_BEAN_NAME)) {
			beanFactory.addBeanPostProcessor(new LoadTimeWeaverAwareProcessor(beanFactory));
			// Set a temporary ClassLoader for type matching.
			beanFactory.setTempClassLoader(new ContextTypeMatchClassLoader(beanFactory.getBeanClassLoader()));
		}

		/**
		 * 从下面几行代码我们可以知道,Spring 往往很 "智能" 就是因为它会帮我们默认注册一些有用的 bean,
		 * 我们也可以选择覆盖
		 */

		// Register default environment beans.
		// 注册默认的系统环境bean到一级缓存中
		// 如果没有定义 "environment" 这个 bean,那么 Spring 会 "手动" 注册一个
		// 将当前环境变量(environment) 注册为单例bean
		if (!beanFactory.containsLocalBean(ENVIRONMENT_BEAN_NAME)) {
			beanFactory.registerSingleton(ENVIRONMENT_BEAN_NAME, getEnvironment());
		}
		// 如果没有定义 "systemProperties" 这个 bean,那么 Spring 会 "手动" 注册一个
		// 将当前系统配置(systemProperties) 注册为单例Bean
		if (!beanFactory.containsLocalBean(SYSTEM_PROPERTIES_BEAN_NAME)) {
			beanFactory.registerSingleton(SYSTEM_PROPERTIES_BEAN_NAME, getEnvironment().getSystemProperties());
		}
		// 如果没有定义 "systemEnvironment" 这个 bean,那么 Spring 会 "手动" 注册一个
		// 将当前系统环境 (systemEnvironment) 注册为单例Bean
		if (!beanFactory.containsLocalBean(SYSTEM_ENVIRONMENT_BEAN_NAME)) {
			beanFactory.registerSingleton(SYSTEM_ENVIRONMENT_BEAN_NAME, getEnvironment().getSystemEnvironment());
		}
	}
- postProcessBeanFactory(beanFactory)
postProcessBeanFactory()方法向上下文中添加了一系列的Bean的后置处理器。
后置处理器工作的时机是在所有的beanDenifition加载完成之后,bean实例化之前执行。
简单来说Bean的后置处理器可以修改BeanDefinition的属性信息。
- invokeBeanFactoryPostProcessors(beanFactory)
- org.springframework.context.annotation.internalConfigurationAnnotationProcessor解析配置类
IoC容器的初始化过程包括三个步骤,在invokeBeanFactoryPostProcessors()方法中完成了IoC容器初始化过程的三个步骤。

1,第一步:Resource定位

在SpringBoot中,我们都知道他的包扫描是从主类所在的包开始扫描的,prepareContext()方法中,会先将主类解析成BeanDefinition,

然后在refresh()方法的invokeBeanFactoryPostProcessors()方法中解析主类的BeanDefinition获取basePackage的路径。这样就完成了定位的过程。

其次SpringBoot的各种starter是通过SPI扩展机制实现的自动装配,SpringBoot的自动装配同样也是在invokeBeanFactoryPostProcessors()方法中实现的。

还有一种情况,在SpringBoot中有很多的@EnableXXX注解,细心点进去看的应该就知道其底层是@Import注解,

在invokeBeanFactoryPostProcessors()方法中也实现了对该注解指定的配置类的定位加载。

常规的在SpringBoot中有三种实现定位,
第一个是主类所在包的,
第二个是SPI扩展机制实现的自动装配(比如各种starter),
第三种就是@Import注解指定的类。
(对于非常规的不说了)

2,第二步:BeanDefinition的载入

在第一步中说了三种Resource的定位情况,定位后紧接着就是BeanDefinition的分别载入。

所谓的载入就是通过上面的定位得到的basePackage,SpringBoot会将该路径拼接成:classpath:com/best/**/.class这样的形式,

然后一个叫做xPathMatchingResourcePatternResolver的类会将该路径下所有的.class文件都加载进来,然后遍历判断是不是有@Component注解,

如果有的话,就是我们要装载的BeanDefinition。大致过程就是这样的了。

TIPS:

@Configuration,@Controller,@Service等注解底层都是@Component注解,只不过包装了一层罢了。

3、第三个过程:注册BeanDefinition

这个过程通过调用上文提到的BeanDefinitionRegister接口的实现来完成。这个注册过程把载入过程中解析得到的BeanDefinition向IoC容器进行注册。

通过上文的分析,我们可以看到,在IoC容器中将BeanDefinition注入到一个ConcurrentHashMap中,IoC容器就是通过这个HashMap来持有这些BeanDefinition数据的。

比如DefaultListableBeanFactory 中的beanDefinitionMap属性。

OK,总结完了,接下来我们通过代码看看具体是怎么实现的。
- 一个小知识点
//首先我们要知道beanFactoryPostProcessor接口是spring的扩展接口,从名字也可以看出,是 beanFactory的扩展接口。在刷新容器之前,该接口可用来修改bean元数据信息。具体实现方式,我们继续跟着上述执行逻辑便知。
//继续跟进上面invokeBeanFactoryPostProcessors方法,第一行很关键:

PostProcessorRegistrationDelegate.invokeBeanFactoryPostProcessors(beanFactory, getBeanFactory);

一个比较核心的代理类出现了,AbstractApplicationContext委托执行post processors任务的工具类。
而在项目启动时会委托什么任务呢?

getBeanFactory得到的值如下:
或许你还记得第一篇博客中介绍的SpringApplication类中applyInitializers(context);方法吧,它会将三个默认的内部类加入到 spring 容器DefaultListableBeanFactory中,如下:
//设置配置警告
ConfigurationWarningsApplicationContextInitializer$ConfigurationWarningsPostProcessor
SharedMetadataReaderFactoryContextInitializer$CachingMetadataReaderFactoryPostProcessor
ConfigFileApplicationListener$PropertySourceOrderingPostProcessor
- 一路跟踪调用栈,来到ConfigurationClassParser类的parse()方法。
// ConfigurationClassParser类
public void parse(Set<BeanDefinitionHolder> configCandidates) {
for (BeanDefinitionHolder holder : configCandidates) {
BeanDefinition bd = holder.getBeanDefinition();
try {
// 如果是SpringBoot项目进来的,bd其实就是前面主类封装成的AnnotatedGenericBeanDefinition (AnnotatedBeanDefinition接口的实现类)
if (bd instanceof AnnotatedBeanDefinition) {
parse(((AnnotatedBeanDefinition) bd).getMetadata(), holder.getBeanName());
}
else if (bd instanceof AbstractBeanDefinition && ((AbstractBeanDefinition) bd).hasBeanClass()) {
parse(((AbstractBeanDefinition) bd).getBeanClass(), holder.getBeanName());
}
else {
parse(bd.getBeanClassName(), holder.getBeanName());
}
}
catch (BeanDefinitionStoreException ex) {
throw ex;
}
catch (Throwable ex) {
throw new BeanDefinitionStoreException(
"Failed to parse configuration class [" + bd.getBeanClassName() + "]", ex);
}
}
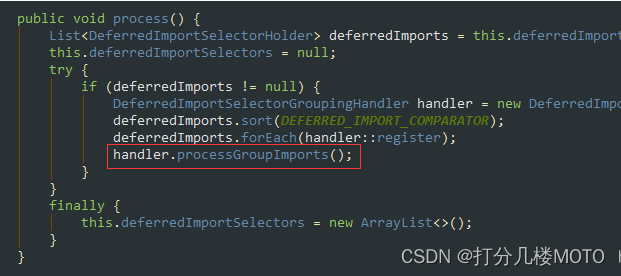
// 加载默认的配置---》(对springboot项目来说这里就是自动装配的入口了)
this.deferredImportSelectorHandler.process();
- 在前面的prepareContext()方法中,我们详细介绍了我们的主类是如何一步步的封装成AnnotatedGenericBeanDefinition,并注册进IoC容器的beanDefinitionMap中的。
继续沿着parse(((AnnotatedBeanDefinition) bd).getMetadata(), holder.getBeanName());方法跟下去
看doProcessConfigurationClass()方法。(SpringBoot的包扫描的入口方法,重点)
	// ConfigurationClassParser类
	protected void processConfigurationClass(ConfigurationClass configClass) throws IOException {
		if (this.conditionEvaluator.shouldSkip(configClass.getMetadata(), ConfigurationPhase.PARSE_CONFIGURATION)) {
			return;
		}

		ConfigurationClass existingClass = this.configurationClasses.get(configClass);
		if (existingClass != null) {
			if (configClass.isImported()) {
				if (existingClass.isImported()) {
					existingClass.mergeImportedBy(configClass);
				}
				// Otherwise ignore new imported config class; existing non-imported class overrides it.
				return;
			}
			else {
				// Explicit bean definition found, probably replacing an import.
				// Let's remove the old one and go with the new one.
				this.configurationClasses.remove(configClass);
				this.knownSuperclasses.values().removeIf(configClass::equals);
			}
		}

		// Recursively process the configuration class and its superclass hierarchy.
		// 递归地处理配置类及其父类层次结构。
		SourceClass sourceClass = asSourceClass(configClass);
		do {
			// 递归处理Bean,如果有父类,递归处理,直到顶层父类
			sourceClass = doProcessConfigurationClass(configClass, sourceClass);
		}
		while (sourceClass != null);

		this.configurationClasses.put(configClass, configClass);
	}
	@Nullable
	protected final SourceClass doProcessConfigurationClass(ConfigurationClass configClass, SourceClass sourceClass)
			throws IOException {

		// Recursively process any member (nested) classes first
		// 首先递归处理内部类,(SpringBoot项目的主类一般没有内部类)
		processMemberClasses(configClass, sourceClass);

		// Process any @PropertySource annotations
		// 针对 @PropertySource 注解的属性配置处理
		for (AnnotationAttributes propertySource : AnnotationConfigUtils.attributesForRepeatable(
				sourceClass.getMetadata(), PropertySources.class,
				org.springframework.context.annotation.PropertySource.class)) {
			if (this.environment instanceof ConfigurableEnvironment) {
				processPropertySource(propertySource);
			}
			else {
				logger.warn("Ignoring @PropertySource annotation on [" + sourceClass.getMetadata().getClassName() +
						"]. Reason: Environment must implement ConfigurableEnvironment");
			}
		}

		// Process any @ComponentScan annotations
		// 根据 @ComponentScan 注解,扫描项目中的Bean(SpringBoot 启动类上有该注解)
		Set<AnnotationAttributes> componentScans = AnnotationConfigUtils.attributesForRepeatable(
				sourceClass.getMetadata(), ComponentScans.class, ComponentScan.class);
		if (!componentScans.isEmpty() &&
				!this.conditionEvaluator.shouldSkip(sourceClass.getMetadata(), ConfigurationPhase.REGISTER_BEAN)) {
			for (AnnotationAttributes componentScan : componentScans) {
				// The config class is annotated with @ComponentScan -> perform the scan immediately
				// 立即执行扫描,(SpringBoot项目为什么是从主类所在的包扫描,这就是关键了)
				Set<BeanDefinitionHolder> scannedBeanDefinitions =
						this.componentScanParser.parse(componentScan, sourceClass.getMetadata().getClassName());
				// Check the set of scanned definitions for any further config classes and parse recursively if needed
				for (BeanDefinitionHolder holder : scannedBeanDefinitions) {
					BeanDefinition bdCand = holder.getBeanDefinition().getOriginatingBeanDefinition();
					if (bdCand == null) {
						bdCand = holder.getBeanDefinition();
					}
					// 检查是否是ConfigurationClass(是否有configuration/component两个注解),如果是,递归查找该类相关联的配置类。
					// 所谓相关的配置类,比如@Configuration中的@Bean定义的bean。或者在有@Component注解的类上继续存在@Import注解。
					if (ConfigurationClassUtils.checkConfigurationClassCandidate(bdCand, this.metadataReaderFactory)) {
						parse(bdCand.getBeanClassName(), holder.getBeanName());
					}
				}
			}
		}

		// Process any @Import annotations
		// 递归处理 @Import 注解(SpringBoot项目中经常用的各种@Enable*** 注解基本都是封装的@Import)
		processImports(configClass, sourceClass, getImports(sourceClass), true);

		// Process any @ImportResource annotations
		AnnotationAttributes importResource =
				AnnotationConfigUtils.attributesFor(sourceClass.getMetadata(), ImportResource.class);
		if (importResource != null) {
			String[] resources = importResource.getStringArray("locations");
			Class<? extends BeanDefinitionReader> readerClass = importResource.getClass("reader");
			for (String resource : resources) {
				String resolvedResource = this.environment.resolveRequiredPlaceholders(resource);
				configClass.addImportedResource(resolvedResource, readerClass);
			}
		}

		// Process individual @Bean methods
		Set<MethodMetadata> beanMethods = retrieveBeanMethodMetadata(sourceClass);
		for (MethodMetadata methodMetadata : beanMethods) {
			configClass.addBeanMethod(new BeanMethod(methodMetadata, configClass));
		}

		// Process default methods on interfaces
		processInterfaces(configClass, sourceClass);

		// Process superclass, if any
		if (sourceClass.getMetadata().hasSuperClass()) {
			String superclass = sourceClass.getMetadata().getSuperClassName();
			if (superclass != null && !superclass.startsWith("java") &&
					!this.knownSuperclasses.containsKey(superclass)) {
				this.knownSuperclasses.put(superclass, configClass);
				// Superclass found, return its annotation metadata and recurse
				return sourceClass.getSuperClass();
			}
		}

		// No superclass -> processing is complete
		return null;
	}
我们大致说一下这个方法里面都干了什么

TIPS:

在以上代码的parse(bdCand.getBeanClassName(), holder.getBeanName());

会进行递归调用,因为当Spring扫描到需要加载的类会进一步判断每一个类是否满足是@Component/@Configuration注解的类,

如果满足会递归调用parse()方法,查找其相关的类。

同样的processImports(configClass, sourceClass, getImports(sourceClass),true);通过@Import注解查找到的类同样也会递归查找其相关的类。

两个递归在debug的时候会很乱,用文字叙述起来更让人难以理解,所以,我们只关注对主类的解析,及其类的扫描过程。

上面代码中 for (AnnotationAttributes propertySource :AnnotationConfigUtils.attributesForRepeatable(... 获取主类上的@PropertySource注解),

解析该注解并将该注解指定的properties配置文件中的值存储到Spring的 Environment中,Environment接口提供方法去读取配置文件中的值,

参数是properties文件中定义的key值。

Set componentScans = AnnotationConfigUtils.attributesForRepeatable(sourceClass.getMetadata(), ComponentScans.class, ComponentScan.class);

解析主类上的@ComponentScan注解,后面的代码将会解析该注解并进行包扫描。

processImports(configClass, sourceClass, getImports(sourceClass), true); 解析主类上的@Import注解,并加载该注解指定的配置类。
TIPS:

在spring中好多注解都是一层一层封装的,比如@EnableXXX,是对@Import注解的二次封装。

@SpringBootApplication注解=@ComponentScan+@EnableAutoConfiguration+@Import+@Configuration+@Component。

@Controller,@Service等等是对@Component的二次封装。。。
继续向下看:

Set scannedBeanDefinitions = this.componentScanParser.parse(componentScan,sourceClass.getMetadata().getClassName());

进入该方法
public Set<BeanDefinitionHolder> parse(AnnotationAttributes componentScan, final String declaringClass) {
		ClassPathBeanDefinitionScanner scanner = new ClassPathBeanDefinitionScanner(this.registry,
				componentScan.getBoolean("useDefaultFilters"), this.environment, this.resourceLoader);

		Class<? extends BeanNameGenerator> generatorClass = componentScan.getClass("nameGenerator");
		boolean useInheritedGenerator = (BeanNameGenerator.class == generatorClass);
		scanner.setBeanNameGenerator(useInheritedGenerator ? this.beanNameGenerator :
				BeanUtils.instantiateClass(generatorClass));

		ScopedProxyMode scopedProxyMode = componentScan.getEnum("scopedProxy");
		if (scopedProxyMode != ScopedProxyMode.DEFAULT) {
			scanner.setScopedProxyMode(scopedProxyMode);
		}
		else {
			Class<? extends ScopeMetadataResolver> resolverClass = componentScan.getClass("scopeResolver");
			scanner.setScopeMetadataResolver(BeanUtils.instantiateClass(resolverClass));
		}

		scanner.setResourcePattern(componentScan.getString("resourcePattern"));

		for (AnnotationAttributes filter : componentScan.getAnnotationArray("includeFilters")) {
			for (TypeFilter typeFilter : typeFiltersFor(filter)) {
				scanner.addIncludeFilter(typeFilter);
			}
		}
		for (AnnotationAttributes filter : componentScan.getAnnotationArray("excludeFilters")) {
			for (TypeFilter typeFilter : typeFiltersFor(filter)) {
				scanner.addExcludeFilter(typeFilter);
			}
		}

		boolean lazyInit = componentScan.getBoolean("lazyInit");
		if (lazyInit) {
			scanner.getBeanDefinitionDefaults().setLazyInit(true);
		}

		Set<String> basePackages = new LinkedHashSet<>();
		String[] basePackagesArray = componentScan.getStringArray("basePackages");
		for (String pkg : basePackagesArray) {
			String[] tokenized = StringUtils.tokenizeToStringArray(this.environment.resolvePlaceholders(pkg),
					ConfigurableApplicationContext.CONFIG_LOCATION_DELIMITERS);
			Collections.addAll(basePackages, tokenized);
		}
		for (Class<?> clazz : componentScan.getClassArray("basePackageClasses")) {
			basePackages.add(ClassUtils.getPackageName(clazz));
		}
		// 根据 declaringClass (如果是SpringBoot项目,则参数为主类的全路径名)
		if (basePackages.isEmpty()) {
			basePackages.add(ClassUtils.getPackageName(declaringClass));
		}

		scanner.addExcludeFilter(new AbstractTypeHierarchyTraversingFilter(false, false) {
			@Override
			protected boolean matchClassName(String className) {
				return declaringClass.equals(className);
			}
		});
		// 根据basePackages扫描类
		return scanner.doScan(StringUtils.toStringArray(basePackages));
	}
发现有两行重要的代码

为了验证代码中的注释,debug,看一下declaringClass,如下图所示确实是我们的主类的全路径名

跳过这一行,继续debug,查看basePackages,该set集合中只有一个,就是主类所在的路径。

TIPS:

为什么只有一个还要用一个集合呢,因为我们也可以用@ComponentScan注解指定扫描路径。

到这里呢IoC容器初始化三个步骤的第一步,Resource定位就完成了,成功定位到了主类所在的包。

接着往下看 return scanner.doScan(StringUtils.toStringArray(basePackages));

Spring是如何进行类扫描的。

进入doScan()方法。
	// ComponentScanAnnotationParser类
	protected Set<BeanDefinitionHolder> doScan(String... basePackages) {
		Assert.notEmpty(basePackages, "At least one base package must be specified");
		Set<BeanDefinitionHolder> beanDefinitions = new LinkedHashSet<>();
		for (String basePackage : basePackages) {
			// 从指定的包中扫描需要装载的Bean
			Set<BeanDefinition> candidates = findCandidateComponents(basePackage);
			for (BeanDefinition candidate : candidates) {
				ScopeMetadata scopeMetadata = this.scopeMetadataResolver.resolveScopeMetadata(candidate);
				candidate.setScope(scopeMetadata.getScopeName());
				String beanName = this.beanNameGenerator.generateBeanName(candidate, this.registry);
				if (candidate instanceof AbstractBeanDefinition) {
					postProcessBeanDefinition((AbstractBeanDefinition) candidate, beanName);
				}
				if (candidate instanceof AnnotatedBeanDefinition) {
					AnnotationConfigUtils.processCommonDefinitionAnnotations((AnnotatedBeanDefinition) candidate);
				}
				if (checkCandidate(beanName, candidate)) {
					BeanDefinitionHolder definitionHolder = new BeanDefinitionHolder(candidate, beanName);
					definitionHolder =
							AnnotationConfigUtils.applyScopedProxyMode(scopeMetadata, definitionHolder, this.registry);
					beanDefinitions.add(definitionHolder);
					// 将该 Bean 注册进 IoC容器(beanDefinitionMap)
					registerBeanDefinition(definitionHolder, this.registry);
				}
			}
		}
		return beanDefinitions;
	}
这个方法中有两个比较重要的方法,第7行 Set candidates = findCandidateComponents(basePackage);

从basePackage中扫描类并解析成BeanDefinition,拿到所有符合条件的类后在第24行 registerBeanDefinition(definitionHolder, this.registry); 将该类注册进IoC容器。

也就是说在这个方法中完成了IoC容器初始化过程的第二三步,BeanDefinition的载入,和BeanDefinition的注册。
- findCandidateComponents(basePackage);
	// ClassPathScanningCandidateComponentProvider类
	public Set<BeanDefinition> findCandidateComponents(String basePackage) {
		if (this.componentsIndex != null && indexSupportsIncludeFilters()) {
			return addCandidateComponentsFromIndex(this.componentsIndex, basePackage);
		}
		else {
			// 扫描需要装载的bean
			return scanCandidateComponents(basePackage);
		}
	}


		// ClassPathScanningCandidateComponentProvider类
	private Set<BeanDefinition> scanCandidateComponents(String basePackage) {
		Set<BeanDefinition> candidates = new LinkedHashSet<>();
		try {
			// 拼接扫描路径,比如:classpath*:com/best/**/*.class
			String packageSearchPath = ResourcePatternResolver.CLASSPATH_ALL_URL_PREFIX +
					resolveBasePackage(basePackage) + '/' + this.resourcePattern;
			// 从 packageSearchPath 路径中扫描所有的类
			Resource[] resources = getResourcePatternResolver().getResources(packageSearchPath);
			boolean traceEnabled = logger.isTraceEnabled();
			boolean debugEnabled = logger.isDebugEnabled();
			for (Resource resource : resources) {
				if (traceEnabled) {
					logger.trace("Scanning " + resource);
				}
				if (resource.isReadable()) {
					try {
						MetadataReader metadataReader = getMetadataReaderFactory().getMetadataReader(resource);
						// 判断该类是不是 @Component 注解标注的类,并且不是需要排除掉的类
						if (isCandidateComponent(metadataReader)) {
							// 将该类封装成ScannedGenericBeanDefinition(BeanDefinition接口的实现类)类
							ScannedGenericBeanDefinition sbd = new ScannedGenericBeanDefinition(metadataReader);
							// IoC容器的BeanDefinition载入到这里就结束了。
							sbd.setSource(resource);
							if (isCandidateComponent(sbd)) {
								if (debugEnabled) {
									logger.debug("Identified candidate component class: " + resource);
								}
								candidates.add(sbd);
							}
							else {
								if (debugEnabled) {
									logger.debug("Ignored because not a concrete top-level class: " + resource);
								}
							}
						}
						else {
							if (traceEnabled) {
								logger.trace("Ignored because not matching any filter: " + resource);
							}
						}
					}
					catch (Throwable ex) {
						throw new BeanDefinitionStoreException(
								"Failed to read candidate component class: " + resource, ex);
					}
				}
				else {
					if (traceEnabled) {
						logger.trace("Ignored because not readable: " + resource);
					}
				}
			}
		}
		catch (IOException ex) {
			throw new BeanDefinitionStoreException("I/O failure during classpath scanning", ex);
		}
		return candidates;
	}

在第13行将basePackage拼接成classpath:org/springframework/boot/demo/**/.class,

在第16行的getResources(packageSearchPath);方法中扫描到了该路径下的所有的类。然后遍历这些Resources,

在第27行判断该类是不是 @Component 注解标注的类,并且不是需要排除掉的类。

在第29行将扫描到的类,解析成ScannedGenericBeanDefinition,该类是BeanDefinition接口的实现类。OK,IoC容器的BeanDefinition载入到这里就结束了。

回到前面的doScan()方法,debug看一下结果(截图中所示的就是定位的需要交给Spring容器管理的类)。


- registerBeanDefinition(definitionHolder, this.registry)
查看registerBeanDefinition()方法。是不是有点眼熟,

在前面介绍prepareContext()方法时,我们详细介绍了主类的BeanDefinition是怎么一步一步的注册进DefaultListableBeanFactory的beanDefinitionMap中的。

完成了BeanDefinition的注册,就完成了IoC容器的初始化过程。

此时,在使用的IoC容器DefaultListableFactory中已经建立了整个Bean的配置信息,而这些BeanDefinition已经可以被容器使用了。

他们都在BeanbefinitionMap里被检索和使用。容器的作用就是对这些信息进行处理和维护。这些信息是容器建立依赖反转的基础。

	protected void registerBeanDefinition(BeanDefinitionHolder definitionHolder, BeanDefinitionRegistry registry) {
		BeanDefinitionReaderUtils.registerBeanDefinition(definitionHolder, registry);
	}

OK,到这里IoC容器的初始化过程的三个步骤就梳理完了。

当然这只是针对SpringBoot的包扫描的定位方式的BeanDefinition的定位,加载,和注册过程。

前面我们说过,还有两种方式@Import和SPI扩展实现的starter的自动装配。
@Import注解的解析过程

现在大家也应该知道了,各种@EnableXXX注解,很大一部分都是对@Import的二次封装

(其实也是为了解耦,比如当@Import导入的类发生变化时,我们的业务系统也不需要改任何代码)。

我们又要回到上文中的ConfigurationClassParser类的doProcessConfigurationClass方法的第68行processImports(configClass, sourceClass, getImports(sourceClass), true);,

跳跃性比较大。上面解释过,我们只针对主类进行分析,因为这里有递归。

processImports(configClass, sourceClass, getImports(sourceClass), true);中configClass和sourceClass参数都是主类相对应的。

首先看getImports(sourceClass);
	private Set<SourceClass> getImports(SourceClass sourceClass) throws IOException {
		Set<SourceClass> imports = new LinkedHashSet<>();
		Set<SourceClass> visited = new LinkedHashSet<>();
		collectImports(sourceClass, imports, visited);
		return imports;
	}

两个呢是主类上的@SpringBootApplication中的@Import注解指定的类

接下来,是不是要进行执行了

记下来再回到ConfigurationClassParser类的parse(Set configCandidates):

- 点进process方法
- 继续点击handler.processGroupImports();
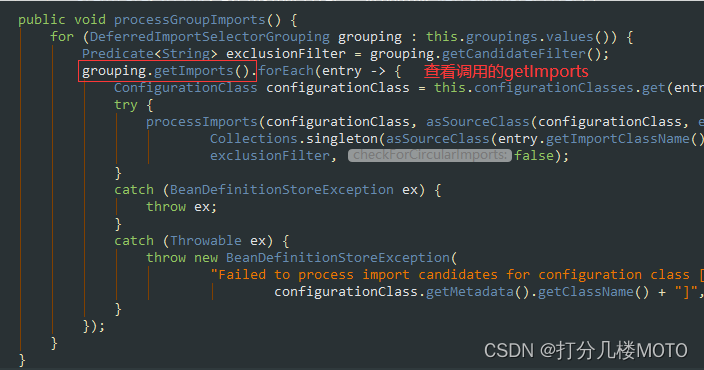
		// 是不是很熟悉了
		public Iterable<Group.Entry> getImports() {
			// 遍历DeferredImportSelectorHolder对象集合deferredImports,deferredImports集合装了各种ImportSelector,当然这里装的是AutoConfigurationImportSelector
			for (DeferredImportSelectorHolder deferredImport : this.deferredImports) {
				// 【1】利用AutoConfigurationGroup的process方法来处理自动配置的相关逻辑,决定导入哪些配置类(这个是我们分析的重点,自动配置的逻辑全在这了)
				// 调用了process方法
				this.group.process(deferredImport.getConfigurationClass().getMetadata(),
						deferredImport.getImportSelector());
			}
			// 【2】经过上面的处理后,然后再进行选择导入哪些配置类
			return this.group.selectImports();
		}


和之前介绍的process完美衔接
		// 这里用来处理自动配置类,比如过滤掉不符合匹配条件的自动配置类
		@Override
		public void process(AnnotationMetadata annotationMetadata, DeferredImportSelector deferredImportSelector) {
			Assert.state(deferredImportSelector instanceof AutoConfigurationImportSelector,
					() -> String.format("Only %s implementations are supported, got %s",
							AutoConfigurationImportSelector.class.getSimpleName(),
							deferredImportSelector.getClass().getName()));
			// 【1】调用getAutoConfigurationEntry方法得到自动配置类放入autoConfigurationEntry对象中
			AutoConfigurationEntry autoConfigurationEntry = ((AutoConfigurationImportSelector) deferredImportSelector)
					.getAutoConfigurationEntry(getAutoConfigurationMetadata(), annotationMetadata);
			// 【2】又将封装了自动配置类的autoConfigurationEntry对象装进autoConfigurationEntries集合
			this.autoConfigurationEntries.add(autoConfigurationEntry);
			// 【3】遍历刚获取的自动配置类
			for (String importClassName : autoConfigurationEntry.getConfigurations()) {
				// 这里符合条件的自动配置类作为key,annotationMetadata作为值放进entries集合
				this.entries.putIfAbsent(importClassName, annotationMetadata);
			}
		}
第六步:刷新上下文后的扩展接口
protected void afterRefresh(ConfigurableApplicationContext context,
			ApplicationArguments args) {
	}
扩展接口,设计模式中的模板方法,默认为空实现。如果有自定义需求,可以重写该方法。比如打印一些启动结束log,或者一些其它后置处理。
注意
EventPublishingRunListener这个是springBoot框架中最早执行的监听器,在该监听器执行started()方法时,会继续发布事件,也就是事件传递。这种实现主要还是基于spring的事件机制。
继续跟进SimpleApplicationEventMulticaster,有个核心方法:
	@Override
	public void multicastEvent(final ApplicationEvent event, @Nullable ResolvableType eventType) {
		ResolvableType type = (eventType != null ? eventType : resolveDefaultEventType(event));
		for (final ApplicationListener<?> listener : getApplicationListeners(event, type)) {
			//获取线程池,如果为空则同步处理。这里线程池为空,还未没初始化。
			Executor executor = getTaskExecutor();
			if (executor != null) {
			    //异步发送事件
				executor.execute(() -> invokeListener(listener, event));
			}
			else {
				//同步发送事件
				invokeListener(listener, event);
			}
		}
	}
这里会根据事件类型ApplicationStartingEvent获取对应的监听器,在容器启动之后执行响应的动作,有如下4种监听器:

这是springBoot启动过程中,第一处根据类型,执行监听器的地方。根据发布的事件类型从上述10种监听器中选择对应的监听器进行事件发布,当然如果继承了 springCloud或者别的框架,就不止10个了。这里选了一个 springBoot 的日志监听器来进行讲解,核心代码如下
 @Override
    public void onApplicationEvent(ApplicationEvent event) {
        //在springboot启动的时候
        if (event instanceof ApplicationStartedEvent) {
            onApplicationStartedEvent((ApplicationStartedEvent) event);
        }
        //springboot的Environment环境准备完成的时候
        else if (event instanceof ApplicationEnvironmentPreparedEvent) {
            onApplicationEnvironmentPreparedEvent(
                    (ApplicationEnvironmentPreparedEvent) event);
        }
        //在springboot容器的环境设置完成以后
        else if (event instanceof ApplicationPreparedEvent) {
            onApplicationPreparedEvent((ApplicationPreparedEvent) event);
        }
        //容器关闭的时候
        else if (event instanceof ContextClosedEvent && ((ContextClosedEvent) event)
                .getApplicationContext().getParent() == null) {
            onContextClosedEvent();
        }
        //容器启动失败的时候
        else if (event instanceof ApplicationFailedEvent) {
            onApplicationFailedEvent();
        }
    }
因为我们的事件类型为ApplicationEvent,所以会执行onApplicationStartedEvent((ApplicationStartedEvent) event);。springBoot会在运行过程中的不同阶段,发送各种事件,来执行对应监听器的对应方法。大同小异,别的监听器执行流程这里不再赘述
这里一共6个配置文件,取值顺序由上到下。也就是说前面的配置变量会覆盖后面同名的配置变量。项目配置变量的时候需要注意这点。

这一步主要是在容器刷新之前的准备动作。包含一个非常关键的操作:将启动类注入容器,为后续开启自动化配置奠定基础。
prepareContext(context, environment, listeners, applicationArguments,
					printedBanner);

private void prepareContext(ConfigurableApplicationContext context,
			ConfigurableEnvironment environment, SpringApplicationRunListeners listeners,
			ApplicationArguments applicationArguments, Banner printedBanner) {
		//设置容器环境,包括各种变量
		context.setEnvironment(environment);
		//执行容器后置处理
		postProcessApplicationContext(context);
		//执行容器中的ApplicationContextInitializer(包括 spring.factories和自定义的实例)
		applyInitializers(context);
		//发送容器已经准备好的事件,通知各监听器
		listeners.contextPrepared(context);
		//打印log
		if (this.logStartupInfo) {
			logStartupInfo(context.getParent() == null);
			logStartupProfileInfo(context);
		}
		// Add boot specific singleton beans
		//注册启动参数bean,这里将容器指定的参数封装成bean,注入容器
		context.getBeanFactory().registerSingleton("springApplicationArguments",
				applicationArguments);
		//设置banner
		if (printedBanner != null) {
			context.getBeanFactory().registerSingleton("springBootBanner", printedBanner);
		}
		// Load the sources
		//获取我们的启动类指定的参数,可以是多个
		Set<Object> sources = getAllSources();
		Assert.notEmpty(sources, "Sources must not be empty");
		//加载我们的启动类,将启动类注入容器
		load(context, sources.toArray(new Object[0]));
		//发布容器已加载事件。
		listeners.contextLoaded(context);
	}
#postProcessApplicationContext
protected void postProcessApplicationContext(ConfigurableApplicationContext context) {
		if (this.beanNameGenerator != null) {
			context.getBeanFactory().registerSingleton(AnnotationConfigUtils.CONFIGURATION_BEAN_NAME_GENERATOR,
					this.beanNameGenerator);
		}
		if (this.resourceLoader != null) {
			if (context instanceof GenericApplicationContext) {
				((GenericApplicationContext) context).setResourceLoader(this.resourceLoader);
			}
			if (context instanceof DefaultResourceLoader) {
				((DefaultResourceLoader) context).setClassLoader(this.resourceLoader.getClassLoader());
			}
		}
		//上面默认不执行任何逻辑,因为beanNameGenerator和resourceLoader默认为空。之所以这样做,是springBoot留给我们的扩展处理方式,类似于这样的扩展,spring中也有很多。
		if (this.addConversionService) {
			context.getBeanFactory().setConversionService(ApplicationConversionService.getSharedInstance());
		}
	}
#applyInitializers
protected void applyInitializers(ConfigurableApplicationContext context) {
		for (ApplicationContextInitializer initializer : getInitializers()) {
			Class<?> requiredType = GenericTypeResolver.resolveTypeArgument(initializer.getClass(),
					ApplicationContextInitializer.class);
			Assert.isInstanceOf(requiredType, context, "Unable to call initializer.");
            //根据不同的实现调到不同的类里面执行initialize方法
			initializer.initialize(context);
		}
	}

介绍一下ApplicationContextInitializer
/**
 用于在被{@linkplain ConfigurableApplicationContext#refresh()刷新}之前初始化Spring{@link ConfigurableApplicationContext}的回调接口。
 *
 * 通常在需要对应用程序上下文进行一些编程初始化的web应用程序中使用。
 例如,针对{@linkplain ConfigurableApplicationContext#getEnvironment()上下文的环境}注册属性源或激活配置文件。
 请参见{@code ContextLoader}和{@code FrameworkServlet}支持,分别声明“contextInitializerClasses”上下文参数和init参数。
 *
 * {@code ApplicationContextInitializer}鼓励处理器检测Spring的{@link org.springframework.core.Ordered}接口是否已实现,或者是否存在{@link org.springframework.core.annotation.Order Order}注释,并在调用之前对实例进行相应排序。
 *
 * @author Chris Beams
 * @since 3.1
 * @param <C> the application context type
 * @see org.springframework.web.context.ContextLoader#customizeContext
 * @see org.springframework.web.context.ContextLoader#CONTEXT_INITIALIZER_CLASSES_PARAM
 * @see org.springframework.web.servlet.FrameworkServlet#setContextInitializerClasses
 * @see org.springframework.web.servlet.FrameworkServlet#applyInitializers
 */
public interface ApplicationContextInitializer<C extends ConfigurableApplicationContext> {

	/**
	 * 初始化给定的应用程序上下文。
	 * @param applicationContext the application to configure
	 */
	void initialize(C applicationContext);

}
加载启动指定类(重点)
这里会将我们的启动类加载spring容器beanDefinitionMap中,为后续springBoot 自动化配置奠定基础,springBoot为我们提供的各种注解配置也与此有关。
load(context, sources.toArray(new Object[0]));

	protected void load(ApplicationContext context, Object[] sources) {
		if (logger.isDebugEnabled()) {
			logger.debug(
					"Loading source " + StringUtils.arrayToCommaDelimitedString(sources));
		}
		BeanDefinitionLoader loader = createBeanDefinitionLoader(
				getBeanDefinitionRegistry(context), sources);
		if (this.beanNameGenerator != null) {
			loader.setBeanNameGenerator(this.beanNameGenerator);
		}
		if (this.resourceLoader != null) {
			loader.setResourceLoader(this.resourceLoader);
		}
		if (this.environment != null) {
			loader.setEnvironment(this.environment);
		}
		loader.load();
	}

//这里参数即为我们项目启动时传递的参数:SpringApplication.run(SpringBootApplication.class, args);
//由于我们指定了启动类,所以上面也就是加载启动类到容器。
//需要注意的是,springBoot2会优先选择groovy加载方式,找不到再选用java方式。或许groovy动态加载class文件的性能更胜一筹。
	private int load(Class<?> source) {
		if (isGroovyPresent()
				&& GroovyBeanDefinitionSource.class.isAssignableFrom(source)) {
			// Any GroovyLoaders added in beans{} DSL can contribute beans here
			GroovyBeanDefinitionSource loader = BeanUtils.instantiateClass(source,
					GroovyBeanDefinitionSource.class);
			load(loader);
		}
		if (isComponent(source)) {
			//以注解的方式,将启动类bean信息存入beanDefinitionMap
			this.annotatedReader.register(source);
			return 1;
		}
		return 0;
	}
通知监听器,容器已准备就绪
listeners.contextLoaded(context);

主还是针对一些日志等监听器的响应处理。
springBoot中Binder类介绍
- 可以方便的进行类型的转换,可以将属性绑定到对象,Map,List等类型上
  #绑定到对象
  MailPropertiesC propertiesC = Binder.get(environment) //首先要绑定配置器
      //再将属性绑定到对象上
      .bind( "kaka.cream.mail-c", Bindable.of(MailPropertiesC.class) ).get(); //再获取实例

  # 绑定Map
  Map<String,Object> propMap = Binder.get(environment)
      .bind( "fish.jdbc.datasource",Bindable.mapOf(String.class, Object.class) ).get();

  # 绑定List
  List<String> list = Binder.get(environment)
      .bind( "kaka.cream.list",Bindable.listOf(String.class) ).get();
  #绑定到String数组
  String[] configsUrl = binder.bind("xc.config.remote", String[].class).orElse(new String[]{});
- Demo
// 绑定的类
public class MultiKafkaProperties {
	private Map<String, Properties> producer;
	private Map<String, Properties> consumer;
	// getter
	// setter
}

// 绑定的类
public class MultiKafkaProperties {
	private Map<String, Properties> producer;
	private Map<String, Properties> consumer;
	// getter
	// setter
}

// 绑定
Binder binder = Binder.get(environment);
MultiKafkaProperties config = binder.bind("kafka", MultiKafkaProperties.class).get();

//转换以及默认值
String datestr = (String) Binder.get(environment).bind("kaka.cream.date",Bindable.of(String.class))
        .map(String::toUpperCase)
        /** .map(new Function(){
          @Override
          public Object apply(Object o) {
            String str = (String)o;
            return str.toUpperCase();
          }
        })**/
        .orElse("bad date string");

//绑定过程回调函数,高度定制
LocalDate str = Binder.get(environment).bind("kaka.cream.date", Bindable.of(LocalDate.class), new BindHandler() {

      @Override
      public <T> Bindable<T> onStart(ConfigurationPropertyName name, Bindable<T> target,
                  BindContext context) {
        log.info("绑定开始{}",name);
        return target;
      }
      @Override
      public Object onSuccess(ConfigurationPropertyName name, Bindable<?> target, BindContext context, Object result) {
        log.info("绑定成功{}",target.getValue());
        return result;
      }

      @Override
      public Object onFailure(ConfigurationPropertyName name, Bindable<?> target, BindContext context, Exception error) throws Exception {
        log.info("绑定失败{}",name);
        return "没有找到匹配的属性";
      }

      @Override
      public void onFinish(ConfigurationPropertyName name, Bindable<?> target, BindContext context, Object result) throws Exception {
        log.info("绑定结束{}",name);
      }
    }).get();
ng.class) ).get();
#绑定到String数组
String[] configsUrl = binder.bind(“xc.config.remote”, String[].class).orElse(new String[]{});
- Demo

```java
// 绑定的类
public class MultiKafkaProperties {
	private Map<String, Properties> producer;
	private Map<String, Properties> consumer;
	// getter
	// setter
}

// 绑定的类
public class MultiKafkaProperties {
	private Map<String, Properties> producer;
	private Map<String, Properties> consumer;
	// getter
	// setter
}

// 绑定
Binder binder = Binder.get(environment);
MultiKafkaProperties config = binder.bind("kafka", MultiKafkaProperties.class).get();

//转换以及默认值
String datestr = (String) Binder.get(environment).bind("kaka.cream.date",Bindable.of(String.class))
        .map(String::toUpperCase)
        /** .map(new Function(){
          @Override
          public Object apply(Object o) {
            String str = (String)o;
            return str.toUpperCase();
          }
        })**/
        .orElse("bad date string");

//绑定过程回调函数,高度定制
LocalDate str = Binder.get(environment).bind("kaka.cream.date", Bindable.of(LocalDate.class), new BindHandler() {

      @Override
      public <T> Bindable<T> onStart(ConfigurationPropertyName name, Bindable<T> target,
                  BindContext context) {
        log.info("绑定开始{}",name);
        return target;
      }
      @Override
      public Object onSuccess(ConfigurationPropertyName name, Bindable<?> target, BindContext context, Object result) {
        log.info("绑定成功{}",target.getValue());
        return result;
      }

      @Override
      public Object onFailure(ConfigurationPropertyName name, Bindable<?> target, BindContext context, Exception error) throws Exception {
        log.info("绑定失败{}",name);
        return "没有找到匹配的属性";
      }

      @Override
      public void onFinish(ConfigurationPropertyName name, Bindable<?> target, BindContext context, Object result) throws Exception {
        log.info("绑定结束{}",name);
      }
    }).get();


 7680
7680


 被折叠的 条评论
为什么被折叠?
被折叠的 条评论
为什么被折叠?
 到【灌水乐园】发言


