


需求:
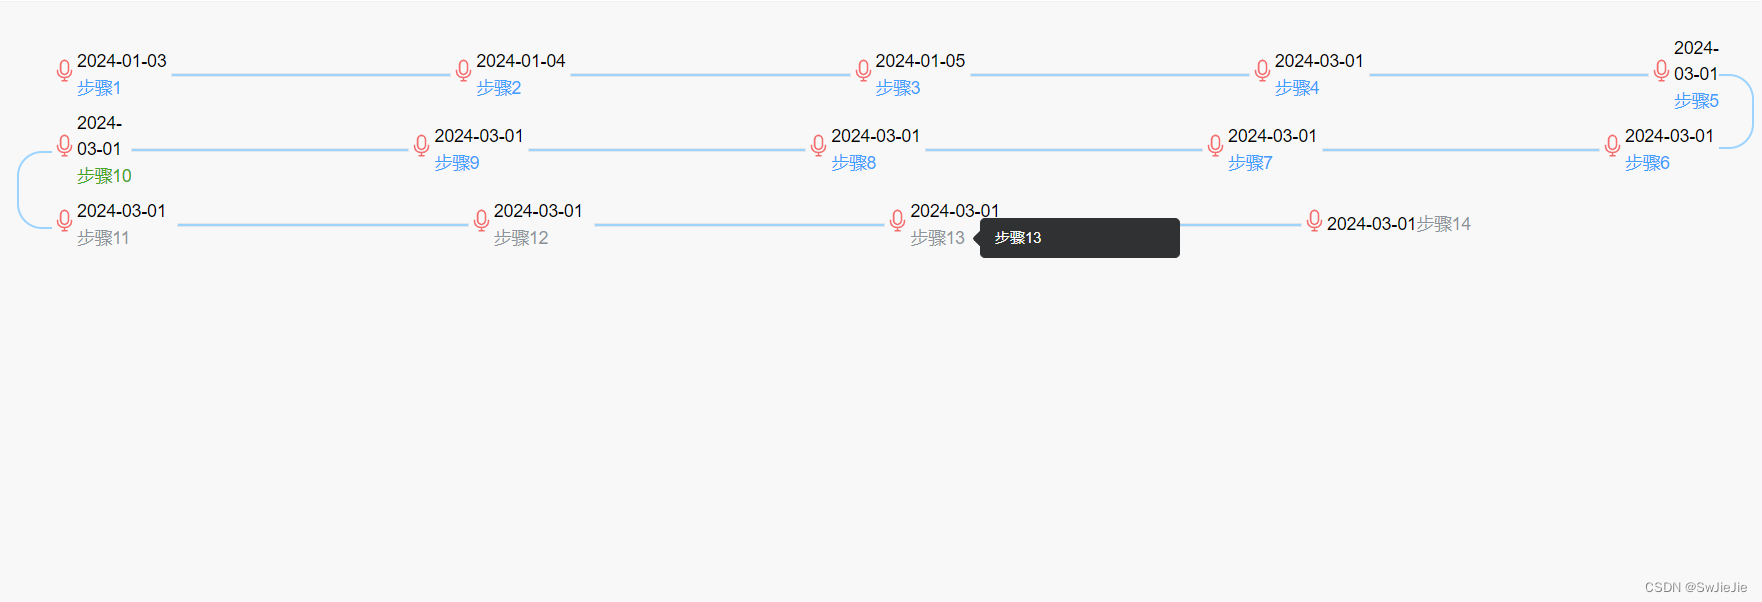
实现可拐弯的步骤条功能
实现后效果如下:
代码部分:
- 创建步骤条组件Steps.vue
<template>
	<div>
		<div
			style="width: 100%; display: flex; position: relative; margin-top: 20px"
		>
			<div style="width: 2%; margin-left: 30px">
				<div>
					<span
						data-v-jzl20210826=""
						style="margin-top: 35px; opacity: 0"
						class="headerRadio"
					></span>

					<div v-if="experienceData.length > Index">
						<span
							v-for="(num, index) in leftRows"
							:key="index"
							class="hingelisHeard"
							style="margin-top: 55px"
						></span>
					</div>
					<span
						data-v-jzl20210826=""
						v-if="leftShow"
						style="margin-top: 98.5px; opacity: 0"
						class="hingeorgerHeard"
					></span>
				</div>
			</div>
			<div style="width: 96%">
				<div
					style="display: flex"
					v-for="(item, index) in experienceData"
					:key="index"
				>
					<div style="display: flex; width: 100%" v-if="(index + 1) % 2 != 0">
						<div
							class="timeline"
							v-for="(v, i) in DisplayProcessing(experienceData, index + 1)"
							:key="i"
							:style="(i + 1) % Index != 0 ? '' : 'width: 12%;'"
						>
							<div class="Nodes">
								<SvgIcon name="ele-Microphone" :size="20" style="color: #f56c6c" />
							</div>
							<div class="timeNodes">
								<div class="nodeTimes">
									<span>{{ v.createTime }} </span>
								</div>
								<div class="timeContent">
									<el-tooltip
										class="item"
										effect="dark"
										:content="v.content"
										placement="right"
									>
										<p
											class="nodeTimelis"
											@click="onClickDate(v.createTime, term)"
										>
											<span v-if="v.status === 0" style="color: #409eff">{{ v.content }}</span>
											<span v-else-if="v.status === 1" style="color: #42a51a">{{ v.content }}</span>
											<span v-else style="color: #6b7280c2">{{ v.content }}</span>
										</p>
									</el-tooltip>
								</div>
							</div>
							<div
								class="border"
								v-if="
									(i + 1) % Index != 0 &&
									i != DisplayProcessing(experienceData, index + 1).length - 1
								"
							>
								<div class="borderTime"></div>
							</div>
						</div>
					</div>
					<div style="display: flex; width: 100%" v-else>
						<div
							class="timeline2"
							v-for="(v, i) in DisplayProcessing(experienceData, index + 1)"
							:key="i"
							:style="
								i + 1 == 1 &&
								DisplayProcessing(experienceData, index + 1).length != 1
									? 'width: 12%;'
									: ''
							"
						>
							<div class="border" v-if="i != 0">
								<div class="borderTime"></div>
							</div>
							<div class="Nodes">
								<SvgIcon name="ele-Microphone" :size="20" style="color: #f56c6c" />
							</div>
							<div class="timeNodes">
								<div class="nodeTimes">
									<span>{{ v.createTime }} </span>
								</div>
								<div class="timeContent">
									<el-tooltip
										class="item"
										effect="dark"
										:content="v.content"
										placement="right"
									>
										<p
											class="nodeTimelis"
											@click="onClickDate(v.createTime, term)"
										>
											<span v-if="v.status === 0" style="color: #409eff">{{ v.content }}</span>
											<span v-else-if="v.status === 1" style="color: #42a51a">{{ v.content }}</span>
											<span v-else style="color: #6b7280c2">{{ v.content }}</span>
										</p>
									</el-tooltip>
								</div>
							</div>
						</div>
					</div>
				</div>
			</div>

			<div style="width: 2%; margin-right: 30px">
				<div>
					<span class="hingelis" v-if="experienceData.length > Index"></span>
					<div v-if="experienceData.length > Index * 2">
						<span
							class="hingelis"
							v-for="(num, index) in rightRows"
							:key="index"
							style="margin-top: 60px"
						></span>
					</div>
				</div>
			</div>
		</div>
	</div>
</template>
<script>
export default {
	props: {
		data: {
			type: Array,
			default: () => {
				return [];
			},
		},
		Index: {
			type: Number,
			default: 0,
		}, //第一行展示X条数据
	},
	data() {
		return {
			experienceData: this.data,
			leftRows: 0,
			rightRows: 0,
			leftShow: false,
			rightShow: false,
			// pdfImg: require("../../assets/images/pdfReported.png"), //在下方展示的图片
		};
	},
	watch: {
		data: {
			handler(newVal, oldVal) {
				//时间线数据
				this.experienceData = newVal;
				let rows = Math.ceil(newVal.length / this.Index);
				this.leftRows =
					rows == 2
						? 0
						: rows % 2 == 0
						? parseInt(rows / 2) - 1
						: parseInt(rows / 2);
				this.rightRows =
					rows == 4
						? 1
						: rows % 2 == 0
						? parseInt(rows / 2) % 2 == 0
							? parseInt(rows / 2) >= 4
								? parseInt(rows / 2) - 1
								: parseInt(rows / 2)
							: parseInt(rows / 2) - 1
						: parseInt(rows / 2) - 1;
				this.leftShow = rows % 2 == 0 ? true : false;
				this.rightShow = rows == 1 ? false : rows % 2 == 1 ? true : false;
			},
			immediate: true,
		},
	},
	created() {},
	methods: {
		DisplayProcessing(Arg, Num) {
			//数据循环处理
			let arr = Arg.slice(this.Index * (Num - 1), this.Index * Num);
			arr = Num % 2 == 0 ? arr.reverse() : arr;
			return arr;
		},
		onClickDate(date, term) {
			//选择报告
			this.$emit("onClickDate", term);
		},
	},
};
</script>
<style scoped lang="scss">
.timeline {
	width: 100%;
	height: 60px;
	display: flex;
	align-items: center;
}
.timeline2 {
	width: 100%;
	height: 60px;
	display: flex;
	align-items: center;
	justify-content: flex-end;
}
.border {
	width: 100%;
	justify-content: center;
	align-items: center;
	display: flex;
	.borderTime {
		border-bottom: 2px solid #9cd3ff;
		width: 100%;
	}
}

.Nodes {
	svg {
		// background: ;
		color: #1e9bff;
		height: 1.5em;
		width: 1.5em;
	}
}

.timeNodes {
	display: flex;
	flex-wrap: wrap;
	align-items: center;
	max-width: 135px;
}

.nodeTimelis {
	max-width: 150px;
	overflow: hidden;
	word-break: keep-all;
	white-space: nowrap;
	text-overflow: ellipsis;
	cursor: pointer;
}
.nodeTimelis:active {
	color: #1e9bff;
}
.nodeTimes {
	margin-bottom: 0;
}

.btns-img {
	height: 16px;
	width: 16px;
}

.hingelis {
	content: "";
	display: block;
	width: 100%;
	height: 60px;
	border: 2px solid #9cd3ff;
	border-radius: 0 20px 20px 0px;
	border-left: 0px;
	margin-top: 29.5px;
}

.hingelisHeard {
	content: "";
	display: block;
	width: 100%;
	height: 63.1px;
	border: 2px solid #9cd3ff;
	border-radius: 20px 0px 0px 20px;
	border-right: 0px;
	margin-top: 50px;
}

.hingeorger {
	display: block;
	width: 100%;
	border-bottom: 1px solid #cccccc;
	margin: 49.5px 0;
	position: relative;
}
.hingeorgerHeard {
	display: block;
	width: 100%;
	border-bottom: 1px solid #cccccc;
	position: relative;
}

.hingeorgerHeard[data-v-jzl20210826]:after {
	content: "";
	position: absolute;
	top: -4px;
	left: -2px;
	border-top: 5px solid transparent;
	border-right: 12px solid #cccccc;
	border-bottom: 5px solid transparent;
}

.hingeorger[data-v-jzl20210826]:after {
	content: "";
	position: absolute;
	top: -4px;
	right: -2px;
	border-top: 5px solid transparent;
	border-left: 12px solid #cccccc;
	border-bottom: 5px solid transparent;
}

.headerRadio {
	display: block;
	width: 100%;
	border-bottom: 1px solid #cccccc;
	position: relative;
}

.headerRadio[data-v-jzl20210826]:after {
	content: "";
	position: absolute;
	top: -4px;
	left: -2px;
	width: 1px;
	height: 1px;
	border-radius: 50%;
	background: #cccccc;
	border: 5px solid #cccccc;
	position: absolute;
	right: 35px;
	top: 50%;
	transform: translate(0, -50%);
}
::-webkit-scrollbar {
	width: 3px;
	height: 3px;
}

::-webkit-scrollbar-thumb {
	border-radius: 5px;
	-webkit-box-shadow: inset 0 0 5px rgba(0, 0, 0, 0.2);
	background-color: #99a9bf;
}

::-webkit-scrollbar-track {
	-webkit-box-shadow: inset 0 0 5px rgba(0, 0, 0, 0.2);
	border-radius: 5px;
	background-color: #d3dce6;
}
</style>
- 在使用的页面引入Steps组件,并传入相关数据
<template>
  <div class="content_box">
		<Steps v-if="dayRecory.length > 0" :data="dayRecory" :Index="5" />
	</div>
</template>

<script>
import { reactive, toRefs } from 'vue';
import Steps from './components/Steps/index.vue';
export default {
  components: { Steps },
  props: {},
  setup() {
    const state = reactive({
      dayRecory: [
				{
					id: 7204928,
					content: "步骤1",
					smallClass: "UpdateOutBoundAgingPlanning",
					bigClass: null,
					createTime: "2024-01-03",
					createUser: "Mia",
					outBoundAgingPlanningId: 1342,
          status: 0
				},
				{
					id: 7204929,
					content: "步骤2",
					smallClass: "UpdateOutBoundAgingPlanning",
					bigClass: "SCFXD",
					createTime: "2024-01-04",
					createUser: "Mia",
					outBoundAgingPlanningId: 1342,
          status: 0
				},
				{
					id: 7204929,
					content: "步骤3",
					smallClass: "UpdateOutBoundAgingPlanning",
					bigClass: "SCFXD",
					createTime: "2024-01-05",
					createUser: "Mia",
					outBoundAgingPlanningId: 1342,
          status: 0
				},
				{
					id: 7204929,
					content: "步骤4",
					smallClass: "UpdateOutBoundAgingPlanning",
					bigClass: "SCFXD",
					createTime: "2024-03-01",
					createUser: "Mia",
					outBoundAgingPlanningId: 1342,
          status: 0
				},
				{
					id: 7204929,
					content: "步骤5",
					smallClass: "UpdateOutBoundAgingPlanning",
					bigClass: "SCFXD",
					createTime: "2024-03-01",
					createUser: "Mia",
					outBoundAgingPlanningId: 1342,
          status: 0
				},
				{
					id: 7204929,
					content: "步骤6",
					smallClass: "UpdateOutBoundAgingPlanning",
					bigClass: "SCFXD",
					createTime: "2024-03-01",
					createUser: "Mia",
					outBoundAgingPlanningId: 1342,
          status: 0
				},
				{
					id: 7204929,
					content: "步骤7",
					smallClass: "UpdateOutBoundAgingPlanning",
					bigClass: "SCFXD",
					createTime: "2024-03-01",
					createUser: "Mia",
					outBoundAgingPlanningId: 1342,
          status: 0
				},
				{
					id: 7204929,
					content: "步骤8",
					smallClass: "UpdateOutBoundAgingPlanning",
					bigClass: "SCFXD",
					createTime: "2024-03-01",
					createUser: "Mia",
					outBoundAgingPlanningId: 1342,
          status: 0
				},
				{
					id: 7204929,
					content: "步骤9",
					smallClass: "UpdateOutBoundAgingPlanning",
					bigClass: "SCFXD",
					createTime: "2024-03-01",
					createUser: "Mia",
					outBoundAgingPlanningId: 1342,
          status: 0
				},
				{
					id: 7204929,
					content: "步骤10",
					smallClass: "UpdateOutBoundAgingPlanning",
					bigClass: "SCFXD",
					createTime: "2024-03-01",
					createUser: "Mia",
					outBoundAgingPlanningId: 1342,
          status: 1
				},
				{
					id: 7204929,
					content: "步骤11",
					smallClass: "UpdateOutBoundAgingPlanning",
					bigClass: "SCFXD",
					createTime: "2024-03-01",
					createUser: "Mia",
					outBoundAgingPlanningId: 1342,
          status: 2
				},
				{
					id: 7204929,
					content: "步骤12",
					smallClass: "UpdateOutBoundAgingPlanning",
					bigClass: "SCFXD",
					createTime: "2024-03-01",
					createUser: "Mia",
					outBoundAgingPlanningId: 1342,
          status: 2
				},
				{
					id: 7204929,
					content: "步骤13",
					smallClass: "UpdateOutBoundAgingPlanning",
					bigClass: "SCFXD",
					createTime: "2024-03-01",
					createUser: "Mia",
					outBoundAgingPlanningId: 1342,
          status: 2
				},
				{
					id: 7204929,
					content: "步骤14",
					smallClass: "UpdateOutBoundAgingPlanning",
					bigClass: "SCFXD",
					createTime: "2024-03-01",
					createUser: "Mia",
					outBoundAgingPlanningId: 1342,
          status: 2
				}
			],
    });
    const methods = {
    };
    return {
      ...toRefs(state),
      ...methods
    };
  },
};
</script>

<style scoped lang="scss">
.main-container {
	margin-left: 0 !important;
}
::v-deep .right-toolbar {
	width: 800px !important;
}
::v-deep .main-title {
	display: none !important;
}
</style>


 101
101


 被折叠的 条评论
为什么被折叠?
被折叠的 条评论
为什么被折叠?
 到【灌水乐园】发言


