


转载:https://blog.csdn.net/justloveyou_/article/details/62893086
https://www.modb.pro/db/100305
hash-方法的原理
https://www.cnblogs.com/aaabbbcccddd/p/14849064.html
参考别人的东西加自己的部分理解补充。算是转载吧
HashMap
一、HashMap 概述
Map 是 Key-Value 对映射的抽象接口,该映射不包括重复的键,即一个键对应一个值。
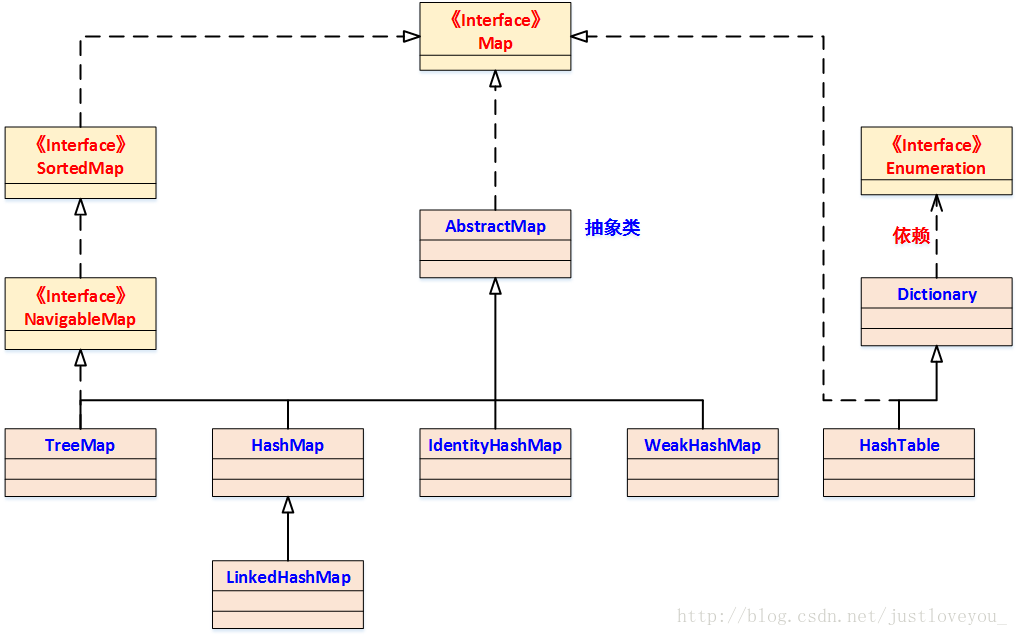
HashMap 是 Java Collection Framework 的重要成员,也是Map族(如下图所示)中我们最为常用的一种。
简单地说,HashMap 是基于哈希表的 Map 接口的实现,以 Key-Value 的形式存在,即存储的对象是 Entry (同时包含了 Key 和 Value) 。(Entry概念很重要,表示一个映射项,里面包含了 Key 和 Value)
在HashMap中,其会根据hash算法来计算key-value的存储位置并进行快速存取。特别地,HashMap最多只允许一条Entry的键为Null(多条会覆盖),但允许多条Entry的值为Null。此外,HashMap 是 Map 的一个非同步的实现。
同样地,HashSet 也是 Java Collection Framework 的重要成员,是 Set 接口的常用实现类,但其与 HashMap 有很多相似之处。
对于 HashSet 而言,其采用 Hash 算法决定元素在Set中的存储位置,这样可以保证元素的快速存取;对于 HashMap 而言,其将key-value 当成一个整体(Entry 对象)来处理,其也采用同样的 Hash 算法去决定 key-value 的存储位置从而保证键值对的快速存取。虽然 HashMap 和 HashSet 实现的接口规范不同,但是它们底层的 Hash 存储机制完全相同。实际上,HashSet 本身就是在 HashMap 的基础上实现的。因此,通过对 HashMap 的数据结构、实现原理、源码实现三个方面了解,我们不但可以进一步掌握其底层的 Hash 存储机制,也有助于对 HashSet 的了解。
dn.net/justloveyou_/article/details/62893086
必须指出的是,虽然容器号称存储的是 Java 对象,但实际上并不会真正将 Java对象放入容器中,只是在容器中保留这些对象的引用。也就是说,Java 容器实际上包含的是引用变量,而这些引用变量指向了我们要实际保存的Java 对象。(理解对象的引用很重要)
HashMap 在 JDK 中的定义
HashMap 实现了Map接口,并继承 AbstractMap 抽象类。其中 Map 接口定义了键值映射规则。和 AbstractCollection抽象类在 Collection 族的作用类似, AbstractMap 抽象类提供了 Map 接口的骨干实现,以最大限度地减少实现Map接口所需的工作(理解这句话就理解了抽象类在集合中的意义)。HashMap 在JDK中的定义为:
public class HashMap<K,V>
    extends AbstractMap<K,V>
    implements Map<K,V>, Cloneable, Serializable{
...
}
源码实现
HashMap 的构造函数
HashMap 一共提供了四个构造函数,其中 默认无参的构造函数 和 参数为Map的构造函数 为 Java Collection Framework 规范的推荐实现,其余两个构造函数则是 HashMap 专门提供的。
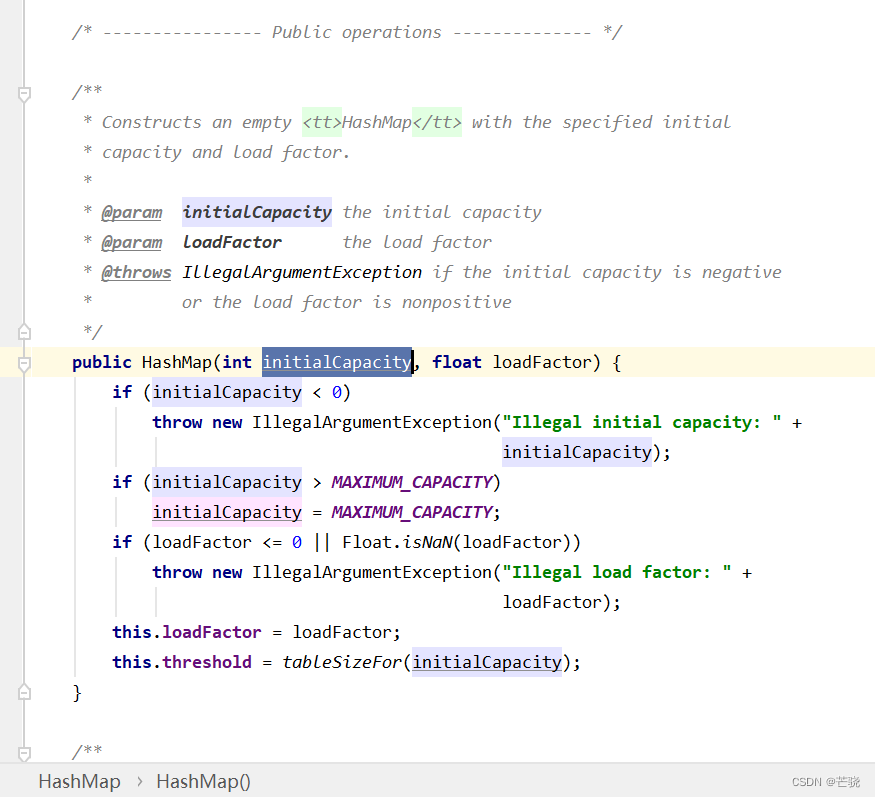
为理解下面构造函数的内容,先理解两个非常重要的参数: 初始容量 和 负载因子, 这两个参数是影响 HashMap 性能的重要参数。其中,容量表示哈希表中通的数量(table数组的大小), 初始容量是创建哈希表时桶的数量;
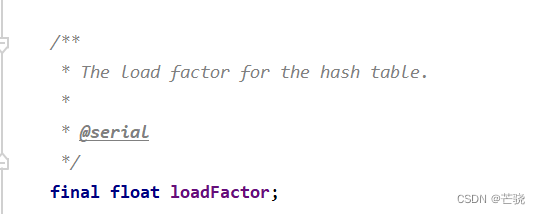
负载因子(散列表中的装填因子=填入表中的记录数/ 散列表的长度)是哈希表在其容量自动增加之前可以达到多满的一种尺度,它衡量的是一个散列表的空间的使用程度,负载因子越大表示散列表的装填程度越高,反之越小。
1、 HashMap()
该构造函数在构造一个具有 > 默认初始容量 (16) 和默认负载因子(0.75) 的空 HashMap ,是 Java Collection Framework 规范推荐提供的 , 源码如下:
无参构造 HashMap()
不初始tab数组,在插入时发现长度为0,则进行扩容时初始化
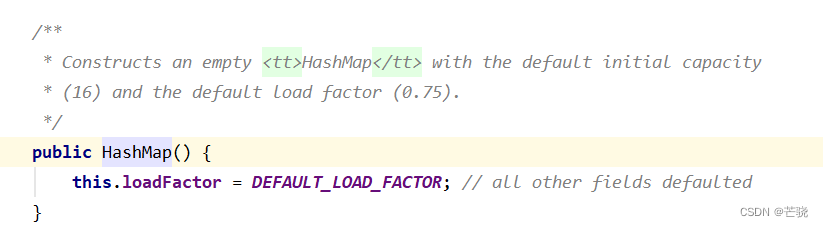
默认空数组


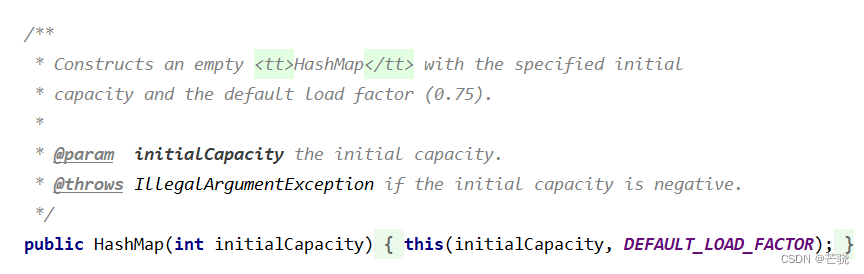
定义初始容量 HashMap(int initialCapacity)
HashMap(int initialCapacity, float loadFactor)
HashMap工作原理
我们知道HashMap其实就是散列查找的具体实现,它包括:
- 散列表
- 散列函数
散列表
HashMap 数组
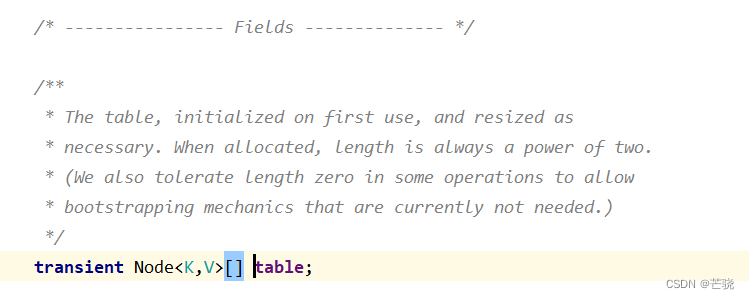
Node 节点
    /**
     * Basic hash bin node, used for most entries.  (See below for
     * TreeNode subclass, and in LinkedHashMap for its Entry subclass.)
     */
    static class Node<K,V> implements Map.Entry<K,V> {
        final int hash;
        final K key;
        V value;
        Node<K,V> next;

        Node(int hash, K key, V value, Node<K,V> next) {
            this.hash = hash;
            this.key = key;
            this.value = value;
            this.next = next;
        }

        public final K getKey()        { return key; }
        public final V getValue()      { return value; }
        public final String toString() { return key + "=" + value; }

        public final int hashCode() {
            return Objects.hashCode(key) ^ Objects.hashCode(value);
        }

        public final V setValue(V newValue) {
            V oldValue = value;
            value = newValue;
            return oldValue;
        }

        public final boolean equals(Object o) {
            if (o == this)
                return true;
            if (o instanceof Map.Entry) {
                Map.Entry<?,?> e = (Map.Entry<?,?>)o;
                if (Objects.equals(key, e.getKey()) &&
                    Objects.equals(value, e.getValue()))
                    return true;
            }
            return false;
        }
    }
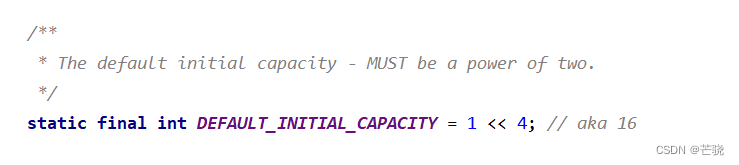
初始容量 默认初始容量 16
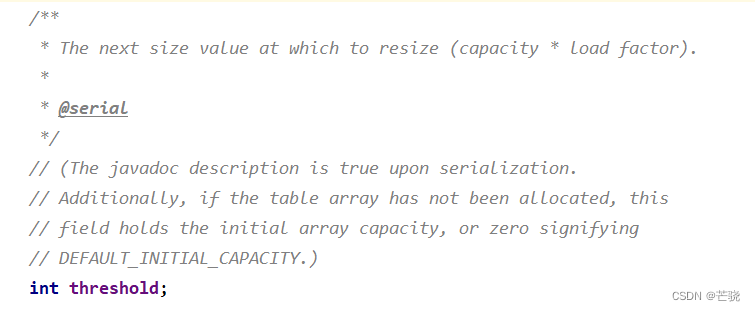
扩容时下一个容量 threshold
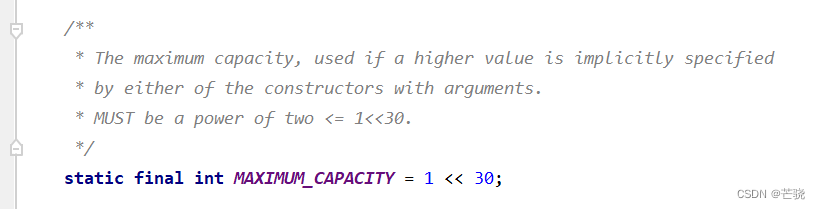
最大容量 MAXIMUM_CAPACITY 2^30
负载因子——定义一个表的装满程度 默认0.75

方法
插入
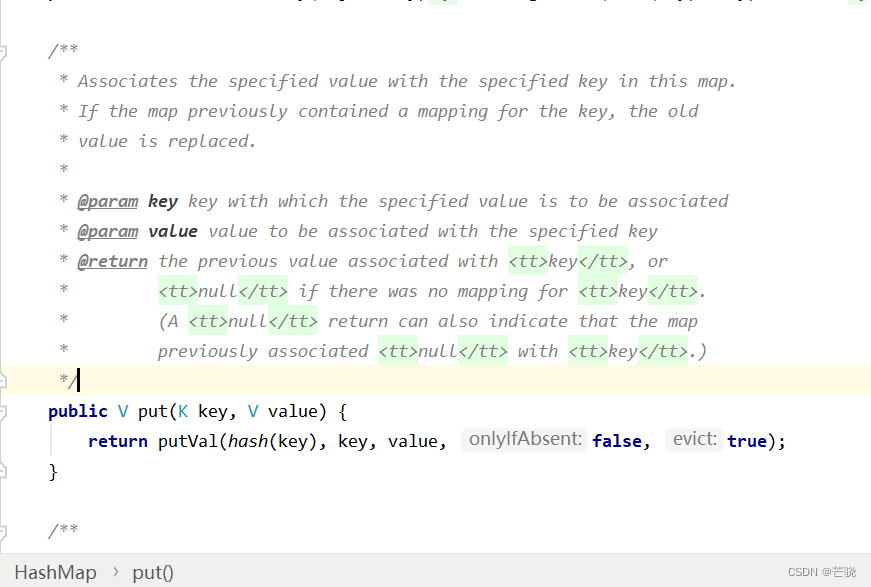
put方法 插入实现
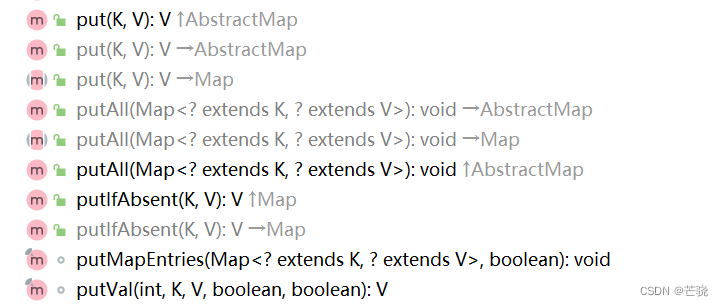
put(K key, V value)
通过putVal + hash方法
putVal(int hash, K key, V value, boolean onlyIfAbsent, boolean evict)
参数:
- hash
- key
- value
- onlyIfAbsent(如果存在,就不二次添加了)

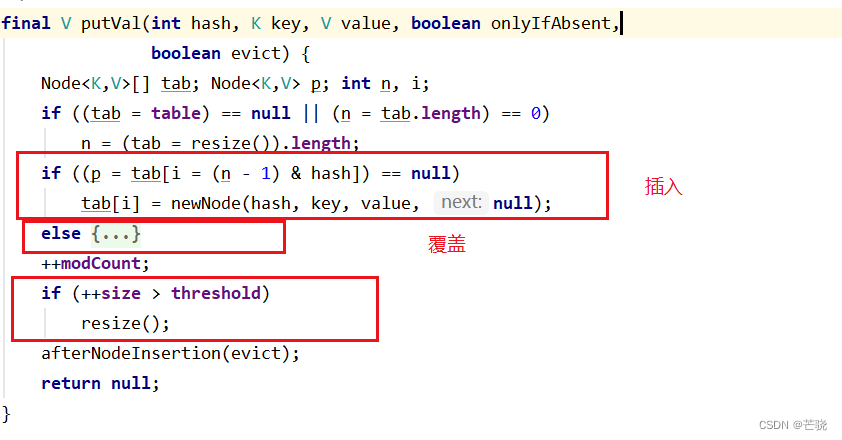
总结一下:
HashMap存储一个哈希键值对的数据结构有三种。
当我们使用putVal方法,通过hashcode,然后高16位与低16位异或运算,再与数组长度-1进行按位与运算之后得到一个数组下标。
这时我们要插入的这个值就可能有四种情况:
- 插入数组
- 插入链表
- 插入红黑树
- 上面任意一种的覆盖
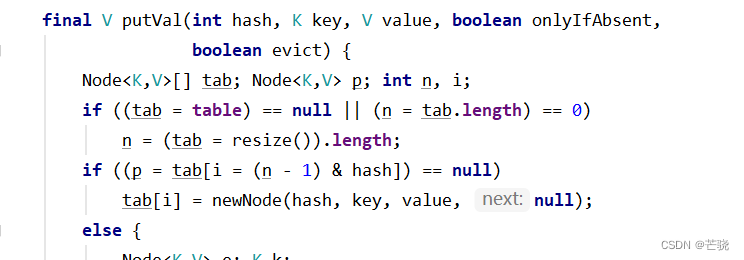
当然首先要判断数组长度以及是否初始化,并可能进行扩容,这个不是重点
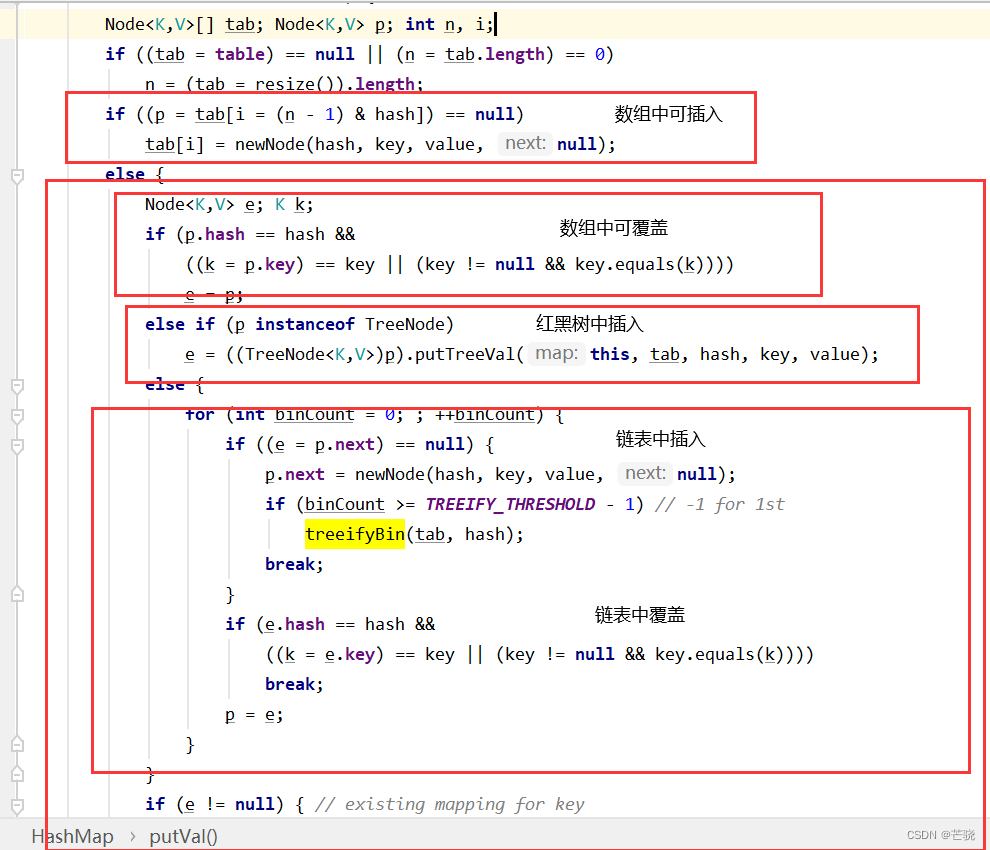
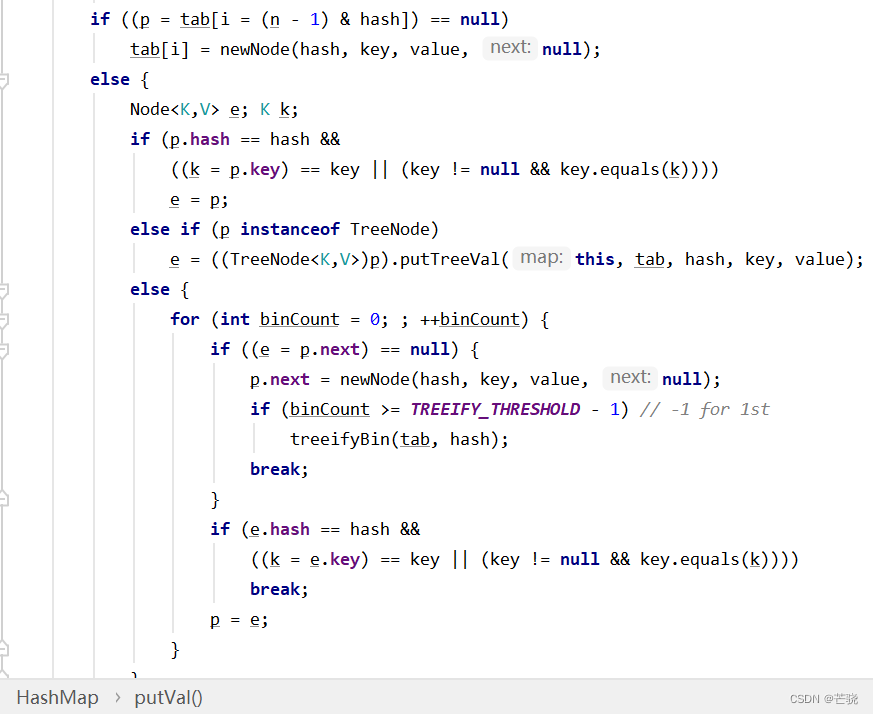
首先来到数组的判断,
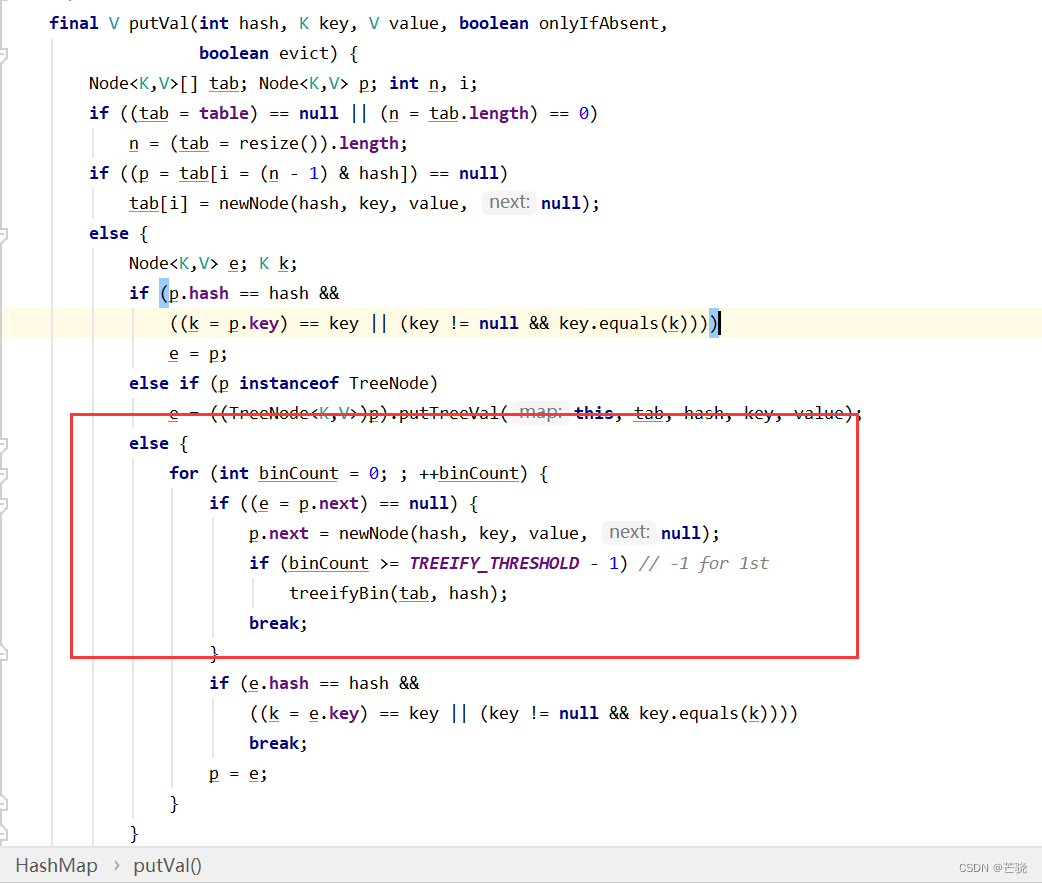
- 如果该下标位置已经被占, 判断是否相同键和hash,考虑覆盖或到下一个数据结构链表
- 如果被占,则可能具有两种形态,链表或者红黑树,要么插入或覆盖链表节点,要么插入或覆盖红黑树节点
插入逻辑结束,但是还没完。
其中两个部分需要注意,当确定要插入一个新的值,势必要使得长度变化。
如果变化的数组的长度,则可能触发扩容
如果变化的链表的长度,则可能触发红黑树化。
/**
* 养成写注释的习惯很重要
* Implements Map.put and related methods
*
* @param hash hash for key
* @param key the key
* @param value the value to put
* @param onlyIfAbsent if true, don't change existing value
* @param evict if false, the table is in creation mode.
* @return previous value, or null if none
*/
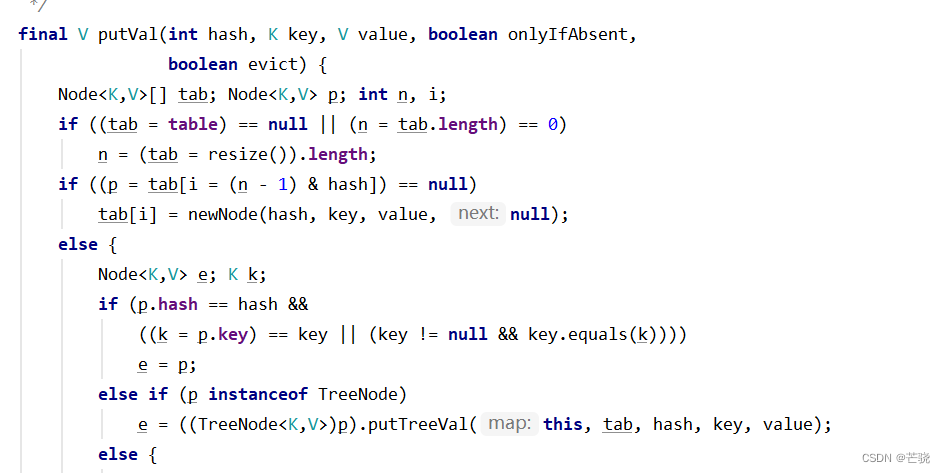
final V putVal(int hash, K key, V value, boolean onlyIfAbsent,
boolean evict) {
Node<K,V>[] tab; Node<K,V> p; int n, i;
if ((tab = table) == null || (n = tab.length) == 0)
n = (tab = resize()).length;
if ((p = tab[i = (n - 1) & hash]) == null)
tab[i] = newNode(hash, key, value, null);
else {
Node<K,V> e; K k;
if (p.hash == hash &&
((k = p.key) == key || (key != null && key.equals(k))))
e = p;
//如果p是TreeNode,说明已经是红黑树数据结构了
else if (p instanceof TreeNode)
e = ((TreeNode<K,V>)p).putTreeVal(this, tab, hash, key, value);
else {
for (int binCount = 0; ; ++binCount) {
if ((e = p.next) == null) {
p.next = newNode(hash, key, value, null);
if (binCount >= TREEIFY_THRESHOLD - 1) // -1 for 1st
treeifyBin(tab, hash);
break;
}
if (e.hash == hash &&
((k = e.key) == key || (key != null && key.equals(k))))
break;
p = e;
}
}
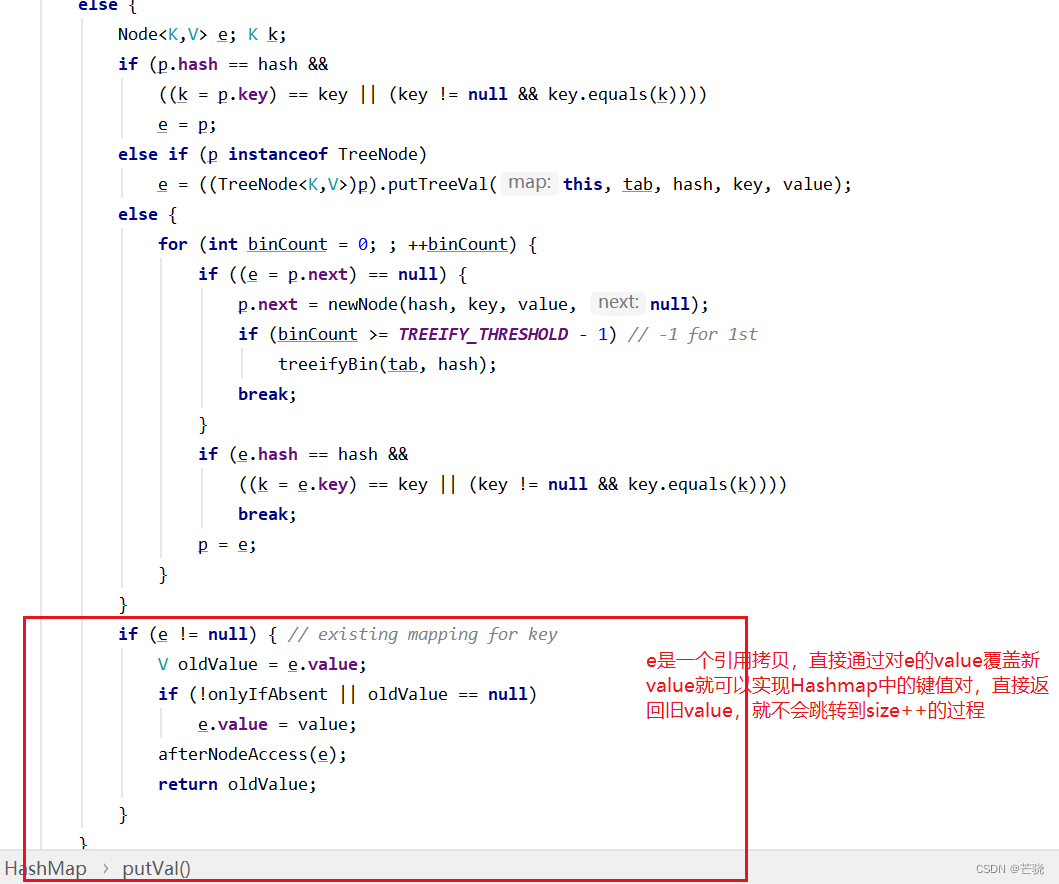
if (e != null) { // existing mapping for key
V oldValue = e.value;
if (!onlyIfAbsent || oldValue == null)
e.value = value;
afterNodeAccess(e);
return oldValue;
}
}
++modCount;
if (++size > threshold)
resize();
afterNodeInsertion(evict);
return null;
}
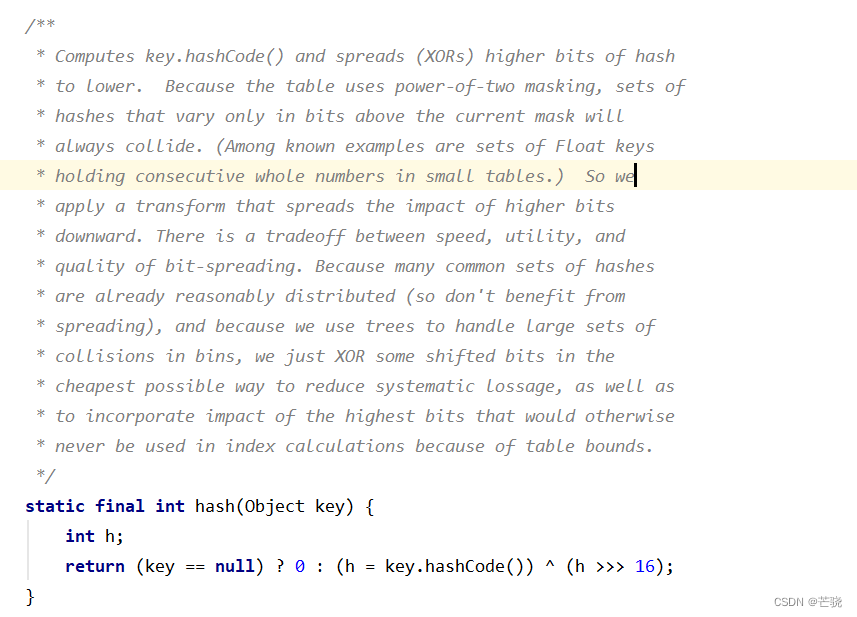
散列函数实现
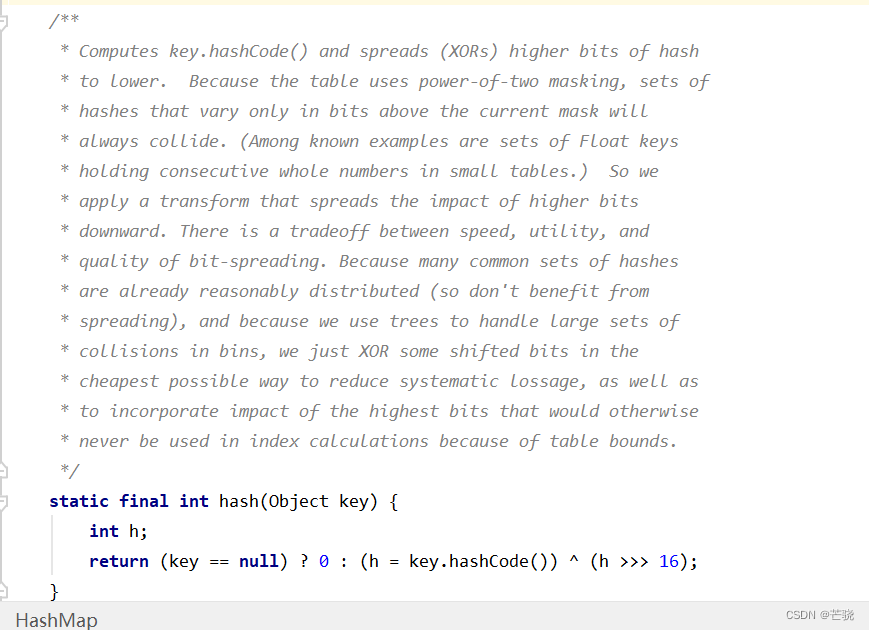
(h = key.hashCode()) ^ (h >>> 16); 这个应该不陌生,h最终是个32位的数值(int型),通过右移补零得到16位的数值(因为默认散列表的容量为16)
hash方法的原理 hash之后高16位与低16位异或
https://tobebetterjavaer.com/collection/hashmap.html#%E4%B8%80%E3%80%81hash-%E6%96%B9%E6%B3%95%E7%9A%84%E5%8E%9F%E7%90%86 直接复制大佬的
我们都知道,key.hashCode() 是用来获取键位的哈希值的,理论上,哈希值是一个 int 类型,范围从-2147483648 到 2147483648。前后加起来大概 40 亿的映射空间,只要哈希值映射得比较均匀松散,一般是不会出现哈希碰撞的。
为什么要高16位于低16位异或呢?
因为大多数情况下散列表的长度不会很大,所以使用hashCode之后高位会没有利用到。
但问题是一个 40 亿长度的数组,内存是放不下的。HashMap 扩容之前的数组初始大小只有 16,所以这个哈希值是不能直接拿来用的,用之前要和数组的长度做取模运算,用得到的余数来访问数组下标才行。

取模运算有两处。
取模运算(“Modulo Operation”)和取余运算(“Remainder Operation ”)两个概念有重叠的部分但又不完全一致。主要的区别在于对负整数进行除法运算时操作不同。取模主要是用于计算机术语中,取余则更多是数学概念。
HashMap处理冲突
我们知道散列表处理冲突通常有两种方法,我们经常使用的是拉链法,将所有的同义词放到一个链表中。
链表处理冲突
jdk8 链表数据结构
遍历链表
尾插法: p.next = newNode(hash, key, value, null); 新插入的元素放到末尾。
链表转化为红黑树条件:binCount >= TREEIFY_THRESHOLD - 1
扩容
扩容场景一: 数组长度为0或者数组没有被初始化
HashMap jdk8 它将初始化的工作推迟到插入操作时,也就是说,不管你有没有定义容量属性,它都会在插入时才进行数组的初始化。
第一次扩容如果是长度为0或者没有初始化数组,则使用默认指标,不算是在原有容量基础上的扩容(concurrentHashMap做的更好。它将这一阶段定义为initTable方法,和resize方法语义区别开来)。
这是第一次的扩容场景
1) 扩容一定是放入新值的时候,该新值不是替换以前的位置的情况下。 (2)扩容发生在存放元素之后,当数据存放之后(先存放,后扩容), 判断当前存入对象的个数,如果大于阈值则进行扩容
扩容场景二: 数组长度不为0 ,在执行插入场景之后size超过阈值,进行扩容
之后的扩容假如长度为16,如果超过了负载因子,进入扩容机制
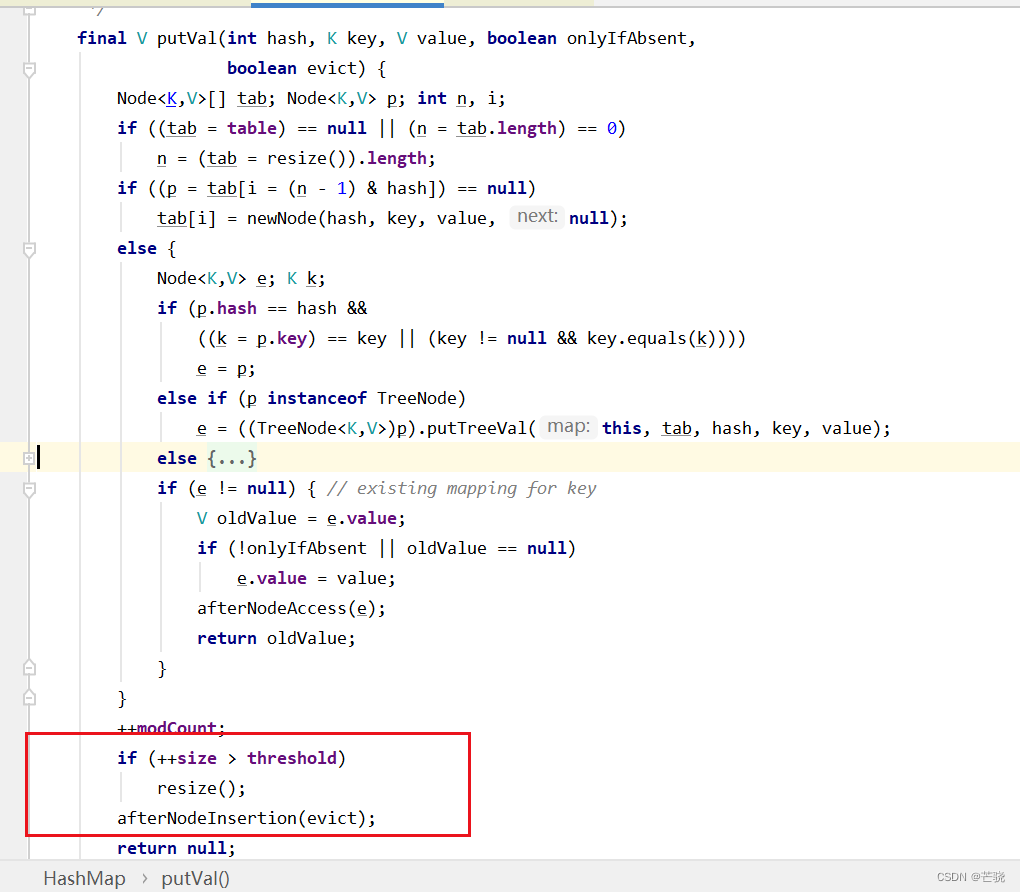
size的判断
size的意义是HashMap中的所有键值对数量,不管你是存在数组还是链表还是红黑树上。
但是这里size的判断是这样的:执行插入才会跳转到size++,执行覆盖,返回旧value
在覆盖的阶段会直接返回
resize
| 过程 | 源码 |
|---|---|
| 如果tab数组没有初始化或者长度为0,视为长度为0 |  |
| 长度为0时的扩容 | 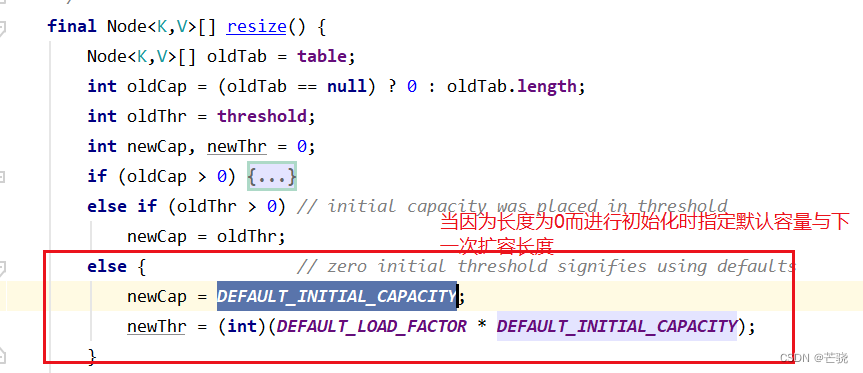 |
| 长度不为0导致的扩容,假如16之后的扩容 | 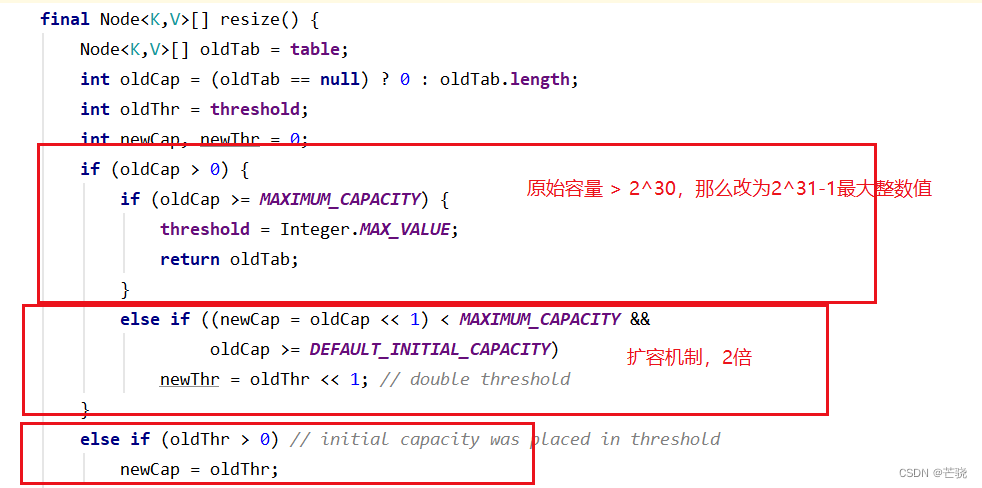 |
| 数据迁移 | 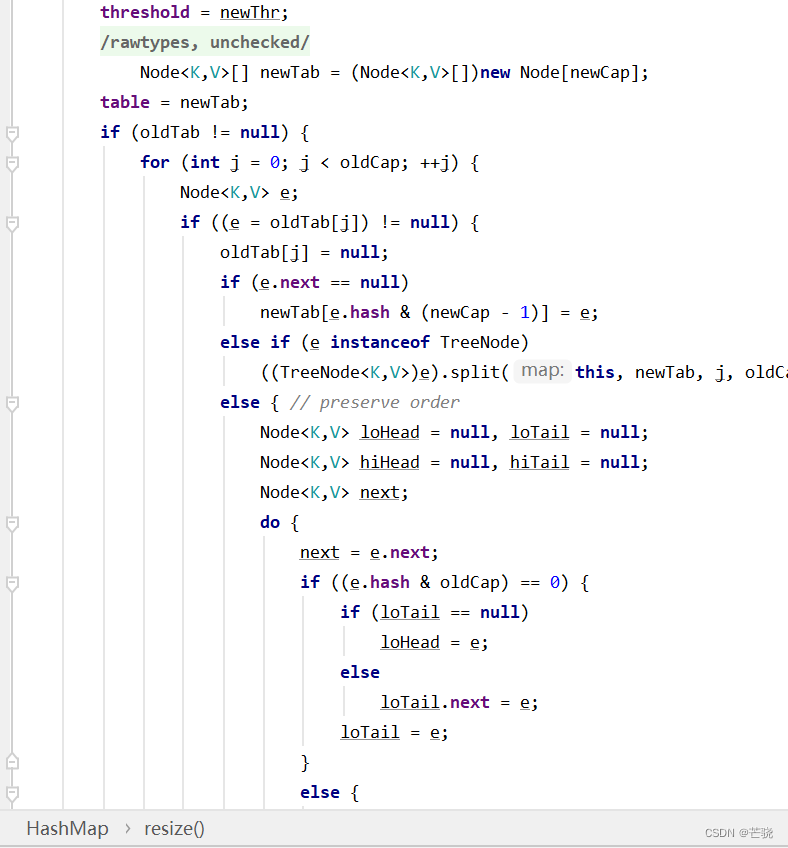 |
    /**
     * Initializes or doubles table size.  If null, allocates in
     * accord with initial capacity target held in field threshold.
     * Otherwise, because we are using power-of-two expansion, the
     * elements from each bin must either stay at same index, or move
     * with a power of two offset in the new table.
     *
     * @return the table
     */
    final Node<K,V>[] resize() {
        Node<K,V>[] oldTab = table;
        int oldCap = (oldTab == null) ? 0 : oldTab.length;
        int oldThr = threshold;
        int newCap, newThr = 0;
        if (oldCap > 0) {
            if (oldCap >= MAXIMUM_CAPACITY) {
                threshold = Integer.MAX_VALUE;
                return oldTab;
            }
            else if ((newCap = oldCap << 1) < MAXIMUM_CAPACITY &&
                     oldCap >= DEFAULT_INITIAL_CAPACITY)
                newThr = oldThr << 1; // double threshold
        }
        else if (oldThr > 0) // initial capacity was placed in threshold
            newCap = oldThr;
        else {               // zero initial threshold signifies using defaults
            newCap = DEFAULT_INITIAL_CAPACITY;
            newThr = (int)(DEFAULT_LOAD_FACTOR * DEFAULT_INITIAL_CAPACITY);
        }
        if (newThr == 0) {
            float ft = (float)newCap * loadFactor;
            newThr = (newCap < MAXIMUM_CAPACITY && ft < (float)MAXIMUM_CAPACITY ?
                      (int)ft : Integer.MAX_VALUE);
        }
        threshold = newThr;
        @SuppressWarnings({"rawtypes","unchecked"})
            Node<K,V>[] newTab = (Node<K,V>[])new Node[newCap];
        table = newTab;
        //数据迁移实现
        if (oldTab != null) {
            for (int j = 0; j < oldCap; ++j) {
                Node<K,V> e;
                //将oldTab中的元素设为null
                if ((e = oldTab[j]) != null) {
                    oldTab[j] = null;
                    if (e.next == null)
                    	//利用hash重新加入到数组中去
                        newTab[e.hash & (newCap - 1)] = e;
                    //如果元素已经是红黑树结构了
                    else if (e instanceof TreeNode)
                        ((TreeNode<K,V>)e).split(this, newTab, j, oldCap);
                    else { // preserve order
                        Node<K,V> loHead = null, loTail = null;
                        Node<K,V> hiHead = null, hiTail = null;
                        Node<K,V> next;
                        do {
                            next = e.next;
                            if ((e.hash & oldCap) == 0) {
                                if (loTail == null)
                                    loHead = e;
                                else
                                    loTail.next = e;
                                loTail = e;
                            }
                            else {
                                if (hiTail == null)
                                    hiHead = e;
                                else
                                    hiTail.next = e;
                                hiTail = e;
                            }
                        } while ((e = next) != null);
                        if (loTail != null) {
                            loTail.next = null;
                            newTab[j] = loHead;
                        }
                        if (hiTail != null) {
                            hiTail.next = null;
                            newTab[j + oldCap] = hiHead;
                        }
                    }
                }
            }
        }
        return newTab;
    }
数据迁移
当数据扩容之后,数据迁移的思想是将所有元素重新分配位置。不存在什么链表整个迁移或者红黑树整个迁移,所有已保存的元素都当做新插入的元素来进行迁移。
这个过程分为几个数据
保存在数组中的数据(指的是该下标位置只有一个元素)

保存在红黑树上的数据

跳转到红黑树的split方法
split 的思路就是把当前要处理的root节点从红黑树中拿出来,然后把整个红黑树再放到当前节点所在旧数组的下标位置。
就像不断提取链表的首节点然后把next节点作为首节点,然后再处理首节点,以此类推,可以把旧数组该位置的所有元素全部处理了。
保存在链表中的数据
建议先看红黑树split,两个原理相同
else { // preserve order
                        Node<K,V> loHead = null, loTail = null;
                        Node<K,V> hiHead = null, hiTail = null;
                        Node<K,V> next;
                        do {
                            next = e.next;
                            if ((e.hash & oldCap) == 0) {
                                if (loTail == null)
                                    loHead = e;
                                else
                                    loTail.next = e;
                                loTail = e;
                            }
                            else {
                                if (hiTail == null)
                                    hiHead = e;
                                else
                                    hiTail.next = e;
                                hiTail = e;
                            }
                        } while ((e = next) != null);
                        //考虑拆分链表时低位链表没有元素的情况
                        if (loTail != null) {
                            loTail.next = null;
                            newTab[j] = loHead;
                        }
                        //考虑拆分链表时高位链表没有元素的情况
                        if (hiTail != null) {
                            hiTail.next = null;
                            newTab[j + oldCap] = hiHead;
                        }
                    }
红黑树使用场景(jdk8)
HashMap与红黑树
JDK1.8 : Table数组+ Entry链表/红黑树;(为什么要使用红黑树?)
HashMap红黑树实现
在JDK1.6,JDK1.7中,HashMap采用位桶+链表实现,即使用链表处理冲突,同一hash值的链表都存储在一个链表里。但是当位于一个桶中的元素较多,即hash值相等的元素较多时,通过key值依次查找的效率较低。而JDK1.8中,HashMap采用位桶+链表+红黑树实现,当链表长度超过阈值(8)时,将链表转换为红黑树,这样大大减少了查找时间。在jdk1.8版本后,java对HashMap做了改进,在链表长度大于8的时候,将后面的数据存在红黑树中,以加快检索速度。
字段定义
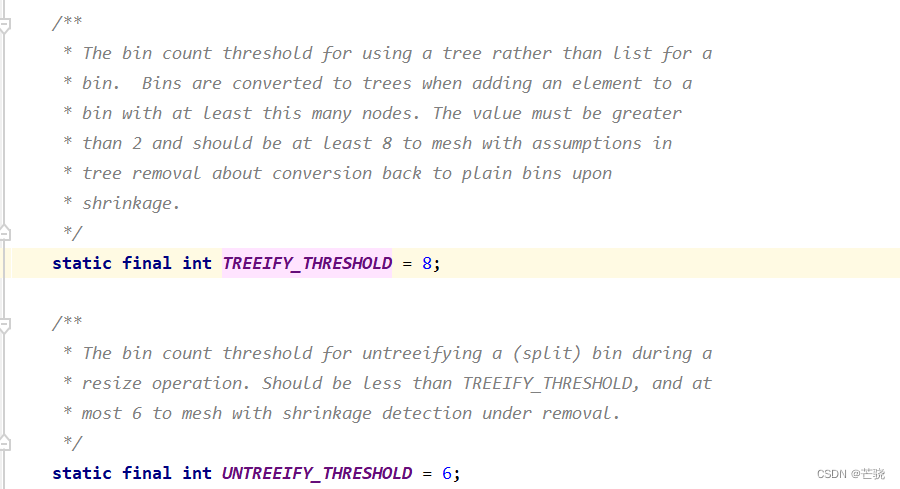
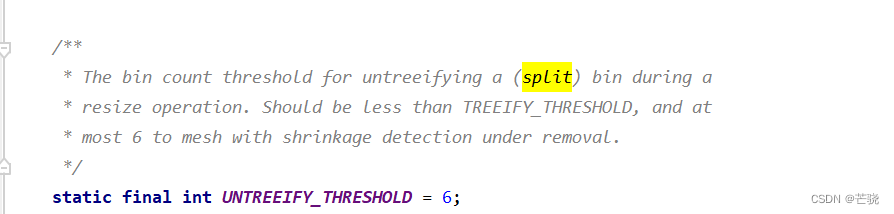
先这样理解,慢慢分析细节:当链表元素个数大于8的时候,就会考虑转换为红黑树;当红黑树元素个数小于6的时候,就会考虑转换回链表。
hashMap中确实定义了这两个常量,但并非简单通过元素个数的判断来进行转换
TREEIFY_THRESHOLD 链表长度 默认8 达到该长度 树化
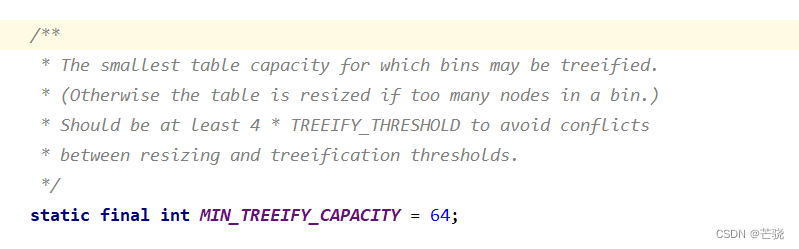
MIN_TREEIFY_CAPACITY 当table的长度小于该变量时优先扩容而不是转化红黑树 默认64
红黑树结构体 TreeNode
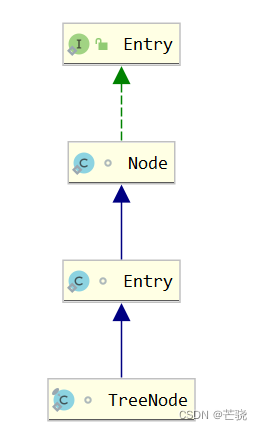
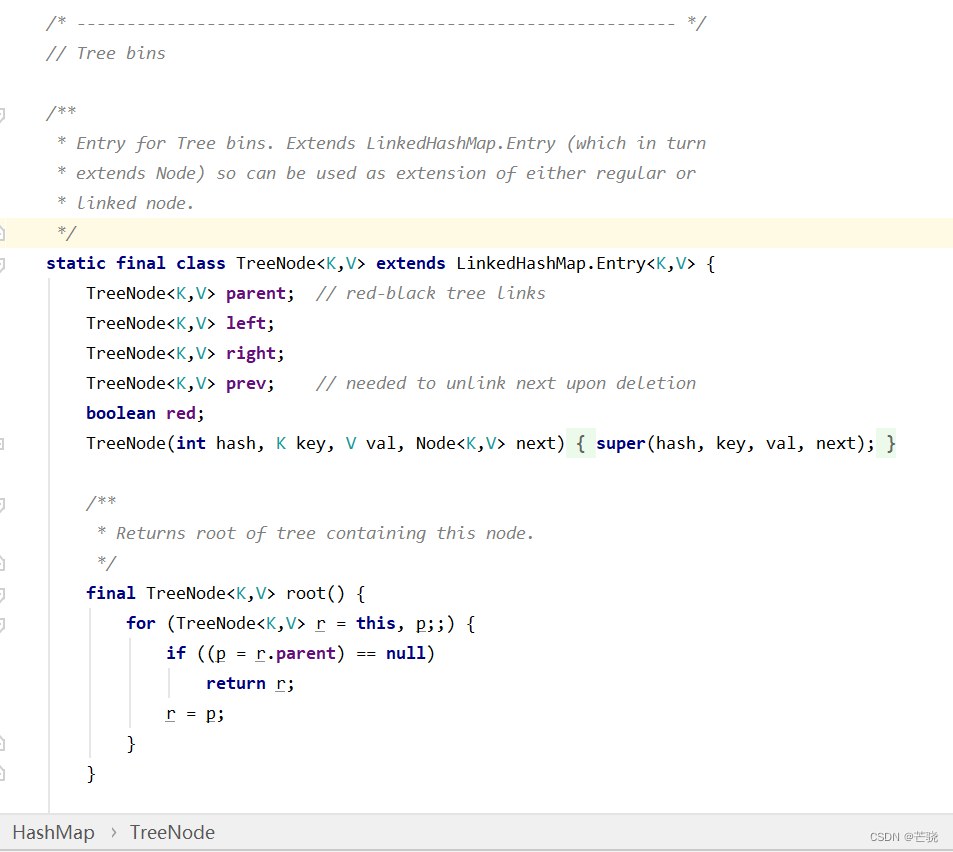
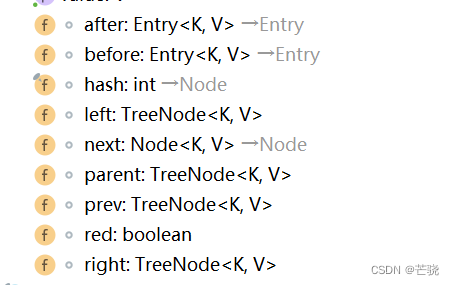
属性
链表转换为红黑树
条件:binCount >= TREEIFY_THRESHOLD - 1(指的是如果链表元素个数大于等于TREEIFY_THRESHOLD进行转化,这里的binCount从0开始的)
treeifyBin 红黑树创建场景
可以看出
链表长度大于8有两种情况:
table长度足够,hash冲突过多
hash没有冲突,但是在计算table下标的时候,由于table长度太小,导致很多hash不一致的
第二种情况是可以用扩容的方式来避免的,扩容后链表长度变短,读写效率自然提高。另外,扩容相对于转换为红黑树的好处在于可以保证数据结构更简单。
由此可见并不是链表长度超过8就一定会转换成红黑树,而是先尝试扩容
如果table数组容量满足条件,需要通过红黑树来代替链表结构。那么树化。
这时我们知道链表的长度超过8,为9时,我们先找到链表的首节点
e = tab[index = (n - 1) & hash]) != null
然后从它开始,将链表上的所有节点转化为TreeNode节点。因为TreeNode节点是Node节点的子节点。所有此时依然可以看做链表节点,但是具有了转化为红黑树的能力,只需要调整一下结构
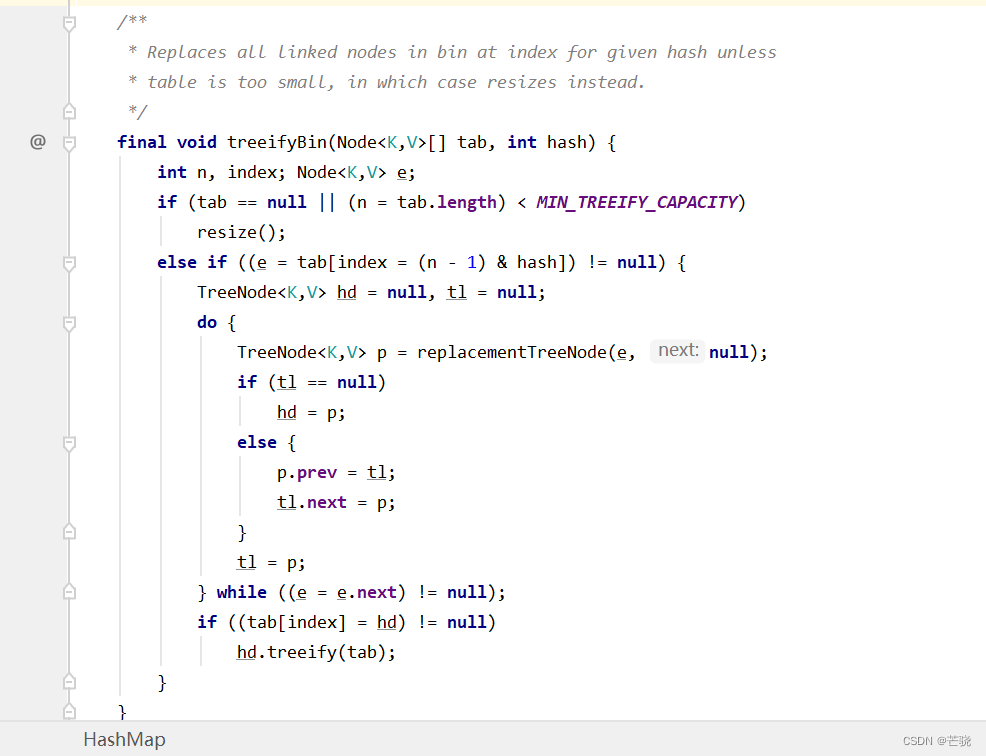
if (tab == null || (n = tab.length) < MIN_TREEIFY_CAPACITY) 尝试扩容
replacementTreeNode(Node<K,V> p, Node<K,V> next) 将链表节点替换为红黑树节点
   // For treeifyBin
    TreeNode<K,V> replacementTreeNode(Node<K,V> p, Node<K,V> next) {
        return new TreeNode<>(p.hash, p.key, p.value, next);
    }
treeify(Node<K,V>[] tab) 树化
| 源码 | 图示 |
|---|---|
 | 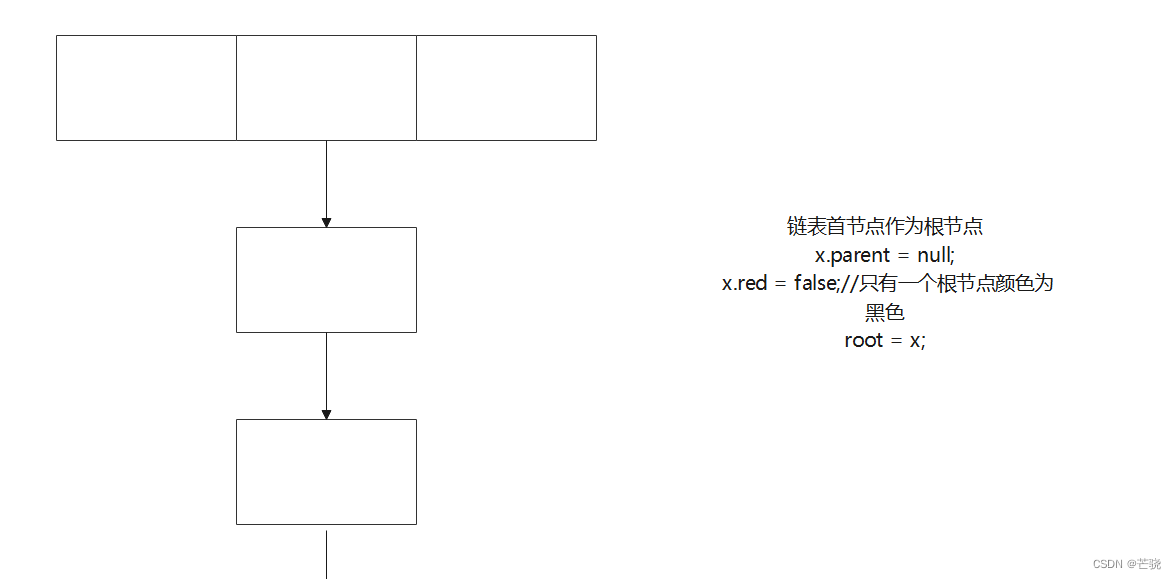 |
 | 在初始化后链表的首节点为红黑树的root节点,这时一棵只有root节点的红黑树就好了,之后相当于将链表上的其他节点插入到红黑树中,这个过程就是定位,然后插入,然后插入修复。 |
   /**
         * Forms tree of the nodes linked from this node.
         * @return root of tree
         */
        final void treeify(Node<K,V>[] tab) {
            TreeNode<K,V> root = null;
            for (TreeNode<K,V> x = this, next; x != null; x = next) {
                next = (TreeNode<K,V>)x.next;
                x.left = x.right = null;
                if (root == null) {
                    x.parent = null;
                    x.red = false;
                    root = x;
                }
                else {
                    K k = x.key;
                    int h = x.hash;
                    Class<?> kc = null;
                    for (TreeNode<K,V> p = root;;) {
                        int dir, ph;
                        K pk = p.key;
                        if ((ph = p.hash) > h)
                            dir = -1;
                        else if (ph < h)
                            dir = 1;
                        else if ((kc == null &&
                                  (kc = comparableClassFor(k)) == null) ||
                                 (dir = compareComparables(kc, k, pk)) == 0)
                            dir = tieBreakOrder(k, pk);

                        TreeNode<K,V> xp = p;
                        if ((p = (dir <= 0) ? p.left : p.right) == null) {
                            x.parent = xp;
                            if (dir <= 0)
                                xp.left = x;
                            else
                                xp.right = x;
                            root = balanceInsertion(root, x);
                            break;
                        }
                    }
                }
            }
            moveRootToFront(tab, root);
        }
红黑树插入 putTreeVal
分析的明明白白
| 过程 | 解释 |
|---|---|
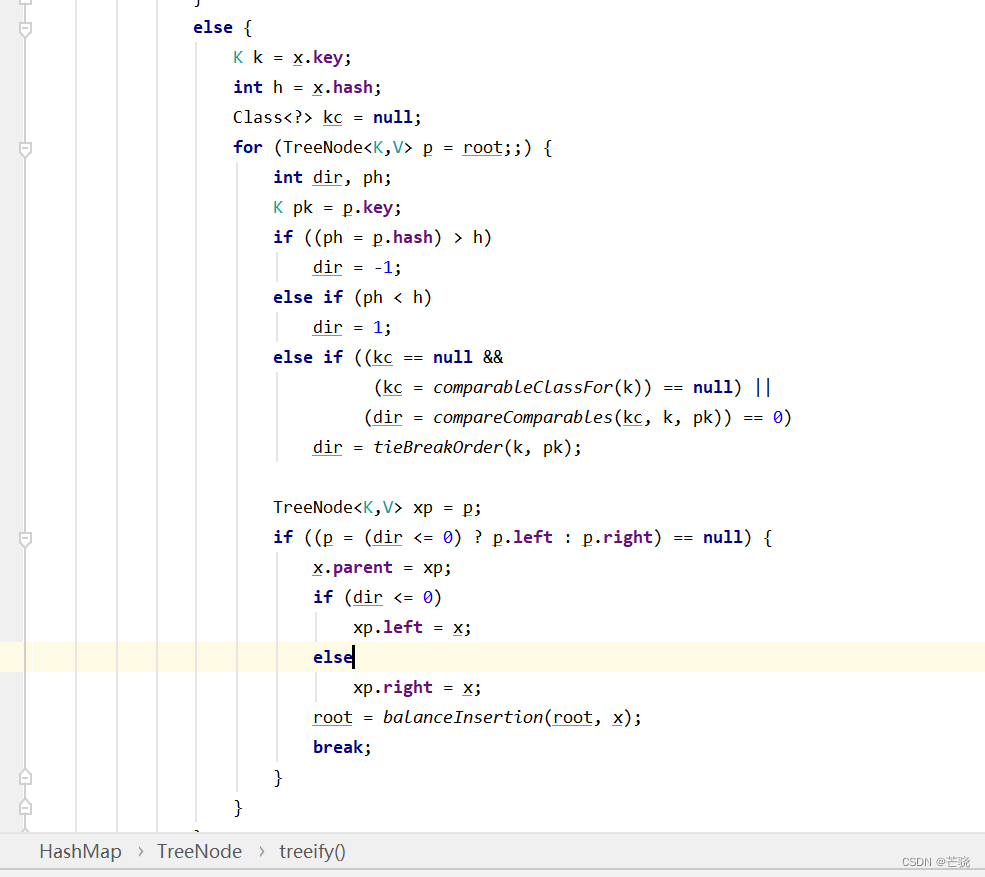
| 首先定位要插入的地方,红黑树的定位 | 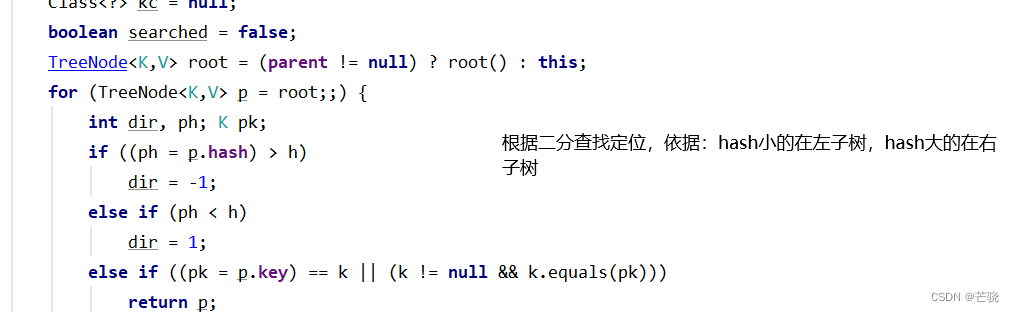 |
    /**
         * Tree version of putVal.
         */
        final TreeNode<K,V> putTreeVal(HashMap<K,V> map, Node<K,V>[] tab,
                                       int h, K k, V v) {
            Class<?> kc = null;
            boolean searched = false;
            TreeNode<K,V> root = (parent != null) ? root() : this;
            for (TreeNode<K,V> p = root;;) {
                int dir, ph; K pk;
                if ((ph = p.hash) > h)
                    dir = -1;
                else if (ph < h)
                    dir = 1;
                else if ((pk = p.key) == k || (k != null && k.equals(pk)))
                    return p;
                else if ((kc == null &&
                          (kc = comparableClassFor(k)) == null) ||
                         (dir = compareComparables(kc, k, pk)) == 0) {
                    if (!searched) {
                        TreeNode<K,V> q, ch;
                        searched = true;
                        if (((ch = p.left) != null &&
                             (q = ch.find(h, k, kc)) != null) ||
                            ((ch = p.right) != null &&
                             (q = ch.find(h, k, kc)) != null))
                            return q;
                    }
                    dir = tieBreakOrder(k, pk);
                }

                TreeNode<K,V> xp = p;
                if ((p = (dir <= 0) ? p.left : p.right) == null) {
                    Node<K,V> xpn = xp.next;
                    TreeNode<K,V> x = map.newTreeNode(h, k, v, xpn);
                    if (dir <= 0)
                        xp.left = x;
                    else
                        xp.right = x;
                    xp.next = x;
                    x.parent = x.prev = xp;
                    if (xpn != null)
                        ((TreeNode<K,V>)xpn).prev = x;
                    moveRootToFront(tab, balanceInsertion(root, x));
                    return null;
                }
            }
        }
split 将链表拆分为两种类型的链表
/**
* Splits nodes in a tree bin into lower and upper tree bins,
* or untreeifies if now too small. Called only from resize;
* see above discussion about split bits and indices.
*
* @param map the map
* @param tab the table for recording bin heads
* @param index the index of the table being split
* @param bit the bit of hash to split on
*/
final void split(HashMap<K,V> map, Node<K,V>[] tab, int index, int bit) {
TreeNode<K,V> b = this;
// Relink into lo and hi lists, preserving order
TreeNode<K,V> loHead = null, loTail = null;
TreeNode<K,V> hiHead = null, hiTail = null;
int lc = 0, hc = 0;
for (TreeNode<K,V> e = b, next; e != null; e = next) {
next = (TreeNode<K,V>)e.next;
e.next = null;
//e.hash & bit == 0 放入低位链表
if ((e.hash & bit) == 0) {
if ((e.prev = loTail) == null)
loHead = e;
else
loTail.next = e;
loTail = e;
++lc;
}
else {
//放入高位链表
if ((e.prev = hiTail) == null)
hiHead = e;
else
hiTail.next = e;
hiTail = e;
++hc;
}
}
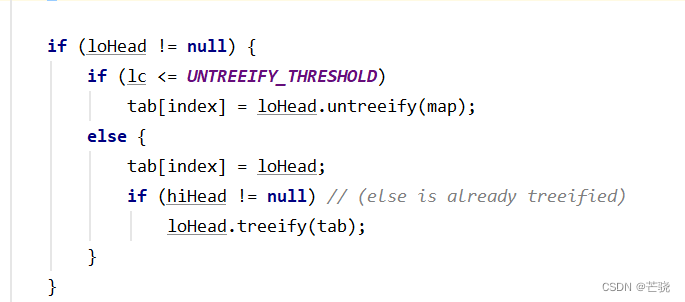
if (loHead != null) {
if (lc <= UNTREEIFY_THRESHOLD)
tab[index] = loHead.untreeify(map);
else {
tab[index] = loHead;
if (hiHead != null) // (else is already treeified)
loHead.treeify(tab);
}
}
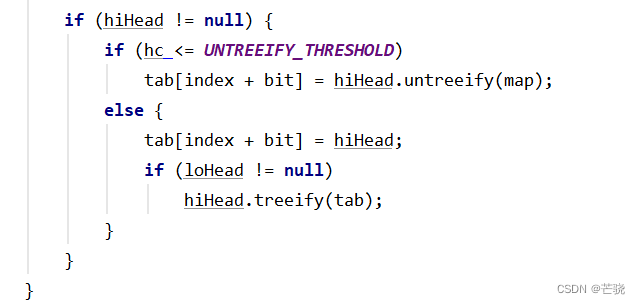
if (hiHead != null) {
if (hc <= UNTREEIFY_THRESHOLD)
tab[index + bit] = hiHead.untreeify(map);
else {
tab[index + bit] = hiHead;
if (loHead != null)
hiHead.treeify(tab);
}
}
}
1. 划分为两个链表

假如旧数组的长度为16,那么它的二进制为 10000, length()-1为1111
我们知道,不管是在同一个红黑树,还是在同一个链表,它们与 (n-1)的与运算都是一样的。
但是这里的与运算知识低位有效位,即1111. 我们现在要把链表或者红黑树上的元素迁移到新数组,肯定不能整个放到原来下标。数组容量增加,同一个元素的hash和原来的hash存放已经不一样了。应该尽可能将元素重新分配。
Hashmap的思路就是把链表或者红黑树分为两种类型
当前所有元素 e.hash & 1111 的值是相同。那我们就用长度哈希来拆分
即 e.hash & 10000 ,这样就可以将原来的链表划分为两类,一类即下面的链表一放入新数组中原本旧数组的下标位置,另一类到原本旧数组位置+旧数组长度的位置。

根据旧数组长度将链表划分为两种类型
e.hash & bit
- 链表一: (e.hash & bit) == 0 , 我们把这种节点称为低位链表(不满足和旧数组长度有效位1位置相同的元素)
- 链表二:(e.hash & bit)!= 0 我们把这种节点称为高位链表
最后会将链表一 放到新数组中原本旧数组的下标位置
而链表二会放到原本旧数组位置+旧数组长度的位置。
2. 判断链表元素数量考虑是否将链表一转化为真正的链表还是真正的红黑树
经过split,你说这两个链表是红黑树但它利用的是链表的结构,不是合格的红黑树结构了。你说它是链表但它使用的是TreeNode。所以是中间形态,需要看情况转化为真正的链表或者红黑树。
处理低位链表。
- 如果元素数量小于等于6,将链表一转化为链表
- 如果元素数量大于6,将链表转化为红黑树结构
高位同理
untreeify
    /**
         * Returns a list of non-TreeNodes replacing those linked from
         * this node.
         */
        final Node<K,V> untreeify(HashMap<K,V> map) {
            Node<K,V> hd = null, tl = null;
            for (Node<K,V> q = this; q != null; q = q.next) {
                Node<K,V> p = map.replacementNode(q, null);
                if (tl == null)
                    hd = p;
                else
                    tl.next = p;
                tl = p;
            }
            return hd;
        }
拓展
HashMap 并发不安全——缺少同步实现
当多个线程执行代码,无法保证原子性操作与有序性
HashMap死锁问题
比较操作
comparableClassFor
https://blog.csdn.net/qpzkobe/article/details/79533237
Hashmap comparableClassFor
    /**
     * Returns x's Class if it is of the form "class C implements
     * Comparable<C>", else null.
     */
    static Class<?> comparableClassFor(Object x) {
        if (x instanceof Comparable) {
            Class<?> c; Type[] ts, as; Type t; ParameterizedType p;
            //如果x为String类,则直接返回Class<String>
            if ((c = x.getClass()) == String.class) // bypass checks
                return c;
            //如果不是
            if ((ts = c.getGenericInterfaces()) != null) {
                for (int i = 0; i < ts.length; ++i) {
                    if (((t = ts[i]) instanceof ParameterizedType) &&
                        ((p = (ParameterizedType)t).getRawType() ==
                         Comparable.class) &&
                        (as = p.getActualTypeArguments()) != null &&
                        as.length == 1 && as[0] == c) // type arg is c
                        return c;
                }
            }
        }
        return null;
    }


 606
606


 被折叠的 条评论
为什么被折叠?
被折叠的 条评论
为什么被折叠?
 到【灌水乐园】发言


