


1 compose介绍
Compose is a tool for defining and running multi-container Docker applications. With Compose, you use a YAML file to configure your application’s services. Then, with a single command, you create and start all the services from your configuration. To learn more about all the features of Compose, see the list of features.
Compose works in all environments: production, staging, development, testing, as well as CI workflows. You can learn more about each case in Common Use Cases.
Using Compose is basically a three-step process:
- Define your app’s environment with a Dockerfile so it can be reproduced anywhere.
- Dockerfile保证我们的项目在任何地方可以运行
- Define the services that make up your app in docker-compose.yml so they can be run together in an isolated environment.
- service是啥?
- docker-compose.yml怎么写?
- Run docker compose up and the Docker compose command starts and runs your entire app. You can alternatively run docker-compose up using the docker-compose binary.
- 启动项目 docker-compose up
注:docker-compose是docker的一个开源项目,需要安装
A docker-compose.yml looks like this:
version: "3.9"  # optional since v1.27.0
services:
  web:
    build: .
    ports:
      - "8000:5000"
    volumes:
      - .:/code
      - logvolume01:/var/log
    links:
      - redis
  redis:
    image: redis
volumes:
  logvolume01: {}
Compose的重要概念:
- 服务sevices:容器、应用(如:web、redis、mysql)
- 项目project:一组关联的容器。比如博客:需要web、mysql等
下载
//官方
sudo curl -L "https://github.com/docker/compose/releases/download/1.29.2/docker-compose-$(uname -s)-$(uname -m)" -o /usr/local/bin/docker-compose

//国内镜像
sudo curl -L "https://get.daocloud.io/docker/compose/releases/download/1.29.2/docker-compose-$(uname -s)-$(uname -m)" -o /usr/local/bin/docker-compose
对二进制文件应用可执行权限:
sudo chmod +x /usr/local/bin/docker-compose
测试安装
docker-compose --version
2 docker-compose初体验
2.1 设置
- 为项目创建一个目录:
mkdir composetest
 cd composetest
- 在项目目录中创建一个名为的文件app.py并将其粘贴到:
import time

import redis
from flask import Flask

app = Flask(__name__)
cache = redis.Redis(host='redis', port=6379)  # 这里写的redis,正因为在一个网络下,才能redis才能作为域名访问。官方很细。

def get_hit_count():
    retries = 5
    while True:
        try:
            return cache.incr('hits')
        except redis.exceptions.ConnectionError as exc:
            if retries == 0:
                raise exc
            retries -= 1
            time.sleep(0.5)

@app.route('/')
def hello():
    count = get_hit_count()
    return 'Hello World! I have been seen {} times.\n'.format(count)
- 在您的项目目录中创建另一个名为的文件requirements.txt并将其粘贴到:
flask
redis
2.2 创建 Dockerfile
# syntax=docker/dockerfile:1
FROM python:3.7-alpine
WORKDIR /code
ENV FLASK_APP=app.py
ENV FLASK_RUN_HOST=0.0.0.0
RUN apk add --no-cache gcc musl-dev linux-headers
COPY requirements.txt requirements.txt
RUN pip install -r requirements.txt
EXPOSE 5000
COPY . .
CMD ["flask", "run"]

2.3 在 Compose 文件中定义服务
在您的项目目录中创建一个名为的文件docker-compose.yml并粘贴以下内容:
version: "3.9"
services:
  web:
    build: .
    ports:
      - "8000:5000"
  redis:
    image: "redis:alpine"
这个 Compose 文件定义了两个服务:web和redis.

2.4 使用 Compose 构建并运行您的应用程序
docker-compose up
- 创建网络
- 执行Docker-conpose yml
- 启动服务
root@xiaoni-01:/home/idea# docker service ls
Error response from daemon: This node is not a swarm manager. Use "docker swarm init" or "docker swarm join" to connect this node to swarm and try again.
默认的服务名 文件名_服务名 _ num
多个服务器。集群。A B _num 副本数量
服务redis服务 => 4个副本。在集群状态。服务都不可能只有一个运行实例。
正式项目都是弹性、10 HA 高并发。
kubectl service 负载均衡。
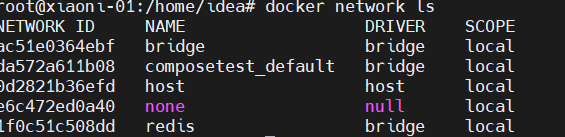
此时compose会自动维护一个网络,这里为composetest_default,这样话各个容器便能通过域名访问,不然只能通过IP。
用insect查看:

我们想要的效果:例如MySQL的端口是3306,后面有十个容器,会实现一个自动转接。
3 yaml编写
https://docs.docker.com/compose/compose-file/compose-file-v3/
#3层
version: ' '   #版本
services:
	服务1:web
		images
		build
		network
		depends on: #依赖,确定先后顺序
			- redis
	服务2:redis
		。。。
	服务3:。。
		。。
# 其他配置 网络/卷 全局规则等等
volumes:
networks:
configs:
多写、多看,compose.yaml:
-
https://docs.docker.com/compose/compose-
file/compose-file-v3/ - 开源项目,compose.yaml
4 开源项目
官方例子:
https://docs.docker.com/samples/wordpress/
后台启动
docker-compose up -d
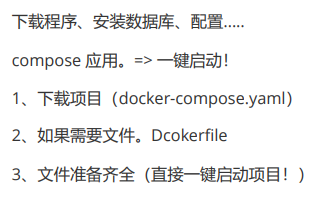

5 实战
- 编写项目微服务
- dockerfile 构建镜像
- docker-compose.yaml 编排项目
- 丢到服务器 docker-compose up
小结:
未来项目只要有 docker-compose 文件。 按照这个规则,启动编排容器。!
公司: docker-compose。 直接启动。
网上开源项目: docker-compose 一键搞定。
假设项目要重新部署打包
docker-compose up --build # 重新构建!


 789
789


 被折叠的 条评论
为什么被折叠?
被折叠的 条评论
为什么被折叠?
 到【灌水乐园】发言


