


OkHttp介绍
OkHttp是当下Android使用最频繁的网络请求框架,由Square公司开源。Google在Android4.4以后开始将源码中的HttpURLConnection底层实现替换为OKHttp,同时现在流行的Retrofit框架底层同样是使用OKHttp的。
优点:
- 支持Http1、Http2、Quic以及WebSocket
- 连接池复用底层TCP(Socket),减少请求延时
- 无缝的支持GZIP减少数据流量
- 缓存响应数据减少重复的网络请求
- 请求失败自动重试主机的其他ip,自动重定向
OkHttp使用流程图
在使用OkHttp发起一次请求时,对于使用者最少存在 OkHttpClient、Request与Call 三个角色。其中 OkHttpClient 和 Request 的创建可以使用它为我们提供的 Builder (建造者模式)。而 Call 则是把 Request 交 给 OkHttpClient 之后返回的一个已准备好执行的请求。
建造者模式:将一个复杂的构建与其表示相分离,使得同样的构建过程可以创建不同的表示。实例化 OKHttpClient和Request的时候,因为有太多的属性需要设置,而且开发者的需求组合千变万化,使用建造 者模式可以让用户不需要关心这个类的内部细节,配置好后,建造者会帮助我们按部就班的初始化表示对象
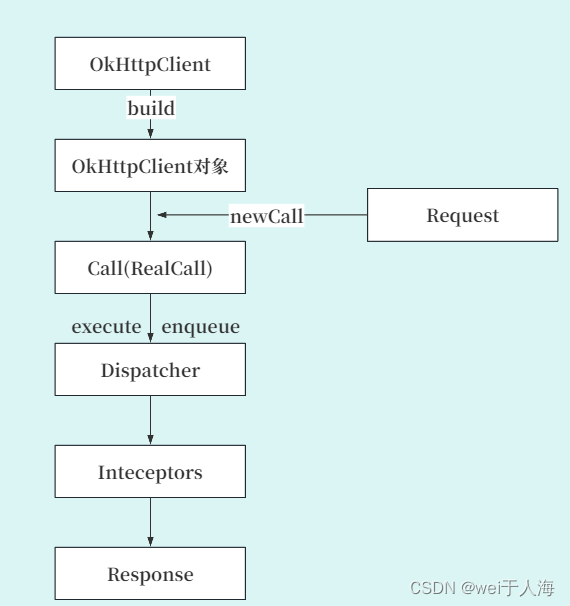
大家要记住这个流程图,对我们的请求逻辑有一个大概的印象。
OkHttp基本使用
-
// 1.创建client -
OkHttpClient client = new OkHttpClient().newBuilder() -
.cookieJar(CookieJar.NO_COOKIES) -
.callTimeout(10000, TimeUnit.MILLISECONDS) -
.build(); -
// 2.创建request -
Request request = new Request.Builder() -
.url("http://10.34.12.156:68080/admin-api") -
.addHeader("Content-Type", "application/json") -
.get(); -
.build(); -
// 3.构建call对象 -
Call call = client.newCall(request); -
// 4.1调用call对象的同步请求方法 -
Response response = call.execute();// response对象中保存的有返回的响应参数 -
// 4.2调用call对象的异步请求方法 -
call.enqueue(new Callback() { -
@Override -
public void onFailure(@NonNull Call call, @NonNull IOException e) { -
Log.d(TAG, "onFailure: ");// 失败回调 -
} -
@Override -
public void onResponse(@NonNull Call call, @NonNull Response response) { -
Log.d(TAG, "onResponse: ");// 成功回调 -
} -
});
![]()
第一步,通过建造者模式创建我们的OkHttpClient对象。
第二步,创建我们的Request请求,把Url、请求头什么的加上,这里也使用了建造者模式。
第三步,创建我们的Call对象,然后就可以开始我们的网络请求了。这块也是我们需要详细分析的部分。
这里是通过client对象的newCakk方法拿到了我们的Call对象,那么newCall方法是什么呢?

查看源码发现,newCall方法返回一个Call对象,是通过RealCall方法返回的。此时,我们需要回过头看看,Call到底是什么?下面的Call的部分源码。
-
interface Call : Cloneable { -
/** Returns the original request that initiated this call. */ -
fun request(): Request -
/** -
* Invokes the request immediately, and blocks until the response can be processed or is in error. -
* -
* To avoid leaking resources callers should close the [Response] which in turn will close the -
* underlying [ResponseBody]. -
* -
* ``` -
* // ensure the response (and underlying response body) is closed -
* try (Response response = client.newCall(request).execute()) { -
* ... -
* } -
* ``` -
* -
* The caller may read the response body with the response's [Response.body] method. To avoid -
* leaking resources callers must [close the response body][ResponseBody] or the response. -
* -
* Note that transport-layer success (receiving a HTTP response code, headers and body) does not -
* necessarily indicate application-layer success: `response` may still indicate an unhappy HTTP -
* response code like 404 or 500. -
* -
* @throws IOException if the request could not be executed due to cancellation, a connectivity -
* problem or timeout. Because networks can fail during an exchange, it is possible that the -
* remote server accepted the request before the failure. -
* @throws IllegalStateException when the call has already been executed. -
*/ -
@Throws(IOException::class) -
fun execute(): Response -
/** -
* Schedules the request to be executed at some point in the future. -
* -
* The [dispatcher][OkHttpClient.dispatcher] defines when the request will run: usually -
* immediately unless there are several other requests currently being executed. -
* -
* This client will later call back `responseCallback` with either an HTTP response or a failure -
* exception. -
* -
* @throws IllegalStateException when the call has already been executed. -
*/ -
fun enqueue(responseCallback: Callback) -
/** Cancels the request, if possible. Requests that are already complete cannot be canceled. */ -
fun cancel() -
/** -
* Returns true if this call has been either [executed][execute] or [enqueued][enqueue]. It is an -
* error to execute a call more than once. -
*/ -
fun isExecuted(): Boolean -
fun isCanceled(): Boolean -
/** -
* Returns a timeout that spans the entire call: resolving DNS, connecting, writing the request -
* body, server processing, and reading the response body. If the call requires redirects or -
* retries all must complete within one timeout period. -
* -
* Configure the client's default timeout with [OkHttpClient.Builder.callTimeout]. -
*/ -
fun timeout(): Timeout -
/** -
* Create a new, identical call to this one which can be enqueued or executed even if this call -
* has already been. -
*/ -
public override fun clone(): Call -
fun interface Factory { -
fun newCall(request: Request): Call -
} -
}
![]()
很容易发现,Call是一个接口,并且,提供了很多待实现的方法。
在 Call 接口中,Factory 接口定义了一个方法:
fun newCall(request: Request): Call
这个方法接受一个 Request 对象作为参数,并返回一个 Call 对象。具体的实现由实现 Factory 接口的类来提供。而我们的OkHttClient也实现了这个接口。
所以,这就是为什么可以通过client可以调用newCall方法返回Call对象的原因。回到正轨,我们前面client.call最终是通过实现newCall方法拿到了Call对象,而newCall方法又是通过RealCall方法返回了一个Call对象, 所以我们需要去看RealCall到底做了什么。
下面贴出了RealCall的部分源码,我们可以看到,RealCall其实是实现了Call接口的,所以这里RealCall确实可以返回Call对象,同时它也实现了Call的抽象方法,比如execute(同步请求)、enqueue(异步请求)等等。
-
class RealCall( -
val client: OkHttpClient, -
/** The application's original request unadulterated by redirects or auth headers. */ -
val originalRequest: Request, -
val forWebSocket: Boolean -
) : Call { -
override fun execute(): Response { -
check(executed.compareAndSet(false, true)) { "Already Executed" } -
timeout.enter() -
callStart() -
try { -
client.dispatcher.executed(this) -
return getResponseWithInterceptorChain() -
} finally { -
client.dispatcher.finished(this) -
} -
} -
override fun enqueue(responseCallback: Callback) { -
check(executed.compareAndSet(false, true)) { "Already Executed" } -
callStart() -
client.dispatcher.enqueue(AsyncCall(responseCallback)) -
} -
@Throws(IOException::class) -
internal fun getResponseWithInterceptorChain(): Response { -
// Build a full stack of interceptors. -
val interceptors = mutableListOf<Interceptor>() -
interceptors += client.interceptors -
interceptors += RetryAndFollowUpInterceptor(client) -
interceptors += BridgeInterceptor(client.cookieJar) -
interceptors += CacheInterceptor(client.cache) -
interceptors += ConnectInterceptor -
if (!forWebSocket) { -
interceptors += client.networkInterceptors -
} -
interceptors += CallServerInterceptor(forWebSocket) -
val chain = RealInterceptorChain( -
call = this, -
interceptors = interceptors, -
index = 0, -
exchange = null, -
request = originalRequest, -
connectTimeoutMillis = client.connectTimeoutMillis, -
readTimeoutMillis = client.readTimeoutMillis, -
writeTimeoutMillis = client.writeTimeoutMillis -
) -
var calledNoMoreExchanges = false -
try { -
val response = chain.proceed(originalRequest) -
if (isCanceled()) { -
response.closeQuietly() -
throw IOException("Canceled") -
} -
return response -
} catch (e: IOException) { -
calledNoMoreExchanges = true -
throw noMoreExchanges(e) as Throwable -
} finally { -
if (!calledNoMoreExchanges) { -
noMoreExchanges(null) -
} -
} -
} -
}
![]()
val call = client.newCall(request)好了,这里我们也分析出来我们是如何获得的call对象了。接下来,我们再去分析,它是如何进行同步请求和异步请求的。这里我们先分析异步请求。
异步请求
-
// 4.2调用call对象的异步请求方法 -
call.enqueue(object : Callback { -
override fun onFailure(call: Call, e: IOException) { -
Log.d("a", "onFailure:") // 失败回调 -
} -
override fun onResponse(call: Call, response: Response) { -
Log.d("b", "onResponse:") // 成功回调 -
} -
})
前面源码里面也看到,我们的RealCall对象也是实现了Call接口并且重写了里面的方法的。那么它具体是怎么执行我们的enqueue方法的呢?
-
override fun enqueue(responseCallback: Callback) { -
check(executed.compareAndSet(false, true)) { "Already Executed" } -
callStart() -
client.dispatcher.enqueue(AsyncCall(responseCallback)) -
}
首先,check,通过check来判断我们是否已经执行了一次enqueue方法了,因为call只允许你调用一次请求,使用完以后无法再重新调用,所以通过原子性判断操作,看我们是否已经执行过了,这里之前Java版的OkHttp源码并不是使用原子性操作来判断的,是用一个变量来判断是否已经有过一次请求了,所以这里其实是做了一个优化。
然后发现它调用一个callStart,这个方法其实是一个监听,里面有方法可以重写,比如网络开始丽连接的时候,DNS域名开始查询的时候等等。这里不做重点分析,感兴趣的可以看看源码,下面是不分源码。
重点来了:client.dispatcher.enqueue(AsyncCall(responseCallback)),这里出现了AsyncCall我们先看看它是什么。
AsyncCall 是 RealCall 的内部类, 它实现了 Runnable 接口,主要是为了能在线程池中去执行它的 run() 方法。
-
internal inner class AsyncCall( -
private val responseCallback: Callback -
) : Runnable { -
@Volatile var callsPerHost = AtomicInteger(0) -
private set -
fun reuseCallsPerHostFrom(other: AsyncCall) { -
// callPerHost代表了连接同一个host的连接数 -
// 此连接数必须小于5 -
this.callsPerHost = other.callsPerHost -
} -
val host: String -
get() = originalRequest.url.host -
val request: Request -
get() = originalRequest -
val call: RealCall -
get() = this@RealCall -
// 将asyncCall添加到线程池中去执行的方法 -
fun executeOn(executorService: ExecutorService) { -
client.dispatcher.assertThreadDoesntHoldLock() -
var success = false -
try { -
// 线程池去执行当前AsyncCall对象的run方法 -
executorService.execute(this) -
success = true -
} catch (e: RejectedExecutionException) { -
val ioException = InterruptedIOException("executor rejected") -
ioException.initCause(e) -
noMoreExchanges(ioException) -
responseCallback.onFailure(this@RealCall, ioException) -
} finally { -
if (!success) { -
// 收尾工作 -
// 其实内部调用的是 promoteAndExecute() -
client.dispatcher.finished(this) -
} -
} -
} -
override fun run() { -
threadName("OkHttp ${redactedUrl()}") { -
var signalledCallback = false -
timeout.enter() -
try { -
// getResponseWithInterceptorChain() 获得请求的响应结果 -
val response = getResponseWithInterceptorChain() -
signalledCallback = true -
// 请求成功的回调 -
responseCallback.onResponse(this@RealCall, response) -
} catch (e: IOException) { -
if (signalledCallback) { -
Platform.get().log("Callback failure for ${toLoggableString()}", Platform.INFO, e) -
} else { -
responseCallback.onFailure(this@RealCall, e) -
} -
} catch (t: Throwable) { -
cancel() -
if (!signalledCallback) { -
val canceledException = IOException("canceled due to $t") -
canceledException.addSuppressed(t) -
// 请求失败的回调 -
responseCallback.onFailure(this@RealCall, canceledException) -
} -
throw t -
} finally { -
// 进行收尾工作 -
// 相比同步请求的finished方法,这儿更重要 -
client.dispatcher.finished(this) -
} -
} -
} -
}
![]()
可以看到,我们的AsyncCall实现了Runnable方法并且实现了run方法。Run方法里面的getResponseWithInterceptorChain就是我们后续的拦截器的调用了。
现在我们再去分析client.dispatcher.enqueue(AsyncCall(responseCallback)),我们可以看看dispatcher的源码,这块源码里面的注释已经解释的很清楚了。主要逻辑就是,对AsyncCall对象进行挑选,将它们放入runningAsyncCalls中。
Dispatcher分发器主要功能:内部维护队列与线程池,完成请求调配。
//异步请求同时存在的最大请求
private int maxRequests = 64;
//异步请求同一域名同时存在的最大请求
private int maxRequestsPerHost = 5;
//闲置任务(没有请求时可执行一些任务,由使用者设置)
private @Nullable Runnable idleCallback;
//异步请求使用的线程池
private @Nullable ExecutorService executorService;
//异步请求等待执行队列
private final Deque<AsyncCall> readyAsyncCalls = new ArrayDeque<>();
//异步请求正在执行队列
private final Deque<AsyncCall> runningAsyncCalls = new ArrayDeque<>();
//同步请求正在执行队列
private final Deque<RealCall> runningSyncCalls = new ArrayDeque<>();
-
// Dispatcher.kt -
// 准备执行的异步请求队列 -
private val readyAsyncCalls = ArrayDeque<AsyncCall>() -
// 正在执行的异步请求队列 -
private val runningAsyncCalls = ArrayDeque<AsyncCall>() -
internal fun enqueue(call: AsyncCall) { -
synchronized(this) { -
// 加当前asyncCall加到准备执行的异步请求队列中 -
readyAsyncCalls.add(call) -
if (!call.call.forWebSocket) { -
// 这里是得到连接同一个 host 的请求数 -
val existingCall = findExistingCallWithHost(call.host) -
if (existingCall != null) call.reuseCallsPerHostFrom(existingCall) -
} -
} -
// dispatcher进行分发call任务的方法 -
promoteAndExecute() -
} -
// 关键方法,dispatcher进行任务分发的方法 -
// 进行收尾工作时,也是调用的它 -
private fun promoteAndExecute(): Boolean { -
this.assertThreadDoesntHoldLock() -
// 需要开始执行的任务集合 -
val executableCalls = mutableListOf<AsyncCall>() -
val isRunning: Boolean -
synchronized(this) { -
val i = readyAsyncCalls.iterator() -
// 迭代等待执行异步请求 -
while (i.hasNext()) { -
val asyncCall = i.next() -
// 正在执行异步请求的总任务数不能大于64个 -
// 否则直接退出这个循环,不再将请求加到异步请求队列中 -
if (runningAsyncCalls.size >= this.maxRequests) break -
// 同一个host的请求数不能大于5 -
// 否则直接跳过此call对象的添加,去遍历下一个asyncCall对象 -
if (asyncCall.callsPerHost.get() >= this.maxRequestsPerHost) continue -
i.remove() -
// 如果拿到了符合条件的asyncCall对象,就将其callPerHost值加1 -
// callPerHost代表了连接同一个host的数量 -
asyncCall.callsPerHost.incrementAndGet() -
// 加到需要开始执行的任务集合中 -
executableCalls.add(asyncCall) -
// 将当前call加到正在执行的异步队列当中 -
runningAsyncCalls.add(asyncCall) -
} -
isRunning = runningCallsCount() > 0 -
} -
for (i in 0 until executableCalls.size) { -
// 遍历每一个集合中的asyncCall对象 -
// 将其添加到线程池中,执行它的run方法 -
val asyncCall = executableCalls[i] -
asyncCall.executeOn(executorService) -
} -
return isRunning -
}
现在我们通过 Dispatcher 将 AsyncCall 对象通过挑选,加到了线程池中。挑选的限制有两个:
1.当前执行的总请求数要小于64个。
2.对于连接的同一个host请求,要保证数量小于5。
现在,我们再回头看看将 AsyncCall 对象加到线程池后的一些细节吧!
-
// Dispatcher.kt -
// 将asyncCall添加到线程池中去执行的方法 -
fun executeOn(executorService: ExecutorService) { -
client.dispatcher.assertThreadDoesntHoldLock() -
var success = false -
try { -
// 这里是之前自定义了创建了一个ExecutorService -
executorService.execute(this) -
success = true -
} catch (e: RejectedExecutionException) { -
val ioException = InterruptedIOException("executor rejected") -
ioException.initCause(e) -
noMoreExchanges(ioException) -
responseCallback.onFailure(this@RealCall, ioException) -
} finally { -
if (!success) { -
// 这里也是会执行收尾工作 -
client.dispatcher.finished(this) -
} -
} -
} -
@get:JvmName("executorService") val executorService: ExecutorService -
get() { -
if (executorServiceOrNull == null) { -
// !!这里的corePoolSize是 0 -
// !!阻塞队列是 SynchronousQueue -
executorServiceOrNull = ThreadPoolExecutor(0, Int.MAX_VALUE, 60, TimeUnit.SECONDS, -
SynchronousQueue(), threadFactory("$okHttpName Dispatcher", false)) -
} -
return executorServiceOrNull!! -
}
我们先来看
executeOn()方法,它的主要工作就是执行添加到线程池的AsyncCall对象的run()方法,去进行网络请求。其次我们目光移动到finally语句块,会发现每次执行完run()方法后,即完成网络请求后,都会去执行这个finished()方法。前面讲到过,内部其实是再次调用了promoteAndExecute()方法。那这是为什么呢?
还记得到我们从准备执行的异步队列中挑选一些
AsyncCall对象拿到线程池中执行吗?如果记得,那你是否还记得我们是有挑选条件的,正因如此,可能在准备执行的异步请求队列中会有一些AsyncCall对象不满足条件仍然留在队列里!那我们难道最后就不执行这些网络请求了吗?当然不是!原来每完成一次网络请求就会再次触发Dispatcher去分发AsyncCall对象!原来如此。
-
private fun promoteAndExecute(): Boolean { -
this.assertThreadDoesntHoldLock() -
val executableCalls = mutableListOf<AsyncCall>() -
val isRunning: Boolean -
synchronized(this) { -
val i = readyAsyncCalls.iterator() -
while (i.hasNext()) { -
val asyncCall = i.next() -
if (runningAsyncCalls.size >= this.maxRequests) break // Max capacity. -
if (asyncCall.callsPerHost.get() >= this.maxRequestsPerHost) continue // Host max capacity. -
i.remove() -
asyncCall.callsPerHost.incrementAndGet() -
executableCalls.add(asyncCall) -
runningAsyncCalls.add(asyncCall) -
} -
isRunning = runningCallsCount() > 0 -
} -
for (i in 0 until executableCalls.size) { -
val asyncCall = executableCalls[i] -
asyncCall.executeOn(executorService) -
} -
return isRunning -
}
可以看到,这里会对我们准备队列里面的call进行筛选,此时如果满足条件,我们的call就会被筛选出来到运行队列去执行。
然后我们再来看看这里用到的线程池是一个什么样的线程池。在上面我贴出来的代码中可以看到,这个线程池的
corePoolSize是0,BlockingQueue是SynchronousQueue,这样构建出来的线程池有什么特殊之处吗?熟悉线程池的同学都应该知道,当任务数超过了
corePoolSize就会将其加到阻塞队列当中。也就是说这些任务不会立马执行,而我们的网络请求可不想被阻塞着。因此这里的
corePoolSize就设置成了0。BlockingQueue设置成SynchronousQueue也是类似道理,SynchronousQueue是不储存元素的,只要提交的任务数小于最大线程数就会立刻新起线程去执行任务。
好了,我们的异步请求暂时先讲到这块,我们最终获得response是在我们RealCall对象重写的run方法里面去拿到的,还记得它的run方法里面的
val response = getResponseWithInterceptorChain()
这块就是拦截器的内容了,这里先不说,我们先继续把同步的情况说完。
同步请求
-
// 调用call对象的同步请求方法 -
val response = call.execute()
继续追溯源码,查看execute方法。
-
override fun execute(): Response { -
check(executed.compareAndSet(false, true)) { "Already Executed" } -
timeout.enter() -
callStart() -
try { -
client.dispatcher.executed(this) -
return getResponseWithInterceptorChain() -
} finally { -
client.dispatcher.finished(this) -
} -
}
这块的check、callStart基本都是和异步请求一样的逻辑。由于是同步队列,无需考虑其他的,将任务加到队列里就好。
-
override fun execute(): Response { -
// 一个call对象只能执行一次execute方法 -
// 这里用CAS思想进行比较,可以提高效率 -
check(executed.compareAndSet(false, true)) { "Already Executed" } -
timeout.enter() -
// 这里主要是个监听器,表示开始进行网络请求了 -
callStart() -
// 重点关注这块 -
try { -
// 通过分发器进行任务分发 -
// 其实这里还体现不出分发器的效果,仅仅是将当前请求加入到一个同步队列当中 -
client.dispatcher.executed(this) -
// 通过 getResponseWithInterceptorChain() 获得相应结果 -
return getResponseWithInterceptorChain() -
} finally { -
// 完成一些收尾工作,在同步请求中,几乎没什么用 -
client.dispatcher.finished(this) -
} -
}
总结一下整个
okhttp网络请求的整个过程。首先通过我们通过 构造者 的方式构建好了
OkHttpClient和Request对象,然后调用OkHttpClient对象的newCall()方法得到一个RealCall对象,最后再调用其execute()或者enqueue()方法进行同步或者异步请求。然后如果是同步请求,
Dispatacher分发器去只是简单的将其加入到正在执行的同步请求队列中做一个标记,如果是异步请求就会根据 两个条件 去筛选合适的请求,并将其发送给一个特定的线程池中去进行网络请求,最后通过getResponseWithInterceptorChain()得到最终结果。
你回过头再看看,是不是和上面的使用流程图基本上一样的呢?
拦截器
getResponseWithInterceptorChain是怎么拿到我们最终的结果呢?这里我们先学一下相关的前置知识。
首先,我们需要了解什么是责任链模式。
对象行为型模式,为请求创建了一个接收者对象的链,在处理请求的时候执行过滤(各司其职)。 责任链上的处理者负责处理请求,客户只需要将请求发送到责任链即可,无须关心请求的处理细节和请求的传递,所以职责链将请求的发送者和请求的处理者解耦了
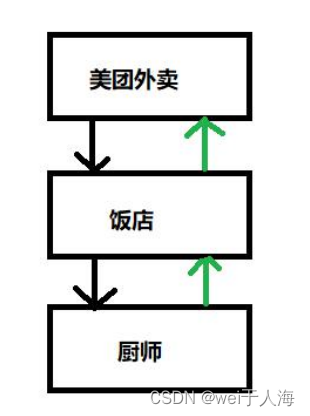
如果你需要点外卖,你只需要去美团下单就好了,不需要做其他事情,美味就来了,干净又卫生。
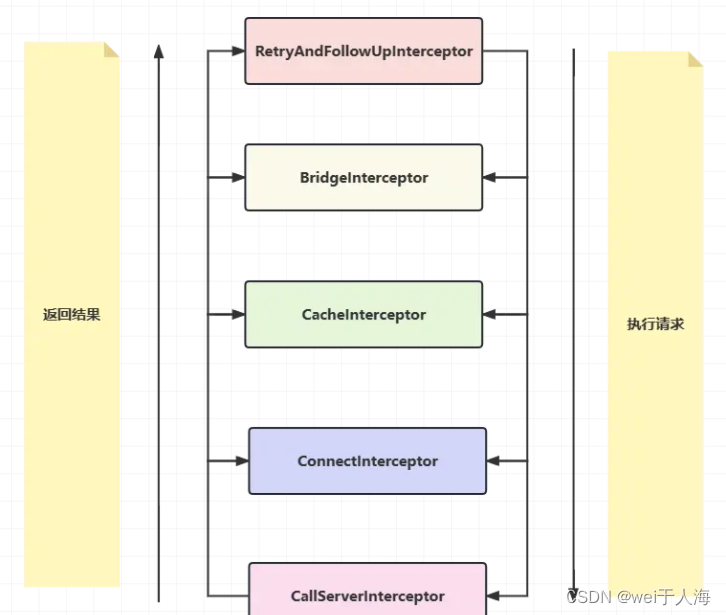
这里先我们介绍一下我们在网络请求中涉及的五大拦截器。
- RetryAndFollowUpInterceptor:请求失败自动重试,如果
DNS设置了多个ip地址会自动重试其余ip地址。- BridgeInterceptor:会补全我们请求中的请求头,例如
Host,Cookie,Accept-Encoding等。- CacheInterceptor:会选择性的将响应结果进行保存,以便下次直接读取,不再需要再向服务器索要数据。
- ConnectInterceptor:建立连接并得到对应的socket;管理连接池,从中存取连接,以便达到连接复用的目的。
- CallServerInterceptor:与服务器建立连接,具体进行网络请求,并将结果逐层返回的地方。
我们的拦截器就是使用了这是模式,由五大拦截器一层层分发下去,最后得到结果再一层层返回上来。
现在,我们开始正式分析, getResponseWithInterceptorChain。
-
// 五大拦截器的起始入口 -
@Throws(IOException::class) -
internal fun getResponseWithInterceptorChain(): Response { -
// 用一个集合保存所有的拦截器 -
val interceptors = mutableListOf<Interceptor>() -
// 这个interceptor就是我们自己可以加的第一个拦截器 -
// 因为位于所有拦截器的第一个,与我们的应用直接相连 -
// 因此这个拦截器又被称为 Application Interceptor -
interceptors += client.interceptors -
// 重试重定向拦截器 -
interceptors += RetryAndFollowUpInterceptor(client) -
// 桥接拦截器 -
interceptors += BridgeInterceptor(client.cookieJar) -
// 缓存拦截器 -
interceptors += CacheInterceptor(client.cache) -
// 连接拦截器 -
interceptors += ConnectInterceptor -
if (!forWebSocket) { -
// 这个interceptor也是我们自己可以加的一个拦截器 -
// 因为位于真正请求返回结果的拦截器前面,可以拿到服务器返回的最原始的结果 -
// 因此这个拦截器又被称为 Network Interceptor -
interceptors += client.networkInterceptors -
} -
interceptors += CallServerInterceptor(forWebSocket) -
// 构建RealInterceptorChain对象,我们正是通过此对象将请求逐层往下传递的 -
val chain = RealInterceptorChain( -
call = this, -
interceptors = interceptors, -
index = 0, -
exchange = null, -
request = originalRequest, -
connectTimeoutMillis = client.connectTimeoutMillis, -
readTimeoutMillis = client.readTimeoutMillis, -
writeTimeoutMillis = client.writeTimeoutMillis -
) -
var calledNoMoreExchanges = false -
try { -
// 调用RealInterceptorChain的proceed()方法,将请求向下一个连接器传递 -
val response = chain.proceed(originalRequest) -
if (isCanceled()) { -
response.closeQuietly() -
throw IOException("Canceled") -
} -
// 放回响应结果 -
return response -
} catch (e: IOException) { -
calledNoMoreExchanges = true -
throw noMoreExchanges(e) as Throwable -
} finally { -
if (!calledNoMoreExchanges) { -
noMoreExchanges(null) -
} -
} -
}
从这个方法中我们大概可以总结出,它将所有的拦截器包括用户自定义的拦截器全部通过一个集合保存了下来,然后构建出了 RealInterceptorChain 对象,并调用其 proceed() 方法开始了拦截器逐层分发工作。
那么它是怎么做到逐层分发的呢?其实很简单,每一个拦截器中都会通过 proceed() 方法再构建一个 RealInterceptorChain 对象,然后调用 intercpt去执行下个拦截器中的任务,如此循环,最终走到最后一个拦截器后退出。
-
// RealInterceptorChain.kt -----> 实现了 Chain 接口 -
override fun proceed(request: Request): Response { -
// 检查是否走完了所有的拦截器,是则退出 -
check(index < interceptors.size -
... -
// 这个方法就是再次构建了 RealInterceptorChain 对象 ==> next -
// 去执行下个拦截器中的任务 -
val next = copy(index = index + 1, request = request)// 这个方法内部就一行代码 new RealInterceptorChain() -
val interceptor = interceptors[index] -
@Suppress("USELESS_ELVIS") -
// 通过调用intercept(next)去执行下一个拦截器中的任务 -
val response = interceptor.intercept(next) ?: throw NullPointerException( -
"interceptor $interceptor returned null") -
... -
// 将结果放回到上一个拦截器中 -
return response -
}
以上我们搞清楚了拦截器是如何一步一步往下传递任务,并逐层往上返回结果的,现在我们来具体看看每个拦截器都做了什么事情。
RetryAndFollowUpInterceptor拦截器
-
// RetryAndFollowUpInterceptor.kt -
// 所有拦截求都实现了 Interceptor 接口 -
override fun intercept(chain: Interceptor.Chain): Response { -
val realChain = chain as RealInterceptorChain -
var request = chain.request -
val call = realChain.call -
var followUpCount = 0 -
var priorResponse: Response? = null -
var newExchangeFinder = true -
var recoveredFailures = listOf<IOException>() -
// 这是个死循环,意思就是如果请求失败就需要一直重试,直到主动退出循环(followUpCount>20) -
while (true) { -
// ExchangeFinder: 获取连接 ---> ConnectInterceptor中使用 -
call.enterNetworkInterceptorExchange(request, newExchangeFinder) -
// 响应结果 -
var response: Response -
var closeActiveExchange = true -
try { -
if (call.isCanceled()) { -
throw IOException("Canceled") -
} -
try { -
// 调用下一个拦截器,即 BridgeInterceptor -
// 整个请求可能会失败,需要捕获然后重试重定向,因此有一个try catch -
response = realChain.proceed(request) -
newExchangeFinder = true -
} catch (e: RouteException) { //1.进行重试 -
// 1.1 路线异常,检查是否需要重试 -
if (!recover(e.lastConnectException, call, request, requestSendStarted = false)) { -
throw e.firstConnectException.withSuppressed(recoveredFailures) -
} else { -
recoveredFailures += e.firstConnectException -
} -
newExchangeFinder = false -
// 失败继续重试 -
continue -
} catch (e: IOException) { -
// 1.2 IO异常 HTTP2才会有ConnectionShutdownException 代表连接中断 -
//如果是因为IO异常,那么requestSendStarted=true (若是HTTP2的连接中断异常仍然为false) -
if (!recover(e, call, request, requestSendStarted = e !is ConnectionShutdownException)) { -
throw e.withSuppressed(recoveredFailures) -
} else { -
recoveredFailures += e -
} -
newExchangeFinder = false -
// 失败继续重试 -
continue -
} -
// priorResponse:上一次请求的响应 -
if (priorResponse != null) { -
response = response.newBuilder() -
.priorResponse(priorResponse.newBuilder() -
.body(null) -
.build()) -
.build() -
} -
val exchange = call.interceptorScopedExchange -
// 2.根据返回的response进行重定向,构建新的Request对象 -
val followUp = followUpRequest(response, exchange) -
// 2.1 followUp为空,代表没有重定向,直接返回结果response -
if (followUp == null) { -
if (exchange != null && exchange.isDuplex) { -
call.timeoutEarlyExit() -
} -
closeActiveExchange = false -
return response -
} -
// 2.2 followUp不为空,但是body中设置了只能请求一次(默认),返回重定向后的结果response -
val followUpBody = followUp.body -
if (followUpBody != null && followUpBody.isOneShot()) { -
closeActiveExchange = false -
return response -
} -
// 重试次数大于20次,抛出异常 -
if (++followUpCount > MAX_FOLLOW_UPS) { -
throw ProtocolException("Too many follow-up requests: $followUpCount") -
} -
// 将之前重定向后的Request对象赋值给request进行重新请求 -
request = followUp -
priorResponse = response -
} finally { -
call.exitNetworkInterceptorExchange(closeActiveExchange) -
} -
} -
}
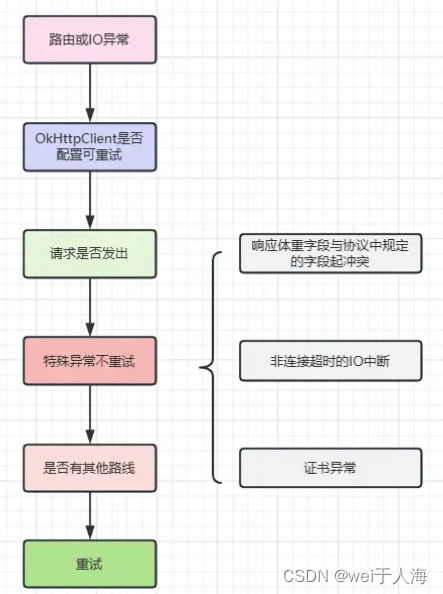
简单来说,RetryAndFollowUpInterceptor拦截器帮我们干了两件事。第一是重试,第二是重定向。
✅ 我们先来看看什么情况下它会进行重试。
-
// RetryAndFollowUpInterceptor.kt -
// 这个方法就是来判断当前请求是否需要重试的 -
private fun recover( -
e: IOException, -
call: RealCall, -
userRequest: Request, -
requestSendStarted: Boolean -
): Boolean { -
// 构建OkHttpClient时配置不重试,则返回false -
if (!client.retryOnConnectionFailure) return false -
// 返回false -
// 1、如果是IO异常(非http2中断异常)表示请求可能发出 -
// 2、如果请求体只能被使用一次(默认为false) -
if (requestSendStarted && requestIsOneShot(e, userRequest)) return false -
// 返回false -
// 协议异常、IO中断异常(除Socket读写超时之外),ssl认证异常 -
if (!isRecoverable(e, requestSendStarted)) return false -
// 无更多的路线,返回false -
if (!call.retryAfterFailure()) return false -
// 以上情况都不是,则返回true 表示可以重试 -
return true -
}
✅ 再来看看如何判断是否需要重定向的。
-
@Throws(IOException::class) -
private fun followUpRequest(userResponse: Response, exchange: Exchange?): Request? { -
val route = exchange?.connection?.route() -
val responseCode = userResponse.code -
val method = userResponse.request.method -
when (responseCode) { -
// 407 代理需要授权,通过proxyAuthenticator获得request,向其中添加请求头 Proxy-Authorization -
// 然后构建一个新的request对象返回出去,准备再次请求 -
HTTP_PROXY_AUTH -> { -
val selectedProxy = route!!.proxy -
if (selectedProxy.type() != Proxy.Type.HTTP) { -
throw ProtocolException("Received HTTP_PROXY_AUTH (407) code while not using proxy") -
} -
return client.proxyAuthenticator.authenticate(route, userResponse) -
} -
// 401 服务器请求需授权,通过authenticator获得到了Request,添加Authorization请求头 -
// 然后构建一个新的request对象返回出去,准备再次请求 -
HTTP_UNAUTHORIZED -> return client.authenticator.authenticate(route, userResponse) -
// 返回的响应码是3xx,这就准备进行重定向,构建新的Request对象 -
HTTP_PERM_REDIRECT, HTTP_TEMP_REDIRECT, HTTP_MULT_CHOICE, HTTP_MOVED_PERM, HTTP_MOVED_TEMP, HTTP_SEE_OTHER -> { -
return buildRedirectRequest(userResponse, method) -
} -
// 408 请求超时 -
HTTP_CLIENT_TIMEOUT -> { -
// 用户设置是否可以进行重试(默认允许) -
if (!client.retryOnConnectionFailure) { -
return null -
} -
val requestBody = userResponse.request.body -
if (requestBody != null && requestBody.isOneShot()) { -
return null -
} -
val priorResponse = userResponse.priorResponse -
// 如果上次也是因为408导致重试,这次请求又返回的408,则不会再去重试了,直接返回null -
if (priorResponse != null && priorResponse.code == HTTP_CLIENT_TIMEOUT) { -
return null -
} -
// 服务器返回的 Retry-After:0 或者未响应Retry-After就不会再次去请求 -
if (retryAfter(userResponse, 0) > 0) { -
return null -
} -
// 返回当前的request对象,准备再次请求 -
return userResponse.request -
} -
// 503 服务不可用 -
HTTP_UNAVAILABLE -> { -
val priorResponse = userResponse.priorResponse -
// 和408相似,如果两次都是503导致请求重试,那么这次就不会再重试了,直接返回null -
if (priorResponse != null && priorResponse.code == HTTP_UNAVAILABLE) { -
return null -
} -
// 服务端返回的有Retry-After: 0,则立即重试 -
if (retryAfter(userResponse, Integer.MAX_VALUE) == 0) { -
return userResponse.request -
} -
return null -
} -
// 421 当前客户端的IP地址连接到服务器的数量超过了服务器允许的范围 -
HTTP_MISDIRECTED_REQUEST -> { -
val requestBody = userResponse.request.body -
if (requestBody != null && requestBody.isOneShot()) { -
return null -
} -
if (exchange == null || !exchange.isCoalescedConnection) { -
return null -
} -
// 使用另一个连接对象发起请求 -
exchange.connection.noCoalescedConnections() -
return userResponse.request -
} -
else -> return null -
} -
}
BridgeInterceptor拦截器
接下来,来到第二个拦截器 BridgeInterceptor。这个拦截器前面说过,主要就是用来补全请求头的,除此之外就是如果响应头中有Content-Encoding: gzip,则会用 GzipSource 进行解析。
-
// BridgeInterceptor.kt -
class BridgeInterceptor(private val cookieJar: CookieJar) : Interceptor { -
@Throws(IOException::class) -
override fun intercept(chain: Interceptor.Chain): Response { -
val userRequest = chain.request() -
val requestBuilder = userRequest.newBuilder() -
// 这里没有什么多说的,就是补全请求头 -
val body = userRequest.body -
if (body != null) { -
val contentType = body.contentType() -
if (contentType != null) { -
requestBuilder.header("Content-Type", contentType.toString()) -
} -
val contentLength = body.contentLength() -
if (contentLength != -1L) { -
requestBuilder.header("Content-Length", contentLength.toString()) -
requestBuilder.removeHeader("Transfer-Encoding") -
} else { -
requestBuilder.header("Transfer-Encoding", "chunked") -
requestBuilder.removeHeader("Content-Length") -
} -
} -
if (userRequest.header("Host") == null) { -
requestBuilder.header("Host", userRequest.url.toHostHeader()) -
} -
if (userRequest.header("Connection") == null) { -
requestBuilder.header("Connection", "Keep-Alive") -
} -
var transparentGzip = false -
if (userRequest.header("Accept-Encoding") == null && userRequest.header("Range") == null) { -
transparentGzip = true -
requestBuilder.header("Accept-Encoding", "gzip") -
} -
val cookies = cookieJar.loadForRequest(userRequest.url) -
if (cookies.isNotEmpty()) { -
requestBuilder.header("Cookie", cookieHeader(cookies)) -
} -
if (userRequest.header("User-Agent") == null) { -
requestBuilder.header("User-Agent", userAgent) -
} -
// 去调用下一个拦截器,并得到响应结果 -
val networkResponse = chain.proceed(requestBuilder.build()) -
cookieJar.receiveHeaders(userRequest.url, networkResponse.headers) -
val responseBuilder = networkResponse.newBuilder() -
.request(userRequest) -
// 根据响应头中的 Content-Encoding,判断是否需要gzip解析 -
if (transparentGzip && -
"gzip".equals(networkResponse.header("Content-Encoding"), ignoreCase = true) && -
networkResponse.promisesBody()) { -
val responseBody = networkResponse.body -
if (responseBody != null) { -
val gzipSource = GzipSource(responseBody.source()) -
val strippedHeaders = networkResponse.headers.newBuilder() -
.removeAll("Content-Encoding") -
.removeAll("Content-Length") -
.build() -
responseBuilder.headers(strippedHeaders) -
val contentType = networkResponse.header("Content-Type") -
// 进行gzip解析 -
responseBuilder.body(RealResponseBody(contentType, -1L, gzipSource.buffer())) -
} -
} -
return responseBuilder.build() -
}
桥接拦截器其实工作内容也很简单,在请求之前,向我们的请求头中添加必要的参数,然后拿到请求的响应后,根据响应头中的参数去判断是否需要 gzip 解析,如果需要则用 GzipSource 去解析就好了。
CacheInterceptor拦截器
在讲 CacheInterceptor 拦截器之前,我们先来了解一下 HTTP的缓存规则。 我们按照其行为将其分为两大类:强缓存和协商缓存。(这块可以去看小林Coding里面的,很详细)
1️⃣强缓存:浏览器并不会将请求发送给服务器。强缓存是利用 http 的返回头中的 Expires 或者 Cache-Control 两个字段来控制的,用来表示资源的缓存时间。
2️⃣协商缓存:浏览器会将请求发送至服务器。服务器根据 http 头信息中的 Last-Modify/If-Modify-Since 或 Etag/If-None-Match 来判断是否命中协商缓存。如果命中,则 http 返回码为 304 ,客户端从本地缓存中加载资源。
-
// CacheInterceptor.kt -
@Throws(IOException::class) -
override fun intercept(chain: Interceptor.Chain): Response { -
val call = chain.call() -
val cacheCandidate = cache?.get(chain.request()) -
val now = System.currentTimeMillis() -
val strategy = CacheStrategy.Factory(now, chain.request(), cacheCandidate).compute() -
// 代表需要发起请求 -
val networkRequest = strategy.networkRequest -
// 代表直接使用本地缓存 -
val cacheResponse = strategy.cacheResponse -
... -
// networkRequest 和 cacheResponse 都是null -
// 说明服务器要求使用缓存,但是本地没有缓存,直接失败 -
if (networkRequest == null && cacheResponse == null) { -
return Response.Builder() -
.request(chain.request()) -
.protocol(Protocol.HTTP_1_1) -
.code(HTTP_GATEWAY_TIMEOUT) -
.message("Unsatisfiable Request (only-if-cached)") -
.body(EMPTY_RESPONSE)// 构建一个空的response返回过去 -
.sentRequestAtMillis(-1L) -
.receivedResponseAtMillis(System.currentTimeMillis()) -
.build() -
} -
// networkRequest为null cacheResponse不为null -
// 说明使用强缓存,成功 -
if (networkRequest == null) { -
return cacheResponse!!.newBuilder() -
.cacheResponse(stripBody(cacheResponse)) -
.build().also { -
listener.cacheHit(call, it) -
} -
} -
... -
var networkResponse: Response? = null -
try { -
// 走到这里说明需要请求一次,判断是协商缓存还是重新去服务器上获取资源 -
// 因此 调用下一个拦截器去继续请求 -
networkResponse = chain.proceed(networkRequest) -
} finally { -
if (networkResponse == null && cacheCandidate != null) { -
cacheCandidate.body?.closeQuietly() -
} -
} -
// 协商缓存 -
// 如果我们本地有缓存,并且服务器放回给我们304响应码,直接使用本地的缓存 -
if (cacheResponse != null) { -
if (networkResponse?.code == HTTP_NOT_MODIFIED) { -
val response = cacheResponse.newBuilder() -
.headers(combine(cacheResponse.headers, networkResponse.headers)) -
.sentRequestAtMillis(networkResponse.sentRequestAtMillis) -
.receivedResponseAtMillis(networkResponse.receivedResponseAtMillis) -
.cacheResponse(stripBody(cacheResponse)) -
.networkResponse(stripBody(networkResponse)) -
.build() -
networkResponse.body!!.close() -
return response -
... -
} else { -
cacheResponse.body?.closeQuietly() -
} -
} -
// 走到这,说明响应码是200 表示我们需要用这次新请求的资源 -
val response = networkResponse!!.newBuilder() -
.cacheResponse(stripBody(cacheResponse)) -
.networkResponse(stripBody(networkResponse)) -
.build() -
if (cache != null) { -
if (response.promisesBody() && CacheStrategy.isCacheable(response, networkRequest)) { -
// 将本次最新得到的响应存到cache中去 -
val cacheRequest = cache.put(response) -
return cacheWritingResponse(cacheRequest, response).also { -
} -
} -
... -
} -
// 将这次新请求的资源返回给上一层拦截器 -
return response -
}
⚡ 总结一下缓存拦截器处理缓存的流程:首先得到 RealInterceptorChain 对象,然后通过它再得到两个很重要的对象:networkRequest 和 cacheResponse 。networkRequest 代表去发起一个网络请求, cacheResponse 代表使用本地缓存。通过这两个对象是否为 null来判断此次请求是使用直接缓存,还是去请求新的资源,还是去使用协商缓存。最后就是会更新缓存,把每次新请求的资源都重新保存至 cache 中。
ConnectInterceptor拦截器
连接拦截器主要就是做建立连接和连接复用的工作,它会从连接池中取出符合条件的连接,以免重复创建,从而提升请求效率。
-
object ConnectInterceptor : Interceptor { -
@Throws(IOException::class) -
override fun intercept(chain: Interceptor.Chain): Response { -
val realChain = chain as RealInterceptorChain -
// 获取连接 Exchange:数据交换(封装了连接) -
val exchange = realChain.call.initExchange(chain) -
val connectedChain = realChain.copy(exchange = exchange) -
// 继续调用下一个拦截器去请求数据 -
return connectedChain.proceed(realChain.request) -
} -
}
可以看到,这个连接拦截器中的代码比较少,主要的逻辑都在 initExchange() 方法当中,这个方法的作用就是拿到一个连接对象建立连接,这里我们可以看看initExchange的源码。
通过RealCall的initExchange(chain)创建一个Exchange对象,其中会打开与目标服务器的链接, 并调用 Chain.proceed()方法进入下一个拦截器。 initExchange()方法中会先通过 ExchangeFinder 尝试去 RealConnectionPool 中寻找已存在的连接,未找到则会重新创建一个RealConnection 并开始连接, 然后将其存入RealConnectionPool,现在已经准备好了RealConnection 对象,然后通过请求协议创建不同的ExchangeCodec 并返回,返回的ExchangeCodec正是创建Exchange对象的一个参数。 ConnectInterceptor的代码很简单,主要的功能就是初始化RealCall的Exchange。这个Exchange的功能就是基于RealConnection+ExchangeCodec进行数据交换。
-
/** -
* 初始化并获取一个新的或池化的连接,用于执行即将到来的请求和响应。 -
*/ -
internal fun initExchange(chain: RealInterceptorChain): Exchange { -
synchronized(this) { -
// 确保仍然期待更多的交换,且资源未被释放 -
check(expectMoreExchanges) { "已释放" } -
// 确保响应体未打开 -
check(!responseBodyOpen) -
// 确保请求体未打开 -
check(!requestBodyOpen) -
} -
// 获取 ExchangeFinder 实例 -
val exchangeFinder = this.exchangeFinder!! -
// 使用 ExchangeFinder 查找适合的编解码器 -
val codec = exchangeFinder.find(client, chain) -
// 创建 Exchange 实例,包括当前对象、事件监听器、ExchangeFinder 和编解码器 -
val result = Exchange(this, eventListener, exchangeFinder, codec) -
// 将创建的 Exchange 实例设置为拦截器范围的 Exchange 和主 Exchange -
this.interceptorScopedExchange = result -
this.exchange = result -
synchronized(this) { -
// 标记请求体和响应体为已打开状态 -
this.requestBodyOpen = true -
this.responseBodyOpen = true -
} -
// 如果请求已取消,则抛出 IOException -
if (canceled) throw IOException("请求已取消") -
// 返回初始化后的 Exchange 实例 -
return result -
}
CallServerInterceptor拦截器
-
// CallServerInterceptor.kt -
@Throws(IOException::class) -
override fun intercept(chain: Interceptor.Chain): Response { -
val realChain = chain as RealInterceptorChain -
val exchange = realChain.exchange!! -
val request = realChain.request -
val requestBody = request.body -
val sentRequestMillis = System.currentTimeMillis() -
// 将请求头写入缓存中 -
exchange.writeRequestHeaders(request) -
var invokeStartEvent = true -
var responseBuilder: Response.Builder? = null -
if (HttpMethod.permitsRequestBody(request.method) && requestBody != null) { -
// 大容量请求体会带有 Expect: 100-continue 字段,服务器识别同意后,才能继续发送请求给服务端 -
if ("100-continue".equals(request.header("Expect"), ignoreCase = true)) { -
// 与服务器进行请求 -
exchange.flushRequest() -
responseBuilder = exchange.readResponseHeaders(expectContinue = true) -
exchange.responseHeadersStart() -
invokeStartEvent = false -
} -
if (responseBuilder == null) { -
if (requestBody.isDuplex()) { -
// Prepare a duplex body so that the application can send a request body later. -
exchange.flushRequest() -
val bufferedRequestBody = exchange.createRequestBody(request, true).buffer() -
requestBody.writeTo(bufferedRequestBody) -
} else { -
// 大部分情况都是走这里,通过IO流把响应结果写入response中 -
val bufferedRequestBody = exchange.createRequestBody(request, false).buffer() -
requestBody.writeTo(bufferedRequestBody) -
bufferedRequestBody.close() -
} -
} else { -
exchange.noRequestBody() -
if (!exchange.connection.isMultiplexed) { -
// 没有响应 Expect:100 continue则阻止此连接得到复用,并且会关闭相关的socket -
exchange.noNewExchangesOnConnection() -
} -
} -
} else { -
exchange.noRequestBody() -
} -
... -
var response = responseBuilder -
.request(request) -
.handshake(exchange.connection.handshake()) -
.sentRequestAtMillis(sentRequestMillis) -
.receivedResponseAtMillis(System.currentTimeMillis()) -
.build() -
var code = response.code -
if (code == 100) { -
// 返回100 表示接收大请求体请求 继续发送请求体 -
// 得到response后返回结果 -
responseBuilder = exchange.readResponseHeaders(expectContinue = false)!! -
// 构建响应体 -
response = responseBuilder -
.request(request) -
.handshake(exchange.connection.handshake()) -
.sentRequestAtMillis(sentRequestMillis) -
.receivedResponseAtMillis(System.currentTimeMillis()) -
.build() -
code = response.code -
} -
response = if (forWebSocket && code == 101) { -
// 如果状态码是101并且是webSocket就返回空的response -
response.newBuilder() -
.body(EMPTY_RESPONSE) -
.build() -
} else { -
response.newBuilder() -
.body(exchange.openResponseBody(response)) -
.build() -
} -
return response -
}
在 okhttp 中,面对比较大的请求体时,会先去询问服务器是否接收此请求体,如果服务器接收并返回响应码 200,则 okhttp 继续发送请求体,否则就直接返回给客户端。如果服务器忽略此请求,则不会响应,最后客户端会超时抛出异常。
当然,如果你也可以自定义拦截器,在创建Client对象的时候,提供了对应的方法的。
拦截器这块的内容我目前感觉掌握的一般,这块的内容基本上参考掘金的一篇文章:传送门
好啦,以上就是OkHttp的核心代码剖析,欢迎大家和我一起在评论区探讨OkHttp的相关内容,笔者后续也会更新一些其他热门框架的源码剖析,喜欢的话可以留个关注,我还有很多技术文章or分享文章会不定时分享。


 873
873

 被折叠的 条评论
为什么被折叠?
被折叠的 条评论
为什么被折叠?
 到【灌水乐园】发言


