


学习python的时候,看到很多会对参数进行加密,于是好奇心驱使下,让我去了解了下AES加密如何在java中实现。
首先
npm install crypto-js
然后在你的方法中,给你们前端源码看看,因为我用的ruoyi框架做的实验,请求可能不是axios发送的请求
-
<template> -
<div id="app"> -
<div>index2222222</div> -
</div> -
</template> -
<script> -
import * as echarts from "echarts"; -
import {listCar} from "@/api/shopcar/car"; -
import {listSchool, qryName, qryScore} from "@/api/shool/school"; -
export default { -
data() { -
return { -
// 遮罩层 -
loading: true, -
// 选中数组 -
ids: [], -
// 非单个禁用 -
single: true, -
// 非多个禁用 -
multiple: true, -
// 显示搜索条件 -
showSearch: true, -
// 总条数 -
total: 0, -
// 【请填写功能名称】表格数据 -
carList: [], -
//测试数组 -
demoList:[], -
// 弹出层标题 -
title: "", -
// 是否显示弹出层 -
open: false, -
// 查询参数 -
queryParams: { -
pageNum: 1, -
pageSize: 10, -
spuId: null, -
spuName: null, -
skuId: null, -
skuInfo: null, -
num: null, -
tenantId: null, -
tenantName: null, -
userId: null, -
username: null, -
isSelect: null, -
addPrice: null, -
price: null, -
}, -
// 表单参数 -
form: {}, -
// 表单校验 -
rules: { -
} -
} -
}, -
created() { -
}, -
//钩子函数 -
mounted() { -
this.qryScore(); -
this.jiami(); -
}, -
methods: { -
jiami(){ -
// 引入crypto-js库 -
const CryptoJS = require('crypto-js'); -
// 定义密钥 -
const key = CryptoJS.enc.Utf8.parse('1234567890123456'); // 密钥长度为16字节 -
// 定义待加密的文件内容 -
const fileContent = 'Hello, World!'; -
// 加密文件内容 -
const encrypted = CryptoJS.AES.encrypt(fileContent, key, { -
mode: CryptoJS.mode.ECB, // 加密模式为ECB -
padding: CryptoJS.pad.Pkcs7 // 填充方式为Pkcs7 -
}); -
// 打印加密后的内容 -
console.log('加密后的内容:', encrypted.toString()); -
// 解密文件内容 -
const decrypted = CryptoJS.AES.decrypt(encrypted, key, { -
mode: CryptoJS.mode.ECB, // 加密模式为ECB -
padding: CryptoJS.pad.Pkcs7 // 填充方式为Pkcs7 -
}); -
// 打印解密后的内容 -
console.log('解密后的内容:', decrypted.toString(CryptoJS.enc.Utf8)); -
}, -
qryScore() { -
this.loading = true; -
qryScore().then(response => { -
console.log(1234) -
console.log(response) -
this.draw(response) -
}); -
}, -
draw(data) { -
// 初始化echarts实例 -
let myChart = echarts.init(document.getElementById('myChart')) -
console.log(this.$echarts) -
myChart.setOption( { -
title: { -
text: 'ECharts 入门示例' -
}, -
tooltip: {}, -
xAxis: { -
data: data.name -
}, -
yAxis: {}, -
series: [ -
{ -
name: '销量', -
type: 'bar', -
data: data.grade -
} -
] -
}); -
} -
} -
} -
</script> -
<style> -
#app { -
font-family: Avenir, Helvetica, Arial, sans-serif; -
-webkit-font-smoothing: antialiased; -
-moz-osx-font-smoothing: grayscale; -
text-align: center; -
color: #2c3e50; -
margin-top: 60px; -
} -
</style>
实现结果

主要代码
-
// 引入crypto-js库 -
const CryptoJS = require('crypto-js'); -
// 定义密钥 -
const key = CryptoJS.enc.Utf8.parse('1234567890123456'); // 密钥长度为16字节 -
// 定义待加密的文件内容 -
const fileContent = 'Hello, World!'; -
// 加密文件内容 -
const encrypted = CryptoJS.AES.encrypt(fileContent, key, { -
mode: CryptoJS.mode.ECB, // 加密模式为ECB -
padding: CryptoJS.pad.Pkcs7 // 填充方式为Pkcs7 -
}); -
// 打印加密后的内容 -
console.log('加密后的内容:', encrypted.toString()); -
// 解密文件内容 -
const decrypted = CryptoJS.AES.decrypt(encrypted, key, { -
mode: CryptoJS.mode.ECB, // 加密模式为ECB -
padding: CryptoJS.pad.Pkcs7 // 填充方式为Pkcs7 -
}); -
// 打印解密后的内容 -
console.log('解密后的内容:', decrypted.toString(CryptoJS.enc.Utf8));
然后我们对请求加密。
后端我是参照这个文章写的,他是真正的大牛,感觉他的文章都写的好有用,虽然自己看不懂。
AES+自定义密钥实现加密解密(前端+后端)_crypto aes加密 自定义密钥-CSDN博客
先生成我们要的秘钥,然后把我们前端改了就行,我是在spring环境中,记得要在上面文件修改下,因为他好像不是spring环境下的配置。
成功了哈,我根据大佬文件改了改放在spring框架下也能用了,那么大致思路就有了,前端加密,后端解密就行了。
后端解密
 大致思路有了,前端根据后端的秘钥进行加密发送,后端解密即可,偷个小懒我就不写了。
我把根据大佬修改后适配于spring环境下的配置文件写在下面了,因为我发现很多文章都只是个类并不适配于spring环境,还要单独修改,所以我改了那么一点点,弄出了工具类,大家粘贴复制即可。
-
package com.ruoyi.web.controller.utils; -
import org.apache.commons.codec.binary.Hex; -
import org.apache.commons.codec.digest.DigestUtils; -
import org.springframework.stereotype.Component; -
import sun.misc.BASE64Decoder; -
import sun.misc.BASE64Encoder; -
import javax.crypto.Cipher; -
import javax.crypto.KeyGenerator; -
import javax.crypto.spec.SecretKeySpec; -
import java.nio.charset.StandardCharsets; -
import java.security.SecureRandom; -
/** -
* AES 加密工具类 -
*/ -
@Component -
public class AesUtil { -
// 加密算法RSA -
public static final String KEY_ALGORITHM = "AES"; -
//编码方式 -
public static final String CODE_TYPE = "UTF-8"; -
//填充类型 AES/ECB/PKCS5Padding AES/ECB/ISO10126Padding -
public static final String AES_TYPE = "AES/ECB/PKCS5Padding"; -
/** -
* 自定义内容加盐,生成AES秘钥 -
*/ -
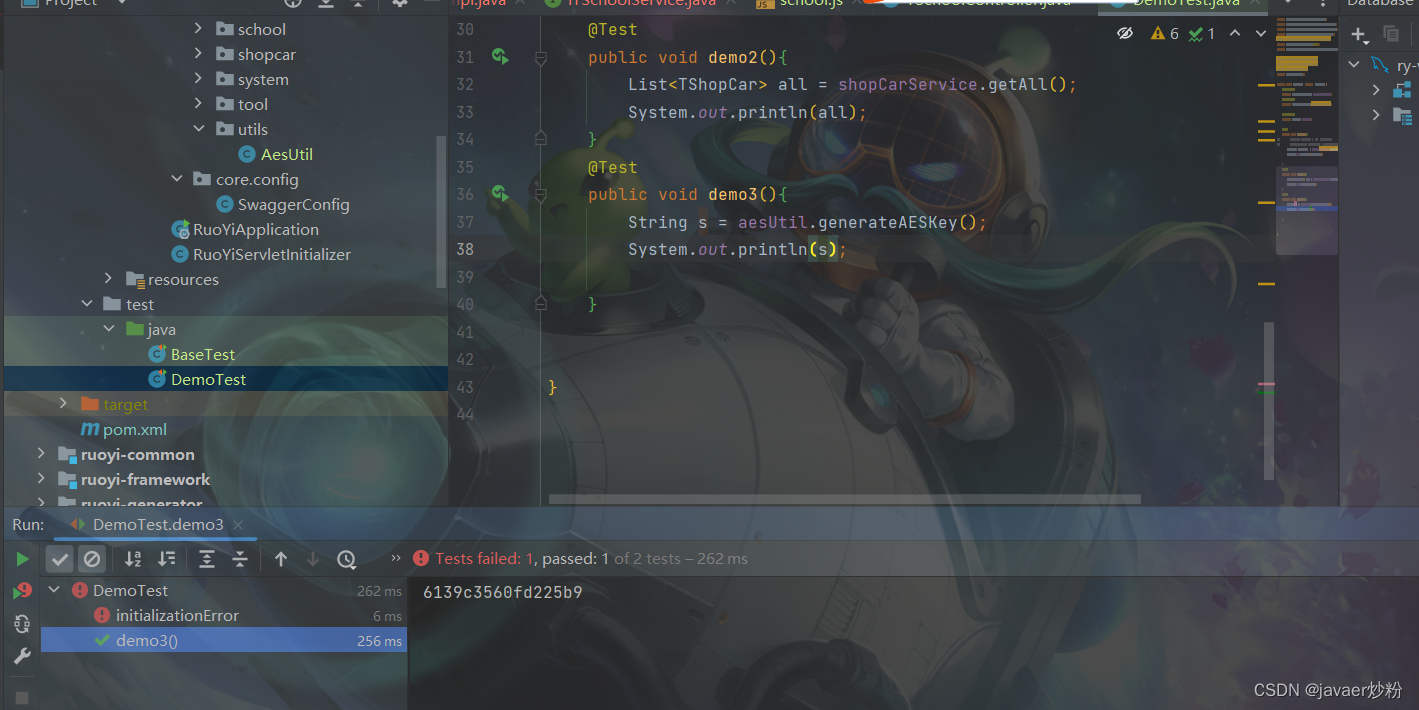
public String generateAESKey(){ -
return DigestUtils.md5Hex(getSalt(6)).substring(8, 24); -
} -
/** -
* 随机生成加盐类 -
*/ -
public String getSalt(int n){ -
char[] chars = ("ABCDEFGHIJKLMNOPQRSTUVWXYZabcdefghijklmnopqrstuvwxyz" + -
"1234567890!@#$%^&*()_+").toCharArray(); -
StringBuilder stringBuilder = new StringBuilder(); -
SecureRandom random = new SecureRandom(); -
for(int i = 0; i < n; i++){ -
stringBuilder.append(chars[random.nextInt(chars.length)]); -
} -
return stringBuilder.toString(); -
} -
/** -
* 加密 -
* @param clearText 明文 -
* @param aesKey AES秘钥 -
* @return 加密串 -
*/ -
public String encryptAes(String clearText, String aesKey) { -
try { -
SecretKeySpec key = new SecretKeySpec(aesKey.getBytes(), KEY_ALGORITHM); -
Cipher cipher = Cipher.getInstance(AES_TYPE); -
cipher.init(Cipher.ENCRYPT_MODE, key); -
byte[] encryptedData = cipher.doFinal(clearText.getBytes(CODE_TYPE)); -
return new BASE64Encoder().encode(encryptedData); -
} catch (Exception e) { -
throw new RuntimeException("加密失败", e); -
} -
} -
/** -
* 解密 -
* @param encryptText 密文 -
* @param aesKey AES秘钥 -
* @return 解密串 -
*/ -
public String decryptAes(String encryptText, String aesKey) { -
try { -
byte[] byteMi = new BASE64Decoder().decodeBuffer(encryptText); -
SecretKeySpec key = new SecretKeySpec(aesKey.getBytes(), KEY_ALGORITHM); -
Cipher cipher = Cipher.getInstance(AES_TYPE); -
cipher.init(Cipher.DECRYPT_MODE, key); -
byte[] decryptedData = cipher.doFinal(byteMi); -
return new String(decryptedData, CODE_TYPE); -
} catch (Exception e) { -
throw new RuntimeException("解密失败", e); -
} -
} -
// public static void main(String[] args) { -
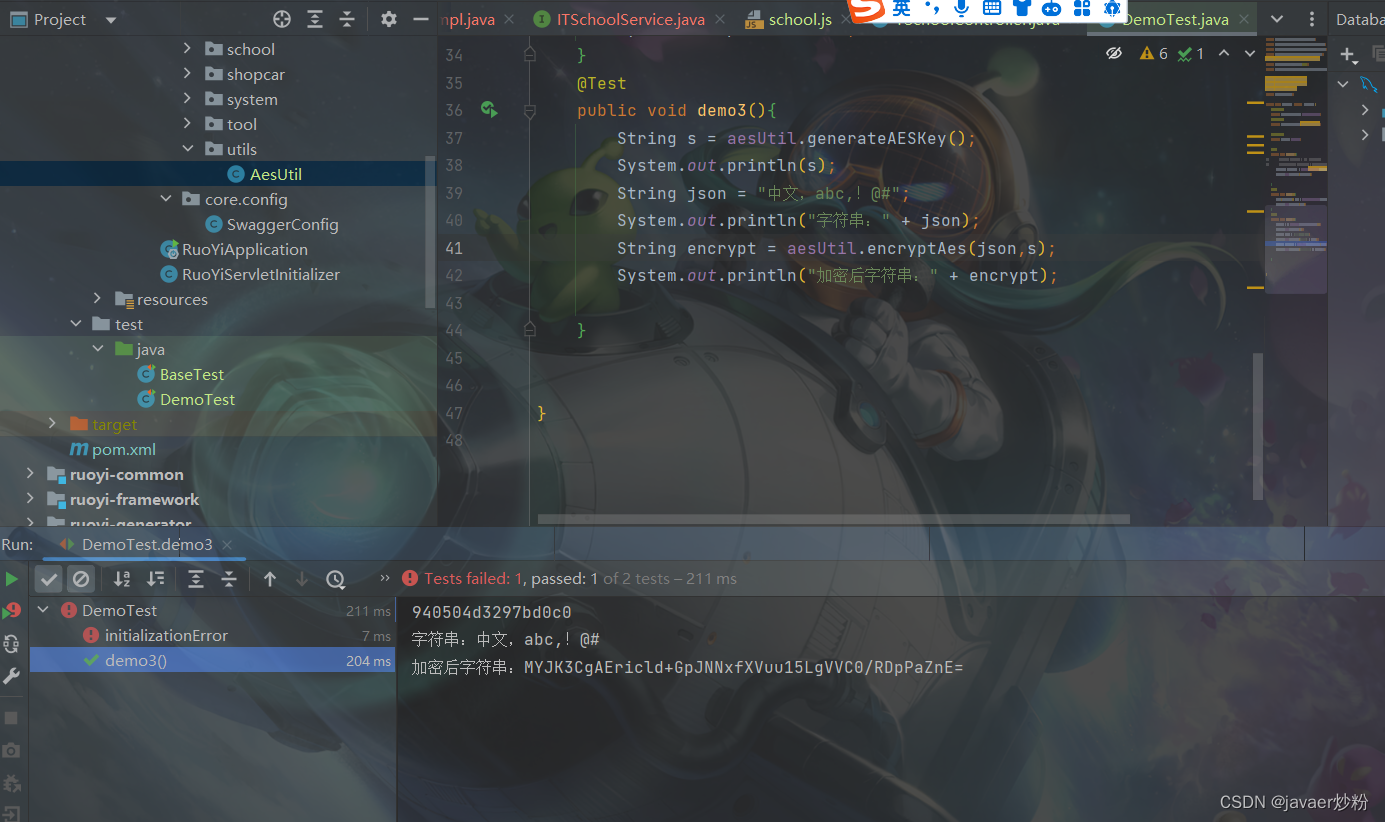
// String aesKey = generateAESKey(); -
// String json = "中文,abc,!@#"; -
// //加密 -
// System.out.println("字符串:" + json); -
// String encrypt = encryptAes(json, aesKey); -
// System.out.println(encrypt); -
// System.out.println("加密后字符串:" + encrypt); -
// //私钥解密 -
// System.out.println("解密后字符串:" + decryptAes(encrypt, aesKey)); -
// } -
}


 2900
2900

 被折叠的 条评论
为什么被折叠?
被折叠的 条评论
为什么被折叠?
 到【灌水乐园】发言


