


Nginx反向代理,nginx网站/tomcat网站
配置环境准备
| 节点 | IP地址 | 角色 |
|---|---|---|
| nginx | 192.168.44.173 | 反向代理服务器 |
| web1 | 192.168.44.174 | 网站1(nginx网站) |
| web2 | 192.168.44.175 | 网站2(nginx网站) |
| web3 | 192.168.44.176 | 网站3(tomcat网站) |
网站安装部署
web1部署
使用nginx部署网站,安装nginx
#进入nginx解压目录
[root@web1 nginx]#	yum -y install make gcc psmisc  pcre-devel openssl openssl-devel
#部署加密网站需要--with-http_ssl_module模块,本次虽含有此模块但未使用
[root@web1 nginx]#	./configure --with-http_ssl_module
[root@web1 nginx]#	make && make install
修改配置文件,指定网页位置
#进入nginx安装目录
[root@web1 nginx]#	cd /usr/local/nginx/
#修改配置文件,指定网页位置
[root@web1 nginx]#	vim conf/nginx.conf
#x新增一个location
location /web1 {
             alias /data/nginx;
             try_files $uri /web1/index.html;
        }
部署网页
#部署网页
[root@web1 nginx]#	mkdir -p /data/nginx
[root@web1 nginx]#	echo web1_test~~~ > /data/nginx/index.html
启动服务
#启动服务
[root@web1 nginx]#	sbin/nginx
[root@web1 nginx]#	ss -utnlp | grep nginx
tcp    LISTEN     0      128       *:80                    *:*                   users:(("nginx",pid=16369,fd=6),("nginx",pid=3945,fd=6))
本机测试访问
#本机测试访问
[root@web1 nginx]#	curl http://192.168.44.174/web1/
web1_test~~~
web2部署
使用nginx部署网站,安装nginx
#进入nginx解压目录
[root@web2 nginx]#	yum -y install make gcc psmisc  pcre-devel openssl openssl-devel
#部署加密网站需要--with-http_ssl_module模块,本次虽含有此模块但未使用
[root@web2 nginx]#	./configure --with-http_ssl_module
[root@web2 nginx]#	make && make install
修改配置文件,指定网页位置
#进入nginx安装目录
[root@web2 nginx]#	cd /usr/local/nginx/
#修改配置文件,指定网页位置
vim conf/nginx.conf
#x新增一个location
location /web2 {
             alias /data/nginx;
             try_files $uri /web2/index.html;
        }
部署网页
#部署网页
[root@web2 nginx]#	mkdir -p /data/nginx
[root@web2 nginx]#	echo web2_test~~~ > /data/nginx/index.html
启动服务
#启动服务
[root@web2 nginx]#	sbin/nginx
[root@web2 nginx]#	ss -utnlp | grep nginx
tcp    LISTEN     0      128       *:80                    *:*                   users:(("nginx",pid=16412,fd=6),("nginx",pid=3944,fd=6))
本机测试访问
#本机测试访问
[root@web2 nginx]#	curl 192.168.44.175/web2/
web2_test~~~
web3部署
使用tomcat部署网站,安装tomcat
#安装tomcat
#解压tomcat,把解压后的目录放到/usr/local/tomcat
[root@web3 ~]#	tar xf apache-tomcat-9.0.6.tar.gz
[root@web3 ~]#	cp -r apache-tomcat-9.0.6 /usr/local/tomcat
#安装tomcat运行以来java环境
[root@web3 ~]#	yum -y install java-1.8.0-openjdk
#配置tomcat运行依赖大量随机字符
[root@web3 ~]#	 mv /dev/random /dev/random.bak
[root@web3 ~]#	 ln -s /dev/urandom /dev/random
修改配置文件,指定网页位置
bin  存放主程序
logs  存放日志
conf  配置文件
webapps  存放网站页面
lib  存放库文件
work  存放编译后页面文件
[root@web3 ~]# cd /usr/local/tomcat/
[root@web3 tomcat]# ls
[root@web3 tomcat]# bin conf lib LICENSE logs NOTICE RELEASE-NOTES RUNNING.txt temp webapps work
[root@web3 tomcat]# vim conf/server.xml
#修改Host标签
151 <Host name="localhost" appBase="webapps"
152 unpackWARs="true" autoDeploy="true">
153 <!-- 新增匹配客户端访问路径/tomcat,网页指定/data/tomcat-->
<Context path="/tomcat" docBase="/data/tomcat" />
154
155 <!-- SingleSignOn valve, share authentication between web applications
156 Documentation at: /docs/config/valve.html -->
157 <!--
158 <Valve className="org.apache.catalina.authenticator.SingleSignOn" />
159 -->
160
161 <!-- Access log processes all example.
162 Documentation at: /docs/config/valve.html
163 Note: The pattern used is equivalent to using pattern="common" -->
164 <Valve className="org.apache.catalina.valves.AccessLogValve" directory="logs"
165 prefix="localhost_access_log" suffix=".txt"
166 pattern="%h %l %u %t "%r" %s %b" />
167
168 </Host>
部署网页
[root@web3 tomcat]# mkdir -p /data/tomcat
[root@web3 tomcat]# echo "web3_tomcat_test~~~" > /data/tomcat/index.html
启动服务
[root@web3 tomcat]# bin/startup.sh
Using CATALINA_BASE:   /usr/local/tomcat
Using CATALINA_HOME:   /usr/local/tomcat
Using CATALINA_TMPDIR: /usr/local/tomcat/temp
Using JRE_HOME:        /usr
Using CLASSPATH:       /usr/local/tomcat/bin/bootstrap.jar:/usr/local/tomcat/bin/tomcat-juli.jar
Tomcat started.
[root@web3 tomcat]# ss -utnlp | grep java
tcp    LISTEN     0      1      ::ffff:127.0.0.1:8005                 :::*                   users:(("java",pid=12113,fd=69))
tcp    LISTEN     0      100      :::8009                 :::*                   users:(("java",pid=12113,fd=53))
tcp    LISTEN     0      100      :::8080                 :::*                   users:(("java",pid=12113,fd=48))
本机测试访问
[root@web3 tomcat]# curl 192.168.44.176:8080/tomcat/
web3_tomcat_test~~~
nginx反向代理部署
安装nginx
#进入nginx解压目录安装nginx
[root@nginx nginx]#	yum -y install make gcc psmisc  pcre-devel openssl openssl-devel
#部署加密网站需要--with-http_ssl_module模块,本次虽含有此模块但未使用
[root@nginx nginx]#	./configure --with-http_ssl_module
[root@nginx nginx]#	make && make install
修改配置文件,指定要代理的网站
#进入nginx安装目录
[root@nginx nginx]#	cd /usr/local/nginx/
#修改配置文件,指定要代理的网站
[root@nginx nginx]#	vim conf/nginx.conf
    #gzip  on;

    server {
        #nginx监听的端口默认80
        listen       80;
        #访问的域名
        server_name  www.nginx_proxy.com;

        #charset koi8-r;

        #access_log  logs/host.access.log  main;
		#默认的匹配,未做修改
        location / {
            root   html;
            index  index.html index.htm;
        }
        #指定代理的网站
        #web1
        location /web1 {
            proxy_pass http://192.168.44.174;
        }
        #web2
        location /web2 {
            proxy_pass http://192.168.44.175;
        }
        #web3
 		location /tomcat {
            proxy_pass http://192.168.44.176:8080;
        }

        #error_page  404              /404.html;
启动服务
#启动服务
[root@nginx nginx]#	sbin/nginx
[root@nginx nginx]#	ss -utnlp | grep nginx
tcp    LISTEN     0      128       *:80                    *:*                   users:(("nginx",pid=16493,fd=6),("nginx",pid=3980,fd=6))
测试访问
使用ip访问
#使用ip访问
[root@nginx nginx]# curl 192.168.44.173
I am nginx_proxy~~~
[root@nginx nginx]# curl 192.168.44.173/web1/
 web1_test~~~
[root@nginx nginx]# curl 192.168.44.173/web2/
web2_test~~~
[root@nginx nginx]# curl  192.168.44.173/tomcat/
web3_tomcat_test~~~
使用域名访问
#使用域名访问
#添加本机域名解析
[root@nginx nginx]# vim /etc/hosts
#追加一行
192.168.44.173  www.nginx_proxy.com
[root@nginx nginx]# curl www.nginx_proxy.com
I am nginx_proxy~~~
[root@nginx nginx]# curl www.nginx_proxy.com/web1/
 web1_test~~~
[root@nginx nginx]# curl www.nginx_proxy.com/web2/
web2_test~~~
[root@nginx nginx]# curl  www.nginx_proxy.com/tomcat/
web3_tomcat_test~~~
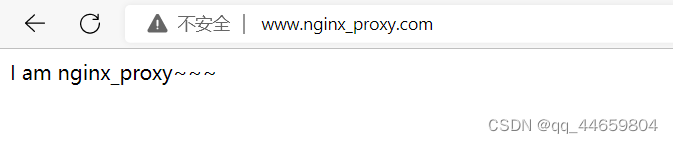
windows真机使用浏览器域名访问
#windows真机使用浏览器访问
进入C:\Windows\System32\drivers\etc
修改hosts文件,追加一行
192.168.44.173 www.nginx_proxy.com


 1449
1449


 被折叠的 条评论
为什么被折叠?
被折叠的 条评论
为什么被折叠?
 到【灌水乐园】发言


