


 本文深入讲解Spring AOP的配置与使用,包括切入点表达式、基于XML和注解的AOP配置,以及环绕通知的实现。通过示例代码,详细演示如何在Spring框架中应用AOP进行方法增强。
Spring AOP 的配置及使用
文章目录
上一篇博客介绍了 Spring AOP 的概念、动态代理模式和入门案例,本片博客将详细介绍 AOP 的配置及使用相关的细节,包括 切入点表达式、基于 xml 配置 AOP,基于注解配置 AOP,基于注解配置类配置AOP。
上一篇博客链接:Spring AOP 概念及动态代理模式
博客展示 demo 的 github 地址:https://github.com/Jacks5320/SpringAopStudy
1 切入点表达式
正式进行 AOP 编程之前,先了解一个核心概念————切点表达式。
作用:让 Spring 框架知道是对哪个类的哪个方法进行增强。
语法结构:[权限修饰符][返回值类型][类的全限定类名][方法名称](参数列表)
使用 execution 来解析切入点表达式:execution([权限修饰符][返回值类型][类的全限定类名][方法名称](参数列表))
以 com.jk.xml.service.impl.AccountServiceImpl.saveAccount() 方法为例,切点表达式如下所示:
标准写法:public void com.jk.xml.service.impl.AccountServiceImpl.saveAccount()

省略访问修饰符:void com.jk.xml.service.impl.AccountServiceImpl.saveAccount()

使用通配符表示任意类型的返回值:* com.jk.xml.service.impl.AccountServiceImpl.saveAccount()

/*	包结构通配

使用通配符表示包名:* *.*.*.*.*.AccountServiceImpl.saveAccount(),有几级包就得写几个 *. 来通配

使用 .. 表示子包:* *..AccountServiceImpl.saveAccount()

*/

/* 类和方法通配

使用通配符来表示类名:* *..*.saveAccount()

使用通配符来表示方法名:* *..AccountServiceImpl.*(),这样只会通配没有参数列表的方法

*/

/* 参数列表通配

基本类型通配:* *..AccountServiceImpl.*(int),表示通配只有一个参数,且参数为 int 类型,如果有多个参数,可以用逗号隔开进行通配。

引用类型:* *..AccountServiceImpl.*(java.util.List)

*/

全通配写法:* *..*.*(..)

以上只是介绍切入点表达式的一些规则和写法,可以按需搭配。

实际开发中的通常写法如下:* com.jk.xml.service.impl.*.*(..),表示业务逻辑层的所有类和方法
- 通过上面展示的语句,应该对切入点表达式有深刻理解了。
- 可以通通配符
*代表任意。(任意权限修饰,任意方法,任意包,任意类)。 ..可以表示当前包的子包,也可以表示任意参数列表。- 有了切入点表达式的概念以后就可以开始配置 AOP 功能了。
2 开始前的准备工作:创建 Maven 工程,导入相关依赖
<dependencies>
    <!--Spring 核心-->
    <dependency>
        <groupId>org.springframework</groupId>
        <artifactId>spring-context</artifactId>
        <version>5.2.8.RELEASE</version>
    </dependency>
    <!--解析切点表达式-->
    <dependency>
        <groupId>org.aspectj</groupId>
        <artifactId>aspectjweaver</artifactId>
        <version>1.9.5</version>
    </dependency>
    <!--整合 Junit-->
    <dependency>
        <groupId>junit</groupId>
        <artifactId>junit</artifactId>
        <version>4.12</version>
        <scope>test</scope>
    </dependency>
    <dependency>
        <groupId>org.springframework</groupId>
        <artifactId>spring-test</artifactId>
        <version>5.2.8.RELEASE</version>
    </dependency>
</dependencies>
3 基于 xml 配置实现 AOP
3.1 创建被代理类的接口及实现类
public interface AccountService {
    //模拟保存
    void saveAccount();
    //模拟更新
    void updateAccount(int id);
    //模拟删除
    int deleteAccount();
}
public class AccountServiceImpl implements AccountService {
    @Override
    public void saveAccount() {
        System.out.println("保存方法执行了。。。");
        // int a = 1/0;		//制造异常通知
    }

    @Override
    public void updateAccount(int id) {
        System.out.println("更新方法执行了。。。");
    }

    @Override
    public int deleteAccount() {
        System.out.println("删除方法执行了。。。");
        return 0;
    }
}
3.2 创建通知类
public class AopUtil {
    //前置通知
    public void beforeAdvice() {
        System.out.println("<==before,前置通知加上了==>");
    }
    //后置通知
    public void afterReturningAdvice() {
        System.out.println("<==afterReturning,后置通知加上了==>");
    }
    //异常通知
    public void afterThrowingAdvice() {
        System.out.println("<==afterThrowing,异常通知加上了==>");
    }
    //最终通知
    public void afterAdvice() {
        System.out.println("<==after,最终通知加上了==>");
    }
    //环绕通知
    public Object aroundAdvice(ProceedingJoinPoint jp) {
        Object rtValue = null;
        try {
            Object[] args = jp.getArgs();       //获取执行方法的参数

            System.out.println("<==around,环绕通知在之前加上了,before==>");       //写在 proceed 之前表示前置通知

            rtValue = jp.proceed(args);     //明确调用切入点方法

            System.out.println("<==around,环绕通知在之后加上了,afterReturning==>");//写在 proceed 之后表示后置通知

            return rtValue;

        } catch (Throwable t) {
            System.out.println("<==around,环绕通知在之后加上了,afterThrowing==>");//写在 catch 里面表示异常通知
            throw new RuntimeException(t);
        } finally {
            System.out.println("<==around,环绕通知在之后加上了,afterReturning==>");//写在 finally 里面表示最终通知
        }
    }
}
3.3 配置 xml 文件
<?xml version="1.0" encoding="UTF-8"?>
<beans xmlns="http://www.springframework.org/schema/beans"
       xmlns:xsi="http://www.w3.org/2001/XMLSchema-instance"
       xmlns:aop="http://www.springframework.org/schema/aop"
       xsi:schemaLocation="http://www.springframework.org/schema/beans
                           http://www.springframework.org/schema/beans/spring-beans.xsd
                           http://www.springframework.org/schema/aop
                           http://www.springframework.org/schema/aop/spring-aop.xsd">

    <!--配置被代理的对象实例化-->
    <bean id="accountService" class="com.jk.xml.service.impl.AccountServiceImpl"/>
    <!-- 配置通知类对象实例化-->
    <bean id="aopUtil" class="com.jk.xml.utils.AopUtil"/>
    <!-- 配置 aop -->
    <aop:config>
        <!-- 配置切面 -->
        <aop:aspect id="logAdvice" ref="aopUtil">
            <!--前置通知:切入点方法执行之前执行-->
            <aop:before method="beforeAdvice" pointcut="execution(* com.jk.xml.service.impl.*.saveAccount(..))"/>
            <!--后置通知:切入点方法正常执行之后执行-->
            <!-- <aop:after-returning method="afterReturningAdvice" pointcut="execution(* com.jk.xml.service.impl.*.*(..))"/> -->
            <aop:after-returning method="afterReturningAdvice" pointcut-ref="aopPoint"/>
            <!--异常通知:切入点方法产生异常时才会执行-->
            <!--<aop:after-throwing method="afterThrowingAdvice" pointcut="execution(* com.jk.xml.service.impl.*.*(..))"/>-->
            <aop:after-throwing method="afterThrowingAdvice" pointcut-ref="aopPoint"/>
            <!--最终通知:无论切入点方法是否正常执行,都会执行-->
            <!--<aop:after method="afterAdvice" pointcut="execution(* com.jk.xml.service.impl.*.*(..))"/>-->
            <aop:after method="afterAdvice" pointcut-ref="aopPoint"/>
            <!--
                以上配置有重复部分,也就是切点表达式,可以提出来单独配置,然后使用 point-ref 来引入 切入点表达式的 id
                aop:pointcut 标签:
                    属性:
                        id:唯一标志
                        expression:切点表达式
                注意:如果是写在 aop:aspect 标签内部,只能当前切面使用,也可以写在外部,其他切面也能使用。
                     如果写在外部,则必须写在 aop:aspect 标签的上面。
                     如果写在内部,可以写在通知标签下面。
            -->
            <aop:pointcut id="aopPoint" expression="execution(* com.jk.xml.service.impl.*.saveAccount(..))"/>
        </aop:aspect>
    </aop:config>
</beans>
- 要使用 AOP 配置功能需要引入
aop名称空间。 - 在 xml 配置文件中要将被代理对象和增强类同时实例化。
- 使用
<aop:config>标签表示是 AOP 的配置。 - 使用
<aop:config>标签中的<aop:aspect>标签表示配置的切面,id 属性是这个切面的唯一标识,可以被其他切面引用,ref 属性指定增强类的 id 属性。 - 使用
<aop:aspect>标签中的通知类标签<aop:xxx>xxx 表示通知类型,method 属性表示通知类中的增强方法,pointcut 属性使用切入点表达式指向增强的方法。 - 可以使用
<aop:pointcut>标签提取通用的切入点表达式,然后使用通知类型标签<aop:xxx>中的 pointcut-ref 属性来引入公共切入点表达式的 id 属性。 - 关于
<aop:pointcut>标签,如果写在<aop:aspect>标签外部,必须在引用切面的前面定义,如果是在内部,则可以放任意位置,为了规范,一般都放在引用位置的前面。
3.4 测试方法
@RunWith(SpringJUnit4ClassRunner.class)
@ContextConfiguration(locations = {"classpath:xml/bean2.xml"})
public class TestBean2 {
    @Autowired
    AccountService as;

    //测试 前置通知、后置通知、异常通知和最终通知
    @Test
    public void testBeforeAdvice(){
        as.saveAccount();
        as.updateAccount(1);
        as.deleteAccount();
    }
}
打印结果:
<==before,前置通知加上了==>
保存方法执行了。。。
<==afterReturning,后置通知加上了==>
<==after,最终通知加上了==>
更新方法执行了。。。
删除方法执行了。。。
- 因为切入点表达式
execution(* com.jk.xml.service.impl.*.saveAccount(..))表示值拦截saveAccount()方法,所以只有这个方法被增强了。 - 需要注意的是:后置通知
afterReturning和 异常通知afterThrowing永远不会同时出现。
3.5 环绕通知
之所以环绕通知单独提取出来,是因为,在环绕通知中可以涵盖其他通知,而且长得更像上篇博客介绍的动态代理模式。
public class AopUtil {
    public Object aroundAdvice(ProceedingJoinPoint jp) {
        Object rtValue = null;
        try {
            Object[] args = jp.getArgs();//获取执行方法的参数

            System.out.println("<==around,环绕通知在之前加上了,before==>");//写在 proceed 之前表示前置通知

            rtValue = jp.proceed(args);//明确调用切入点方法

            System.out.println("<==around,环绕通知在之后加上了,afterReturning==>");//写在 proceed 之后表示后置通知

            return rtValue;

        } catch (Throwable t) {
            System.out.println("<==around,环绕通知在之后加上了,afterThrowing==>");//写在 catch 里面表示异常通知
            throw new RuntimeException(t);
        } finally {
            System.out.println("<==around,环绕通知在之后加上了,afterReturning==>");//写在 finally 里面表示最终通知
        }
    }
}
JoinPoint的类视图:
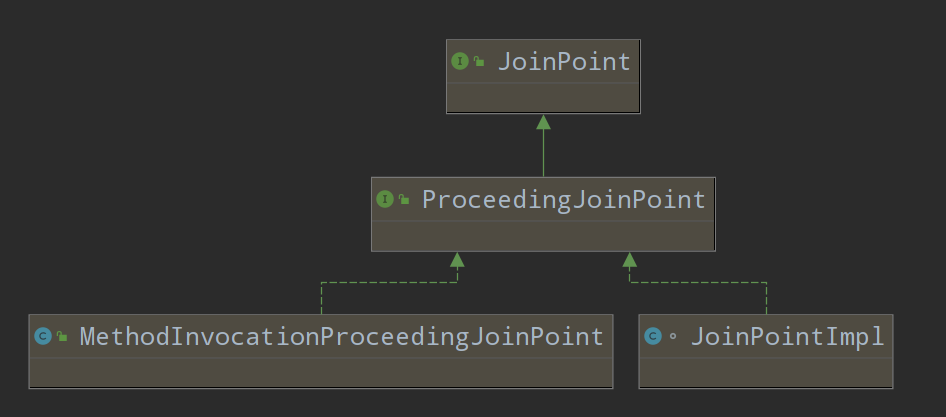
ProceedingJoinPoint是JoinPoint的子接口,都是由AspectJ提供,用于管理连接点的。- 只支持作为环绕通知的参数,如果写在其他通知中会出现异常:
java.lang.IllegalArgumentException: ProceedingJoinPoint is only supported for around advice。 - 有两个实现类:
JoinPointImpl和MethodInvocationProceedingJoinPoint。这里就不展开了,介绍几个与代理相关的方法:getTarget().getClass():获取被代理对象getThis().getClass():获取代理的对象getSignature().getName():获取当前拦截的方法名getArgs():获取当前拦截方法的参数数组,可以使用索引获取参数。
4 基于注解实现 AOP
这里依然使用上面的实现类和接口。
4.1 创建通知类
@Component
@Aspect//表示当前类是一个切面类
public class AopUtil {

    //指定切入点表达式
    @Pointcut("execution(* com.jk.annotation.service.impl.*.*(..))")
    private void aopAdvice() {
    }

    //前置通知
    @Before("aopAdvice()")
    public void beforeAdvice() {
        System.out.println("<==before,前置通知加上了==>");
    }

    //后置通知
    @AfterReturning("aopAdvice()")
    public void afterReturningAdvice() {
        System.out.println("<==afterReturning,后置通知加上了==>");
    }

    //异常通知
    @AfterThrowing("aopAdvice()")
    public void afterThrowingAdvice() {
        System.out.println("<==afterThrowing,异常通知加上了==>");
    }

    //最终通知
    @After("aopAdvice()")
    public void afterAdvice() {
        System.out.println("<==after,最终通知加上了==>");
    }
}
@Aspect等价于 xml 中的<aop:aspect id="accountAdvice" ref="aopUtil">@Pointcut等价于 xml 中的<aop:pointcut id="aopPoint" expression="execution(* com.jk.xml.service.impl.*.saveAccount(..))"/>@Before("aopAdvice()")等价于 xml 中的<aop:before method="beforeAdvice" pointcut="execution(aopPoint"/>
4.2 配置 xml 文件
<?xml version="1.0" encoding="UTF-8"?>
<beans xmlns="http://www.springframework.org/schema/beans"
       xmlns:xsi="http://www.w3.org/2001/XMLSchema-instance"
       xmlns:aop="http://www.springframework.org/schema/aop"
       xmlns:context="http://www.springframework.org/schema/context"
       xsi:schemaLocation="http://www.springframework.org/schema/beans
                           http://www.springframework.org/schema/beans/spring-beans.xsd
                           http://www.springframework.org/schema/aop
                           http://www.springframework.org/schema/aop/spring-aop.xsd
                           http://www.springframework.org/schema/context
                           http://www.springframework.org/schema/context/spring-context.xsd">

    <context:component-scan  base-package="com.jk.annotation"/>
    <!--开启 aop 自动代理-->
    <aop:aspectj-autoproxy/>
</beans>
4.3 测试方法
@RunWith(SpringJUnit4ClassRunner.class)
@ContextConfiguration(locations = "classpath:annotation/bean.xml")
public class TestDemo {
    @Autowired
    private AccountService as;
    //测试注解
    @Test
    public void testAnnotation(){
        as.saveAccount();
    }
}
执行结果:
<==before,前置通知加上了==>
保存方法执行了。。。
<==afterReturning,后置通知加上了==>
<==after,最终通知加上了==>
- 效果与基于 xml 配置实现的 AOP 一样。
4.4 环绕通知
@Component
@Aspect//表示当前类是一个切面类
public class AopUtil {

    @Around("aopAdvice()")
    public Object aroundAdvice(ProceedingJoinPoint jp) {
        Object rtValue = null;
        try {
            Object[] args = jp.getArgs();       //获取执行方法的参数

            System.out.println("<==around,环绕通知在之前加上了,before==>");       //写在 proceed 之前表示前置通知

            rtValue = jp.proceed(args);         //明确调用切入点方法

            System.out.println("<==around,环绕通知在之后加上了,afterReturning==>");//写在 proceed 之后表示后置通知

            return rtValue;

        } catch (Throwable t) {
            System.out.println("<==around,环绕通知在之后加上了,afterThrowing==>"); //写在 catch 里面表示异常通知
            throw new RuntimeException(t);
        } finally {
            System.out.println("<==around,环绕通知在最后加上了,after==>");        //写在 finally 里面表示最终通知
        }
    }
}
执行结果:
<==around,环绕通知在之前加上了,before==>
保存方法执行了。。。
<==around,环绕通知在之后加上了,afterReturning==>
<==around,环绕通知在最后加上了,after==>
5 完全注解实现 AOP
完全注解配置的意思指的是不需要任何的 xml 配置都可以运行,这里只需要添加一个配置注解类,删除配置文件即可。
5.1 创建配置类
@Configuration
@ComponentScan(basePackages = "com.jk.annotation")
@EnableAspectJAutoProxy     //等同于    <aop:aspectj-autoproxy/>
public class SpringConfig {
}
5.2 测试方法
@RunWith(SpringJUnit4ClassRunner.class)
@ContextConfiguration(classes = SpringConfig.class)
public class TestDemo2 {

    @Autowired
    AccountService as;

    @Test
    public void fullAnnotation(){
        as.saveAccount();
    }
}
- 测试方法中只把
@ContextConfiguration的值换成了配置类。
以上就是 AOP 相关的配置和使用方法了,希望能帮助你理解 AOP 的概念。


 被折叠的 条评论
为什么被折叠?
被折叠的 条评论
为什么被折叠?
 到【灌水乐园】发言


