


Spring
常用依赖
<dependencies>
    <!-- https://mvnrepository.com/artifact/org.springframework/spring-webmvc -->
    <dependency>
        <groupId>org.springframework</groupId>
        <artifactId>spring-webmvc</artifactId>
        <version>5.3.3</version>
    </dependency>
<!-- https://mvnrepository.com/artifact/mysql/mysql-connector-java -->
        <dependency>
            <groupId>mysql</groupId>
            <artifactId>mysql-connector-java</artifactId>
            <version>8.0.26</version>
        </dependency>
    <dependency>
        <groupId>junit</groupId>
        <artifactId>junit</artifactId>
        <version>4.12</version>
        <scope>test</scope>
    </dependency>

</dependencies>
事务
1、事务的定义
事务(Transaction)是数据库区别于文件系统的重要特性之一。目前国际认可的数据库设计原则是ACID特性,用以保证数据库事务的正
确执行。Mysql的innodb引擎中的事务就完全符合ACID特性。spring对于事务的支持,分层概览图如下:
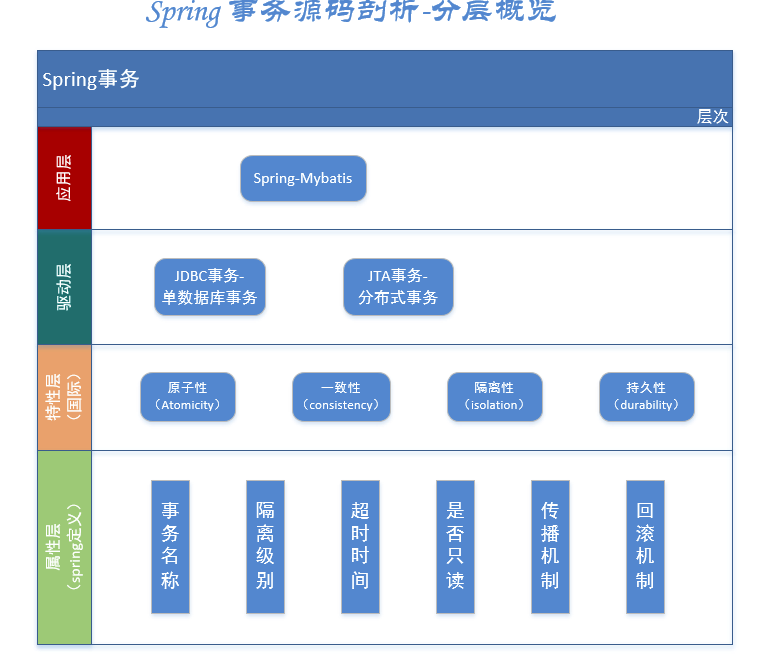
2、事务的ACID特性
原子性(Atomicity):一个事务必须被视为一个不可分割的最小工作单元,整个事务中的所有操作要么全部提交成功,要么全部失败回
滚。主要涉及InnoDB事务。相关特性:事务的提交,回滚,信息表。
一致性(consistency):数据库总是从一个一致性的状态转换到另一个一致性的状态。在事务开始前后,数据库的完整性约束没有被破坏。例如违反了唯一性,必须撤销事务,返回初始状态。主要涉及内部InnoDB处理,以保护数据不受崩溃,相关特性:双写缓冲、崩溃
恢复。
隔离性(isolation):每个读写事务的对象对其他事务的操作对象能相互分离,即:事务提交前对其他事务是不可见的,通常内部加锁
实现。主要涉及事务,尤其是事务隔离级别,相关特性:隔离级别、innodb锁的底层实现细节。
持久性(durability):一旦事务提交,则其所做的修改会永久保存到数据库涉及到MySQL软件特性与特定硬件配置的相互影响,相关特
性:4个配置项:双写缓冲开关、事务提交刷新log的级别、binlog同步频率、表文件;写缓存、操作系统对于fsync()的支持、备份策略
等
3、事务的属性
要保证事务的ACID特性,spring给事务定义了6个属性,对应于声明式事务注解(org.springframework.transaction.annotation.Transactional)@Transactional(key1=,key2=…)
- 事务名称:用户可手动指定事务的名称,当多个事务的时候,可区分使用哪个事务。对应注解中的属性value、transactionManager
- 隔离级别: 为了解决数据库容易出现的问题,分级加锁处理策略。 对应注解中的属性isolation
- 超时时间: 定义一个事务执行过程多久算超时,以便超时后回滚。可以防止长期运行的事务占用资源.对应注解中的属性timeout
- 是否只读:表示这个事务只读取数据但不更新数据, 这样可以帮助数据库引擎优化事务.对应注解中的属性readOnly
- 传播机制: 对事务的传播特性进行定义,共有7种类型。对应注解中的属性propagation
- 回滚机制:定义遇到异常时回滚策略。对应注解中的属性rollbackFor、noRollbackFor、rollbackForClassName、noRollbackForClassName
其中隔离级别和传播机制比较复杂,咱们细细地品一品。
3.1 隔离级别
这一块比较复杂,我们从3个角度来看:3种错误现象、mysql的底层技术支持、分级处理策略。这一小节一定要好好看,已经开始涉及核
心原理了。
现象(三种问题)
- 脏读(Drity Read):事务A更新记录但未提交,事务B查询出A未提交记录。
- 不可重复读(Non-repeatable read): 事务A读取一次,此时事务B对数据进行了更新或删除操作,事务A再次查询数据不一致。
- 幻读(Phantom Read): 事务A读取一次,此时事务B插入一条数据事务A再次查询,记录多了。
3.2传播行为
-
PROPAGATION_REQUIRED:如果当前没有事务,就新建一个事务,如果已经存在一个事务中,加入到这个事务中。这是最常见的选择。
-
PROPAGATION_SUPPORTS:支持当前事务,如果当前没有事务,就以非事务方式执行。
-
PROPAGATION_MANDATORY:支持当前事务,如果当前没有事务,就抛出异常。
-
PROPAGATION_REQUIRES_NEW:新建事务,如果当前存在事务,把当前事务挂起。
-
PROPAGATION_NOT_SUPPORTED:以非事务方式执行操作,如果当前存在事务,就把当前事务挂起。
-
PROPAGATION_NEVER:以非事务方式执行,如果当前存在事务,则抛出异常。
虽然有7种,但是常用的就第一种REQUIRED和第四种REQUIRES_NEW
4、编程式事务
所谓编程式事务指的是通过编码方式实现事务,即类似于JDBC编程实现事务管理。管理使用TransactionTemplate或者直接使用底层的
PlatformTransactionManager。对于编程式事务管理,spring推荐使用TransactionTemplate。
流程
-
创建事务管理器
<?xml version="1.0" encoding="UTF-8"?> <beans xmlns="http://www.springframework.org/schema/beans" xmlns:xsi="http://www.w3.org/2001/XMLSchema-instance" xmlns:content="http://www.springframework.org/schema/context" xmlns:tx="http://www.springframework.org/schema/tx" xmlns:aop="http://www.springframework.org/schema/aop" xsi:schemaLocation="http://www.springframework.org/schema/beans http://www.springframework.org/schema/beans/spring-beans.xsd http://www.springframework.org/schema/context https://www.springframework.org/schema/context/spring-context.xsd http://www.springframework.org/schema/tx http://www.springframework.org/schema/tx/spring-tx.xsd http://www.springframework.org/schema/aop https://www.springframework.org/schema/aop/spring-aop.xsd"> <content:property-placeholder location="classpath:db.properties"/> <content:component-scan base-package="transaction"/> <bean id="dataSource" class="org.springframework.jdbc.datasource.DriverManagerDataSource"> <property name="driverClassName" value="${jdbc.driver}"/> <property name="url" value="${jdbc.url}"/> <property name="username" value="${jdbc.username}"/> <property name="password" value="${jdbc.password}"/> </bean> <bean class="org.springframework.jdbc.core.JdbcTemplate" id="jdbcTemplate"> <property name="dataSource" ref="dataSource"/> </bean> <bean id="userTest" class="transaction.UserTestImpl"/> <bean class="org.springframework.jdbc.datasource.DataSourceTransactionManager" id="transactionManager"> <property name="dataSource" ref="dataSource"/> </bean> <!-- 创建事务模板类 , 创建事务管理器模板--> <bean class="org.springframework.transaction.support.TransactionTemplate" id="transactionTemplate"> <property name="transactionManager" ref="transactionManager"/> </bean> </beans> -
创建事务类及其实例
package transaction; import org.springframework.beans.factory.annotation.Autowired; import org.springframework.jdbc.core.JdbcTemplate; import org.springframework.stereotype.Component; import org.springframework.transaction.annotation.Transactional; import org.springframework.transaction.support.TransactionCallback; import org.springframework.transaction.support.TransactionTemplate; import java.util.Map; @Component public class UserTestImpl implements UserTest{ private JdbcTemplate jdbcTemplate; private TransactionTemplate transactionTemplate; @Autowired//set注入 public void setTransactionTemplate(TransactionTemplate transactionTemplate){ this.transactionTemplate=transactionTemplate; } @Autowired public void setJdbcTemplate(JdbcTemplate jdbcTemplate){ this.jdbcTemplate=jdbcTemplate; } @Override public void exchange() { transactionTemplate.execute(transactionStatus -> { String sql="update springboot.people set bid=bid+1 where id=?"; jdbcTemplate.update(sql,1); int i=10/0; String sql1="update springboot.people set bid=bid-1 where id=?"; jdbcTemplate.update(sql1,2); return null; }); } } -
测试
@Test
  public void test0(){
      ClassPathXmlApplicationContext context = new ClassPathXmlApplicationContext("bean3.xml");
      UserTest userTest = context.getBean("userTest", UserTest.class);
      userTest.exchange();
  }
5、声明式事务
就是在aop的基础上,受aop管理的。其本质是对方法前后进行拦截,然后在目标方法开始之前创建或者加入一个事务,在执行完目标方法之后根据执行情况提交或者回滚事务。声明式事务最大的优点就是不需要通过编程的方式管理事务,这样就不需要在业务逻辑代码中掺杂事务管理的代码,只需在配置文件中做相关的事务规则声明(或通过基于@Transactional注解的方式),便可以将事务规则应用到业务逻辑中。
流程
-
添加事务管理器
-
添加事务设置
<?xml version="1.0" encoding="UTF-8"?> <beans xmlns="http://www.springframework.org/schema/beans" xmlns:xsi="http://www.w3.org/2001/XMLSchema-instance" xmlns:content="http://www.springframework.org/schema/context" xmlns:tx="http://www.springframework.org/schema/tx" xmlns:aop="http://www.springframework.org/schema/aop" xsi:schemaLocation="http://www.springframework.org/schema/beans http://www.springframework.org/schema/beans/spring-beans.xsd http://www.springframework.org/schema/context https://www.springframework.org/schema/context/spring-context.xsd http://www.springframework.org/schema/tx http://www.springframework.org/schema/tx/spring-tx.xsd http://www.springframework.org/schema/aop https://www.springframework.org/schema/aop/spring-aop.xsd"> <!--将db.properties文件注入--> <content:property-placeholder location="classpath:db.properties"/> <!-- 开启扫描器--> <content:component-scan base-package="transaction"/> <!-- 创建dataSource--> <bean id="dataSource" class="org.springframework.jdbc.datasource.DriverManagerDataSource"> <property name="driverClassName" value="${jdbc.driver}"/> <property name="url" value="${jdbc.url}"/> <property name="username" value="${jdbc.username}"/> <property name="password" value="${jdbc.password}"/> </bean> <!--jdbcTemplate用于操作数据库--> <bean class="org.springframework.jdbc.core.JdbcTemplate" id="jdbcTemplate"> <property name="dataSource" ref="dataSource"/> </bean> <bean id="userTest" class="transaction.UserTestImpl"/> <!-- 创建事务管理器--> <bean class="org.springframework.jdbc.datasource.DataSourceTransactionManager" id="transactionManager"> <property name="dataSource" ref="dataSource"/> </bean> <!-- 添加事务--> <tx:advice transaction-manager="transactionManager" id="interceptor"> <tx:attributes> <tx:method name="exchange" propagation="REQUIRED"/> </tx:attributes> </tx:advice> <aop:config> <aop:pointcut id="p" expression="execution(* transaction.*.*(..))"/> <aop:advisor advice-ref="interceptor" pointcut-ref="p"/> </aop:config> </beans> -
创建事务类
 package transaction;
 public interface UserTest {
           public void exchange();
  }
package transaction; import org.springframework.beans.factory.annotation.Autowired; import org.springframework.jdbc.core.JdbcTemplate; import org.springframework.stereotype.Component; import org.springframework.transaction.annotation.Transactional; import java.util.Map; @Component @Transactional public class UserTestImpl implements UserTest{ private JdbcTemplate jdbcTemplate; @Autowired public void setJdbcTemplate(JdbcTemplate jdbcTemplate){ this.jdbcTemplate=jdbcTemplate; } @Override public void exchange() { String sql="update springboot.people set bid=bid+1 where id=?"; jdbcTemplate.update(sql,1); int i=10/0; String sql1="update springboot.people set bid=bid-1 where id=?"; jdbcTemplate.update(sql1,2); } } -
测试
  @Test
  public void test0(){
    ClassPathXmlApplicationContext context = new  ClassPathXmlApplicationContext("bean3.xml");
  UserTest userTest = context.getBean("userTest", UserTest.class);
  userTest.exchange();
}
可以发现当异常产生后,两个用户的值都没有改变,这就是事务的回滚机制所在。


 416
416


 被折叠的 条评论
为什么被折叠?
被折叠的 条评论
为什么被折叠?
 到【灌水乐园】发言


