


torchvision中的transforms模块可以完成对图片的变换。
给定一张图片,位置为./imgs/dog.png
1. 使用Image.open()打开图片
from PIL import Image
path = './imgs/dog.png'
img_PIL = Image.open(path)
查看图片:
img_PIL.show()
查看属性:
>>> img_PIL
<PIL.PngImagePlugin.PngImageFile image mode=RGB size=500x667>

# 返回图像尺寸
>>> img_PIL.size
(500, 667)

# 返回图像模式
>>> img_PIL.format
'PNG'
>>> img_PIL.mode
'RGB'
2. PIL.Image转换成numpy.ndarray
使用numpy.array()进行转换的代码:
img_array = np.array(img_PIL)
查看转换结果:
# 查看数组
>>> img_array
array([[[ 38,  96, 163],
        [ 38,  96, 163],
        [ 38,  96, 163],
        ...,
        [ 39,  99, 163],
        [ 39,  99, 163],
        [ 39,  99, 163]],
       ...,
       [[203, 206, 205],
        [191, 193, 192],
        [195, 198, 197],
        ...,
        [222, 223, 218],
        [233, 234, 229],
        [239, 239, 235]]], dtype=uint8)

# 查看数组的尺寸
>>> img_array.shape
(667, 500, 3)

# 查看数组的类型
>>> img_array.dtype
dtype('uint8')

# 使用matplotlib模块显示图像
>>> from matplotlib import pyplot as plt
Backend QtAgg is interactive backend. Turning interactive mode on.
>>> plt.imshow(img_array)
Out[26]: <matplotlib.image.AxesImage at 0x281fb507e50>
>>> plt.show()
转换为数组后,元素的取值在[0, 255]之间,元素的类型为unit8
3. PIL.Image转换为torch.FloadTensor
使用torchvision.transforms.ToTensor()进行转换的代码:
from torchvision import transforms

trans_totensor = transforms.ToTensor()
img_tensor = trans_totensor(img_PIL)
查看转换结果:
>>> img_tensor
tensor([[[0.1490, 0.1490, 0.1490,  ..., 0.1529, 0.1529, 0.1529],
         [0.1490, 0.1490, 0.1490,  ..., 0.1529, 0.1529, 0.1529],
         [0.1490, 0.1490, 0.1490,  ..., 0.1529, 0.1529, 0.1529],
         ...,
         [0.7255, 0.7647, 0.8078,  ..., 0.8275, 0.8784, 0.9059],
         [0.7529, 0.7569, 0.7961,  ..., 0.8510, 0.8902, 0.9176],
         [0.7961, 0.7490, 0.7647,  ..., 0.8706, 0.9137, 0.9373]],
        [[0.3765, 0.3765, 0.3765,  ..., 0.3882, 0.3882, 0.3882],
         [0.3765, 0.3765, 0.3765,  ..., 0.3882, 0.3882, 0.3882],
         [0.3765, 0.3765, 0.3765,  ..., 0.3882, 0.3882, 0.3882],
         ...,
         [0.7333, 0.7765, 0.8157,  ..., 0.8275, 0.8784, 0.9059],
         [0.7608, 0.7647, 0.8078,  ..., 0.8510, 0.8902, 0.9176],
         [0.8078, 0.7569, 0.7765,  ..., 0.8745, 0.9176, 0.9373]],
        [[0.6392, 0.6392, 0.6392,  ..., 0.6392, 0.6392, 0.6392],
         [0.6392, 0.6392, 0.6392,  ..., 0.6392, 0.6392, 0.6392],
         [0.6392, 0.6392, 0.6392,  ..., 0.6392, 0.6392, 0.6392],
         ...,
         [0.7294, 0.7725, 0.8118,  ..., 0.8196, 0.8706, 0.8980],
         [0.7569, 0.7608, 0.8039,  ..., 0.8431, 0.8824, 0.9098],
         [0.8039, 0.7529, 0.7725,  ..., 0.8549, 0.8980, 0.9216]]])

# 查看tensor的尺寸
>>> img_tensor.shape
Out[15]: torch.Size([3, 667, 500])

# 查看元素类型
>>> img_tensor.dtype
Out[16]: torch.float32
4. 将numpy.ndarray转换为torch.FloadTensor
使用torchvision.transforms.ToTensor()进行转换的代码:
trans_totensor = transforms.ToTensor()
img_tensor = trans_totensor(img_array)
查看转换结果:
>>> img_tensor
Out[18]:
tensor([[[0.1490, 0.1490, 0.1490,  ..., 0.1529, 0.1529, 0.1529],
         [0.1490, 0.1490, 0.1490,  ..., 0.1529, 0.1529, 0.1529],
         [0.1490, 0.1490, 0.1490,  ..., 0.1529, 0.1529, 0.1529],
         ...,
         [0.7255, 0.7647, 0.8078,  ..., 0.8275, 0.8784, 0.9059],
         [0.7529, 0.7569, 0.7961,  ..., 0.8510, 0.8902, 0.9176],
         [0.7961, 0.7490, 0.7647,  ..., 0.8706, 0.9137, 0.9373]],
        [[0.3765, 0.3765, 0.3765,  ..., 0.3882, 0.3882, 0.3882],
         [0.3765, 0.3765, 0.3765,  ..., 0.3882, 0.3882, 0.3882],
         [0.3765, 0.3765, 0.3765,  ..., 0.3882, 0.3882, 0.3882],
         ...,
         [0.7333, 0.7765, 0.8157,  ..., 0.8275, 0.8784, 0.9059],
         [0.7608, 0.7647, 0.8078,  ..., 0.8510, 0.8902, 0.9176],
         [0.8078, 0.7569, 0.7765,  ..., 0.8745, 0.9176, 0.9373]],
        [[0.6392, 0.6392, 0.6392,  ..., 0.6392, 0.6392, 0.6392],
         [0.6392, 0.6392, 0.6392,  ..., 0.6392, 0.6392, 0.6392],
         [0.6392, 0.6392, 0.6392,  ..., 0.6392, 0.6392, 0.6392],
         ...,
         [0.7294, 0.7725, 0.8118,  ..., 0.8196, 0.8706, 0.8980],
         [0.7569, 0.7608, 0.8039,  ..., 0.8431, 0.8824, 0.9098],
         [0.8039, 0.7529, 0.7725,  ..., 0.8549, 0.8980, 0.9216]]])
注:ToTensor 通过 o u t = i n p u t / 255 out = input/255 out=input/255将图像的值从[0, 255]缩放到 [0, 1] 。
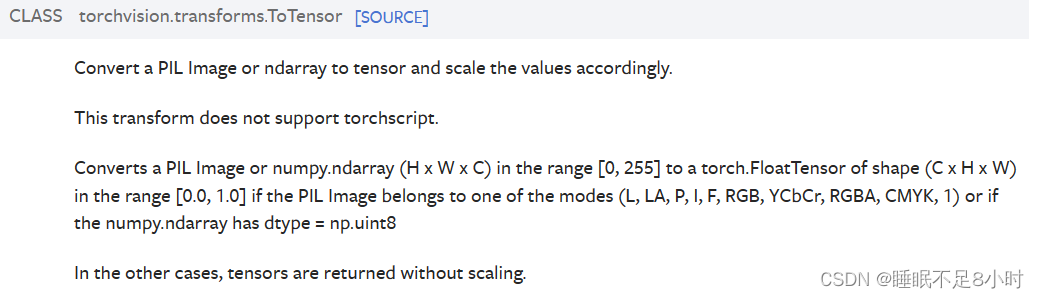
附:pytorch官网关于ToTensor的使用说明
翻译过来就是,如果PIL.Image的模式属于L、LA、P、I、F、RGB、YCbCr、RGBA、CMYK、1)之一,或者numpy.ndarray的dtype=np.unit8,使用torchvision.transforms.ToTensor可以将PIL图像或numpy.ndarray(尺寸为H x W x C)转换为torch.FloatTensor,元素取值在[0.0, 1.0]之间。
5. 将numpy.ndarray或Tensor转换为PIL.Image
使用 torchvision.transforms.ToPILImage转换的代码:
trans_ToPILImage = transforms.ToPILImage()
img_PIL = trans_ToPILImage(img_tensor)
查看转换结果:
>>> img_PIL
Out[22]: <PIL.Image.Image image mode=RGB size=500x667>
以上是我在查阅资料之后进行的总结,如果不妥或错误之处,欢迎大家批评指正!!


 459
459


 被折叠的 条评论
为什么被折叠?
被折叠的 条评论
为什么被折叠?
 到【灌水乐园】发言


