


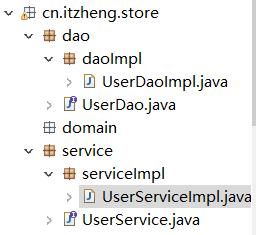
dao和service的创建和实现
1、在dao下创建接口UserDao,在dao下创建一个包daoimpl在这个包下创建一个类UserDaoImpl实现UserDao类
2、在service下创建接口UserService,在service包下创建一个包serviceImpl,在这个包内创建一个类实现UserService该接口
在Servlet下创建一个UserServlet并继承BaseServlet
package cn.itzheng.store.web.servlet;

import java.io.IOException;
import javax.servlet.ServletException;
import javax.servlet.http.HttpServlet;
import javax.servlet.http.HttpServletRequest;
import javax.servlet.http.HttpServletResponse;

import cn.itzheng.store.web.base.BaseServlet;

/**
 * Servlet implementation class UserServlet
 */
public class UserServlet extends BaseServlet {

	public void doGet(HttpServletRequest request, HttpServletResponse response) throws ServletException, IOException {
		// TODO Auto-generated method stub
		response.getWriter().append("Served at: ").append(request.getContextPath());
	}


	public void doPost(HttpServletRequest request, HttpServletResponse response) throws ServletException, IOException {
		// TODO Auto-generated method stub
		doGet(request, response);
	}

}
在domain下创建User类,要根据对应user表的数据库创建
package cn.itzheng.store.domain;
import java.util.Date;
public class User {
	// 安装数据库创建
	private String uid;
	private String password;
	private String name;
	private String email;
	private String telephone;
	private Date birthday;
	private String sex;
	private int state;
	private String code;
	public String getUid() {
		return uid;
	}
	public void setUid(String uid) {
		this.uid = uid;
	}
	public String getPassword() {
		return password;
	}
	public void setPassword(String password) {
		this.password = password;
	}
	public String getName() {
		return name;
	}
	public void setName(String name) {
		this.name = name;
	}
	public String getEmail() {
		return email;
	}
	public void setEmail(String email) {
		this.email = email;
	}
	public String getTelephone() {
		return telephone;
	}
	public void setTelephone(String telephone) {
		this.telephone = telephone;
	}
	public Date getBirthday() {
		return birthday;
	}
	public void setBirthday(Date birthday) {
		this.birthday = birthday;
	}
	public String getSex() {
		return sex;
	}
	public void setSex(String sex) {
		this.sex = sex;
	}
	public int getState() {
		return state;
	}
	public void setState(int state) {
		this.state = state;
	}
	public String getCode() {
		return code;
	}
	public void setCode(String code) {
		this.code = code;
	}
	public User() {
		// TODO Auto-generated constructor stub
	}
	public User(String uid, String password, String name, String email, String telephone, Date birthday, String sex,
			int state, String code) {
		super();
		this.uid = uid;
		this.password = password;
		this.name = name;
		this.email = email;
		this.telephone = telephone;
		this.birthday = birthday;
		this.sex = sex;
		this.state = state;
		this.code = code;
	}
	@Override
	public String toString() {
		return "User [uid=" + uid + ", password=" + password + ", name=" + name + ", email=" + email + ", telephone="
				+ telephone + ", birthday=" + birthday + ", sex=" + sex + ", state=" + state + ", code=" + code + "]";
	}

}
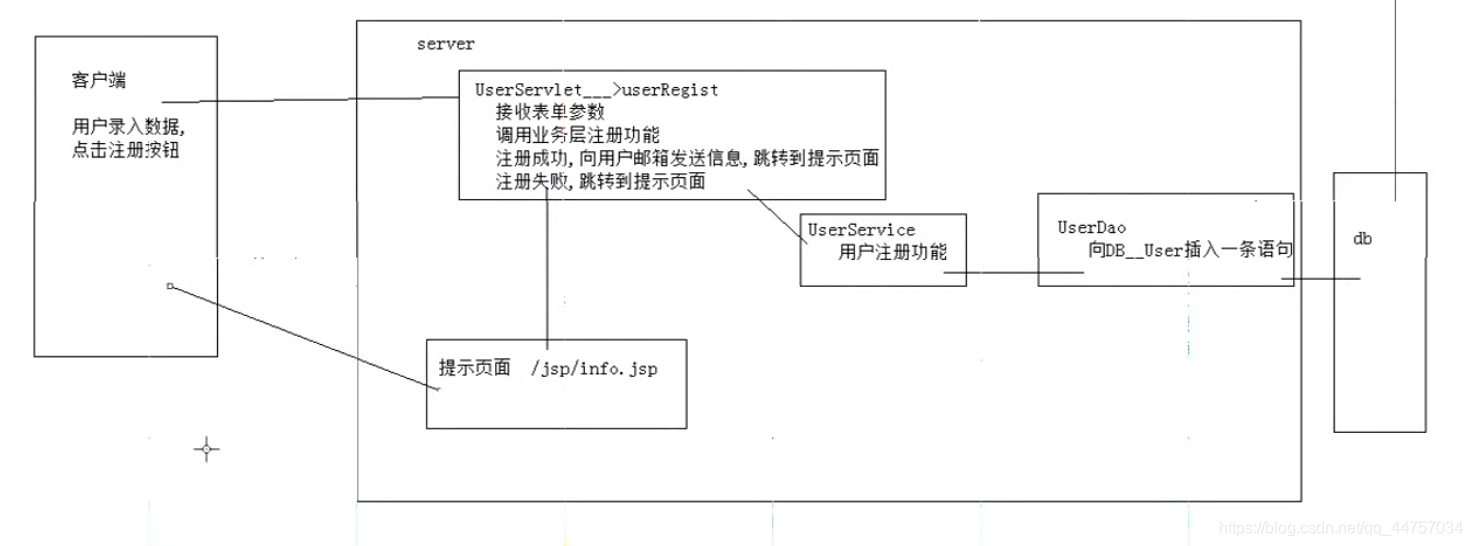
功能:用户注册:
开发约定:
为了项目管理方便,不会从客户端直接发起到jsp页面。
先请求到Servlet,在由Servlet转发到JSP页面。
1、页面路径跳转
在index。

UserServlet先执行父类的init方法和service方法,之后在执行该方法,
jsp的method 会统一发现这里的,并发送到父类BaseServlet的service 方法当中
BaseServlet通过this.getclass的方式获取到该UserServlet类字节码文件名获取到该方法而执行该方法(执行什么方法由jsp页面传入的method来决定)
package cn.itzheng.store.web.servlet;
import java.io.IOException;
import javax.servlet.ServletException;
import javax.servlet.http.HttpServlet;
import javax.servlet.http.HttpServletRequest;
import javax.servlet.http.HttpServletResponse;
import cn.itzheng.store.web.base.BaseServlet;
/**
 * Servlet implementation class UserServlet
 */
public class UserServlet extends BaseServlet {
	public String registUI(HttpServletRequest request, HttpServletResponse response) throws ServletException, IOException {
		// TODO Auto-generated method stub
		return "/jsp/register.jsp";
	}
}
上面页面点击注册之后跳转到对应的注册页面
2、注册功能原理分析
3、开发步骤约定(普通MVC功能)
(1)准备工作(表单属性设置,链接的拼接,Ajax编写)
准备工作实现完毕之后,可以从客户端向服务端发起请求。
(2)实现Servlet
明确要实现的功能,中文注释,代码
(3)service_dao
(4)jsp页面
PS:为了方便断点调试eclipse==》window===》 preferences ====》

4、步骤实现
注册页面改变
<%@ page language="java" contentType="text/html; charset=UTF-8"
	pageEncoding="UTF-8"%>
<!doctype html>
<html>
<head></head>
<meta charset="utf-8" />
<meta name="viewport" content="width=device-width, initial-scale=1">
<title>会员注册</title>
<link rel="stylesheet"
	href="${pageContext.request.contextPath}/css/bootstrap.min.css"
	type="text/css" />
<script src="${pageContext.request.contextPath}/js/jquery-1.11.3.min.js"
	type="text/javascript"></script>
<script src="${pageContext.request.contextPath}/js/bootstrap.min.js"
	type="text/javascript"></script>
<!-- 引入自定义css文件 style.css -->
<link rel="stylesheet"
	href="${pageContext.request.contextPath}/css/style.css" type="text/css" />
<style>
body {
	margin-top: 20px;
	margin: 0 auto;
}

.carousel-inner .item img {
	width: 100%;
	height: 300px;
}

.container .row div {
	/* position:relative;
	 float:left; */
}
font {
	color: #3164af;
	font-size: 18px;
	font-weight: normal;
	padding: 0 10px;
}
</style>
</head>
<body>
	<!--
            	描述:菜单栏
            -->
	<div class="container-fluid">
		<div class="col-md-4">
			<img src="${pageContext.request.contextPath}/img/logo2.png" />
		</div>
		<div class="col-md-5">
			<img src="${pageContext.request.contextPath}/img/header.png" />
		</div>
		<div class="col-md-3" style="padding-top: 20px">
			<ol class="list-inline">
				<li><a href="${pageContext.request.contextPath}/jsp/login.jsp">登录</a></li>
				<li><a
					href="${pageContext.request.contextPath}/jsp/register.jsp">注册</a></li>
				<li><a href="${pageContext.request.contextPath}/jsp/cart.jsp">购物车</a></li>
				<li><a
					href="${pageContext.request.contextPath}/jsp/order_list.jsp">我的订单</a></li>
			</ol>
		</div>
	</div>
	<!--
            	描述:导航条
            -->
	<div class="container-fluid">
		<nav class="navbar navbar-inverse">
			<div class="container-fluid">
				<!-- Brand and toggle get grouped for better mobile display -->
				<div class="navbar-header">
					<button type="button" class="navbar-toggle collapsed"
						data-toggle="collapse" data-target="#bs-example-navbar-collapse-1"
						aria-expanded="false">
						<span class="sr-only">Toggle navigation</span> <span
							class="icon-bar"></span> <span class="icon-bar"></span> <span
							class="icon-bar"></span>
					</button>
					<a class="navbar-brand" href="#">首页</a>
				</div>

				<!-- Collect the nav links, forms, and other content for toggling -->
				<div class="collapse navbar-collapse"
					id="bs-example-navbar-collapse-1">
					<ul class="nav navbar-nav">
						<li class="active"><a href="#">手机数码<span class="sr-only">(current)</span></a></li>
						<li><a href="#">电脑办公</a></li>
						<li><a href="#">电脑办公</a></li>
						<li><a href="#">电脑办公</a></li>
					</ul>
					<form class="navbar-form navbar-right" role="search">
						<div class="form-group">
							<input type="text" class="form-control" placeholder="Search">
						</div>
						<button type="submit" class="btn btn-default">Submit</button>
					</form>

				</div>
				<!-- /.navbar-collapse -->
			</div>
			<!-- /.container-fluid -->
		</nav>
	</div>
	<div class="container"
		style="width:100%;background:url('${pageContext.request.contextPath}/img/regist_bg.jpg');">
		<div class="row">
			<div class="col-md-2"></div>
			<div class="col-md-8"
				style="background: #fff; padding: 40px 80px; margin: 30px; border: 7px solid #ccc;">
				<font>会员注册</font>USER REGISTER
				<!-- ${pageContext.request.contextPath}取到当前项目的路径,在这里相当于/store_v5 -->
				<form class="form-horizontal" style="margin-top: 5px;" action="${pageContext.request.contextPath}/UserServlet?method=userRegist" method="post">
					<div class="form-group">
						<label for="username" class="col-sm-2 control-label">用户名</label>
						<div class="col-sm-6">
							<input type="text" name="username" class="form-control" id="username"
								placeholder="请输入用户名">
						</div>
					</div>
					<div class="form-group">
						<label for="inputPassword3"  class="col-sm-2 control-label">密码</label>
						<div class="col-sm-6">
							<input type="password" name="password" class="form-control" id="inputPassword3"
								placeholder="请输入密码">
						</div>
					</div>
					<div class="form-group">
						<label for="confirmpwd" class="col-sm-2 control-label">确认密码</label>
						<div class="col-sm-6">
							<input type="password" class="form-control" id="confirmpwd"
								placeholder="请输入确认密码">
						</div>
					</div>
					<div class="form-group">
						<label for="inputEmail3" class="col-sm-2 control-label">Email</label>
						<div class="col-sm-6">
							<input type="email" name="email" class="form-control" id="inputEmail3"
								placeholder="Email">
						</div>
					</div>
					<div class="form-group">
						<label for="usercaption" class="col-sm-2 control-label">姓名</label>
						<div class="col-sm-6">
							<input type="text" name="name" class="form-control" id="usercaption"
								placeholder="请输入姓名">
						</div>
					</div>
					<div class="form-group opt">
						<label for="inlineRadio1" class="col-sm-2 control-label">性别</label>
						<div class="col-sm-6">
							<label class="radio-inline"> <input type="radio"
								name="sex" id="inlineRadio1" value="男"  checked="checked" >
								男
							</label> <label class="radio-inline"> <input type="radio"
								name="sex" id="inlineRadio2" value="女">
								女
							</label>
						</div>
					</div>
					<div class="form-group">
						<label for="date" class="col-sm-2 control-label">出生日期</label>
						<div class="col-sm-6">
							<input type="date" class="form-control" name="birthday">
						</div>
					</div>

					<div class="form-group">
						<label for="date" class="col-sm-2 control-label">验证码</label>
						<div class="col-sm-3">
							<input type="text" class="form-control">

						</div>
						<div class="col-sm-2">
							<img src="${pageContext.request.contextPath}/img/captcha.jhtml" />
						</div>

					</div>

					<div class="form-group">
						<div class="col-sm-offset-2 col-sm-10">
							<input type="submit" width="100" value="注册" name="submit"
								border="0"
								style="background: url('${pageContext.request.contextPath}/img/register.gif') no-repeat scroll 0 0 rgba(0, 0, 0, 0);
				    height:35px;width:100px;color:white;">
						</div>
					</div>
				</form>
			</div>

			<div class="col-md-2"></div>

		</div>
	</div>
	<div style="margin-top: 50px;">
		<img src="${pageContext.request.contextPath}/img/footer.jpg"
			width="100%" height="78" alt="我们的优势" title="我们的优势" />
	</div>

	<div style="text-align: center; margin-top: 5px;">
		<ul class="list-inline">
			<li><a href="${pageContext.request.contextPath}/jsp/info.jsp">关于我们</a></li>
			<li><a>联系我们</a></li>
			<li><a>招贤纳士</a></li>
			<li><a>法律声明</a></li>
			<li><a>友情链接</a></li>
			<li><a target="_blank">支付方式</a></li>
			<li><a target="_blank">配送方式</a></li>
			<li><a>服务声明</a></li>
			<li><a>广告声明</a></li>
		</ul>
	</div>
</body>
</html>
setAttribute这个方法,在JSP内置对象session和request都有这个方法,这个方法作用就是保存数据,然后还可以用getAttribute方法来取出。
比如现在又个User对象,User curruser = new User(“zhangsan”, 20, “男”);
1,request.setAttribute(“curruser”, curruser)这个方法是将curruser这个对象保存在request作用域中,然后在转发进入的页面就可以获取到你的值,如果你会一些框架的话,那些框架标签也可以获取到,比如struts标签,还有jstl。如果这你都不会的话,那么你可以在jsp页面编写java小脚本来获取:<% User myuser = (User)request.getAttribute(“curruser”)%>,在jsp页面显示值:<%=myuser.getName()%>。
2,session.setAttribute(“curruser”, curruser)。这个方法和上面唯一的区别就是作用域,就是在你整个程序启动的时候,如果在session中保存了数据,那么在你这个无论你在哪个页面,在什么时候都可以获取到这个值,全局的,只要你的这个程序是启动的。session默认的过期时间是30分钟,过期无效,可以去修改这个值。
UserServlet -->userRegist
依次实现service和dao
package cn.itzheng.store.web.servlet;
import java.io.IOException;
import java.lang.reflect.InvocationTargetException;
import java.util.Iterator;
import java.util.Map;
import java.util.Map.Entry;
import java.util.Set;
import javax.servlet.ServletException;
import javax.servlet.http.HttpServlet;
import javax.servlet.http.HttpServletRequest;
import javax.servlet.http.HttpServletResponse;
import org.apache.commons.beanutils.BeanUtils;
import org.apache.commons.beanutils.ConvertUtils;
import org.apache.commons.beanutils.converters.DateConverter;
import cn.itzheng.store.domain.User;
import cn.itzheng.store.service.UserService;
import cn.itzheng.store.service.serviceImpl.UserServiceImpl;
import cn.itzheng.store.utils.MyBeanUtils;
import cn.itzheng.store.utils.UUIDUtils;
import cn.itzheng.store.web.base.BaseServlet;
/**
 * Servlet implementation class UserServlet
 */
public class UserServlet extends BaseServlet {
	// jsp的method 会统一发现这里的,并发送到父类的service 方法当中
	// 先执行父类的init方法和service方法,之后在执行该方法,
	// BaseServlet通过this.getclass的方式获取到该类字节码文件名获取到该方法而执行该方法(执行什么方法由jsp页面传入的method来决定)
	public String registUI(HttpServletRequest request, HttpServletResponse response)
			throws ServletException, IOException {
		// TODO Auto-generated method stub
		return "/jsp/register.jsp";
	}
	// userRegist
	public String userRegist(HttpServletRequest request, HttpServletResponse response)
			throws ServletException, IOException, Exception {
		// 接收业务注册功能
		// 遍历map
		Map<String, String[]> map = request.getParameterMap();// 获取页面上的键值对数据
		User user = new User();
		user.setUid(UUIDUtils.getId());
		user.setState(0);
		user.setCode(UUIDUtils.getCode());
		MyBeanUtils.populate(user, map);// 调用MyBeanUtils的populate静态方法
		System.out.println(user);
		/*
		 * // 1_创建时间类型的转换器 DateConverter dt = new DateConverter();//
		 * 用来设置BeanUtils当中对应的获得时间的格式 // 2_设置转换的格式 dt.setPattern("yyyy-MM-dd"); //
		 * 3_注册转换器 ConvertUtils.register(dt, java.util.Date.class);
		 *
		 * BeanUtils.populate(user, map);//将map当中的数据通过populate放入到user
		 *
		 * System.out.println(user);
		 *
		 * Set<String> keySet = map.keySet();// 将map当中的key集合放入到keySet的set集合当中
		 * Iterator<String> iterator = keySet.iterator(); while (iterator.hasNext()) {
		 * String str = iterator.next();// 获取到每一个key System.out.println(str); String[]
		 * strs = map.get(str);// 通过键获取到每一个值 for (String string : strs) {
		 * System.out.println(string); } System.out.println();
		 *
		 * }
		 */
		// 调用业务注册功能
		UserService userservice = new UserServiceImpl();
		try {
			userservice.userRegist(user);
			// 注册注册成功,向用户邮箱发送信息,跳转到提示页面
			// 发送邮件
			//
			request.setAttribute("msg", "用户注册成功,请激活");
		} catch (Exception e) {
			// 注册失败,跳转到提示页面
			request.setAttribute("msg", "用户注册失败,请重新注册");
		}
		return "/jsp/info.jsp";
	}
}
package cn.itzheng.store.service;

import java.sql.SQLException;

import cn.itzheng.store.domain.User;

public interface UserService {

	void userRegist(User user) throws SQLException;

}
package cn.itzheng.store.service.serviceImpl;

import java.sql.SQLException;

import cn.itzheng.store.dao.UserDao;
import cn.itzheng.store.dao.daoImpl.UserDaoImpl;
import cn.itzheng.store.domain.User;
import cn.itzheng.store.service.UserService;

public class UserServiceImpl implements UserService {

	@Override
	public void userRegist(User user)throws SQLException {
		// TODO Auto-generated method stub
		// 实现注册功能
		UserDao userDao = new UserDaoImpl();
		userDao.userRegist(user) ;
	}

}
package cn.itzheng.store.dao;

import java.sql.SQLException;

import cn.itzheng.store.domain.User;

public interface UserDao {

	void userRegist(User user) throws SQLException;

}
package cn.itzheng.store.dao.daoImpl;

import java.sql.SQLException;

import org.apache.commons.dbutils.QueryRunner;

import cn.itzheng.store.dao.UserDao;
import cn.itzheng.store.domain.User;
import cn.itzheng.store.utils.JDBCUtils;

public class UserDaoImpl implements UserDao {

	@Override
	public void userRegist(User user) throws SQLException {
		// TODO Auto-generated method stub

		String sql = "insert into user values(?,?,?,?,?,?,?,?,?,?);";
		QueryRunner qr = new QueryRunner(JDBCUtils.getDataSource());
		// 将user当中的数据放入到Object对象的数组当中
		Object[] params = { user.getUid(), user.getUsername(), user.getPassword(), user.getName(), user.getEmail(),
				user.getTelephone(), user.getBirthday(), user.getSex(), user.getState(), user.getCode() };
		qr.update(sql, params);// 通过dbutils当中QueryRunner的update方法将数据与对应的SQL语句的问号匹配

	}
}


 424
424


 被折叠的 条评论
为什么被折叠?
被折叠的 条评论
为什么被折叠?
 到【灌水乐园】发言


