


提示:文章写完后,目录可以自动生成,如何生成可参考右边的帮助文档
文章目录
前言
需求需要为公司项目统一添加健康检查,存在很多微服务,难道要一个一个的修改配置文件吗?
可以使用公共配置文件,修改公共配置文件,做到一处修改,处处更新;
一、使用步骤
1.引入依赖
根pom.xml依赖管理:
<dependency>
    <groupId>org.springframework.boot</groupId>
    <artifactId>spring-boot-dependencies</artifactId>
    <version>${spring-boot.version}</version>
    <type>pom</type>
    <scope>import</scope>
</dependency>

项目 pom.xml引入依赖
<dependency>
    <groupId>org.springframework.boot</groupId>
    <artifactId>spring-boot-starter-actuator</artifactId>
</dependency>
2.配置文件
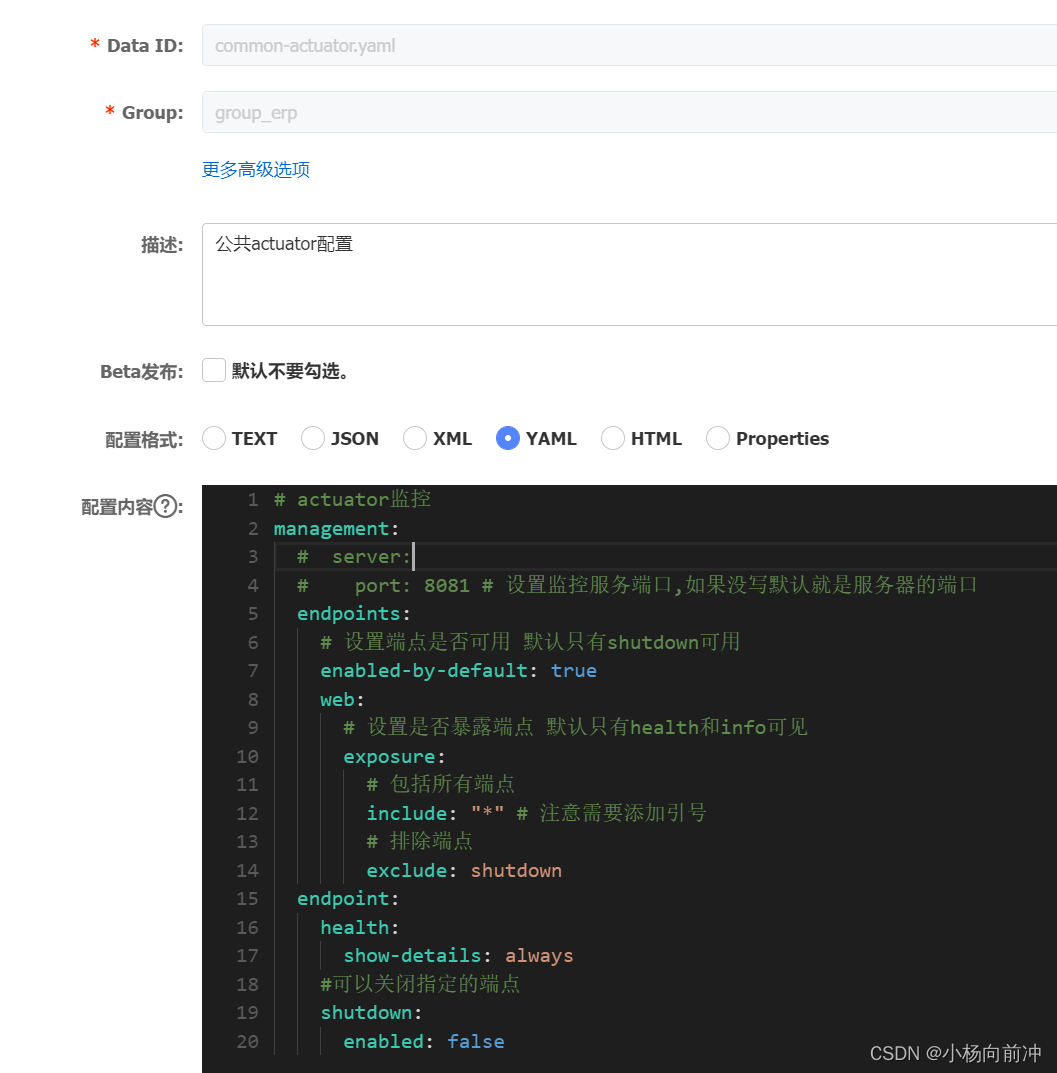
抽取公共配置文件再引入或,将以下配置直接添加到现有配置文件中
#actuator监控
management:
  #  server:
  #    port: 8081 # 设置监控服务端口,如果没写默认就是服务器的端口
  endpoints:
    # 设置端点是否可用 默认只有shutdown可用
    enabled-by-default: true
    web:
      # 设置是否暴露端点 默认只有health和info可见
      exposure:
        # 包括所有端点
        include: "*" # 注意需要添加引号
        # 排除端点
        exclude: shutdown
      #访问地址
      #base-path: /actuator #默认
  endpoint:
    health:
      show-details: always
    #可以关闭指定的端点
    shutdown:
      enabled: false
2.1 直接添加到现有配置文件中
略
2.2 抽取公共配置文件再引入
- 创建公共配置文件
-
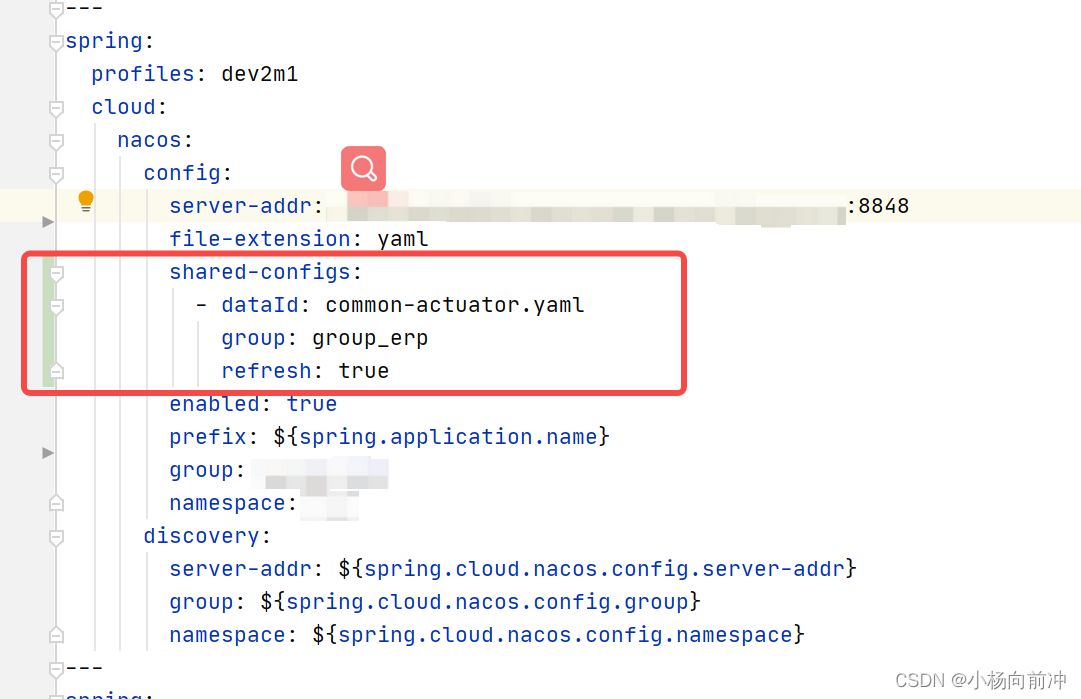
- bootstrap.yaml 引入
shared-configs 共享配置
dataId;group;refresh;
3. 启动项目,访问地址
3.1 查询支持的检测
ip:port/actuator --> http://127.0.0.1:9333/actuator
{
  "_links": {
      其他 ....
      "health": {
          "href": "http://127.0.0.1:9333/actuator/health",
          "templated": false
      },
      其他 ....
  }
}
3.2 健康检测查询地址
ip:port/actuator/health --> http://127.0.0.1:9333/actuator/health
{
    "status": "DOWN",
    "components": {
        "db": {
            "status": "UP",
            "details": {
                "database": "MySQL",
                "validationQuery": "isValid()"
            }
        },
        "discoveryComposite": {
            "status": "UP",
            "components": {
                "discoveryClient": {
                    "status": "UP",
                    "details": {
                        "services": [
                            "erpa",
                            "erpb",
                            "mfc",
                            "erpd",
                            "erpe",
                            "erpf"
                        ]
                    }
                }
            }
        },
        "diskSpace": {
            "status": "UP",
            "details": {
                "total": 322122543104,
                "free": 227919015936,
                "threshold": 10485760,
                "exists": true
            }
        },
        "elasticsearch": {
            "status": "DOWN",
            "details": {
                "error": "java.net.ConnectException: Timeout connecting to [localhost/127.0.0.1:9200]"
            }
        },
        "nacosConfig": {
            "status": "UP"
        },
        "nacosDiscovery": {
            "status": "UP"
        },
        "ping": {
            "status": "UP"
        },
        "redis": {
            "status": "UP",
            "details": {
                "version": "5.0.13"
            }
        },
        "refreshScope": {
            "status": "UP"
        }
    }
}
3.3 未使用ES导致健康检查失败
- 排除无需检查的ES
#去除检查
management:
 health:
   elasticsearch:
     enabled: false
- 再次检测
{
    "status": "UP",
    "components": {
        "db": {
            "status": "UP",
            "details": {
                "database": "MySQL",
                "validationQuery": "isValid()"
            }
        },
        "discoveryComposite": {
            "status": "UP",
            "components": {
                "discoveryClient": {
                    "status": "UP",
                    "details": {
                        "services": [
                            "erp-a",
                            "erp-b",
                            "erp-c",
                            "erp-d",
                            "erp-e",
                            "erp-f"
                        ]
                    }
                }
            }
        },
        "diskSpace": {
            "status": "UP",
            "details": {
                "total": 322122543104,
                "free": 227914055680,
                "threshold": 10485760,
                "exists": true
            }
        },
        "nacosConfig": {
            "status": "UP"
        },
        "nacosDiscovery": {
            "status": "UP"
        },
        "ping": {
            "status": "UP"
        },
        "redis": {
            "status": "UP",
            "details": {
                "version": "5.0.13"
            }
        },
        "refreshScope": {
            "status": "UP"
        }
    }
}
总结
以上就是今天要讲的内容,本文仅仅简单介绍了spring-boot-actuator的简答配置使用,以及如何抽取公共配置.


 4890
4890


 被折叠的 条评论
为什么被折叠?
被折叠的 条评论
为什么被折叠?
 到【灌水乐园】发言


