


Rear备份操作系统(RHEL红帽+Suse+Kylin-Server麒麟)
文章目录
- Rear备份操作系统(RHEL红帽+Suse+Kylin-Server麒麟)
- 一、环境准备
- 二、搭建NFS服务器server端
- 三、rear备份系统--RHEL 7.9
- 四、rear备份系统--Suse 12p3
- 五、rear备份系统--Kylin-Server 10麒麟系统
- 六、使用rear备份过程中遇到的问题及解决方案
- 6-1、麒麟系统rear备份的时候,会提示缺少lsb_release包
- 6-2、麒麟系统rear备份的时候,会提示ERROR: nls_cp437 exists but no module file
- 6-3、麒麟系统rear备份失败,提示no space……
- 6-4 、ERROR: URL 'file:///mnt/rearbackup/' has the backup directory '/mnt/rearbackup/' in
- 6-5、rear -d -D mkbackup gives ERROR: Could not create ISO image (with /usr/bin/mkisofs)
一、环境准备
| 系统 | IP |
|---|---|
| RHEL 7.9(NFS服务器) | 192.168.10.11 (备份目录为/databackup/rearbackup) |
| RHEL 7.9(红帽系统测试服务器) | 192.168.10.12 |
| Suse 12p3(suse系统测试服务器) | 192.168.10.13 |
| Kylin server V10(麒麟系统测试服务器) | 192.168.10.14 |
# 1、需考虑因素
	备份的时候需要读磁盘,因此数据量大小会影响磁盘性能;如果备份到远端,还会对网络带宽会有影响。

# 2、建议
	由于备份占用较大空间,建议挂载nfs或cifs,做为备份目的端。还支持ftp、sftp、http等,因此可以搭建nfs server或ftp server或http server 做为目的端。
二、搭建NFS服务器server端
1、nfs服务端IP及备份目录规划:
# IP:192.168.10.11  备份目录:/databackup/rearbackup

2、安装nfs服务,修改配置文件
[root@localhost]# yum install nfs-utils	 #安装nfs服务
[root@localhost]# mkdir /databackup/rearbackup    #该目录是操作系统备份存放目录
[root@localhost]# vim /etc/exports       #该文件是NFS配置文件
/databackup/rearbackup *(rw,sync,no_root_squash,no_subtree_check,crossmnt)

[root@localhost]# systemctl restart nfs    #重启NFS服务
[root@localhost]# systemctl enable nfs    #设置NFS服务开机自启
[root@localhost]# exportfs -arv           #查看NFS共享目录是否正常配置
exporting *:/databackup/rearbackup

3、nfs客户端验证
	应测试能否正常挂载和写入,并且建议为每个主机单独创建目录,建议目录以ip地址命名,默认自动创建以主机名命名的备份目录,但是因为有些主机的主机名可能一样,导致冲突。
#以红帽系统作为nfs客户端为例:
[root@localhost]# mount -t nfs -o rw,noatime 192.168.10.11:/databackup/rearbackup /data
[root@localhost]# cd /data
[root@localhost]# mkdir 192.168.10.12
然后卸载掉 umount /data
三、rear备份系统–RHEL 7.9
3-1、配置本地yum源、安装rear软件
1)、检查系统/tmp目录空间,建议free空间有5G以上

2)、配置yum源、安装rear软件及依赖包
[root@localhost]# yum install -y rear genisoimage syslinux
3-2、修改rear工具配置文件:/etc/rear/local.conf
# 1、全系统备份
[root@localhost]# vim  /etc/rear/local.conf
OUTPUT=ISO
OUTPUT_URL=nfs://NFS服务器IP/databackup/rearbackup
BACKUP=NETFS
BACKUP_URL=nfs://NFS服务器IP/databackup/rearbackup
BACKUP_PROG_EXCLUDE=("${BACKUP_PROG_EXCLUDE[@]}" '/media' '/var/tmp' '/var/crash')
NETFS_KEEP_OLD_BACKUP_COPY=yes


#-------------------------------------------------------------------------------------------------------------#
#参数说明:
#BACKUP=NETFS #表示使用ReaR内置的备份方法(称为NETFS),可创建救援系统和整个系统的备份。默认情况下,它将创建一个简单的备份作为tar存档。要启用完整系统备份,需 BACKUP=NETFS和 BACKUP_URL变量搭配使用
#BACKUP_PROG_EXCLUDE=: #指定不备份哪些路径,如果生产环境中数据太大,建议单独备份数据,系统备份尽量的只备份系统自带的文件
#KERNEL_CMDLINE="noip" #表示不会备份ip地址信息,如果要保留ip,则去掉这个参数
#ISO_DIR="/databackup/rearbackup" 	#指定可引导ISO镜像的存放位置,如果不加该参数默认位置为/var/lib/rear/output
#-------------------------------------------------------------------------------------------------------------#


# 2、查看rear配置信息命令
[root@localhost]# rear dump
3-3、创建备份数据文件和可引导ISO镜像
#执行命令后,会显示备份大小和速率。备份完成后没有报错:会显示总共备份时长和平均速率。
[root@localhost]# rear -d -v mkbackup
Relax-and-Recover 2.4 / Git
Using log file: /var/log/rear/rear-localhost.log
Using backup archive '/tmp/rear.g0IpTQxTOxkJNn8/outputfs/localhost/backup.tar.gz'
Creating disk layout
Using guessed bootloader 'GRUB' (found in first bytes on /dev/sda)
Creating root filesystem layout
Handling network interface 'ens33'
ens33 is a physical device
Handled network interface 'ens33'
Handling network interface 'ens37'
ens37 is a physical device
Handled network interface 'ens37'
Copying logfile /var/log/rear/rear-localhost.log into initramfs as '/tmp/rear-localhost-partial-2022-07-30T18:49:11+0800.log'
Copying files and directories
Copying binaries and libraries
Copying kernel modules
Copying all files in /lib*/firmware/
Creating recovery/rescue system initramfs/initrd initrd.cgz with gzip default compression
Created initrd.cgz with gzip default compression (282751715 bytes) in 22 seconds
Making ISO image
Wrote ISO image: /var/lib/rear/output/rear-localhost.iso (279M)
Copying resulting files to nfs location
Saving /var/log/rear/rear-localhost.log as rear-localhost.log to nfs location
Creating tar archive '/tmp/rear.g0IpTQxTOxkJNn8/outputfs/localhost/backup.tar.gz'
Archived 8092 MiB [avg 14615 KiB/sec] OK
WARNING: tar ended with return code 1 and below output:
  ---snip---
  tar: /var/spool/postfix/public/flush: socket ignored
  tar: /var/spool/postfix/public/showq: socket ignored
  tar: /opt/zbox/tmp/mysql/mysql.sock: socket ignored
  ----------
This means that files have been modified during the archiving
process. As a result the backup may not be completely consistent
or may not be a perfect copy of the system. Relax-and-Recover
will continue, however it is highly advisable to verify the
backup in order to be sure to safely recover this system.

Archived 8092 MiB in 568 seconds [avg 14589 KiB/sec]
Exiting rear mkbackup (PID 4126) and its descendant processes
3-4、在nfs备份服务器上查看是否生成备份数据
# NFS服务器上操作
[root@localhost]# cd /databackup/rearbackup/主机名/
[root@localhost]# du -sm *
15      backup.log
8118    backup.tar.gz
1       README
279     rear-localhost.iso
1       rear-localhost.log
1       VERSION0
执行备份命令后,Rear将检查当前备份系统并收集必要的信息,如磁盘布局,要排除的文件和引导加载程序等。然后/var/lib/rear/output默认情况下将创建具有灾难恢复系统的可引导ISO映像。最后,要备份的文件以及可引导的ISO映像将转移到NFS服务器。
3-5、进行RHEL操作系统故障模拟及故障恢复测试
3-5-1、故障模拟
#可以将/boot/grub/grub.cfg文件删除,然后重启。删除后系统无法正常启动
[root@localhost]# rm -rf /boot/grub/grub.cfg

## grub是引导操作系统的程序,它会根据自己的配置文件,去引导内核,当内核被加载到内存以后,内核会根据grub配置文件中的配置,找到根分区所使用的文件系统对应的驱动,通过根分区文件系统对应的驱动,挂载根分区,从而达到启动操作系统的目的。
3-5-2、 下载nfs服务器上存放的/databackup/rearbackup/主机名/主机名.iso 光盘引导文件
#下载nfs服务器上存放的光盘引导文件,文件名形式如下:
	/databackup/rearbackup/主机名/主机名.iso
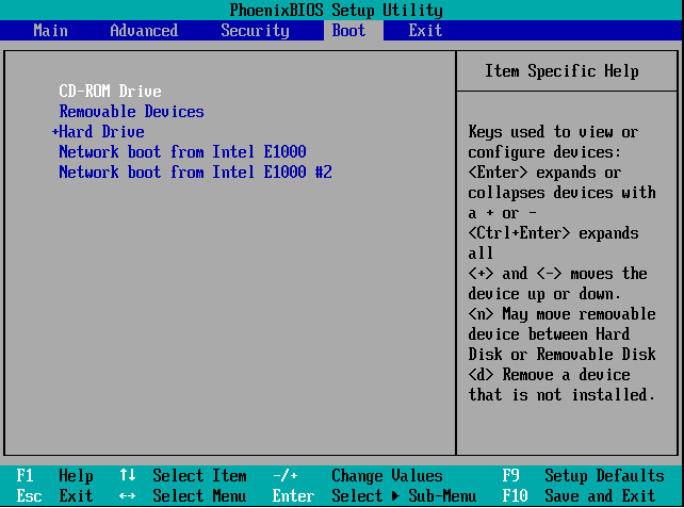
3-5-3、将系统挂载盘rear-localhost.iso备份镜连接至系统,并修改BIOS启动顺序
#确保备份镜像与需恢复主机之间可正常访问,然后进入服务器BIOS,修改启动顺序为CD-ROM光盘启动并保存,不同型号服务器页面略有差别,以实际页面为准。本文以vmvare虚拟机中的BIOS为例
3-5-4、选择恢复服务器(localhost为默认主机名)
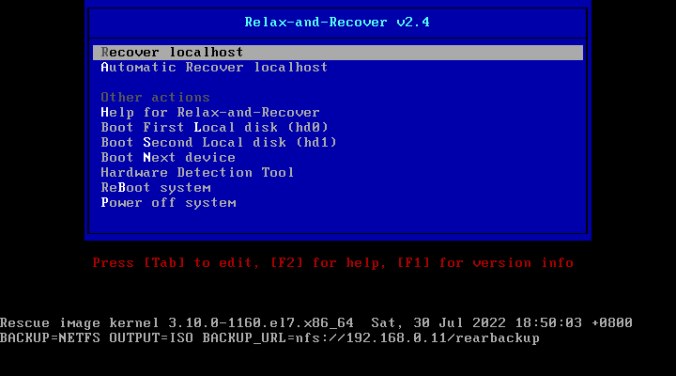
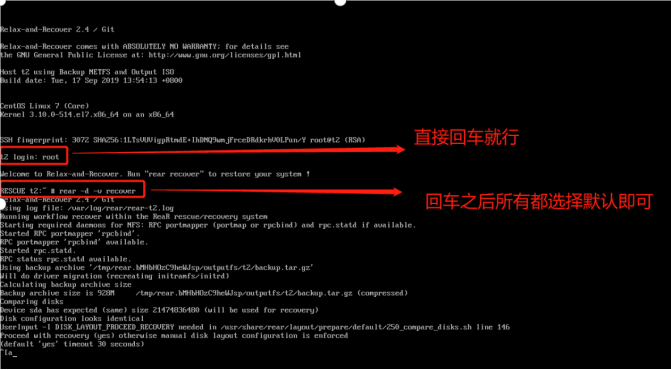
3-5-5、登录急救模式,并执行rear恢复命令
1、进入急救模式后,以root身份登录,无需密码
2、执行恢复命令
# rear -d -v recover

#恢复备份后,可以选择留在灾难恢复系统的shell中以检查测试服务器上的重新创建。如果一切正常,请重新启动测试服务器并从本地硬盘启动。进入rear的shell之后,系统默认的路径是在/mnt/local中,就像救援模式根目录在/mnt/sysimage中一样,也就是说/mnt/local就是根目录。
3、为确保SELinux在下次启动时重新标记文件,否则可能无法登录系统,因为/etc/passwd文件可能具有不正确的SELinux上下文。建议执行以下命令:
# touch /mnt/local/.autorelabel

4、最后重启就行了,选择从本地磁盘启动,已经重建成功了。
# cd /mnt/local/
# reboot
注意:系统恢复完成后,需及时将BIOS中的启动顺序恢复为本地磁盘启动。
四、rear备份系统–Suse 12p3
4-1、下载suse版本rear软件包
1、Rear软件包下载地址:
	https://download.opensuse.org/repositories/Archiving:/Backup:/Rear/
4-2、安装rear软件
[root@localhost]# rpm -ivh rear-2.7-1.x86_64.rpm
4-3、修改rear配置文件
[root@localhost]# vim /etc/rear/local.conf
OUTPUT=ISO
OUTPUT_URL=nfs://NFS服务器IP/rearbackup
BACKUP=NETFS
BACKUP_URL=nfs://NFS服务器IP/rearbackup
BACKUP_PROG_EXCLUDE=("${BACKUP_PROG_EXCLUDE[@]}" '/media' '/var/tmp' '/var/crash')
NETFS_KEEP_OLD_BACKUP_COPY=yes
4-4、执行rear备份操作及nfs服务端验证
[root@localhost]# rear -v -d mkbackup
Relax-and-Recover 2.7 / 2022-07-13
Running rear mkbackup (PID 67045 date 2022-07-31 16:46:05)
Command line options: /usr/sbin/rear -v -d mkbackup
Using log file: /var/log/rear/rear-linux-ivch.log
Using build area: /var/tmp/rear.wAY1F1Z4d38C8R3
Running 'init' stage ======================
Running workflow mkbackup on the normal/original system
Running 'prep' stage ======================
Using backup archive '/var/tmp/rear.wAY1F1Z4d38C8R3/outputfs/linux-ivch/backup.tar.gz'
Using '/usr/bin/mkisofs' to create ISO filesystem images
Using autodetected kernel '/boot/vmlinuz-4.12.14-120-default' as kernel in the recovery system
Running 'layout/save' stage ======================
Copying result files '/var/lib/rear/output/rear-linux-ivch.iso /var/tmp/rear.wAY1F1Z4d38C8R3/tmp/VERSION /var/tmp/rear.wAY1F1Z4d38C8R3/tmp/README /var/tmp/rear.wAY1F1Z4d38C8R3/tmp/rear-linux-ivch.log' to /var/tmp/rear.wAY1F1Z4d38C8R3/outputfs/linux-ivch at nfs location
Running 'backup' stage ======================
Exiting rear mkbackup (PID 67045) and its descendant processes ...
Running exit tasks
To remove the build area you may use (with caution): rm -Rf --one-file-system /var/tmp/rear.wAY1F1Z4d38C8R3
# NFS服务器上操作
[root@localhost]# cd /databackup/rearbackup/主机名/
[root@localhost]# du -sh *
16M     backup.log
1.7G    backup.tar.gz
4.0K    README
447M    rear-linux-suse.iso
120K    rear-linux-suse.log
4.0K    VERSION
4-5、Suse系统故障模拟及系统恢复
故障模拟及恢复步骤可参考第三章节3-5小节
五、rear备份系统–Kylin-Server 10麒麟系统
5-1、安装rear软件
[root@localhost]# yum install -y rear genisoimage syslinux
[root@localhost]# yum install -y lsb*
5-2、修改rear配置文件
[root@localhost]# vim /etc/rear/local.conf
OUTPUT=ISO
OUTPUT_URL=nfs://NFS服务器IP/rearbackup
BACKUP=NETFS
BACKUP_URL=nfs://NFS服务器IP/rearbackup
BACKUP_PROG_EXCLUDE=("${BACKUP_PROG_EXCLUDE[@]}" '/media' '/var/tmp' '/var/crash')
NETFS_KEEP_OLD_BACKUP_COPY=yes
5-3、执行rear备份操作及nfs服务端验证
[root@qilin]# rear -d -v mkbackup
Relax-and-Recover 2.4 / 2018-06-21
Using log file: /var/log/rear/rear-kylin-test1.log
Using backup archive '/back/rear.acBm6maZEgHRRYf/outputfs/kylin-test1/backup.tar.gz'
Creating disk layout
Using guessed bootloader 'GRUB' (found in first bytes on /dev/sda)
Creating root filesystem layout
Handling network interface 'ens192'
ens192 is a physical device
Handled network interface 'ens192'
Skipping 'virbr0': not bound to any physical interface.
To log into the recovery system via ssh set up /root/.ssh/authorized_keys or specify SSH_ROOT_PASSWORD
Copying logfile /var/log/rear/rear-kylin-test1.log into initramfs as '/tmp/rear-kylin-test1-partial-2022-08-01T12:10:37+08:00.log'
Copying files and directories
Copying binaries and libraries
Copying all kernel modules in /lib/modules/4.19.90-24.4.v2101.ky10.x86_64 (MODULES contains 'all_modules')
Copying all files in /lib*/firmware/
Creating recovery/rescue system initramfs/initrd initrd.cgz with gzip default compression
0	/tmp/fcitx-socket-:0
Created initrd.cgz with gzip default compression (364671284 bytes) in 31 seconds
Making ISO image
Wrote ISO image: /var/lib/rear/output/rear-kylin-test1.iso (359M)
Copying resulting files to nfs location
Saving /var/log/rear/rear-kylin-test1.log as rear-kylin-test1.log to nfs location
Creating tar archive '/back/rear.acBm6maZEgHRRYf/outputfs/kylin-test1/backup.tar.gz'
Archived 4073 MiB [avg 10351 KiB/sec] OK
Archived 4073 MiB in 404 seconds [avg 10326 KiB/sec]
Exiting rear mkbackup (PID 101869) and its descendant processes
Running exit tasks
You should also rm -Rf /back/rear.acBm6maZEgHRRYf
# NFS服务器上操作
[root@qilin]# cd /databackup/rearbackup/主机名/
[root@qilin]# du -sh *
28M	backup.log
4.0G	backup.tar.gz
4.0K	README
359M	rear-kylin-test1.iso
1.1M	rear-kylin-test1.log
4.0K	VERSION
5-4、Suse系统故障模拟及系统恢复
故障模拟及恢复步骤可参考第三章节3-5小节
六、使用rear备份过程中遇到的问题及解决方案
6-1、麒麟系统rear备份的时候,会提示缺少lsb_release包
#解决方案:
	使用yum安装麒麟版本lsb相关安装包
[root@qilin]# yum install -y lsb*
6-2、麒麟系统rear备份的时候,会提示ERROR: nls_cp437 exists but no module file

# 解决方案
	在文件/etc/rear/local.conf 最后添加一行:MODULES=( 'all_modules' )
[root@qilin]# cat /etc/rear/local.conf
OUTPUT=ISO
OUTPUT_URL=nfs://NFS服务器IP/rearbackup
BACKUP=NETFS
BACKUP_URL=nfs://NFS服务器IP/rearbackup
BACKUP_PROG_EXCLUDE=("${BACKUP_PROG_EXCLUDE[@]}" '/media' '/var/tmp' '/var/crash')
NETFS_KEEP_OLD_BACKUP_COPY=yes
MODULES=('all_modules')
6-3、麒麟系统rear备份失败,提示no space……
1)、报错原因
使用rear备份默认备份文件存放路径在/tmp目录下,麒麟系统默认的/tmp较小,因此在存放备份数据和ISO文件的时候会报错
2)、解决方案:
1、若/tmp目录为逻辑卷,可扩容逻辑卷空间大小;
2、修改/etc/fstab文件,从而对/tmp扩容
3、使用export临时指定一个空间相对较大的rear的备份目录,然后再执行备份操作
3)、操作步骤
1)方案1的操作步骤可搜索逻辑卷扩容相关资料,对/tmp所在逻辑卷进行扩容即可

2)方案2:修改/etc/fstab文件,对/tmp扩容步骤:(size=9G 数值可根据实际情况自定义)
[root@qilin rearbackup]# cat /etc/fstab

#
# /etc/fstab
# Created by anaconda on Mon Aug  1 21:47:35 2022
#
# Accessible filesystems, by reference, are maintained under '/dev/disk/'.
# See man pages fstab(5), findfs(8), mount(8) and/or blkid(8) for more info.
#
# After editing this file, run 'systemctl daemon-reload' to update systemd
# units generated from this file.
#
/dev/mapper/klas-root   /                       xfs     defaults        0 0
UUID=4e526a99-6164-41cf-aad4-8bea9b162199 /boot                   xfs     defaults        0 0
UUID=a045b2c7-efb2-4b30-99ee-5be55fa031f6 none                    swap    defaults        0 0
/dev/cdrom              /mnt/cdrom              iso9660          defaults        0 0
tmpfs /tmp tmpfs nodev,nosuid,size=9G 0 0

[root@qilin rearbackup]# reboot

##修改完/etc/fstab文件后,执行reboot命令重启服务器。查看/tmp扩容是否生效即可,如下示例:
[root@qilin rearbackup]# df -Th
文件系统              类型      容量  已用  可用 已用% 挂载点
devtmpfs              devtmpfs  456M     0  456M    0% /dev
tmpfs                 tmpfs     482M     0  482M    0% /dev/shm
tmpfs                 tmpfs     482M   20M  463M    4% /run
tmpfs                 tmpfs     482M     0  482M    0% /sys/fs/cgroup
/dev/mapper/klas-root xfs        38G  8.0G   30G   22% /
tmpfs                 tmpfs     9.0G  2.8G  6.3G   31% /tmp
/dev/sr0              iso9660   4.1G  4.1G     0  100% /mnt/cdrom
/dev/sda1             xfs       195M  185M   11M   95% /boot
tmpfs                 tmpfs      97M     0   97M    0% /run/user/0
tmpfs                 tmpfs      97M     0   97M    0% /run/user/992
tmpfs                 tmpfs      97M     0   97M    0% /run/user/993

3)、使用export临时指定一个临时变量,然后再执行备份操作( /xxxdir为系统中空间大的备份目录)
[root@qilin rearbackup]# export TMPDIR=/xxxdir
[root@qilin]# rear -d -v mkbackup
6-4 、ERROR: URL ‘file:///mnt/rearbackup/’ has the backup directory ‘/mnt/rearbackup/’ in
#分析原因: 如下,/mnt没有独立分区属于根分区,而备份数据需要存放在单独的分区中。根据下面执行结果,可知/databackup为独立分区,故可把/mnt/backup改为/databackup/backup。然后重新执行备份命令

[root@qilin rearbackup]# df -Th
文件系统              类型      容量  已用  可用 已用% 挂载点
devtmpfs              devtmpfs  456M     0  456M    0% /dev
tmpfs                 tmpfs     482M     0  482M    0% /dev/shm
tmpfs                 tmpfs     482M   20M  463M    4% /run
tmpfs                 tmpfs     482M     0  482M    0% /sys/fs/cgroup
/dev/mapper/klas-root xfs        38G  8.0G   30G   22% /
tmpfs                 tmpfs     9.0G  2.8G  6.3G   31% /databackup
/dev/sr0              iso9660   4.1G  4.1G     0  100% /mnt/cdrom
/dev/sda1             xfs       195M  185M   11M   95% /boot
tmpfs                 tmpfs      97M     0   97M    0% /run/user/0
tmpfs                 tmpfs      97M     0   97M    0% /run/user/992
tmpfs                 tmpfs      97M     0   97M    0% /run/user/993
6-5、rear -d -D mkbackup gives ERROR: Could not create ISO image (with /usr/bin/mkisofs)
[root@suse]# rear -d -D mkbackup
Relax-and-Recover 2.4 / Git
Running rear mkbackup (PID 7088)
Using log file: /var/log/rear/rear-server.log
Using backup archive '/tmp/rear.89pkYz3DLPtrFlh/outputfs/server/backup.tar.gz'
Using UEFI Boot Loader for Linux (USING_UEFI_BOOTLOADER=1)
Creating disk layout
Doing SLES12-SP1 (and later) btrfs subvolumes setup because the default subvolume path contains '@/.snapshots/'
Using sysconfig bootloader 'grub2-efi'
Creating root filesystem layout
Handling network interface 'eth0'
eth0 is a physical device
Handled network interface 'eth0'
To log into the recovery system via ssh set up /root/.ssh/authorized_keys or specify SSH_ROOT_PASSWORD
Trying to find what to use as UEFI bootloader...
Trying to find a 'well known file' to be used as UEFI bootloader...
Using '/boot/efi/EFI/sles/grubx64.efi' as UEFI bootloader file
Copying logfile /var/log/rear/rear-server.log into initramfs as '/tmp/rear-server-partial-2021-01-13T15:04:17+01:00.log'
Copying files and directories
Copying binaries and libraries
Copying kernel modules
Copying all files in /lib*/firmware/
Creating recovery/rescue system initramfs/initrd initrd.cgz with gzip default compression
Created initrd.cgz with gzip default compression (288841031 bytes) in 39 seconds
Making ISO image
ERROR: Could not create ISO image (with /usr/bin/mkisofs)
Some latest log messages since the last called script 820_create_iso_image.sh:
        -UDF                    Generate UDF file system
        -dvd-audio              Generate DVD-Audio compliant UDF file system
        -dvd-video              Generate DVD-Video compliant UDF file system
        -dvd-hybrid             Generate a hybrid (DVD-Audio/DVD-Video) compliant UDF file system
        -iso-level LEVEL        Set ISO9660 level (1..3) or 4 for ISO9660 v 2
        -V ID, -volid ID        Set Volume ID
        -graft-points           Allow to use graft points for filenames
        -M FILE, -prev-session FILE     Set path to previous session to merge
Aborting due to an error, check /var/log/rear/rear-server.log for details
Exiting rear mkbackup (PID 7088) and its descendant processes
Running exit tasks
You should also rm -Rf /tmp/rear.89pkYz3DLPtrFlh
Terminated
#解决方案:
1、如果你的系统是UEFI启动,需要使用以下命令安装ebiso:
[root@suse]# zypper install -y ebiso

2、在rear配置文件/etc/rear/local.conf增加下面一行:
ISO_MKISOFS_BIN=/usr/bin/ebiso
#报错原因:
若要允许在 UEFI 系统上进行灾难恢复,至少需要 Rear 版本 1.18.a 和程序包 ebiso。
只有此版本支持新的帮助程序工具 /usr/bin/ebiso。
此帮助程序工具用于创建 UEFI 可启动的后部系统 ISO 映像。


 2万+
2万+

 被折叠的 条评论
为什么被折叠?
被折叠的 条评论
为什么被折叠?
 到【灌水乐园】发言


