


 本文介绍如何在两台CentOS 7.5机器之间搭建iSCSI存储服务,包括服务端(target)和客户端(initiator)的配置过程。涵盖安装targetcli、创建iSCSI target、配置CHAP认证、添加LUNs等步骤。
ISCIS是什么?ISCSI本文不详解,只进行iscsi的搭建
两台机器,一台服务端target,一台客户端initiator,环境如下
机器A:target: 192.168.238.134 (CentOS7.5)
机器B:initiator:192.168.238.132 (CentOS7.5)
搭建ISCIS target:
机器A: 192.168.238.134
这台机器上有一块40G的硬盘,被我分两个区:/dev/sdb1 /devsdb2

1:安装 targetcli
Centos7默认是自带的,通过rpm -qa|grep targetcli可以看到
[root@localhost ~]# rpm -qa|grep targetcli
targetcli-2.1.fb46-1.el7.noarch
[root@localhost ~]#
[root@localhost ~]# targetcli
targetcli shell version 2.1.fb46
Copyright 2011-2013 by Datera, Inc and others.
For help on commands, type 'help'.

/> ls
o- / .................................................................................................... [...]
  o- backstores ......................................................................................... [...]
  | o- block ............................................................................. [Storage Objects: 2]
  | | o- sdb1 .................................................... [/dev/sdb1 (0 bytes) write-thru deactivated]
  | | | o- alua .............................................................................. [ALUA Groups: 1]
  | | |   o- default_tg_pt_gp .................................................. [ALUA state: Active/optimized]
  | | o- sdb2 .................................................... [/dev/sdb2 (0 bytes) write-thru deactivated]
  | |   o- alua .............................................................................. [ALUA Groups: 1]
  | |     o- default_tg_pt_gp .................................................. [ALUA state: Active/optimized]
  | o- fileio ............................................................................ [Storage Objects: 0]
  | o- pscsi ............................................................................. [Storage Objects: 0]
  | o- ramdisk ........................................................................... [Storage Objects: 0]
  o- iscsi ....................................................................................... [Targets: 0]
  o- loopback .................................................................................... [Targets: 0]
/>
2.创建iSCSI target
/> cd iscsi
/iscsi> ls
o- iscsi .......................................................................................................
/iscsi> create wwn=iqn.2021-03.com.iscsi:server
Created target iqn.2021-03.com.iscsi:server.
Created TPG 1.
Global pref auto_add_default_portal=true
Created default portal listening on all IPs (0.0.0.0), port 3260.
/iscsi>
3.创建ACLs(允许访问的iSCSI 的client)
/iscsi> ls
o- iscsi ......................................................................................... [Targets: 1]
  o- iqn.2021-03.com.iscsi:server ................................................................... [TPGs: 1]
    o- tpg1 ............................................................................ [no-gen-acls, no-auth]
      o- acls ....................................................................................... [ACLs: 0]
      o- luns ....................................................................................... [LUNs: 0]
      o- portals ................................................................................. [Portals: 1]
        o- 0.0.0.0:3260 .................................................................................. [OK]
/iscsi> cd iqn.2021-03.com.iscsi:server/tpg1/acls
/iscsi/iqn.20...ver/tpg1/acls> create wwn=iqn.2021-03.com.iscsi:client
Created Node ACL for iqn.2021-03.com.iscsi:client
/iscsi/iqn.20...ver/tpg1/acls>
4.配置CHAP 认证
/iscsi/iqn.20...ver/tpg1/acls> cd iqn.2021-03.com.iscsi:client
/iscsi/iqn.20....iscsi:client> set auth userid=username password=password
Parameter password is now 'password'.
Parameter userid is now 'username'.
/iscsi/iqn.20....iscsi:client>
5.创建block backstores named sdb1, sdb2
/iscsi/iqn.20....iscsi:client> cd /backstores/block
/backstores/block> create name=sdb1  dev=/dev/sdb1
Created block storage object sdb1 using /dev/sdb1.
/backstores/block> create name=sdb2  dev=/dev/sdb2
Created block storage object sdb2 using /dev/sdb2.
/backstores/block>
6.添加LUNs 到 iSCSI target
/backstores/block> cd /iscsi/iqn.2021-03.com.iscsi:server/tpg1/luns
/iscsi/iqn.20...ver/tpg1/luns> ls
o- luns ............................................................................................. [LUNs: 0]
/iscsi/iqn.20...ver/tpg1/luns> create /backstores/block/sdb1
Created LUN 0.
Created LUN 0->0 mapping in node ACL iqn.2021-03.com.iscsi:client
/iscsi/iqn.20...ver/tpg1/luns>
/iscsi/iqn.20...ver/tpg1/luns> create /backstores/block/sdb2
Created LUN 1.
Created LUN 1->1 mapping in node ACL iqn.2021-03.com.iscsi:client
/iscsi/iqn.20...ver/tpg1/luns>
7.修改portal
/iscsi/iqn.20...i:server/tpg1> luns/
/iscsi/iqn.20...ver/tpg1/luns>
/iscsi/iqn.20...ver/tpg1/luns>
/iscsi/iqn.20...ver/tpg1/luns>
/iscsi/iqn.20...ver/tpg1/luns> cd /iscsi/iqn.2021-03.com.iscsi:server/tpg1/portals/
/iscsi/iqn.20.../tpg1/portals> ls
o- portals ....................................................................................... [Portals: 1]
  o- 0.0.0.0:3260 ........................................................................................ [OK]
/iscsi/iqn.20.../tpg1/portals> delete 0.0.0.0 3260
Deleted network portal 0.0.0.0:3260
/iscsi/iqn.20.../tpg1/portals> create 192.168.238.134 3260
Using default IP port 3260
Created network portal 192.168.238.134:3260.
/iscsi/iqn.20.../tpg1/portals>
8.退出保存 or saveconfig 只保存
/iscsi/iqn.20.../tpg1/portals> exit
Global pref auto_save_on_exit=true
Last 10 configs saved in /etc/target/backup.
Configuration saved to /etc/target/saveconfig.json
9.关闭防火墙,enable target服务
[root@localhost ~]# systemctl stop firewalld
[root@localhost ~]# systemctl enable target
Created symlink from /etc/systemd/system/multi-user.target.wants/target.service to /usr/lib/systemd/system/target.service.
[root@localhost ~]#
搭建initiator:
机器B:initiator:192.168.238.132
1.确认安装 iscsi-initiator-utils 是否安装,如果没有可以用yum 装上
[root@localhost ~]# rpm -qa|grep initiator
iscsi-initiator-utils-6.2.0.874-7.el7.x86_64
iscsi-initiator-utils-iscsiuio-6.2.0.874-7.el7.x86_64
[root@localhost ~]#
2.修改initiator name 跟上面的target acl 里一致
[root@localhost ~]# cat  /etc/iscsi/initiatorname.iscsi
InitiatorName=iqn.2021-03.com.iscsi:client
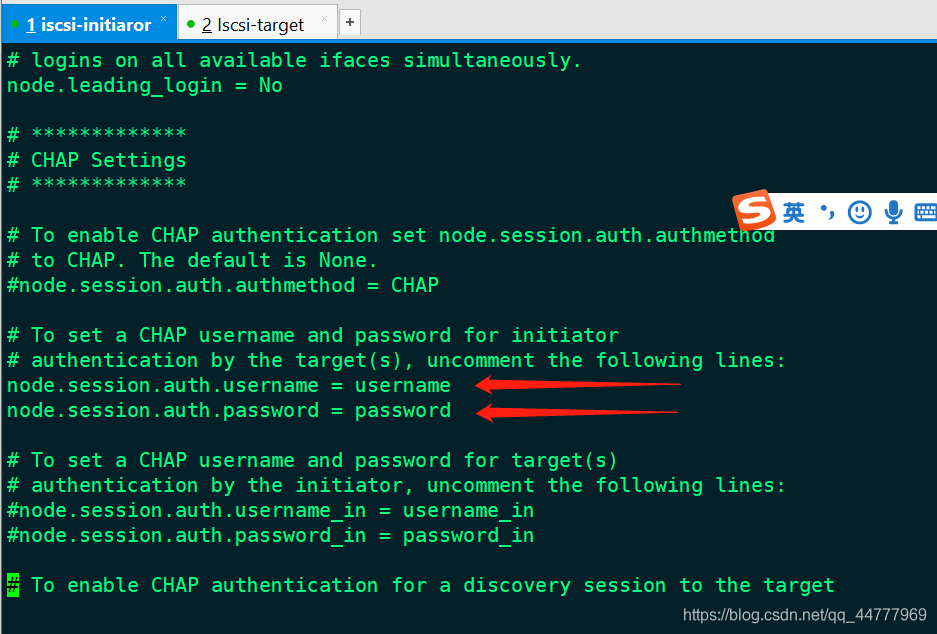
3.修改 CHAP 认证 user /password
vim /etc/iscsi/iscsid.conf
4.启动iscsi
[root@localhost ~]# systemctl start iscsid
5.Discovery LUNs and login
[root@localhost ~]# iscsiadm -m discovery -t sendtargets -p 192.168.238.134 -discover
192.168.238.134:3260,1 iqn.2021-03.com.iscsi:server
[root@localhost ~]# iscsiadm -m node -p 192.168.238.134 -l
Logging in to [iface: default, target: iqn.2021-03.com.iscsi:server, portal: 192.168.238.134,3260] (multiple)
Login to [iface: default, target: iqn.2021-03.com.iscsi:server, portal: 192.168.238.134,3260] successful.
[root@localhost ~]#
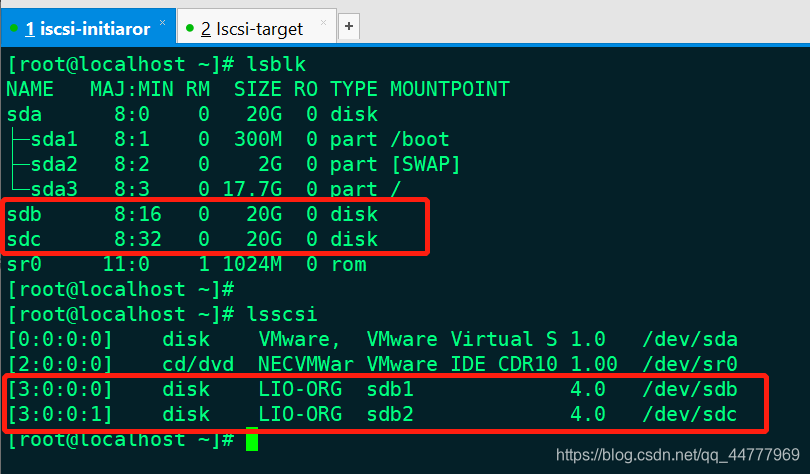
6.确认map 过来的LUN 能够被发现
lsblk 和lsscsi命令查看
磁盘sdb sdc 就是target端的的LUN
7.在新磁盘上创建分区及文件系统
[root@localhost ~]# fdisk /dev/sdb
Welcome to fdisk (util-linux 2.23.2).

Changes will remain in memory only, until you decide to write them.
Be careful before using the write command.


Command (m for help): n
Partition type:
   p   primary (0 primary, 0 extended, 4 free)
   e   extended
Select (default p): p
Partition number (1-4, default 1):
First sector (8192-41943039, default 8192):
Using default value 8192
Last sector, +sectors or +size{K,M,G} (8192-41943039, default 41943039):
Using default value 41943039
Partition 1 of type Linux and of size 20 GiB is set

Command (m for help): w
The partition table has been altered!

Calling ioctl() to re-read partition table.
Syncing disks.
[root@localhost ~]# mkfs.ext4 /dev/sdb
mke2fs 1.42.9 (28-Dec-2013)
/dev/sdb is entire device, not just one partition!
Proceed anyway? (y,n) y
Filesystem label=
OS type: Linux
Block size=4096 (log=2)
Fragment size=4096 (log=2)
Stride=0 blocks, Stripe width=1024 blocks
1310720 inodes, 5242880 blocks
262144 blocks (5.00%) reserved for the super user
First data block=0
Maximum filesystem blocks=2153775104
160 block groups
32768 blocks per group, 32768 fragments per group
8192 inodes per group
Superblock backups stored on blocks:
	32768, 98304, 163840, 229376, 294912, 819200, 884736, 1605632, 2654208,
	4096000

Allocating group tables: done
Writing inode tables: done
Creating journal (32768 blocks):
done
Writing superblocks and filesystem accounting information: done
8.将磁盘挂载
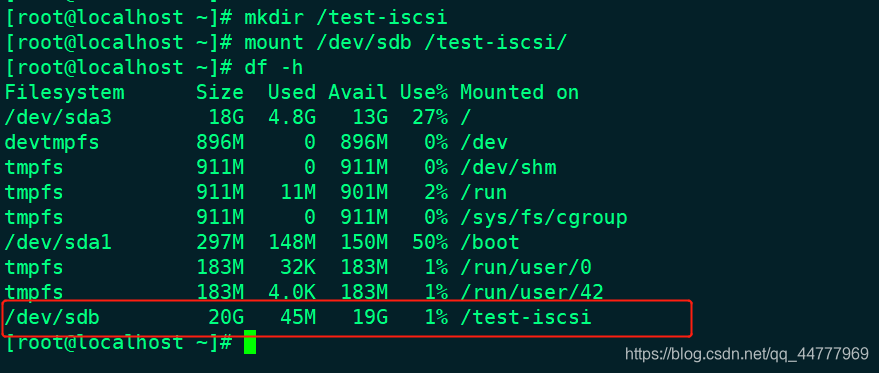
至此从服务端(target)map过来的新磁盘已分区,并且创建了文件系统,切挂载到客户端(initiator)并且能被使用
至此是iscsi存储服务器(target.initiator)的搭建,但是并不完善,后续还会有:安装配置multipath
多路径软件,能够使map过来的lun可以进行冗余负载等功能。


 被折叠的 条评论
为什么被折叠?
被折叠的 条评论
为什么被折叠?
 到【灌水乐园】发言


