


C++文件和流
iostream库:cin cout 从标准输入读取流和向标准输出写入流。
fstream库:从文件读取流和向文件写入流。
- ofstream:该数据类型表示输出文件流,用于创建文件并向文件写入信息;
- ifstream:该数据结构表示输入文件流,用于从文件读取信息;
- fstream:文件流,同时具有ofstream和ifstream两种功能。
要在C++中进行文件处理,必须在C++源代码中包含头文件和。
打开文件
void open(const char *filename, ios::openmode mode);
- ios::app 【追加模式,所有写入都追加到文件末尾】
- ios::ate 【文件打开定位到文件末尾】
- ios::in 【打开文件用于读取】
- ios::out 【打开文件用于写入】
- ios::trunc 【如果文件已存在,其内容将在打开文件之前被截断,即把文件长度设为0。】
同时使用
ofstream outfile;
outfile.open("file.dat", ios::out | ios::trunc );
关闭文件
当 C++ 程序终止时,它会自动关闭刷新所有流,释放所有分配的内存,并关闭所有打开的文件。但程序员应该养成一个好习惯,在程序终止前关闭所有打开的文件。
读取&写入实例
#include <fstream>
#include <iostream>
using namespace std;

int main(){
	char data[100];

	// 以写模式打开文件
	ofstream outfie;
	outfile.open("afile.dat");

	cout << "Writing to the file" <<endl;
	cout << "Enter your name: ";
	cin.getline(data, 100);

	// 向文件写入用户输入的数据
	outfile << data <<endl;

	cout << "Enter your age: ";
	cin >> data;
	cin.ignore();

	// 再次向文件写入用户输入的数据
	outfile << data <<endl;

	// 以读模式打开文件
	ifstream infile;
	infile.open("afile.dat");

	cout << "Readomg from the file" <<endl;
	infile >> data;

	// 在屏幕上写入数据
	cout << data << endl;

	// 再次从文件读取数据,并显示
	infile >> data;
	cout << data <<endl;

	infile.close();

	return 0;
}
程序编译运行结果:
$./a.out
Writing to the file
Enter your name: Zara
Enter your age: 9
Reading from the file
Zara
9
文件位置指针
// 定位到 fileObject 的第 n 个字节(假设是 ios::beg)
fileObject.seekg( n );

// 把文件的读指针从 fileObject 当前位置向后移 n 个字节
fileObject.seekg( n, ios::cur );

// 把文件的读指针从 fileObject 末尾往回移 n 个字节
fileObject.seekg( n, ios::end );

// 定位到 fileObject 的末尾
fileObject.seekg( 0, ios::end );
C++异常处理
异常时程序在执行期间产生的问题。C++异常是指在程序运行时发生的特殊情况,比如尝试除以零的操作。异常提供了一种转移程序控制权的方式。C++异常处理设计三个关键字:try、catch、throw。
- throw:当问题出现时,程序会抛出一个异常。这是通过throw关键字完成的。
- catch:通过异常处理程序捕获异常。catch关键字用于捕获异常。
- try:try块中的代码标识将被激活的特定异常。后面跟一个或多个catch块。
try
{
   // 保护代码
}catch( ExceptionName e1 )
{
   // catch 块
}catch( ExceptionName e2 )
{
   // catch 块
}catch( ExceptionName eN )
{
   // catch 块
}
抛出异常
double division(int a, int b)
{
   if( b == 0 )
   {
      throw "Division by zero condition!";
   }
   return (a/b);
}
捕获异常
try
{
   // 保护代码
}catch( ExceptionName e )
{
  // 处理 ExceptionName 异常的代码
}
实例:
#include <iostream>
using namespace std;

double division(int a, int b){
	if (b == 0){
		throw "Division by zero condition!";
	}
	retnrn (a/b);
}

int main(){
	int x = 50;
	int y = 0;
	double z = 0;

	try {
		z  = division(x,y);
		cout << z <<endl;
	}catch (const char* msg){
		cerr << msg <<endl;
	}

	return 0;
}
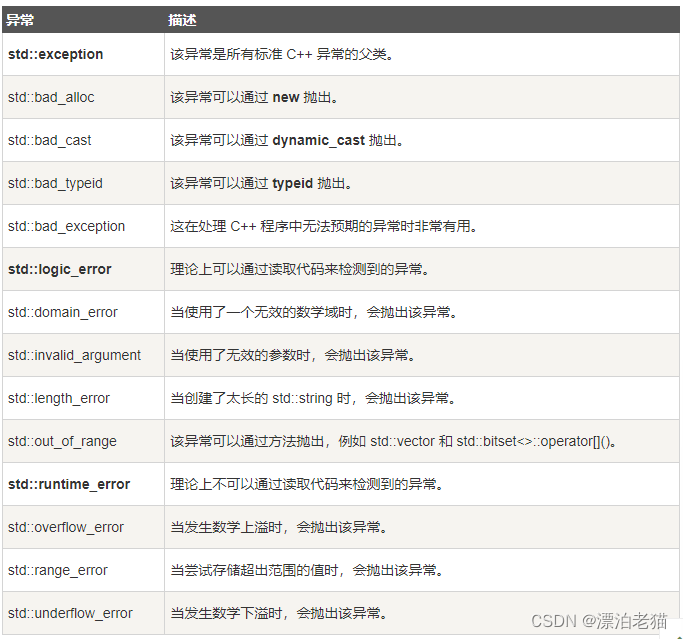
C++标准的异常
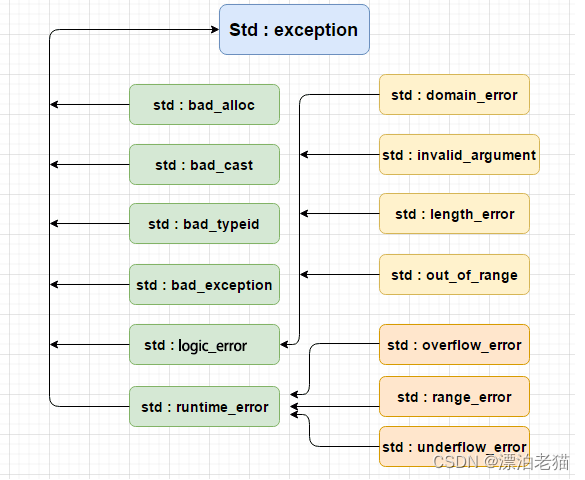
定义新的异常
通过继承和重载exception类来定义新的异常。
#include <iostream>
#include <exception>
using namespace std;

struct MyException : public exception{
	const char * what() const throw(){
		return "C++ Exception";
	}
};

int main(){
	try{
		throw MyException();
	} catch (MyException& e){
		std::cout << "MyException caught" << std::endl;
		std::cout << e.what() << std::endl;
	} catch(std::exception& e){
		//其他错误
	}

	return 0;
}
MyException caught
C++ Exception
C++动态内存
C++程序中的内存分为两个部分:
- 栈:在函数内部声明的所有变量都将占用栈内存;
- 堆:这是程序中未使用的内存,在程序运行时可用于动态分配内存。
很多时候,无法提前预知需要多少内存来存储某个定义变量中的特定信息,所需内存的大小需要在运行时才能确定。
在C++中,您可以使用特殊的运算符为给定类型的变量在运行时分配堆内的内存,这会返回所分配的空间地址。这种运算符即new运算符。
如果不再需要动态分配的内存空间,可以使用delete运算符,删除之前由new运算符分配的内存。
#include <iostrean>
using namespace std;

int main(){
	double* pvalue = NULL;	// 初始化为null的指针
	pvalue = new double;	// 为变量请求内存
	*pvalue = 1314.99;	// 在分配的地址存储值
	cout << "Value of pvalue : " << *pvalue <<endl;
	delete pvalue;	// 释放内存
	return 0;
}
数组的动态内存分配
假设要为一个字符数组(一个有20个字符的字符串)分配内存,可以使用上面实例中的语法来为数组动态的分配内存:
char* pvalue = NULL;	// 初始化为null的指针
pvalue = new char[20];	// 为变量请求内存
删除刚刚创建的属组:
delete [] pvalue; // 删除 pvalue 所指向的数组
一维数组
// 动态分配,数组长度为m
int *array = new int[m];

// 释放内存
delete [] array;
二维数组
int **array;

array = new int *[m];
for (int i=0; i<m; i++){
	array[i] = new int [n];
}

// 释放
for (int i=0; i<m; i++){
	delete [] array[i];
}
delete [] array;
二维数组实例测试
#include <iostream>
using namespace std;

int main(){
	int **p;
	int i,j;
	p = new int *[4];
	for (i=0; i<4; i++){
		p[i] = new int [8];
	}

	for (i=0; i<4; i+; i++){
		for (j=; j<8; j++){
			p[i][j] = j*i;
		}
	}

	for (i=0; i<4;i++){
		for (j=0; j<8; j++){
			if (j==0) cout <<endl;
			cout << p[i][j] <<"\t";
		}
	}
	for (i=0; i<4; i++){
		delete [] p[i];
	}
	delete [] p;
	return 0;
}
对象的动态内存分配
对象与简单的数据类型没有什么不同。
#include <iostream>
using namespace std;

class Box{
	public:
		Box() {
			cout << "调用构造函数!" <<endl;
		}
		~Box(){
			cout << "调用析构函数!" <<endl;
		}
};

int main(){
	Box* myBoxArray = new Box[4];
	delete [] myBoxArray; // 删除数组
	return 0;
}
C++命名空间
命名空间是专门用于解决不同库中相同函数名调用问题,它可以作为附加信息来区分不同库中相同名称的函数、类、变量等。使用了命名空间即定义了上下文。本质上,命名空间就是定义了一个范围。
#include <iostream>
using namespace std;

namespace first_space{
	void func(){
		cout << "Inside first_sapce" <<endl;
	}
}

namespace second_space{
	void func (){
		cout << "Inside second_space" <<endl;
	}
}

int main(){
	first_space::func();
	second_space::func();

	return 0;
}
using 指令
可以使用using namespace指令,这样在使用命名空间时就可以不用再前面加上命名空间的名称。这个指令会告诉编译器,后续的代码将使用指定的命名空间中的名称。
#include <iostream>
using namespace std;

namespace first_space{
	void func(){
		cout << "Inside first_space" <<endl;
	}
}

namespace second_space{
	void func(){
		cout << "Inside second_space" <<endl;
	}
}

using namespace first_space;
int main(){
	func();

	return 0;
}
using 也可以用来指定命名空间中的特定项目。
using std::cout;
不连续的命名空间
命名空间可以定义在几个不同的部分中,因此命名空间是由几个单独定义的部分组成的。一个命名空间的各个组成部分可以分散在多个文件中。
所以,如果命名空间中的某个组成部分需要请求定义在另一个文件中的名称,则仍然需要声明该名称。下面的命名空间定义可以是定义一个新的命名空间,也可以是为已有的命名空间增加新的元素。
嵌套的命名空间
命名空间可以嵌套。
namespace namespace_name1{
	namespace namesapce_name2{
	}
}
通过使用 :: 运算符来访问嵌套的命名空间中的成员:
// 访问 namespace_name2 中的成员
using namespace namespace_name1::namespace_name2;

// 访问 namespace_name1 中的成员
using namespace namespace_name1;
C++模板
模板是泛型编程的基础,泛型编程即以一种独立于任何特定类型的方式编写代码。
模板是创建泛型类或函数的蓝图或公式。库容器,比如迭代器和算法,都是泛型编程的例子,都使用了模板的概念。
每个容器都有一个单一的定义,比如向量,可以定义不同类型的向量,vector vector。
函数模板
// 一般形式
template <typename type> ret-type func-name(parameter list){
	// 函数主体
}
type是函数所使用的数据类型的占位符名称,这个名称可以在函数定义中使用。
例子
#include <iostream>
#include <string>
using namespace std;

template <typename T>
inline T const& Max (T const& a, T const& b){
	return a < b? b:a;
}

int main(){
	int i = 39;
	int j = 20;
	cout << "Max(i, j): " << Max(i, j) <<endl;

	double f1 = 13.5;
	double f2 = 20.7;
	coout << "Max(i, j): " << Max(f1, f2) <<endl;

	string s1 = "Hello";
	string s2 = "World";
	cout << "Max(s1, s2): " << Max(s1, s2) <<endl;

	return 0;
}
编译链接结果:
Max(i, j): 39
Max(f1, f2): 20.7
Max(s1, s2): World
类模板
与函数模板一样,也可以定义类模板。泛型类声明的一般形式如下所示:
template <class type> class class-name{
}
type是占位符类型名称,可以在类被实例化的时候进行指定。
例子
#include <iostream>
#include <vector>
#include <cstdlib>
#include <string>
#include <stdexcept>
using namespace std;

template <class T>
class Stack {
	private:
		vector<T> elems;	// 元素

	public:
		void push(T const&);	// 入栈
		void pop();		// 出栈
		T top() const;	// 返回栈顶元素
		bool empty() const{		// 如果为空返回真
			return elems.empty();
		}
};

template <class T>
void Stack<T>::push (T const& elem){
	elems.push_back(elem);
}

template <class T>
void Stack<T>::pop (){
	if (elems.empty()) {
		throw out_of_range("Stack<>::pop(): empty stack");
	}
	elems.pop_back();
}

template <class T>
T Stack<T>::top () const{
	if (elems.empty()){
		throw out_of_range("Stack<>::top():empty stack");
	}
	return elems.back();	// 返回最后一个元素的副本
}

int main(){
	try {
		Stack<int>	intStack;
		Stack<string> stringStack;

		intStack.push(7);
		cout << intStack.top() <<endl;

		stringStack.push("hello");
		cout << stringStack.top() <<std::endl;
		stringStack.pop();
		stringStack.pop();
	} catch (exception const& ex) {
		cerr << "Exception: " << ex.what() <<endl;
		return -1;
	}
}
编译执行结果:
7
hello
Exception: Stack<>::pop(): empty stack
C++预处理器
预处理器是一些指令,只是编译器在实际编译之前所需完成的预处理。
所有的预处理器指令都是以井号(#)开头,只有空格字符可以出现在预处理指令之前。预处理指令不是C++语句,所以它们不会以分号结尾。
#include 指令,这个宏用于把头文件包含到源文件中。
C++还支持很多预处理指令,比如 #include、#define、#if、#else、#line等,让我们一起看看这些重要指令。
#define预处理
#define预处理指令用于创建符号常量。该符号常量通常称为宏。
例子
#include <iostream>
using namespace std;

#define PI 3.1415926

int main(){
	cout << "Value of PI :" << PI << endl;
	return 0;
}
参数宏
可以使用#define来定义一个带有参数的宏,如下所示:
#include <iostream>
using namespace std;

#define MIN(a,b)(a<b ? a : b)

int main(){
	int i, j;
	i = 100;
	j = 30;
	cout << "较小的值为:" << MIN(i, j) <<endl;

	return 0;
}
条件编译
有几个指令可以用来有选择地对部分程序源代码进行编译。这个过程被称为条件编译。
条件预处理器的结构与if选择结构很像。
#ifdef NULL
	#define NULL 0
#endif
只在调试时编译,调试开关可以使用一个宏来实现:
#ifdef DEBUG
	cerr << "Variable x = " << x <<endl;
#endif
如果在指令 #ifdef DEBUG 之前已经定义了符号常量DEBUG,则会对程序中的cerr语句进行编译。可以使用 #if 0 语句注释掉程序的一部分:
#if 0
	不进行编译的代码
#endif
例子
#include <iostream>
using namespace std;
#define DEBUG

#define MIN(a, b) (((a)<(b)) ? a : b)

int main (){
	int i, j;
	i = 100;
	j = 30;

#ifdef DEBUG
	cerr << "Trace: Inside main function" <<endl;
#endif

#if 0
	cout << MKSTR(HELLO C++) << endl;
#endif

	cout << "The minimum is " << MIN(i, j) <<endl;

#ifdef DEBUG
	cerr <<"Trace: Coming out of main function" <<endl;
#endif
	return 0;
}
编译执行结果:
Trace: Inside main function
The minimum is 30
Trace: Coming out of main function
#和##运算符
#和## 预处理运算符在C++和ANSI/ISO C中都是可用的。 #运算符会把 replacement-text 令牌转换为用引号引起来的字符串。
#include <iostream>
using namespace std;

#define MKSTR( x )

int main(){
	cout << MKSTR(HELLO C++) <<endl;

	return 0;
}
将 cout << MKSTR(HELLO C++) << endl; 转换成 cout << “HELLO C++” << endl;
##运算符用于连接两个令牌。
#define CONCAT( x, y ) x ## y
例子
#include <iostream>
using namespace std;

#define concat(a, b) a ## b

int main(){
	int xy = 100;
	cout << concat(x, y);
	return 0;
}
将 cout << concat(x, y); 转换为 cout << xy;
C++中的预定义宏
__LINE__ 这会在程序编译时包含当前行号;
__FILE__ 这会在程序编译时包含当前文件名;
__DATE__ 这会包含一个形式为 month/day/year 的字符串,它表示把源文件转换为目标代码的日期。
__TIME__ 这会包含一个形式为 hour:minute:second 的字符串,它表示程序被编译的时间。
C++信号处理
信号是由操作系统传给进程的中断,会提早终止一个程序。在UNIX、LINUX、MacOSX或windows系统中,可以通过Ctrl+C产生中断。
有些信号不能呗程序捕获,但是下表所列信号可以在程序中捕获,并可以基于信号采取适当的动作。这些信号是定义在C++头文件 <csignal>中。
| 信号 | 描述 |
|---|---|
| SIGABRT | 程序的异常终止,如调用abort。 |
| SIGFPE | 错误的算术运算,比如除以零或者导致溢出的操作。 |
| SIGILL | 检测非法指令。 |
| SIGINT | 程序终止(interrupt)信号。 |
| SIGSEGV | 非法访问内存。 |
| SIGTERM | 发送到程序的终止请求。 |
signal()函数
C++信号处理库提供了signal函数,用来捕获突发事件。
void (*signal (int sig, void (*func)(int)))(int);
signal(registered signal, signal handler)
这个函数接收两个参数:第一个参数是要设置的信号的标识符,第二个参数是指向信号处理函数的指针。函数返回值是一个指向先前信号处理函数的指针。如果先前没有设置信号处理函数,则返回值为 SIG_DFL。如果先前设置的信号处理函数为 SIG_IGN,则返回值为 SIG_IGN。
例子
#include <iostream>
#include <csignal>
#include <unistd.h>

using namespace std;

void signalHandler( int signum ){
	cout << "Interrupt signal (" << signum << ") received.\n";

	// 清理并关闭
	// 终止程序
	exit(signum);
}

int main (){
	// 注册信号 SIGINT 和信号处理程序
	signal(SIGINT, signalHandler);

	while(1){
		cout << "Going to sleep..." <<endl;
		sleep(1);
	}
	return 0;
}
编译执行结果:
Going to sleep…
Going to sleep…
Going to sleep…
按下Ctrl+C中断程序:
Going to sleep…
Going to sleep…
Going to sleep…
Interrupt signal (2) received.
raise()函数
可以使用 raise() 生成信号,该函数带有一个整数信号编号作为参数:
int raise (signal sig);
在这里, sig是要发送的信号的编号,这些信号包括:SIGINT、SIGABRT、SIGFPE、SIGILL、SIGSEGV、SIGTERM、SIGHUP。
例子
#include <iostream>
#include <csignal>
#include <unistd.h>

using namespace std;

void signalHandler( int signum ){
	cout << "Interrupt signal (" << signum << ") received.\n";
	// 清理并关闭
	// 终止程序
	exit(signum);
}

int main(){
	int i=0;
	signal (SIGINT, signalHandler);

	while(++i){
		cout << "Going to sleep..." <<endl;
		if(i == 3){
			raise( SIGINT );
		}
		sleep(1);
	}
	return 0;
}
编译执行结果:
Going to sleep…
Going to sleep…
Going to sleep…
Interrupt signal (2) received.
note:
sleep函数
功能:执行挂起一段时间,也就是等待一段时间再继续执行;
用法:sleep(时间)
sleep是区分大小写的,有的编译器是大写,有的是小写;
sleep括号里的时间,在windows下是以毫秒为单位,而Linux是以秒为单位。
C++多线程
多线程是多任务处理的一种特殊形式,多任务处理允许让电脑同时运行两个或两个以上的程序。一般情况下,两种类型的多任务处理:基于进程和基于线程。
- 基于进程的多任务处理是程序的并发执行;
- 基于线程的多任务处理是同一程序的片段的并发执行。
多线程程序包含可以同时运行的两个或多个部分。这样的程序中的每个部分称为一个线程,每个线程定义了一个单独的执行路径。
本教程假设您使用的是 Linux 操作系统,我们要使用 POSIX 编写多线程 C++ 程序。POSIX Threads 或 Pthreads 提供的 API 可在多种类 Unix POSIX 系统上可用,比如 FreeBSD、NetBSD、GNU/Linux、Mac OS X 和 Solaris。
创建线程
#include <pthread.h>
pthread_create (thread, attr, start_routine, arg)
pthread_create 创建一个新的线程,并让它可执行。关于参数:
| 参数 | 描述 |
|---|---|
| thread | 指向线程标识符指针 |
| attr | 一个不透明的属性对象,可以被用来设置线程属性。可以指定线程属性对象,也可以使用默认值 NULL |
| start_routine | 线程运行函数起始地址,一旦线程被创建就会执行 |
| arg | 运行函数的参数。它必须通过把引用作为指针强制转换为void类型进行传递。如果没有传递参数,则使用NULL。 |
| 创建线程成功时,返回0,若返回值不为0,则说明创建失败。 |
终止线程
#include <pthread.h>
pthread_exit (status)
pthread_exit 用于显式地退出一个线程。通常情况下,pthread_exit() 函数是在线程完成工作后无需继续存在时被调用。
如果 main() 是在它所创建的线程之前结束,并通过 pthread_exit() 退出,那么其他线程将继续执行。否则,它们将在 main() 结束时自动被终止。
例子
#include <iostream>
#include <pthread.h>
using namespace std;

#define NUNM_THREADS 5

// 线程的运行函数
void* say_hello(void* args){
	cout << "Hello CPP!" <<endl;
	return 0;
}

int main (){
	pthread_t tids[NUM_THREADS];
	for(int i=0; i<NUM_THREADS; i++){
		int ret = pthread_create(&tids[i], NULL, say_hello, NULL);
		if (ret != 0){
			cout << "pthread_create error: error_code=" << ret <<endl;
		}
	}
	// 等各个线程退出后,进程才结束,否则进程强制结束了,线程可能还没反应过来;
	pthread_exit(NULL);
}
使用 -lpthread 库编译程序:
$ g++ test.cpp -lpthread -o test.o
执行程序:
$ ./test.o
Hello CPP!
Hello CPP!
Hello CPP!
Hello CPP!
Hello CPP!
使用pthread_create()函数创建了5个线程,并接收传入的参数。每个线程打印一个“Hello CPP!”消息,并输出接收的参数,然后调用pthread_exit()终止线程。
#include <iostream>
#include <cstdlib.h>
#include <pthread.h>

using namespace std;

#define NUM_THREADS 5

void *PrintHello(void *threadid){
	//  对传入的参数进行强制类型转换,由无类型指针变为整型数指针,然后再读取
	int tid = *((int*)threadid);
	cout << "Hello CPP! 线程ID, " << tid <<endl;
	pthread_exit(NULL);
}

int main(){
	pthread_t threads[NUM_THREADS];
	int indexes[NUM_THREADS];	// 用数组保存i的值
	int rc;
	int i;
	for (i=0; i<NUM_THREADS; i++){
		cout << "main() : 创建线程, " << i <<endl;
		indexes[i] = i;	// 先保存i的值
		rc = pthread_create(&threads[i], NULL, PrintHello, (void *)&(indexes[i]));
		if (rc) {
			cout << "Error: 无法创建线程, " << rc <<endl;
			exit(-1);
		}
	}
	pthread_exit(NULL);
}
编译执行结果:
$ g++ test.cpp -lpthread -o test.o
$ ./test.o
main() : 创建线程, 0
main() : 创建线程, 1
Hello Runoob! 线程 ID, 0
main() : 创建线程, Hello Runoob! 线程 ID, 21

main() : 创建线程, 3
Hello Runoob! 线程 ID, 2
main() : 创建线程, 4
Hello Runoob! 线程 ID, 3
Hello Runoob! 线程 ID, 4
向线程传递参数
这个实例演示了如何通过结构传递多个参数。
#include <iostream>
#include <cstdlib>
#include <pthread.h>

using namespace std;

#define NUNM_THREADS 5

struct thread_data{
	int thread_id;
	char *message;
};

void *PrintHello(void *threadarg){
	struct thread_data *my_data;
	my_data = (struct thread_data *) threadarg;
	cout << "Thread ID : " << my_data->thread_id;
	cout << " Message : " << my_data->message << endl;

	pthread_exit(NULL);
}

int main(){
	pthread_t threads[NUM_THREADS];
	struct thread_data td[NUM_THREADS];
	int rc;
	int i;

	for( i=0; i<NUM_THREADS; i++ ){
		cout << "main() : creating thread, " << i << endl;
		td[i].thread_id = i;
		td[i].message = (char*)"This is message";
		rc = pthread_create(&threads[i], NULL, PrintHello, (void *)&td[i]);
		if (rc){
			cout << "Eror: unable to create thread, " << rc <<endl;
			exit(-1);
		}
	}
	pthread_exit(NULL);
}
编译执行结果:
$ g++ -Wno-write-strings test.cpp -lpthread -o test.o
$ ./test.o
main() : creating thread, 0
main() : creating thread, 1
Thread ID : 0 Message : This is message
main() : creating thread, Thread ID : 21
 Message : This is message
main() : creating thread, 3
Thread ID : 2 Message : This is message
main() : creating thread, 4
Thread ID : 3 Message : This is message
Thread ID : 4 Message : This is message
连接和分离线程
使用以下两个函数连接或分离线程:
pthread_join(threadid, status)
pthread_detach(threadid)
pthread_join() 子程序阻碍调用程序,直到指定的 threadid线程终止为止。当创建一个线程时,它的某个属性会定义它是否是可连接的(joinable)或可分离的(detached)。只有创建时定义为可连接的线程才可以被连接。如果线程创建时被定义为可分离的,则它永远也不能被连接。
例子
#include <iostream>
#include <cstdlib>
#include <pthread.h>
#include <unistd.h>

using namespace std;

#define NUM_THREADS 5
void *wait(void *t){
	int i;
	long tid;

	tid = (long)t;

	sleep(1);
	cout << "Sleeping in thread " <<endl;
	cout << "Thread with id : " << tid << " ...exiting" <<endl;
	pthread_exit(NULL);
}

int main(){
	int rc;
	int i;
	pthread_t threads[NUM_THREADS];
	pthread_attr_t attr;
	void *status;

	// 初始化并设置线程为可连接的(joinable)
	pthread_attr_init(&attr);
	pthread_attr_setdetachstate(&attr, PTHREAD_CREATE_JOINABLE);

	for (i=0; i<NUM_THREADS; i++){
		cout << "main() : creating thread, " << i <<endl;
		rc = pthread_create(&threads[i], NULL, wait, (void *)&i);
		if (rc) {
			cout << "Error:unable to create thread, " << rc <<endl;
			exit(-1);
		}
	}

	// 删除属性,并等待其他线程
	pthread_attr_destroy(&attr);
	for(i=0; i<NUM_THREDS; i++){
		rc = pthread_join(threads[i], &status);
		if(rc){
			couot << "Error:unable to join," << rc <<endl;
			exit(-1);
		}
		cout << "Main: completed thread id :" << i;
		cout << " exiting with status :" <<status <<endl;
	}

	cout << "Main: program exiting." <<endl;
	pthread_exit(NULL);
}
编译执行结果:
main() : creating thread, 0
main() : creating thread, 1
main() : creating thread, 2
main() : creating thread, 3
main() : creating thread, 4
Sleeping in thread
Thread with id : 4  ...exiting
Sleeping in thread
Thread with id : 3  ...exiting
Sleeping in thread
Thread with id : 2  ...exiting
Sleeping in thread
Thread with id : 1  ...exiting
Sleeping in thread
Thread with id : 0  ...exiting
Main: completed thread id :0  exiting with status :0
Main: completed thread id :1  exiting with status :0
Main: completed thread id :2  exiting with status :0
Main: completed thread id :3  exiting with status :0
Main: completed thread id :4  exiting with status :0
Main: program exiting.
std::thread
C++ 11 之后添加了新的标准线程库 std::thread , std::thread 在 头文件中声明,因此使用 std::thread 时需要包含在 头文件。
一些编译器使用C++的编译参数是 -std=c++
g++ -std=c++ test.cpp
std::thread 默认构造函数,创建一个空的std::thread执行对象。
#include <thread>
std::thread thread_object(callable)
一个可调用对象可以是以下三个中的任何一个:
- 函数指针
- 函数对象
- lambda表达式
定义 callable 后,将其传递给 std::thread 构造函数 thread_object 。
例子
// 演示多线程的CPP程序
// 使用三个不同的可调用对象
#include <iostream>
#include <thread>
using namespace std;

// 一个虚拟函数
void foo(int Z){
	for (int i=0; i < Z; i++){
		cout << "线程使用函数指针作为可调用参数\n";
	}
}

// 可调用对象
class thread_obj {
public:
	void operator()(int x){
		for (int i=0; i<x; i++){
			cout << "线程使用函数作为可调用参数\n";
		}
	}
};

int main(){
	cout << "线程 1、2、3 "
		"独立运行" <<endl;

	// 函数指针
	thread th1(foo, 3);

	// 函数对象
	thread th2(thread_obj(), 3);

	// 定义 Lambda 表达式
	auto f = [](int x) {
		for (int i=0; i<x; i++){
			cout << "线程使用lambda 表达式作为可调用参数\n";
		}
	};

	thread th3(f, 3);
	th1.join();
	th2.join();
	th3.join();
	return 0;
}
使用C++ 11 的编译参数 -std=c++11:
g++ -std=c++11 test.cpp
编译执行结果:
线程 1 、2 、3 独立运行
线程使用函数指针作为可调用参数
线程使用函数指针作为可调用参数
线程使用函数指针作为可调用参数
线程使用函数对象作为可调用参数
线程使用函数对象作为可调用参数
线程使用函数对象作为可调用参数
线程使用 lambda 表达式作为可调用参数
线程使用 lambda 表达式作为可调用参数
线程使用 lambda 表达式作为可调用参数
C++web编程
什么是CGI?
- 公共网关接口(CGI),是一套标准,定义了信息时如何在Web服务器和客户端脚本之间进行交换的;
- CGI规范目前是由NCSA维护的,NCSA定义CGI如下:
- 公共网关接口(CGI),是一种用于外部网关程序与信息服务器(如HTTP服务器)对接的接口标准。
Web浏览
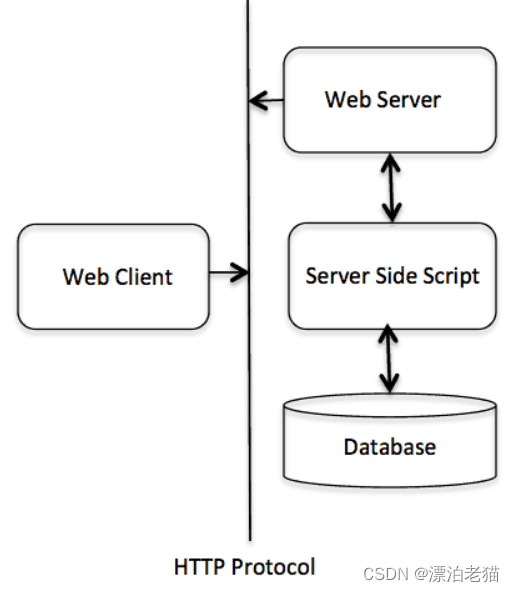
当我们点击一个超链接,浏览一个特定的网页或URL,会发生什么?
- 浏览器联系上HTTP Web服务器,并请求URL,即文件名;
- Web服务器将解析URL,并查找文件名。如果找到请求的文件,Web服务器会把文件发送回浏览器,否则发送一条错误信息,表明请求了一个错误的文件;
- Web浏览器从Web服务器获取响应,并根据接收到的响应来显示文件或错误消息。
然而,以这种方式搭建起来的HTTP服务器,不管何时请求目录中的某个文件,HTTP服务器发送回来的不是该文件,而是以程序形式执行,并把执行产生的输出发送回浏览器显示出来。
公共网关协议(CGI),是使得应用程序(称为CGI程序或CGI脚本)能够与Web服务器以及客户端进行交互的标准协议。这些CGI程序可以用Python、PERL、shell、C或C++等进行编写。
CGI架构图
Web服务器配置
在进行CGI编程之前,请确保Web服务器支持CGI,并已配置成可以处理CGI程序。所有由HTTP服务器执行的CGI程序,都必须在预配置的目录中。该目录就是CGI目录,按照惯例命名为 /var/www/cgi-bin 。虽然CGI文件是C++可执行文件,但是按照惯例它的扩展名是 .cgi。
默认情况喜爱,Apache Web 服务器回配置在 /var/www/cgi-bin 中运行CGI程序。如果想指定其他目录来运行CGI脚本,在httpd.conf中修改:
<Directory "/var/www/cgi-bin">
   AllowOverride None
   Options ExecCGI
   Order allow,deny
   Allow from all
</Directory>

<Directory "/var/www/cgi-bin">
Options All
</Directory>
第一个CGI程序
#include <iostream>
using namespace std;

int main(){
	cout << "Content -type:text/html\r\n\r\n";
	cout << "<html>\n";
   	cout << "<head>\n";
   	cout << "<title>Hello World - 第一个 CGI 程序</title>\n";
  	cout << "</head>\n";
   	cout << "<body>\n";
   	cout << "<h2>Hello World! 这是我的第一个 CGI 程序</h2>\n";
   	cout << "</body>\n";
   	cout << "</html>\n";

   	return 0;
}
编译之后,把可执行文件命名为 cplusplus.cgi ,并把这个文件保存在 /var/www/cgi-bin 中。
执行结果:


 227
227


 被折叠的 条评论
为什么被折叠?
被折叠的 条评论
为什么被折叠?
 到【灌水乐园】发言


