


目录
前言
基于尚硅谷杨博超老师讲解的Mybtaisplus(spring版)的学习笔记。
windows系统下的mysql密码是:abc123。
项目地址
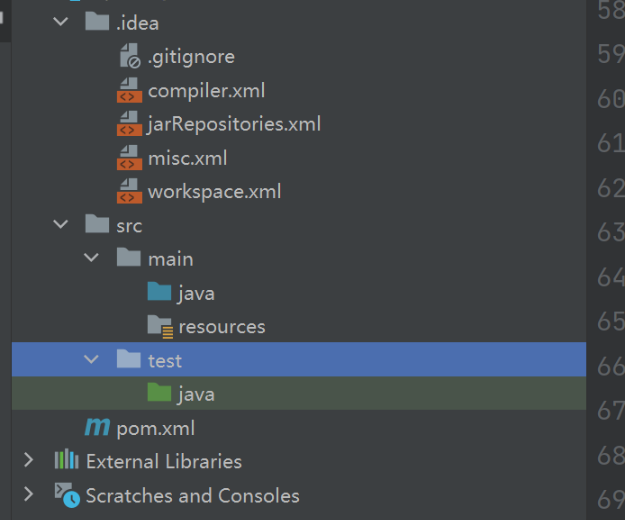
从github导入maven项目时,因为我们设置了ignore文件,所以在复制导入的时候,本地是没有src目录的,我们需要自己创建。即src\main\java 和src\main\resources及src\test\java。
1 MyBatis-Plus简介
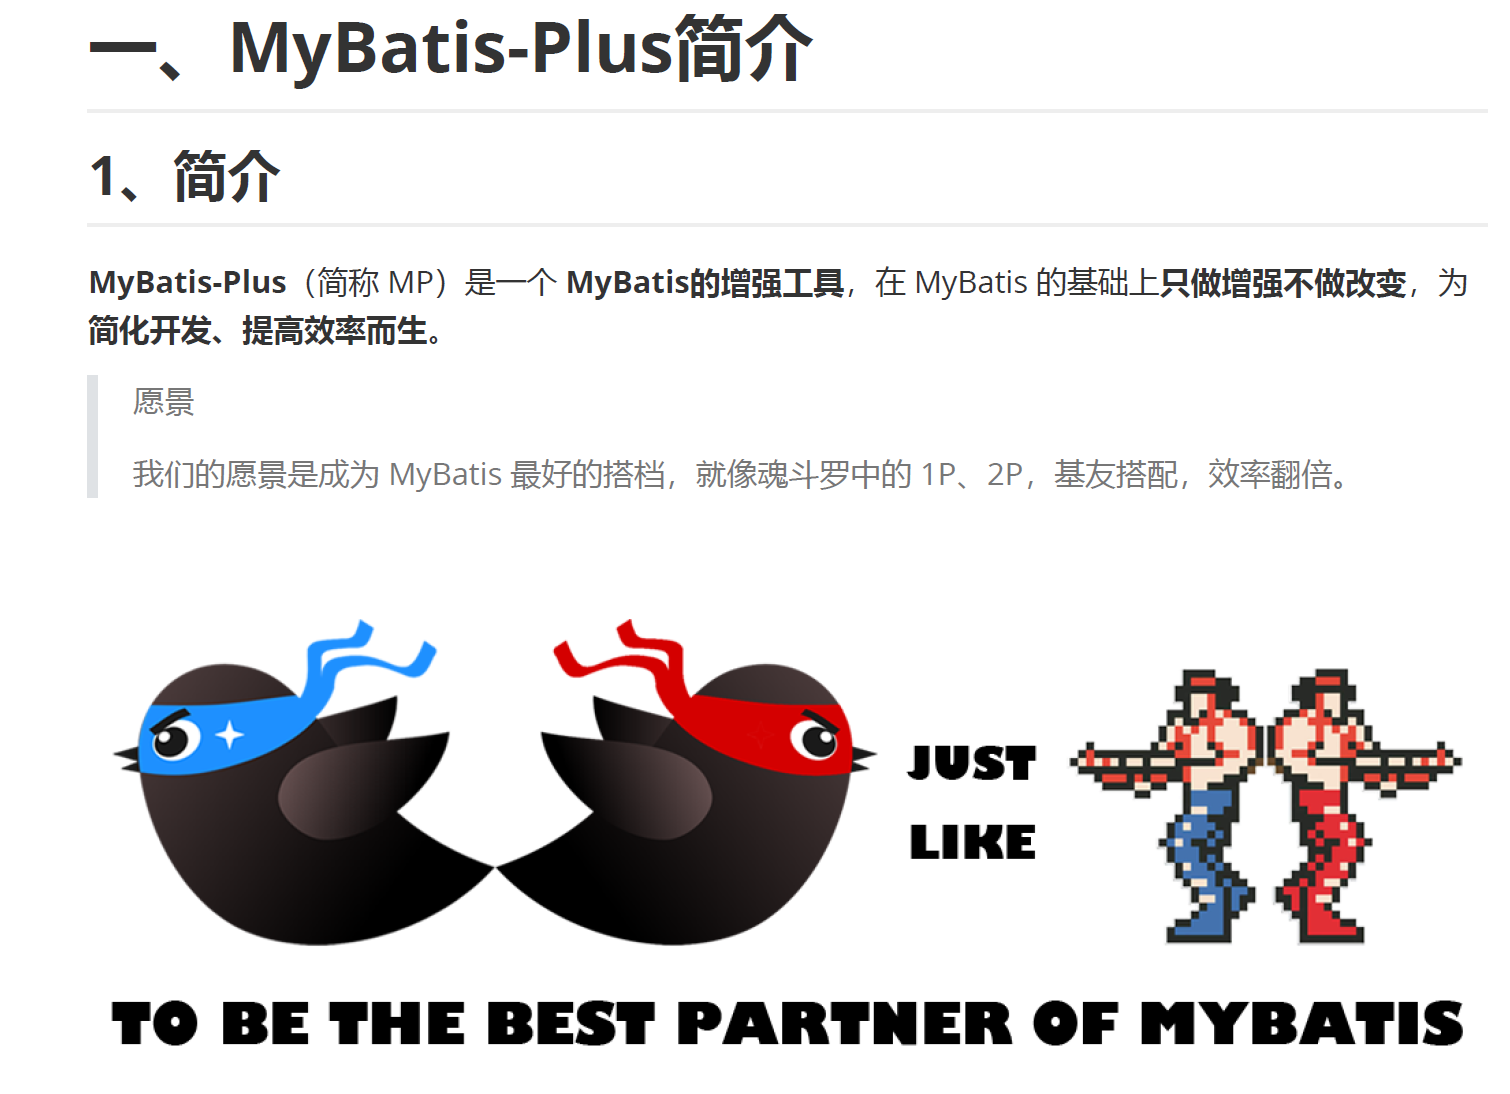
1.1 简介
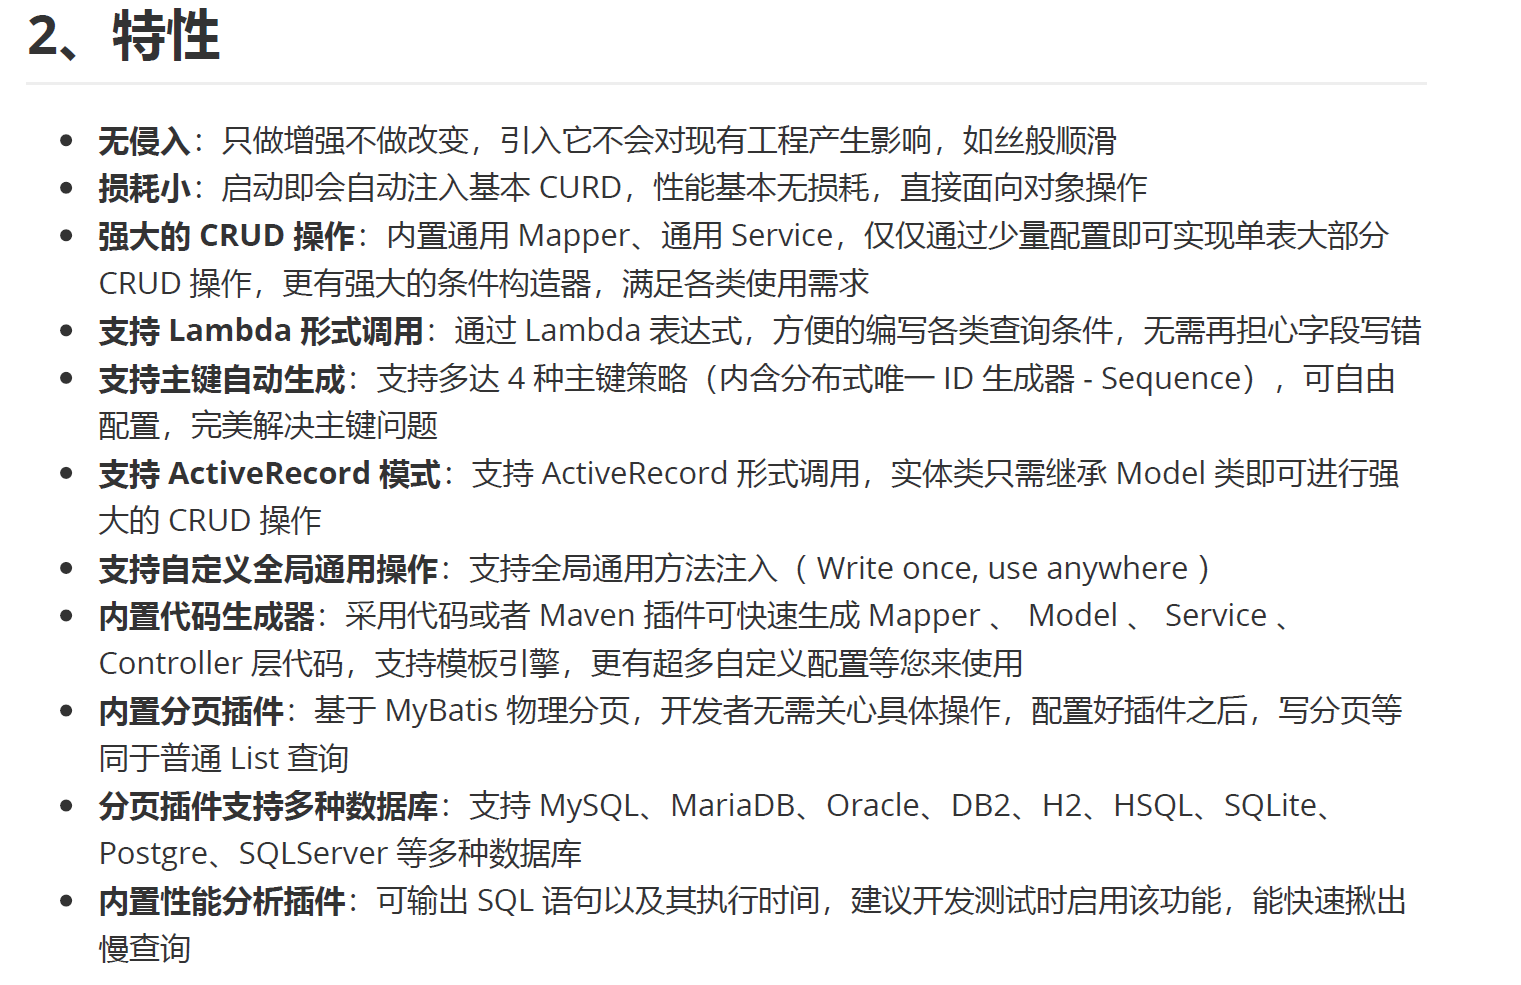
1.2 特性
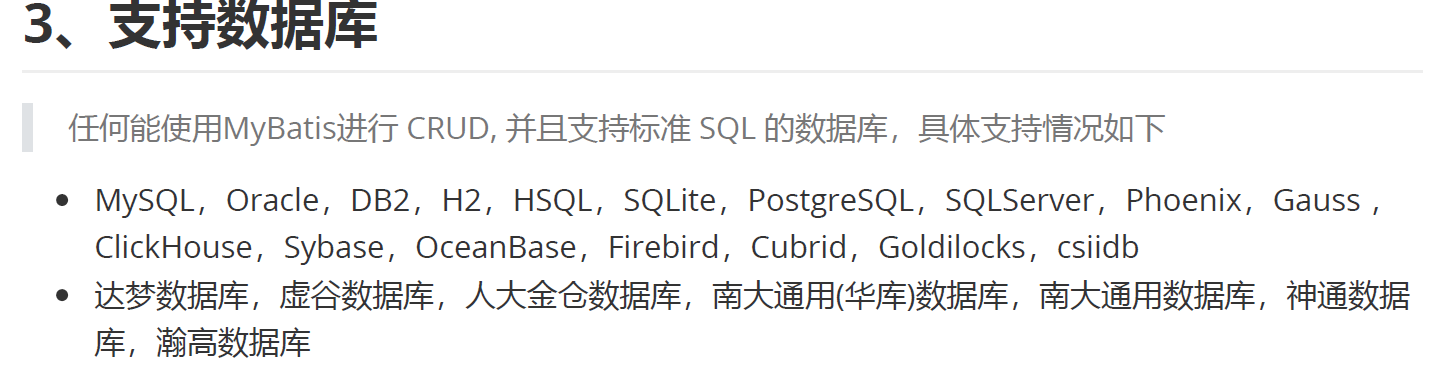
1.3 支持数据库
1.4 框架结构
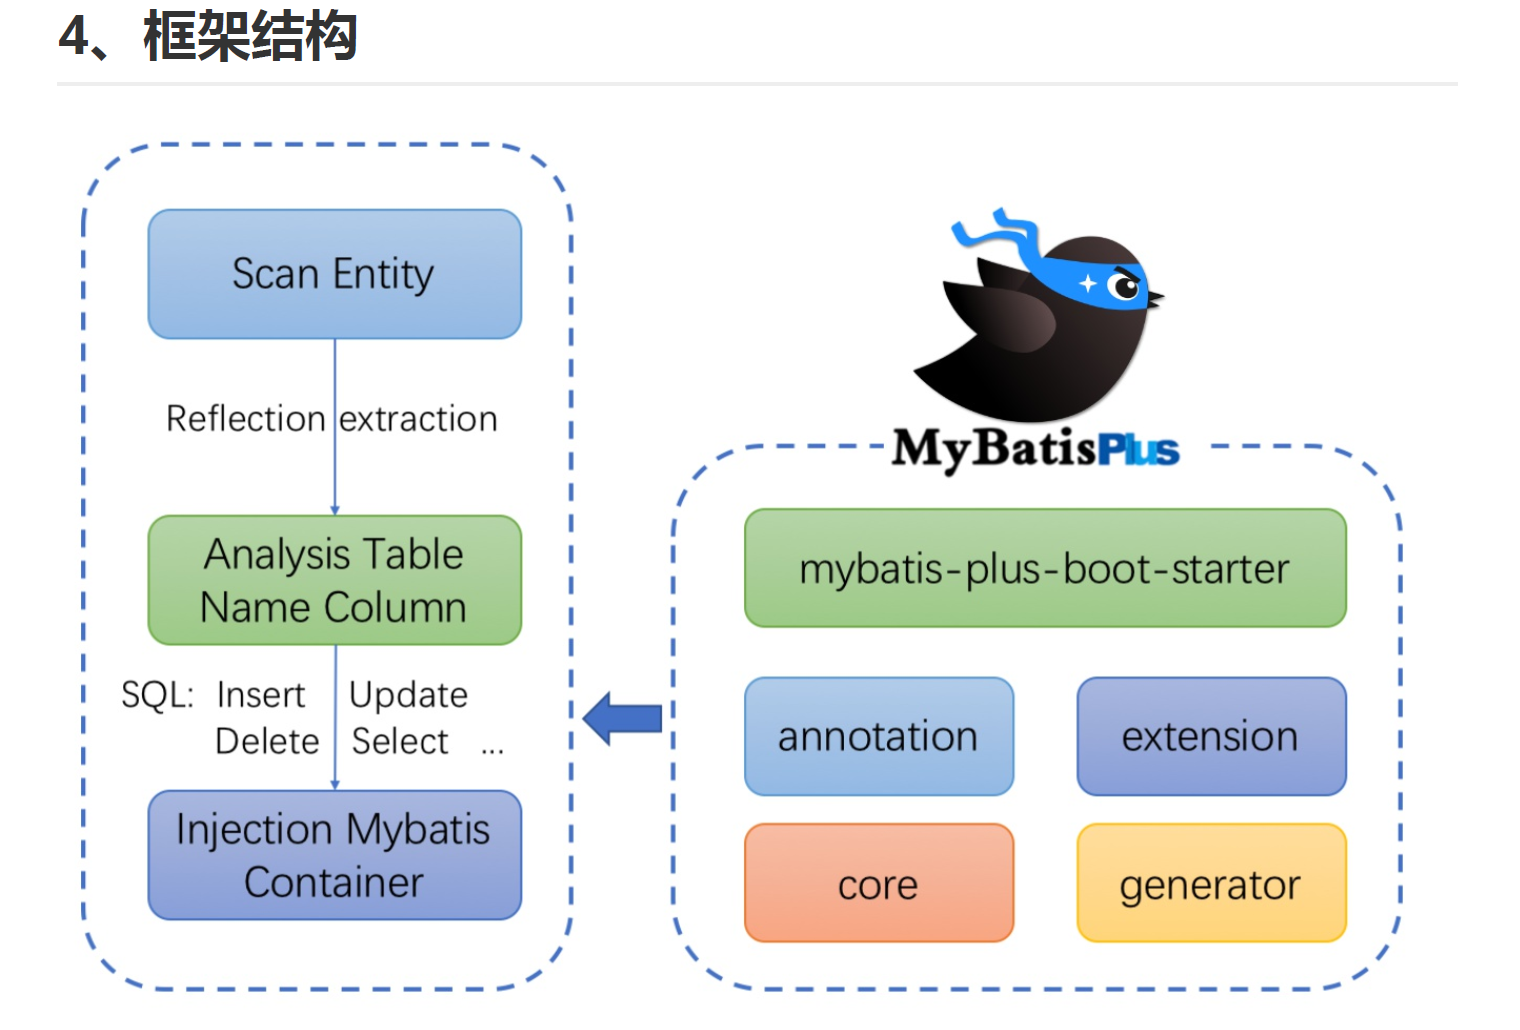
工作原理:扫描实体类,通过反射抽取实体类中的属性,然后再分析我们要操作的表是谁?需要操作的实体类的属性是谁?也就是表中的字段是谁?然后再生成对应的sql语句,然后再注入到mybatis容器中。
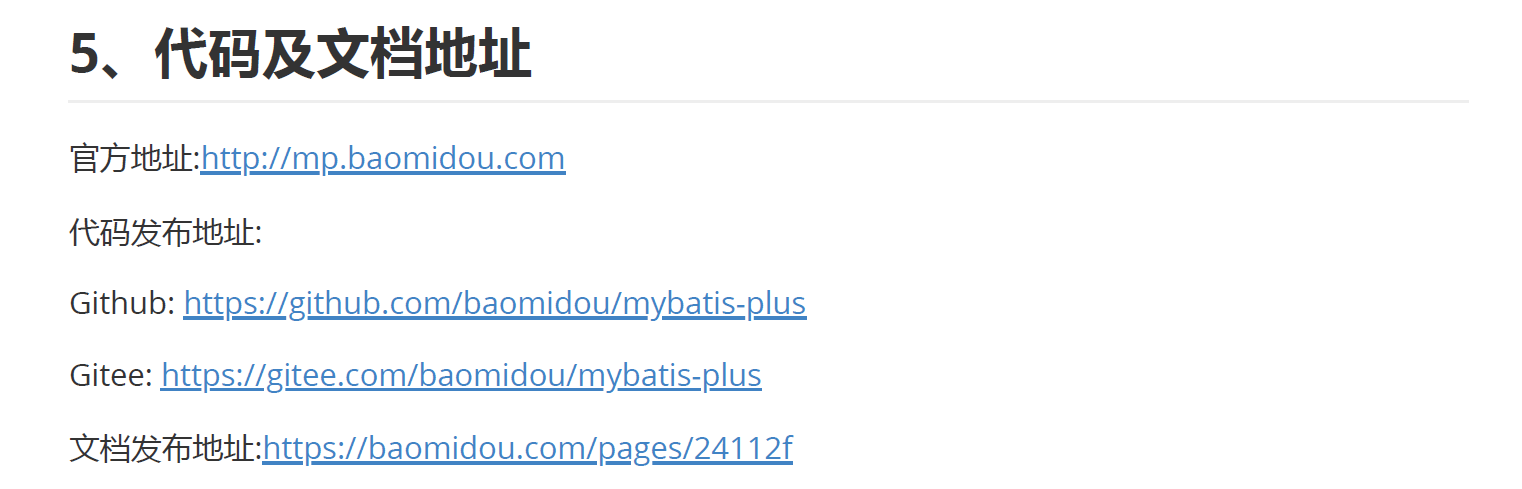
1.5 代码及文档地址
2 入门案例
2.1 开发环境
以maven工程为例,以ssm整合为技术框架。
| 工具 | 版本 |
|---|---|
| IDE | idea 2021.3 |
| JDK | JDK1.8 |
| MAVEN | maven 3.8.4 |
| MySQL | MySQL5.7 |
| Spring | 5.3.1 |
| MyBatis-Plus | 3.4.3.4 |
2.2 准备工作
2.2.1 创建maven工程并引入依赖
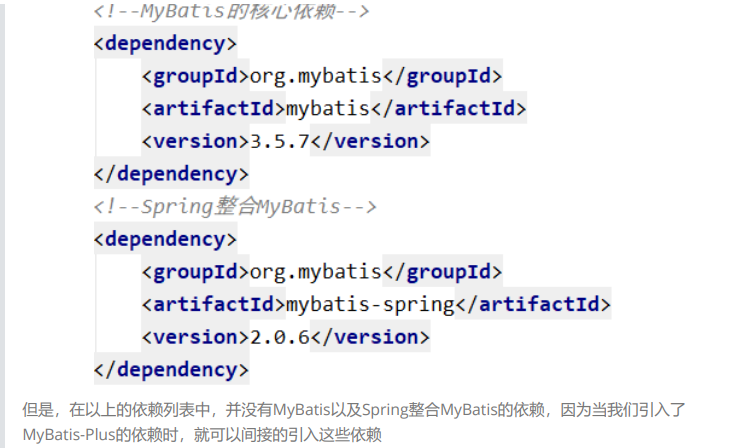
新建一个maven工程。引入需要的依赖。
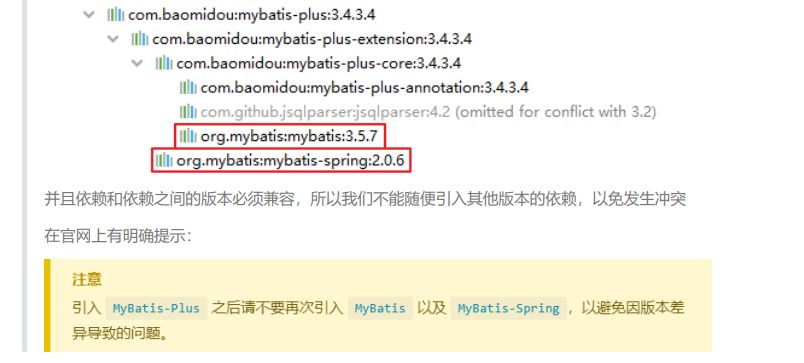
注意使用mybatis-plus代替mybatis和spring的依赖。
完整版依赖在项目地址中。此处的依赖仅仅只是为了先构建框架。
<?xml version="1.0" encoding="UTF-8"?>
<project xmlns="http://maven.apache.org/POM/4.0.0"
         xmlns:xsi="http://www.w3.org/2001/XMLSchema-instance"
         xsi:schemaLocation="http://maven.apache.org/POM/4.0.0 http://maven.apache.org/xsd/maven-4.0.0.xsd">
    <modelVersion>4.0.0</modelVersion>

    <groupId>com.atguigu.ssm</groupId>
    <artifactId>ssm-integration</artifactId>
    <version>1.0-SNAPSHOT</version>
    <packaging>jar</packaging>

    <dependencies>
        <!--提供大量扩展,提供一些容器实现-->
        <dependency>
            <groupId>org.springframework</groupId>
            <artifactId>spring-context</artifactId>
            <version>${spring.version}</version>
        </dependency>
        <!-- Spring 的测试功能 -->
        <dependency>
            <groupId>org.springframework</groupId>
            <artifactId>spring-test</artifactId>
            <version>${spring.version}</version>
        </dependency>

        <!-- 日志 -->
        <dependency>
            <groupId>ch.qos.logback</groupId>
            <artifactId>logback-classic</artifactId>
            <version>1.2.3</version>
        </dependency>

        <!-- MySQL驱动 -->
        <dependency>
            <groupId>mysql</groupId>
            <artifactId>mysql-connector-java</artifactId>
            <version>5.1.3</version>
        </dependency>

        <!-- 数据源连接池 -->
        <dependency>
            <groupId>com.alibaba</groupId>
            <artifactId>druid</artifactId>
            <version>1.0.31</version>
        </dependency>

        <!-- junit5测试类-->
        <dependency>
            <groupId>org.junit.jupiter</groupId>
            <artifactId>junit-jupiter-api</artifactId>
            <version>5.7.0</version>
            <scope>test</scope>
        </dependency>

        <!-- lombok用来简化实体类 -->
        <dependency>
            <groupId>org.projectlombok</groupId>
            <artifactId>lombok</artifactId>
            <version>1.16.16</version>
        </dependency>

        <!--MyBatis-Plus的核心依赖-->
        <dependency>
            <groupId>com.baomidou</groupId>
            <artifactId>mybatis-plus</artifactId>
            <version>3.4.3.4</version>
        </dependency>


    </dependencies>
    <properties>
        <maven.compiler.source>8</maven.compiler.source>
        <maven.compiler.target>8</maven.compiler.target>
        <spring.version>5.3.1</spring.version>
    </properties>


</project>

注意
1. MySQL5.7版本的url:
jdbc:mysql://localhost:3306/mybatis_plus?characterEncoding=utf-8&useSSL=false

2. MySQL8.0版本的url:
jdbc:mysql://localhost:3306/mybatis_plus?
serverTimezone=GMT%2B8&characterEncoding=utf-8&useSSL=false

3. 否则运行测试用例报告如下错误:
java.sql.SQLException: The server time zone value 'Öйú±ê׼ʱ¼ä' is unrecognized orrepresents more
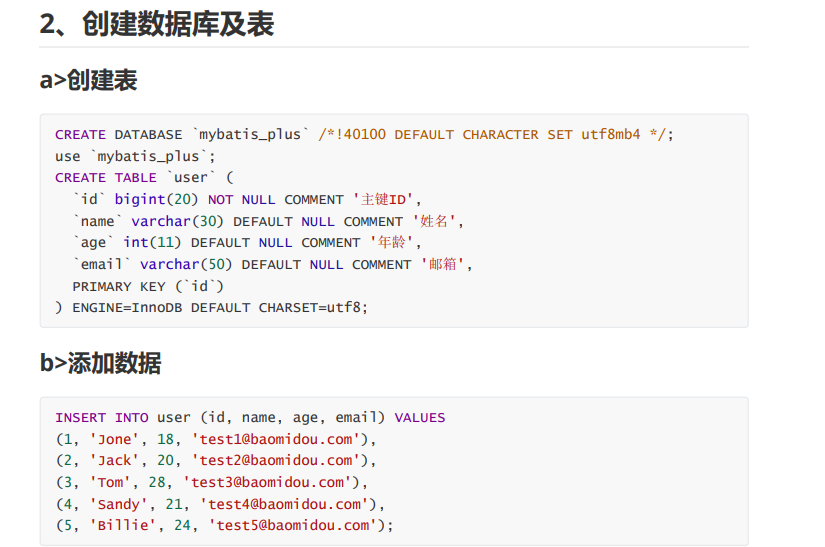
2.2.2 物理建模:创建数据库及表
2.2.3 逻辑建模:创建实体类
[1] lombok插件的使用
简化实体类开发,即我们不需要手动去创建有参和无参构造以及get和set方法还有tostring等。
我们只需要在类上加入注解: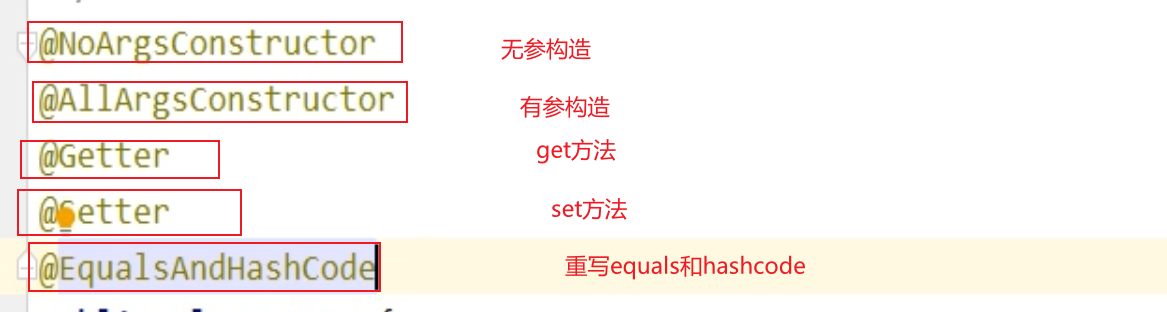
然后重新进行编译之后就会自动帮助我们创建。
但是如果在一个类上写如此多的注解,我们可以使用一个Data注解来代替上面设置的5 个注解。
注意:data注解中不包括有参构造,但是新增了一个tostring方法,所以说相当于还是代替5个注解。

这个注解是我们使用最多的。
[2] 创建实体类
这里我们使用lombok插件简化实体类开发。
@Data
public class User {

    private Long id;
    private String name;
    private Integer age;
    private String email;
}
注意此处的id类型是Long类型,不要写成long类型,否则雪花算法不会实现。因为雪花算法要求就是Long。
2.2.4 加入日志配置文件
日志文件对于我们进行调试代码有很好的作用,我们可以使用日志配置文件进行更好的查询到异常问题所在。
注意:配置文件全部放在resources目录下。
logback.xml
<?xml version="1.0" encoding="UTF-8"?>
<configuration debug="false">
    <!--定义日志文件的存储地址 logs为当前项目的logs目录 还可以设置为../logs -->
    <property name="LOG_HOME" value="logs" />
    <!--控制台日志, 控制台输出 -->
    <appender name="STDOUT" class="ch.qos.logback.core.ConsoleAppender">
        <encoder class="ch.qos.logback.classic.encoder.PatternLayoutEncoder">
            <!--格式化输出:%d表示日期,%thread表示线程名,%-5level:级别从左显示5个字符
            宽度,%msg:日志消息,%n是换行符-->
            <pattern>%d{yyyy-MM-dd HH:mm:ss.SSS} [%thread] %-5level %logger{50}
                - %msg%n</pattern>
        </encoder>
    </appender>
    <!-- 日志输出级别 -->
    <root level="DEBUG">
        <appender-ref ref="STDOUT" />
    </root>

    <!-- 根据特殊需求指定局部日志级别 -->
    <logger name="org.springframework.web.servlet.DispatcherServlet" level="DEBUG" />
    <logger name="src/test/java/com/atguigu/mybatisplus/test/MyBatisPlusTest.java" level="DEBUG"/>
</configuration>
2.3 连接数据库
2.3.1 创建jdbc.properties
在resources目录下创建jdbc.properties文件。
jdbc.username=root
jdbc.password=abc123
jdbc.url=jdbc:mysql://localhost:13306/mybatis_plus
jdbc.driver=com.mysql.jdbc.Driver
2.3.2 创建Spring配置文件并完成测试所需配置
因为目前我们只是先进行数据库连接的测试,所以我们需要配置的很少。只需要引入jdbc.properties文件和配置数据源既可。
spring-persist
<?xml version="1.0" encoding="UTF-8"?>
<beans xmlns="http://www.springframework.org/schema/beans"
       xmlns:xsi="http://www.w3.org/2001/XMLSchema-instance"
       xmlns:context="http://www.springframework.org/schema/context"
       xsi:schemaLocation="http://www.springframework.org/schema/beans
                            http://www.springframework.org/schema/beans/spring-beans.xsd
                            http://www.springframework.org/schema/context
                            https://www.springframework.org/schema/context/spring-context.xsd">
    <!-- 引入jdbc.properties -->
    <context:property-placeholder location="classpath:jdbc.properties"></context:property-placeholder>

    <!-- 配置Druid数据源 -->
    <bean id="dataSource" class="com.alibaba.druid.pool.DruidDataSource">
        <property name="driverClassName" value="${jdbc.driver}"></property>
        <property name="url" value="${jdbc.url}"></property>
        <property name="username" value="${jdbc.username}"></property>
        <property name="password" value="${jdbc.password}"></property>
    </bean>
</beans>
2.3.3 创建junit测试类测试
测试类写法有两种。按自己喜好选择。
spring测试类写法1
//    //在spring的环境中进行测试
//@RunWith(SpringJUnit4ClassRunner.class)
指定spring的配置文件
//@ContextConfiguration("classpath:spring-persist.xml")


//spring测试类写法2
@SpringJUnitConfig(locations = {
   "classpath:spring-persist.xml"})
public class MyBatisPlusTest {


    @Autowired
    private DruidDataSource dataSource;

    Logger logger = LoggerFactory.getLogger(getClass());


    @Test
    public void getConn() throws SQLException {

        DruidPooledConnection connection = dataSource.getConnection();

        logger.debug(connection.toString());

    }

}
执行操作,测试成功。
2.4 spring整合mybatis
2.4.1 创建mybatis的配置文件
在resources下创建mybatis-config.xml。
<?xml version="1.0" encoding="UTF-8" ?>
<!DOCTYPE configuration
        PUBLIC "-//MyBatis.org//DTD Config 3.0//EN"
        "http://mybatis.org/dtd/mybatis-3-config.dtd">
<!--设置实体类所在包的别名-->
    <typeAliases>
        <package name="com.atguigu.mybatisplus.entity"/>
    </typeAliases>

</configuration>
注意此处不需要设置驼峰式命名,因为mybatisplus就是默认会转换为驼峰式命名。
驼峰式命名
包名:xxxyyyzzz
类名、接口名:XxxYyyZzz
变量名、方法名:xxxYyyZzz
常量名:XXX_YYY_ZZZ
2.4.2 创建mapper接口
public interface UserMapper  {

    /**
     * 查询所有用户信息
     * @return
     */

    List<User> getAllUser();
}
2.4.3 创建mapper映射文件
<?xml version="1.0" encoding="UTF-8" ?>
<!DOCTYPE mapper
        PUBLIC "-//mybatis.org//DTD Mapper 3.0//EN"
        "http://mybatis.org/dtd/mybatis-3-mapper.dtd">
<mapper namespace="com.atguigu.mybatisplus.mapper.TestMapper">

    <!-- List<User> getAllUser();-->
    <select id="getAllUser" resultType="user">
        select id,name,age,email from user
    </select>

</mapper>
2.4.4 完善spring配置文件
<?xml version="1.0" encoding="UTF-8"?>
<beans xmlns="http://www.springframework.org/schema/beans"
       xmlns:xsi="http://www.w3.org/2001/XMLSchema-instance"
       xmlns:context="http://www.springframework.org/schema/context"
       xsi:schemaLocation="http://www.springframework.org/schema/beans
                            http://www.springframework.org/schema/beans/spring-beans.xsd
                            http://www.springframework.org/schema/context
                            https://www.springframework.org/schema/context/spring-context.xsd">
    <!-- 引入jdbc.properties -->
    <context:property-placeholder location="classpath:jdbc.properties"></context:property-placeholder>

    <!-- 配置Druid数据源 -->
    <bean id="dataSource" class=
最低0.47元/天 解锁文章


 1006
1006


 被折叠的 条评论
为什么被折叠?
被折叠的 条评论
为什么被折叠?
 到【灌水乐园】发言


