


 本文详细介绍了Spring Security在Web应用中的身份认证、授权流程,以及如何自定义登录界面、认证规则、成功/失败处理和注销登录。涵盖自定义UserDetailsService、验证码验证和权限控制等内容。
Spring Security
简介
Spring 是非常流行和成功的 Java 应用开发框架,Spring Security 正是 Spring 家族中的成员。Spring Security 基于 Spring 框架,提供了一套 Web 应用安全性的完整解决方案。
于安全方面的两个主要区域是“认证”和“授权”(或者访问控制),一般来说,Web 应用的安全性包括用户认证(Authentication)和用户授权(Authorization)两个部分,这两点也是 Spring Security 重要核心功能
(1)用户认证指的是:验证某个用户是否为系统中的合法主体,也就是说用户能否访问该系统。用户认证一般要求用户提供用户名和密码。系统通过校验用户名和密码来完成认证过程。通俗点说就是系统认为用户是否能登录
(2)用户授权指的是验证某个用户是否有权限执行某个操作。在一个系统中,不同用户所具有的权限是不同的。比如对一个文件来说,有的用户只能进行读取,而有的用户可以进行修改。一般来说,系统会为不同的用户分配不同的角色,而每个角色则对应一系列的权限。通俗点讲就是系统判断用户是否有权限去做某些事情。
SpringSecurity 特点:
- 和 Spring 无缝整合。
- 全面的权限控制。
- 专门为 Web 开发而设计。
- 旧版本不能脱离 Web 环境使用。
- 新版本对整个框架进行了分层抽取,分成了核心模块和 Web 模块。单独
引入核心模块就可以脱离 Web 环境。 - 重量级。
Shiro
Apache 旗下的轻量级权限控制框架。
特点:
- 轻量级。Shiro 主张的理念是把复杂的事情变简单。针对对性能有更高要求
的互联网应用有更好表现。 - 通用性。
- 好处:不局限于 Web 环境,可以脱离 Web 环境使用。
- 缺陷:在 Web 环境下一些特定的需求需要手动编写代码定制
认识SpringSecurity
Spring Security是一个功能强大、可高度定制的身份验证和访问控制框架。它是保护基于Spring的应用程序的事实标准。
Spring Security是一个面向Java应用程序提供身份验证和安全性的框架。与所有Spring项目一样,Spring Security的真正威力在于它可以轻松地扩展以满足定制需求。
记住几个类:
WebSecurityConfigurerAdapter:自定义Security策略AuthenticationManagerBuilder:自定义认证策略@EnableWebSecurity:开启WebSecurity模式
Spring Security的两个主要目标是 “认证” 和 “授权”(访问控制)。
“认证”(Authentication)
身份验证是关于验证您的凭据,如用户名/用户ID和密码,以验证您的身份。
身份验证通常通过用户名和密码完成,有时与身份验证因素结合使用。
“授权” (Authorization)
授权发生在系统成功验证您的身份后,最终会授予您访问资源(如信息,文件,数据库,资金,位置,几乎任何内容)的完全权限。
这个概念是通用的,而不是只在Spring Security 中存在。
SpringSecurity 入门案例
创建一个springboot项目,加入web和security的启动器
<dependency>
   <groupId>org.springframework.boot</groupId>
   <artifactId>spring-boot-starter-security</artifactId>
</dependency>
controller
package com.blb.controller;

import org.springframework.web.bind.annotation.GetMapping;
import org.springframework.web.bind.annotation.RestController;

@RestController
public class TestController {

    @GetMapping("/hello")
    public String hello(){
        return "hello";
    }
}
访问
http://localhost:8080/hello

默认的用户名:user
密码在项目启动的时候在控制台会打印,注意每次启动的时候密码都回发生变化!


输入玩账户密码后才能进入返回的页面
虽然开发者只需要引入一个依赖,就可以让 Spring Security 对应用进行保护。Spring Security 又是如何做到的呢?
在 Spring Security 中 认证、授权 等功能都是基于[过滤器]
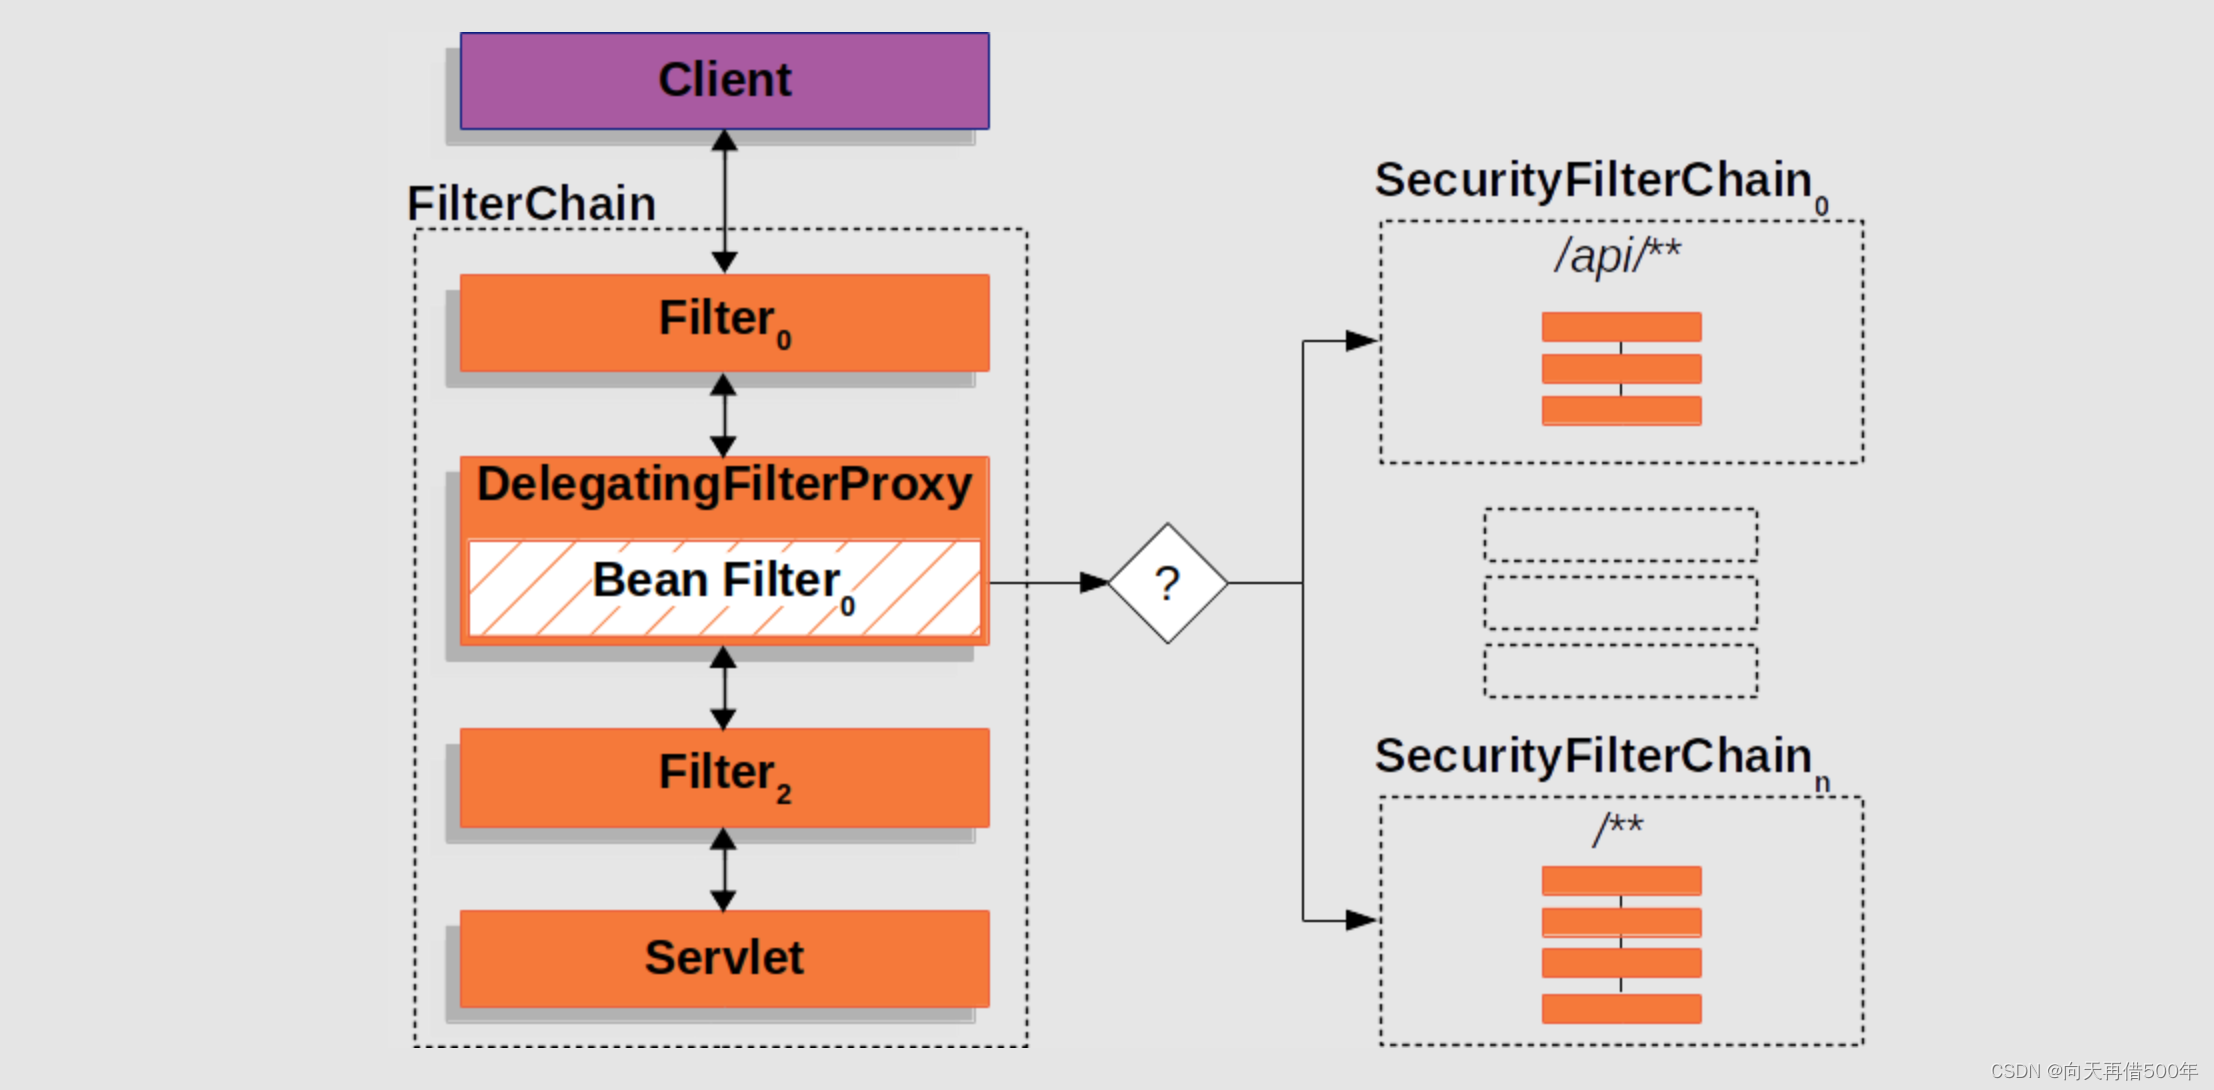
需要注意的是,默认过滤器并不是直接放在 Web 项目的原生过滤器链中,而是通过一个FlterChainProxy 来统一管理。Spring Security 中的过滤器链通过 FilterChainProxy 嵌入到 Web项目的原生过滤器链中。FilterChainProxy 作为一个顶层的管理者,将统一管理 Security Filter。FilterChainProxy 本身是通过 Spring 框架提供的 DelegatingFilterProxy 整合到原生的过滤器链中。
流程分析

- 请求 /hello 接口,在引入 spring security 之后会先经过一些列过滤器
- 在请求到达 FilterSecurityInterceptor时,发现请求并未认证。请求拦截下来,并抛出 AccessDeniedException 异常。
- 抛出 AccessDeniedException 的异常会被 ExceptionTranslationFilter 捕获,这个 Filter 中会调用 LoginUrlAuthenticationEntryPoint#commence 方法给客户端返回 302,要求客户端进行重定向到 /login 页面。
- 客户端发送 /login 请求。
- /login 请求会再次被拦截器中 DefaultLoginPageGeneratingFilter 拦截到,并在拦截器中返回生成登录页面。
就是通过这种方式,Spring Security 默认过滤器中生成了登录页面,并返回!
自定义认证
自定义资源权限规则
- /index 公共资源
- /hello … 受保护资源 权限管理
在项目中添加如下配置就可以实现对资源权限规则设定:
@Configuration
public class WebSecurityConfigurer extends WebSecurityConfigurerAdapter {
    @Override
    protected void configure(HttpSecurity http) throws Exception {
        http.authorizeHttpRequests()
                .mvcMatchers("/index").permitAll()
                .anyRequest().authenticated()
                .and().formLogin();
    }
}
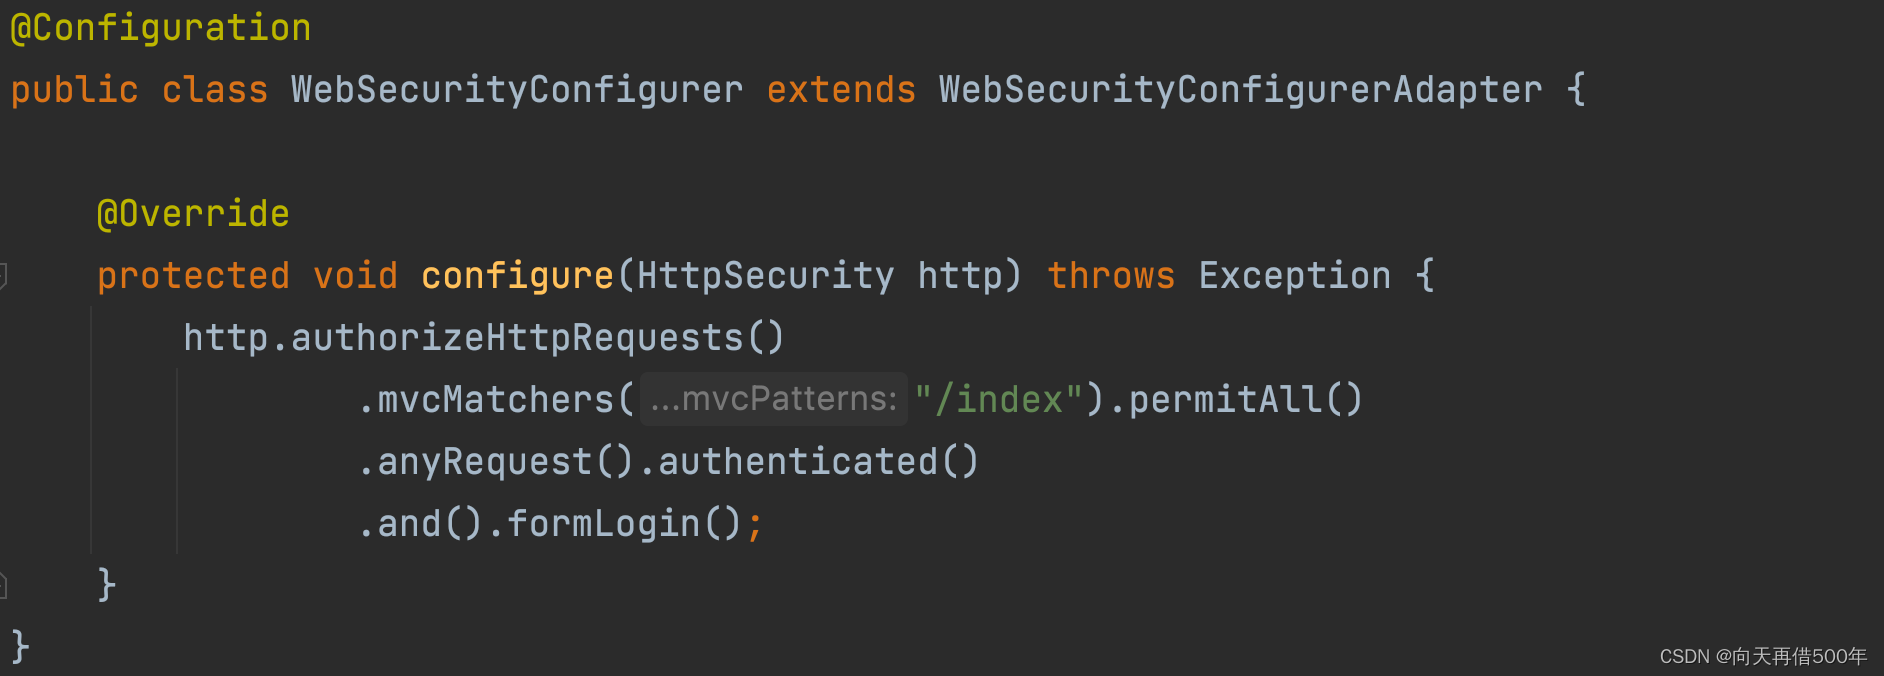
- permitAll() 代表放行该资源,该资源为公共资源 无需认证和授权可以直接访问
- anyRequest().authenticated() 代表所有请求,必须认证之后才能访问
- formLogin() 代表开启表单认证
注意: 放行资源必须放在所有认证请求之前!
自定义登录界面
引入模板依赖
<!--thymeleaf-->
<dependency>
  <groupId>org.springframework.boot</groupId>
  <artifactId>spring-boot-starter-thymeleaf</artifactId>
</dependency>
定义登录页面 controller
@Controller
public class LoginController {

    @RequestMapping("/login.html")
    public String login() {
        return "login";
    }
}
在 templates 中定义登录界面
login.html
<!DOCTYPE html>
<html lang="en" xmlns:th="https://www.thymeleaf.org">
<head>
    <meta charset="UTF-8">
    <title>登录</title>
</head>
<body>
<h1>用户登录</h1>
<form method="post" th:action="@{/doLogin}">
    用户名:<input name="username" type="text"/><br>
    密码:<input name="password" type="password"/><br>
    <input type="submit" value="登录"/>
</form>
</body>
</html>
需要注意的是
- 登录表单 method 必须为
post,action 的请求路径为/doLogin - 用户名的 name 属性必须为
username - 密码的 name 属性必须为
password
如果要改默认属性可以通过配置类修改
usernameParameter(“uname”)
passwordParameter(“pwd”)
配置 Spring Security 配置类
@Configuration
public class WebSecurityConfigurer extends WebSecurityConfigurerAdapter {
    @Override
    protected void configure(HttpSecurity http) throws Exception {
         http.authorizeHttpRequests()
                .mvcMatchers("/login.html").permitAll()
                .mvcMatchers("/index").permitAll()
                .anyRequest().authenticated()
                .and()
                .formLogin()
                .loginPage("/login.html") //用来指定默认登录页面 注意:一旦自定义页面以后必须指定登录url
                .loginProcessingUrl("/doLogin")
                .usernameParameter("username")
                .passwordParameter("password")
                .successForwardUrl("/index") //forward 跳转           注意:不会跳转到之前请求路径
                //.defaultSuccessUrl("/index")   //redirect 重定向    注意:如果之前请求路径,会有优先跳转之前请求路径
                //.failureUrl("/login.html")
                .and()
                .csrf().disable();//禁止csrf 跨站请求保护
    }
}
注意:一旦自定义页面以后必须指定登录url
successForwardUrl 、defaultSuccessUrl 这两个方法都可以实现成功之后跳转
- successForwardUrl 默认使用
forward跳转注意:不会跳转到之前请求路径 - defaultSuccessUrl 默认使用
redirect跳转 `注意:如果之前请求路径,会有优先跳转之前请求路径,可以传入第二个参数进行
前后端分离自定义登录成功处理
有时候页面跳转并不能满足我们,特别是在前后端分离开发中就不需要成功之后跳转页面。只需要给前端返回一个 JSON 通知登录成功还是失败与否。这个时候可以通过自定义 AuthenticationSucccessHandler 实现
自定义 AuthenticationSuccessHandler 实现
public class MyAuthenticationSuccessHandler implements AuthenticationSuccessHandler {
    @Override
    public void onAuthenticationSuccess(HttpServletRequest request, HttpServletResponse response, Authentication authentication) throws IOException, ServletException {
        Map<String, Object> result = new HashMap<String, Object>();
        result.put("msg", "登录成功");
        result.put("status", 200);
        result.put("authentication", authentication);
        response.setContentType("application/json;charset=UTF-8");
        String s = new ObjectMapper().writeValueAsString(result);
        response.getWriter().println(s);
    }
}
配置 AuthenticationSuccessHandler
@Configuration
public class WebSecurityConfigurer extends WebSecurityConfigurerAdapter {
    @Override
    protected void configure(HttpSecurity http) throws Exception {
        http.authorizeHttpRequests()
                .mvcMatchers("/login.html").permitAll()
                .mvcMatchers("/index").permitAll()
                .anyRequest().authenticated()
                .and()
                .formLogin()
                .loginPage("/login.html") //用来指定默认登录页面 注意:一旦自定义页面以后必须指定登录url
                .loginProcessingUrl("/doLogin")
                .usernameParameter("username")
                .passwordParameter("password")
                .successHandler(new MyAuthenticationSuccessHandler())
                .and()
                .csrf().disable();//禁止csrf 跨站请求保护
    }
}

显示登录失败信息
为了能更直观在登录页面看到异常错误信息,可以在登录页面中直接获取异常信息。Spring Security 在登录失败之后会将异常信息存储到 request 、session作用域中 key 为 SPRING_SECURITY_LAST_EXCEPTION 命名属性中,源码可以参考 SimpleUrlAuthenticationFailureHandler :
显示异常信息
<!DOCTYPE html>
<html lang="en" xmlns:th="https://www.thymeleaf.org">
<head>
    <meta charset="UTF-8">
    <title>登录</title>
</head>
<body>
<h1>用户登录</h1>
<div th:text="${SPRING_SECURITY_LAST_EXCEPTION}"></div>
<form method="post" th:action="@{/doLogin}">
    用户名:<input name="username" type="text"/><br>
    密码:<input name="password" type="password"/><br>
    <input type="submit" value="登录"/>
</form>
</body>
</html>
@Configuration
public class WebSecurityConfigurer extends WebSecurityConfigurerAdapter {
    @Override
    protected void configure(HttpSecurity http) throws Exception {
        http.authorizeHttpRequests()
                .mvcMatchers("/login.html").permitAll()
                .mvcMatchers("/index").permitAll()
                .anyRequest().authenticated()
                .and()
                .formLogin()
                .loginPage("/login.html") //用来指定默认登录页面 注意:一旦自定义页面以后必须指定登录url
                .loginProcessingUrl("/doLogin")
                .usernameParameter("username")
                .passwordParameter("password")
//                .successForwardUrl("/index") //forward 跳转           注意:不会跳转到之前请求路径
//                //.defaultSuccessUrl("/index")   //redirect 重定向    注意:如果之前请求路径,会有优先跳转之前请求路径
                .successHandler(new MyAuthenticationSuccessHandler())
//                .failureUrl("/login.html")
                .failureForwardUrl("/login.html")
                .and()
                .csrf().disable();//禁止csrf 跨站请求保护
    }
}
failureUrl、failureForwardUrl 关系类似于之前提到的 successForwardUrl 、defaultSuccessUrl 方法
- failureUrl 失败以后的重定向跳转
- failureForwardUrl 失败以后的 forward 跳转
注意:因此获取 request 中异常信息,这里只能使用failureForwardUrl
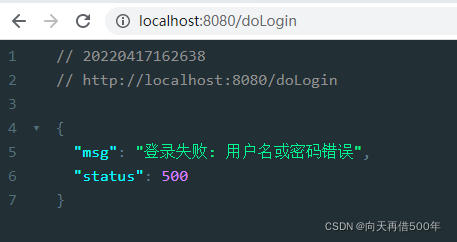
前后端分离自定义登录失败处理
和自定义登录成功处理一样,Spring Security 同样为前后端分离开发提供了登录失败的处理,这个类就是 AuthenticationFailureHandler
自定义 AuthenticationFailureHandler 实现
public class MyAuthenticationFailureHandler implements AuthenticationFailureHandler {

    @Override
    public void onAuthenticationFailure(HttpServletRequest request, HttpServletResponse response, AuthenticationException exception) throws IOException, ServletException {
        Map<String, Object> result = new HashMap<String, Object>();
        result.put("msg", "登录失败: "+exception.getMessage());
        result.put("status", 500);
        response.setContentType("application/json;charset=UTF-8");
        String s = new ObjectMapper().writeValueAsString(result);
        response.getWriter().println(s);
    }
}
配置 AuthenticationFailureHandler
@Configuration
public class WebSecurityConfigurer extends WebSecurityConfigurerAdapter {
    @Override
    protected void configure(HttpSecurity http) throws Exception {
        http.authorizeHttpRequests()
                .mvcMatchers("/login.html").permitAll()
                .mvcMatchers("/index").permitAll()
                .anyRequest().authenticated()
                .and()
                .formLogin()
                .loginPage("/login.html") //用来指定默认登录页面 注意:一旦自定义页面以后必须指定登录url
                .loginProcessingUrl("/doLogin")
                .usernameParameter("username")
                .passwordParameter("password")
//                .successForwardUrl("/index") //forward 跳转           注意:不会跳转到之前请求路径
//                //.defaultSuccessUrl("/index")   //redirect 重定向    注意:如果之前请求路径,会有优先跳转之前请求路径
                .successHandler(new MyAuthenticationSuccessHandler())
//                .failureUrl("/login.html")
//                .failureForwardUrl("/login.html")
                .failureHandler(new MyAuthenticationFailureHandler())
                .and()
                .csrf().disable();//禁止csrf 跨站请求保护
    }
}
注销登录
Spring Security 中也提供了默认的注销登录配置,在开发时也可以按照自己需求对注销进行个性化定制。
- 开启注销登录
默认开启
@Configuration
public class WebSecurityConfigurer extends WebSecurityConfigurerAdapter {
@Override
    protected void configure(HttpSecurity http) throws Exception {
        http.authorizeHttpRequests()
                //...
                .and()
                .formLogin()
                //...
                .and()
                .logout()
                .logoutUrl("/logout")
                .invalidateHttpSession(true)
                .clearAuthentication(true)
                .logoutSuccessUrl("/login.html")
                .and()
                .csrf().disable();//这里先关闭 CSRF
    }
}
- 通过 logout() 方法开启注销配置
- logoutUrl 指定退出登录请求地址,默认是 GET 请求,路径为
/logout - invalidateHttpSession 退出时是否是 session 失效,默认值为 true
- clearAuthentication 退出时是否清除认证信息,默认值为 true
- logoutSuccessUrl 退出登录时跳转地址
配置多个注销登录请求
如果项目中有需要,开发者还可以配置多个注销登录的请求,同时还可以指定请求的方法:
@Configuration
public class WebSecurityConfigurer extends WebSecurityConfigurerAdapter {
		@Override
    protected void configure(HttpSecurity http) throws Exception {
        http.authorizeHttpRequests()
                //...
                .and()
                .formLogin()
                //...
                .and()
                .logout()
                .logoutRequestMatcher(new OrRequestMatcher(
                        new AntPathRequestMatcher("/logout1","GET"),
                        new AntPathRequestMatcher("/logout","GET")
                ))
                .invalidateHttpSession(true)
                .clearAuthentication(true)
                .logoutSuccessUrl("/login.html")
                .and()
                .csrf().disable();//这里先关闭 CSRF
    }
}
前后端分离注销登录配置
如果是前后端分离开发,注销成功之后就不需要页面跳转了,只需要将注销成功的信息返回前端即可,此时我们可以通过自定义 LogoutSuccessHandler 实现来返回注销之后信息:
public class MyLogoutSuccessHandler implements LogoutSuccessHandler {
    @Override
    public void onLogoutSuccess(HttpServletRequest request, HttpServletResponse response, Authentication authentication) throws IOException, ServletException {
        Map<String, Object> result = new HashMap<String, Object>();
        result.put("msg", "注销成功");
        result.put("status", 200);
        response.setContentType("application/json;charset=UTF-8");
        String s = new ObjectMapper().writeValueAsString(result);
        response.getWriter().println(s);
    }
}
@Configuration
public class WebSecurityConfigurer extends WebSecurityConfigurerAdapter {
    @Override
    protected void configure(HttpSecurity http) throws Exception {
        http.authorizeHttpRequests()
          			//....
                .and()
                .formLogin()
 								//...
                .and()
                .logout()
                //.logoutUrl("/logout")
                .logoutRequestMatcher(new OrRequestMatcher(
                        new AntPathRequestMatcher("/logout1","GET"),
                        new AntPathRequestMatcher("/logout","GET")
                ))
                .invalidateHttpSession(true)
                .clearAuthentication(true)
                //.logoutSuccessUrl("/login.html")
                .logoutSuccessHandler(new MyLogoutSuccessHandler())
                .and()
                .csrf().disable();//这里先关闭 CSRF
    }
}
登录用户数据获取
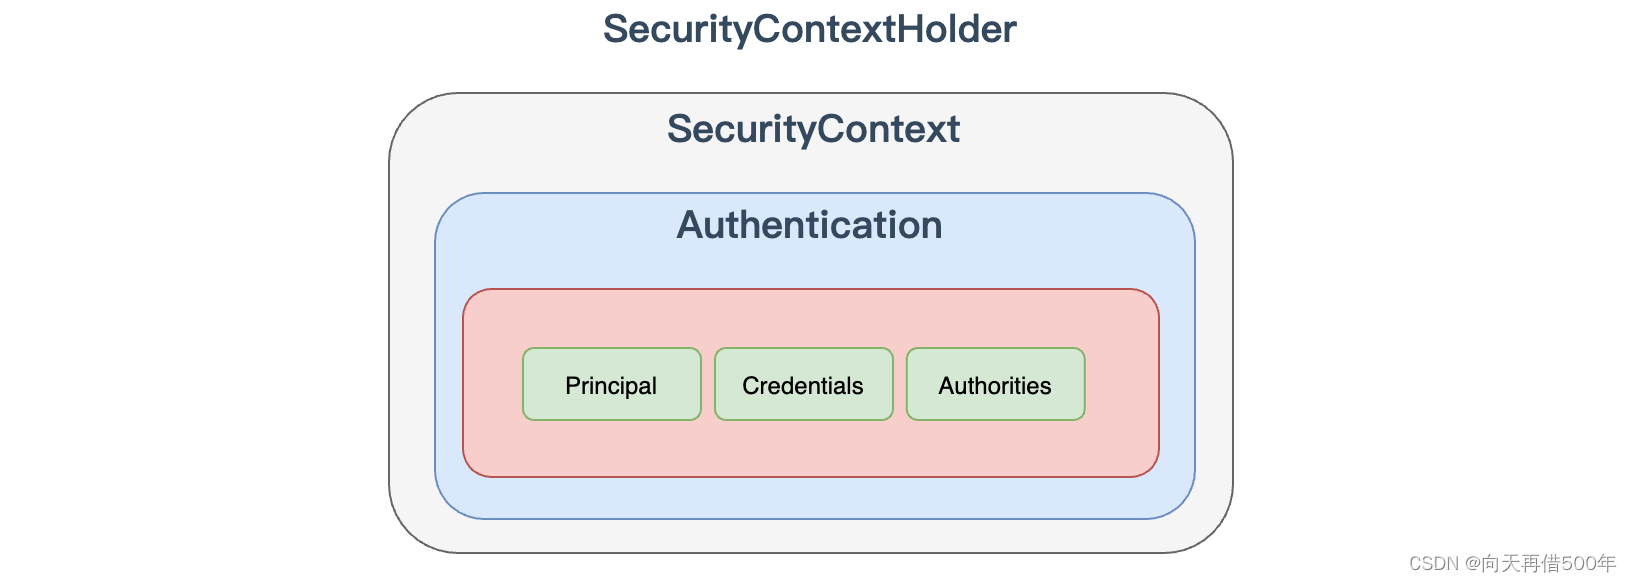
SecurityContextHolder
Spring Security 会将登录用户数据保存在 Session 中。但是,为了使用方便,Spring Security在此基础上还做了一些改进,其中最主要的一个变化就是线程绑定。当用户登录成功后,Spring Security 会将登录成功的用户信息保存到 SecurityContextHolder 中。
SecurityContextHolder 中的数据保存默认是通过ThreadLocal 来实现的,使用 ThreadLocal 创建的变量只能被当前线程访问,不能被其他线程访问和修改,也就是用户数据和请求线程绑定在一起。当登录请求处理完毕后,Spring Security 会将 SecurityContextHolder 中的数据拿出来保存到 Session 中,同时将 SecurityContexHolder 中的数据清空。以后每当有请求到来时,Spring Security 就会先从 Session 中取出用户登录数据,保存到SecurityContextHolder 中,方便在该请求的后续处理过程中使用,同时在请求结束时将 SecurityContextHolder 中的数据拿出来保存到 Session 中,然后将SecurityContextHolder 中的数据清空。
实际上 SecurityContextHolder 中存储是 SecurityContext,在 SecurityContext 中存储是 Authentication。
MODE THREADLOCAL:这种存放策略是将 SecurityContext 存放在 ThreadLocal中,大家知道 Threadlocal 的特点是在哪个线程中存储就要在哪个线程中读取,这其实非常适合 web 应用,因为在默认情况下,一个请求无论经过多少 Filter 到达 Servlet,都是由一个线程来处理的。这也是 SecurityContextHolder 的默认存储策略,这种存储策略意味着如果在具体的业务处理代码中,开启了子线程,在子线程中去获取登录用户数据,就会获取不到。MODE INHERITABLETHREADLOCAL:这种存储模式适用于多线程环境,如果希望在子线程中也能够获取到登录用户数据,那么可以使用这种存储模式。MODE GLOBAL:这种存储模式实际上是将数据保存在一个静态变量中,在 JavaWeb开发中,这种模式很少使用到。
SecurityContextHolderStrategy
通过 SecurityContextHolder 可以得知,SecurityContextHolderStrategy 接口用来定义存储策略方法
public interface SecurityContextHolderStrategy {
	void clearContext();
	SecurityContext getContext();
	void setContext(SecurityContext context);
	SecurityContext createEmptyContext();
}
接口中一共定义了四个方法:
clearContext:该方法用来清除存储的 SecurityContext对象。getContext:该方法用来获取存储的 SecurityContext 对象。setContext:该方法用来设置存储的 SecurityContext 对象。create Empty Context:该方法则用来创建一个空的 SecurityContext 对象。
代码中获取认证之后用户数据
@RestController
public class HelloController {
    @RequestMapping("/hello")
    public String hello() {
      Authentication authentication = SecurityContextHolder
        .getContext().getAuthentication();
      User principal = (User) authentication.getPrincipal();
      System.out.println("身份 :"+principal.getUsername());
      System.out.println("凭证 :"+authentication.getCredentials());
      System.out.println("权限 :"+authentication.getAuthorities());
      return "hello security";
    }
}
多线程情况下获取用户数据
@RestController
public class HelloController {
    @RequestMapping("/hello")
    public String hello() {
      new Thread(()->{
        Authentication authentication = SecurityContextHolder
          .getContext().getAuthentication();
        User principal = (User) authentication.getPrincipal();
        System.out.println("身份 :"+principal.getUsername());
        System.out.println("凭证 :"+authentication.getCredentials());
        System.out.println("权限 :"+authentication.getAuthorities());
      }).start();
      return "hello security";
    }
}

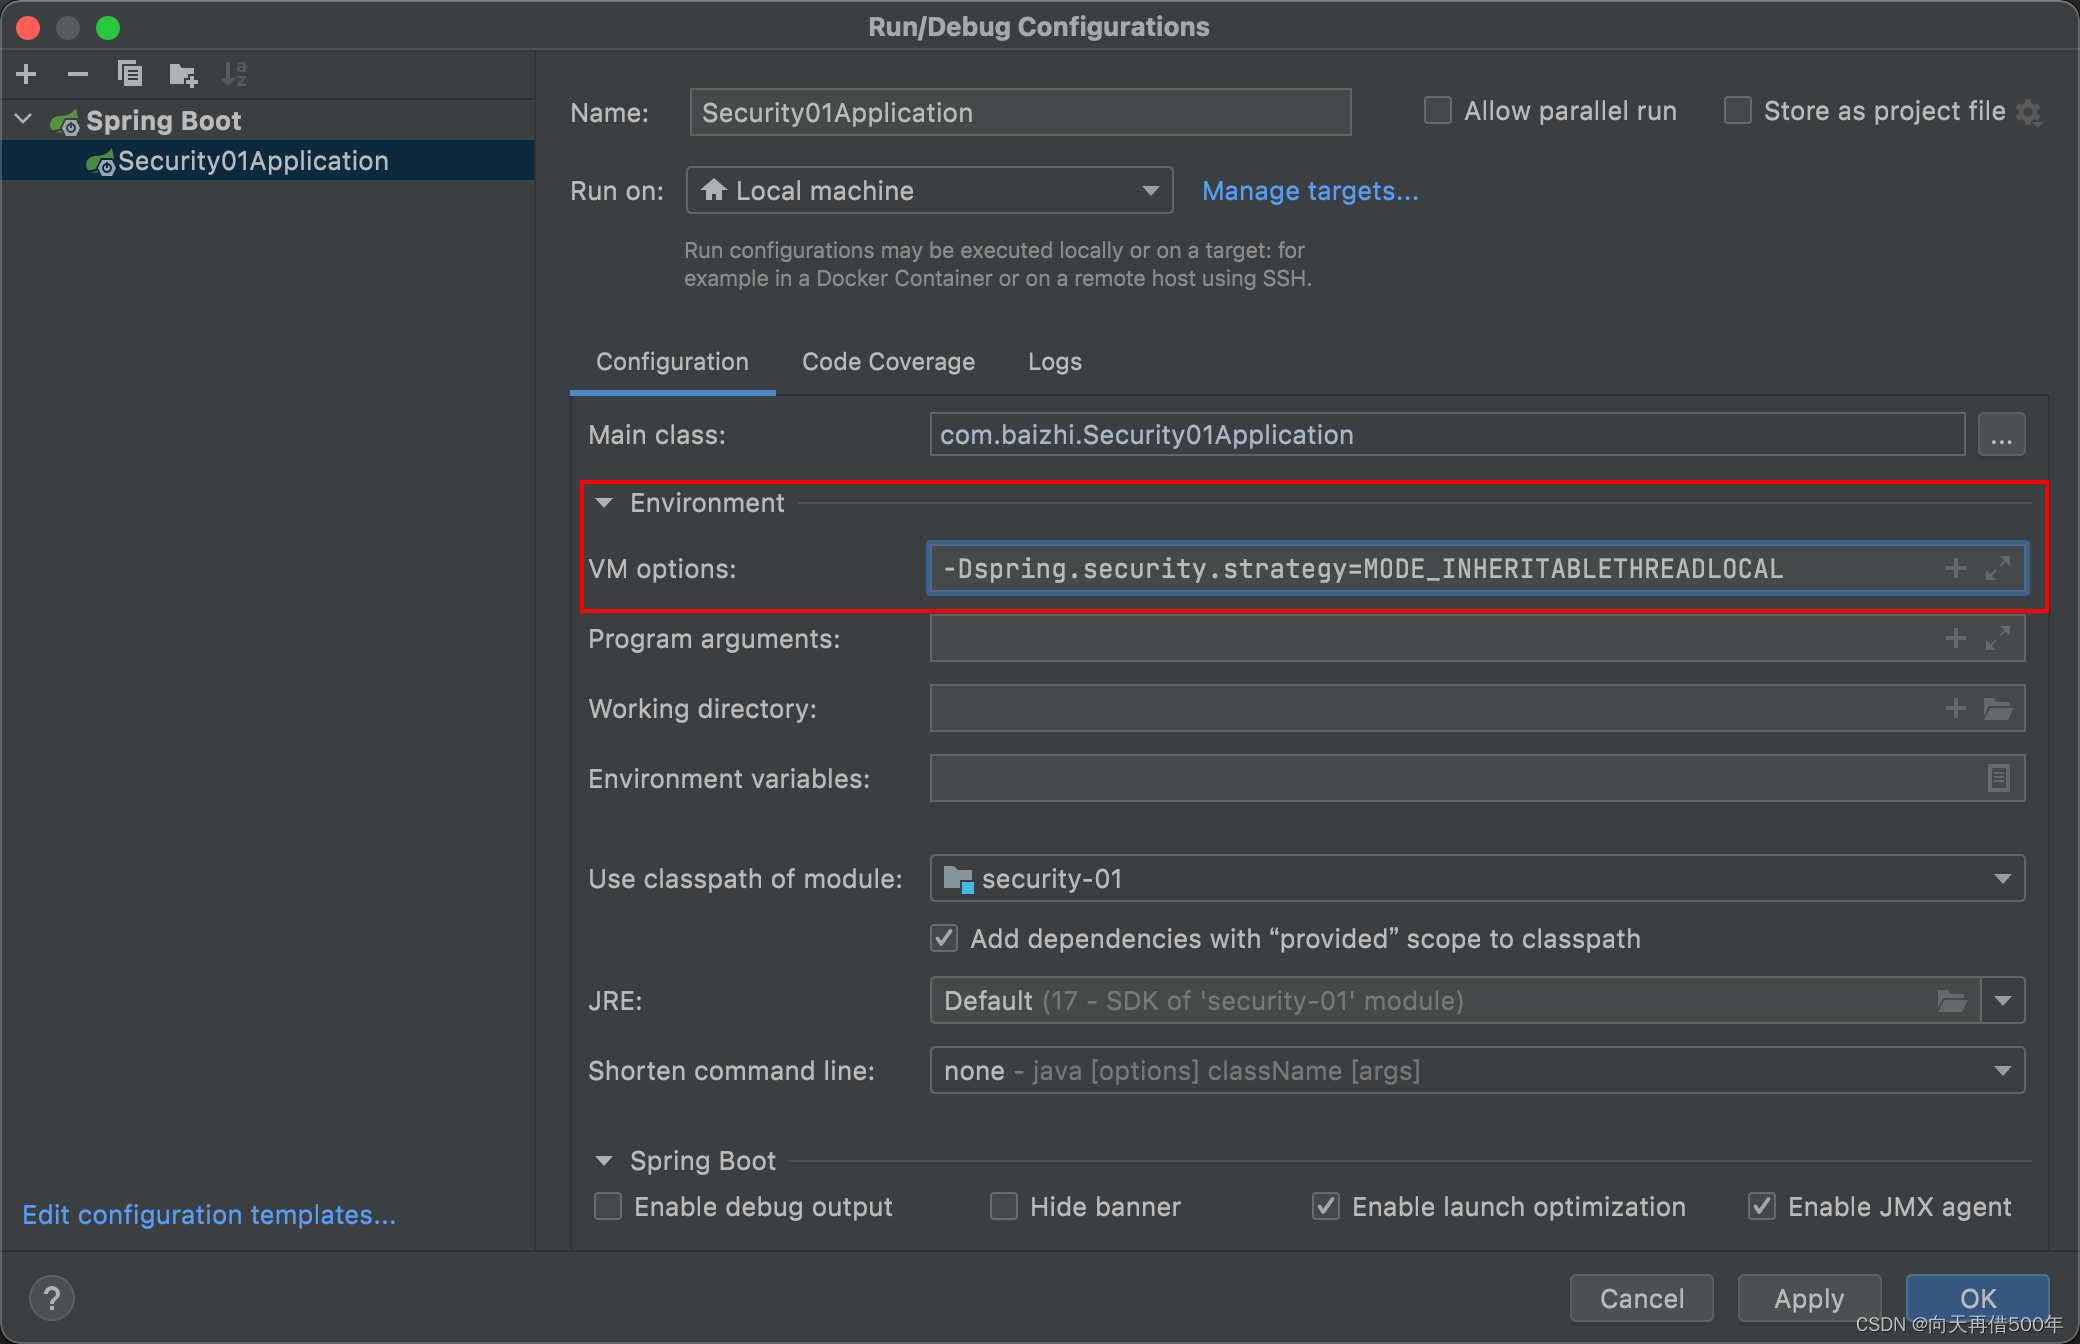
可以看到默认策略,是无法在子线程中获取用户信息,如果需要在子线程中获取必须使用第二种策略,默认策略是通过 System.getProperty 加载的,因此我们可以通过增加 VM Options 参数进行修改。
-Dspring.security.strategy=MODE_INHERITABLETHREADLOCAL
页面上获取用户信息
-
引入依赖
<dependency> <groupId>org.thymeleaf.extras</groupId> <artifactId>thymeleaf-extras-springsecurity5</artifactId> <version>3.0.4.RELEASE</version> </dependency> -
页面加入命名空间
<html lang="en" xmlns:th="https://www.thymeleaf.org" xmlns:sec="http://www.thymeleaf.org/extras/spring-security"> -
页面中使用
<!--获取认证用户名-->
<ul>
  <li sec:authentication="principal.username"></li>
  <li sec:authentication="principal.authorities"></li>
  <li sec:authentication="principal.accountNonExpired"></li>
  <li sec:authentication="principal.accountNonLocked"></li>
  <li sec:authentication="principal.credentialsNonExpired"></li>
</ul>
自定义认证数据源
认证流程分析
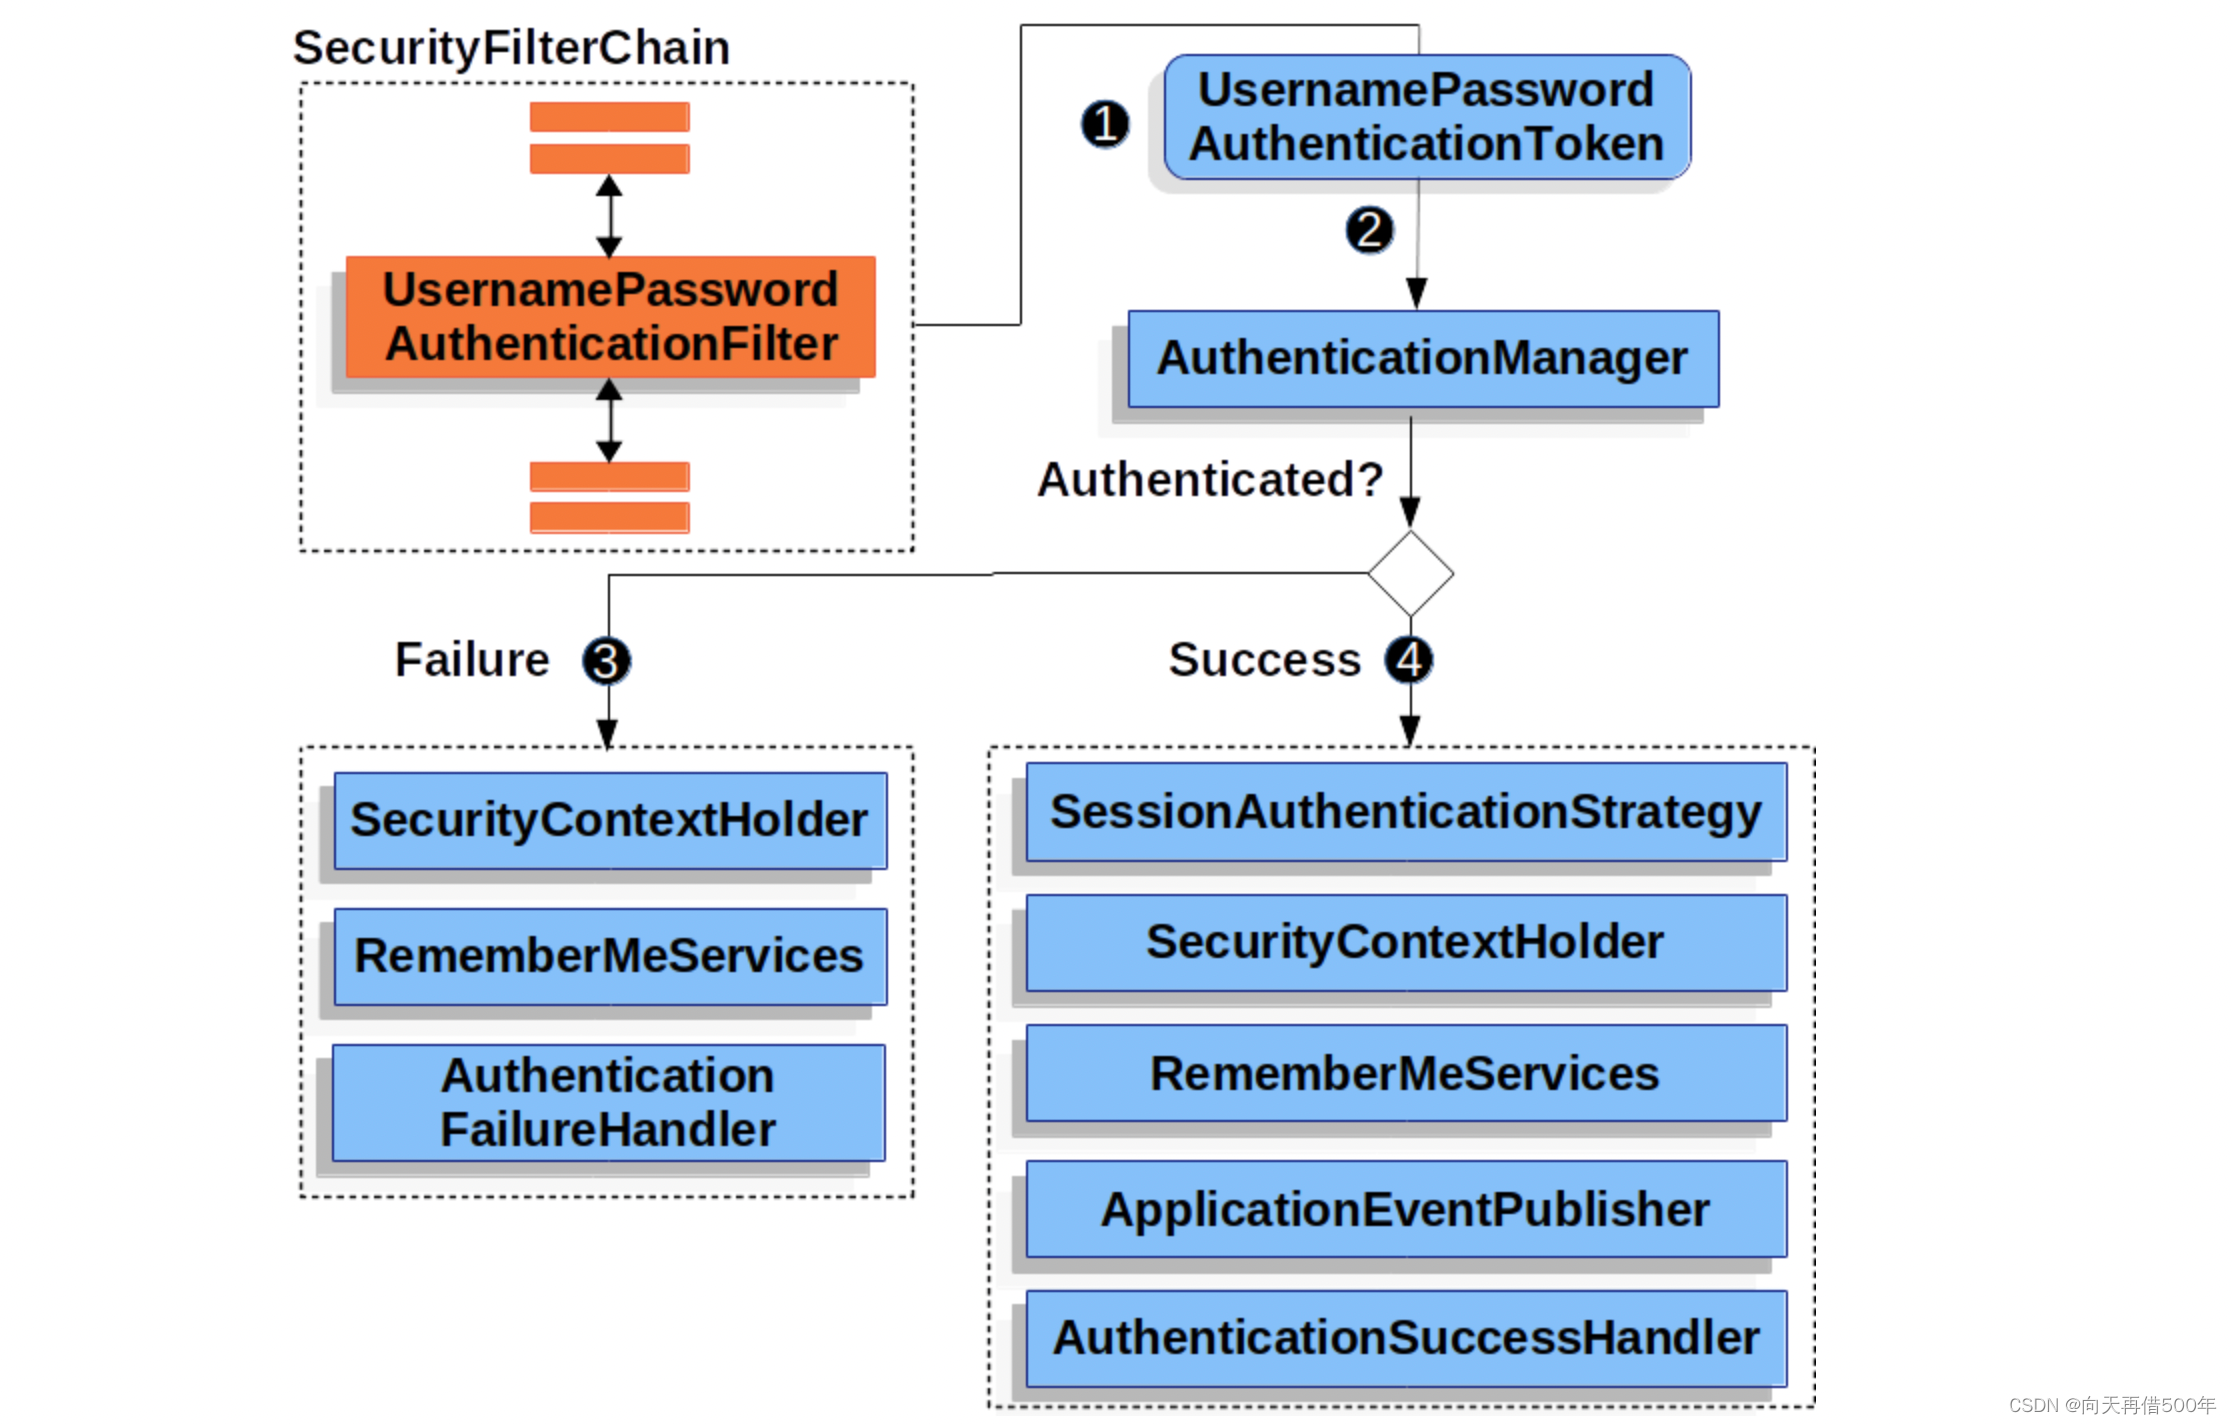
- 发起认证请求,请求中携带用户名、密码,该请求会被
UsernamePasswordAuthenticationFilter拦截 - 在
UsernamePasswordAuthenticationFilter的attemptAuthentication方法中将请求中用户名和密码,封装为Authentication对象,并交给AuthenticationManager进行认证 - 认证成功,将认证信息存储到 SecurityContextHodler 以及调用记住我等,并回调
AuthenticationSuccessHandler处理 - 认证失败,清除 SecurityContextHodler 以及 记住我中信息,回调
AuthenticationFailureHandler处理
三者关系
从上面分析中得知,AuthenticationManager 是认证的核心类,但实际上在底层真正认证时还离不开 ProviderManager 以及 AuthenticationProvider 。他们三者关系是样的呢?
AuthenticationManager是一个认证管理器,它定义了 Spring Security 过滤器要执行认证操作。ProviderManagerAuthenticationManager接口的实现类。Spring Security 认证时默认使用就是 ProviderManager。AuthenticationProvider就是针对不同的身份类型执行的具体的身份认证。
AuthenticationManager 与 ProviderManager
ProviderManager 是 AuthenticationManager 的唯一实现,也是 Spring Security 默认使用实现。从这里不难看出默认情况下AuthenticationManager 就是一个ProviderManager。
ProviderManager 与 AuthenticationProvider
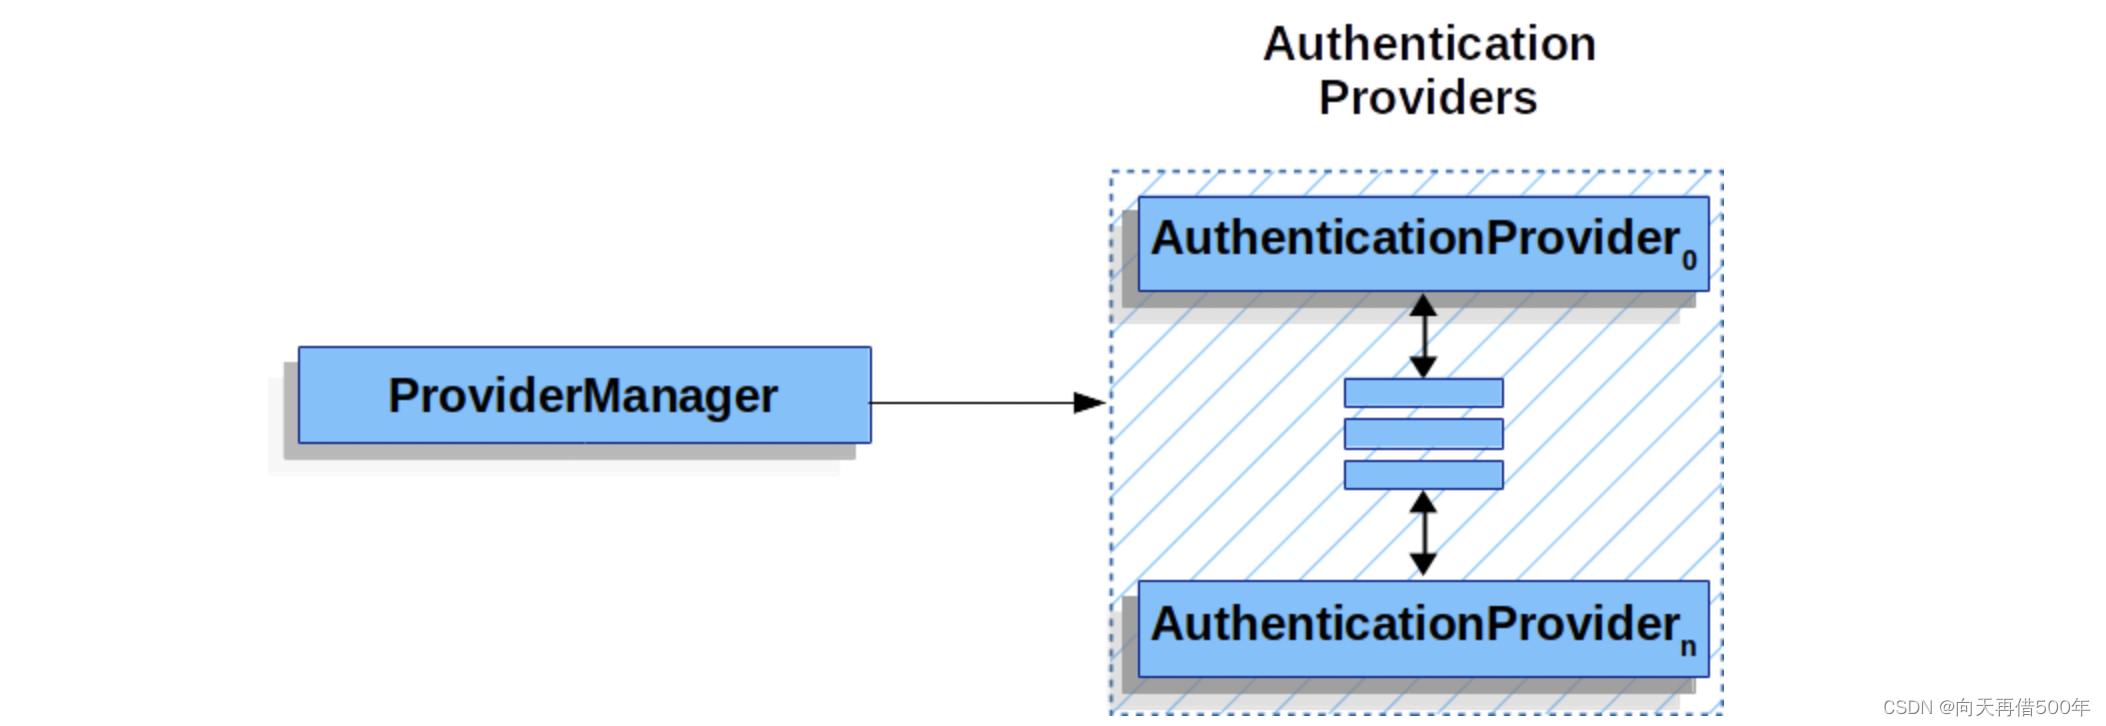
在 Spring Security 中,允许系统同时支持多种不同的认证方式,例如同时支持用户名/密码认证、ReremberMe 认证、手机号码动态认证等,而不同的认证方式对应了不同的 AuthenticationProvider,所以一个完整的认证流程可能由多个 AuthenticationProvider 来提供。
多个 AuthenticationProvider 将组成一个列表,这个列表将由 ProviderManager 代理。换句话说,在ProviderManager 中存在一个 AuthenticationProvider 列表,在Provider Manager 中遍历列表中的每一个 AuthenticationProvider 去执行身份认证,最终得到认证结果。
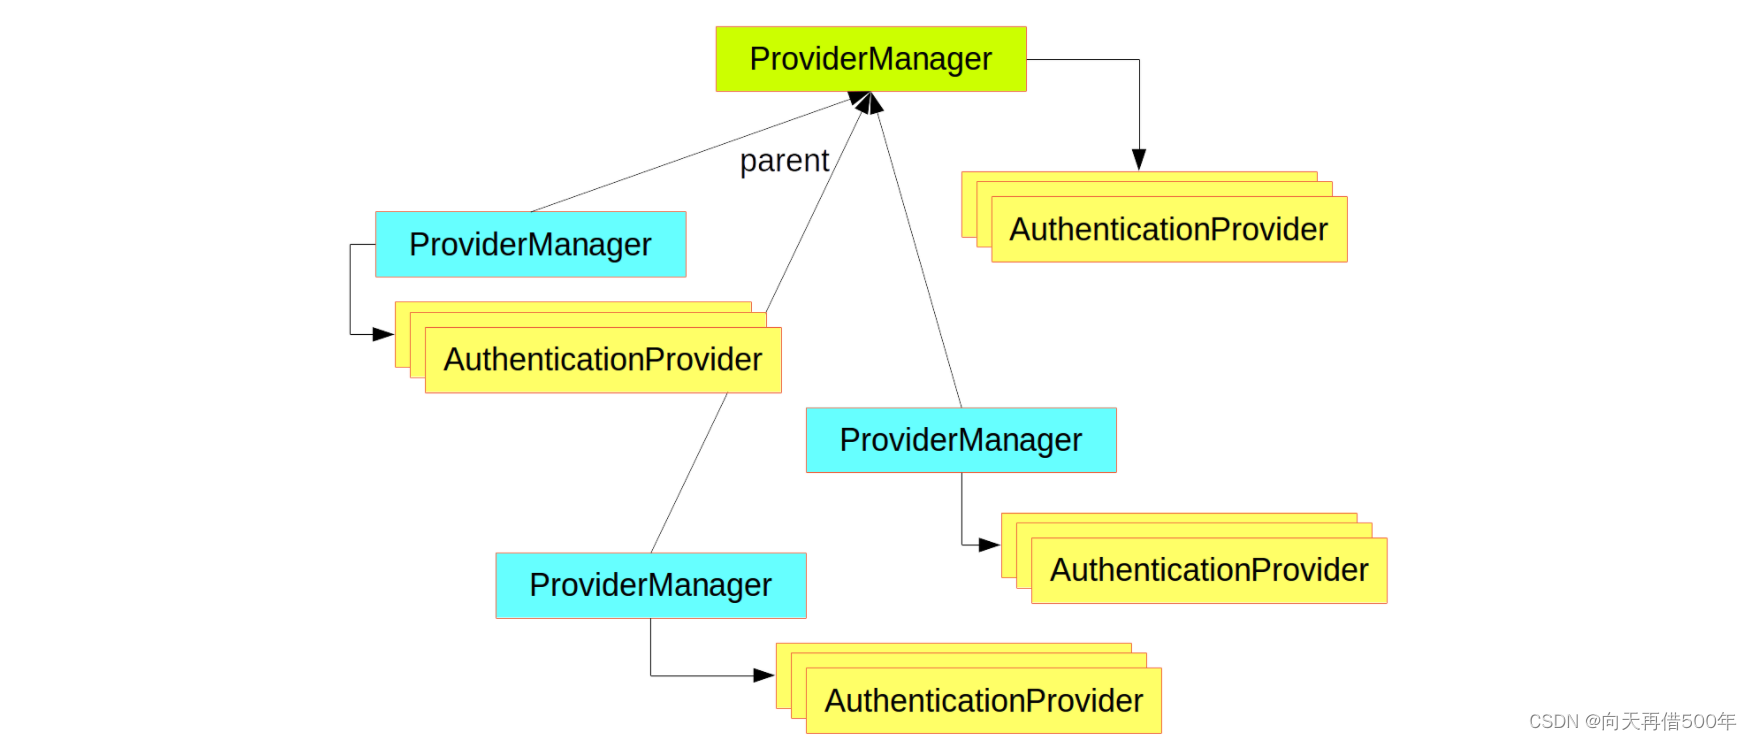
ProviderManager 本身也可以再配置一个 AuthenticationManager 作为 parent,这样当ProviderManager 认证失败之后,就可以进入到 parent 中再次进行认证。理论上来说,ProviderManager 的 parent 可以是任意类型的 AuthenticationManager,但是通常都是由
ProviderManager 来扮演 parent 的角色,也就是 ProviderManager 是 ProviderManager 的 parent。
ProviderManager 本身也可以有多个,多个ProviderManager 共用同一个 parent。有时,一个应用程序有受保护资源的逻辑组(例如,所有符合路径模式的网络资源,如/api/**),每个组可以有自己的专用 AuthenticationManager。通常,每个组都是一个ProviderManager,它们共享一个父级。然后,父级是一种 全局资源,作为所有提供者的后备资源。
弄清楚认证原理之后我们来看下具体认证时数据源的获取。默认情况下 AuthenticationProvider 是由 DaoAuthenticationProvider 类来实现认证的,在DaoAuthenticationProvider 认证时又通过 UserDetailsService 完成数据源的校验。他们之间调用关系如下:
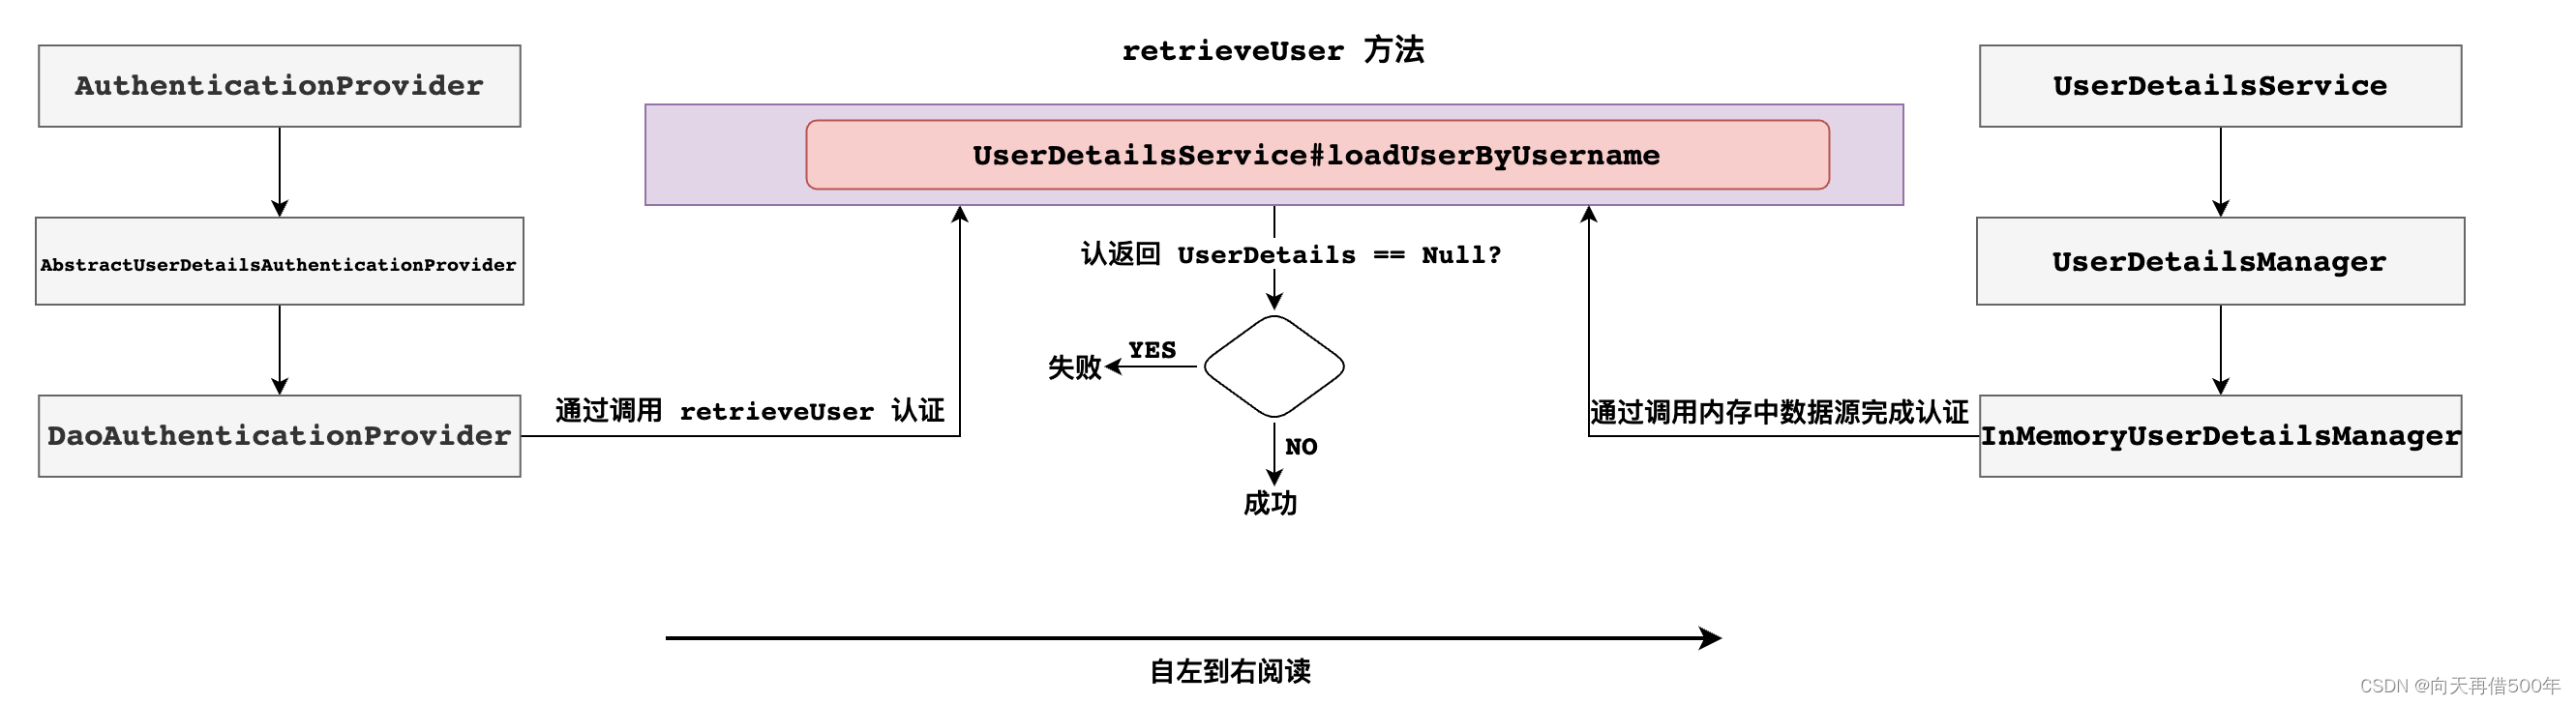
总结: AuthenticationManager 是认证管理器,在 Spring Security 中有全局AuthenticationManager,也可以有局部AuthenticationManager。全局的AuthenticationManager用来对全局认证进行处理,局部的AuthenticationManager用来对某些特殊资源认证处理。当然无论是全局认证管理器还是局部认证管理器都是由 ProviderManger 进行实现。 每一个ProviderManger中都代理一个AuthenticationProvider的列表,列表中每一个实现代表一种身份认证方式。认证时底层数据源需要调用 UserDetailService 来实现。
配置全局 AuthenticationManager
默认的全局 AuthenticationManager
@Configuration
public class WebSecurityConfigurer extends WebSecurityConfigurerAdapter {
  @Autowired
  public void initialize(AuthenticationManagerBuilder builder) {
    //builder..
  }
}
springboot 对 security 进行自动配置时自动在工厂中创建一个全局AuthenticationManager
总结
- 默认自动配置创建全局AuthenticationManager 默认找当前项目中是否存在自定义 UserDetailService 实例 自动将当前项目 UserDetailService 实例设置为数据源
- 默认自动配置创建全局AuthenticationManager 在工厂中使用时直接在代码中注入即可
自定义全局 AuthenticationManager
@Configuration
public class WebSecurityConfigurer extends WebSecurityConfigurerAdapter {
  @Override
  public void configure(AuthenticationManagerBuilder builder) {
  	//builder ....
  }
}
总结
- 一旦通过 configure 方法自定义 AuthenticationManager实现 就回将工厂中自动配置AuthenticationManager 进行覆盖
- 一旦通过 configure 方法自定义 AuthenticationManager实现 需要在实现中指定认证数据源对象 UserDetaiService 实例
- 一旦通过 configure 方法自定义 AuthenticationManager实现 这种方式创建AuthenticationManager对象工厂内部本地一个 AuthenticationManager 对象 不允许在其他自定义组件中进行注入
用来在工厂中暴露自定义AuthenticationManager 实例
@Configuration
public class WebSecurityConfigurer extends WebSecurityConfigurerAdapter {

    //1.自定义AuthenticationManager  推荐  并没有在工厂中暴露出来
    @Override
    public void configure(AuthenticationManagerBuilder builder) throws Exception {
        System.out.println("自定义AuthenticationManager: " + builder);
        builder.userDetailsService(userDetailsService());
    }

    //作用: 用来将自定义AuthenticationManager在工厂中进行暴露,可以在任何位置注入
    @Override
    @Bean
    public AuthenticationManager authenticationManagerBean() throws Exception {
        return super.authenticationManagerBean();
    }
}
自定义内存数据源
@Configuration
public class WebSecurityConfigurer extends WebSecurityConfigurerAdapter {

    @Bean
    public UserDetailsService userDetailsService(){
        InMemoryUserDetailsManager inMemoryUserDetailsManager
                = new InMemoryUserDetailsManager();
        UserDetails u1 = User.withUsername("zhangs")
                .password("{noop}111").roles("USER").build();
        inMemoryUserDetailsManager.createUser(u1);
        return inMemoryUserDetailsManager;
    }

    @Override
    protected void configure(AuthenticationManagerBuilder auth)
      throws Exception {
        auth.userDetailsService(userDetailsService());
    }
}
自定义数据库数据源
- 设计表结构
-- 用户表
CREATE TABLE `user`
(
    `id`                    int(11) NOT NULL AUTO_INCREMENT,
    `username`              varchar(32)  DEFAULT NULL,
    `password`              varchar(255) DEFAULT NULL,
    `enabled`               tinyint(1) DEFAULT NULL,
    `accountNonExpired`     tinyint(1) DEFAULT NULL,
    `accountNonLocked`      tinyint(1) DEFAULT NULL,
    `credentialsNonExpired` tinyint(1) DEFAULT NULL,
    PRIMARY KEY (`id`)
) ENGINE=InnoDB AUTO_INCREMENT=4 DEFAULT CHARSET=utf8;
-- 角色表
CREATE TABLE `role`
(
    `id`      int(11) NOT NULL AUTO_INCREMENT,
    `name`    varchar(32) DEFAULT NULL,
    `name_zh` varchar(32) DEFAULT NULL,
    PRIMARY KEY (`id`)
) ENGINE=InnoDB AUTO_INCREMENT=4 DEFAULT CHARSET=utf8;
-- 用户角色关系表
CREATE TABLE `user_role`
(
    `id`  int(11) NOT NULL AUTO_INCREMENT,
    `uid` int(11) DEFAULT NULL,
    `rid` int(11) DEFAULT NULL,
    PRIMARY KEY (`id`),
    KEY   `uid` (`uid`),
    KEY   `rid` (`rid`)
) ENGINE=InnoDB AUTO_INCREMENT=5 DEFAULT CHARSET=utf8;
- 插入测试数据
-- 插入用户数据
BEGIN;
  INSERT INTO `user`
  VALUES (1, 'root', '{noop}123', 1, 1, 1, 1);
  INSERT INTO `user`
  VALUES (2, 'admin', '{noop}123', 1, 1, 1, 1);
  INSERT INTO `user`
  VALUES (3, 'dyk', '{noop}123', 1, 1, 1, 1);
COMMIT;
-- 插入角色数据
BEGIN;
  INSERT INTO `role`
  VALUES (1, 'ROLE_product', '商品管理员');
  INSERT INTO `role`
  VALUES (2, 'ROLE_admin', '系统管理员');
  INSERT INTO `role`
  VALUES (3, 'ROLE_user', '用户管理员');
COMMIT;
-- 插入用户角色数据
BEGIN;
  INSERT INTO `user_role`
  VALUES (1, 1, 1);
  INSERT INTO `user_role`
  VALUES (2, 1, 2);
  INSERT INTO `user_role`
  VALUES (3, 2, 2);
  INSERT INTO `user_role`
  VALUES (4, 3, 3);
COMMIT;
- 项目中引入依赖
<dependency>
  <groupId>org.mybatis.spring.boot</groupId>
  <artifactId>mybatis-spring-boot-starter</artifactId>
  <version>2.2.0</version>
</dependency>
<dependency>
  <groupId>mysql</groupId>
  <artifactId>mysql-connector-java</artifactId>
  <version>5.1.38</version>
</dependency>
<dependency>
  <groupId>com.alibaba</groupId>
  <artifactId>druid</artifactId>
  <version>1.2.7</version>
</dependency>
- 配置 springboot 配置文件
# datasource
spring.datasource.type=com.alibaba.druid.pool.DruidDataSource
spring.datasource.driver-class-name=com.mysql.jdbc.Driver
spring.datasource.url=jdbc:mysql://localhost:3306/my_java?characterEncoding=UTF-8&useSSL=false
spring.datasource.username=root
spring.datasource.password=123456
# mybatis
mybatis.mapper-locations=classpath:com/blb/mapper/*.xml
mybatis.type-aliases-package=com.blb.entity
# log
logging.level.com.blb=debug
-
创建 entity
- 创建 user 对象
package com.blb.demo1.entity;

import org.springframework.security.core.GrantedAuthority;
import org.springframework.security.core.authority.SimpleGrantedAuthority;
import org.springframework.security.core.userdetails.UserDetails;

import java.util.*;

//自定义User
public class User implements UserDetails {

    private Integer id;
    private String username;
    private String password;
    private Boolean enabled;//账户是否激活
    private Boolean accountNonExpired;//账户是否过期
    private Boolean accountNonLocked; //账户是否被锁定
    private Boolean credentialsNonExpired;//密码是否过期
    private List<Role> roles = new ArrayList<>();//关系属性 用来存储当前用户所有角色信息


    //返回权限信息
    @Override
    public Collection<? extends GrantedAuthority> getAuthorities() {
        Set<SimpleGrantedAuthority> authorities = new HashSet<>();
        roles.forEach(role -> {
            SimpleGrantedAuthority simpleGrantedAuthority = new SimpleGrantedAuthority(role.getName());
            authorities.add(simpleGrantedAuthority);
        });
        return authorities;
    }

    @Override
    public String getPassword() {
        return password;
    }

    public void setPassword(String password) {
        this.password = password;
    }

    @Override
    public String getUsername() {
        return username;
    }

    public void setUsername(String username) {
        this.username = username;
    }

    @Override
    public boolean isAccountNonExpired() {
        return accountNonExpired;
    }

    public void setAccountNonExpired(Boolean accountNonExpired) {
        this.accountNonExpired = accountNonExpired;
    }

    @Override
    public boolean isAccountNonLocked() {
        return accountNonLocked;
    }

    public void setAccountNonLocked(Boolean accountNonLocked) {
        this.accountNonLocked = accountNonLocked;
    }

    @Override
    public boolean isCredentialsNonExpired() {
        return credentialsNonExpired;
    }

    public void setCredentialsNonExpired(Boolean credentialsNonExpired) {
        this.credentialsNonExpired = credentialsNonExpired;
    }

    @Override
    public boolean isEnabled() {
        return enabled;
    }

    public void setEnabled(Boolean enabled) {
        this.enabled = enabled;
    }

    public Integer getId() {
        return id;
    }

    public void setId(Integer id) {
        this.id = id;
    }

    public List<Role> getRoles() {
        return roles;
    }

    public void setRoles(List<Role> roles) {
        this.roles = roles;
    }
}
- 创建 role 对象
@Data
public class Role {
    private Integer id;
    private String name;
    private String nameZh;
    //get set..
}
- 创建 UserDao 接口
@Mapper
public interface UserDao {
    //根据用户名查询用户
    User loadUserByUsername(String username);

  	//根据用户id查询角色
  	List<Role> getRolesByUid(Integer uid);
}
- 创建 UserMapper 实现
<?xml version="1.0" encoding="UTF-8" ?>
<!DOCTYPE mapper
        PUBLIC "-//mybatis.org//DTD Mapper 3.0//EN"
        "http://mybatis.org/dtd/mybatis-3-mapper.dtd">
<mapper namespace="com.blb.demo1.dao.UserDao">
    <!--查询单个-->
    <select id="loadUserByUsername" resultType="User">
        select id,
               username,
               password,
               enabled,
               accountNonExpired,
               accountNonLocked,
               credentialsNonExpired
        from user
        where username = #{username}
    </select>

    <!--查询指定行数据-->
    <select id="getRolesByUid" resultType="Role">
        select r.id,
               r.name,
               r.name_zh nameZh
        from role r,
             user_role ur
        where r.id = ur.rid
          and ur.uid = #{uid}
    </select>
</mapper>
- 创建 UserDetailService 实例
@Component
public class MyUserDetailService implements UserDetailsService {

    @Autowired
    private UserDao userDao;

    @Override
    public UserDetails loadUserByUsername(String username) throws UsernameNotFoundException {
        User user = userDao.loadUserByUsername(username);
        if (ObjectUtils.isEmpty(user)) throw new RuntimeException("用户不存在");
        user.setRoles(userDao.getRolesByUid(user.getId()));
        return user;
    }
}
- 配置 authenticationManager 使用自定义UserDetailService
package com.blb.demo1.config;

import com.blb.demo1.service.MyUserDetailService;
import org.springframework.beans.factory.annotation.Autowired;
import org.springframework.context.annotation.Bean;
import org.springframework.context.annotation.Configuration;
import org.springframework.security.authentication.AuthenticationManager;
import org.springframework.security.config.annotation.authentication.builders.AuthenticationManagerBuilder;
import org.springframework.security.config.annotation.web.builders.HttpSecurity;
import org.springframework.security.config.annotation.web.configuration.WebSecurityConfigurerAdapter;

@Configuration
public class WebSecurityConfigurer extends WebSecurityConfigurerAdapter {
    @Autowired
    private MyUserDetailService myUserDetailService;

    //自定义AuthenticationManager  推荐  并没有在工厂中暴露出来
    @Override
    public void configure(AuthenticationManagerBuilder builder) throws Exception {
        System.out.println("自定义AuthenticationManager: " + builder);
        builder.userDetailsService(myUserDetailService);
    }

    //作用: 用来将自定义AuthenticationManager在工厂中进行暴露,可以在任何位置注入
    @Override
    @Bean
    public AuthenticationManager authenticationManagerBean() throws Exception {
        return super.authenticationManagerBean();
    }

    @Override
    protected void configure(HttpSecurity http) throws Exception {
        http.authorizeHttpRequests()
                .mvcMatchers("/login.html").permitAll()
                .mvcMatchers("/index").permitAll()
                .anyRequest().authenticated()
                .and()
                .formLogin()
                .loginPage("/login.html") //用来指定默认登录页面 注意:一旦自定义页面以后必须指定登录url
                .loginProcessingUrl("/doLogin")
                .usernameParameter("username")
                .passwordParameter("password")
//                .successForwardUrl("/index") //forward 跳转           注意:不会跳转到之前请求路径
//                //.defaultSuccessUrl("/index")   //redirect 重定向    注意:如果之前请求路径,会有优先跳转之前请求路径
                .successHandler(new MyAuthenticationSuccessHandler())
//                .failureUrl("/login.html")
//                .failureForwardUrl("/login.html")
//                .failureHandler(new MyAuthenticationFailureHandler())
                .and()
                .csrf().disable();//禁止csrf 跨站请求保护
    }
}
添加认证验证码
导入生成验证码依赖
<dependency>
  <groupId>com.github.penggle</groupId>
  <artifactId>kaptcha</artifactId>
  <version>2.3.2</version>
</dependency>
验证码配置类
@Configuration
public class KaptchaConfig {

    @Bean
    public Producer kaptcha() {
        Properties properties = new Properties();
        //1.验证码宽度
        properties.setProperty("kaptcha.image.width", "150");
        //2.验证码高度
        properties.setProperty("kaptcha.image.height", "50");
        //3.验证码字符串
        properties.setProperty("kaptcha.textproducer.char.string", "0123456789");
        //4.验证码长度
        properties.setProperty("kaptcha.textproducer.char.length", "4");
        Config config = new Config(properties);
        DefaultKaptcha defaultKaptcha = new DefaultKaptcha();
        defaultKaptcha.setConfig(config);
        return defaultKaptcha;
    }
}
传统 web 开发
生成验证码 controller
@Controller
public class VerifyCodeController {

    @Autowired
    private Producer producer;


    @RequestMapping("/vc.jpg")
    public void verifyCode(HttpServletResponse response, HttpSession session) throws IOException {
        //1.生成验证码
        String verifyCode = producer.createText();
        //2.保存到中 session
        session.setAttribute("kaptcha", verifyCode);
        //3.生成图片
        BufferedImage bi = producer.createImage(verifyCode);
        //4.响应图片
        response.setContentType("image/png");
        ServletOutputStream os = response.getOutputStream();
        ImageIO.write(bi, "jpg", os);
    }
}
自定义验证码异常类
//自定义验证码认证异常
public class KaptchaNotMatchException extends AuthenticationException {
    public KaptchaNotMatchException(String msg, Throwable cause) {
        super(msg, cause);
    }

    public KaptchaNotMatchException(String msg) {
        super(msg);
    }
}
自定义filter验证验证码
//自定义验证码的 filter
public class KaptchaFilter extends UsernamePasswordAuthenticationFilter {

    private static final String FORM_KAPTCHA_KEY = "kaptcha";

    private String kaptchaParameter = FORM_KAPTCHA_KEY;

    public String getKaptchaParameter() {
        return kaptchaParameter;
    }

    public void setKaptchaParameter(String kaptchaParameter) {
        this.kaptchaParameter = kaptchaParameter;
    }

    @Override
    public Authentication attemptAuthentication(HttpServletRequest request, HttpServletResponse response) throws AuthenticationException {
        if (!request.getMethod().equals("POST")) {
            throw new AuthenticationServiceException("Authentication method not supported: " + request.getMethod());
        }
        //1.从请求中获取验证码
        String verifyCode = request.getParameter(getKaptchaParameter());
        //2.与 session 中验证码进行比较
        String sessionVerifyCode = (String) request.getSession().getAttribute("kaptcha");
        if (!ObjectUtils.isEmpty(verifyCode) && !ObjectUtils.isEmpty(sessionVerifyCode) &&
                verifyCode.equalsIgnoreCase(sessionVerifyCode)) {
            return super.attemptAuthentication(request, response);
        }
        throw new KaptchaNotMatchException("验证码不匹配!");
    }
}
放行以及配置验证码 filter
@Configuration
public class SecurityConfig extends WebSecurityConfigurerAdapter {

    @Bean
    public UserDetailsService userDetailsService() {
        InMemoryUserDetailsManager inMemoryUserDetailsManager = new InMemoryUserDetailsManager();
        inMemoryUserDetailsManager.createUser(User.withUsername("root").password("{noop}123").roles("amdin").build());
        return inMemoryUserDetailsManager;
    }

    @Override
    protected void configure(AuthenticationManagerBuilder auth) throws Exception {
        auth.userDetailsService(userDetailsService());
    }

    @Override
    @Bean
    public AuthenticationManager authenticationManagerBean() throws Exception {
        return super.authenticationManagerBean();
    }

    @Bean
    public KaptchaFilter kaptchaFilter() throws Exception {
        KaptchaFilter kaptchaFilter = new KaptchaFilter();
        kaptchaFilter.setFilterProcessesUrl("/doLogin");
        kaptchaFilter.setUsernameParameter("username");
        kaptchaFilter.setPasswordParameter("password");
        kaptchaFilter.setKaptchaParameter("kaptcha");
        //指定认证管理器
        kaptchaFilter.setAuthenticationManager(authenticationManagerBean());
        //指定认证成功处理
        kaptchaFilter.setAuthenticationSuccessHandler((req, resp, auth) -> {
            resp.sendRedirect("/index");
        });
        //指定认证失败处理
        kaptchaFilter.setAuthenticationFailureHandler((req, resp, ex) -> {
            resp.sendRedirect("/login.html");
        });
        return kaptchaFilter;
    }

    @Override
    protected void configure(HttpSecurity http) throws Exception {
        http.authorizeRequests()
                .mvcMatchers("/login.html").permitAll()
                .mvcMatchers("/vc.jpg").permitAll()
                .anyRequest().authenticated()
                .and()
                .formLogin()
                .loginPage("/login.html")
                .and()
                .logout()
                .logoutUrl("/logout")
                .and()
                .csrf().disable();

        http.addFilterAt(kaptchaFilter(), UsernamePasswordAuthenticationFilter.class);
    }
}
登录页面添加验证码
<form method="post" th:action="@{/doLogin}">
    用户名:<input name="uname" type="text"/><br>
    密码:<input name="passwd" type="password"/><br>
    验证码: <input name="kaptcha" type="text"/> <img alt="" th:src="@{/vc.jpg}"><br>
    <input type="submit" value="登录"/>
</form>
前后端分离开发验证码生成
生成验证码 controller
@RestController
public class KaptchaController {
    private final Producer producer;

    @Autowired
    public KaptchaController(Producer producer) {
        this.producer = producer;
    }

    @GetMapping("/vc.png")
    public String getVerifyCode(HttpSession session) throws IOException {
        //1.生成验证码
        String code = producer.createText();
        session.setAttribute("kaptcha", code);//可以更换成 redis 实现
        BufferedImage bi = producer.createImage(code);
        //2.写入内存
        FastByteArrayOutputStream fos = new FastByteArrayOutputStream();
        ImageIO.write(bi, "png", fos);
        //3.生成 base64
        return Base64.encodeBase64String(fos.toByteArray());
    }
}
定义验证码异常类
public class KaptchaNotMatchException extends AuthenticationException {

    public KaptchaNotMatchException(String msg) {
        super(msg);
    }

    public KaptchaNotMatchException(String msg, Throwable cause) {
        super(msg, cause);
    }
}
在自定义LoginKaptchaFilter中加入验证码验证
//自定义 filter
public class LoginKaptchaFilter extends UsernamePasswordAuthenticationFilter {

    public static final String FORM_KAPTCHA_KEY = "kaptcha";

    private String kaptchaParameter = FORM_KAPTCHA_KEY;

    public String getKaptchaParameter() {
        return kaptchaParameter;
    }

    public void setKaptchaParameter(String kaptchaParameter) {
        this.kaptchaParameter = kaptchaParameter;
    }

    @Override
    public Authentication attemptAuthentication(HttpServletRequest request, HttpServletResponse response) throws AuthenticationException {
        if (!request.getMethod().equals("POST")) {
            throw new AuthenticationServiceException("Authentication method not supported: " + request.getMethod());
        }
        try {
            //1.获取请求数据
            Map<String, String> userInfo = new ObjectMapper().readValue(request.getInputStream(), Map.class);
            String kaptcha = userInfo.get(getKaptchaParameter());//用来获取数据中验证码
            String username = userInfo.get(getUsernameParameter());//用来接收用户名
            String password = userInfo.get(getPasswordParameter());//用来接收密码
            //2.获取 session 中验证码
            String sessionVerifyCode = (String) request.getSession().getAttribute("kaptcha");
            if (!ObjectUtils.isEmpty(kaptcha) && !ObjectUtils.isEmpty(sessionVerifyCode) &&
                    kaptcha.equalsIgnoreCase(sessionVerifyCode)) {
                //3.获取用户名 和密码认证
                UsernamePasswordAuthenticationToken authRequest = new UsernamePasswordAuthenticationToken(username, password);
                setDetails(request, authRequest);
                return this.getAuthenticationManager().authenticate(authRequest);
            }
        } catch (IOException e) {
            e.printStackTrace();
        }
        throw new KaptchaNotMatchException("验证码不匹配!");
    }
}
配置
@Configuration
public class SecurityConfig extends WebSecurityConfigurerAdapter {

    //自定义内存数据源
    @Bean
    public UserDetailsService userDetailsService() {
        InMemoryUserDetailsManager inMemoryUserDetailsManager = new InMemoryUserDetailsManager();
        inMemoryUserDetailsManager.createUser(User.withUsername("root").password("{noop}123").roles("admin").build());
        return inMemoryUserDetailsManager;
    }

    @Override
    protected void configure(AuthenticationManagerBuilder auth) throws Exception {
        auth.userDetailsService(userDetailsService());
    }

    @Override
    @Bean
    public AuthenticationManager authenticationManagerBean() throws Exception {
        return super.authenticationManagerBean();
    }

    //配置
    @Bean
    public LoginKaptchaFilter loginKaptchaFilter() throws Exception {
        LoginKaptchaFilter loginKaptchaFilter = new LoginKaptchaFilter();
        //1.认证 url
        loginKaptchaFilter.setFilterProcessesUrl("/doLogin");
        //2.认证 接收参数
        loginKaptchaFilter.setUsernameParameter("uname");
        loginKaptchaFilter.setPasswordParameter("passwd");
        loginKaptchaFilter.setKaptchaParameter("kaptcha");
        //3.指定认证管理器
        loginKaptchaFilter.setAuthenticationManager(authenticationManagerBean());
        //4.指定成功时处理
        loginKaptchaFilter.setAuthenticationSuccessHandler((req, resp, authentication) -> {
            Map<String, Object> result = new HashMap<String, Object>();
            result.put("msg", "登录成功");
            result.put("用户信息", authentication.getPrincipal());
            resp.setContentType("application/json;charset=UTF-8");
            resp.setStatus(HttpStatus.OK.value());
            String s = new ObjectMapper().writeValueAsString(result);
            resp.getWriter().println(s);
        });
        //5.认证失败处理
        loginKaptchaFilter.setAuthenticationFailureHandler((req, resp, ex) -> {
            Map<String, Object> result = new HashMap<String, Object>();
            result.put("msg", "登录失败: " + ex.getMessage());
            resp.setStatus(HttpStatus.INTERNAL_SERVER_ERROR.value());
            resp.setContentType("application/json;charset=UTF-8");
            String s = new ObjectMapper().writeValueAsString(result);
            resp.getWriter().println(s);
        });
        return loginKaptchaFilter;
    }

    @Override
    protected void configure(HttpSecurity http) throws Exception {
        http.authorizeRequests()
                .mvcMatchers("/vc.jpg").permitAll()
                .anyRequest().authenticated()
                .and()
                .formLogin()
                .and()
                .exceptionHandling()
                .authenticationEntryPoint((req, resp, ex) -> {
                    resp.setContentType("application/json;charset=UTF-8");
                    resp.setStatus(HttpStatus.UNAUTHORIZED.value());
                    resp.getWriter().println("必须认证之后才能访问!");
                })
                .and()
                .logout()
                .and()
                .csrf().disable();

        http.addFilterAt(loginKaptchaFilter(), UsernamePasswordAuthenticationFilter.class);
    }
密码加密
PasswordEncoder
通过对认证流程源码分析得知,实际密码比较是由PasswordEncoder完成的,因此只需要使用PasswordEncoder 不同实现就可以实现不同方式加密。
public interface PasswordEncoder {
	String encode(CharSequence rawPassword);
	boolean matches(CharSequence rawPassword, String encodedPassword);
	default boolean upgradeEncoding(String encodedPassword) {
		return false;
	}
}
- encode 用来进行明文加密的
- matches 用来比较密码的方法
- upgradeEncoding 用来给密码进行升级的方法
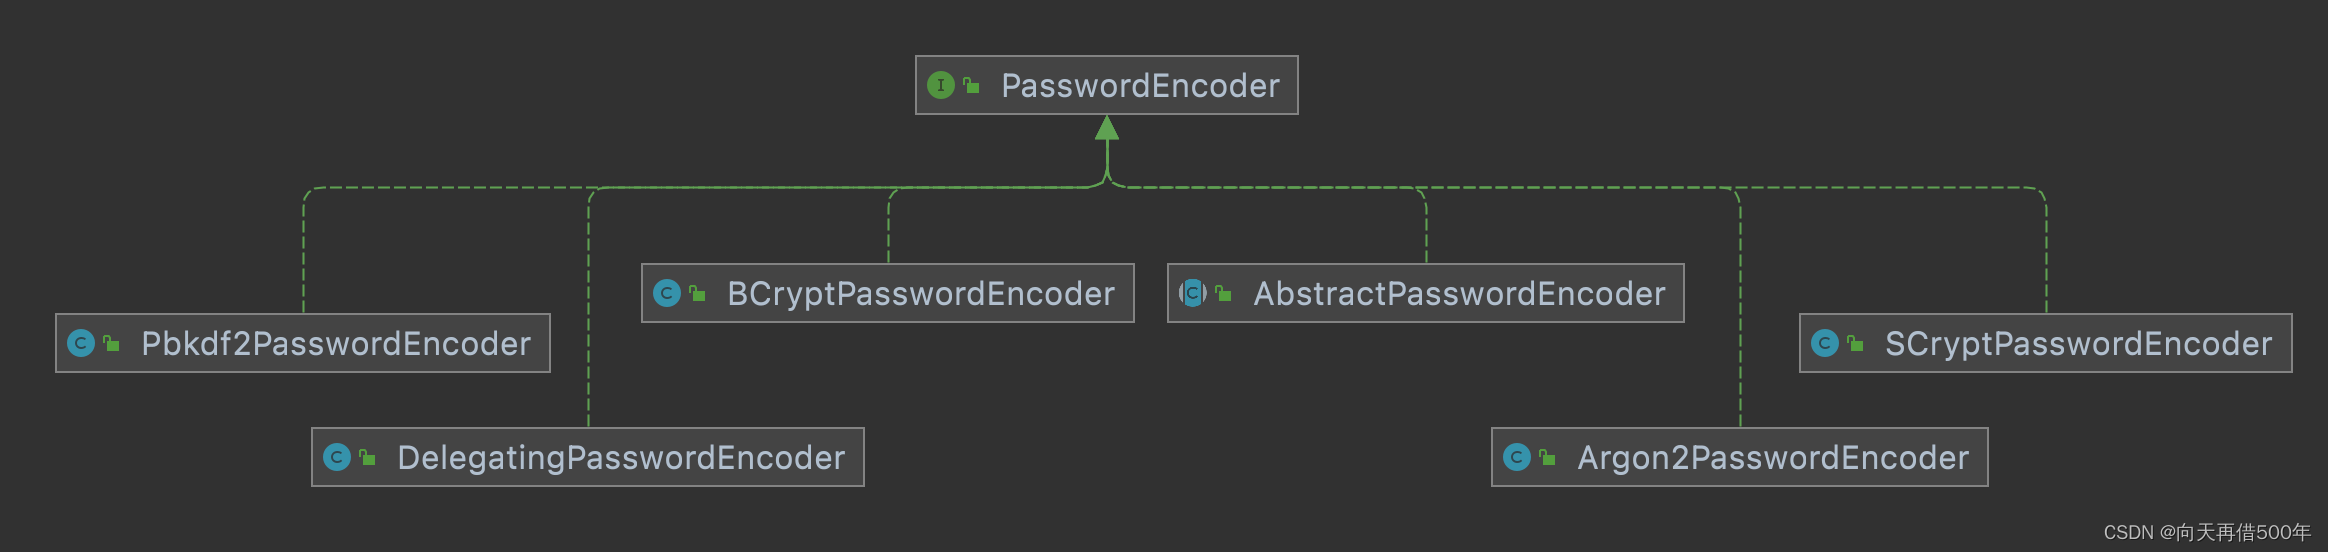
DelegatingPasswordEncoder
根据上面 PasswordEncoder的介绍,可能会以为 Spring security 中默认的密码加密方案应该是四种自适应单向加密函数中的一种,其实不然,在 spring Security 5.0之后,默认的密码加密方案其实是 DelegatingPasswordEncoder。从名字上来看,DelegatingPaswordEncoder 是一个代理类,而并非一种全新的密码加密方案,DeleggtinePasswordEncoder 主要用来代理上面介绍的不同的密码加密方案。为什么采DelegatingPasswordEncoder 而不是某一个具体加密方式作为默认的密码加密方案呢?主要考虑了如下两方面的因素:
-
兼容性:使用 DelegatingPasswrordEncoder 可以帮助许多使用旧密码加密方式的系统顺利迁移到 Spring security 中,它允许在同一个系统中同时存在多种不同的密码加密方案。
-
便捷性:密码存储的最佳方案不可能一直不变,如果使用 DelegatingPasswordEncoder作为默认的密码加密方案,当需要修改加密方案时,只需要修改很小一部分代码就可以实现。
通过源码分析得知如果在工厂中指定了PasswordEncoder,就会使用指定PasswordEncoder,否则就会使用默认DelegatingPasswordEncoder。
密码加密实战
使用固定密码加密方案
@Configuration
public class SecurityConfig extends WebSecurityConfigurerAdapter {
     @Bean
     public PasswordEncoder BcryptPasswordEncoder() {
         return new BCryptPasswordEncoder();
     }
  	 @Bean
    public UserDetailsService userDetailsService() {
        InMemoryUserDetailsManager inMemoryUserDetailsManager = new InMemoryUserDetailsManager();
        inMemoryUserDetailsManager.createUser(User.withUsername("root").password("$2a$10$WGFkRsZC0kzafTKOPcWONeLvNvg2jqd3U09qd5gjJGSHE5b0yoy6a").roles("xxx").build());
        return inMemoryUserDetailsManager;
    }
}
使用灵活密码加密方案 推荐
@Configuration
public class SecurityConfig extends WebSecurityConfigurerAdapter {
  	 @Bean
    public UserDetailsService userDetailsService() {
        InMemoryUserDetailsManager inMemoryUserDetailsManager = new InMemoryUserDetailsManager();
        inMemoryUserDetailsManager.createUser(User.withUsername("root").password("{bcrypt}$2a$10$WGFkRsZC0kzafTKOPcWONeLvNvg2jqd3U09qd5gjJGSHE5b0yoy6a").roles("xxx").build());
        return inMemoryUserDetailsManager;
    }
}
密码自动升级
推荐使用DelegatingPasswordEncoder 的另外一个好处就是自动进行密码加密方案的升级,这个功能在整合一些老的系统时非常有用。
- 准备库表
-- 用户表
CREATE TABLE `user`
(
    `id`                    int(11) NOT NULL AUTO_INCREMENT,
    `username`              varchar(32)  DEFAULT NULL,
    `password`              varchar(255) DEFAULT NULL,
    `enabled`               tinyint(1) DEFAULT NULL,
    `accountNonExpired`     tinyint(1) DEFAULT NULL,
    `accountNonLocked`      tinyint(1) DEFAULT NULL,
    `credentialsNonExpired` tinyint(1) DEFAULT NULL,
    PRIMARY KEY (`id`)
) ENGINE=InnoDB AUTO_INCREMENT=4 DEFAULT CHARSET=utf8;
-- 角色表
CREATE TABLE `role`
(
    `id`      int(11) NOT NULL AUTO_INCREMENT,
    `name`    varchar(32) DEFAULT NULL,
    `name_zh` varchar(32) DEFAULT NULL,
    PRIMARY KEY (`id`)
) ENGINE=InnoDB AUTO_INCREMENT=4 DEFAULT CHARSET=utf8;
-- 用户角色关系表
CREATE TABLE `user_role`
(
    `id`  int(11) NOT NULL AUTO_INCREMENT,
    `uid` int(11) DEFAULT NULL,
    `rid` int(11) DEFAULT NULL,
    PRIMARY KEY (`id`),
    KEY   `uid` (`uid`),
    KEY   `rid` (`rid`)
) ENGINE=InnoDB AUTO_INCREMENT=5 DEFAULT CHARSET=utf8;
- 插入数据
-- 插入用户数据
BEGIN;
  INSERT INTO `user`
  VALUES (1, 'root', '{noop}123', 1, 1, 1, 1);
  INSERT INTO `user`
  VALUES (2, 'admin', '{noop}123', 1, 1, 1, 1);
  INSERT INTO `user`
  VALUES (3, 'dyk', '{noop}123', 1, 1, 1, 1);
COMMIT;
-- 插入角色数据
BEGIN;
  INSERT INTO `role`
  VALUES (1, 'ROLE_product', '商品管理员');
  INSERT INTO `role`
  VALUES (2, 'ROLE_admin', '系统管理员');
  INSERT INTO `role`
  VALUES (3, 'ROLE_user', '用户管理员');
COMMIT;
-- 插入用户角色数据
BEGIN;
  INSERT INTO `user_role`
  VALUES (1, 1, 1);
  INSERT INTO `user_role`
  VALUES (2, 1, 2);
  INSERT INTO `user_role`
  VALUES (3, 2, 2);
  INSERT INTO `user_role`
  VALUES (4, 3, 3);
COMMIT;
- 整合 mybatis
<dependency>
    <groupId>mysql</groupId>
    <artifactId>mysql-connector-java</artifactId>
    <version>5.1.38</version>
</dependency>

<dependency>
  <groupId>org.mybatis.spring.boot</groupId>
  <artifactId>mybatis-spring-boot-starter</artifactId>
  <version>2.2.0</version>
</dependency>

<dependency>
  <groupId>com.alibaba</groupId>
  <artifactId>druid</artifactId>
  <version>1.2.8</version>
</dependency>
# datasource
spring.datasource.type=com.alibaba.druid.pool.DruidDataSource
spring.datasource.driver-class-name=com.mysql.jdbc.Driver
spring.datasource.url=jdbc:mysql://localhost:3306/my_java?characterEncoding=UTF-8&useSSL=false
spring.datasource.username=root
spring.datasource.password=123456
# mybatis
mybatis.mapper-locations=classpath:com/blb/mapper/*.xml
mybatis.type-aliases-package=com.blb.entity
# log
logging.level.com.blb=debug
- 编写实体类
public class User implements UserDetails {
    private Integer id;
    private String username;
    private String password;
    private Boolean enabled;
    private Boolean accountNonExpired;
    private Boolean accountNonLocked;
    private Boolean credentialsNonExpired;
    private List<Role> roles = new ArrayList<>();
    @Override
    public Collection<? extends GrantedAuthority> getAuthorities() {
        List<SimpleGrantedAuthority> authorities = new ArrayList<>();
        for (Role role : roles) {
            authorities.add(new SimpleGrantedAuthority(role.getName()));
        }
        return authorities;
    }

    @Override
    public String getPassword() {
        return password;
    }

    public void setPassword(String password) {
        this.password = password;
    }

    @Override
    public String getUsername() {
        return username;
    }

    public void setUsername(String username) {
        this.username = username;
    }

    @Override
    public boolean isAccountNonExpired() {
        return accountNonExpired;
    }

    public void setAccountNonExpired(Boolean accountNonExpired) {
        this.accountNonExpired = accountNonExpired;
    }

    @Override
    public boolean isAccountNonLocked() {
        return accountNonLocked;
    }

    public void setAccountNonLocked(Boolean accountNonLocked) {
        this.accountNonLocked = accountNonLocked;
    }

    @Override
    public boolean isCredentialsNonExpired() {
        return credentialsNonExpired;
    }

    public void setCredentialsNonExpired(Boolean credentialsNonExpired) {
        this.credentialsNonExpired = credentialsNonExpired;
    }

    @Override
    public boolean isEnabled() {
        return enabled;
    }

    public void setEnabled(Boolean enabled) {
        this.enabled = enabled;
    }

    public void setRoles(List<Role> roles) {
        this.roles = roles;
    }

    public Integer getId() {
        return id;
    }

    public void setId(Integer id) {
        this.id = id;
    }
}
public class Role {
    private Integer id;
    private String name;
    private String nameZh;

    public Integer getId() {
        return id;
    }

    public void setId(Integer id) {
        this.id = id;
    }

    public String getName() {
        return name;
    }

    public void setName(String name) {
        this.name = name;
    }

    public String getNameZh() {
        return nameZh;
    }

    public void setNameZh(String nameZh) {
        this.nameZh = nameZh;
    }
}
- 创建dao
@Mapper
public interface UserDao {
    List<Role> getRolesByUid(Integer uid);
    User loadUserByUsername(String username);
  	Integer updatePassword(@Param("username") String username,@Param("password") String password);
}
- 编写 mapper
<!DOCTYPE mapper
        PUBLIC "-//mybatis.org//DTD Mapper 3.0//EN"
        "http://mybatis.org/dtd/mybatis-3-mapper.dtd">
<mapper namespace="com.blb.demo1.dao.UserDao">


    <select id="loadUserByUsername" resultType="User">
        select id,
               username,
               password,
               enabled,
               accountNonExpired,
               accountNonLocked,
               credentialsNonExpired
        from `user`
        where username = #{username}
    </select>


    <select id="getRolesByUid" resultType="Role">
        select r.id,
               r.name,
               r.name_zh nameZh
        from `role` r,
             `user_role` ur
        where r.id = ur.rid
          and ur.uid = #{uid}
    </select>

  	<update id="updatePassword">
      update `user` set password=#{password}
      where username=#{username}
  	</update>

</mapper>
- 编写service 实现
@Service
public class MyUserDetailService implements UserDetailsService,UserDetailsPasswordService {
    private final UserDao userDao;

    @Autowired
    public MyUserDetailService(UserDao userDao) {
        this.userDao = userDao;
    }

    @Override
    public UserDetails loadUserByUsername(String username) throws UsernameNotFoundException {
        User user = userDao.loadUserByUsername(username);
        if (ObjectUtils.isEmpty(user)) {
            throw new RuntimeException("用户不存在!");
        }
        user.setRoles(userDao.getRolesByUid(user.getId()));
        return user;
    }

  	 @Override
    public UserDetails updatePassword(UserDetails user, String newPassword) {
        Integer result = userDao.updatePassword(user.getUsername(), newPassword);
        if (result == 1) {
            ((User) user).setPassword(newPassword);
        }
        return user;
    }
}
- 配置securityconfig
@Configuration
public class SecurityConfig extends WebSecurityConfigurerAdapter {


    private final MyUserDetailService myUserDetailService;

    @Autowired
    public SecurityConfig(MyUserDetailService myUserDetailService) {
        this.myUserDetailService = myUserDetailService;
    }
      @Override
    protected void configure(AuthenticationManagerBuilder auth) throws Exception {
        //查询数据库
        auth.userDetailsService(myUserDetailService);
    }

}
记住我 RememberMe
具体的实现思路就是通过 Cookie 来记录当前用户身份。当用户登录成功之后,会通过一定算法,将用户信息、时间戳等进行加密,加密完成后,通过响应头带回前端存储在cookie中,当浏览器会话过期之后,如果再次访问该网站,会自动将 Cookie 中的信息发送给服务器,服务器对 Cookie中的信息进行校验分析,进而确定出用户的身份,Cookie中所保存的用户信息也是有时效的,例如三天、一周等。
@Override
    protected void configure(HttpSecurity http) throws Exception {
        http.authorizeRequests()
                //.mvcMatchers("/index").rememberMe()  //指定资源记住我
                .anyRequest().authenticated()
                .and()
                .formLogin()
                .and()
                .rememberMe() //开启记住我功能
                .tokenRepository(persistentTokenRepository())
                //.rememberMeServices(rememberMeServices()) //指定 rememberService 实现
                //.rememberMeParameter("remember-me") 用来接收请求中哪个参数作为开启记住我的参数
                //.alwaysRemember(true) //总是记住我
                .and()
                .csrf().disable();
    }
使用内存中令牌实现
@Configuration
public class SecurityConfig extends WebSecurityConfigurerAdapter {
@Override
    protected void configure(HttpSecurity http) throws Exception {
        http.authorizeRequests()
                .anyRequest().authenticated()
                .and()
                .formLogin()
                .and()
                .rememberMe() //开启记住我功能
                .rememberMeServices(rememberMeServices())
                .and()
                .csrf().disable();
    }

    @Bean
    public RememberMeServices rememberMeServices() {
        return new PersistentTokenBasedRememberMeServices(
          	   "key",//参数 1: 自定义一个生成令牌 key 默认 UUID
               userDetailsService(), //参数 2:认证数据源
               new InMemoryTokenRepositoryImpl());//参数 3:令牌存储方式
    }
}
持久化令牌
<dependency>
  <groupId>com.alibaba</groupId>
  <artifactId>druid</artifactId>
  <version>1.2.8</version>
</dependency>

<dependency>
  <groupId>mysql</groupId>
  <artifactId>mysql-connector-java</artifactId>
  <version>5.1.38</version>
</dependency>

<dependency>
  <groupId>org.mybatis.spring.boot</groupId>
  <artifactId>mybatis-spring-boot-starter</artifactId>
  <version>2.2.0</version>
</dependency>
配置数据源
spring.thymeleaf.cache=false
spring.datasource.type=com.alibaba.druid.pool.DruidDataSource
spring.datasource.driver-class-name=com.mysql.jdbc.Driver
spring.datasource.url=jdbc:mysql://localhost:3306/security?characterEncoding=UTF-8
spring.datasource.username=root
spring.datasource.password=root
mybatis.mapper-locations=classpath:mapper/*.xml
mybatis.type-aliases-package=com.entity
配置持久化令牌
@Configuration
public class SecurityConfig extends WebSecurityConfigurerAdapter {
    //...
    @Autowired
    private DataSource dataSource;
    @Bean
    public PersistentTokenRepository persistentTokenRepository(){
        JdbcTokenRepositoryImpl jdbcTokenRepository = new JdbcTokenRepositoryImpl();
        jdbcTokenRepository.setCreateTableOnStartup(false);//只需要没有表时设置为 true
        jdbcTokenRepository.setDataSource(dataSource);
        return jdbcTokenRepository;
    }
  	//..
    @Override
    protected void configure(HttpSecurity http) throws Exception {

        http.authorizeRequests()
                .mvcMatchers("/login.html").permitAll()
                .anyRequest().authenticated()
								 //...
                .logout()
                .and()
                .rememberMe() //开启记住我功能
                .tokenRepository(persistentTokenRepository())
                .and()
                .csrf().disable();
    }
}
配置
设置用户名和密码
方式一 通过配置文件
spring:
  security:
    user:
      name: dyk
      password: 123456
方式二 通过配置类
@Configuration
public class SecurityConfig1 extends WebSecurityConfigurerAdapter {
    @Bean
    BCryptPasswordEncoder password(){
        return new BCryptPasswordEncoder();
    }


    @Override
    protected void configure(AuthenticationManagerBuilder auth) throws Exception {
        BCryptPasswordEncoder passwordEncoder=new BCryptPasswordEncoder();
        String password=passwordEncoder.encode("123456");
        auth.inMemoryAuthentication().withUser("dyk123").password(password).roles("admin");
    }
}
方式三 自定义编写实现类
1.创建配置类,使用UserDetailsService实现类
2.编写实现类,返回User对象,User对象有用户名和密码和操作权限
创建MyUserDetailsService实现UserDetailsService 返回User对象
@Service("userDetailsService")
public class MyUserDetailsService implements UserDetailsService {
    @Override
    public UserDetails loadUserByUsername(String s) throws UsernameNotFoundException {
        List<GrantedAuthority> auths= AuthorityUtils.commaSeparatedStringToAuthorityList("role");
        return new User("cb123",new BCryptPasswordEncoder().encode("123"),auths);
    }
}
以后用户名密码权限都是通过查询数据库得到的这里我是用集合模拟的假数据
配置类注入MyUserDetailsService
@Configuration
public class SecurityConfig2 extends WebSecurityConfigurerAdapter {
    @Bean
    BCryptPasswordEncoder password(){
        return new BCryptPasswordEncoder();
    }
   @Autowired
   private UserDetailsService userDetailsService;
    @Override
    protected void configure(AuthenticationManagerBuilder auth) throws Exception {
        auth.userDetailsService(userDetailsService).passwordEncoder(password());
    }
}
返回值 UserDetails
这个类是系统默认的用户“主体”
public interface UserDetails extends Serializable {
// 表示获取登录用户所有权限
Collection<? extends GrantedAuthority> getAuthorities();
// 表示获取密码
String getPassword();
// 表示获取用户名
String getUsername();
// 表示判断账户是否过期
boolean isAccountNonExpired();
// 表示判断账户是否被锁定
boolean isAccountNonLocked();
// 表示凭证{密码}是否过期
boolean isCredentialsNonExpired();
// 表示当前用户是否可用
boolean isEnabled();
}
我们只需要使用 User 这个实体类即可
public class User implements UserDetails, CredentialsContainer {
    private static final long serialVersionUID = 550L;
    private static final Log logger = LogFactory.getLog(User.class);
    private String password;
    private final String username;
    private final Set<GrantedAuthority> authorities;
    private final boolean accountNonExpired;
    private final boolean accountNonLocked;
    private final boolean credentialsNonExpired;
    private final boolean enabled;

    public User(String username, String password, Collection<? extends GrantedAuthority> authorities) {
        this(username, password, true, true, true, true, authorities);
    }
通过查询数据库设置账户密码权限
依赖
这里新引入了mysql,mybatisplus,lombok依赖
<dependency>
            <groupId>org.springframework.boot</groupId>
            <artifactId>spring-boot-starter-security</artifactId>
        </dependency>
        <dependency>
            <groupId>org.springframework.boot</groupId>
            <artifactId>spring-boot-starter-thymeleaf</artifactId>
        </dependency>
        <dependency>
            <groupId>org.springframework.boot</groupId>
            <artifactId>spring-boot-starter-web</artifactId>
        </dependency>
        <dependency>
            <groupId>org.thymeleaf.extras</groupId>
            <artifactId>thymeleaf-extras-springsecurity5</artifactId>
        </dependency>

        <dependency>
            <groupId>org.springframework.boot</groupId>
            <artifactId>spring-boot-starter-test</artifactId>
            <scope>test</scope>
        </dependency>
        <dependency>
            <groupId>org.springframework.security</groupId>
            <artifactId>spring-security-test</artifactId>
            <scope>test</scope>
        </dependency>

        <dependency>
            <groupId>com.baomidou</groupId>
            <artifactId>mybatis-plus-boot-starter</artifactId>
            <version>3.4.2</version>
        </dependency>
        <dependency>
            <groupId>mysql</groupId>
            <artifactId>mysql-connector-java</artifactId>
        </dependency>

        <dependency>
            <groupId>org.projectlombok</groupId>
            <artifactId>lombok</artifactId>
        </dependency>
配置文件
spring:
  datasource:
    driver-class-name: com.mysql.cj.jdbc.Driver
    url: jdbc:mysql://localhost:3306/db3?useUnicode=true&characterEncoding=UTF-8&serverTimezone=UTC
    username: root
    password: 123456
  thymeleaf:
    cache: false
mybatis-plus:
  configuration:
    log-impl: org.apache.ibatis.logging.stdout.StdOutImpl
创建数据库
CREATE TABLE users(

   id INT PRIMARY KEY ,
   username VARCHAR(20),
   PASSWORD VARCHAR(20)
)CHARSET=utf8
实体类Users
@Data
@NoArgsConstructor
@AllArgsConstructor
@ToString
public class Users {
    private Integer id;
    private String username;
    private String password;
}
创建接口继承MybatisPlus的BaseMapper
@Repository
@Mapper
public interface UsersMapper extends BaseMapper<Users> {
}
可以使用@Mapper或者在启动类上加入MapperScan
查询数据库
@Service("userDetailsService")
public class MyUserDetailsService implements UserDetailsService {
    @Autowired
    private UsersMapper usersMapper;
    @Override
    public UserDetails loadUserByUsername(String username) throws UsernameNotFoundException {
        //调用userMapper方法,根据用户查询数据库
        QueryWrapper queryWrapper=new QueryWrapper();
        queryWrapper.eq("username",username);
        Users users = usersMapper.selectOne(queryWrapper);

        //判断
        if(users==null){
            throw new UsernameNotFoundException("用户名不存在");
        }

        List<GrantedAuthority> auths= AuthorityUtils.commaSeparatedStringToAuthorityList("role");
        return new User(users.getUsername(),new BCryptPasswordEncoder().encode(users.getPassword()),auths);
    }
}
自定义用户登录页面
在配置类中重写protected void configure(HttpSecurity http) 方法
@Configuration
public class SecurityConfig2 extends WebSecurityConfigurerAdapter {
    @Bean
    BCryptPasswordEncoder password(){
        return new BCryptPasswordEncoder();
    }
   @Autowired
   private UserDetailsService userDetailsService;
    @Override
    protected void configure(AuthenticationManagerBuilder auth) throws Exception {
        auth.userDetailsService(userDetailsService).passwordEncoder(password());
    }

    @Override
    protected void configure(HttpSecurity http) throws Exception {
        http.formLogin()//自定义自己编写的登录页面
        .loginPage("/login.html")//登录页面设置
        .loginProcessingUrl("/user/login")//登录访问的路径
        .defaultSuccessUrl("/index").permitAll()//登录成功后的跳转路径
        .and().authorizeRequests()
                .antMatchers("/","/hello","/user/login").permitAll()//设置那些路径可以直接访问,不需要认证
                .anyRequest().authenticated() //其他所有请求都需要先验证才能访问
                .and().csrf().disable();//关闭csrf防护
    }
}
在static目录下新建login.html
注意表单提交地址应该与loginProcessingUrl(“/user/login”)//登录访问的路径一致
<!DOCTYPE html>
<html lang="en">
<head>
    <meta charset="UTF-8">
    <title>Title</title>
</head>
<body>
     <form action="/user/login" method="post">
         用户名:<input type="text" name="username"><br>
         密码:<input type="text" name="password"><br>
         <input type="submit" value="登录">
     </form>
</body>
</html>
注意 表单里面的name标签必须是username和password
原因:
在执行登录的时候会走一个过滤器 UsernamePasswordAuthenticationFilter
也可以修改
@Override
    protected void configure(HttpSecurity http) throws Exception {
        http.formLogin()//自定义自己编写的登录页面

         .usernameParameter("UserName")//自定义入参
         .passwordParameter("PassWord")


        .loginPage("/login.html")//登录页面设置
        .loginProcessingUrl("/user/login")//登录访问的路径
        .successForwardUrl("/suc")
         .failureForwardUrl("/err").permitAll()//登录成功后的跳转路径
        .and().authorizeRequests()
                .antMatchers("/","/user/login","/success.html","/error.html").permitAll()//设置那些路径可以直接访问,不需要认证

                .anyRequest().authenticated() //其他请求需要认证
                .and().csrf().disable();//关闭csrf防护
    }
修改后注意表单的两个name应该为UserName,PassWord
controller
@RestController
public class TestController {

    @GetMapping("/hello")
    public String hello(){
        return "hello";
    }

    @RequestMapping("/index")
    public String index(){
        return "index";
    }

}

可以发先由于设置了
antMatchers("/","/hello","/user/login").permitAll()//设置那些路径可以直接访问,不需要认证
现在不需要登录就能访问/hello了
表单的提交地址要和配置类中的一致
<form action="/user/login" method="post">

http.formLogin()//自定义自己编写的登录页面
        .loginPage("/login.html")//登录页面设置
        .loginProcessingUrl("/user/login")//登录访问的路径
        .defaultSuccessUrl("/index").permitAll()//登录成功后的跳转路径
并且登录成功后会自动访问controller里的/index路径
自定义登录成功处理器
public class MyAuthenticationSuccessHandler implements AuthenticationSuccessHandler {
    private String url;

    public MyAuthenticationSuccessHandler(String url) {
        this.url = url;
    }

    @Override
    public void onAuthenticationSuccess(HttpServletRequest httpServletRequest, HttpServletResponse httpServletResponse, Authentication authentication) throws IOException, ServletException {
         httpServletResponse.sendRedirect(url);

    }
}
登录成功后跳转到百度
注意要把上面successForwardUrl注释掉
 @Override
    protected void configure(HttpSecurity http) throws Exception {
        http.formLogin()//自定义自己编写的登录页面
        .loginPage("/login.html")//登录页面设置
        .loginProcessingUrl("/user/login")//登录访问的路径
        //.successForwardUrl("/suc")

          .successHandler(new MyAuthenticationSuccessHandler("http://www.baidu.com"))

         .failureForwardUrl("/err").permitAll()//登录成功后的跳转路径
        .and().authorizeRequests()
                .antMatchers("/","/user/login","/success.html","/error.html").permitAll()//设置那些路径可以直接访问,不需要认证

                .anyRequest().authenticated() //其他请求需要认证
                .and().csrf().disable();//关闭csrf防护
    }
同理自定义失败处理器只需要实现AuthenticationFailureHandler重写方法即可
基于角色或权限进行访问
我的理解是角色和权限,角色其实是权限的集合
anyRequest()
表示匹配所有请求,一般情况下都会使用设置全部内容需要进行认证
.anyRequest().authenticated() //其他请求需要认证
antMatchers()
方法定义如下:
public CantMatchers(String...antPatterns)
参数不定向参数,每个参数是一个ant表达式,用于匹配url规则
规则如下:
?·匹配一个字符*·匹配0个或多个字符**·匹配0个或多个目录
在实际项目中放行静态资源
放行js,css文件下所有静态资源
.antMatchers("/js/**","/css/**").permitAll()//设置那些路径可以直接访问,不需要认证
另一种方式是只有.js文件都放行
.antMatchers("/**/*.js"").permitAll()//设置那些路径可以直接访问,不需要认证
hasAuthority()
如果当前的主体具有指定的权限,则返回 true,否则返回 false
.antMatchers("/insert").hasAnyAuthority("admin")
hasAnyAuthority
用户具备其中某一个权限,就允许访问
.antMatchers("/insert").hasAnyAuthority("admin","user")
在配置类设置当前访问路径需要有那些权限
注意:.anyRequest().authenticated() //所有请求需要认证这个应该放在最后面,是从上往下执行的,如果放在前面,请求可能就被拦截了
@Override
    protected void configure(HttpSecurity http) throws Exception {
        http.formLogin()//自定义自己编写的登录页面
        .loginPage("/login.html")//登录页面设置
        .loginProcessingUrl("/user/login")//登录访问的路径
        .defaultSuccessUrl("/index").permitAll()//登录成功后的跳转路径
        .and().authorizeRequests()
                .antMatchers("/","/hello","/user/login").permitAll()//设置那些路径可以直接访问,不需要认证


                //当前登录用户,只有具有admin权限才可以访问这个路径
                .antMatchers("/").hasAuthority("admin")


                .anyRequest().authenticated() //所有请求需要认证
                .and().csrf().disable();//关闭csrf防护
    }
在UserDetailsService,把返回user对象设置权限
当这边设置的权限是role而不是admin时
 List<GrantedAuthority> auths= AuthorityUtils.commaSeparatedStringToAuthorityList("role");
        return new User(users.getUsername(),new BCryptPasswordEncoder().encode(users.getPassword()),auths);

当把当前登录用户权限设置为admin时即可访问 /
List<GrantedAuthority> auths= AuthorityUtils.commaSeparatedStringToAuthorityList("admin");
        return new User(users.getUsername(),
        new BCryptPasswordEncoder().encode(users.getPassword()),auths);

hasAnyAuthority
如果当前的主体有任何提供的角色(给定的作为一个逗号分隔的字符串列表)的话,返回true.
@Override
    protected void configure(HttpSecurity http) throws Exception {
        http.formLogin()//自定义自己编写的登录页面
        .loginPage("/login.html")//登录页面设置
        .loginProcessingUrl("/user/login")//登录访问的路径
        .defaultSuccessUrl("/index").permitAll()//登录成功后的跳转路径
        .and().authorizeRequests()
                .antMatchers("/","/hello","/user/login").permitAll()//设置那些路径可以直接访问,不需要认证
                //当前登录用户,只有具有admin权限才可以访问这个路径
                .antMatchers("/").hasAuthority("admin")


                //当前登录用户,只要具有admin或manager其中一个即可访问这个路径
                .antMatchers("/hello").hasAnyAuthority("admin,manager")


                .anyRequest().authenticated() //其他请求需要认证
                .and().csrf().disable();//关闭csrf防护
    }
List<GrantedAuthority> auths= AuthorityUtils.commaSeparatedStringToAuthorityList("admin");
        return new User(users.getUsername(),
        new BCryptPasswordEncoder().encode(users.getPassword()),auths);
和上面那个方法效果几乎一样,这里就不给出截图了
hasRole
如果用户具备给定角色就允许访问,否则出现 403。
如果当前主体具有指定的角色,则返回 true
@Configuration
public class SecurityConfig3 extends WebSecurityConfigurerAdapter {
    @Bean
    BCryptPasswordEncoder password(){
        return new BCryptPasswordEncoder();
    }
   @Autowired
   private UserDetailsService userDetailsService;
    @Override
    protected void configure(AuthenticationManagerBuilder auth) throws Exception {
        auth.userDetailsService(userDetailsService).passwordEncoder(password());
    }

    @Override
    protected void configure(HttpSecurity http) throws Exception {
        http.formLogin()//自定义自己编写的登录页面
        .loginPage("/login.html")//登录页面设置
        .loginProcessingUrl("/user/login")//登录访问的路径
        .defaultSuccessUrl("/index").permitAll()//登录成功后的跳转路径
        .and().authorizeRequests()
                .antMatchers("/","/hello","/user/login").permitAll()//设置那些路径可以直接访问,不需要认证
                //当前登录用户,只有具有teacher角色才可以访问这个路径
                .antMatchers("/").hasRole("teacher")

                .anyRequest().authenticated() //其他请求需要认证
                .and().csrf().disable();//关闭csrf防护
    }
}
注意给用户添加角色要加上ROLE_
List<GrantedAuthority> auths= AuthorityUtils.commaSeparatedStringToAuthorityList("ROLE_teacher");

        return new User(users.getUsername(),
        new BCryptPasswordEncoder().encode(users.getPassword()),auths);
hasAnyRole
表示用户具备任何一个条件都可以访问。
给用户添加角色
基本作用和上面一样,这里就不做过多描述,区别就是只要具备其中一个角色就能访问该路径
自定义没有权限访问页面
@Configuration
public class SecurityConfig3 extends WebSecurityConfigurerAdapter {
    @Bean
    BCryptPasswordEncoder password(){
        return new BCryptPasswordEncoder();
    }
   @Autowired
   private UserDetailsService userDetailsService;
    @Override
    protected void configure(AuthenticationManagerBuilder auth) throws Exception {
        auth.userDetailsService(userDetailsService).passwordEncoder(password());
    }

    @Override
    protected void configure(HttpSecurity http) throws Exception {
        //配置自定义没有权限403跳转页面
        http.exceptionHandling().accessDeniedPage("/403.html");


        http.formLogin()//自定义自己编写的登录页面
        .loginPage("/login.html")//登录页面设置
        .loginProcessingUrl("/user/login")//登录访问的路径
        .defaultSuccessUrl("/index").permitAll()//登录成功后的跳转路径
        .and().authorizeRequests()
                .antMatchers("/","/hello","/user/login").permitAll()//设置那些路径可以直接访问,不需要认证
                //当前登录用户,只有具有teacher角色才可以访问这个路径
                .antMatchers("/").hasRole("teacher")

                .anyRequest().authenticated() //其他请求需要认证
                .and().csrf().disable();//关闭csrf防护
    }
}
403.html
<!DOCTYPE html>
<html lang="en">
<head>
    <meta charset="UTF-8">
    <title>403页面</title>
  <style>

    body {
      width: 100%;
      height: 100vh;
      display: flex;
      align-items: center;
      justify-content: center;
      flex-direction: column;
      family: font;
      background-image: linear-gradient(45deg, #f6d200 25%, #181617 25%, #181617 50%, #f6d200 50%, #f6d200 75%, #181617 75%, #181617 100%);
    }

    h1 {
      text-transform: uppercase;
      background: repeating-linear-gradient(
              45deg,
              #f6d200 ,
              #f6d200  10px,
              #181617  10px,
              #181617  20px
      );
      -webkit-background-clip: text;
      -webkit-text-fill-color: transparent;
      /*animation: move 5s ease infinite;*/
      font-size: 384px;
      margin: 0;
      line-height: .7;
      position: relative;
    :before,
    :after{
       content: "Caution";
       background-color: #f6d200;
       color: #181617;
       border-radius: 10px;
       font-size: 35px;
       position: absolute;
       padding: 31px;
       text-transform: uppercase;
       font-weight: bold;
       -webkit-text-fill-color: #181617;
       left: 50%;
       top: 50%;
       transform: translate(-50%, -50%) rotate(20deg);
     }
    :before {
       content: "";
       padding: 70px 130px;
       background: repeating-linear-gradient(45deg, #f6d200, #f6d200 10px, #181617 10px, #181617 20px);
       box-shadow: 0px 0px 10px #181617;
     }
     span:before,
     span:after{
        content: "";
        width: 8px;
        height: 8px;
        background: #757575;
        color: #757575;
        border-radius: 50%;
        position: absolute;
        bottom: 0;
        margin: auto;
        top: 20%;
        z-index: 3;
        box-shadow: 0px 60px 0 0px;
      }
    span:before {
      left: 37%;
      transform: rotate(22deg);
      top: -44%;
    }
    span:after {
      right: 34%;
      transform: rotate(22deg);
      top: 3%;
    }
    }

  </style>
</head>
<body>
<h1 class="text"><span>403</span></h1>
</body>
</html>
注解的使用
@Secured
判断是否具有角色,另外需要注意的是这里匹配的字符串需要添加前缀“ROLE_“。
使用注解先要开启注解功能!
在启动类(或配置类)开启注解
@EnableGlobalMethodSecurity(securedEnabled = true)
在controller的方法上使用注解,设置角色
@RequestMapping("/insert")
    @Secured({"ROLE_sale","ROLE_manager"})
    public String insert()
    {
        return "insert";
    }
UserDetailsService设置用户角色
List<GrantedAuthority> auths= AuthorityUtils.commaSeparatedStringToAuthorityList("ROLE_manager");
        return new User(users.getUsername(),
        new BCryptPasswordEncoder().encode(users.getPassword()),auths);

@PreAuthorize
@PreAuthorize:注解适合进入方法前的权限验证, @PreAuthorize 可以将登录用
户的 roles/permissions 参数传到方法中
在启动类或者配置类先开启注解功能:
@EnableGlobalMethodSecurity(prePostEnabled = true)
在controller方法上添加注解
 @RequestMapping("/update")
    @PreAuthorize("hasAnyAuthority('admin')")
    //@PreAuthorize("hasAnyRole('ROLE_manager')")
    public String update()
    {
        return "update";
    }
UserDetailsService设置用户角色
List<GrantedAuthority> auths= AuthorityUtils.commaSeparatedStringToAuthorityList("ROLE_manager,admin");
        return new User(users.getUsername(),
        new BCryptPasswordEncoder().encode(users.getPassword()),auths);
@PostAuthorize
在启动类或者配置类先开启注解功能:
@EnableGlobalMethodSecurity(prePostEnabled = true)
@PostAuthorize 注解使用并不多,在方法执行后再进行权限验证,适合验证带有返回值的权限
在controller方法上添加注解
@RequestMapping("/delete")
    @PostAuthorize("hasAnyAuthority('teacher')")
    public String delete(){
        System.out.println("delete 已经执行");

        return "delete";
    }
UserDetailsService设置用户角色
List<GrantedAuthority> auths= AuthorityUtils.commaSeparatedStringToAuthorityList("ROLE_manager,admin");
        return new User(users.getUsername(),
        new BCryptPasswordEncoder().encode(users.getPassword()),auths);
可以一眼就看出来是没有权限访问该路径的
但是里面打印的内容却已经执行了


@PostFilter
@PostFilter :权限验证之后对数据进行过滤 留下用户名是 admin1 的数据表达式中的 filterObject 引用的是方法返回值 List 中的某一个元素
对方法的返回数据过滤
@RequestMapping("getAll")
@PreAuthorize("hasRole('ROLE_管理员')")
@PostFilter("filterObject.username == 'admin1'")
@ResponseBody
public List<UserInfo> getAllUser(){
 ArrayList<UserInfo> list = new ArrayList<>();
 list.add(new UserInfo(1l,"admin1","6666"));
 list.add(new UserInfo(2l,"admin2","888"));
return list;
}
只有username是admin1的才会返回
@PreFilter
@PreFilter: 进入控制器之前对数据进行过滤
@RequestMapping("getTestPreFilter")
@PreAuthorize("hasRole('ROLE_管理员')")
@PreFilter(value = "filterObject.id%2==0")
@ResponseBody
public List<UserInfo> getTestPreFilter(@RequestBody List<UserInfo>
list){
 list.forEach(t-> {
 System.out.println(t.getId()+"\t"+t.getUsername());
 });
return list;
}
只有id是偶数的才会传进去
用户注销
success.html
<!DOCTYPE html>
<html lang="en">
<head>
    <meta charset="UTF-8">
    <title>Title</title>
</head>
<body>
 <h1>登录成功</h1>
 <a href="/logout">退出</a>
</body>
</html>
在配置类中添加退出映射地址
//配置退出映射地址
        http.logout().logoutUrl("/logout").logoutSuccessUrl("/index").permitAll();
退出之后,是无法访问需要登录时才能访问的控制器
基于数据库的记住我
数据库表
CREATE TABLE `persistent_logins` (
 `username` varchar(64) NOT NULL,
 `series` varchar(64) NOT NULL,
 `token` varchar(64) NOT NULL,
 `last_used` timestamp NOT NULL DEFAULT CURRENT_TIMESTAMP ON UPDATE
CURRENT_TIMESTAMP,
 PRIMARY KEY (`series`)
) ENGINE=InnoDB DEFAULT CHARSET=utf8;
添加数据库的配置文件
spring:
  datasource:
    driver-class-name: com.mysql.cj.jdbc.Driver
    url: jdbc:mysql://localhost:3306/db1?useUnicode=true&characterEncoding=UTF-8&serverTimezone=UTC
    username: root
    password: 123456
  thymeleaf:
    cache: false
mybatis-plus:
  configuration:
    log-impl: org.apache.ibatis.logging.stdout.StdOutImpl
编写配置类
要注入数据源和PersistentTokenRepository实现类
 //注入数据源
    @Autowired
    private DataSource dataSource;

    @Bean
    public PersistentTokenRepository persistentTokenRepository(){
        JdbcTokenRepositoryImpl jdbcTokenRepository=new JdbcTokenRepositoryImpl();
        jdbcTokenRepository.setDataSource(dataSource);
        //自动创建数据库表
        //jdbcTokenRepository.setCreateTableOnStartup(true);
        return jdbcTokenRepository;
    }
.and().rememberMe().tokenRepository(persistentTokenRepository())
                .tokenValiditySeconds(60)//设置有效时长,以秒为单位
                .userDetailsService(userDetailsService)
package com.blb.config;

import org.springframework.beans.factory.annotation.Autowired;
import org.springframework.context.annotation.Bean;
import org.springframework.context.annotation.Configuration;
import org.springframework.security.config.annotation.authentication.builders.AuthenticationManagerBuilder;
import org.springframework.security.config.annotation.web.builders.HttpSecurity;
import org.springframework.security.config.annotation.web.configuration.WebSecurityConfigurerAdapter;
import org.springframework.security.core.userdetails.UserDetailsService;
import org.springframework.security.crypto.bcrypt.BCryptPasswordEncoder;
import org.springframework.security.web.authentication.rememberme.JdbcTokenRepositoryImpl;
import org.springframework.security.web.authentication.rememberme.PersistentTokenRepository;

import javax.sql.DataSource;

@Configuration
public class SecurityConfig5 extends WebSecurityConfigurerAdapter {
    //注入数据源
    @Autowired
    private DataSource dataSource;

    @Bean
    public PersistentTokenRepository persistentTokenRepository(){
        JdbcTokenRepositoryImpl jdbcTokenRepository=new JdbcTokenRepositoryImpl();
        jdbcTokenRepository.setDataSource(dataSource);
        //自动创建数据库表
        //jdbcTokenRepository.setCreateTableOnStartup(true);
        return jdbcTokenRepository;
    }

    @Bean
    BCryptPasswordEncoder password(){
        return new BCryptPasswordEncoder();
    }
   @Autowired
   private UserDetailsService userDetailsService;
    @Override
    protected void configure(AuthenticationManagerBuilder auth) throws Exception {
        auth.userDetailsService(userDetailsService).passwordEncoder(password());
    }

    @Override
    protected void configure(HttpSecurity http) throws Exception {
        //配置自定义没有权限403跳转页面
        http.exceptionHandling().accessDeniedPage("/403.html");

        //配置退出映射地址
        http.logout().logoutUrl("/logout").logoutSuccessUrl("/index").permitAll();

        http.formLogin()//自定义自己编写的登录页面
        .loginPage("/login.html")//登录页面设置
        .loginProcessingUrl("/user/login")//登录访问的路
        .defaultSuccessUrl("/success.html").permitAll()//登录成功后的跳转路径
        .and().authorizeRequests()
                .antMatchers("/","/hello","/user/login").permitAll()//设置那些路径可以直接访问,不需要认证
//                //当前登录用户,只有具有teacher角色才可以访问这个路径

                .anyRequest().authenticated() //其他请求需要认证
                .and().rememberMe().tokenRepository(persistentTokenRepository())
                .tokenValiditySeconds(60)//设置有效时长,以秒为单位
                .userDetailsService(userDetailsService)


                .and().csrf().disable();//关闭csrf防护
    }
}
页面添加记住我复选框
记住我:<input type="checkbox"name="remember-me"title="记住密码"/><br/>
此处:name 属性值必须位 remember-me.不能改为其他值
结合thymeleaf
<dependency>
   <groupId>org.thymeleaf.extras</groupId>
   <artifactId>thymeleaf-extras-springsecurity5</artifactId>
   <version>3.0.4.RELEASE</version>
</dependency>
- 整合包4(springsecurity4)——springboot版本2.0.9
- 整合包5(springsecurity5)——springboot版本之后
导入命名空间
<html lang="en" xmlns:th="http://www.thymeleaf.org"
      xmlns:sec="http://www.thymeleaf.org/thymeleaf-extras-springsecurity5">
<!--登录注销-->
<div class="right menu">

    <!--如果未登录-->
    <div sec:authorize="!isAuthenticated()">
        <a class="item" th:href="@{/login}">
            <i class="address card icon"></i> 登录
        </a>
    </div>

    <!--如果已登录-->
    <div sec:authorize="isAuthenticated()">
        <a class="item">
            <i class="address card icon"></i>
            用户名:<span sec:authentication="principal.username"></span>
            角色:<span sec:authentication="principal.authorities"></span>
        </a>
    </div>

    <div sec:authorize="isAuthenticated()">
        <a class="item" th:href="@{/logout}">
            <i class="sign-out  icon"></i> 注销
        </a>
    </div>
</div>
<!--菜单根据用户的角色动态的实现-->
<div class="column"  sec:authorize="hasRole('vip1')">
    <div class="ui raised segment">
        <div class="ui">
            <div class="content">
                <h5 class="content">Level 1</h5>
                <hr>
                <div><a th:href="@{/level1/1}"><i class="bullhorn icon"></i> Level-1-1</a></div>
                <div><a th:href="@{/level1/2}"><i class="bullhorn icon"></i> Level-1-2</a></div>
                <div><a th:href="@{/level1/3}"><i class="bullhorn icon"></i> Level-1-3</a></div>
            </div>
        </div>
    </div>
</div>

<div class="column"  sec:authorize="hasRole('vip2')">
    <div class="ui raised segment">
        <div class="ui">
            <div class="content">
                <h5 class="content">Level 2</h5>
                <hr>
                <div><a th:href="@{/level2/1}"><i class="bullhorn icon"></i> Level-2-1</a></div>
                <div><a th:href="@{/level2/2}"><i class="bullhorn icon"></i> Level-2-2</a></div>
                <div><a th:href="@{/level2/3}"><i class="bullhorn icon"></i> Level-2-3</a></div>
            </div>
        </div>
    </div>
</div>

<div class="column"  sec:authorize="hasRole('vip3')">
    <div class="ui raised segment">
        <div class="ui">
            <div class="content">
                <h5 class="content">Level 3</h5>
                <hr>
                <div><a th:href="@{/level3/1}"><i class="bullhorn icon"></i> Level-3-1</a></div>
                <div><a th:href="@{/level3/2}"><i class="bullhorn icon"></i> Level-3-2</a></div>
                <div><a th:href="@{/level3/3}"><i class="bullhorn icon"></i> Level-3-3</a></div>
            </div>
        </div>
    </div>
</div>


 1902
1902

 被折叠的 条评论
为什么被折叠?
被折叠的 条评论
为什么被折叠?
 到【灌水乐园】发言


