


参考
| 项目 | 描述 |
|---|---|
| 搜索引擎 | Bing |
| 哔哩哔哩 | 黑马程序员 |
| VueJS 官方文档 | 插槽 Slots |
描述
| 项目 | 描述 |
|---|---|
| Edge | 109.0.1518.70 (正式版本) (64 位) |
| 操作系统 | Windows 10 专业版 |
| @vue/cli | 5.0.8 |
| npm | 8.19.3 |
| VueJS | 2.6.14 |
插槽
在对组件进行封装时,我们可能需要提供一个接口,使得组件的使用者可以向该组件提供模板或其他组件以供当前组件使用,而这个接口就是插槽。
你可以通过为组件提供一个 slot 元素来设置插槽,组件的使用者在向组件提供内容后,内容将取代组件中的 slot 元素。
举个栗子
App.vue
<template>
  <div class="container">
    <Extend>
      <!-- 为插槽提供按钮 -->
      <button>Click Me</button>
    </Extend>
  </div>
</template>

<script>
// 导入组件
import Extend from '@/components/Extend.vue';

export default {
  components: {
    // 注册组件
    Extend
  }
}
</script>

<style>

</style>
Extend.vue
<template>
  <div class="container">
    <h3>请向本组件传递一个按钮,我们将会使它居中显示。</h3>
    <div class="box">
      <!--
        设置插槽,父组件中提供的模板或
        将取代 slot 元素。
        -->
      <slot></slot>
    </div>
  </div>
</template>

<script>
export default {

}
</script>

// 为防止出现样式冲突问题,为 style
// 添加 scoped 属性。
<style scoped>
.box{
  width: 300px;
  height: 300px;
  background-color: dodgerblue;
  /* 通过 CSS 的 FlexBox 使得 .box 中的元素居中显示 */
  display: flex;
  justify-content: center;
  align-items: center;
}
</style>
执行效果:
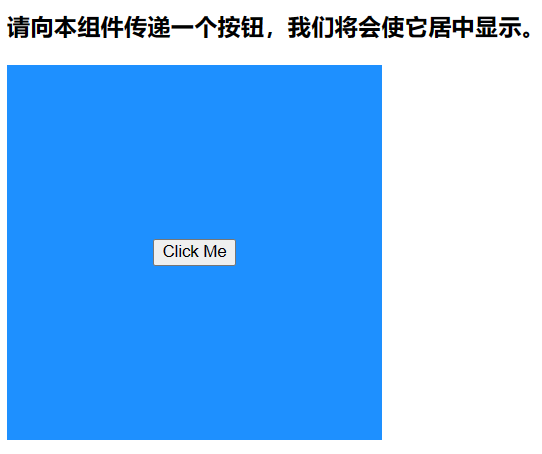
可以看到在向组件 Extend 提供了 button 元素后,button 元素被子组件 Extend.vue 接收并使其取代了 slot 元素。
注:
你可以向组件元素提供多个元素或组件,它们将作为一个整体替代子组件中的内容。
默认内容
在父组件未提供任何内容时,你可能希望使用默认内容来代替子组件中的 slot 元素。为此,你可以向 slot 元素内部添加内容,这部分内容将作为插槽的默认内容。
举个栗子
App.vue
<template>
  <div class="container">
    <Extend></Extend>
  </div>
</template>

<script>
// 导入组件
import Extend from '@/components/Extend.vue';

export default {
  components: {
    // 注册组件
    Extend
  }
}
</script>

<style>

</style>
Extend.vue
<template>
  <div class="container">
    <h3>请向本组件传递一个按钮,我们将会使它居中显示。</h3>
    <div class="box">
      <!--
        设置插槽,父组件中提供的模板或
        将取代 slot 元素。
        -->
      <slot>
        <!-- 此处的内容将作为插槽的默认内容 -->
        <button>Default Button</button>
      </slot>
    </div>
  </div>
</template>

<script>
export default {

}
</script>

// 为防止出现样式冲突问题,为 style
// 添加 scoped 属性。
<style scoped>
.box{
  width: 300px;
  height: 300px;
  background-color: dodgerblue;
  /* 通过 CSS 的 FlexBox 使得 .box 中的元素居中显示 */
  display: flex;
  justify-content: center;
  align-items: center;
}
</style>
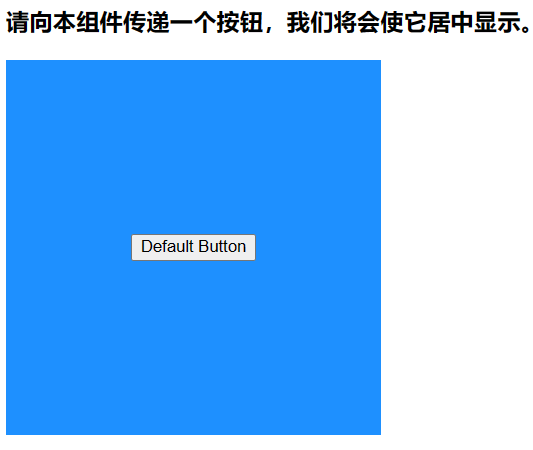
执行效果:
由于父组件 App.vue 并没有向子组件提供任何内容,因此子组件中的插槽将使用默认内容。
具名插槽
当你需要在组件中预留多个插槽并且为这些插槽分配不同的内容时,你可以为这些插槽命名。在为插槽命名后,你可以通过插槽的名称向对应的插槽提供内容。这些带有名称的插槽就叫做具名插槽。
命名
如果你需要为插槽命名,你可以为 slot 元素设置 name 属性,并通过为该属性提供属性值来为该插槽提供名称。
指定插槽
VueJS 提供了内置指令 v-slot,你可以通过该元素指定需要使用到的插槽。该指令仅能使用在 组件元素 或 template 元素中,否则 VueJS 将抛出错误信息,在错误想象中,你可以观察到如下内容:
v-slot can only be used on components or <template>.
注:
- 当你未为插槽指定名称时,插槽将使用默认名称 default。当你未通过 v-slot组件元素或 template 元素指定使用的插槽的名称时,默认使用名称为 default 的插槽。
- 位于组件元素内部的顶层元素(除其他组件元素或 template 元素)都将作为名称为 default 的插槽的内容。
- v-slot 指令可以简写为 # 。
- 你可以在同一个组件中设置多个相同名称的插槽。
举个栗子
App.vue
<template>
  <div class="container">

    <Extend>
      <template v-slot:One>
        <button>One</button>
      </template>

      <template v-slot:Two>
        <button>Two</button>
      </template>

      <template v-slot:Three>
        <button>Three</button>
      </template>
    </Extend>

  </div>
</template>

<script>
// 导入组件
import Extend from '@/components/Extend.vue';

export default {
  components: {
    // 注册组件
    Extend
  }
}
</script>

<style>

</style>
Extend.vue
<template>
  <div class="container">
    <h3>请向本组件传递按钮,我们将会使它居中显示。</h3>

    <div class="box" style="background-color: pink;">
      <!-- 将插槽命名为 Three -->
      <slot name="Three"></slot>
    </div>

    <div class="box" style="background-color: dodgerblue">
      <slot name="Two"></slot>
    </div>

    <div class="box" style="background-color: aqua;">
      <slot name="One"></slot>
    </div>

  </div>
</template>

<script>
export default {

}
</script>

// 为防止出现样式冲突问题,为 style
// 添加 scoped 属性。
<style scoped>
.box{
  width: 300px;
  height: 100px;
  background-color: dodgerblue;
  /* 通过 CSS 的 FlexBox 使得 .box 中的元素居中显示 */
  display: flex;
  justify-content: center;
  align-items: center;
}
</style>
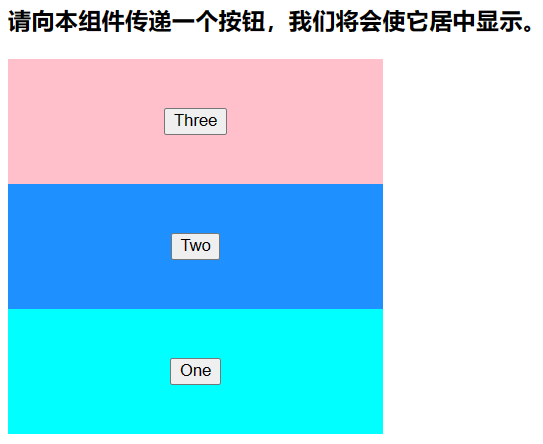
效果:
动态插槽
你可以通过为 v-slot 指令绑定数据,通过修改数据来指定不同的插槽,从而达到动态切换插槽的目的。
举个栗子
App.vue
<template>
  <div class="container">
    <!-- 点击该按钮将动态切换使用的插槽 -->
    <button v-on:click="transfer()">Transfer</button>

    <Extend>
      <!-- 为 v-slot 绑定数据 -->
      <template v-slot:[target]>
        <button>One</button>
      </template>
    </Extend>

  </div>
</template>

<script>
// 导入组件
import Extend from '@/components/Extend.vue';

export default {
  // 定义数据
  data() {
    return {
      target: 'One'
    }
  },
  components: {
    // 注册组件
    Extend
  },
  // 定义事件处理函数
  methods: {
    // 修改数据达到动态切换使用插槽的目的
    transfer() {
      if(this.target === 'One'){
        this.target = 'Two';
      }else if(this.target === 'Two'){
        this.target = 'Three';
      }else{
        this.target = 'One';
      }
    }
  }
}
</script>

<style>

</style>
Extend.vue
<template>
  <div class="container">
    <div class="box" style="background-color: pink;">
      <!-- 将插槽命名为 Three -->
      <slot name="Three"></slot>
    </div>

    <div class="box" style="background-color: dodgerblue">
      <slot name="Two"></slot>
    </div>

    <div class="box" style="background-color: aqua;">
      <slot name="One"></slot>
    </div>

  </div>
</template>

<script>
export default {

}
</script>

// 为防止出现样式冲突问题,为 style
// 添加 scoped 属性。
<style scoped>
.box{
  width: 300px;
  height: 100px;
  background-color: dodgerblue;
  /* 通过 CSS 的 FlexBox 使得 .box 中的元素居中显示 */
  display: flex;
  justify-content: center;
  align-items: center;
}
</style>
效果:

作用域插槽
父组件模板中的表达式只能访问父组件的作用域,子组件模板中的表达式只能访问子组件的作用域。
在向插槽提供内容时,内容提供者无法直接访问插槽所在的组件的作用域。如果你需要向插槽的使用者提供一些数据,那么你可以通过作用域插槽的方式向插槽的使用者提供数据。
作用域插槽能够将 slot 元素中的所有属性(除属性 name 外)及其对应的值整合为一个对象传递给该插槽的使用者。插槽的使用者可以通过 v-slot 指令来对该对象进行接收。
默认作用域插槽
默认作用域插槽具有作用域插槽传递数据的功能,但该插槽使用默认的插槽名称 default 。
为了解默认作用域插槽的使用方法,请观察如下示例:
App.vue
<template>
<div class="container">
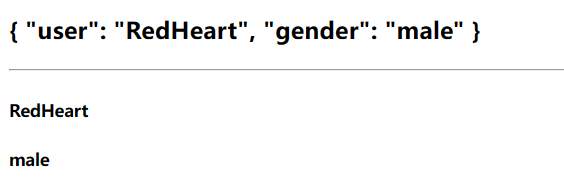
<!-- 通过为 v-slot 赋值来获取插件传递的对象 -->
<Extend v-slot="content">
<h3>{{ content }}</h3>
<hr>
<h5>{{ content.user }}</h5>
<h5>{{ content.gender }}</h5>
</Extend>
</div>
</template>
<script>
// 导入组件
import Extend from '@/components/Extend.vue';
export default {
// 注册组件
components: {
Extend
}
}
</script>
<style>
</style>
Extend.vue
<template>
  <div class="container">
    <!-- 通过定义 slot 的属性向插槽的使用者提供数据 -->
    <slot v-bind:user="user" gender="male"></slot>
  </div>
</template>

<script>
export default {
  // 定义数据
  data() {
    return {
      user: 'RedHeart'
    }
  }
}
</script>

<style>

</style>
效果:
具名作用域插槽
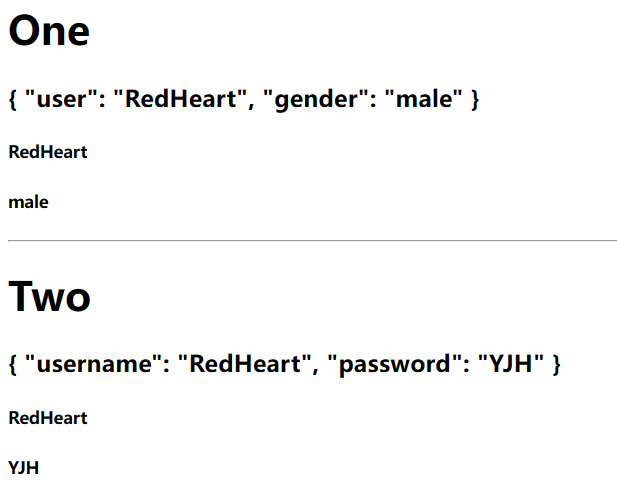
举个栗子
App.vue
<template>
  <div class="container">
    <Extend>
      <template #One="content">
        <h1>One</h1>
        <h3>{{ content }}</h3>
        <h5>{{ content.user }}</h5>
        <h5>{{ content.gender }}</h5>
        <hr>
      </template>

      <template v-slot:Two="content">
        <h1>Two</h1>
        <h3>{{ content }}</h3>
        <h5>{{ content.username }}</h5>
        <h5>{{ content.password }}</h5>
      </template>
    </Extend>
  </div>
</template>

<script>
// 导入组件
import Extend from '@/components/Extend.vue';

export default {
  // 注册组件
  components: {
    Extend
  }
}
</script>

<style>

</style>
Extend.vue
<template>
  <div class="container">
    <!-- 通过定义 slot 的属性向插槽的使用者提供数据 -->
    <slot name="One" v-bind:user="user" gender="male"></slot>
    <slot name="Two" username="RedHeart" password="YJH"></slot>
  </div>
</template>

<script>
export default {
  // 定义数据
  data() {
    return {
      user: 'RedHeart'
    }
  }
}
</script>

<style>

</style>
效果:


 1193
1193


 被折叠的 条评论
为什么被折叠?
被折叠的 条评论
为什么被折叠?
 到【灌水乐园】发言


