


参考
| 项目 | 描述 |
|---|---|
| 搜索引擎 | Bing |
| 哔哩哔哩 | 黑马程序员 |
描述
| 项目 | 描述 |
|---|---|
| Edge | 109.0.1518.70 (正式版本) (64 位) |
| 操作系统 | Windows 10 专业版 |
| @vue/cli | 5.0.8 |
| npm | 8.19.3 |
| VueJS | 2.6.14 |
路由
单页面应用程序
单页Web应用程序 (Single Page Web Application,SPA) 就是只有一张Web页面的应用,是加载单个 HTML 页面并在用户与应用程序交互时动态更新该页面的 Web 应用程序。
Hash 地址
链接的基本组成
一个 URL 通常具有如下基本结构:
protocl://host/path/?param=value#name
其中:
| 项目 | 描述 |
|---|---|
| protocol | 使用到的协议。 |
| host | 服务器的主机地址(域名)。 |
| path | 路径。 |
| param | 查询字符串中的查询参数。 |
| vlaue | 查询字符串中某个参数对应的参数值。 |
| #name | 锚点。 |
Hash 地址
Hash 地址 又称为 锚点,锚点是网页制作中超级链接的一种,是一种能够定位当前页面的元素的超级链接。
举个栗子
<html>

<body>

<p>
<a href="#C4">查看 Chapter 4。</a>
</p>

<h2>Chapter 1</h2>
<p>This chapter explains ba bla bla</p>

<h2>Chapter 2</h2>
<p>This chapter explains ba bla bla</p>

<h2>Chapter 3</h2>
<p>This chapter explains ba bla bla</p>

<!-- 为该元素命名为 C4,锚点将通过名称 C4 定位该元素。 -->
<h2><a name="C4">Chapter 4</a></h2>
<p>This chapter explains ba bla bla</p>

<h2>Chapter 5</h2>
<p>This chapter explains ba bla bla</p>

<h2>Chapter 6</h2>
<p>This chapter explains ba bla bla</p>

<h2>Chapter 7</h2>
<p>This chapter explains ba bla bla</p>

<h2>Chapter 8</h2>
<p>This chapter explains ba bla bla</p>

<h2>Chapter 9</h2>
<p>This chapter explains ba bla bla</p>

<h2>Chapter 10</h2>
<p>This chapter explains ba bla bla</p>

<h2>Chapter 11</h2>
<p>This chapter explains ba bla bla</p>

<h2>Chapter 12</h2>
<p>This chapter explains ba bla bla</p>

<h2>Chapter 13</h2>
<p>This chapter explains ba bla bla</p>

<h2>Chapter 14</h2>
<p>This chapter explains ba bla bla</p>

<h2>Chapter 15</h2>
<p>This chapter explains ba bla bla</p>

<h2>Chapter 16</h2>
<p>This chapter explains ba bla bla</p>

<h2>Chapter 17</h2>
<p>This chapter explains ba bla bla</p>

</body>
</html>
执行效果:

注:
- 本部分示例引用自 W3school。
- 使用锚点链接将产生历史记录。一个较为直观的体现是,在点击锚点后,你可以点击浏览器中的左箭头按钮来返回点击锚点之前的页面。

路由
路由在 VueJS 及 Web 后端中的概念稍有不同,但都表示某两者之间的映射关系。
VueJS
在 VueJS 中,路由可以理解为 Hash 地址 与 组件 的映射关系。由于 VueJS 构建的是单页面应用程序,在构造具有如下效果的页面时,无法直接切换页面(因为仅有一个页面),但可以通过切换组件来达到相同的效果。

后端
在 Web 后端中,路由可以理解为 URL 与 处理函数 的映射关系。当一个请求从客户端发送到服务器端时,都需要与已定义的路由进行匹配,当匹配成功时将调用对应的处理函数以对客户端的请求进行响应。
路由实现
铺垫
Hash 地址的获取
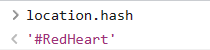
你可以通过 location.hash 来获取当前页面的 URL 中的 Hash 地址。
举个栗子
- 请访问链接 https://cn.bing.com/?mkt=zh-cn#RedHeart。
- 在访问链接后,打开浏览器控制台并输入 location.hash ,你将观察到如下内容:
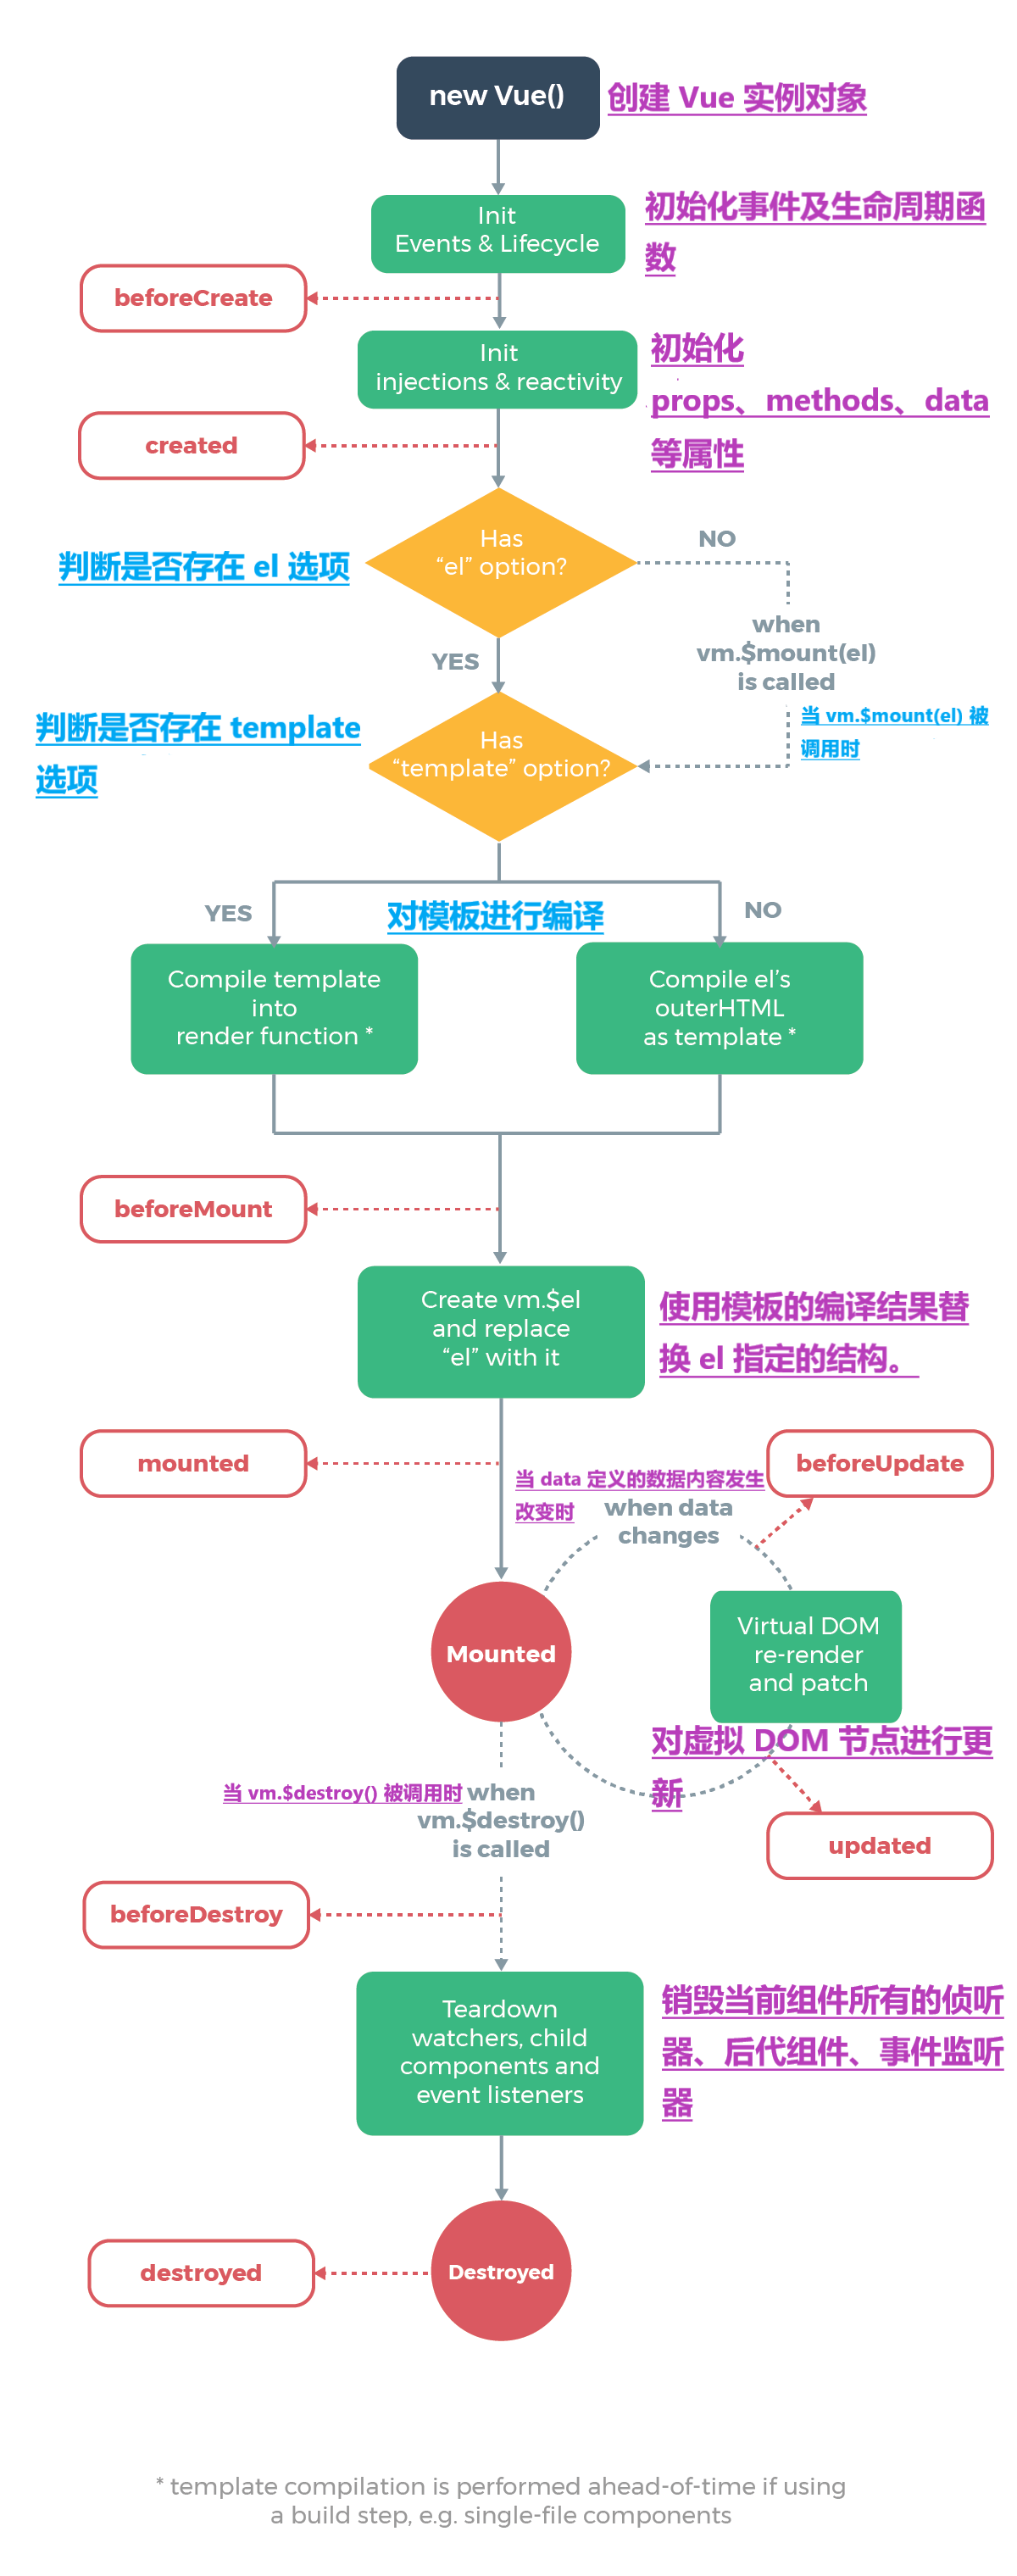
组件的生命周期
由于组件的生命周期函数 beforeCreate 执行前,VueJS 已初始化事件。故我们可以在 beforeCreate 生命周期函数执行时设置事件回调函数来监听 URL 中 Hash 地址的变化。
实现
子组件
组件的动态切换过程中需要用到以下组件,这三个子组件仅存在颜色样式的区别。
Dodgerblue.vue
<template>
  <div class="box"></div>
</template>

<script>
export default {

}
</script>

<style scoped>
  .box{
    width: 150px;
    height: 150px;
    background-color: dodgerblue;
  }
</style>
Pink.vue
<template>
  <div class="box"></div>
</template>

<script>
export default {

}
</script>

<style scoped>
  .box{
    width: 150px;
    height: 150px;
    background-color: pink;
  }
</style>
YellowGreen.vue
<template>
  <div class="box"></div>
</template>

<script>
export default {

}
</script>

<style scoped>
  .box{
    width: 150px;
    height: 150px;
    background-color: yellowgreen;
  }
</style>
主逻辑
App.vue
<template>
  <div class="container">
    <div class="controller">
      <a href="#Dodgerblue">Dodgerblue</a>
      <a href="#Pink">Pink</a>
      <a href="#YellowGreen">YellowGreen</a>
    </div>
    <!-- 设置动态组件 -->
    <component :is="target"></component>
  </div>
</template>

<script>
// 导入组件
import Dodgerblue from '@/components/Dodgerblue.vue';
import Pink from '@/components/Pink.vue';
import YellowGreen from '@/components/YellowGreen.vue';

export default {
  // 定义数据
  data() {
    return {
      target: 'Dodgerblue'
    }
  },
  // 注册组件
  components: {
    Dodgerblue,
    Pink,
    YellowGreen
  },
  // 使用 beforeCreate 生命周期钩子
  beforeCreate() {
    // 在 Hash 地址发生变化时将执行该回调函数
    window.onhashchange = () => {
      // 与 Hash 地址进行匹配以使用合适的组件
      switch (location.hash){
        case '#Dodgerblue':
          this.target = 'Dodgerblue';
          break;
        case '#Pink':
          this.target = 'Pink';
          break;
        case '#YellowGreen':
          this.target = 'YellowGreen';
          break;
      }
    }
  }
}
</script>

<style scoped>
/* 为超链接添加样式 */
a{
  text-decoration: none;
  display: inline-block;
  width: 100px;
  height: 30px;
  background-color: #f40;
  color: #fff;
  border-radius: 3px;
  margin-right: 5px;
  margin-bottom: 10px;
  text-align: center;
  line-height: 30px;
  font-weight: 600;
  font-size: 13px;
}
</style>
执行结果:


 492
492


 被折叠的 条评论
为什么被折叠?
被折叠的 条评论
为什么被折叠?
 到【灌水乐园】发言


