


环境介绍:
| IP | 角色 | 系统版本 | Docker版本 | 服务器配置 |
|---|---|---|---|---|
| 192.168.2.20 | Node2、Gitlab | CentOS 7.5.1804 | Docker 19.03.13 | 2核+CPU,4GB+内存(Gitlab低于4G内存会报502错误) |
部署Gitlab仓库:
- 拉取Gitlab镜像
[root@k8s-node2 ~]# docker pull gitlab/gitlab-ce
Using default tag: latest
latest: Pulling from gitlab/gitlab-ce
35807b77a593: Pull complete
b32ac5d80a55: Pull complete
df336912e872: Pull complete
b793eccd1af3: Pull complete
f74a7e006150: Pull complete
0084a219e293: Pull complete
3af13cab3fdf: Pull complete
59278f51bfcb: Pull complete
Digest: sha256:7241af5bd54251aa412692cff1adf2d8c604425a03adad5300919b06bd4c6585
Status: Downloaded newer image for gitlab/gitlab-ce:latest
docker.io/gitlab/gitlab-ce:latest

[root@k8s-node2 ~]# docker images
REPOSITORY                                           TAG                 IMAGE ID            CREATED                  SIZE
gitlab/gitlab-ce                                     latest              ca616a263319        Less than a second ago   2.29GB
- 运行Gitlab容器
命令解释:
-
-i :以交互模式运行容器,通常与 -t 同时使用命令解释
-
-t :为容器重新分配一个伪输入终端,通常与 -i 同时使用
-
-d :后台运行容器,并返回容器ID
-
-p:80:80 将容器内80端口映射至宿主机80端口,这是访问gitlab的端口
-
-p:222:22 将容器内22端口映射至宿主机222端口,这是访问ssh的端口
-
-v :/usr/local/gitlab-test/etc:/etc/gitlab 将容器/etc/gitlab目录挂载到宿主机/usr/local/gitlab-test/etc目录下,若宿主机内此目录不存在将会自动创建,其他两个挂载同这个一样
-
–restart always :容器自启动
-
–privileged=true :让容器获取宿主机root权限
-
–name gitlab :设置容器名称为gitlab
-
gitlab/gitlab-ce :镜像的名称,这里也可以写镜像ID
[root@k8s-node2 ~]# docker run -itd --name gitlab -p 443:443 -p 80:80 -p 222:22 --restart always -v /home/gitlab/config:/etc/gitlab -v /home/gitlab/logs:/var/log/gitlab -v /home/gitlab/data:/var/opt/gitlab gitlab/gitlab-ce
971e942b7a703fb82bcd308a3ad8c0f70912ea7abb14b46e8c63ca5b82ab6568
docker run -v挂载目录时,若本地没有该目录挂载时会自动创建。
[root@k8s-node2 ~]# ls /home/
gitlab

[root@k8s-node2 ~]# ls /home/gitlab/
config  data  logs
[root@k8s-node2 ~]# docker ps
CONTAINER ID        IMAGE                                               COMMAND                  CREATED              STATUS                                 PORTS                                                           NAMES
971e942b7a70        gitlab/gitlab-ce                                    "/assets/wrapper"        About a minute ago   Up About a minute (health: starting)   0.0.0.0:80->80/tcp, 0.0.0.0:443->443/tcp, 0.0.0.0:222->22/tcp   gitlab
- 修改gitlab.rb配置文件
注意:
修改gitlab.rb配置文件操作最好是在容器内进行修改(也可以在宿主机映射目录中修改,记得修改完后进入容器验证修改结果),在挂载到宿主机的文件上直接进行修改可能会出现配置更新不到容器内,或者是不能即时更新到容器内,导致gitlab启动成功,但是无法访问或其它问题。
[root@k8s-node2 ~]# vim /home/gitlab/config/gitlab.rb    //gitlab.rb文件内容默认全部注释
  ...
  ...
  32 # external_url 'GENERATED_EXTERNAL_URL'
  33 external_url 'http://192.168.1.20'     //配置http协议所使用的gitlab访问地址,可以写域名。如果端口不写的话默认为80端口
  34 gitlab_rails['gitlab_ssh_host'] = '192.168.1.20'  //配置ssh协议所使用的访问地址和端口
  35 gitlab_rails['gitlab_shell_ssh_port'] = 222  //此端口是docker run时22端口映射的222端口
  36 ## Roles for multi-instance GitLab

- 重启gitlab容器
[root@k8s-node2 ~]# docker restart gitlab
gitlab
访问报错:
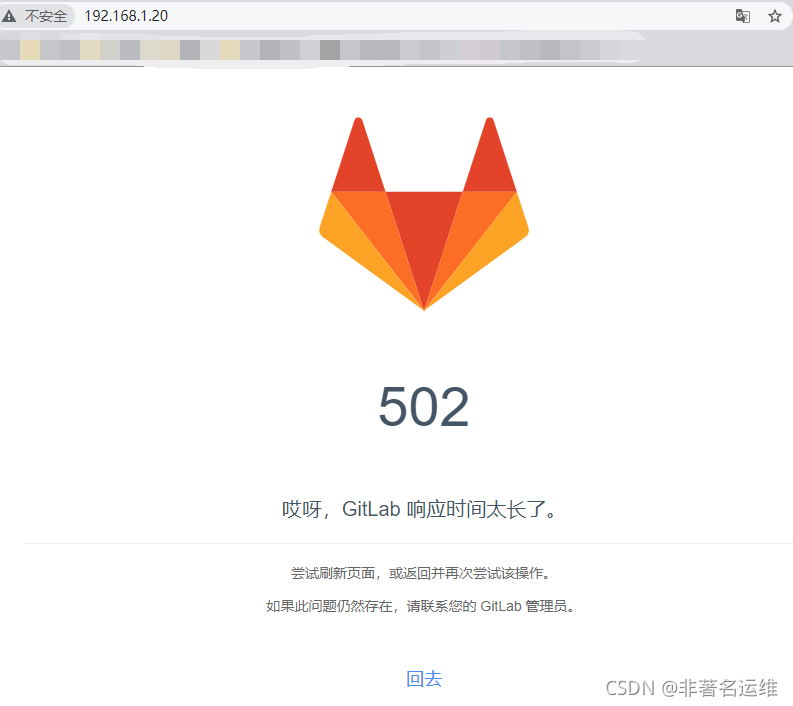
注意:出现502报错,请第一时间检查内存大小,内存不足会提示502报错。(服务器内存至少4G,不够会出现502错误。)
原始内存大小:
[root@k8s-ndoe2 ~]# free -h
              total        used        free      shared  buff/cache   available
Mem:           1.9G        342M        482M         14M        1.1G        1.3G
Swap:            0B          0B          0B
升级后内存大小:
[root@k8s-node2 ~]# free -h
              total        used        free      shared  buff/cache   available
Mem:           3.8G        2.9G        157M         25M        821M        613M
Swap:            0B          0B          0B
访问:

可以看到在升级完服务器内存大小后,就可以正常登录Gitlab了。
登录Gitlab仓库:
Gitlab默认的管理员临时密码在gitlab容器中/etc/gitlab/initial_root_password文件中,如果该路径下没有这个文件,我们就无法正常登录到gitlab中去,可以试试下面两种方法。
1.宿主机中搜索initial_root_password文件
[root@k8s-node2 ~]# find / -name initial_root_password
/mnt/data/volumes/e7d5b220d1dc98ea2229882865f58e643fef42d4f1c16a3a54458abd017b7c77/_data/initial_root_password

[root@k8s-node2 ~]# cat /mnt/data/volumes/e7d5b220d1dc98ea2229882865f58e643fef42d4f1c16a3a54458abd017b7c77/_data/initial_root_password
# WARNING: This value is valid only in the following conditions
#          1. If provided manually (either via `GITLAB_ROOT_PASSWORD` environment variable or via `gitlab_rails['initial_root_password']` setting in `gitlab.rb`, it was provided before database was seeded for the first time (usually, the first reconfigure run).
#          2. Password hasn't been changed manually, either via UI or via command line.
#
#          If the password shown here doesn't work, you must reset the admin password following https://docs.gitlab.com/ee/security/reset_user_password.html#reset-your-root-password.

Password: LkhENj02qgKkT7DZplqE35TfdPThK3wuSCgHw0H+BOI=

# NOTE: This file will be automatically deleted in the first reconfigure run after 24 hours.
可以看到上面搜索到的initial_root_password文件中显示了gitlab的默认密码。
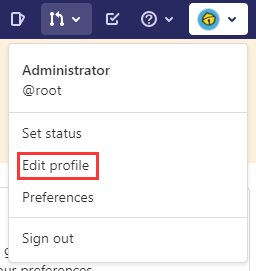
2.重置gitlab管理员账户密码

可以看到重置gitlab管理员账号密码后使用新的账户密码成功登录进gitlab中。
配置Gitlab界面语言为中文


↓↓↓↓↓↓
最近刚申请了个微信公众号,上面也会分享一些运维知识,大家点点发财手关注一波,感谢大家。 【原创公众号】:非著名运维 【福利】:公众号回复 “资料” 送运维自学资料大礼包哦!


 被折叠的 条评论
为什么被折叠?
被折叠的 条评论
为什么被折叠?
 到【灌水乐园】发言


