


理论基础
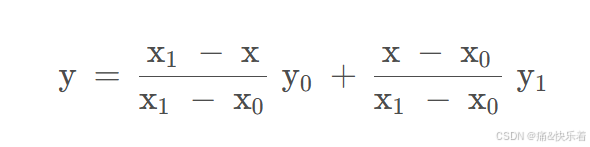
双线性插值是一种更为平滑的图像缩放算法,它考虑了目标像素周围四个源像素的影响,并根据距离进行加权。其主要经过三次线性插值得到,如下为线性插值的公式,可以将插值点的值解释为两个点的距离加权,其中距离近的点权重大,距离远的点权重小。
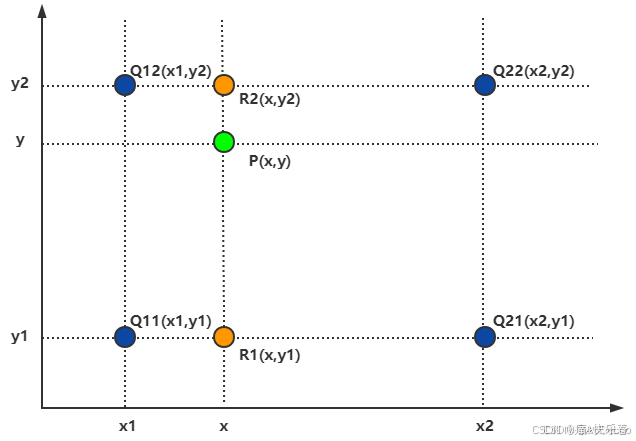
已知Q11(x1,y1)、Q12(x1,y2)、Q21(x2,y1)、Q22(x2,y2),求其中点P(x,y)的值。
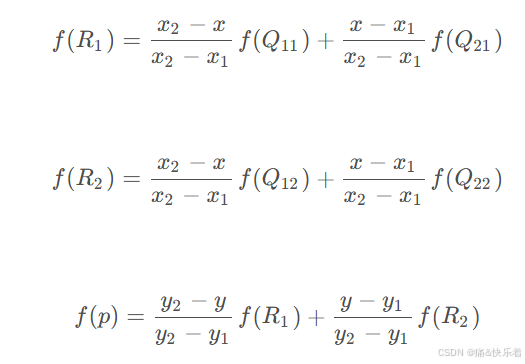
代入整理得:

不难发现,其中每个点的权重和对角点到点P的距离是相关的(水平距离x垂直距离)。
当然,也可以简化为如下的加权公式,可以看到该点由四个点加权求和得到。

最后将如下公式用于实际计算:

python实现
import numpy as np
import cv2
def four_pixels(src_i, src_j, src_img, src_row, src_col):
i, j = int(src_i), int(src_j) # x,y的整数部分
u = src_i - i # 求出x的小数部分
v = src_j - j # 求出y的小数部分
src_i1 = i+1
src_j1 = j+1
if src_i1 >= src_row - 1:
src_i1 = src_row - 1
if src_j1 >= src_col - 1:
src_j1 = src_col - 1
pixel = int((1-u) * (1-v) * src_img[i, j] + u * (1 - v) * src_img[src_i1, j] +
(1-u) * v * src_img[i, src_j1] + u * v * src_img[src_i1, src_j1])
return pixel
def bilinear_interpolation(src_img, des_shape):
src_size = src_img.shape[:-1]
des_size = des_shape[:-1]
src_row, src_col = src_size
des_row, des_col = des_size
des_img = np.zeros(des_shape)
for i in range(des_row):
for j in range(des_col):
src_i = float(i) * (src_row / des_row)
src_j = float(j) * (src_col / des_col)
des_img[i, j, 0] = four_pixels(src_i, src_j, src_img[:, :, 0], src_row, src_col)
des_img[i, j, 1] = four_pixels(src_i, src_j, src_img[:, :, 1], src_row, src_col)
des_img[i, j, 2] = four_pixels(src_i, src_j, src_img[:, :, 2], src_row, src_col)
des_img = des_img.astype(np.uint8)
return des_img
def nearest_interpolation(src_img, des_shape):
src_size = src_img.shape[:-1]
des_size = des_shape[:-1]
src_row, src_col = src_size
des_row, des_col = des_size
des_img = np.zeros(des_shape)
for i in range(des_row):
for j in range(des_col):
src_i = float(i) * (src_row / des_row)
src_j = float(j) * (src_col / des_col)
src_i = int(src_i)
src_j = int(src_j)
des_img[i, j, :] = src_img[src_i, src_j, :]
des_img = des_img.astype(np.uint8)
return des_img
image = cv2.imread(r"xiaowu.jpeg", -1)
b_image = bilinear_interpolation(image, (300, 240, 3))
n_image = nearest_interpolation(image, (450, 360, 3))
print(image.shape)
print(b_image.shape)
print(n_image.shape)
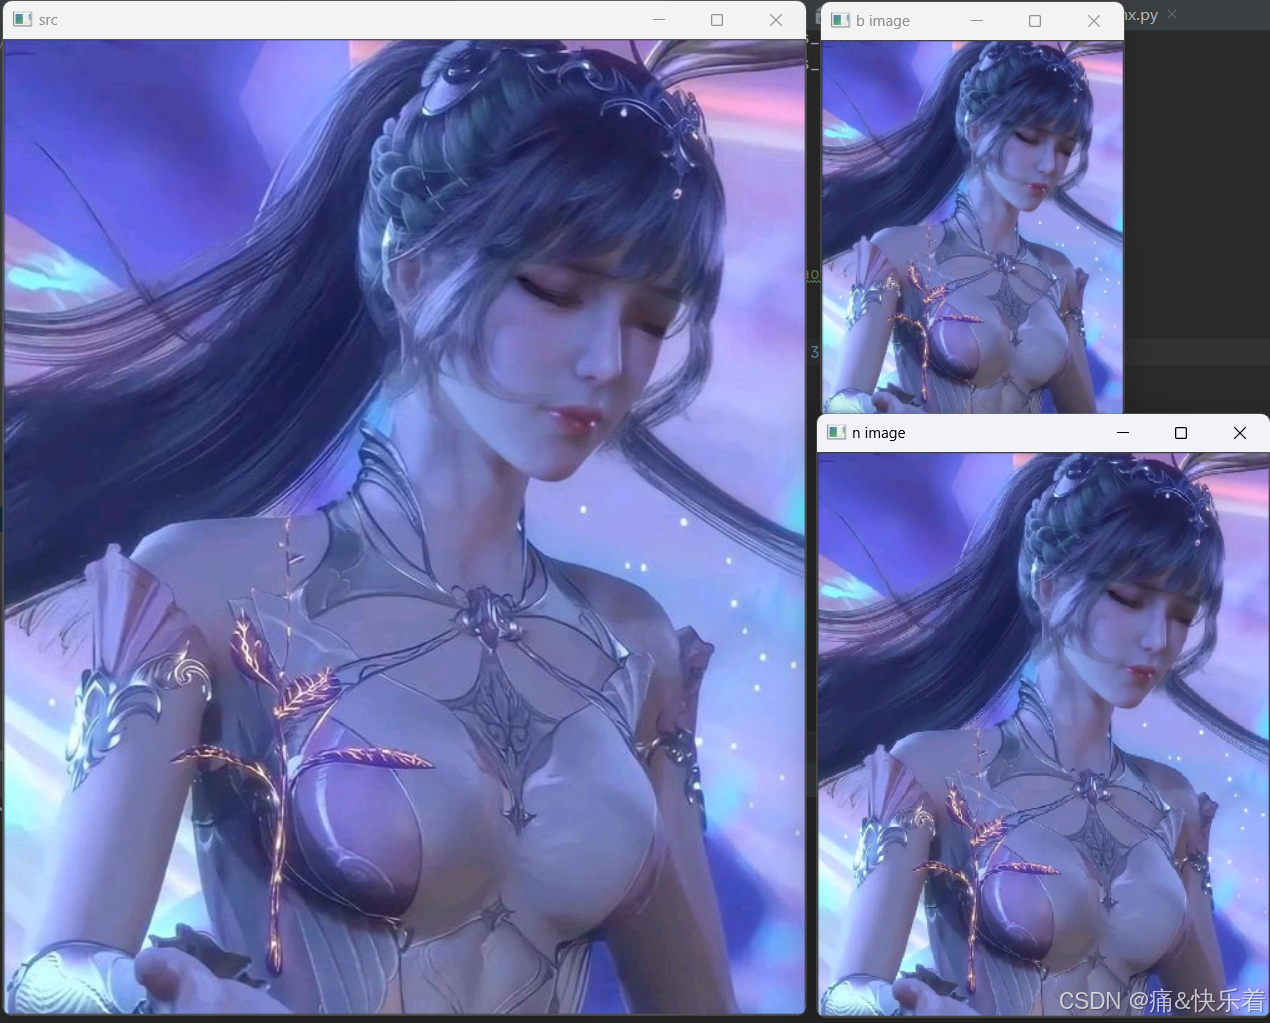
cv2.imshow('src', image)
cv2.imshow('b image', b_image)
cv2.imshow('n image', n_image)
cv2.waitKey(0)
C++实现
#include <opencv2/opencv.hpp>

cv::Mat resizeBilinear(const cv::Mat& src, int newWidth, int newHeight) {
    cv::Mat dst(newHeight, newWidth, src.type(), cv::Scalar(0,0,0)); // 初始化目标图像为黑色
    double xRatio = static_cast<double>(src.cols) / newWidth;
    double yRatio = static_cast<double>(src.rows) / newHeight;

    for (int i = 0; i < newHeight; ++i) {
        for (int j = 0; j < newWidth; ++j) {
            double srcX = j * xRatio;
            double srcY = i * yRatio;

            int x0 = static_cast<int>(floor(srcX));
            int x1 = std::min(x0 + 1, src.cols - 1);
            int y0 = static_cast<int>(floor(srcY));
            int y1 = std::min(y0 + 1, src.rows - 1);

            double dx = srcX - x0;
            double dy = srcY - y0;

            // 获取周围四个像素的值
            cv::Vec3b p0 = src.at<cv::Vec3b>(y0, x0);
            cv::Vec3b p1 = src.at<cv::Vec3b>(y0, x1);
            cv::Vec3b p2 = src.at<cv::Vec3b>(y1, x0);
            cv::Vec3b p3 = src.at<cv::Vec3b>(y1, x1);

            // 根据双线性插值公式计算目标像素的值
            cv::Vec3b interp = (1 - dx) * (1 - dy) * p0 +
                               dx * (1 - dy) * p1 +
                               (1 - dx) * dy * p2 +
                               dx * dy * p3;

            // 将计算得到的像素值赋给目标图像的对应位置
            dst.at<cv::Vec3b>(i, j) = interp;
        }
    }

    return dst;
}

int main() {
    // 加载源图像
    cv::Mat src = cv::imread("path_to_image.jpg");
    if (src.empty()) {
        std::cerr << "Image load failed!" << std::endl;
        return -1;
    }

    // 设置目标图像的宽度和高度
    int newWidth = 800;
    int newHeight = 600;

    // 调用双线性插值resize函数
    cv::Mat resizedImage = resizeBilinear(src, newWidth, newHeight);

    // 显示结果图像
    cv::imshow("Resized Image", resizedImage);
    cv::waitKey(0);

    return 0;
}
CUDA实现
#include <opencv2/opencv.hpp>
#include <iostream>

// Kernel function for bilinear interpolation
__global__ void bilinearInterpolationKernel(const uchar* src, uchar* dst, int srcWidth, int srcHeight, int dstWidth, int dstHeight) {
    int x = threadIdx.x + blockIdx.x * blockDim.x;
    int y = threadIdx.y + blockIdx.y * blockDim.y;

    if (x < dstWidth && y < dstHeight) {
        double srcX = x * (static_cast<double>(srcWidth) / dstWidth);
        double srcY = y * (static_cast<double>(srcHeight) / dstHeight);

        int x0 = floor(srcX);
        int x1 = min(x0 + 1, srcWidth - 1);
        int y0 = floor(srcY);
        int y1 = min(y0 + 1, srcHeight - 1);

        double dx = srcX - x0;
        double dy = srcY - y0;

        uchar p0 = src[y0 * srcWidth + x0];
        uchar p1 = src[y0 * srcWidth + x1];
        uchar p2 = src[y1 * srcWidth + x0];
        uchar p3 = src[y1 * srcWidth + x1];

        uchar interp;
        interp = (1 - dx) * (1 - dy) * p0 + dx * (1 - dy) * p1 + (1 - dx) * dy * p2 + dx * dy * p3;

        dst[y * dstWidth + x] = interp;
    }
}

cv::Mat resizeBilinearCUDA(const cv::Mat& src, int newWidth, int newHeight) {
    cv::Mat dst(newHeight, newWidth, src.type(), cv::Scalar(0,0,0));

    // Allocate memory on the GPU
    uchar* d_src;
    uchar* d_dst;
    cudaMalloc(&d_src, src.total() * sizeof(uchar));
    cudaMalloc(&d_dst, dst.total() * sizeof(uchar));

    // Copy data from host to device
    cudaMemcpy(d_src, src.ptr(), src.total() * sizeof(uchar), cudaMemcpyHostToDevice);

    // Define block and grid sizes
    dim3 blockSize(16, 16);
    dim3 gridSize((newWidth + blockSize.x - 1) / blockSize.x, (newHeight + blockSize.y - 1) / blockSize.y);

    // Launch the kernel
    bilinearInterpolationKernel<<<gridSize, blockSize>>>(d_src, d_dst, src.cols, src.rows, newWidth, newHeight);

    // Copy the result back to host
    cudaMemcpy(dst.ptr(), d_dst, dst.total() * sizeof(uchar), cudaMemcpyDeviceToHost);

    // Free the GPU memory
    cudaFree(d_src);
    cudaFree(d_dst);

    return dst;
}

int main() {
    cv::Mat src = cv::imread("path_to_image.jpg", 0);
    if (src.empty()) {
        std::cerr << "Image load failed!" << std::endl;
        return -1;
    }

    int newWidth = 800;
    int newHeight = 600;

    cv::Mat resizedImage = resizeBilinearCUDA(src, newWidth, newHeight);

    cv::imshow("Resized Image", resizedImage);
    cv::waitKey(0);

    return 0;
}
附:CUDA实现最近邻插值
这个原理很简单,就直接上代码了,需要的可以直接取用。
#include <iostream>
#include <cuda_runtime.h>

// 宏定义用于检查CUDA错误
#define CHECK_CUDA_ERROR(call) \
    do { \
        cudaError_t error = call; \
        if (error != cudaSuccess) { \
            std::cerr << "CUDA error: " << cudaGetErrorString(error) << " at " << __FILE__ << ":" << __LINE__ << std::endl; \
            exit(EXIT_FAILURE); \
        } \
    } while (0)

// 最近邻插值CUDA核函数
__global__ void nearestNeighborInterpolationKernel(unsigned char* output, const unsigned char* input, int inputWidth, int inputHeight, int outputWidth, int outputHeight) {
    int x = blockIdx.x * blockDim.x + threadIdx.x;
    int y = blockIdx.y * blockDim.y + threadIdx.y;

    if (x < outputWidth && y < outputHeight) {
        // 计算输入图像中的最近邻点
        int inputX = min((int)((float)x / (float)outputWidth * inputWidth), inputWidth - 1);
        int inputY = min((int)((float)y / (float)outputHeight * inputHeight), inputHeight - 1);

        // 将输入图像中的像素值复制到输出图像中
        output[y * outputWidth + x] = input[inputY * inputWidth + inputX];
    }
}

void nearestNeighborInterpolation(const unsigned char* inputImage, unsigned char* outputImage, int inputWidth, int inputHeight, int outputWidth, int outputHeight) {
    unsigned char *d_inputImage, *d_outputImage;

    // 分配设备内存
    CHECK_CUDA_ERROR(cudaMalloc(&d_inputImage, inputWidth * inputHeight * sizeof(unsigned char)));
    CHECK_CUDA_ERROR(cudaMalloc(&d_outputImage, outputWidth * outputHeight * sizeof(unsigned char)));

    // 将数据从主机复制到设备
    CHECK_CUDA_ERROR(cudaMemcpy(d_inputImage, inputImage, inputWidth * inputHeight * sizeof(unsigned char), cudaMemcpyHostToDevice));

    // 定义块和线程数量
    dim3 blockSize(16, 16);
    dim3 gridSize((outputWidth + blockSize.x - 1) / blockSize.x, (outputHeight + blockSize.y - 1) / blockSize.y);

    // 调用CUDA核函数
    nearestNeighborInterpolationKernel<<<gridSize, blockSize>>>(d_outputImage, d_inputImage, inputWidth, inputHeight, outputWidth, outputHeight);

    // 确保CUDA核函数执行完成
    CHECK_CUDA_ERROR(cudaDeviceSynchronize());

    // 将数据从设备复制回主机
    CHECK_CUDA_ERROR(cudaMemcpy(outputImage, d_outputImage, outputWidth * outputHeight * sizeof(unsigned char), cudaMemcpyDeviceToHost));

    // 释放设备内存
    CHECK_CUDA_ERROR(cudaFree(d_inputImage));
    CHECK_CUDA_ERROR(cudaFree(d_outputImage));
}

int main() {
    // 示例输入和输出图像尺寸
    int inputWidth = 256;
    int inputHeight = 256;
    int outputWidth = 512;
    int outputHeight = 512;

    // 分配主机内存
    unsigned char* inputImage = new unsigned char[inputWidth * inputHeight];
    unsigned char* outputImage = new unsigned char[outputWidth * outputHeight];

    // 初始化输入图像(这里简单使用渐变值进行初始化,可以根据需要进行修改)
    for (int y = 0; y < inputHeight; ++y) {
        for (int x = 0; x < inputWidth; ++x) {
            inputImage[y * inputWidth + x] = (unsigned char)((float)x / inputWidth * 255);
        }
    }

    // 调用最近邻插值函数
    nearestNeighborInterpolation(inputImage, outputImage, inputWidth, inputHeight, outputWidth, outputHeight);

    // 输出或保存输出图像(这里简单输出部分像素值进行验证)
    for (int y = 0; y < 10; ++y) {
        for (int x = 0; x < 10; ++x) {
            std::cout << (int)outputImage[y * outputWidth + x] << " ";
        }
        std::cout << std::endl;
    }

    // 释放主机内存
    delete[] inputImage;
    delete[] outputImage;

    return 0;
}


 5847
5847

 被折叠的 条评论
为什么被折叠?
被折叠的 条评论
为什么被折叠?
 到【灌水乐园】发言


