


准备工作
npm install sortablejs //拖拽组件
npm install element-plus //element组件库
1、子组件内
HTML部分
<div class="dragTable d-flex flex-warp" ref="dragTable" style="position: relative">
    <div class="cropper" v-for="(item,index) in imgList" >
      <img :src="item.imageName" width="90" class="avatar mr-10" height="90"/>
      <div @click.stop class="imageUrlHover d-flex just-around align-center px-20">
        <el-icon @click="handleBig(item)" size="20" class="cursor-pointer">
          <ZoomIn/>
        </el-icon>
        <el-icon @click="handleRemove(index)" size="20" class="cursor-pointer ml-10">
          <Delete/>
        </el-icon>
      </div>
    </div>
    <el-upload
      ref="uploadRef"
      v-if="!isMove"
      readonly
      :file-list="fileList"
      class="avatar-uploader mr-10"
      style="width: 90px;height: 90px;"
      accept=".jpg,.png,.jpeg,.webp"
      :show-file-list="false"
      :on-change="beforUpload"
      :multiple="true"
      :auto-upload="false"
      :on-exceed="handleExceed"
      drag
      :limit="10"
    >
      <el-icon style="width: 88px;height: 88px;" class="avatar-uploader-icon">
        <Plus class=" "/>
      </el-icon>
    </el-upload>
  </div>
  <el-dialog width="600px" :title="dialogTitle" v-model="imgVisible">
    <img w-full width="560" :src="imageUrl" alt="Preview Image"/>
  </el-dialog>
</div>
script部分
import {defineEmits, nextTick, ref} from "vue";
import {ElMessage, UploadProps} from "element-plus";
import {uploadFile} from "@/api/user";//此处是你上传文件的方法
import Sortable from "sortablejs";
import {blobToFile} from "@/utils/common";//此方法在文末
import {Delete, ZoomIn,Plus} from '@element-plus/icons-vue'

const imgVisible = ref(false);
const imageUrl = ref(null);
const dialogTitle = ref('');
//查看大图
const handleBig = (e:any) => {
  imgVisible.value = true;
  imageUrl.value = e.imageName;
  dialogTitle.value = '查看图片';
}

const fileList = ref([]);
const imgList:any = ref([]);
let coverImageIndex = 1;
const beforUpload: UploadProps["beforeUpload"] = async (rawFile:any) => {
  if (rawFile.status !== 'ready') return;
  try {
    //此处转换是因为我接口所需要的参数是这个格式 具体的得看你们接口需要传什么类型的数据
    let file = {
      file:blobToFile(rawFile.raw, rawFile.name)
    }
    initDropTable();
    await handleSuccess(file)
  } catch (error:any) {
    // 处理错误
    ElMessage.error(error);
    fileList.value = [];
    imgList.value = [];
  }
}
const emit = defineEmits(['setImgList'])
const handleSuccess = async (file: any) => {
  let e = await uploadFile(file);
  if (e.code === 200) {
    imgList.value.push({
      sn: coverImageIndex++,
      imageName: e.data.objectName
    })
    emit('setImgList',imgList.value)
  }
}
const handleRemove = (index:any) => {
  imgList.value.splice(index,1);
}

const handleExceed = (files:any, fileList:any)=>{
  // files为当前选择的文件,fileList已经选择后的文件(上次选择的)
  //提示最多只能上传10个
  if(fileList.length + files.length>10){
    ElMessage.error('最多上传10个文件!');
    return
  }
}

const dragTable = ref();
const isMove = ref(false);//拖拽开始时隐藏上传按钮 以防他也被拖动位置
const initDropTable = () => {
  if(dragTable.value){
    const el = dragTable.value;
    Sortable.create(el, {
      handle:'.cropper',
      animation: 150,
      ghostClass: 'blue-background-class',
      onStart:()=>{
        isMove.value = true;
      },
      onEnd: ({ newIndex , oldIndex }) => {
        isMove.value = false;
        const arr = imgList.value;
        if(newIndex == arr.length){
          return
        }
        const currRow = arr.splice(oldIndex, 1)[0];
        arr.splice(newIndex, 0, currRow);
        imgList.value = [];
        nextTick(() => {
          imgList.value = arr;
        })
      }
    })
  }
}
</script>
2、父组件内
HTML部分
<upload-img-drag @setImgList="setDetailsImgList"></upload-img-drag>
script部分
import UploadImgDrag from "@/components/uploadImgDrag.vue";
const setDetailsImgList = (e:any) => {
  formState.detailsImgList = e;
}
3、SCSS部分
.cropper{
  position: relative;
  .imageUrlHover {
      display: none;
      position: absolute;
      width: 90px;
      height: calc(100% - 10px);
      z-index: 10;
      color: white;
      left: 0;
      border-radius: 5px;
      top: 0;
      background-color: rgb(0, 0, 0, 0.5);
  }
}
.avatar{
  border-radius: 5px;
  height: auto;
}
.avatar:hover + .imageUrlHover {
  display: flex;
  transition: all 0.5s;
}
.imageUrlHover:hover {
display: flex;
}
4、blobToFile转换方法
export const blobToFile = (blob: any, fileName: string) => {
    return new window.File([blob], fileName, {
        type: blob.type,
    });
};
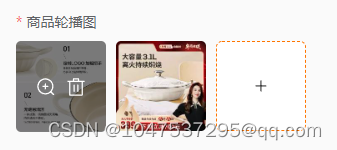
5、效果图


 1129
1129


 被折叠的 条评论
为什么被折叠?
被折叠的 条评论
为什么被折叠?
 到【灌水乐园】发言


