


文章目录
- 1、部署filebeat
- 2、修改filebeat的配置⽂件
- 3、input的log类型(修改filebeat收集的日志到终端案例)
- 4、input的通配符案例
- 5、input的通用字段案例
- 6、将数据写入ES案例
- 7、自定义索引名称案例
- 8、根据不同的标签/字段,写入不同的索引案例
- 9、自定义分片和副本数量案例
- 10、基于log类型收集nginx原生日志
- 11、基于log类型收集nginx的json日志
- 12、基于modules类型采集nginx日志文件
- 13、基于modules类型采集tomcat日志文件
- 14、基于log类型收集tomcat的原生日志
- 15、基于log类型收集tomcat的json日志
- 16、基于log类型多行匹配案例-收集tomcat的错误日志
- 17、filebeat 日志过滤案例
- 18、filestream类型解析json日志案例
- 19、filestream类型多行匹配案例--收集tomcat的错误日志
- 20、filebeat日志聚合到本地案例
- 21、filebeat日志聚合到ES案例
- 22、将filebeat收集的数据写入redis案例
1、部署filebeat
[root@localhost ~]# mkdir -p /hqtbj/hqtwww/
[root@localhost ~]# wget -cP /hqtbj/hqtwww/ https://artifacts.elastic.co/downloads/beats/filebeat/filebeat-7.17.6-linux-x86_64.tar.gz
[root@localhost ~]# cd /hqtbj/hqtwww/
[root@localhost hqtwww]# tar -zxf filebeat-7.17.6-linux-x86_64.tar.gz
[root@localhost hqtwww]# mv filebeat-7.17.6-linux-x86_64 filebeat_workspace
2、修改filebeat的配置⽂件
(1)编写测试的配置文件
[root@localhost ~]# mkdir -p /hqtbj/hqtwww/filebeat_workspace/config/
[root@localhost ~]# cat >> /hqtbj/hqtwww/filebeat_workspace/config/01-stdin-to-console.yml << EOF
#指定输入的类型
filebeat.inputs:
#指定输入的类型喂stdin,表示标准输入
- type: stdin

#指定输出的类型
output.console:
  #打印漂亮的输出格式
  pretty: true
EOF

(2)运行filebeat实例
[root@localhost ~]# cd /hqtbj/hqtwww/filebeat_workspace/
[root@localhost filebeat_workspace]# ./filebeat -e -c config/01-stdin-to-console.yml
运行后会阻塞终端,在终端内直接输入任意内容,会以json格式来返回输入的内容到终端,即为测试成功;
3、input的log类型(修改filebeat收集的日志到终端案例)
filebeat默认是按行来读取的
[root@localhost ~]# cat >> /hqtbj/hqtwww/filebeat_workspace/config/02-log-to-console.yml << EOF
filebeat.inputs:
- type: log
  paths:
    - /tmp/test.log

output.console:
  pretty: true
EOF
运行成功后观察终端输出,在/tmp/test.log里输入任意内容,将会以json格式来返回输入的内容到终端,即为测试成功;
4、input的通配符案例
[root@localhost ~]# cat >> /hqtbj/hqtwww/filebeat_workspace/config/03-log-to-console.yml << EOF
filebeat.inputs:
- type: log
  paths:
    - /tmp/test.log
    - /tmp/*.txt

- type: log
  paths:
    - /tmp/test/*/*.log

output.console:
  pretty: true
EOF
5、input的通用字段案例
[root@localhost ~]# cat >> /hqtbj/hqtwww/filebeat_workspace/config/04-log-to-console.yml << EOF
filebeat.inputs:
- type: log
  #是否启用当前的输入类型,默认值为true
  enabled: true
  #指定数据路径
  paths:
    - /tmp/test.log
    - /tmp/*.txt
  #给当前的输入类型打上标签
  tags: ["oldboyedu-linux80","容器运维","DBA运维","SRE运维工程师"]
  #自定义字段
  fields:
    school: "北京昌平区沙河镇"
    class: "linux-80"

- type: log
  enabled: true
  paths:
    - /tmp/test/*/*.log
  tags: ["oldboyedu-python","云原生开发"]
  fields:
    name: "oldboy"
    hobby: "linux,抖音"
  #将自定义字段的key-value放到顶级字段,
  #默认值为false,会将数据放在一个叫fields的字段下面;
  fields_under_root: true

output.console:
  pretty: true
EOF
6、将数据写入ES案例
[root@localhost ~]# cat >> /hqtbj/hqtwww/filebeat_workspace/config/05-log-to-es.yml << EOF
filebeat.inputs:
- type: log
  enabled: true
  paths:
    - /tmp/test.log
    - /tmp/*.txt
  tags: ["oldboyedu-linux80","容器运维","DBA运维","SRE运维工程师"]
  fields:
    school: "北京昌平区沙河镇"
    class: "linux-80"

- type: log
  enabled: true
  paths:
    - /tmp/test/*/*.log
  tags: ["oldboyedu-python","云原生开发"]
  fields:
    name: "oldboy"
    hobby: "linux,抖音"
  fields_under_root: true

output.elasticsearch:
  #ES地址
  hosts: ["http://192.168.1.1:9200","http://192.168.1.2:9200","http://192.168.1.3:9200"]
EOF
7、自定义索引名称案例
[root@localhost ~]# cat >> /hqtbj/hqtwww/filebeat_workspace/config/06-log-to-es.yml << EOF
filebeat.inputs:
- type: log
  enabled: true
  paths:
    - /tmp/test.log
    - /tmp/*.txt
  tags: ["oldboyedu-linux80","容器运维","DBA运维","SRE运维工程师"]
  fields:
    school: "北京昌平区沙河镇"
    class: "linux-80"

- type: log
  enabled: true
  paths:
    - /tmp/test/*/*.log
  tags: ["oldboyedu-python","云原生开发"]
  fields:
    name: "oldboy"
    hobby: "linux,抖音"
  fields_under_root: true

output.elasticsearch:
  enabled: true
  hosts: ["http://192.168.1.1:9200","http://192.168.1.2:9200","http://192.168.1.3:9200"]
  index: "oldboyedu-linux-elk-%{+yyyy.MM.dd}"

#禁用索引生命周期管理,如果开启的话则会忽略我们自定义的索引;
setup.ilm.enabled: false
#设置索引模板的名称
setup.template.name: "oldboyedu-linux"
#设置索引模板的匹配模式
setup.template.pattern: "oldboyedu-linux-*"
EOF
8、根据不同的标签/字段,写入不同的索引案例
[root@localhost ~]# cat >> /hqtbj/hqtwww/filebeat_workspace/config/07-log-to-es.yml << EOF
filebeat.inputs:
- type: log
  enabled: true
  paths:
    - /tmp/test.log
    - /tmp/*.txt
  tags: ["oldboyedu-linux80","容器运维","DBA运维","SRE运维工程师"]
  fields:
    school: "北京昌平区沙河镇"
    class: "linux-80"

- type: log
  enabled: true
  paths:
    - /tmp/test/*/*.log
  tags: ["oldboyedu-python","云原生开发"]
  fields:
    name: "oldboy"
    hobby: "linux,抖音"
  fields_under_root: true

output.elasticsearch:
  enabled: true
  hosts: ["http://192.168.1.1:9200","http://192.168.1.2:9200","http://192.168.1.3:9200"]
  indices:
    - index: "oldboyedu-linux-elk-%{+yyyy.MM.dd}"
      #匹配指定字段包含的内容
      when.contains:
        tags: "容器运维"
    - index: "oldboyedu-linux-python-%{+yyyy.MM.dd}"
      when.contains:
        tags: "云原生开发"

setup.ilm.enabled: false
setup.template.name: "oldboyedu-linux"
setup.template.pattern: "oldboyedu-linux-*"
EOF
9、自定义分片和副本数量案例
[root@localhost ~]# cat >> /hqtbj/hqtwww/filebeat_workspace/config/08-log-to-es.yml << EOF
filebeat.inputs:
- type: log
  enabled: true
  paths:
    - /tmp/test.log
    - /tmp/*.txt
  tags: ["oldboyedu-linux80","容器运维","DBA运维","SRE运维工程师"]
  fields:
    school: "北京昌平区沙河镇"
    class: "linux-80"

- type: log
  enabled: true
  paths:
    - /tmp/test/*/*.log
  tags: ["oldboyedu-python","云原生开发"]
  fields:
    name: "oldboy"
    hobby: "linux,抖音"
  fields_under_root: true

output.elasticsearch:
  enabled: true
  hosts: ["http://192.168.1.1:9200","http://192.168.1.2:9200","http://192.168.1.3:9200"]
  #index: "oldboyedu-linux-elk-%{+yyyy.MM.dd}"
  indices:
    - index: "oldboyedu-linux-elk-%{+yyyy.MM.dd}"
      when.contains:
        tags: "容器运维"
    - index: "oldboyedu-linux-python-%{+yyyy.MM.dd}"
      when.contains:
        tags: "云原生开发"

setup.ilm.enabled: false
setup.template.name: "oldboyedu-linux"
setup.template.pattern: "oldboyedu-linux-*"
#覆盖已有的索引模版,如果为true则会直接覆盖现有的模版,为false则为不覆盖;
setup.template.overwrite: false
#配置索引模版
setup.template.settings:
  #设置分片数量
  index.number_of_shards: 3
  #设置副本数量,要求小于集群节点的数量,否则会出现副本分片无法分配的情况(集群状态呈黄色)
  index.number_of_replicas: 2
EOF
10、基于log类型收集nginx原生日志
[root@localhost ~]# cat >> /hqtbj/hqtwww/filebeat_workspace/config/09-nginx-to-es.yml << EOF
filebeat.inputs:
- type: log
  enabled: true
  paths:
    - /var/log/nginx/access.log*
  tags: ["nginx-access"]

output.elasticsearch:
  enabled: true
  hosts: ["http://192.168.1.1:9200","http://192.168.1.2:9200","http://192.168.1.3:9200"]
  index: "oldboyedu-linux-nginx-%{+yyyy.MM.dd}"

#禁用索引生命周期管理,如果开启的话则会忽略我们自定义的索引
setup.ilm.enabled: false
#设置索引模板的名称
setup.template.name: "oldboyedu-linux"
#设置索引模板的匹配模式
setup.template.pattern: "oldboyedu-linux-*"
#覆盖已有的索引模版
setup.template.overwrite: false
#配置索引模版
setup.template.settings:
  #设置分片数量
  index.number_of_shards: 3
  #设置副本数量,要求小于集群节点的数量
  index.number_of_replicas: 2
EOF
11、基于log类型收集nginx的json日志
(1)修改nginx原生日志输出格式为json格式
[root@localhost ~]# vim /etc/nginx/nginx.conf
...
   log_format oldboyedu_nginx_json '{"@timestamp":"$time_iso8601",'
                                    '"host":"$server_addr",'
                                    '"clientip":"$remote_addr",'
                                    '"SendBytes":$body_bytes_sent,'
                                    '"responsetime":$request_time,'
                                    '"upstreamtime":"$upstream_response_time",'
                                    '"upstreamhost":"$upstream_addr",'
                                    '"http_host":"$host",'
                                    '"uri":"$uri",'
                                    '"domain":"$host",'
                                    '"xff":"$http_x_forwarded_for",'
                                    '"referer":"$http_referer",'
                                    '"tcp_xff":"$proxy_protocol_addr",'
                                    '"http_user_agent":"$http_user_agent",'
                                    '"status":"$status"}';
    access_log /var/log/nginx/access.log oldboyedu_nginx_json;

(2)检查nginx并启动
[root@localhost ~]# nginx -t
nginx: the configuration file /etc/nginx/nginx.conf syntax is ok
nginx: configuration file /etc/nginx/nginx.conf test is successful
[root@localhost ~]# nginx -s reload

(3)定义filebeat配置文件
[root@localhost ~]# cat >> /hqtbj/hqtwww/filebeat_workspace/config/10-nginx-to-es.yml << EOF
filebeat.inputs:
- type: log
  enabled: true
  paths:
    - /var/log/nginx/access.log*
  tags: ["nginx-access-json"]
  #以JSON格式解析message内容,拆分字段;
  json.keys_under_root: true

output.elasticsearch:
  enabled: true
  hosts: ["http://192.168.1.1:9200","http://192.168.1.2:9200","http://192.168.1.3:9200"]
  index: "oldboyedu-linux-nginx-access-%{+yyyy.MM.dd}"

#禁用索引生命周期管理,如果开启的话则会忽略我们自定义的索引
setup.ilm.enabled: false
#设置索引模板的名称
setup.template.name: "oldboyedu-linux"
#设置索引模板的匹配模式
setup.template.pattern: "oldboyedu-linux-*"
#覆盖已有的索引模版
setup.template.overwrite: false
#配置索引模版
setup.template.settings:
  #设置分片数量
  index.number_of_shards: 3
  #设置副本数量,要求小于集群节点的数量
  index.number_of_replicas: 2
EOF
12、基于modules类型采集nginx日志文件
(1)定义filebeat配置文件
[root@localhost ~]# cat >> /hqtbj/hqtwww/filebeat_workspace/filebeat.yml << EOF
filebeat.config.modules:
  #指定模块的配置文件路径;${path.config}就是//hqtbj/hqtwww/filebeat_workspace
  path: ${path.config}/modules.d/*.yml
  #开启热加载功能
  reload.enabled: false

output.elasticsearch:
  enabled: true
  hosts: ["http://192.168.1.1:9200","http://192.168.1.2:9200","http://192.168.1.3:9200"]
  index: "oldboyedu-linux-nginx-access-%{+yyyy.MM.dd}"

#禁用索引生命周期管理,如果开启的话则会忽略我们自定义的索引
setup.ilm.enabled: false
#设置索引模板的名称
setup.template.name: "oldboyedu-linux"
#设置索引模板的匹配模式
setup.template.pattern: "oldboyedu-linux-*"
#覆盖已有的索引模版
setup.template.overwrite: false
#配置索引模版
setup.template.settings:
  #设置分片数量
  index.number_of_shards: 3
  #设置副本数量,要求小于集群节点的数量
  index.number_of_replicas: 2
EOF

(2)查看并启用nginx模块
[root@localhost ~]# cd /hqtbj/hqtwww/filebeat_workspace/
#查看现有的模块
[root@localhost filebeat_workspace]# ./filebeat modules list
#开启nginx模块
[root@localhost filebeat_workspace]# ./filebeat modules enable nginx
#关闭打开的模块使用disable
#例如:
[root@localhost filebeat_workspace]# ./filebeat modules disable nginx

(3)编辑/hqtbj/hqtwww/filebeat_workspace/modules.d/nginx.yml(nginx模块的配置文件,用于收集nginx日志)
[root@localhost filebeat_workspace]# egrep -v "^*#|^$" /hqtbj/hqtwww/filebeat_workspace/modules.d/nginx.yml
- module: nginx
  access:
    enabled: true
    var.paths: ["/var/log/nginx/access.log"]
  error:
    enabled: false
    var.paths: ["/var/log/nginx/error.log"]
  ingress_controller:
    enabled: false
13、基于modules类型采集tomcat日志文件
(1)部署tomcat
略...

(2)定义filebeat配置文件
[root@localhost ~]# cat >> /hqtbj/hqtwww/filebeat_workspace/filebeat.yml << EOF
filebeat.config.modules:
  #指定模块的配置文件路径;${path.config}就是//hqtbj/hqtwww/filebeat_workspace
  path: ${path.config}/modules.d/*.yml
  #开启热加载功能
  reload.enabled: false

output.elasticsearch:
  enabled: true
  hosts: ["http://192.168.1.1:9200","http://192.168.1.2:9200","http://192.168.1.3:9200"]
  index: "oldboyedu-linux-tomcat-access-%{+yyyy.MM.dd}"

#禁用索引生命周期管理,如果开启的话则会忽略我们自定义的索引
setup.ilm.enabled: false
#设置索引模板的名称
setup.template.name: "oldboyedu-linux"
#设置索引模板的匹配模式
setup.template.pattern: "oldboyedu-linux-*"
#覆盖已有的索引模版
setup.template.overwrite: false
#配置索引模版
setup.template.settings:
  #设置分片数量
  index.number_of_shards: 3
  #设置副本数量,要求小于集群节点的数量
  index.number_of_replicas: 2
EOF

(3)查看并启用tomcat模块
[root@localhost ~]# cd /hqtbj/hqtwww/filebeat_workspace/
#查看现有的模块
[root@localhost filebeat_workspace]# ./filebeat modules list
#开启nginx模块
[root@localhost filebeat_workspace]# ./filebeat modules enable tomcat
#关闭打开的模块使用disable
#例如:
[root@localhost filebeat_workspace]# ./filebeat modules disable tomcat

(4)编辑/hqtbj/hqtwww/filebeat_workspace/modules.d/tomcat.yml(nginx模块的配置文件,用于收集nginx日志)
[root@localhost filebeat_workspace]# egrep -v "^*#|^$" /hqtbj/hqtwww/filebeat_workspace/modules.d/tomcat.yml
- module: tomcat
  log:
    enabled: true
    # 指定输⼊的类型是⽂件(file),默认是监听udp端⼝(不会向es传输日志)
    var.input: file
    #tomcat访问日志的位置
    var.paths:
      - /hqtbj/hqtwww/apache-tomcat-8.5.9/logs/localhost_access_log*.txt
14、基于log类型收集tomcat的原生日志
[root@localhost ~]# cat >> /hqtbj/hqtwww/filebeat_workspace/config/13-tomcat-to-es.yml << EOF
filebeat.inputs:
- type: log
  enabled: true
  #tomcat的访问日志位置
  paths:
    - /hqtbj/hqtwww/apache-tomcat-8.5.9/logs/*.txt
  tags: ["tomcat-access-json"]

output.elasticsearch:
  enabled: true
  hosts: ["http://192.168.1.1:9200","http://192.168.1.2:9200","http://192.168.1.3:9200"]
  index: "oldboyedu-linux-tomcat-access-%{+yyyy.MM.dd}"

#禁用索引生命周期管理,如果开启的话则会忽略我们自定义的索引
setup.ilm.enabled: false
#设置索引模板的名称
setup.template.name: "oldboyedu-linux"
#设置索引模板的匹配模式
setup.template.pattern: "oldboyedu-linux-*"
#覆盖已有的索引模版
setup.template.overwrite: false
#配置索引模版
setup.template.settings:
  #设置分片数量
  index.number_of_shards: 3
  #设置副本数量,要求小于集群节点的数量
  index.number_of_replicas: 2
15、基于log类型收集tomcat的json日志
(1)自定义tomcat的日志格式
[root@localhost ~]# vim /hqtbj/hqtwww/apache-tomcat-8.5.9/conf/server.xml
...
#大约在148-164之间,主要修改下吗的pattern字段:
<Host name="localhost" appBase="webapps"
unpackWARs="true" autoDeploy="true">
<!-- SingleSignOn valve, share authentication between web applications
Documentation at: /docs/config/valve.html -->
<!--
<Valve className="org.apache.catalina.authenticator.SingleSignOn" />
-->
<!-- Access log processes all example.
Documentation at: /docs/config/valve.html
Note: The pattern used is equivalent to using pattern="common" -->
<Valve className="org.apache.catalina.valves.AccessLogValve" directory="logs"
prefix="localhost_access_log" suffix=".txt"
pattern="{"clientip":"%h","ClientUser":"%l","authenticated":"%u","AccessTime":"%t","request":"%r","status":"%s","SendBytes":"%b","Query?string":"%q","partner":"%{Referer}i","http_user_agent":"%{User-Agent}i"}" />
</Host>
(2)修改filebeat的配置文件
[root@localhost ~]# cat >> /hqtbj/hqtwww/filebeat_workspace/13-tomcat-to-es.yml << EOF
filebeat.inputs:
- type: log
enabled: true
paths:
- /hqtbj/hqtwww/apache-tomcat-8.5.9/logs/*.txt
tags: ["tomcat-access-json"]
#以JSON格式解析message内容,拆分字段;
json.keys_under_root: true
output.elasticsearch:
enabled: true
hosts: ["http://192.168.1.1:9200","http://192.168.1.2:9200","http://192.168.1.3:9200"]
index: "oldboyedu-linux-tomcat-access-%{+yyyy.MM.dd}"
#禁用索引生命周期管理,如果开启的话则会忽略我们自定义的索引
setup.ilm.enabled: false
#设置索引模板的名称
setup.template.name: "oldboyedu-linux"
#设置索引模板的匹配模式
setup.template.pattern: "oldboyedu-linux-*"
#覆盖已有的索引模版
setup.template.overwrite: false
#配置索引模版
setup.template.settings:
#设置分片数量
index.number_of_shards: 3
#设置副本数量,要求小于集群节点的数量
index.number_of_replicas: 2
EOF
16、基于log类型多行匹配案例-收集tomcat的错误日志
[root@localhost ~]# cat >> /hqtbj/hqtwww/filebeat_workspace/14-tomcat-to-es.yml << EOF
filebeat.inputs:
- type: log
  enabled: true
  paths:
    - /hqtbj/hqtwww/apache-tomcat-8.5.9/logs/*.out
  tags: ["tomcat-error-json"]
  #指定多行匹配的类型,可选值为pattern(常用,只要下面匹配的参数出现就换行),count(次数,用于下面匹配的参数出现多少次就换行)
  multiline.type: pattern
  #指定匹配的模式,这里的'^\d{2}代表的是以两个数字开头的,例如11或者12'
  multiline.pattern: '^\d{2}'
  #下面两个参数参考官方架构图即可;https://www.elastic.co/guide/en/beats/filebeat/7.17/multiline-examples.html
  multiline.negate: true
  multiline.match: after

output.elasticsearch:
  enabled: true
  hosts: ["http://192.168.1.1:9200","http://192.168.1.2:9200","http://192.168.1.3:9200"]
  index: "oldboyedu-linux-tomcat-error-%{+yyyy.MM.dd}"


#禁用索引生命周期管理,如果开启的话则会忽略我们自定义的索引
setup.ilm.enabled: false
#设置索引模板的名称
setup.template.name: "oldboyedu-linux"
#设置索引模板的匹配模式
setup.template.pattern: "oldboyedu-linux-*"
#覆盖已有的索引模版
setup.template.overwrite: false
#配置索引模版
setup.template.settings:
  #设置分片数量
  index.number_of_shards: 3
  #设置副本数量,要求小于集群节点的数量
  index.number_of_replicas: 2
EOF
无多行匹配收集错误日志:
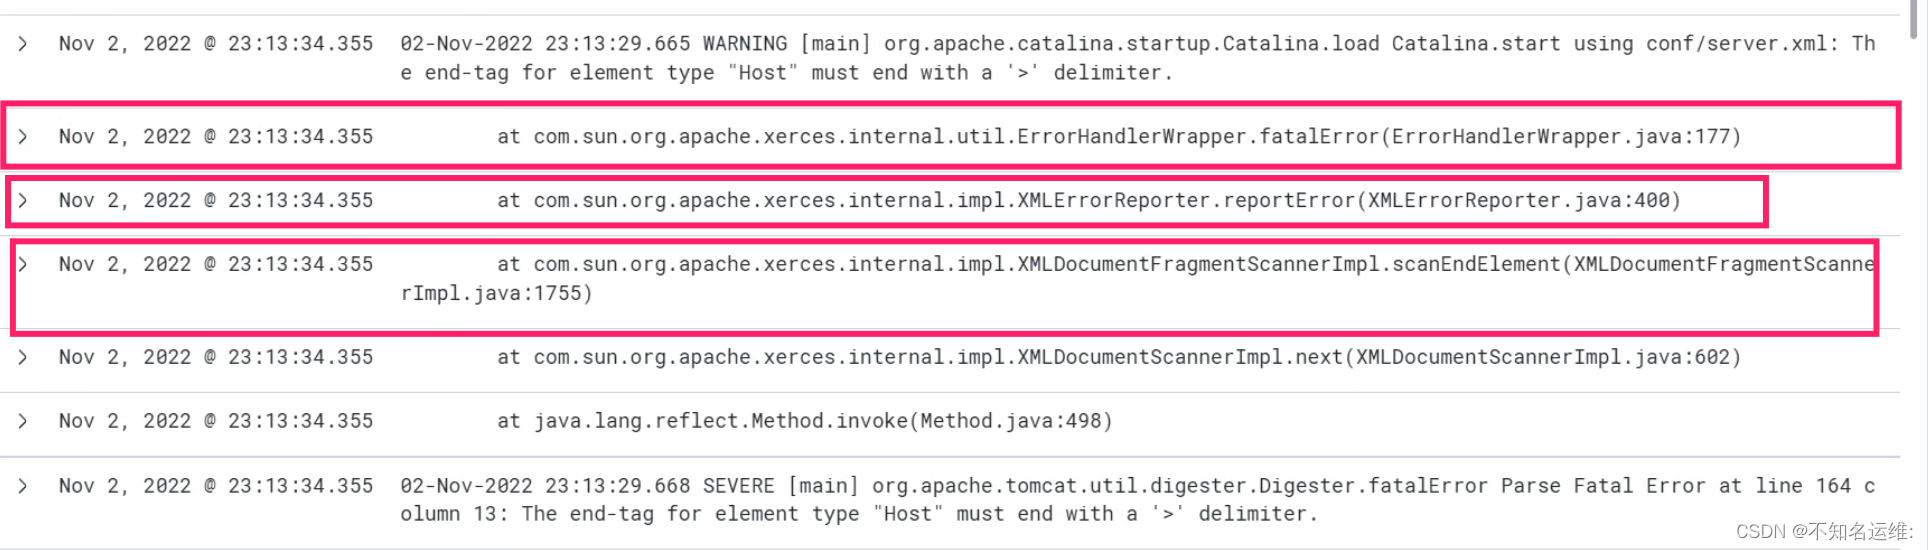
可以看到错误日志被当作单独的一行来展示了,非常影响排错
多行匹配后收集错误日志如下:

17、filebeat 日志过滤案例
(1)排除日志中指定的内容;类似【黑名单】的作用
[root@localhost ~]# cat >> /hqtbj/hqtwww/filebeat_workspace/15-log-to-console.yml  << EOF
filebeat.inputs:
- type: log
  paths:
    - /tmp/test.log
  #不采集的日志中包含指定的内容(例如下方指定的以"INFO"开头的数据、日志中包含"发送消息成功"的数据、日志中以"SUCCESS"结尾的数据)区分大小写
  exclude_lines: ['^INFO','发送消息成功','SUCCESS$']

output.console:
  pretty: true
EOF

(2)只收集日志中指定的内容;类似【白名单】的作用
[root@localhost ~]# cat >> /hqtbj/hqtwww/filebeat_workspace/16-log-to-console.yml  << EOF
filebeat.inputs:
- type: log
  paths:
    - /tmp/test.log
  #只采集的日志中包含的指定内容(例如下方指定的以"ERROR"开头的数据、日志中包含"返回消息失败"的数据、日志中以"Failed"结尾的数据)区分大小写!
  include_lines: ['^ERROR', '发送消息失败','Failed$']

output.console:
  pretty: true
EOF
如果include_lines和exclude_lines两种类型同时出现并指定相同的内容时,exclude_lines生效!!!
例如下方的以"WRN"开头的字段,那么将不会被采集

18、filestream类型解析json日志案例
官方警告后面log类型的input可能会被弃用,建议使用filestream类型
[root@localhost ~]# cat >> /hqtbj/hqtwww/filebeat_workspace/16-filestream-to-es.yml  << EOF
filebeat.inputs:
- type: filestream
  enabled: true
  paths:
    - /var/log/nginx/access.log
  tags: ["nginx-access-json"]
  #对于filestream类型而言,不能直接配置json解析,而是需要配置解析器实现
  #json.keys_under_root: true
  #综上所述,需要以下的写法实现
  parsers:
    - ndjson:
      #对json字段内容进行JSON格式解析,并将key放到顶级字段
      keys_under_root: true

output.elasticsearch:
  enabled: true
  hosts: ["http://192.168.1.1:9200","http://192.168.1.2:9200","http://192.168.1.3:9200"]
  index: "oldboyedu-linux-nginx-access-%{+yyyy.MM.dd}"

#禁用索引生命周期管理,如果开启的话则会忽略我们自定义的索引
setup.ilm.enabled: false
#设置索引模板的名称
setup.template.name: "oldboyedu-linux"
#设置索引模板的匹配模式
setup.template.pattern: "oldboyedu-linux-*"
#覆盖已有的索引模版
setup.template.overwrite: false
#配置索引模版
setup.template.settings:
  #设置分片数量
  index.number_of_shards: 3
  #设置副本数量,要求小于集群节点的数量
  index.number_of_replicas: 2
EOF
19、filestream类型多行匹配案例–收集tomcat的错误日志
[root@localhost ~]# cat >> /hqtbj/hqtwww/filebeat_workspace/17-filestream_tomcat-to-es.yml << EOF
filebeat.inputs:
- type: filestream
  enabled: true
  paths:
    - /hqtbj/hqtwww/apache-tomcat-8.5.9/logs/*.out
  tags: ["tomcat-error-json"]
  parsers:
    - multiline:
        #指定多行匹配的类型,可选值为pattern(常用,只要下面匹配的参数出现就换行),count(次数,用于下面匹配的参数出现多少次就换行)
        type: pattern
        #指定匹配的模式,这里的'^\d{2}代表的是以两个数字开头的,例如11或者12'
        pattern: '^\d{2}'
        #下面两个参数参考官方架构图即可;https://www.elastic.co/guide/en/beats/filebeat/7.17/multiline-examples.html
        negate: true
        match: after

output.elasticsearch:
  enabled: true
  hosts: ["http://192.168.1.1:9200","http://192.168.1.2:9200","http://192.168.1.3:9200"]
  index: "oldboyedu-linux-tomcat-error-%{+yyyy.MM.dd}"

#禁用索引生命周期管理,如果开启的话则会忽略我们自定义的索引
setup.ilm.enabled: false
#设置索引模板的名称
setup.template.name: "oldboyedu-linux"
#设置索引模板的匹配模式
setup.template.pattern: "oldboyedu-linux-*"
#覆盖已有的索引模版
setup.template.overwrite: false
#配置索引模版
setup.template.settings:
  #设置分片数量
  index.number_of_shards: 3
  #设置副本数量,要求小于集群节点的数量
  index.number_of_replicas: 2
EOF
20、filebeat日志聚合到本地案例
日志聚合就是将多个源端的日志,聚合到同一台服务器上;
例如
客户端A 发送日志111
客户端B 发送日志222
服务器C 收集到的日志为 111和222
#基于input的tcp和udp类型将多个客户端的日志聚合到filebeat本地的文件中
[root@localhost ~]# cat >> /hqtbj/hqtwww/filebeat_workspace/18-tcp-to-file.yml  << EOF
filebeat.inputs:
#tcp类型
- type: tcp
#监听的地址和端口
  host: "192.168.1.4:9000"
- type: tcp
  host: "192.168.1.4:9001"
#udp类型
- type: udp
  host: "192.168.1.4:8000"

output.file:
  #文件存放的位置
  path: "/tmp/filebeat"
  #指定文件名
  filename: test1104.log
  #指定文件的滚动大小,默认值是10MB
  rotate_every_kb: 10000
  #指定保存文件的个数,默认是7个,有效值是2-1024个
  number_of_files: 7
  #指定文件的权限,默认是0600,属主拥有可读可写的权限
  permissions: 0600
EOF
21、filebeat日志聚合到ES案例
#基于input的tcp和udp类型将多个客户端的日志聚合到filebeat然后输出给ES
[root@localhost ~]# cat >> /hqtbj/hqtwww/filebeat_workspace/19-tcp-to-es.yml  << EOF
filebeat.inputs:
- type: tcp
  host: "192.168.1.4:9000"
  tags: ["tcp-message"]

- type: tcp
  host: "192.168.1.4:9001"
  tags: ["tcp-message"]

- type: udp
  host: "192.168.1.4:8000"
  tags: ["udp-message"]

output.elasticsearch:
  enabled: true
  hosts: ["http://192.168.1.1:9200","http://192.168.1.2:9200","http://192.168.1.3:9200"]
  #index: "oldboyedu-linux-nginx-%{+yyyy.MM.dd}"
  indices:
    - index: "oldboyedu-linux-tcpmessage-%{+yyyy.MM.dd}"
      when.contains:
        tags: "tcp-message"
    - index: "oldboyedu-linux-udpmessage-%{+yyyy.MM.dd}"
      when.contains:
        tags: "udp-message"

#禁用索引生命周期管理,如果开启的话则会忽略我们自定义的索引
setup.ilm.enabled: false
#设置索引模板的名称
setup.template.name: "oldboyedu-linux"
#设置索引模板的匹配模式
setup.template.pattern: "oldboyedu-linux-*"
#覆盖已有的索引模版
setup.template.overwrite: false
#配置索引模版
setup.template.settings:
  #设置分片数量
  index.number_of_shards: 3
  #设置副本数量,要求小于集群节点的数量
  index.number_of_replicas: 2
EOF
22、将filebeat收集的数据写入redis案例
(1)yum方式快速部署redis
[root@localhost ~]# yum -y install redis

修改redis配置文件
[root@localhost ~]# vim /etc/redis.conf
...
#绑定监听的IP
bind 192.168.1.2
设置登录密码
requirepass 123.com.cn

#开启redis
[root@localhost ~]# systemctl start redis

其他节点连接测试redis环境
[root@localhost ~]# redis-cli -a 123.com.cn -h 192.168.1.2 -p 6379

(2)编写filebeat配置文件
[root@localhost ~]# cat >> /hqtbj/hqtwww/filebeat_workspace/20-log-to-redis.yml  << EOF
filebeat.inputs:
- type: log
  paths:
    - /tmp/test.log

output.redis:
  #写入redis的主机地址
  hosts: ["192.168.1.2:6379"]
  #指定redis的认证口令(登录密码)
  password: "123.com.cn"
  #指定的key的值,可自定义
  key: "filebeat-test-redis"
  #指定redis桶(数据库)编号
  db: 7
  #规定超时时间
  timeout: 5

(3)启动filebeat并测试
[root@localhost ~]# cd /hqtbj/hqtwww/filebeat_workspace/
[root@localhost filebeat_workspace]# ./filebeat -e -c config/01-stdin-to-console.yml
测试:
在/tmp/test.log文件里添加数据11112,看redis的第7桶会不会出现"filebeat-test-redis"这个键,并且验证这个键的值是不是我们添加的11112
[root@localhost ~]# echo '11112' >> /tmp/test.log
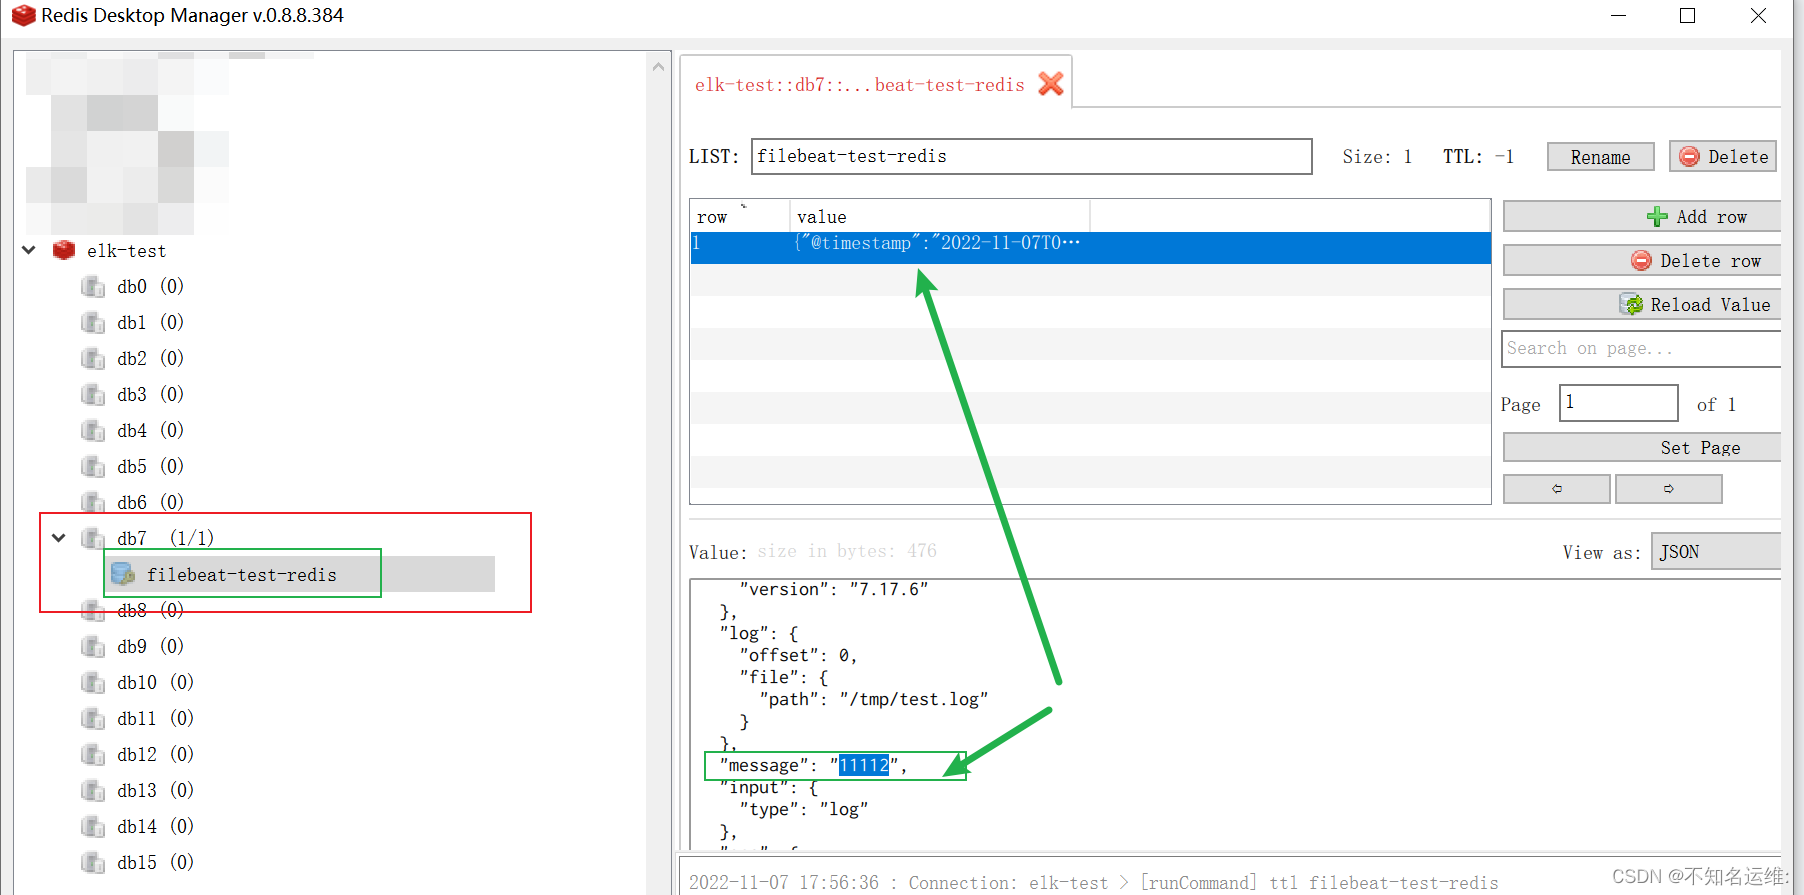
写入redis成功,后续只要我们filebeat监听的文件里有内容输入进来,就会去redis的"filebeat-test-redis"这个键里写相应的数据;


 692
692


 被折叠的 条评论
为什么被折叠?
被折叠的 条评论
为什么被折叠?
 到【灌水乐园】发言


