


第二部分:AOP面向切面编程(下)
一、异常通知
异常通知:切入点方法发生异常后才会执行该切面方法。注意异常通知和后置通知是矛盾的,不能既执行异常通知又执行后置通知。
1. DeptDao——切入点方法
package com.dao;

import org.springframework.stereotype.Repository;

@Repository
public class DeptDao {
    public Integer insert(String dname) {
        System.out.println(dname + "插入成功!");
        // 在这里设置异常,检测到异常后会出发异常通知
        System.out.println(100/0);
        return 1;
    }
}
2. DmlAspect——切面方法
| 含义/作用 | |
|---|---|
| @AfterThrowing | 异常通知注解 |
| pointcut | 用来指定切入点表达式 |
| execution | 切入点表达式,用来指定切入点 |
| throwing | 用来获取异常对象 |
| afterException | 自定义的异常通知的切面方法 |
| JointPoint | 切入点对象 |
| Throwable | 异常对象 |
	// 异常通知的切面方法
    @AfterThrowing(pointcut = "execution(* com.dao.*.*(*))", throwing = "e")
    public void afterException(JoinPoint point, Throwable e) {
        System.out.println("***************异常通知***********************");
        System.out.println("切入点发生的异常:" + e.getMessage());
        System.out.println("*****************************************");
    }
3. DeptTest——测试方法
package com.test;

import com.dao.DeptDao;
import org.junit.Test;
import org.springframework.context.ApplicationContext;
import org.springframework.context.support.ClassPathXmlApplicationContext;

public class DeptTest {
	// 声明spring引用
    private static ApplicationContext as = null;

    static {
        as = new ClassPathXmlApplicationContext("applicationContext.xml");
    }

    @Test
    public void testDept() {
        DeptDao deptDao = (DeptDao) as.getBean("deptDao");
        deptDao.insert("开发部");
    }


}
二、最终通知
最终通知:切入点正常执行后,或异常发生后立即执行。一般在前置通知之后,在后置通知和异常通知之前。
1. DmlAspect——切面方法
| 含义/作用 | |
|---|---|
| @After | 最终通知的注解 |
| execution | 切入点表达式,用来指定切入点 |
| JoinPoint | 切入点对象 |
package com.aspect;

import org.aspectj.lang.JoinPoint;
import org.aspectj.lang.annotation.*;
import org.springframework.aop.Pointcut;
import org.springframework.stereotype.Component;

@Component
@Aspect
public class DmlAspect {
    // 最终通知的切面方法
    @After("execution(* com.dao.*.*(*))")
    public void doAfter(JoinPoint point) {
        System.out.println("*****************最终通知**********************");
    }
}
2. DeptTest——测试方法
	 @Test
    public void testDept() {
        DeptDao deptDao = (DeptDao) as.getBean("deptDao");
        deptDao.insert("开发部");
    }
三、AOP环绕通知
将前面的前置通知、后置通知、异常通知、最终通知综合以后就形成了环绕通知。切面程序可以调用目标组件的切入点的运行,与struct中的拦截器功能类似。
1. 通知的执行流程

2. DmlAspect——切面方法
| 含义/作用 | |
|---|---|
| @Around | 环绕通知的注解 |
| execution | 切入点表达式,用来指定切入点 |
| ProceedingJoinPoint | 是JoinPoint的子类,可以控制切入点的执行 |
| proceed() | 可以调用目标组件,并返回目标组件的返回值 |
package com.aspect;
import org.aspectj.lang.JoinPoint;
import org.aspectj.lang.ProceedingJoinPoint;
import org.aspectj.lang.annotation.*;
import org.springframework.aop.Pointcut;
import org.springframework.stereotype.Component;
@Component
@Aspect
public class DmlAspect {
// 环绕通知
@Around("execution(* com.dao.*.*(*))")
public void doAround(ProceedingJoinPoint point) {
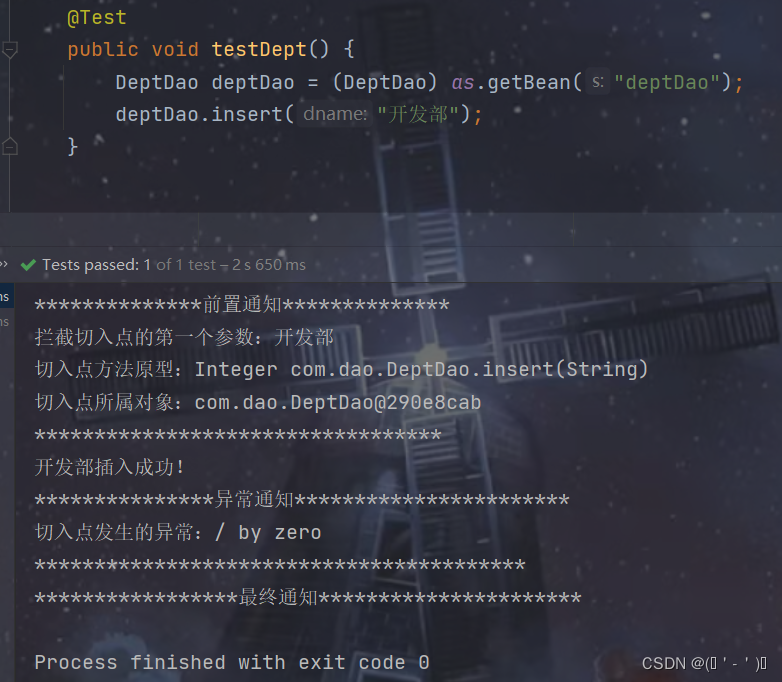
System.out.println("**************前置通知**************");
System.out.println("拦截切入点的第一个参数:" + point.getArgs()[0]);
System.out.println("切入点方法原型:" + point.getSignature());
System.out.println("切入点所属对象:" + point.getTarget());
System.out.println("**********************************");
try {
// 显示反射执行切入点方法
Object result = point.proceed();
System.out.println("**************后置通知******************");
System.out.println("切入点方法的返回值:" + result);
System.out.println("*********************************");
} catch (Throwable e) {
System.out.println("***************异常通知***********************");
System.out.println("切入点发生的异常:" + e.getMessage());
System.out.println("*****************************************");
} finally {
System.out.println("*****************最终通知**********************");
}
}
}
3. 测试和运行结果
四、切入点表达式
作用:将指定的bean组件下的方法设置为切入点
1. within——按(包名.类名)来匹配主键的
*:是通配符,用来代表全部
并列的两个点:代表子包
1.1 DmlAspect
	// 环绕通知
	// 代表dao包下,所有的子类
    @Around("within(com.dao.*)")
    public void doAround(ProceedingJoinPoint point) {
        System.out.println("**************前置通知**************");
        System.out.println("拦截切入点的第一个参数:" + point.getArgs()[0]);
        System.out.println("切入点方法原型:" + point.getSignature());
        System.out.println("切入点所属对象:" + point.getTarget());
        System.out.println("**********************************");
        try {
            // 显示反射执行切入点方法
            Object result = point.proceed();
            System.out.println("**************后置通知******************");
            System.out.println("切入点方法的返回值:" + result);
            System.out.println("*********************************");
        } catch (Throwable e) {
            System.out.println("***************异常通知***********************");
            System.out.println("切入点发生的异常:" + e.getMessage());
            System.out.println("*****************************************");
        } finally {
            System.out.println("*****************最终通知**********************");
        }
    }
2. bean——按bean组件的id值来匹配
通配符*:写在前面表示以…开头,写在后面表示以…结尾
2.1 DMLAspect
	//表示将所有以...Dao的bean组件都设置为切入点
	@Around("bean(*Dao)")
    public void doAround(ProceedingJoinPoint point) {
        System.out.println("**************前置通知**************");
        System.out.println("拦截切入点的第一个参数:" + point.getArgs()[0]);
        System.out.println("切入点方法原型:" + point.getSignature());
        System.out.println("切入点所属对象:" + point.getTarget());
        System.out.println("**********************************");
        try {
            // 显示反射执行切入点方法
            Object result = point.proceed();
            System.out.println("**************后置通知******************");
            System.out.println("切入点方法的返回值:" + result);
            System.out.println("*********************************");
        } catch (Throwable e) {
            System.out.println("***************异常通知***********************");
            System.out.println("切入点发生的异常:" + e.getMessage());
            System.out.println("*****************************************");
        } finally {
            System.out.println("*****************最终通知**********************");
        }
    }
3. execution——按方法来匹配(常用)

3.1 DmlAspect
	// 返回值类型任意;将com.dao包下的所有类,的insert方法(参数个数和类型任意)设置为切入点
	@Around("execution(* com.dao.*.insert(..))")
    public void doAround(ProceedingJoinPoint point) {
        System.out.println("**************前置通知**************");
        System.out.println("拦截切入点的第一个参数:" + point.getArgs()[0]);
        System.out.println("切入点方法原型:" + point.getSignature());
        System.out.println("切入点所属对象:" + point.getTarget());
        System.out.println("**********************************");
        try {
            // 显示反射执行切入点方法
            Object result = point.proceed();
            System.out.println("**************后置通知******************");
            System.out.println("切入点方法的返回值:" + result);
            System.out.println("*********************************");
        } catch (Throwable e) {
            System.out.println("***************异常通知***********************");
            System.out.println("切入点发生的异常:" + e.getMessage());
            System.out.println("*****************************************");
        } finally {
            System.out.println("*****************最终通知**********************");
        }
    }
第三部分:事务控制
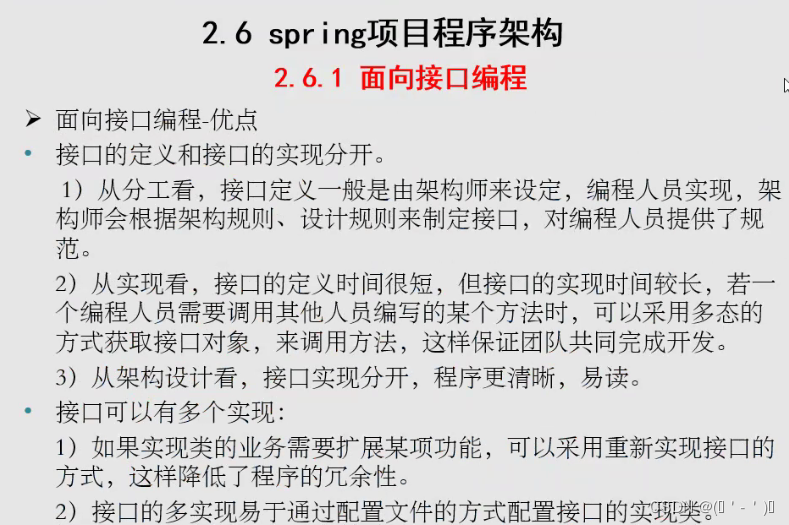
一、面向接口编程
spring项目的架构是面向接口编程。
1. 接口
在Java编程语言中,接口是一个抽象类型,是抽象方法的集合,用interface来声明。一个类通过继承接口的方式,从而来继承接口里的抽象方法。
2. 面向接口编程
在系统分析或架构设计中,每个层级的程序并不是直接提供程序服务,而是定义一组接口,通过实现接口来提供功能。面向接口编程实际上是面向对象编程的一部分。
3. 面向接口编程的优点
二、spring和mybatis整合
除了实体类不创建为bean组件,其它都要设置为bean组件。mapper通过配置文件将其设置为bean组件;service的实现类通过@Service注解将其设置为bean组件。
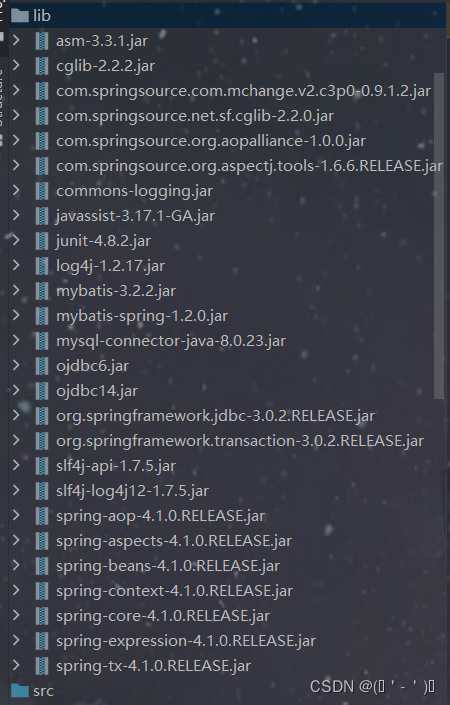
1. 新建文件,引入jar包
这里创建的是JavaSE项目。本地数据库是5版本的就引入5版本的jar包;8版本的就引入8版本的jar包,并设置配置文件中有关数据库的内容。
2. 添加配置文件
添加到src路径下
mybatis.xml
<?xml version="1.0" encoding="UTF-8"?>
<!DOCTYPE configuration
        PUBLIC "-//mybatis.org//DTD Config 3.0//EN"
        "http://mybatis.org/dtd/mybatis-3-config.dtd">
<configuration>
    <!--添加自定义的类型转换器-->
   <typeHandlers>
       <typeHandler handler="com.tentact.common.StringArrayTypeHandler" javaType="[Ljava.lang.String;" jdbcType="VARCHAR"></typeHandler>
   </typeHandlers>

</configuration>
applicationContext.xml
①添加c3p0数据源,用来连接数据库和将数据库的数据源new成对象
②创建持久层核心处理类对象,用来操作数据库
③将数据访问层的类转为bean组件
④将指定包下的组件都添加到spring容器中
<?xml version="1.0" encoding="UTF-8"?>
<beans xmlns="http://www.springframework.org/schema/beans"
xmlns:xsi="http://www.w3.org/2001/XMLSchema-instance" xmlns:context="http://www.springframework.org/schema/context"
xmlns:aop="http://www.springframework.org/schema/aop" xmlns:tx="http://www.springframework.org/schema/tx"
xsi:schemaLocation="http://www.springframework.org/schema/beans
http://www.springframework.org/schema/beans/spring-beans.xsd
http://www.springframework.org/schema/context
http://www.springframework.org/schema/context/spring-context.xsd
http://www.springframework.org/schema/aop
http://www.springframework.org/schema/aop/spring-aop.xsd
http://www.springframework.org/schema/tx
http://www.springframework.org/schema/tx/spring-tx.xsd">
<!--设置c3p0数据源,数据源有缓存和连接池,用来维护和数据库的连接将数据库的数据源new成对象-->
<bean class="com.mchange.v2.c3p0.ComboPooledDataSource" id="dataSource">
<property name="jdbcUrl"
value="jdbc:mysql://localhost:3306/mybatis?useUnicode=true&characterEncoding=utf-8" />
<property name="driverClass" value="com.mysql.cj.jdbc.Driver" />
<property name="user" value="root" />
<property name="password" value="123456" />
<property name="initialPoolSize" value="3" />
<property name="maxPoolSize" value="10" />
<property name="minPoolSize" value="1" />
<property name="acquireIncrement" value="3" />
<property name="maxIdleTime" value="60" />
</bean>
<!-- 配置sqlSessionFactory,指定mybatis的映射文件 -->
<bean id="sqlSessionFactory" class="org.mybatis.spring.SqlSessionFactoryBean">
<property name="dataSource" ref="dataSource" />
<property name="configLocation" value="classpath:mybatis.xml" />
<property name="mapperLocations" value="classpath:com/tentact/mapping/*.xml"></property>
</bean>
<!-- 自动扫描数据访问层,将数据访问层的类转成bean组件 -->
<bean class="org.mybatis.spring.mapper.MapperScannerConfigurer">
<!-- 扫描产生mapper接口文件 -->
<property name="basePackage" value="com.tentact.mapper"></property>
<property name="sqlSessionFactory" ref="sqlSessionFactory"></property>
</bean>
<!-- 开启自动扫描,通过扫描包下的bean组件,将组件自动注入到spring容器中 -->
<context:component-scan base-package="com.tentact"></context:component-scan>
</beans>
bean、mapper、mapping文件用代码生成器自动生成
StudentService
package com.tentact.service;

import com.tentact.bean.Student;


public interface StudentService {
    int deleteByPrimaryKey(Integer id);

    int insert(Student record);

    int insertSelective(Student record);

    Student selectByPrimaryKey(Integer id);

    int updateByPrimaryKeySelective(Student record);

    int updateByPrimaryKey(Student record);
}
StudentServiceImpl
package com.tentact.service;

import com.tentact.bean.Student;
import com.tentact.mapper.StudentMapper;
import org.springframework.beans.factory.annotation.Autowired;
import org.springframework.stereotype.Service;

// 将接口类变为bean对象
@Service
public class StudentServiceImpl implements StudentService{
	// 自动获取StudentMapper的bean对象
    @Autowired
    private StudentMapper studentMapper;

    @Override
    public int deleteByPrimaryKey(Integer id) {
        return 0;
    }

    @Override
    public int insert(Student record) {
        return 0;
    }

    @Override
    public int insertSelective(Student record) {
        return 0;
    }

	// 这里用设个方法进行测试
    @Override
    public Student selectByPrimaryKey(Integer id) {
        return this.studentMapper.selectByPrimaryKey(id);
    }

    @Override
    public int updateByPrimaryKeySelective(Student record) {
        return 0;
    }

    @Override
    public int updateByPrimaryKey(Student record) {
        return 0;
    }
}
StudentTest
package com.tentact.test;

import com.tentact.bean.Student;
import com.tentact.service.StudentService;
import org.junit.Test;
import org.springframework.context.ApplicationContext;
import org.springframework.context.support.ClassPathXmlApplicationContext;


public class StudentTest {
    // 创建spring对象
    private static ApplicationContext ac = null;
    static {
        ac  = new ClassPathXmlApplicationContext("applicationContext.xml");
    }

    @Test
    public void selectByPrimaryKey() {
        StudentService studentService = (StudentService) ac.getBean("studentServiceImpl");
        Student student = studentService.selectByPrimaryKey(1);
        if (student != null) {
            System.out.println(student.getId() + "\t" + student.getName());
        }
    }

}
总结
今天学了面向切面编程的异常通知、最终通知和环绕通知。了解了什么是面向切面编程。具体应用等以后遇到再补充吧!下午主要是将spring和mybatis框架进行了一下整合。


 1134
1134


 被折叠的 条评论
为什么被折叠?
被折叠的 条评论
为什么被折叠?
 到【灌水乐园】发言


