


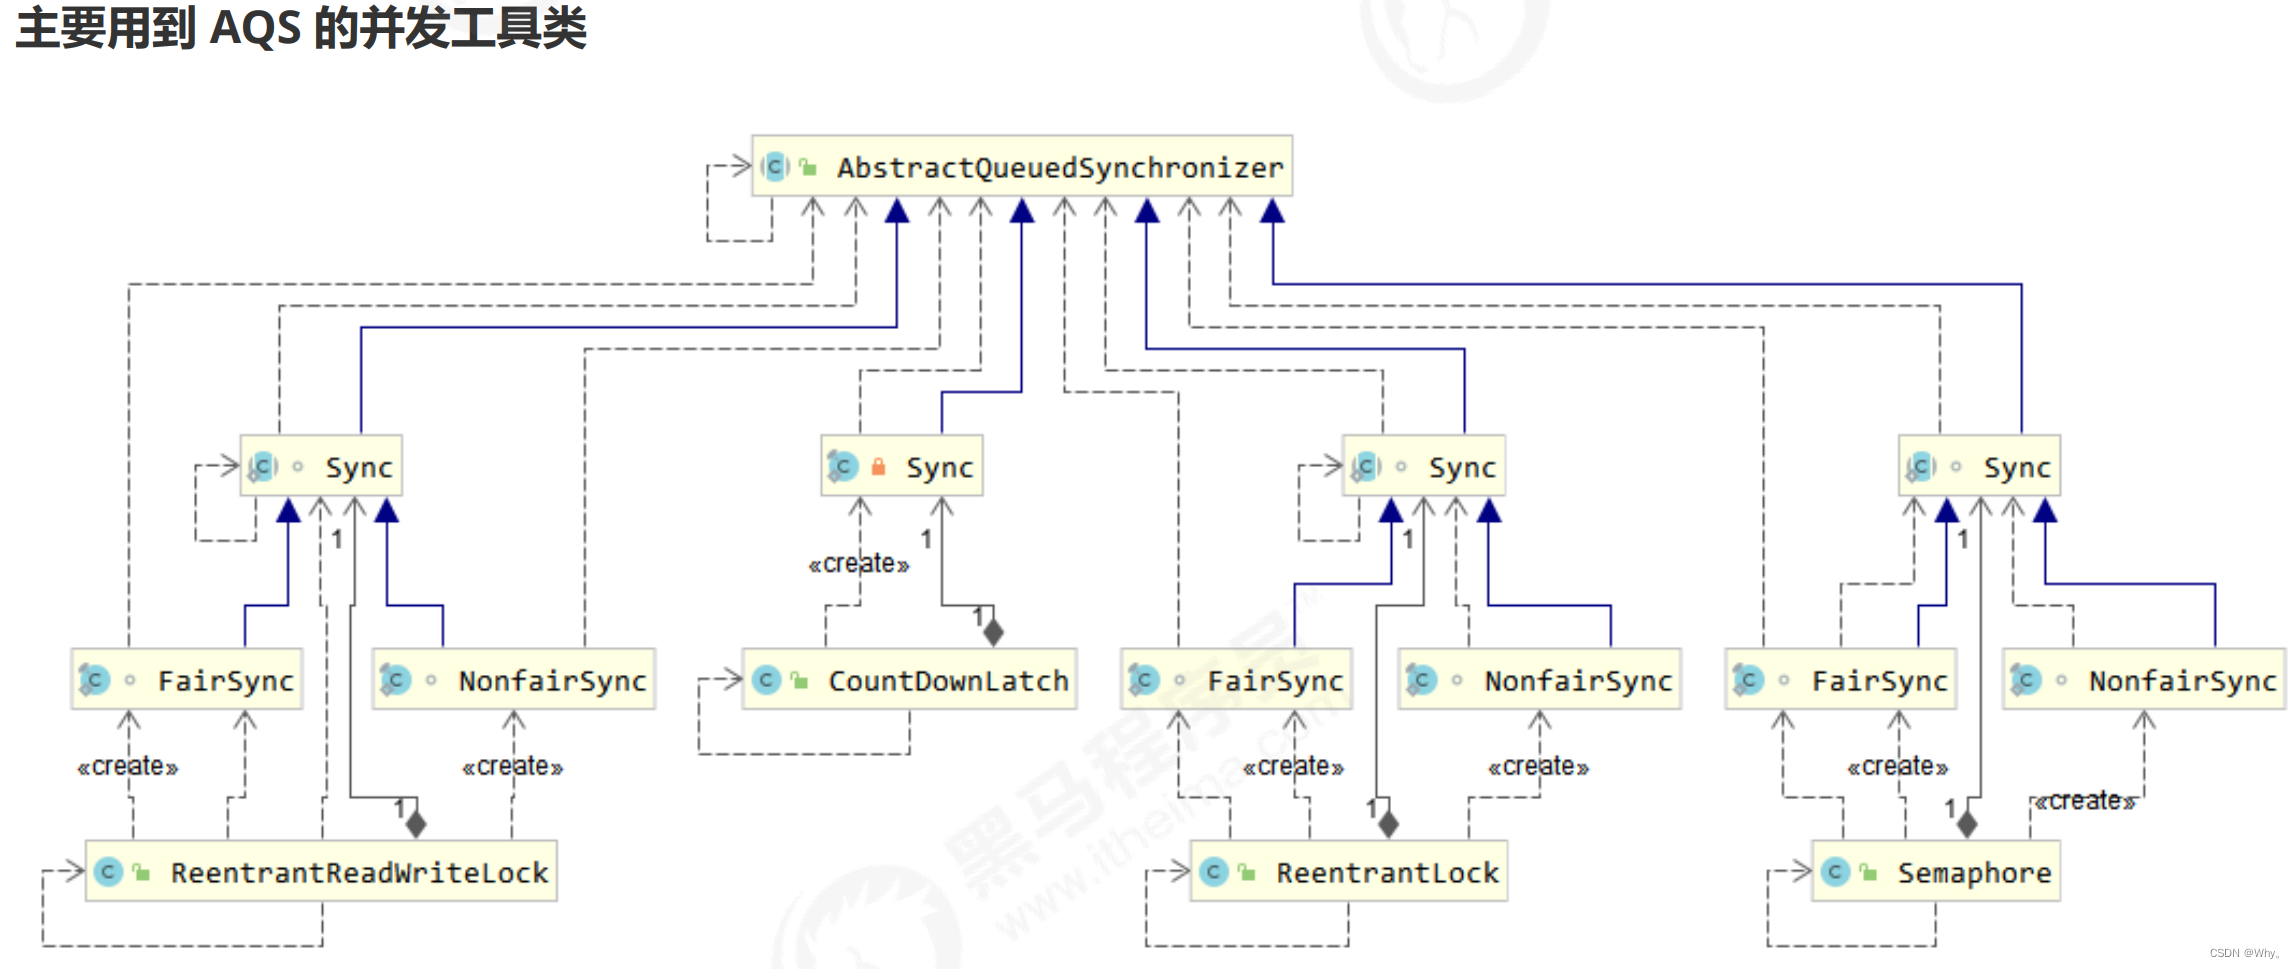
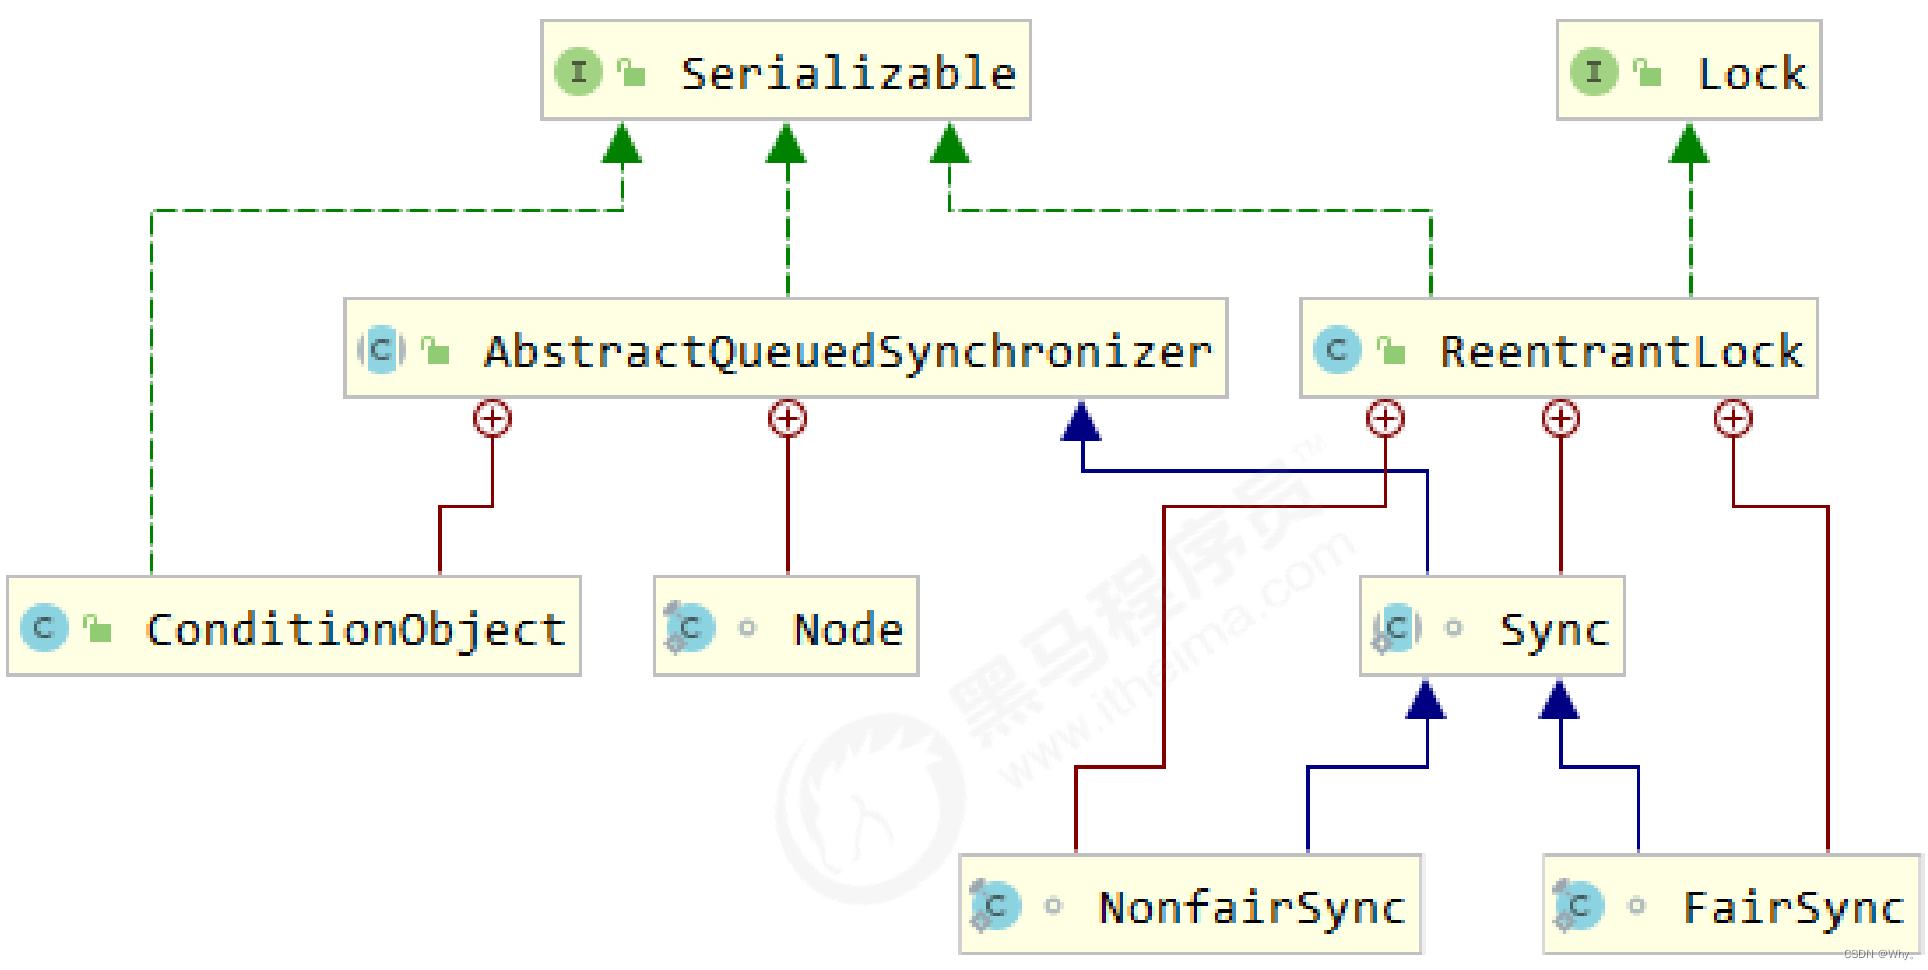
1、AQS
全称是AbstractQueuedSynchronizer,是一个抽象类,是阻塞式锁和相关的同步器工具的框架。
特点:
- 用state属性来表示资源的状态(独占模式和共享模式),子类需要定义如何维护这个状态,控制如何获取锁和释放锁
- getState 获取state状态
- setState 设置state状态
- compareAndSetState cas机制设置state状态
- 独占模式是只有一个线程能够访问资源,而共享模式可以允许多个线程访问资源。
- 提供了基于FIFO的等待队列,类似于Monitor的EntryList。
- 条件变量来实现等待、唤醒机制,支持多个条件变量,类似于Monitor的WaitSet。
子类主要实现这样一些方法(默认抛出 UnsupportedOperationException)
- tryAcquire
- tryRelease
- tryAcquireShared
- tryReleaseShared
- isHeldExclusively
// 如果获取锁失败
if (!tryAcquire(arg)) {
	// 入队, 可以选择阻塞当前线程 park unpark
}

// 如果释放锁成功
if (tryRelease(arg)) {
	// 让阻塞线程恢复运行
}
1.1 实现不可重入锁
@Slf4j(topic = "c.TestAqs")
public class TestAqs {
public static void main(String[] args) {
MyLock lock = new MyLock();
new Thread(() -> {
lock.lock();
try {
log.debug("locking...");
sleep(1);
} finally {
log.debug("unlocking...");
lock.unlock();
}
},"t1").start();
new Thread(() -> {
lock.lock();
try {
log.debug("locking...");
} finally {
log.debug("unlocking...");
lock.unlock();
}
},"t2").start();
}
}
// 自定义锁(不可重入锁)
class MyLock implements Lock {
// 独占锁 同步器类
class MySync extends AbstractQueuedSynchronizer {
@Override
protected boolean tryAcquire(int arg) {
if(compareAndSetState(0, 1)) {
// 加上了锁,并设置 owner 为当前线程
setExclusiveOwnerThread(Thread.currentThread());
return true;
}
return false;
}
@Override
protected boolean tryRelease(int arg) {
setExclusiveOwnerThread(null);
setState(0);
return true;
}
@Override // 是否持有独占锁
protected boolean isHeldExclusively() {
return getState() == 1;
}
public Condition newCondition() {
return new ConditionObject();
}
}
private MySync sync = new MySync();
@Override // 加锁(不成功会进入等待队列)
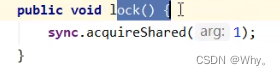
public void lock() {
sync.acquire(1);
}
@Override // 加锁,不成功,进入等待队列,可打断
public void lockInterruptibly() throws InterruptedException {
sync.acquireInterruptibly(1);
}
@Override // 尝试加锁(一次),不成功返回,不进入队列
public boolean tryLock() {
return sync.tryAcquire(1);
}
@Override // 尝试加锁,不成功,进入等待队列,有时限
public boolean tryLock(long time, TimeUnit unit) throws InterruptedException {
return sync.tryAcquireNanos(1, unit.toNanos(time));
}
@Override // 解锁
public void unlock() {
sync.release(1);
}
@Override // 创建条件变量
public Condition newCondition() {
return sync.newCondition();
}
}1.2 AQS 要实现的功能目标
- 阻塞版本获取锁 acquire 和非阻塞的版本尝试获取锁 tryAcquire
- 获取锁超时机制
- 通过打断取消机制
- 独占机制及共享机制
- 条件不满足时的等待机制
1.3 AQS 的基本思想
获取锁的逻辑
while(state 状态不允许获取) {
	if(队列中还没有此线程) {
		入队并阻塞
	}
}
当前线程出队
释放锁的逻辑
if(state 状态允许了) {
	恢复阻塞的线程(s)
}
要点:原子维护 state 状态;阻塞及恢复线程;维护队列
1.4 设计
state设计
- state 使用 volatile 配合 cas 保证其修改时的原子性
- state 使用了 32bit int 来维护同步状态,因为当时使用 long 在很多平台下测试的结果并不理想
阻塞恢复设计
- 早期的控制线程暂停和恢复的api有suspend和resume,但它们是不可用的,因为如果先调用的resume那么suspend将感知不到
- 解决方法是使用park&unpark来实现线程的暂停和恢复,先unpark再park也没问题
- park&unpark是针对线程的,而不是针对同步器的,因此控制粒度更为精细
- park线程还可以通过interrupt打断
队列设计
- 使用了 FIFO 先入先出队列,并不支持优先级队列
- 设计时借鉴了 CLH 队列,它是一种单向无锁队列。
- CLH 好处:无锁,使用自旋;快速,无阻塞。
队列中有head和tail两个指针节点,都用volatile修饰配合cas使用,每个节点有state维护节点状态。
//入队伪代码,只需要考虑 tail 赋值的原子性
do {
// 原来的 tail
Node prev = tail;
// 用 cas 在原来 tail 的基础上改为 node
} while(tail.compareAndSet(prev, node))
//出队伪代码
while((Node prev=node.prev).state != 唤醒状态) {
}
// 设置头节点
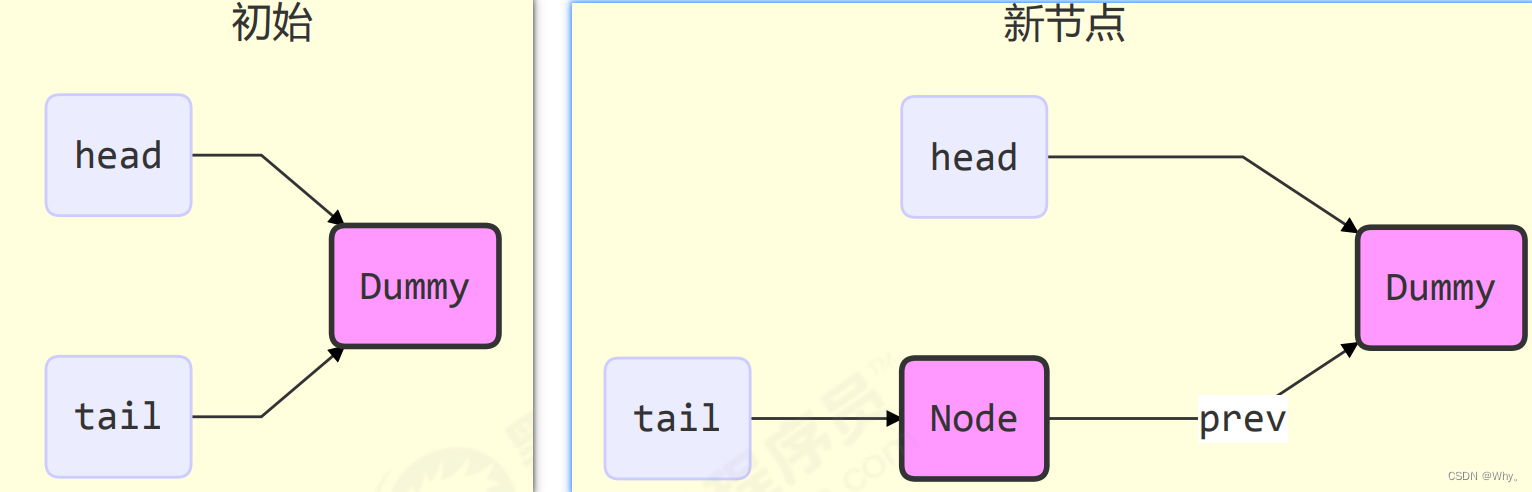
head = node;AQS 在一些方面改进了 CLH
private Node enq(final Node node) {
	for (;;) {
		Node t = tail;
		// 队列中还没有元素 tail 为 null
		if (t == null) {
			// 将 head 从 null -> dummy
			if (compareAndSetHead(new Node()))
				tail = head;
			} else {
				// 将 node 的 prev 设置为原来的 tail
				node.prev = t;
				// 将 tail 从原来的 tail 设置为 node
				if (compareAndSetTail(t, node)) {
					// 原来 tail 的 next 设置为 node
					t.next = node;
					return t;
				}
			}
	}
}
2、ReentrantLock 原理
2.1 非公平锁实现原理
ReentrantLock默认是非公平锁,新的线程与队列中的线程共同来抢资源。
public ReentrantLock() {
	sync = new NonfairSync();
}
加锁
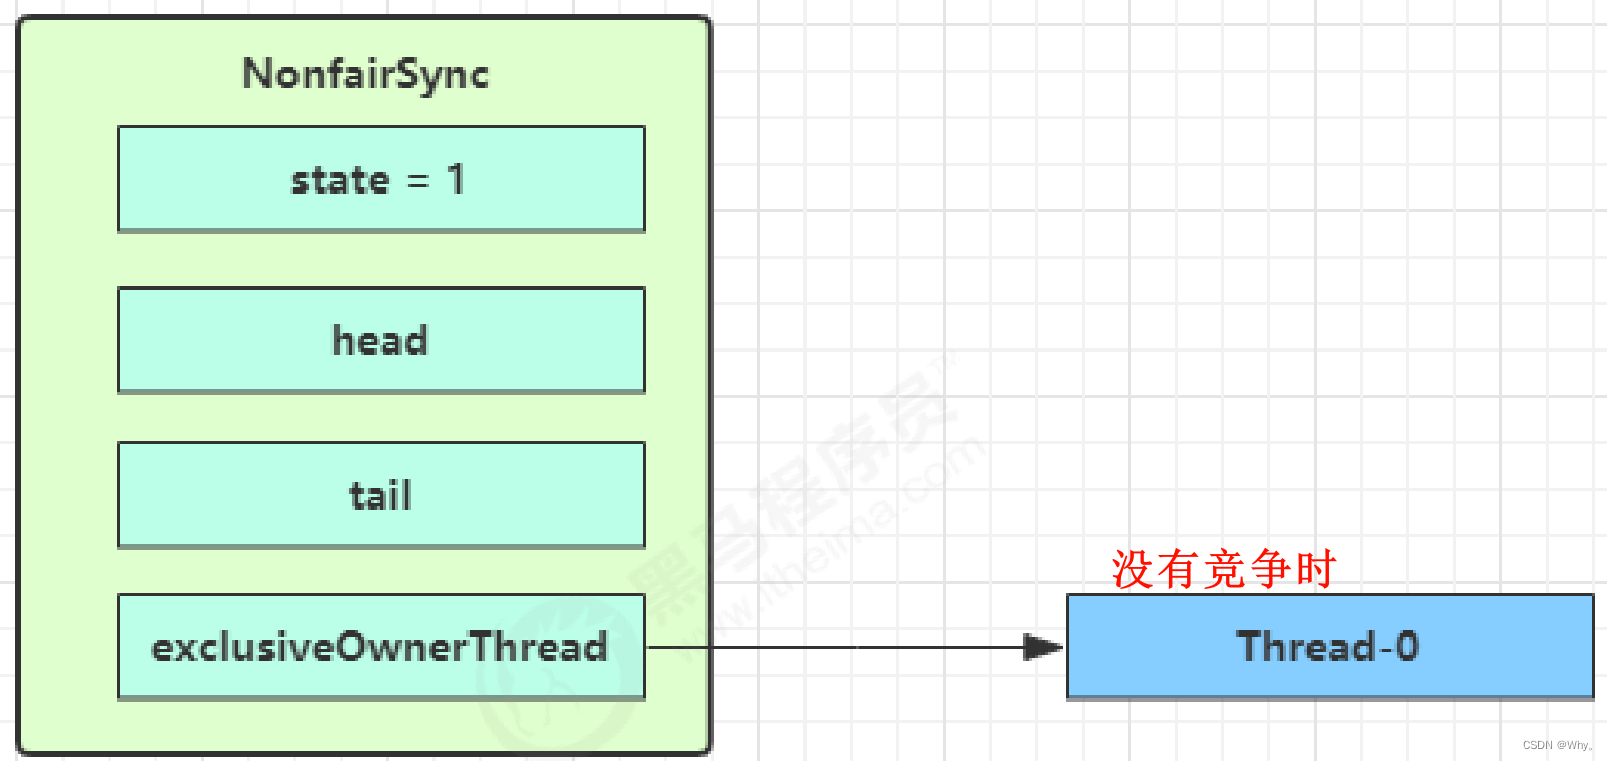
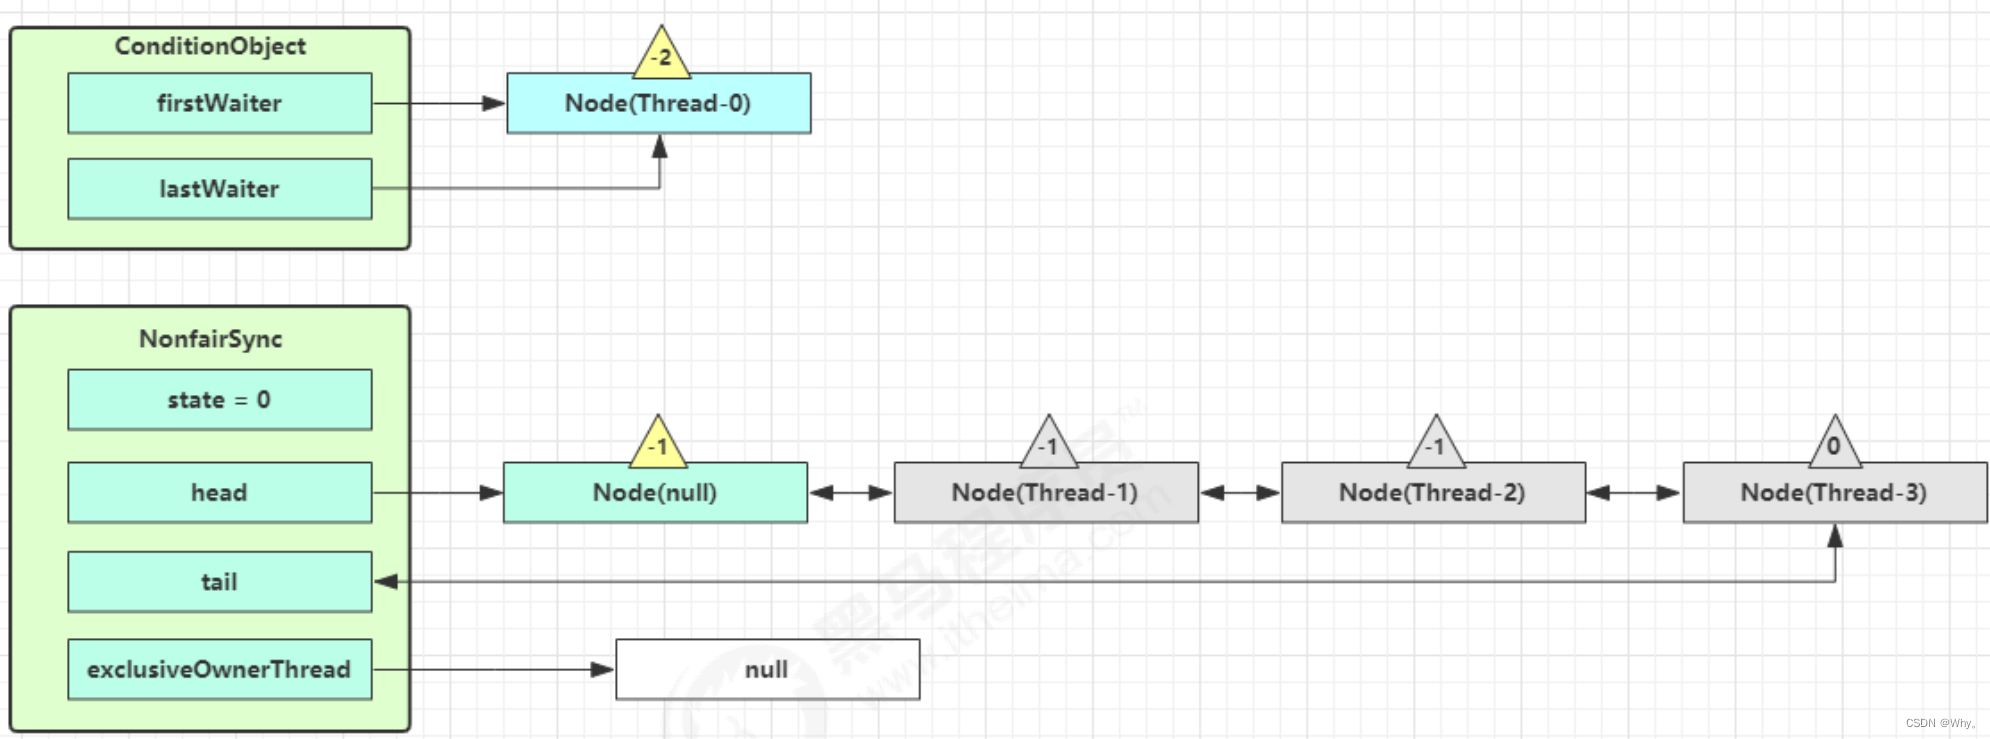
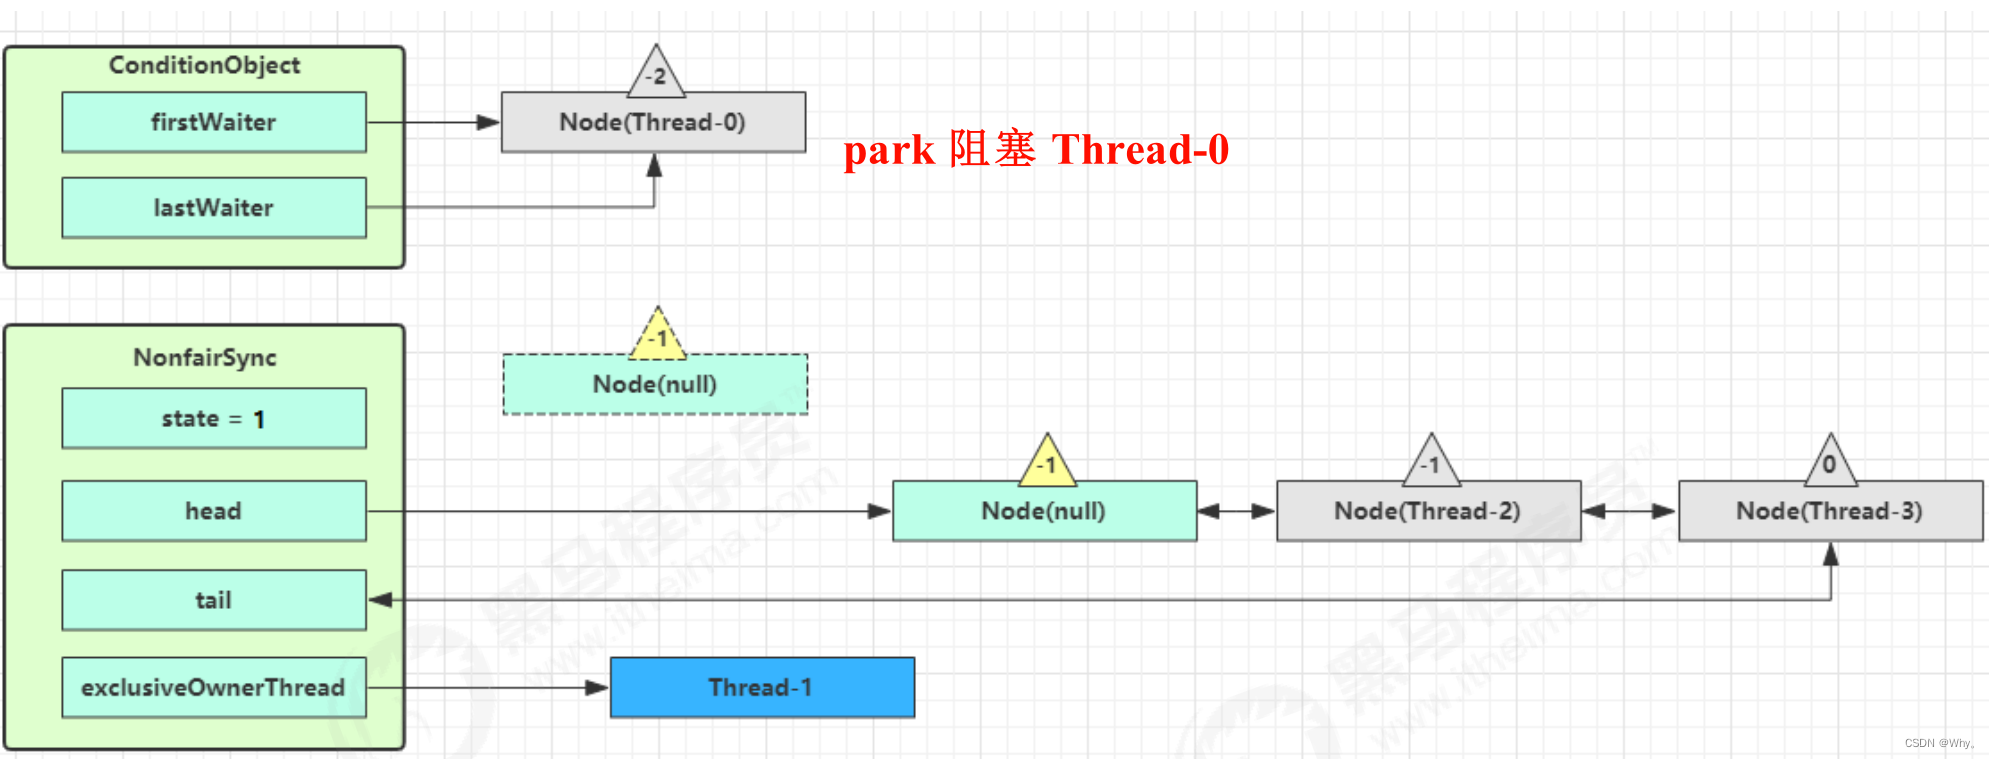
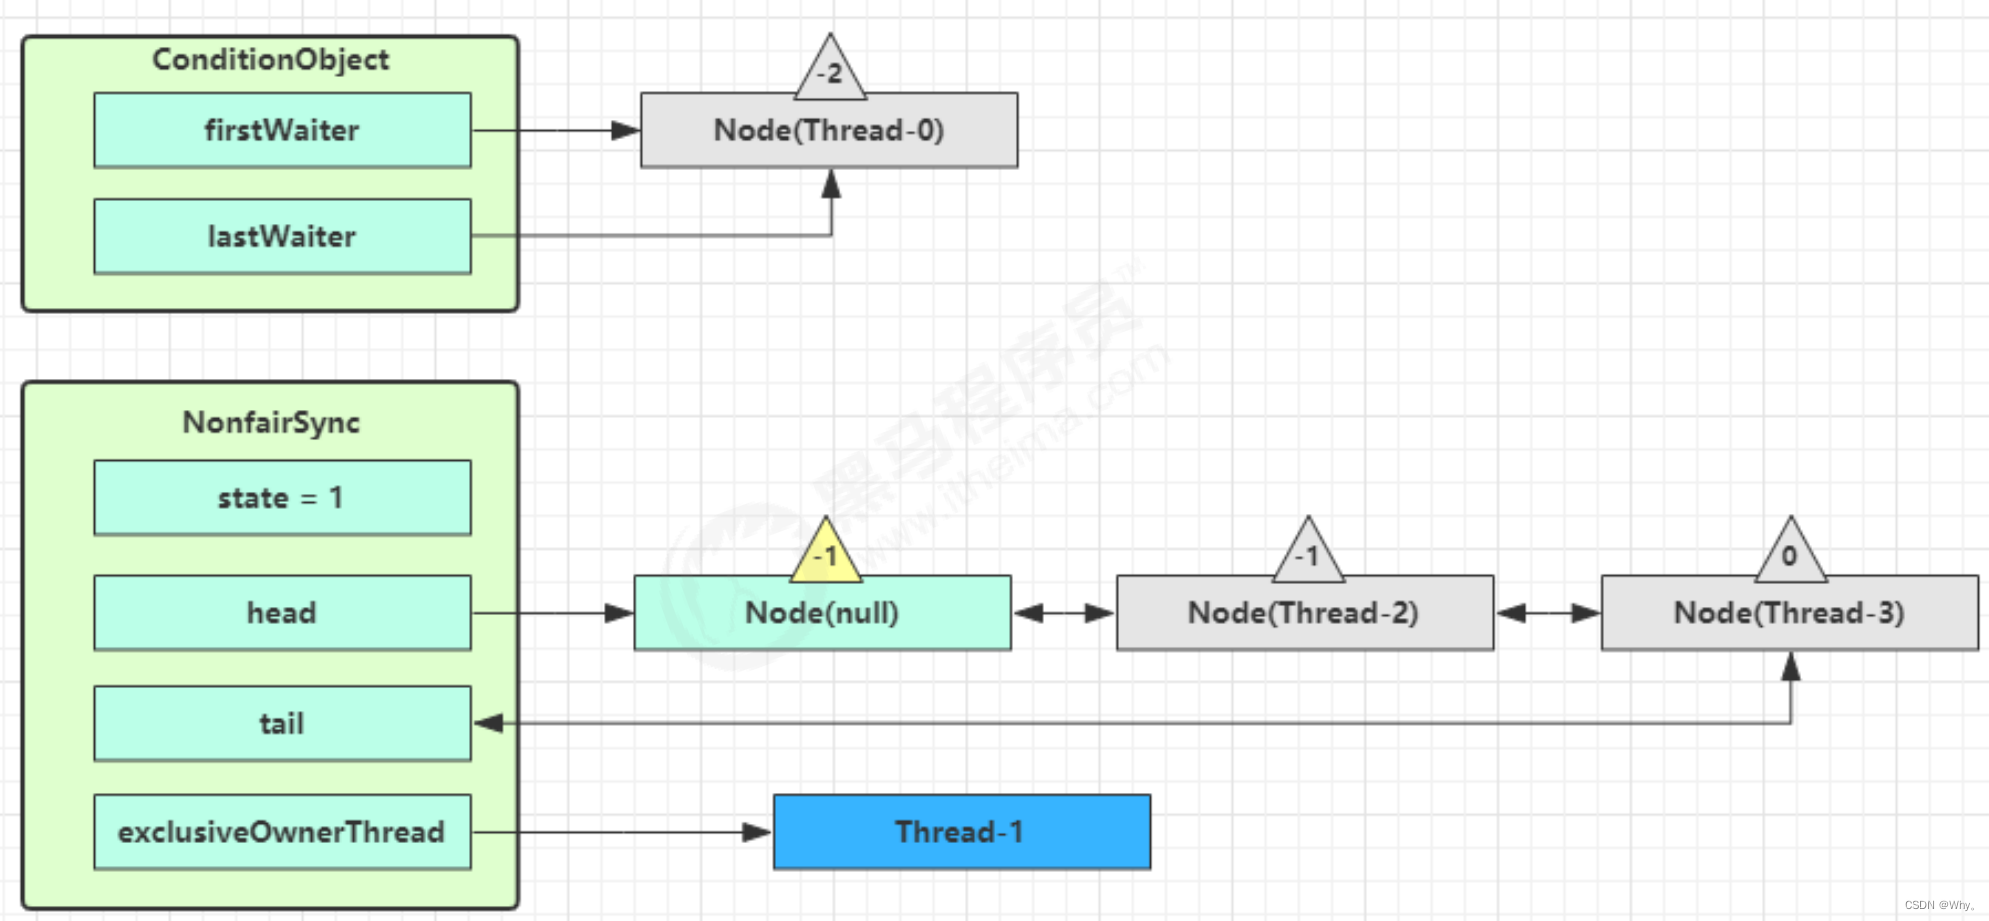
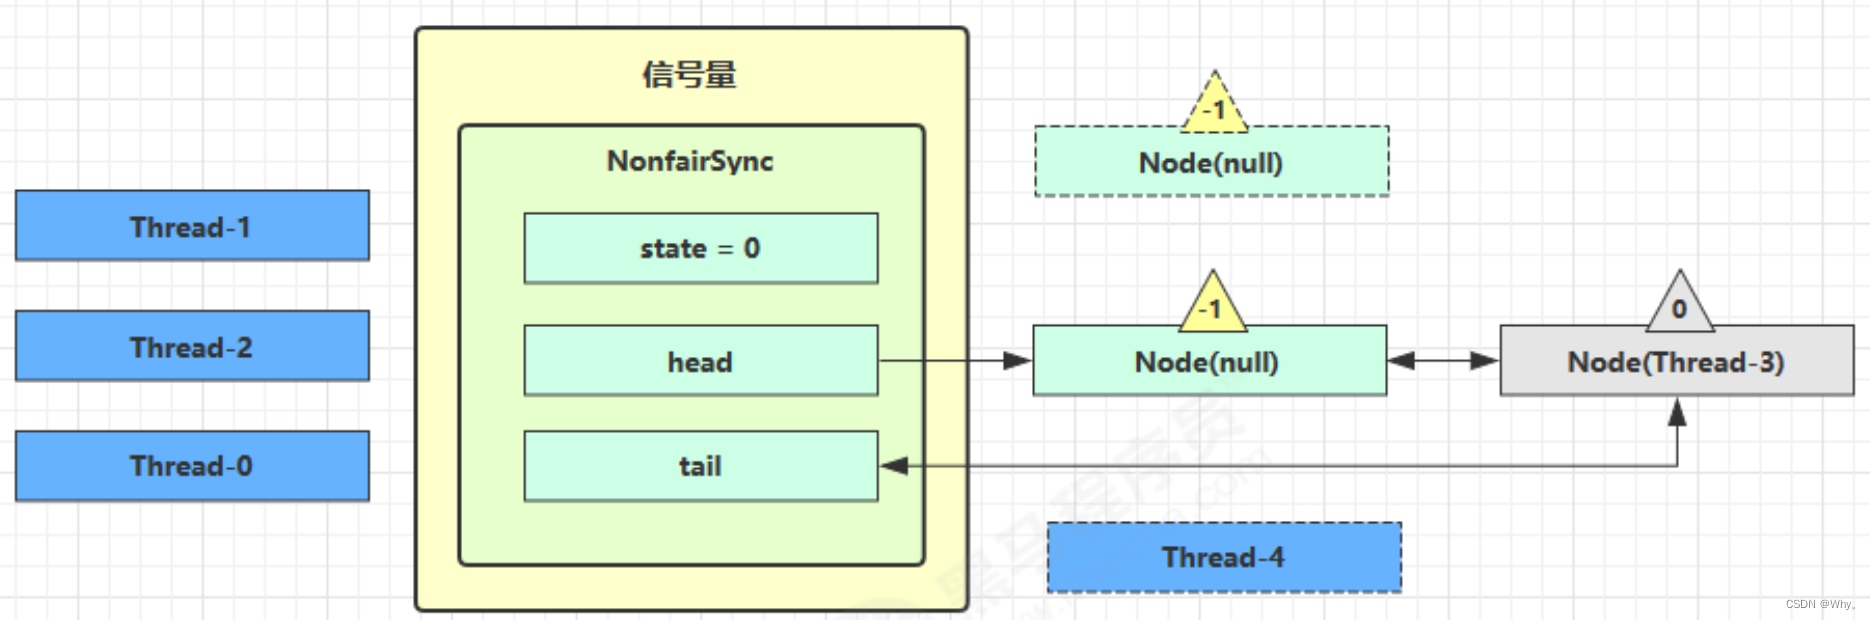
第一个竞争Thread-1出现时,执行了
1.CAS尝试将state由0改为1,结果失败
2.进入tryAcquire逻辑,这时state已经是1,结果仍然失败
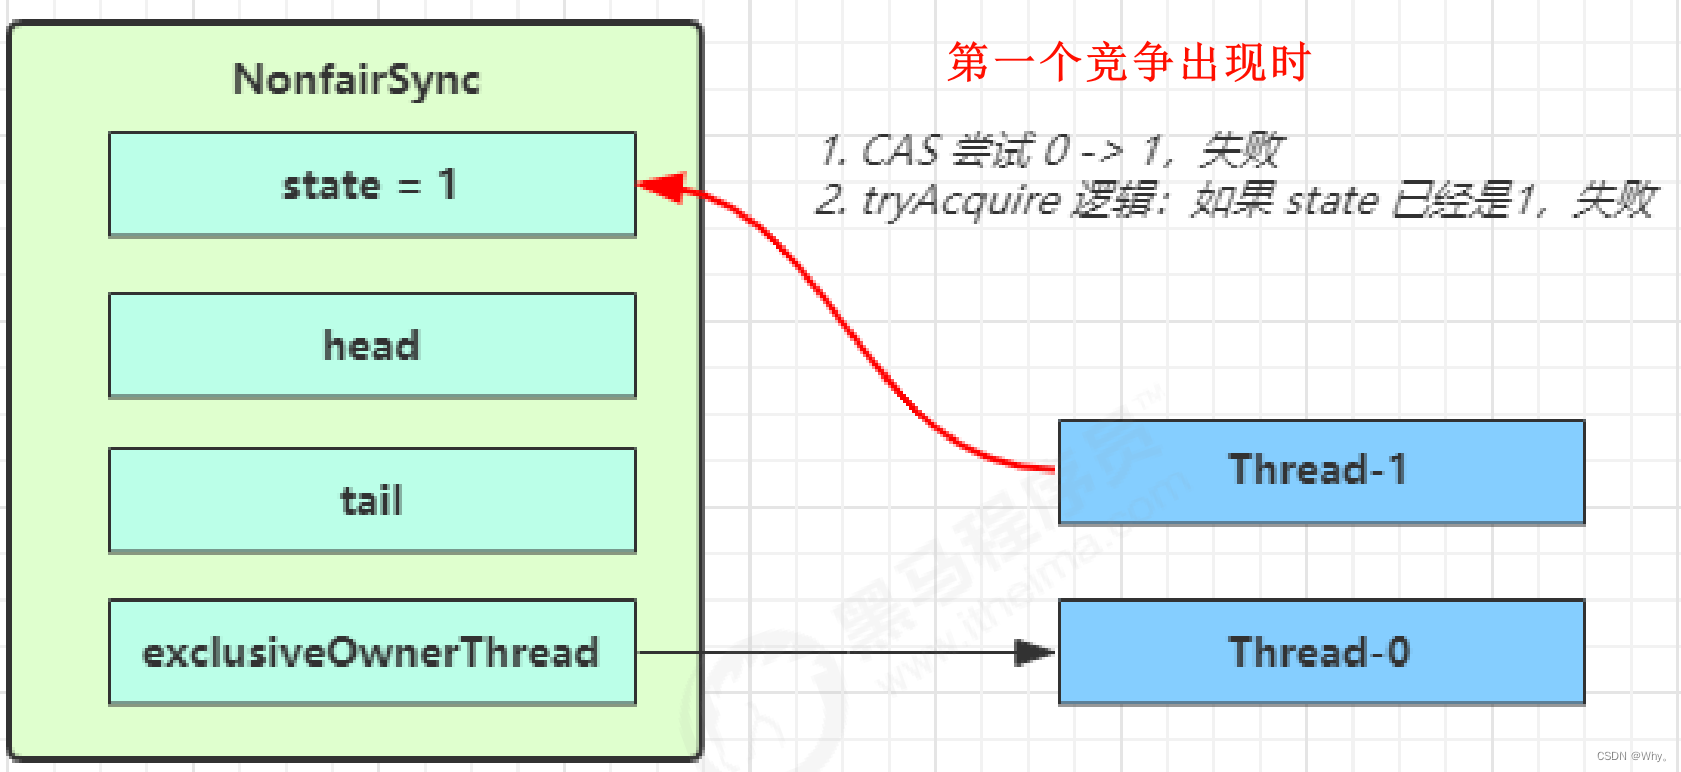

3.接下来Thread1进入addWaiter逻辑,构造Node队列
图中黄色三角表示该Node的waitStatus状态,其中0为默认正常状态
Node的创建是懒惰的
其中第一个Node称为Dummy(哑元)或哨兵,用来占位,并不关联线程
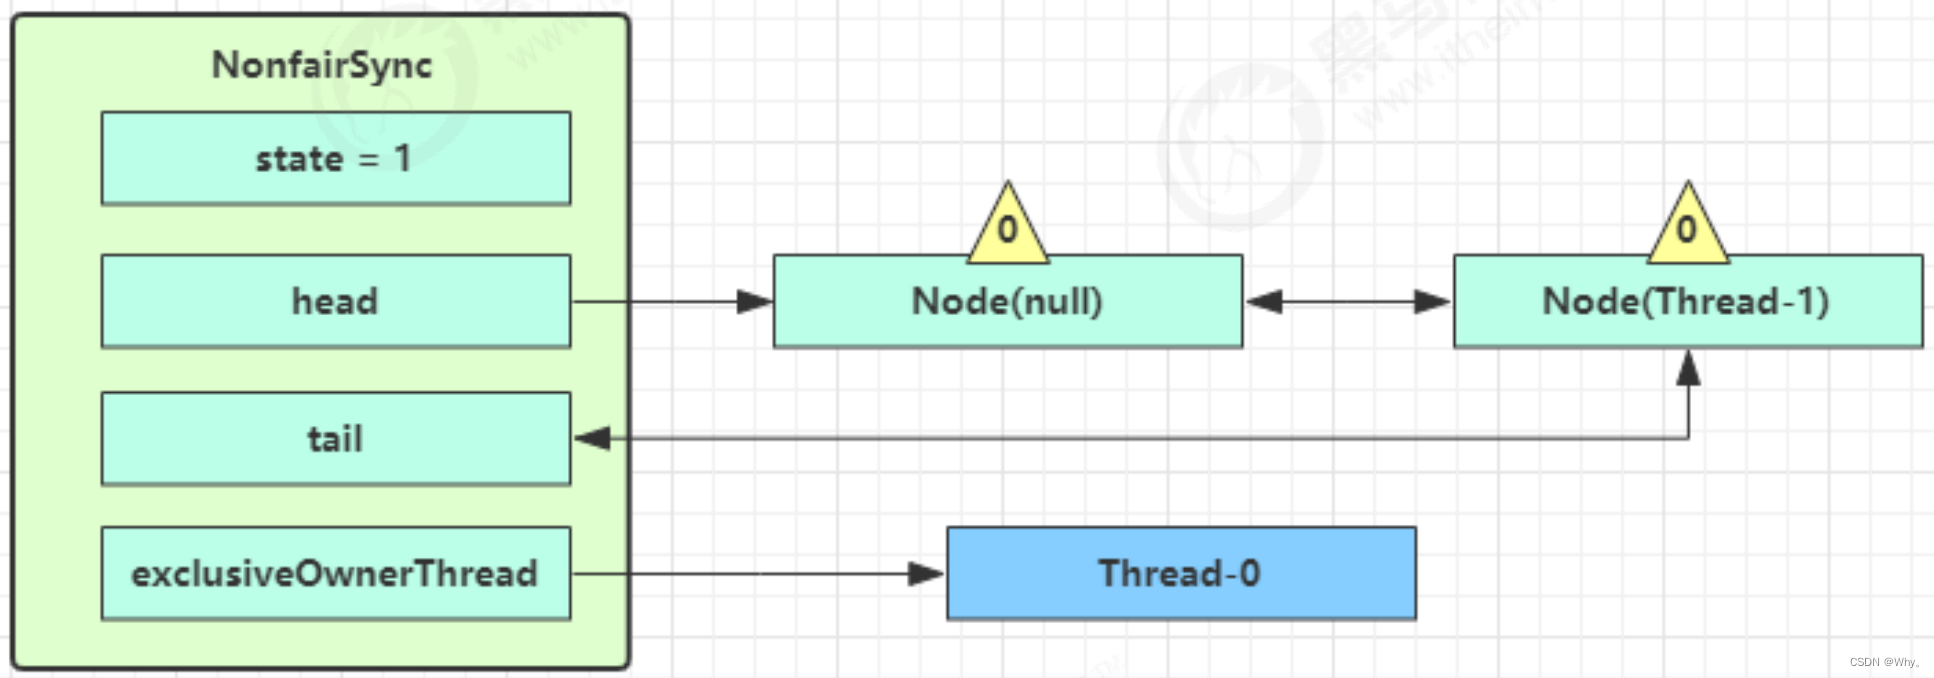
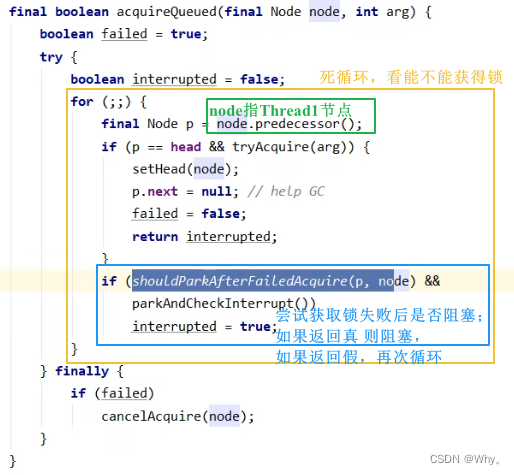
当前线程Thread1进入acquireQueued逻辑
1.acquireQueued会在一个死循环中不断尝试获得锁,失败后进入park阻塞
2.如果自己是紧邻着head(排第二位),那么再次tryAcquire尝试获取锁,当然这时state仍为1,失败
3.进入shouldParkAfterFailedAcquire逻辑,将前驱node,即head的waitStatus改为-1,这次返回false
4.shouldParkAfterFailedAcquire执行完毕回到acquireQueued,再次tryAcquire尝试获取锁,当然这时state仍为1,失败
5.当再次进入shouldParkAfterFailedAcquire时,这时因为其前驱node的waitStatus已经是-1,这次返回true
6.进入parkAndCheckInterrupt,Thread-1 park(灰色表示)
加锁源码
// Sync 继承自 AQS
static final class NonfairSync extends Sync {
private static final long serialVersionUID = 7316153563782823691L;
// 加锁实现
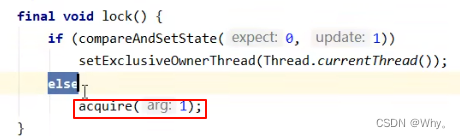
final void lock() {
// 首先用 cas 尝试(仅尝试一次)将 state 从 0 改为 1, 如果成功表示获得了独占锁
if (compareAndSetState(0, 1))
setExclusiveOwnerThread(Thread.currentThread());
else
// 如果尝试失败,进入 ㈠
acquire(1);
}
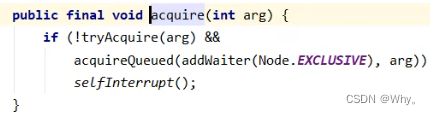
// ㈠ AQS 继承过来的方法, 方便阅读, 放在此处
public final void acquire(int arg) {
// ㈡ tryAcquire
if (
!tryAcquire(arg) &&
// 当 tryAcquire 返回为 false 时, 先调用 addWaiter ㈣, 接着 acquireQueued ㈤
acquireQueued(addWaiter(Node.EXCLUSIVE), arg)
) {
selfInterrupt();
}
}
// ㈡ 进入 ㈢
protected final boolean tryAcquire(int acquires) {
return nonfairTryAcquire(acquires);
}
// ㈢ Sync 继承过来的方法, 方便阅读, 放在此处
final boolean nonfairTryAcquire(int acquires) {
final Thread current = Thread.currentThread();
int c = getState();
// 如果还没有获得锁
if (c == 0) {
// 尝试用 cas 获得, 这里体现了非公平性: 不去检查 AQS 队列
if (compareAndSetState(0, acquires)) {
setExclusiveOwnerThread(current);
return true;
}
}
// 如果已经获得了锁, 线程还是当前线程, 表示发生了锁重入
else if (current == getExclusiveOwnerThread()) {
// state++
int nextc = c + acquires;
if (nextc < 0) // overflow
throw new Error("Maximum lock count exceeded");
setState(nextc);
return true;
}
// 获取失败, 回到调用处
return false;
}
// ㈣ AQS 继承过来的方法, 方便阅读, 放在此处
private Node addWaiter(Node mode) {
// 将当前线程关联到一个 Node 对象上, 模式为独占模式
Node node = new Node(Thread.currentThread(), mode);
// 如果 tail 不为 null, cas 尝试将 Node 对象加入 AQS 队列尾部
Node pred = tail;
if (pred != null) {
node.prev = pred;
if (compareAndSetTail(pred, node)) {
// 双向链表
pred.next = node;
return node;
}
}
// 尝试将 Node 加入 AQS, 进入 ㈥
enq(node);
return node;
}
// ㈥ AQS 继承过来的方法, 方便阅读, 放在此处
private Node enq(final Node node) {
for (;;) {
Node t = tail;
if (t == null) {
// 还没有, 设置 head 为哨兵节点(不对应线程,状态为 0)
if (compareAndSetHead(new Node())) {
tail = head;
}
} else {
// cas 尝试将 Node 对象加入 AQS 队列尾部
node.prev = t;
if (compareAndSetTail(t, node)) {
t.next = node;
return t;
}
}
}
}
// ㈤ AQS 继承过来的方法, 方便阅读, 放在此处
final boolean acquireQueued(final Node node, int arg) {
boolean failed = true;
try {
boolean interrupted = false;
for (;;) {
final Node p = node.predecessor();
// 上一个节点是 head, 表示轮到自己(当前线程对应的 node)了, 尝试获取
if (p == head && tryAcquire(arg)) {
// 获取成功, 设置自己(当前线程对应的 node)为 head
setHead(node);
// 上一个节点 help GC
p.next = null;
failed = false;
// 返回中断标记 false
return interrupted;
}
if (
// 判断是否应当 park, 进入 ㈦
shouldParkAfterFailedAcquire(p, node) &&
// park 等待, 此时 Node 的状态被置为 Node.SIGNAL ㈧
parkAndCheckInterrupt()
) {
interrupted = true;
}
}
} finally {
if (failed)
cancelAcquire(node);
}
}
// ㈦ AQS 继承过来的方法, 方便阅读, 放在此处
private static boolean shouldParkAfterFailedAcquire(Node pred, Node node) {
// 获取上一个节点的状态
int ws = pred.waitStatus;
if (ws == Node.SIGNAL) {
// 上一个节点都在阻塞, 那么自己也阻塞好了
return true;
}
// > 0 表示取消状态
if (ws > 0) {
// 上一个节点取消, 那么重构删除前面所有取消的节点, 返回到外层循环重试
do {
node.prev = pred = pred.prev;
} while (pred.waitStatus > 0);
pred.next = node;
} else {
// 这次还没有阻塞
// 但下次如果重试不成功, 则需要阻塞,这时需要设置上一个节点状态为 Node.SIGNAL
compareAndSetWaitStatus(pred, ws, Node.SIGNAL);
}
return false;
}
// ㈧ 阻塞当前线程
private final boolean parkAndCheckInterrupt() {
LockSupport.park(this);
return Thread.interrupted();
}
}释放锁
Thread-0 释放锁,进入 tryRelease 流程,如果成功:
设置 exclusiveOwnerThread 为 null
state = 0
当前队列不为null,并且head的waitStatus = -1,进入unparkSuccessor流程
找到队列中离head最近的一个Node(没取消的),unpark恢复其运行,本例中即为Thread-1
回到Thread-1的acquireQueued流程

如果加锁成功(没有竞争),会设置
exclusiveOwnerThread 为 Thread-1,state = 1
head 指向刚刚 Thread-1 所在的 Node,该 Node 清空 Thread
原本的 head 因为从链表断开,而可被垃圾回收

如果不巧又被 Thread-4 占了先
Thread-4 被设置为 exclusiveOwnerThread,state = 1
Thread-1 再次进入 acquireQueued 流程,获取锁失败,重新进入 park 阻塞
解锁源码
// Sync 继承自 AQS
static final class NonfairSync extends Sync {
// 解锁实现
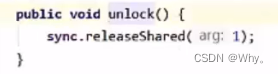
public void unlock() {
sync.release(1);
}
// AQS 继承过来的方法, 方便阅读, 放在此处
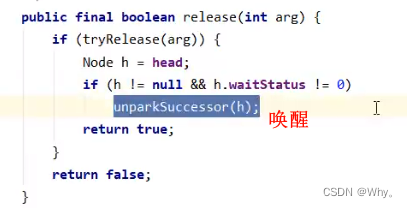
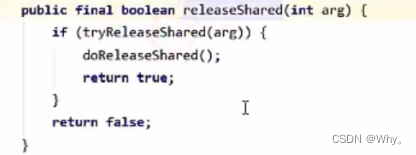
public final boolean release(int arg) {
// 尝试释放锁, 进入 ㈠
if (tryRelease(arg)) {
// 队列头节点 unpark
Node h = head;
if (
// 队列不为 null
h != null &&
// waitStatus == Node.SIGNAL 才需要 unpark
h.waitStatus != 0
) {
// unpark AQS 中等待的线程, 进入 ㈡
unparkSuccessor(h);
}
return true;
}
return false;
}
// ㈠ Sync 继承过来的方法, 方便阅读, 放在此处
protected final boolean tryRelease(int releases) {
// state--
int c = getState() - releases;
if (Thread.currentThread() != getExclusiveOwnerThread())
throw new IllegalMonitorStateException();
boolean free = false;
// 支持锁重入, 只有 state 减为 0, 才释放成功
if (c == 0) {
free = true;
setExclusiveOwnerThread(null);
}
setState(c);
return free;
}
// ㈡ AQS 继承过来的方法, 方便阅读, 放在此处
private void unparkSuccessor(Node node) {
// 如果状态为 Node.SIGNAL 尝试重置状态为 0
// 不成功也可以
int ws = node.waitStatus;
if (ws < 0) {
compareAndSetWaitStatus(node, ws, 0);
}
// 找到需要 unpark 的节点, 但本节点从 AQS 队列中脱离, 是由唤醒节点完成的
Node s = node.next;
// 不考虑已取消的节点, 从 AQS 队列从后至前找到队列最前面需要 unpark 的节点
if (s == null || s.waitStatus > 0) {
s = null;
for (Node t = tail; t != null && t != node; t = t.prev)
if (t.waitStatus <= 0)
s = t;
}
if (s != null)
LockSupport.unpark(s.thread);
}
}2.2 可重入原理
static final class NonfairSync extends Sync {
	// ...

	// Sync 继承过来的方法, 方便阅读, 放在此处
	final boolean nonfairTryAcquire(int acquires) {
	final Thread current = Thread.currentThread();
	int c = getState();
	if (c == 0) {
		if (compareAndSetState(0, acquires)) {
			setExclusiveOwnerThread(current);
			return true;
		}
	}
	// 如果已经获得了锁, 线程还是当前线程, 表示发生了锁重入
	else if (current == getExclusiveOwnerThread()) {
		// state++
		int nextc = c + acquires;
		if (nextc < 0) // overflow
			throw new Error("Maximum lock count exceeded");
			setState(nextc);
			return true;
		}
		return false;
	}

	// Sync 继承过来的方法, 方便阅读, 放在此处
	protected final boolean tryRelease(int releases) {
		// state--
		int c = getState() - releases;
		if (Thread.currentThread() != getExclusiveOwnerThread())
			throw new IllegalMonitorStateException();
		boolean free = false;
		// 支持锁重入, 只有 state 减为 0, 才释放成功
		if (c == 0) {
			free = true;
			setExclusiveOwnerThread(null);
		}
		setState(c);
		return free;
	}
}
2.3 可打断原理
不可打断模式
在此模式下,即使它被打断,仍会驻留在 AQS 队列中,一直要等到获得锁后方能得知自己被打断了
// Sync 继承自 AQS
static final class NonfairSync extends Sync {
	// ...

	private final boolean parkAndCheckInterrupt() {
		// 如果打断标记已经是 true, 则 park 会失效
		LockSupport.park(this);
		// interrupted 会清除打断标记
		return Thread.interrupted();
	}

	final boolean acquireQueued(final Node node, int arg) {
		boolean failed = true;
		try {
			boolean interrupted = false;
			for (;;) {
				final Node p = node.predecessor();
				if (p == head && tryAcquire(arg)) {
					setHead(node);
					p.next = null;
					failed = false;
					// 还是需要获得锁后, 才能返回打断状态
					return interrupted;
				}
				if (
					shouldParkAfterFailedAcquire(p, node) &&
					parkAndCheckInterrupt()
				) {
					// 如果是因为 interrupt 被唤醒, 返回打断状态为 true
					interrupted = true;
				}
			}
		} finally {
		if (failed)
			cancelAcquire(node);
		}
	}

	public final void acquire(int arg) {
		if (!tryAcquire(arg) && acquireQueued(addWaiter(Node.EXCLUSIVE), arg)){
			// 如果打断状态为 true
			selfInterrupt();
		}
	}

	static void selfInterrupt() {
		// 重新产生一次中断
		Thread.currentThread().interrupt();
	}
}
可打断模式
static final class NonfairSync extends Sync {
	public final void acquireInterruptibly(int arg) throws InterruptedException {
		if (Thread.interrupted())
			throw new InterruptedException();
		// 如果没有获得到锁, 进入 ㈠
		if (!tryAcquire(arg))
			doAcquireInterruptibly(arg);
	}

	// ㈠ 可打断的获取锁流程
	private void doAcquireInterruptibly(int arg) throws InterruptedException {
		final Node node = addWaiter(Node.EXCLUSIVE);
		boolean failed = true;
		try {
			for (;;) {
				final Node p = node.predecessor();
				if (p == head && tryAcquire(arg)) {
					setHead(node);
					p.next = null; // help GC
					failed = false;
					return;
				}
				if (shouldParkAfterFailedAcquire(p, node) &&
					parkAndCheckInterrupt()) {
					// 在 park 过程中如果被 interrupt 会进入此
					// 这时候抛出异常, 而不会再次进入 for (;;)
					throw new InterruptedException();
				}
			}
		} finally {
		if (failed)
			cancelAcquire(node);
		}
	}
}
2.4 公平锁实现原理
static final class FairSync extends Sync {
	private static final long serialVersionUID = -3000897897090466540L;
	final void lock() {
		acquire(1);
	}

	// AQS 继承过来的方法, 方便阅读, 放在此处
	public final void acquire(int arg) {
		if (
			!tryAcquire(arg) &&
			acquireQueued(addWaiter(Node.EXCLUSIVE), arg)
		) {
			selfInterrupt();
		}
	}
	// 与非公平锁主要区别在于 tryAcquire 方法的实现
	protected final boolean tryAcquire(int acquires) {
		final Thread current = Thread.currentThread();
		int c = getState();
		if (c == 0) {
			// 先检查 AQS 队列中是否有前驱节点, 没有才去竞争
			if (!hasQueuedPredecessors() && compareAndSetState(0, acquires)) {
				setExclusiveOwnerThread(current);
				return true;
			}
		}
		else if (current == getExclusiveOwnerThread()) {
			int nextc = c + acquires;
			if (nextc < 0)
				throw new Error("Maximum lock count exceeded");
			setState(nextc);
			return true;
		}
		return false;
	}

	// ㈠ AQS 继承过来的方法, 方便阅读, 放在此处
	public final boolean hasQueuedPredecessors() {
		Node t = tail;
		Node h = head;
		Node s;
		// h != t 时表示队列中有 Node
		return h != t &&
		(
			// (s = h.next) == null 表示队列中还有没有老二
			(s = h.next) == null ||
			// 或者队列中老二线程不是此线程
			s.thread != Thread.currentThread()
		);
	}
}
2.5 条件变量实现原理
每个条件变量其实就对应着一个等待队列,其实现类是 ConditionObject
await 流程
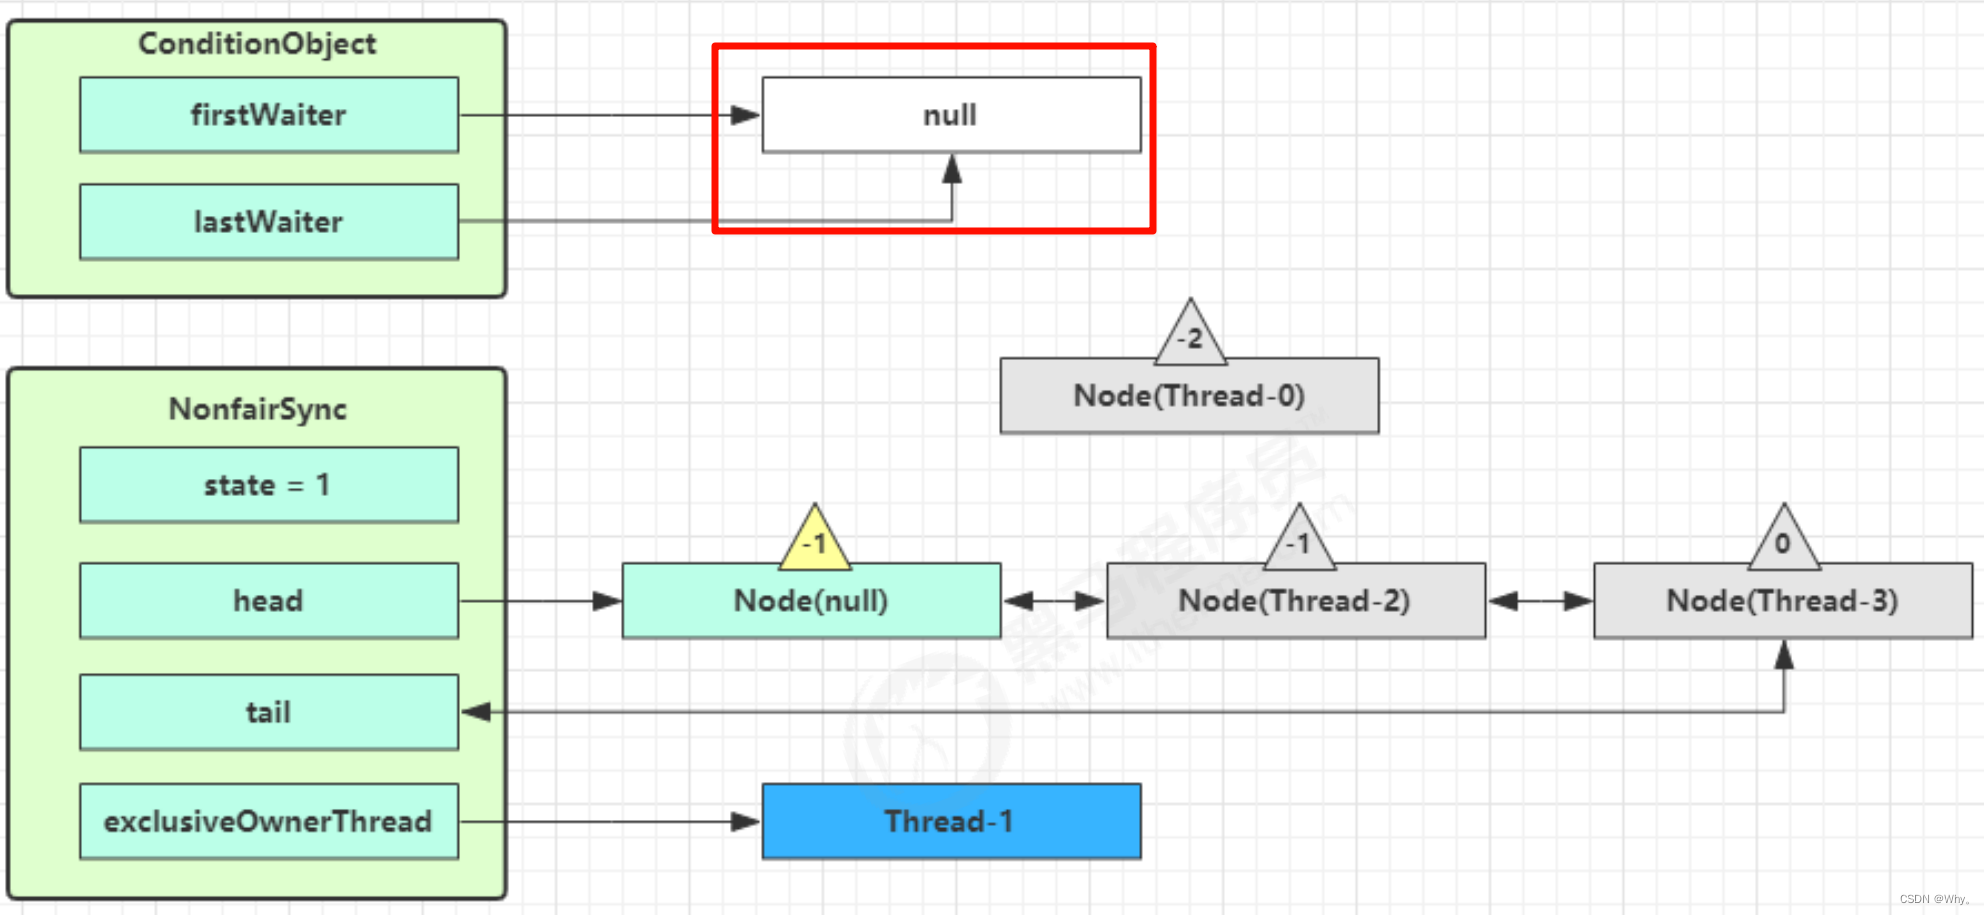
开始Thread-0持有锁,调用await,进入ConditionObject的addConditionWaiter流程
创建新的Node状态为-2(Node.CONDITION),关联Thread-0,加入等待队列尾部接下来进入 AQS 的 fullyRelease 流程,释放同步器上的锁
unpark AQS 队列中的下一个节点,竞争锁,假设没有其他竞争线程,那么 Thread-1 竞争成功
signal 流程
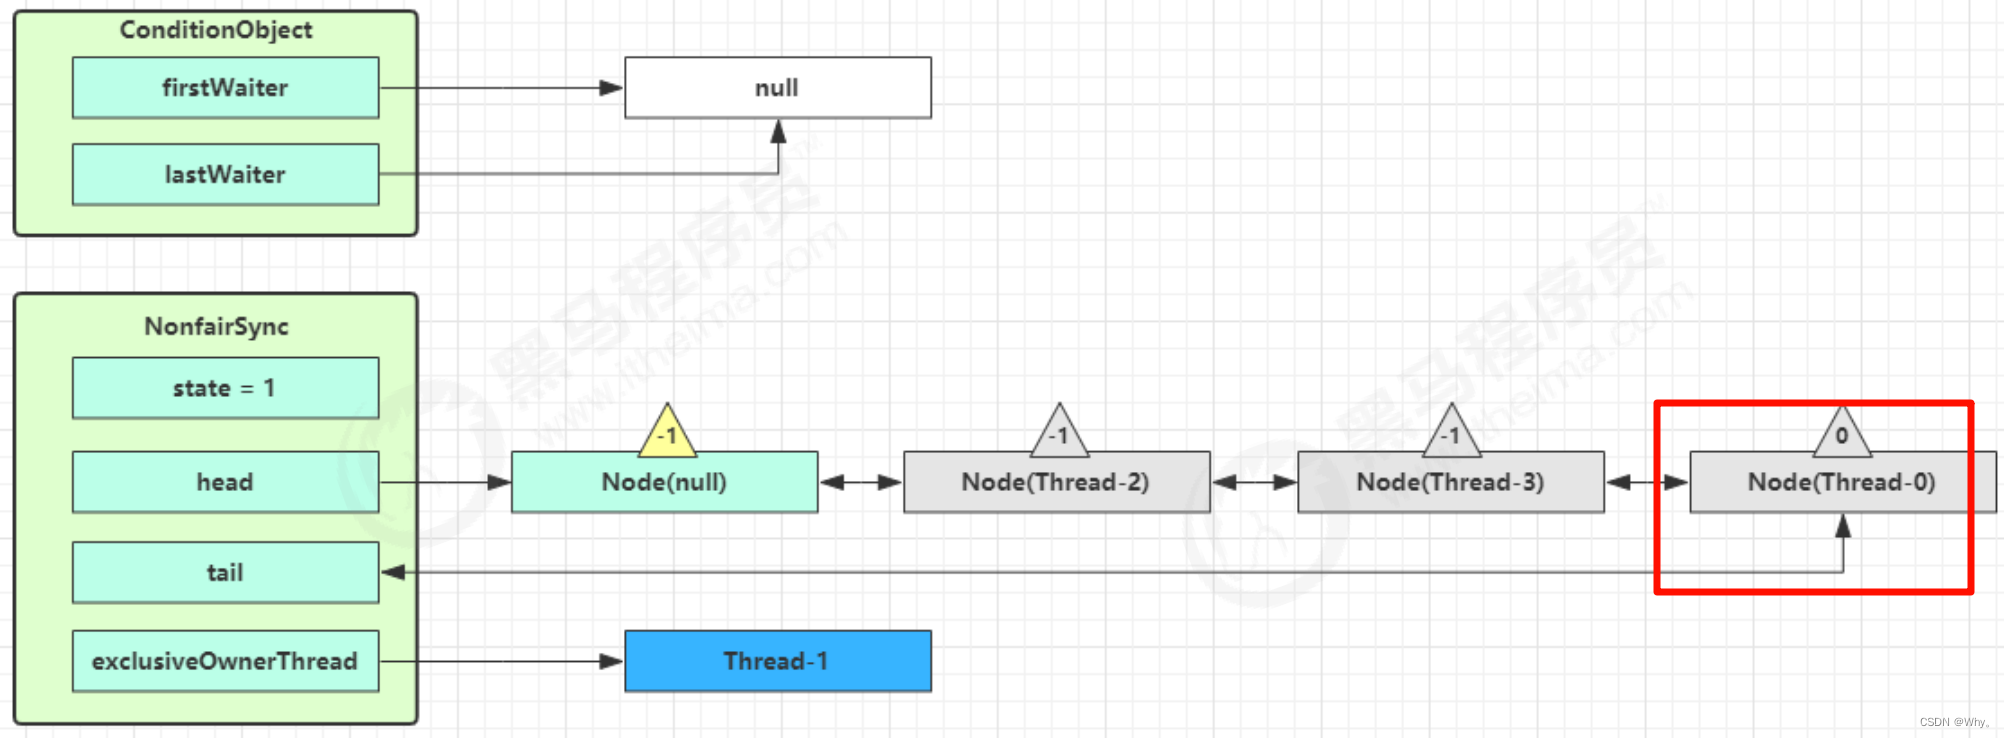
假设 Thread-1 要来唤醒 Thread-0
进入 ConditionObject 的 doSignal 流程,取得等待队列中第一个 Node,即 Thread-0 所在 Node
执行transferForSignal流程,将该Node加入AQS队列尾部,将Thread-0的waitStatus改为0,Thread-3的waitStatus改为-1
Thread-1 释放锁,进入 unlock 流程
源码
public class ConditionObject implements Condition, java.io.Serializable {
private static final long serialVersionUID = 1173984872572414699L;
// 第一个等待节点
private transient Node firstWaiter;
// 最后一个等待节点
private transient Node lastWaiter;
public ConditionObject() { }
// ㈠ 添加一个 Node 至等待队列
private Node addConditionWaiter() {
Node t = lastWaiter;
// 所有已取消的 Node 从队列链表删除, 见 ㈡
if (t != null && t.waitStatus != Node.CONDITION) {
unlinkCancelledWaiters();
t = lastWaiter;
}
// 创建一个关联当前线程的新 Node, 添加至队列尾部
Node node = new Node(Thread.currentThread(), Node.CONDITION);
if (t == null)
firstWaiter = node;
else
t.nextWaiter = node;
lastWaiter = node;
return node;
}
// 唤醒 - 将没取消的第一个节点转移至 AQS 队列
private void doSignal(Node first) {
do {
// 已经是尾节点了
if ( (firstWaiter = first.nextWaiter) == null) {
lastWaiter = null;
}
first.nextWaiter = null;
} while (
// 将等待队列中的 Node 转移至 AQS 队列, 不成功且还有节点则继续循环 ㈢
!transferForSignal(first) &&
// 队列还有节点
(first = firstWaiter) != null
);
}
// 外部类方法, 方便阅读, 放在此处
// ㈢ 如果节点状态是取消, 返回 false 表示转移失败, 否则转移成功
final boolean transferForSignal(Node node) {
// 如果状态已经不是 Node.CONDITION, 说明被取消了
if (!compareAndSetWaitStatus(node, Node.CONDITION, 0))
return false;
// 加入 AQS 队列尾部
Node p = enq(node);
int ws = p.waitStatus;
if (
// 上一个节点被取消
ws > 0 ||
// 上一个节点不能设置状态为 Node.SIGNAL
!compareAndSetWaitStatus(p, ws, Node.SIGNAL)
) {
// unpark 取消阻塞, 让线程重新同步状态
LockSupport.unpark(node.thread);
}
return true;
}
// 全部唤醒 - 等待队列的所有节点转移至 AQS 队列
private void doSignalAll(Node first) {
lastWaiter = firstWaiter = null;
do {
Node next = first.nextWaiter;
first.nextWaiter = null;
transferForSignal(first);
first = next;
} while (first != null);
}
// ㈡
private void unlinkCancelledWaiters() {
// ...
}
// 唤醒 - 必须持有锁才能唤醒, 因此 doSignal 内无需考虑加锁
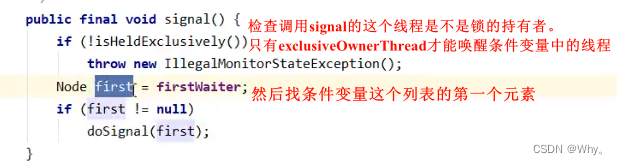
public final void signal() {
if (!isHeldExclusively())throw new IllegalMonitorStateException();
Node first = firstWaiter;
if (first != null)
doSignal(first);
}
// 全部唤醒 - 必须持有锁才能唤醒, 因此 doSignalAll 内无需考虑加锁
public final void signalAll() {
if (!isHeldExclusively())throw new IllegalMonitorStateException();
Node first = firstWaiter;
if (first != null)
doSignalAll(first);
}
// 不可打断等待 - 直到被唤醒
public final void awaitUninterruptibly() {
// 添加一个 Node 至等待队列, 见 ㈠
Node node = addConditionWaiter();
// 释放节点持有的锁, 见 ㈣
int savedState = fullyRelease(node);
boolean interrupted = false;
// 如果该节点还没有转移至 AQS 队列, 阻塞
while (!isOnSyncQueue(node)) {
// park 阻塞
LockSupport.park(this);
// 如果被打断, 仅设置打断状态
if (Thread.interrupted())
interrupted = true;
}
// 唤醒后, 尝试竞争锁, 如果失败进入 AQS 队列
if (acquireQueued(node, savedState) || interrupted)
selfInterrupt();
}
// 外部类方法, 方便阅读, 放在此处
// ㈣ 因为某线程可能重入,需要将 state 全部释放
final int fullyRelease(Node node) {
boolean failed = true;
try {
int savedState = getState();
if (release(savedState)) {
failed = false;
return savedState;
} else {
throw new IllegalMonitorStateException();
}
} finally {
if (failed)
node.waitStatus = Node.CANCELLED;
}
}
// 打断模式 - 在退出等待时重新设置打断状态
private static final int REINTERRUPT = 1;
// 打断模式 - 在退出等待时抛出异常
private static final int THROW_IE = -1;
// 判断打断模式
private int checkInterruptWhileWaiting(Node node) {
return Thread.interrupted() ?
(transferAfterCancelledWait(node) ? THROW_IE : REINTERRUPT) : 0;
}
// ㈤ 应用打断模式
private void reportInterruptAfterWait(int interruptMode)throws InterruptedException {
if (interruptMode == THROW_IE)
throw new InterruptedException();
else if (interruptMode == REINTERRUPT)
selfInterrupt();
}
// 等待 - 直到被唤醒或打断
public final void await() throws InterruptedException {
if (Thread.interrupted()) {
throw new InterruptedException();
}
// 添加一个 Node 至等待队列, 见 ㈠
Node node = addConditionWaiter();
// 释放节点持有的锁
int savedState = fullyRelease(node);
int interruptMode = 0;
// 如果该节点还没有转移至 AQS 队列, 阻塞
while (!isOnSyncQueue(node)) {
// park 阻塞
LockSupport.park(this);
// 如果被打断, 退出等待队列
if ((interruptMode = checkInterruptWhileWaiting(node)) != 0)
break;
}
// 退出等待队列后, 还需要获得 AQS 队列的锁
if (acquireQueued(node, savedState) && interruptMode != THROW_IE)
interruptMode = REINTERRUPT;
// 所有已取消的 Node 从队列链表删除, 见 ㈡
if (node.nextWaiter != null)
unlinkCancelledWaiters();
// 应用打断模式, 见 ㈤
if (interruptMode != 0)
reportInterruptAfterWait(interruptMode);
}
// 等待 - 直到被唤醒或打断或超时
public final long awaitNanos(long nanosTimeout) throws InterruptedException {
if (Thread.interrupted()) {
throw new InterruptedException();
}
// 添加一个 Node 至等待队列, 见 ㈠
Node node = addConditionWaiter();
// 释放节点持有的锁
int savedState = fullyRelease(node);
// 获得最后期限
final long deadline = System.nanoTime() + nanosTimeout;
int interruptMode = 0;
// 如果该节点还没有转移至 AQS 队列, 阻塞
while (!isOnSyncQueue(node)) {
// 已超时, 退出等待队列
if (nanosTimeout <= 0L) {
transferAfterCancelledWait(node);
break;
}
// park 阻塞一定时间, spinForTimeoutThreshold 为 1000 ns
if (nanosTimeout >= spinForTimeoutThreshold)
LockSupport.parkNanos(this, nanosTimeout);
// 如果被打断, 退出等待队列
if ((interruptMode = checkInterruptWhileWaiting(node)) != 0)
break;
nanosTimeout = deadline - System.nanoTime();
}
// 退出等待队列后, 还需要获得 AQS 队列的锁
if (acquireQueued(node, savedState) && interruptMode != THROW_IE)
interruptMode = REINTERRUPT;
// 所有已取消的 Node 从队列链表删除, 见 ㈡
if (node.nextWaiter != null)
unlinkCancelledWaiters();
// 应用打断模式, 见 ㈤
if (interruptMode != 0)
reportInterruptAfterWait(interruptMode);
return deadline - System.nanoTime();
}
// 等待 - 直到被唤醒或打断或超时, 逻辑类似于 awaitNanos
public final boolean awaitUntil(Date deadline) throws InterruptedException {
// ...
}
// 等待 - 直到被唤醒或打断或超时, 逻辑类似于 awaitNanos
public final boolean await(long time, TimeUnit unit) throws InterruptedException {
// ...
}
// 工具方法 省略 ...
}3、ReentrantReadWriteLock读写锁
当读操作远远高于写操作时,这时候使用读写锁让读-读可以并发,提高性能。类似于数据库中的select ... from ... lock in share mode
class DataContainer {
	private Object data;
	private ReentrantReadWriteLock rw = new ReentrantReadWriteLock();
	private ReentrantReadWriteLock.ReadLock r = rw.readLock();
	private ReentrantReadWriteLock.WriteLock w = rw.writeLock();

	public Object read() {
		log.debug("获取读锁...");
		r.lock();
		try {
			log.debug("读取");
			sleep(1);
			return data;
		} finally {
			log.debug("释放读锁...");
			r.unlock();
		}
	}
	public void write() {
		log.debug("获取写锁...");
		w.lock();
		try {
			log.debug("写入");
			sleep(1);
		} finally {
			log.debug("释放写锁...");
			w.unlock();
		}
	}
}读锁-读锁可以并发;读锁-写锁相互阻塞;写锁-写锁相互阻塞
注意事项
- 读锁不支持条件变量
- 重入时升级不支持:即持有读锁的情况下去获取写锁,会导致获取写锁永久等待
- 重入时降级支持:即持有写锁的情况下去获取读锁
class CachedData {
	Object data;
	// 是否有效,如果失效,需要重新计算 data
	volatile boolean cacheValid;
	final ReentrantReadWriteLock rwl = new ReentrantReadWriteLock();
	void processCachedData() {
		rwl.readLock().lock();
		if (!cacheValid) {
			// 获取写锁前必须释放读锁
			rwl.readLock().unlock();
			rwl.writeLock().lock();
			try {
				// 判断是否有其它线程已经获取了写锁、更新了缓存, 避免重复更新
				if (!cacheValid) {
					data = ...
					cacheValid = true;
				}
				// 降级为读锁, 释放写锁, 这样能够让其它线程读取缓存
				rwl.readLock().lock();
			} finally {
				rwl.writeLock().unlock();
			}
		}
		// 自己用完数据, 释放读锁
		try {
			use(data);
		} finally {
			rwl.readLock().unlock();
		}
	}
}
原理
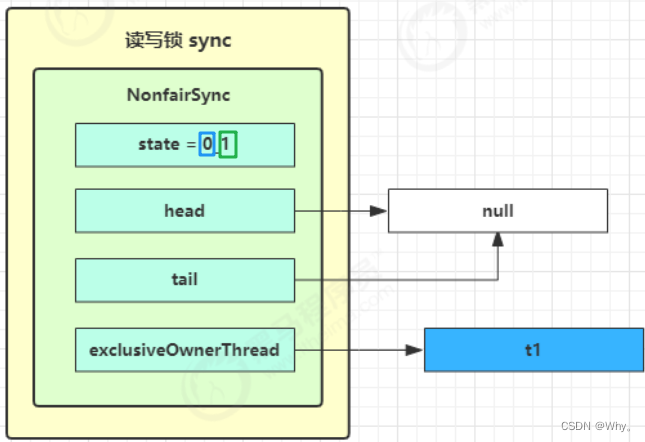
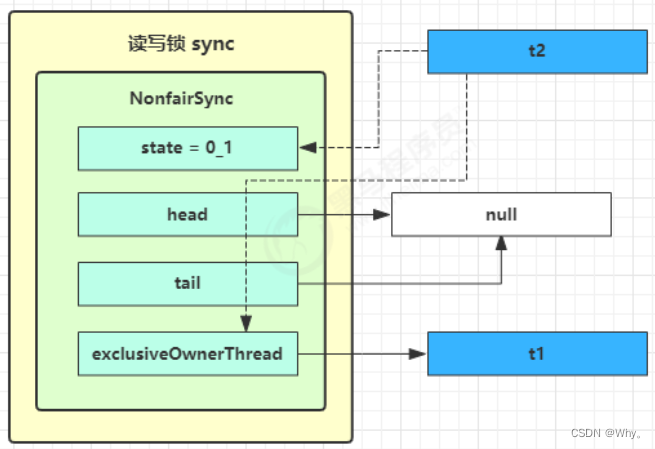
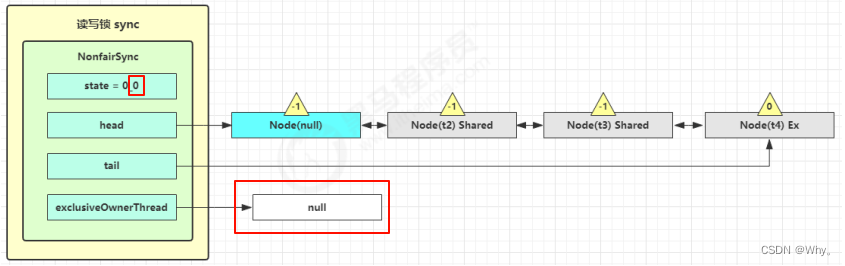
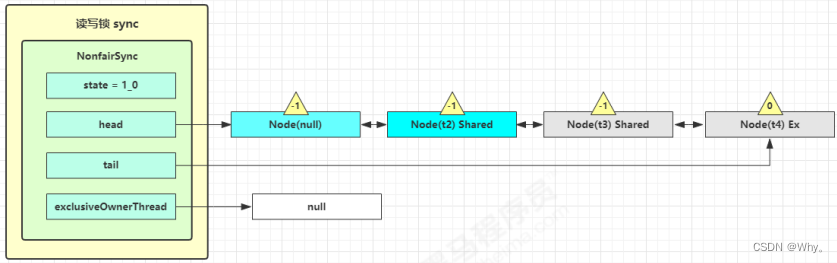
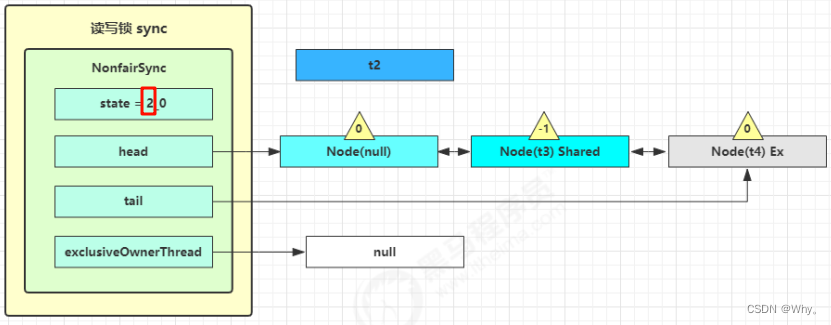
读写锁用的是同一个 Sycn 同步器,因此等待队列、state 等也是同一个
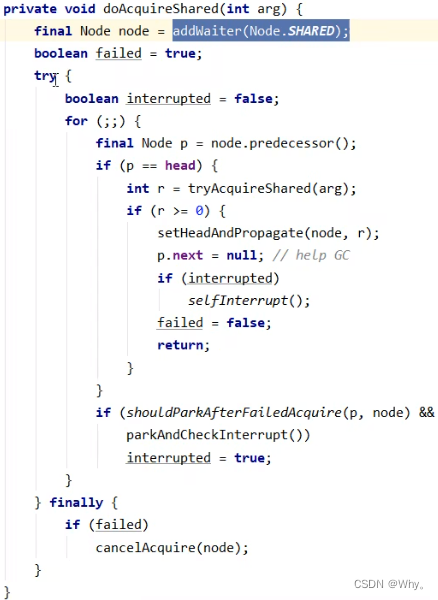
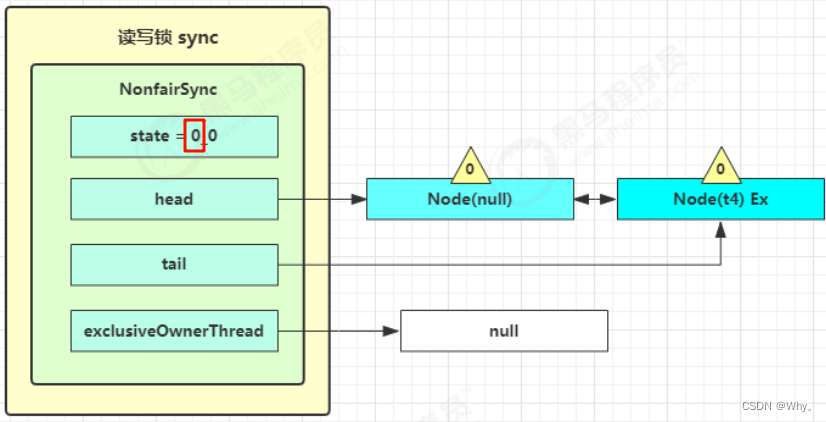
t1 w.lock、t2 r.lock
1)t1成功上锁,流程与ReentrantLock加锁相比没有特殊之处,不同是写锁状态占了state的低16位,而读锁使用的是state的高16位。
![]()

2)t2执行r.lock,这时进入读锁的sync.acquireShared(1)流程,首先会进入tryAcquireShared流程。如果有写锁占据,那么tryAcquireShared返回-1表示失败。
tryAcquireShared返回值表示
- -1表示失败
- 0表示成功,但后继节点不会继续唤醒
- 正数表示成功,而且数值是还有几个后继节点需要唤醒,读写锁返回1

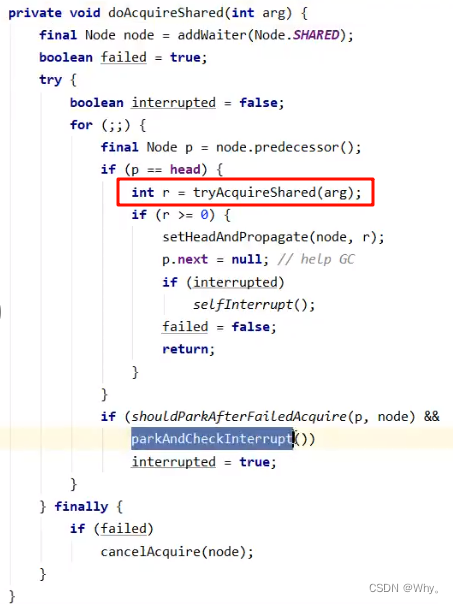
3)这时会进入sync.doAcquireShared(1)流程,首先也是调用addWaiter添加节点,不同之处在于节点被设置为Node.SHARED模式而非Node.EXCLUSIVE模式,注意此时t2仍处于活跃状态
4)t2会看看自己的节点是不是老二,如果是,还会再次调用tryAcquireShared(1)来尝试获取锁
5)如果没有成功,在doAcquireShared内for(;;)循环一次,把前驱节点的waitStatus改为-1,再for(;;)循环一次尝试tryAcquireShared(1)如果还不成功,那么在parkAndCheckInterrupt()处park
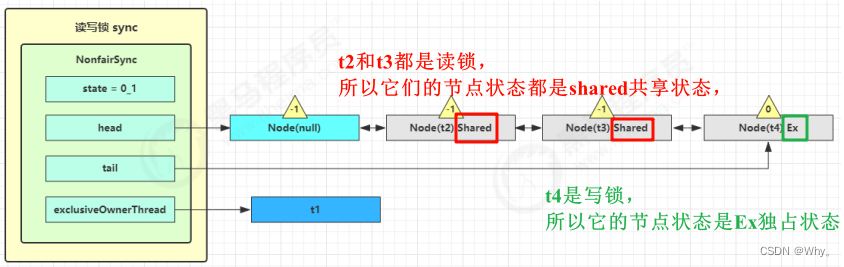
t3 r.lock、t4 w.lock
这种状态下,假设又有 t3 加读锁和 t4 加写锁,这期间 t1 仍然持有锁,就变成了下面的样子
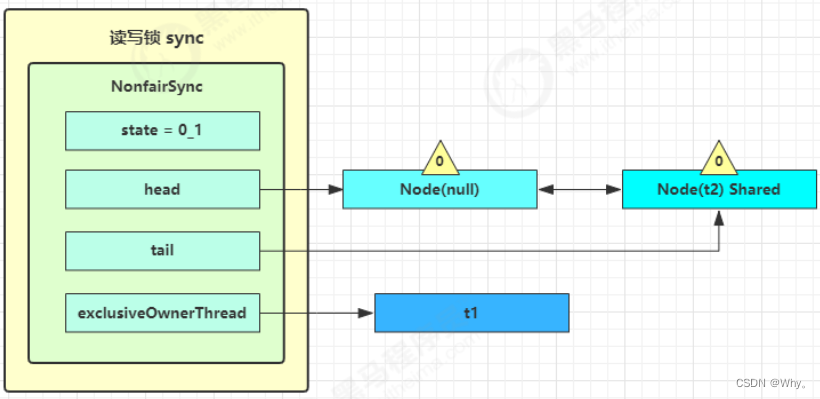
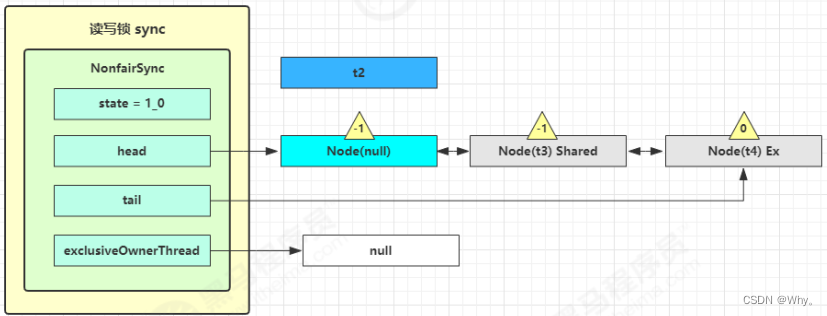
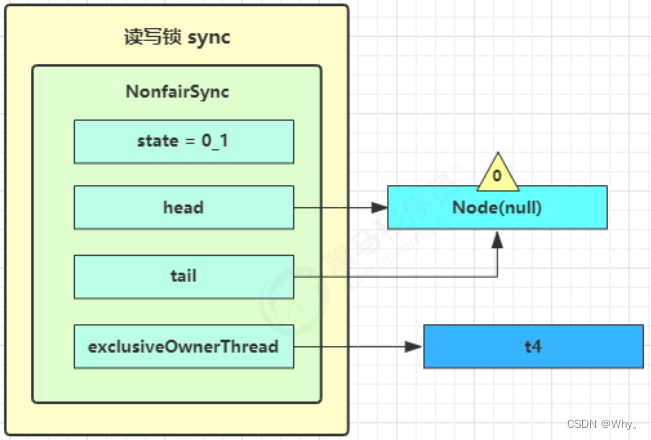
t1 w.unlock
这时会走到写锁的 sync.release(1) 流程,调用 sync.tryRelease(1) 成功
![]()

接下来执行唤醒流程sync.unparkSuccessor,即让老二恢复运行,这时t2在doAcquireShared内parkAndCheckInterrupt()处恢复运行
这回再来一次for(;;)执行tryAcquireShared成功则让读锁计数加一

这时 t2 已经恢复运行,接下来 t2 调用 setHeadAndPropagate(node, 1),它原本所在节点被置为头节点

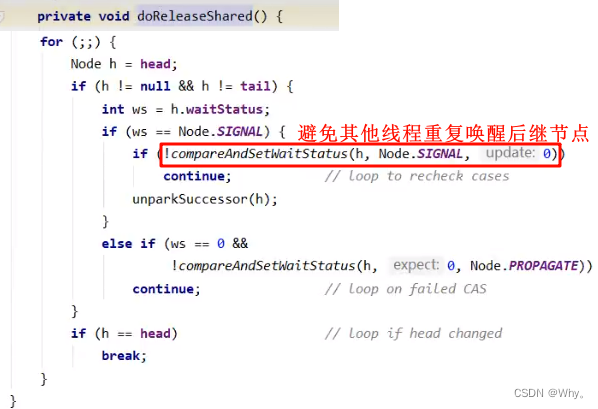
在setHeadAndPropagate方法内还会检查下一个节点是否是shared,如果是则调用doReleaseShared()将head的状态从-1改为0并唤醒老二,这时t3在doAcquireShared内parkAndCheckInterrupt()处恢复运行

再来一次 for (;;) 执行 tryAcquireShared 成功则让读锁计数加一
这时 t3 已经恢复运行,接下来 t3 调用 setHeadAndPropagate(node, 1),它原本所在节点被置为头节点

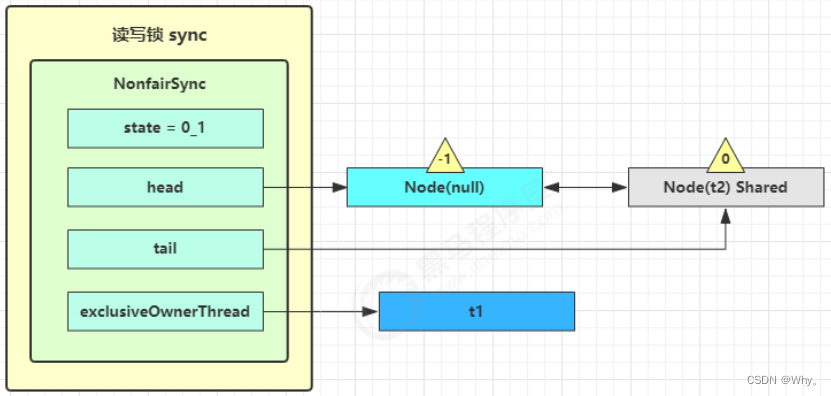
t2 r.unlock、t3 r.unlock
t2进入sync.releaseShared(1)中,调用tryReleaseShared(1)让计数减一,但由于计数还不为零

![]()
t3进入sync.releaseShared(1)中,调用tryReleaseShared(1)让计数减一,这回计数为零了,进入doReleaseShared()将头节点从-1改为0并唤醒老二,即
之后t4在acquireQueued中parkAndCheckInterrupt处恢复运行,再次for(;;)这次自己是老二,并且没有其他竞争,tryAcquire(1)成功,修改头结点,流程结束
源码
写锁上锁流程
3static final class NonfairSync extends Sync {
	// ... 省略无关代码

	// 外部类 WriteLock 方法, 方便阅读, 放在此处
	public void lock() {
		sync.acquire(1);
	}

	// AQS 继承过来的方法, 方便阅读, 放在此处
	public final void acquire(int arg) {
		if (
			// 尝试获得写锁失败
			!tryAcquire(arg) &&
			// 将当前线程关联到一个 Node 对象上, 模式为独占模式
			// 进入 AQS 队列阻塞
			acquireQueued(addWaiter(Node.EXCLUSIVE), arg)
		) {
			selfInterrupt();
		}
	}

	// Sync 继承过来的方法, 方便阅读, 放在此处
	protected final boolean tryAcquire(int acquires) {
		// 获得低 16 位, 代表写锁的 state 计数
		Thread current = Thread.currentThread();
		int c = getState();
		int w = exclusiveCount(c);

		if (c != 0) {
			if (
			// c != 0 and w == 0 表示有读锁, 或者
			w == 0 ||
			// 如果 exclusiveOwnerThread 不是自己
			current != getExclusiveOwnerThread()
		) {
			// 获得锁失败
			return false;
		}
		// 写锁计数超过低 16 位, 报异常
		if (w + exclusiveCount(acquires) > MAX_COUNT)
			throw new Error("Maximum lock count exceeded");
		// 写锁重入, 获得锁成功
		setState(c + acquires);
			return true;
		}
		if (
			// 判断写锁是否该阻塞, 或者
			writerShouldBlock() ||
			// 尝试更改计数失败
			!compareAndSetState(c, c + acquires)
		) {
			// 获得锁失败
			return false;
		}
		// 获得锁成功
		setExclusiveOwnerThread(current);
		return true;
	}

	// 非公平锁 writerShouldBlock 总是返回 false, 无需阻塞
	final boolean writerShouldBlock() {
		return false;
	}
}
写锁释放流程
static final class NonfairSync extends Sync {
// ... 省略无关代码
// WriteLock 方法, 方便阅读, 放在此处
public void unlock() {
sync.release(1);
}
// AQS 继承过来的方法, 方便阅读, 放在此处
public final boolean release(int arg) {
// 尝试释放写锁成功
if (tryRelease(arg)) {
// unpark AQS 中等待的线程
Node h = head;
if (h != null && h.waitStatus != 0)
unparkSuccessor(h);
return true;
}
return false;
}
// Sync 继承过来的方法, 方便阅读, 放在此处
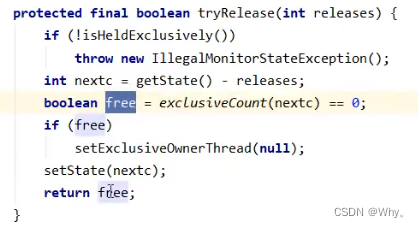
protected final boolean tryRelease(int releases) {
if (!isHeldExclusively())
throw new IllegalMonitorStateException();
int nextc = getState() - releases;
// 因为可重入的原因, 写锁计数为 0, 才算释放成功
boolean free = exclusiveCount(nextc) == 0;
if (free) {
setExclusiveOwnerThread(null);
}
setState(nextc);
return free;
}
}读锁上锁流程
static final class NonfairSync extends Sync {
// ReadLock 方法, 方便阅读, 放在此处
public void lock() {
sync.acquireShared(1);
}
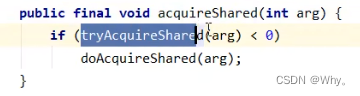
// AQS 继承过来的方法, 方便阅读, 放在此处
public final void acquireShared(int arg) {
// tryAcquireShared 返回负数, 表示获取读锁失败
if (tryAcquireShared(arg) < 0) {
doAcquireShared(arg);
}
}
// Sync 继承过来的方法, 方便阅读, 放在此处
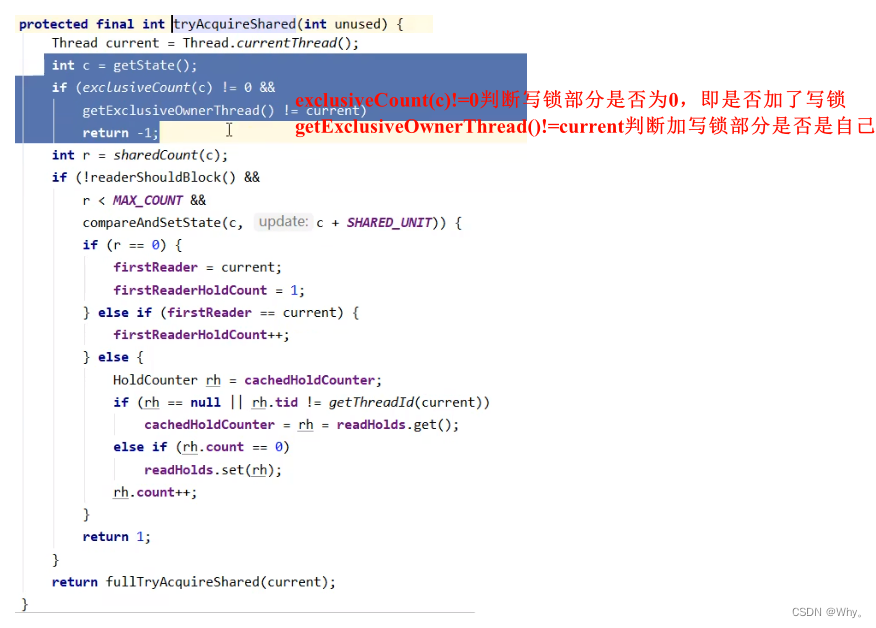
protected final int tryAcquireShared(int unused) {
Thread current = Thread.currentThread();
int c = getState();
// 如果是其它线程持有写锁, 获取读锁失败
if (exclusiveCount(c) != 0 && getExclusiveOwnerThread() != current){
return -1;
}
int r = sharedCount(c);
if (
// 读锁不该阻塞(如果老二是写锁,读锁该阻塞), 并且
!readerShouldBlock() &&
// 小于读锁计数, 并且
r < MAX_COUNT &&
// 尝试增加计数成功
compareAndSetState(c, c + SHARED_UNIT)
) {
// ... 省略不重要的代码
return 1;
}
return fullTryAcquireShared(current);
}
// 非公平锁 readerShouldBlock 看 AQS 队列中第一个节点是否是写锁
// true 则该阻塞, false 则不阻塞
final boolean readerShouldBlock() {
return apparentlyFirstQueuedIsExclusive();
}
// AQS 继承过来的方法, 方便阅读, 放在此处
// 与 tryAcquireShared 功能类似, 但会不断尝试 for (;;) 获取读锁, 执行过程中无阻塞
final int fullTryAcquireShared(Thread current) {
HoldCounter rh = null;
for (;;) {
int c = getState();
if (exclusiveCount(c) != 0) {
if (getExclusiveOwnerThread() != current)
return -1;
} else if (readerShouldBlock()) {
// ... 省略不重要的代码
}
if (sharedCount(c) == MAX_COUNT)
throw new Error("Maximum lock count exceeded");
if (compareAndSetState(c, c + SHARED_UNIT)) {
// ... 省略不重要的代码
return 1;
}
}
}
// AQS 继承过来的方法, 方便阅读, 放在此处
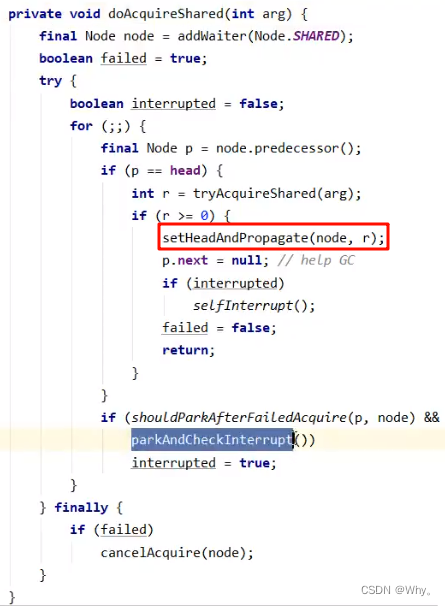
private void doAcquireShared(int arg) {
// 将当前线程关联到一个 Node 对象上, 模式为共享模式
final Node node = addWaiter(Node.SHARED);
boolean failed = true;
try {
boolean interrupted = false;
for (;;) {
final Node p = node.predecessor();
if (p == head) {
// 再一次尝试获取读锁
int r = tryAcquireShared(arg);
// 成功
if (r >= 0) {
// ㈠
// r 表示可用资源数, 在这里总是 1 允许传播
//(唤醒 AQS 中下一个 Share 节点)
setHeadAndPropagate(node, r);
p.next = null; // help GC
if (interrupted)
selfInterrupt();
failed = false;
return;
}
}
if (
// 是否在获取读锁失败时阻塞(前一个阶段 waitStatus == Node.SIGNAL)
shouldParkAfterFailedAcquire(p, node) &&
// park 当前线程
parkAndCheckInterrupt()
) {
interrupted = true;
}
}
} finally {
if (failed)
cancelAcquire(node);
}
}
// ㈠ AQS 继承过来的方法, 方便阅读, 放在此处
private void setHeadAndPropagate(Node node, int propagate) {
Node h = head; // Record old head for check below
// 设置自己为 head
setHead(node);
// propagate 表示有共享资源(例如共享读锁或信号量)
// 原 head waitStatus == Node.SIGNAL 或 Node.PROPAGATE
// 现在 head waitStatus == Node.SIGNAL 或 Node.PROPAGATE
if (propagate > 0 || h == null || h.waitStatus < 0 ||
(h = head) == null || h.waitStatus < 0) {
Node s = node.next;
// 如果是最后一个节点或者是等待共享读锁的节点
if (s == null || s.isShared()) {
// 进入 ㈡
doReleaseShared();
}
}
}
// ㈡ AQS 继承过来的方法, 方便阅读, 放在此处
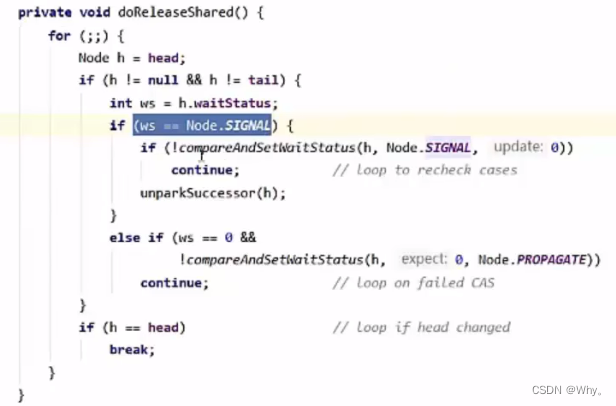
private void doReleaseShared() {
// 如果 head.waitStatus == Node.SIGNAL ==> 0 成功, 下一个节点 unpark
// 如果 head.waitStatus == 0 ==> Node.PROPAGATE, 为了解决 bug, 见后面分析
for (;;) {
Node h = head;
// 队列还有节点
if (h != null && h != tail) {
int ws = h.waitStatus;
if (ws == Node.SIGNAL) {
if (!compareAndSetWaitStatus(h, Node.SIGNAL, 0))
continue; // loop to recheck cases
// 下一个节点 unpark 如果成功获取读锁
// 并且下下个节点还是 shared, 继续 doReleaseShared
unparkSuccessor(h);
}
else if (ws == 0 &&
!compareAndSetWaitStatus(h, 0, Node.PROPAGATE))
continue; // loop on failed CAS
}
if (h == head) // loop if head changed
break;
}
}
}读锁释放流程
static final class NonfairSync extends Sync {

	// ReadLock 方法, 方便阅读, 放在此处
	public void unlock() {
		sync.releaseShared(1);
	}

	// AQS 继承过来的方法, 方便阅读, 放在此处
	public final boolean releaseShared(int arg) {
		if (tryReleaseShared(arg)) {
			doReleaseShared();
			return true;
		}
		return false;
	}

	// Sync 继承过来的方法, 方便阅读, 放在此处
	protected final boolean tryReleaseShared(int unused) {
		// ... 省略不重要的代码
		for (;;) {
			int c = getState();
			int nextc = c - SHARED_UNIT;
			if (compareAndSetState(c, nextc)) {
				// 读锁的计数不会影响其它获取读锁线程, 但会影响其它获取写锁线程
				// 计数为 0 才是真正释放
				return nextc == 0;
			}
		}
	}

	// AQS 继承过来的方法, 方便阅读, 放在此处
	private void doReleaseShared() {
		// 如果 head.waitStatus == Node.SIGNAL ==> 0 成功, 下一个节点 unpark
		// 如果 head.waitStatus == 0 ==> Node.PROPAGATE
		for (;;) {
			Node h = head;
			if (h != null && h != tail) {
				int ws = h.waitStatus;
				// 如果有其它线程也在释放读锁,那么需要将 waitStatus 先改为 0
				// 防止 unparkSuccessor 被多次执行
				if (ws == Node.SIGNAL) {
					if (!compareAndSetWaitStatus(h, Node.SIGNAL, 0))
						continue; // loop to recheck cases
					unparkSuccessor(h);
				}
				// 如果已经是 0 了,改为 -3,用来解决传播性,见后文信号量 bug 分析
				else if (ws == 0 && !compareAndSetWaitStatus(h, 0, Node.PROPAGATE))
					continue; // loop on failed CAS
			}
			if (h == head) // loop if head changed
				break;
		}
	}
}
4、StampedLock
JDK 8 加入,是为了进一步优化读性能,它的特点是在使用读锁、写锁时都必须配合戳使用
// 加解读锁
long stamp = lock.readLock();
lock.unlockRead(stamp);

// 加解写锁
long stamp = lock.writeLock();
lock.unlockWrite(stamp);乐观读,StampedLock支持tryOptimisticRead()方法(乐观读),读取完毕后需要做一次戳校验,如果校验通过,表示这期间没有写操作,数据可以安全使用;如果校验没通过,需要重新获取读锁,保证数据安全。
【注意】StampedLock 不支持条件变量、不支持可重入
long stamp = lock.tryOptimisticRead();
// 验戳
if(!lock.validate(stamp)){
	// 锁升级
}
测试
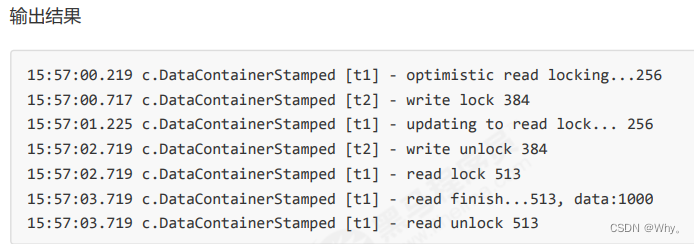
@Slf4j(topic = "c.DataContainerStamped")
class DataContainerStamped {
private int data;
private final StampedLock lock = new StampedLock();
public DataContainerStamped(int data) {
this.data = data;
}
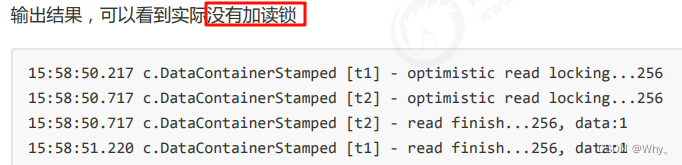
public int read(int readTime) {
long stamp = lock.tryOptimisticRead();
log.debug("optimistic read locking...{}", stamp);
sleep(readTime);
if (lock.validate(stamp)) {
log.debug("read finish...{}, data:{}", stamp, data);
return data;
}
// 锁升级 - 读锁
log.debug("updating to read lock... {}", stamp);
try {
stamp = lock.readLock();
log.debug("read lock {}", stamp);
sleep(readTime);
log.debug("read finish...{}, data:{}", stamp, data);
return data;
} finally {
log.debug("read unlock {}", stamp);
lock.unlockRead(stamp);
}
}
public void write(int newData) {
long stamp = lock.writeLock();
log.debug("write lock {}", stamp);
try {
sleep(2);
this.data = newData;
} finally {
log.debug("write unlock {}", stamp);
lock.unlockWrite(stamp);
}
}
}读读
@Slf4j(topic = "c.TestStampedLock")
public class TestStampedLock {
    public static void main(String[] args) {
        DataContainerStamped dataContainer = new DataContainerStamped(1);
        new Thread(() -> {
            dataContainer.read(1);
        }, "t1").start();
        sleep(0.5);
        new Thread(() -> {
            dataContainer.read(0);
        }, "t2").start();
    }
}
读写
@Slf4j(topic = "c.TestStampedLock")
public class TestStampedLock {
    public static void main(String[] args) {
        DataContainerStamped dataContainer = new DataContainerStamped(1);
        new Thread(() -> {
            dataContainer.read(1);
        }, "t1").start();
        sleep(0.5);
        new Thread(() -> {
            dataContainer.write(100);
        }, "t2").start();
    }
}
5、Semaphore信号量
用来限制能同时访问共享资源的线程上限。
- semaphore.acquire();//获取到资源。 当一个线程调用acquire操作时,它要么通过成功获取信号量(信号量减1),要么一直等下去,直到有线程释放信号量,或超时。
- semaphore.release();//释放资源。实际上会将信号量的值加1,然后唤醒等待的线程。
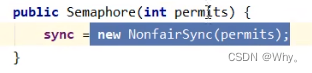
public static void main(String[] args) {
	// 1. 创建 semaphore 对象
	Semaphore semaphore = new Semaphore(3);
	// 2. 10个线程同时运行
	for (int i = 0; i < 10; i++) {
		new Thread(() -> {
			// 3. 获取许可
			try {
				semaphore.acquire();
			} catch (InterruptedException e) {
				e.printStackTrace();
			}
			try {
				log.debug("running...");
				sleep(1);
				log.debug("end...");
			} finally {
				// 4. 释放许可
				semaphore.release();
			}
		}).start();
	}
}
加锁解锁流程
Semaphore有点像一个停车场,permits就好像停车位数量,当线程获得了permits就像是获得了停车位,然后停车场显示空余车位减一。
刚开始,permits(state)为3,这时5个线程来获取资源。
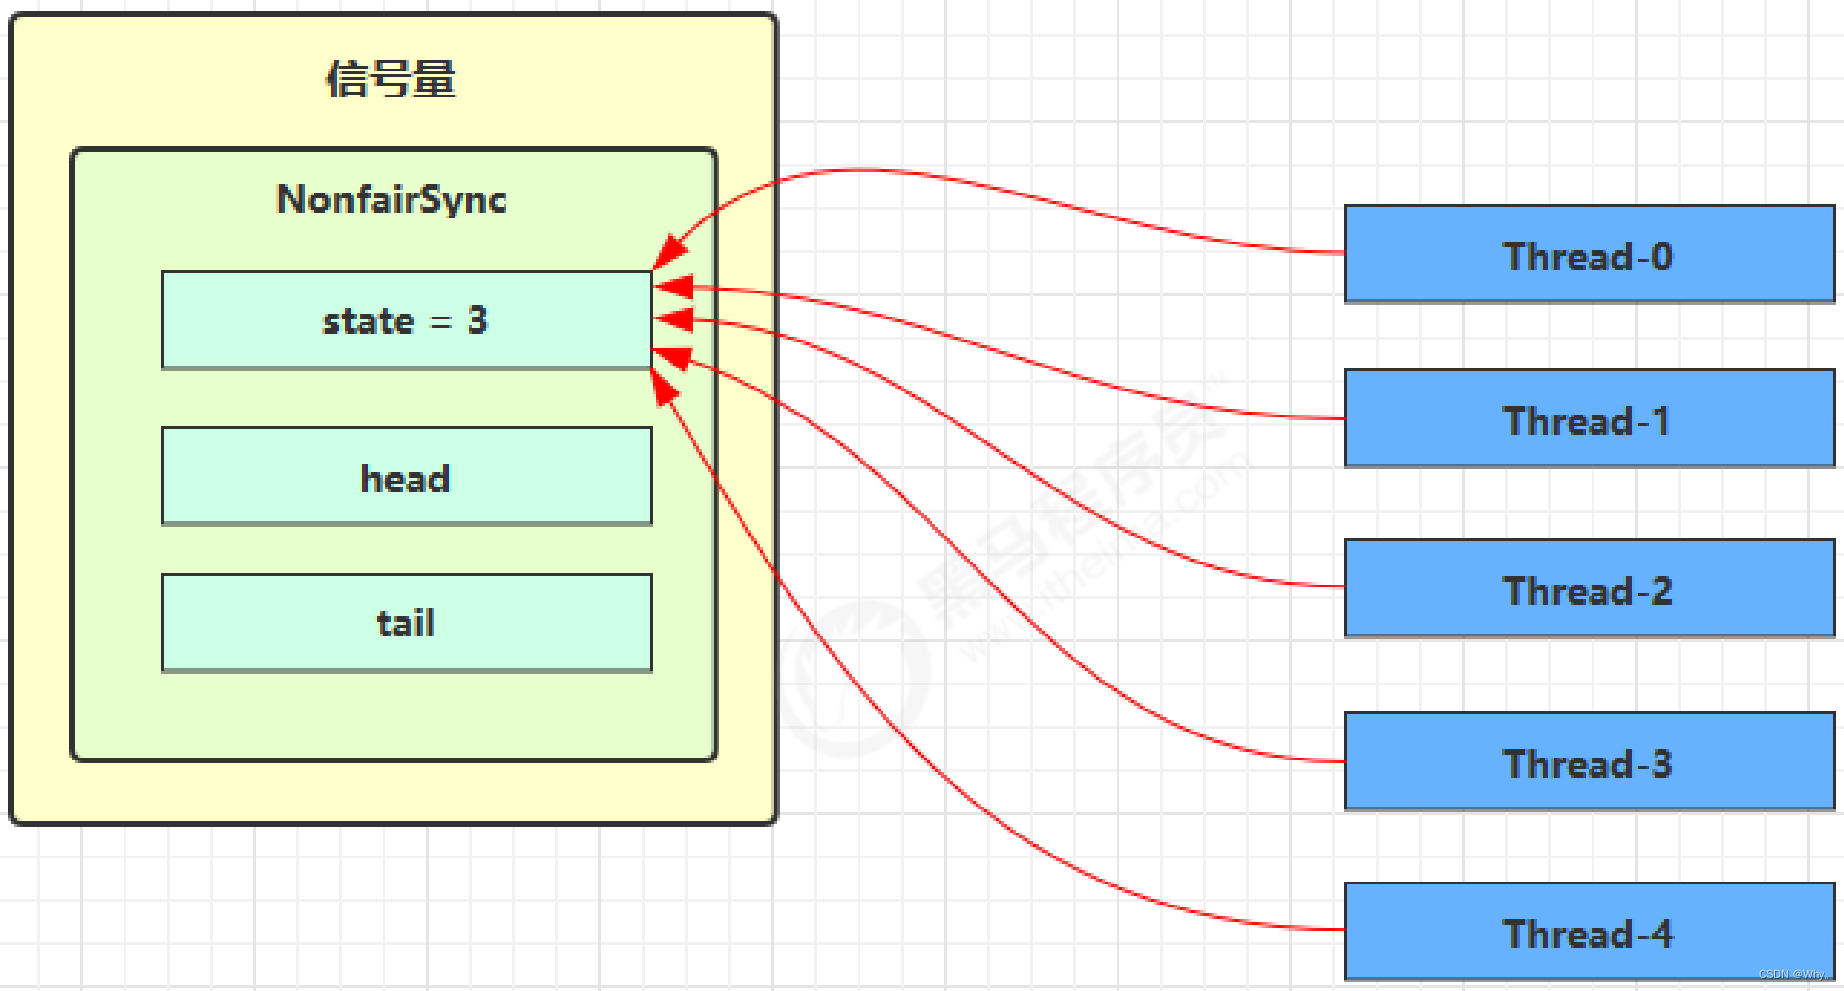
假设其中Thread-1,Thread-2,Thread-4 cas竞争成功,而Thread-0和Thread-3竞争失败,进入AQS队列park阻塞
![]()
这时 Thread-4 释放了 permits,状态如下
接下来Thread-0竞争成功,permits再次设置为0,设置自己为head节点,断开原来的head节点,unpark接下来的Thread-3节点,但由于permits是0,因此Thread-3在尝试不成功后再次进入park状态
源码
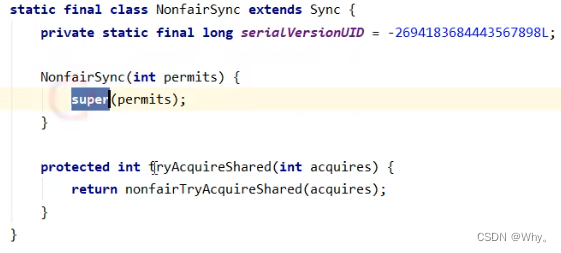
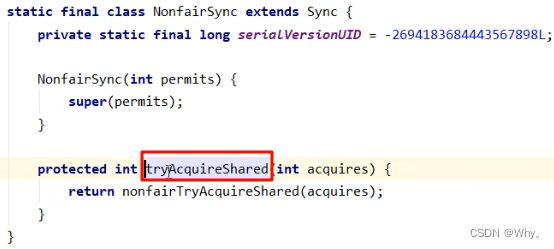
static final class NonfairSync extends Sync {
private static final long serialVersionUID = -2694183684443567898L;
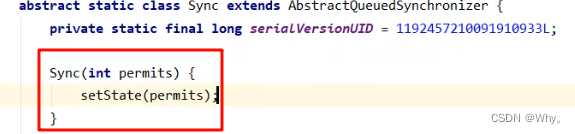
NonfairSync(int permits) {
// permits 即 state
super(permits);
}
// Semaphore 方法, 方便阅读, 放在此处
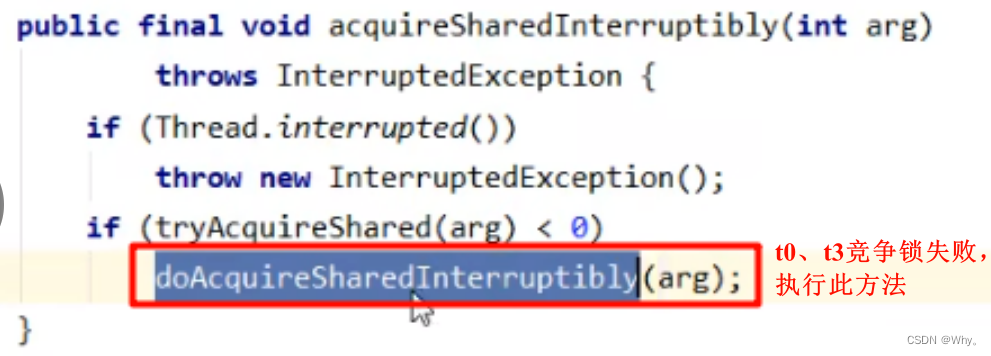
public void acquire() throws InterruptedException {
sync.acquireSharedInterruptibly(1);
}
// AQS 继承过来的方法, 方便阅读, 放在此处
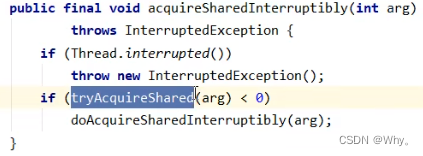
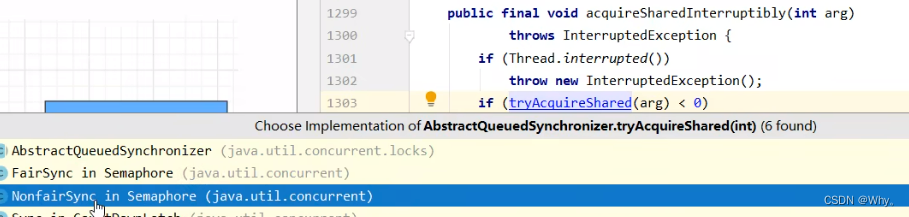
public final void acquireSharedInterruptibly(int arg)throws InterruptedException {
if (Thread.interrupted())
throw new InterruptedException();
if (tryAcquireShared(arg) < 0)
doAcquireSharedInterruptibly(arg);
}
// 尝试获得共享锁
protected int tryAcquireShared(int acquires) {
return nonfairTryAcquireShared(acquires);
}
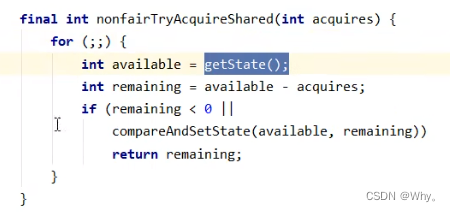
// Sync 继承过来的方法, 方便阅读, 放在此处
final int nonfairTryAcquireShared(int acquires) {
for (;;) {
int available = getState();
int remaining = available - acquires;
if (
// 如果许可已经用完, 返回负数, 表示获取失败, 进入 doAcquireSharedInterruptibly
remaining < 0 ||
// 如果 cas 重试成功, 返回正数, 表示获取成功
compareAndSetState(available, remaining)
) {
return remaining;
}
}
}
// AQS 继承过来的方法, 方便阅读, 放在此处
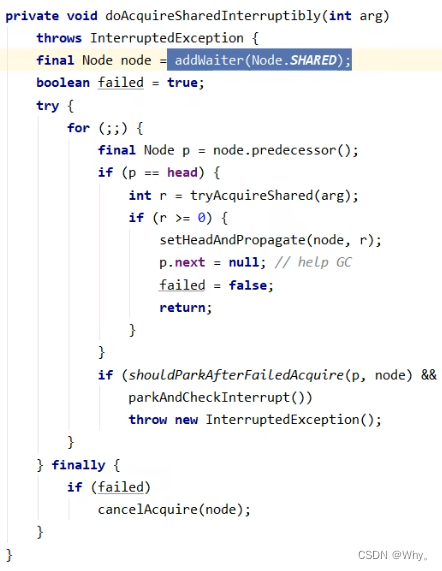
private void doAcquireSharedInterruptibly(int arg) throws InterruptedException {
final Node node = addWaiter(Node.SHARED);
boolean failed = true;
try {
for (;;) {
final Node p = node.predecessor();
if (p == head) {
// 再次尝试获取许可
int r = tryAcquireShared(arg);
if (r >= 0) {
// 成功后本线程出队(AQS), 所在 Node设置为 head
// 如果 head.waitStatus == Node.SIGNAL ==> 0 成功, 下一个节点 unpark
// 如果 head.waitStatus == 0 ==> Node.PROPAGATE
// r 表示可用资源数, 为 0 则不会继续传播
setHeadAndPropagate(node, r);
p.next = null; // help GC
failed = false;
return;
}
}
// 不成功, 设置上一个节点 waitStatus = Node.SIGNAL, 下轮进入 park 阻塞
if (shouldParkAfterFailedAcquire(p, node) && parkAndCheckInterrupt())
throw new InterruptedException();
}
} finally {
if (failed)
cancelAcquire(node);
}
}
// Semaphore 方法, 方便阅读, 放在此处
public void release() {
sync.releaseShared(1);
}
// AQS 继承过来的方法, 方便阅读, 放在此处
public final boolean releaseShared(int arg) {
if (tryReleaseShared(arg)) {
doReleaseShared();
return true;
}
return false;
}
// Sync 继承过来的方法, 方便阅读, 放在此处
protected final boolean tryReleaseShared(int releases) {
for (;;) {
int current = getState();
int next = current + releases;
if (next < current) // overflow
throw new Error("Maximum permit count exceeded");
if (compareAndSetState(current, next))
return true;
}
}
}应用
- 使用Semaphore限流,在访问高峰期时,让请求线程阻塞,高峰期过去再释放许可,当然它只适合限制单机线程数量,并且仅是限制线程数,而不是限制资源数(例如连接数,请对比TomcatLimitLatch的实现)
- 用Semaphore实现简单连接池,对比『享元模式』下的实现(用waitnotify),性能和可读性显然更好,注意下面的实现中线程数和数据库连接数是相等的
public class TestPoolSemaphore {
    public static void main(String[] args) {
        Pool pool = new Pool(2);
        for (int i = 0; i < 5; i++) {
            new Thread(() -> {
                Connection conn = pool.borrow();
                try {
                    Thread.sleep(1000);
                } catch (InterruptedException e) {
                    e.printStackTrace();
                }
                pool.free(conn);
            }).start();
        }
    }
}

@Slf4j(topic = "c.Pool")
class Pool {
    // 1. 连接池大小
    private final int poolSize;

    // 2. 连接对象数组
    private Connection[] connections;

    // 3. 连接状态数组 0 表示空闲, 1 表示繁忙
    private AtomicIntegerArray states;

    private Semaphore semaphore;

    // 4. 构造方法初始化
    public Pool(int poolSize) {
        this.poolSize = poolSize;
        // 让许可数与资源数一致
        this.semaphore = new Semaphore(poolSize);
        this.connections = new Connection[poolSize];
        this.states = new AtomicIntegerArray(new int[poolSize]);
        for (int i = 0; i < poolSize; i++) {
            connections[i] = new MockConnection("连接" + (i+1));
        }
    }

    // 5. 借连接
    public Connection borrow() {// t1, t2, t3
        // 获取许可
        try {
            semaphore.acquire(); // 没有许可的线程,在此等待
        } catch (InterruptedException e) {
            e.printStackTrace();
        }
        for (int i = 0; i < poolSize; i++) {
            // 获取空闲连接
            if(states.get(i) == 0) {
                if (states.compareAndSet(i, 0, 1)) {
                    log.debug("borrow {}", connections[i]);
                    return connections[i];
                }
            }
        }
        // 不会执行到这里
        return null;
    }
    // 6. 归还连接
    public void free(Connection conn) {
        for (int i = 0; i < poolSize; i++) {
            if (connections[i] == conn) {
                states.set(i, 0);
                log.debug("free {}", conn);
                semaphore.release();
                break;
            }
        }
    }
}

class MockConnection implements Connection {

    private String name;

    public MockConnection(String name) {
        this.name = name;
    }

    @Override
    public String toString() {
        return "MockConnection{" +
                "name='" + name + '\'' +
                '}';
    }

    @Override
    public Statement createStatement() throws SQLException {
        return null;
    }

    //......
}
6、CountdownLatch减少计数
用来进行线程同步协作,等待所有线程完成倒计时。
其中构造参数用来初始化等待计数值,await()用来等待计数归零,countDown()用来让计数减一。
@Slf4j(topic = "c.TestCountDownLatch")
public class TestCountDownLatch {
    public static void main(String[] args) throws InterruptedException, ExecutionException {
        CountDownLatch latch = new CountDownLatch(3);

        new Thread(() -> {
            log.debug("begin...");
            sleep(1);
            latch.countDown();
            log.debug("end...{}", latch.getCount());
        }).start();

        new Thread(() -> {
            log.debug("begin...");
            sleep(2);
            latch.countDown();
            log.debug("end...{}", latch.getCount());
        }).start();

        new Thread(() -> {
            log.debug("begin...");
            sleep(1.5);
            latch.countDown();
            log.debug("end...{}", latch.getCount());
        }).start();

        log.debug("waiting...");
        latch.await();
        log.debug("wait end...");
    }
}
配合线程池使用,改进如下
@Slf4j(topic = "c.TestCountDownLatch")
public class TestCountDownLatch {
    public static void main(String[] args) throws InterruptedException, ExecutionException {
        CountDownLatch latch = new CountDownLatch(3);
        ExecutorService service = Executors.newFixedThreadPool(4);
        service.submit(() -> {
            log.debug("begin...");
            sleep(1);
            latch.countDown();
            log.debug("end...{}", latch.getCount());
        });
        service.submit(() -> {
            log.debug("begin...");
            sleep(1.5);
            latch.countDown();
            log.debug("end...{}", latch.getCount());
        });
        service.submit(() -> {
            log.debug("begin...");
            sleep(2);
            latch.countDown();
            log.debug("end...{}", latch.getCount());
        });
        service.submit(()->{
            try {
                log.debug("waiting...");
                latch.await();
                log.debug("wait end...");
            } catch (InterruptedException e) {
                e.printStackTrace();
            }
        });
    }
}
应用之同步等待多线程准备完毕
@Slf4j(topic = "c.TestCountDownLatch")
public class TestCountDownLatch {
    public static void main(String[] args) throws InterruptedException, ExecutionException {
        AtomicInteger num = new AtomicInteger(0);
        ExecutorService service = Executors.newFixedThreadPool(10, (r) -> {
            return new Thread(r, "t" + num.getAndIncrement());
        });
        CountDownLatch latch = new CountDownLatch(10);
        String[] all = new String[10];
        Random r = new Random();
        for (int j = 0; j < 10; j++) {
            int x = j;
            service.submit(() -> {
                for (int i = 0; i <= 100; i++) {
                    try {
                        Thread.sleep(r.nextInt(100));
                    } catch (InterruptedException e) {
                    }
                    all[x] = Thread.currentThread().getName() + "(" + (i + "%") + ")";
                    System.out.print("\r" + Arrays.toString(all));
                }
                latch.countDown();
            });
        }
        latch.await();
        System.out.println("\n游戏开始...");
        service.shutdown();
    }
}
7、CyclicBarrier循环栅栏
用来进行线程协作,等待线程满足某个计数。构造时设置『计数个数』,每个线程执行到某个需要“同步”的时刻调用await()方法进行等待,当等待的线程数满足『计数个数』时,继续执行。
public class CyclicBarrierDemo {
    private static final int NUMBER = 7;

    public static void main(String[] args) {
        //CyclicBarrier(int parties, Runnable barrierAction)

        CyclicBarrier cyclicBarrier = new CyclicBarrier(NUMBER, () -> {
            System.out.println("*****集齐7颗龙珠就可以召唤神龙");
        });

        for (int i = 1; i <= 7; i++) {
            new Thread(() -> {
                try {
                    System.out.println(Thread.currentThread().getName() + "\t 星龙珠被收集 ");
                    cyclicBarrier.await();
                } catch (InterruptedException | BrokenBarrierException e) {
                    // TODO Auto-generated catch block
                    e.printStackTrace();
                }

            }, String.valueOf(i)).start();
        }
    }
}【注】CyclicBarrier与CountDownLatch的主要区别在于CyclicBarrier是可以重用的CyclicBarrier可以被比喻为『人满发车』
8、JUC安全集合
里面包含三类关键词:Blocking、CopyOnWrite、Concurrent
- Blocking大部分实现基于ReenTrantLock锁,并提供用来阻塞的方法
- CopyOnWrite之类容器修改开销相对较重(适用于读多写少)
- Concurrent类型的容器
- 内部很多操作使用cas优化,一般可以提供较高吞吐量
- 弱一致性
- 遍历时弱一致性,例如,当利用迭代器遍历时,如果容器发生修改,迭代器仍然可以继续进行遍历,这时内容是旧的
- 求大小弱一致性,size操作未必是100%准确
- 读取弱一致性
遍历时如果发生了修改,对于非安全容器来讲,使用fail-fast机制也就是让遍历立刻失败,抛出ConcurrentModificationException,不再继续遍历。
练习:单词计数
public class TestWordCount {
    public static void main(String[] args) {
        demo(
                // 创建 map 集合
                // 创建 ConcurrentHashMap?
				// 		单个put或get操作是安全的,但是组合不一定安全,所以选用computeIfAbsent方法
                () -> new HashMap<String, LongAdder>(),

                (map, words) -> {
                    for (String word : words) {
						Integer counter = map.get(word);
						int newValue = counter == null ? 1 : counter + 1;
						map.put(word, newValue);
                    }
                }
        );
    }

	//模版代码,模版代码中封装了多线程读取文件的代码
    private static <V> void demo(Supplier<Map<String, V>> supplier, BiConsumer<Map<String, V>, List<String>> consumer) {
        Map<String, V> counterMap = supplier.get();
        // key value
        // a   200
        // b   200
        List<Thread> ts = new ArrayList<>();
        for (int i = 1; i <= 26; i++) {
            int idx = i;
            Thread thread = new Thread(() -> {
                List<String> words = readFromFile(idx);
                consumer.accept(counterMap, words);
            });
            ts.add(thread);
        }

        ts.forEach(t -> t.start());
        ts.forEach(t -> {
            try {
                t.join();
            } catch (InterruptedException e) {
                e.printStackTrace();
            }
        });

        System.out.println(counterMap);
    }

    public static List<String> readFromFile(int i) {
        ArrayList<String> words = new ArrayList<>();
        try (BufferedReader in = new BufferedReader(new InputStreamReader(new FileInputStream("tmp/" + i + ".txt")))) {
            while (true) {
                String word = in.readLine();
                if (word == null) {
                    break;
                }
                words.add(word);
            }
            return words;
        } catch (IOException e) {
            throw new RuntimeException(e);
        }
    }
}
要求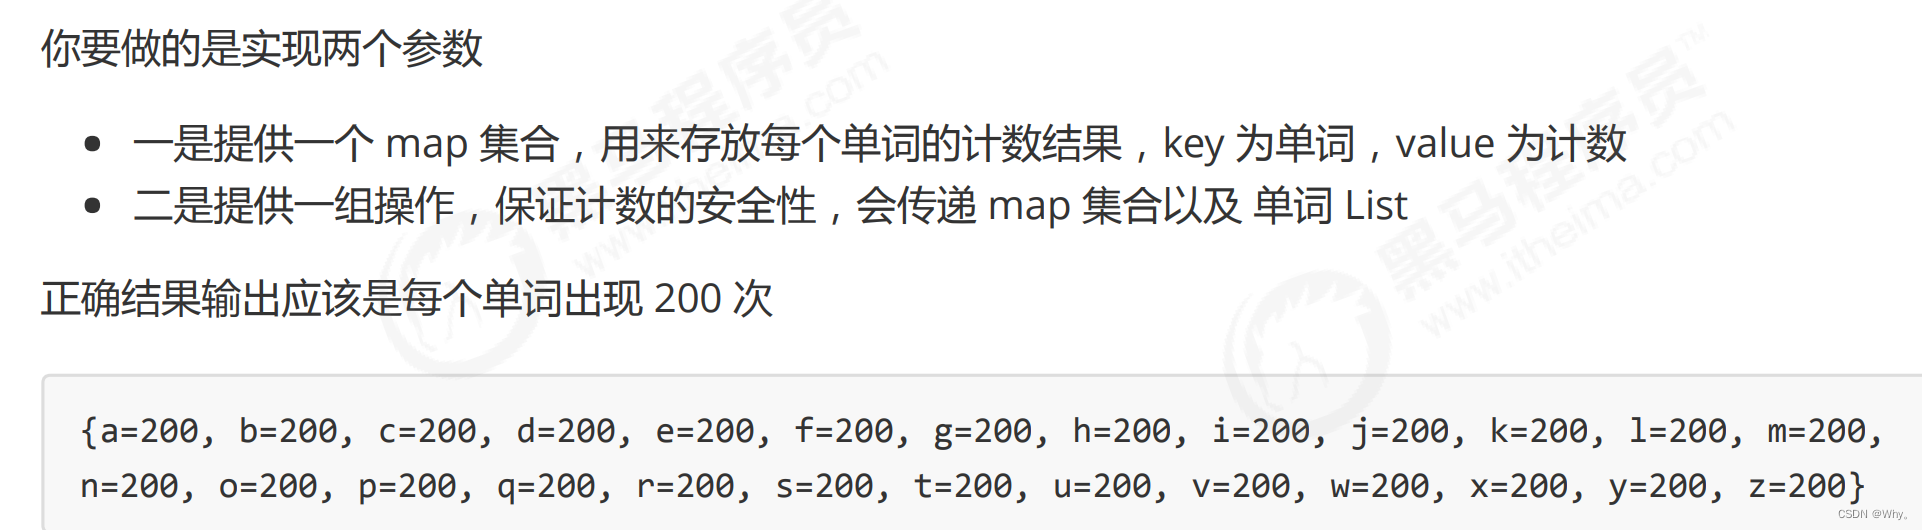
正解
demo(

		() -> new ConcurrentHashMap<String, LongAdder>(),

		(map, words) -> {
			for (String word : words) {
				// 注意不能使用 putIfAbsent,此方法返回的是上一次的 value,首次调用返回 null
				// 如果缺少一个 key,则计算生成一个 value , 然后将  key value 放入 map
				//                  a      0
				LongAdder value = map.computeIfAbsent(word, (key) -> new LongAdder());
				// 执行累加
				value.increment(); // 2
		}
);
JDK 8 ConcurrentHashMap
重要属性和内部类
// 默认为 0
// 当初始化时, 为 -1
// 当扩容时, 为 -(1 + 扩容线程数)
// 当初始化或扩容完成后,为 下一次的扩容的阈值大小
private transient volatile int sizeCtl;
// 整个 ConcurrentHashMap 就是一个 Node[]
static class Node<K,V> implements Map.Entry<K,V> {}
// hash 表
transient volatile Node<K,V>[] table;
// 扩容时的 新 hash 表
private transient volatile Node<K,V>[] nextTable;
// 扩容时如果某个 bin 迁移完毕, 用 ForwardingNode 作为旧 table bin 的头结点
static final class ForwardingNode<K,V> extends Node<K,V> {}
// 用在 compute 以及 computeIfAbsent 时, 用来占位, 计算完成后替换为普通 Node
static final class ReservationNode<K,V> extends Node<K,V> {}
// 作为 treebin 的头节点, 存储 root 和 first
static final class TreeBin<K,V> extends Node<K,V> {}
// 作为 treebin 的节点, 存储 parent, left, right
static final class TreeNode<K,V> extends Node<K,V> {}
重要方法
// 获取 Node[] 中第 i 个 Node
static final <K,V> Node<K,V> tabAt(Node<K,V>[] tab, int i)

// cas 修改 Node[] 中第 i 个 Node 的值, c 为旧值, v 为新值
static final <K,V> boolean casTabAt(Node<K,V>[] tab, int i, Node<K,V> c, Node<K,V> v)

// 直接修改 Node[] 中第 i 个 Node 的值, v 为新值
static final <K,V> void setTabAt(Node<K,V>[] tab, int i, Node<K,V> v)
构造器分析
到实现了懒惰初始化,在构造方法中仅仅计算了 table 的大小,以后在第一次使用时才会真正创建
public ConcurrentHashMap(int initialCapacity, float loadFactor, int concurrencyLevel) {
	// 初始容量、加载因子、并发度
	if (!(loadFactor > 0.0f) || initialCapacity < 0 || concurrencyLevel <= 0)
		throw new IllegalArgumentException();
	if (initialCapacity < concurrencyLevel) // Use at least as many bins
		initialCapacity = concurrencyLevel; // as estimated threads
	long size = (long)(1.0 + (long)initialCapacity / loadFactor);
	// tableSizeFor 仍然是保证计算的大小是 2^n, 即 16,32,64 ...
	int cap = (size >= (long)MAXIMUM_CAPACITY) ? MAXIMUM_CAPACITY : tableSizeFor((int)size);
	this.sizeCtl = cap;
}
get 流程
public V get(Object key) {
	Node<K,V>[] tab; Node<K,V> e, p; int n, eh; K ek;
	// spread 方法能确保返回结果是正数
	int h = spread(key.hashCode());
	if ((tab = table) != null && (n = tab.length) > 0 && (e = tabAt(tab, (n - 1) & h)) != null) {
		// 如果头结点已经是要查找的 key
		if ((eh = e.hash) == h) {
			if ((ek = e.key) == key || (ek != null && key.equals(ek)))
				return e.val;
		}
		// hash 为负数表示该 bin 在扩容中或是 treebin, 这时调用 find 方法来查找
		else if (eh < 0)
			return (p = e.find(h, key)) != null ? p.val : null;
		// 正常遍历链表, 用 equals 比较
		while ((e = e.next) != null) {
			if (e.hash == h && ((ek = e.key) == key || (ek != null && key.equals(ek))))
			return e.val;
		}
	}
	return null;
}
put 流程
数组简称(table),链表简称(bin)
public V put(K key, V value) {
	return putVal(key, value, false);
}

final V putVal(K key, V value, boolean onlyIfAbsent) {
	if (key == null || value == null) throw new NullPointerException();
	// 其中 spread 方法会综合高位低位, 具有更好的 hash 性
	int hash = spread(key.hashCode());
	int binCount = 0;
	for (Node<K,V>[] tab = table;;) {
		// f 是链表头节点
		// fh 是链表头结点的 hash
		// i 是链表在 table 中的下标
		Node<K,V> f; int n, i, fh;
		// 要创建 table
		if (tab == null || (n = tab.length) == 0)
			// 初始化 table 使用了 cas, 无需 synchronized 创建成功, 进入下一轮循环
			tab = initTable();
		// 要创建链表头节点
		else if ((f = tabAt(tab, i = (n - 1) & hash)) == null) {
			// 添加链表头使用了 cas, 无需 synchronized
			if (casTabAt(tab, i, null,
				new Node<K,V>(hash, key, value, null)))
			break;
		}
		// 帮忙扩容
		else if ((fh = f.hash) == MOVED)
			// 帮忙之后, 进入下一轮循环
			tab = helpTransfer(tab, f);
		else {
			V oldVal = null;
			// 锁住链表头节点
			synchronized (f) {
				// 再次确认链表头节点没有被移动
				if (tabAt(tab, i) == f) {
					// 链表
					if (fh >= 0) {
						binCount = 1;
						// 遍历链表
						for (Node<K,V> e = f;; ++binCount) {
							K ek;
							// 找到相同的 key
							if (e.hash == hash &&((ek = e.key) == key ||(ek != null && key.equals(ek)))) {
								oldVal = e.val;
								// 更新
								if (!onlyIfAbsent)
									e.val = value;
								break;
							}
							Node<K,V> pred = e;
							// 已经是最后的节点了, 新增 Node, 追加至链表尾
							if ((e = e.next) == null) {
								pred.next = new Node<K,V>(hash, key, value, null);
								break;
							}
						}
					}
					// 红黑树
					else if (f instanceof TreeBin) {
						Node<K,V> p;
						binCount = 2;
						// putTreeVal 会看 key 是否已经在树中, 是, 则返回对应的 TreeNode
						if ((p = ((TreeBin<K,V>)f).putTreeVal(hash, key, value)) != null) {
							oldVal = p.val;
							if (!onlyIfAbsent)
								p.val = value;
						}
					}
				}
				// 释放链表头节点的锁
			}

			if (binCount != 0) {
				if (binCount >= TREEIFY_THRESHOLD)
					// 如果链表长度 >= 树化阈值(8), 进行链表转为红黑树
					treeifyBin(tab, i);
				if (oldVal != null)
					return oldVal;
				break;
			}
		}
	}
	// 增加 size 计数
	addCount(1L, binCount);
	return null;
}

private final Node<K,V>[] initTable() {
	Node<K,V>[] tab; int sc;
	while ((tab = table) == null || tab.length == 0) {
		if ((sc = sizeCtl) < 0)
			Thread.yield();
		// 尝试将 sizeCtl 设置为 -1(表示初始化 table)
		else if (U.compareAndSwapInt(this, SIZECTL, sc, -1)) {
			// 获得锁, 创建 table, 这时其它线程会在 while() 循环中 yield 直至 table 创建
			try {
				if ((tab = table) == null || tab.length == 0) {
					int n = (sc > 0) ? sc : DEFAULT_CAPACITY;
					Node<K,V>[] nt = (Node<K,V>[])new Node<?,?>[n];
					table = tab = nt;
					sc = n - (n >>> 2);
				}
			} finally {
				sizeCtl = sc;
			}
			break;
		}
	}
	return tab;
}

// check 是之前 binCount 的个数
private final void addCount(long x, int check) {
	CounterCell[] as; long b, s;
	if (
		// 已经有了 counterCells, 向 cell 累加
		(as = counterCells) != null ||
		// 还没有, 向 baseCount 累加
		!U.compareAndSwapLong(this, BASECOUNT, b = baseCount, s = b + x)
	) {
		CounterCell a; long v; int m;
		boolean uncontended = true;
		if (
			// 还没有 counterCells
			as == null || (m = as.length - 1) < 0 ||
			// 还没有 cell
			(a = as[ThreadLocalRandom.getProbe() & m]) == null ||
			// cell cas 增加计数失败
			!(uncontended = U.compareAndSwapLong(a, CELLVALUE, v = a.value, v + x))
		) {
			// 创建累加单元数组和cell, 累加重试
			fullAddCount(x, uncontended);
			return;
		}
		if (check <= 1)
			return;
		// 获取元素个数
		s = sumCount();
	}
	if (check >= 0) {
		Node<K,V>[] tab, nt; int n, sc;
		while (s >= (long)(sc = sizeCtl) && (tab = table) != null && (n = tab.length) < MAXIMUM_CAPACITY) {
			int rs = resizeStamp(n);
			if (sc < 0) {
				if ((sc >>> RESIZE_STAMP_SHIFT) != rs || sc == rs + 1 ||
				sc == rs + MAX_RESIZERS || (nt = nextTable) == null ||
				transferIndex <= 0)
					break;
				// newtable 已经创建了,帮忙扩容
				if (U.compareAndSwapInt(this, SIZECTL, sc, sc + 1))
					transfer(tab, nt);
			}
			// 需要扩容,这时 newtable 未创建
			else if (U.compareAndSwapInt(this, SIZECTL, sc, (rs << RESIZE_STAMP_SHIFT) + 2))
				transfer(tab, null);
			s = sumCount();
		}
	}
}
size 计算流程
size 计算实际发生在 put,remove 改变集合元素的操作之中
- 没有竞争发生,向 baseCount 累加计数
- 有竞争发生,新建 counterCells,向其中的一个 cell 累加计数
- counterCells 初始有两个
- cell 如果计数竞争比较激烈,会创建新的 cell 来累加计数
public int size() {
	long n = sumCount();
	return ((n < 0L) ? 0 :
			(n > (long)Integer.MAX_VALUE) ? Integer.MAX_VALUE :
			(int)n);
}
final long sumCount() {
	CounterCell[] as = counterCells; CounterCell a;
	// 将 baseCount 计数与所有 cell 计数累加
	long sum = baseCount;
	if (as != null) {
		for (int i = 0; i < as.length; ++i) {
			if ((a = as[i]) != null)
				sum += a.value;
		}
	}
	return sum;
}
总结
Java8数组(Node)+(链表Node|红黑树TreeNode)以下数组简称(table),链表简称(bin)
- 初始化,使用cas来保证并发安全,懒惰初始化table
- 树化,当table.length<64时,先尝试扩容,超过64时,并且bin.length>8时,会将链表树化,树化过程会用synchronized锁住链表头
- put,如果该bin尚未创建,只需要使用cas创建bin;如果已经有了,锁住链表头进行后续put操作,元素添加至bin的尾部
- get,无锁操作仅需要保证可见性,扩容过程中get操作拿到的是ForwardingNode它会让get操作在新table进行搜索
- 扩容,扩容时以bin为单位进行,需要对bin进行synchronized,但这时妙的是其它竞争线程也不是无事可做,它们会帮助把其它bin进行扩容,扩容时平均只有1/6的节点会把复制到新table中
- size,元素个数保存在baseCount中,并发时的个数变动保存在CounterCell[ ]当中。最后统计数量时累加即可。
JDK 7 ConcurrentHashMap
它维护了一个segment数组,每个segment对应一把锁
- 优点:如果多个线程访问不同的segment,实际是没有冲突的,这与jdk8中是类似的
- 缺点:Segments数组默认大小为16,这个容量初始化指定后就不能改变了,并且不是懒惰初始化
构造器分析
public ConcurrentHashMap(int initialCapacity, float loadFactor, int concurrencyLevel) {
	if (!(loadFactor > 0) || initialCapacity < 0 || concurrencyLevel <= 0)
		throw new IllegalArgumentException();
	if (concurrencyLevel > MAX_SEGMENTS)
		concurrencyLevel = MAX_SEGMENTS;
	// ssize 必须是 2^n, 即 2, 4, 8, 16 ... 表示了 segments 数组的大小
	int sshift = 0;
	int ssize = 1;
	while (ssize < concurrencyLevel) {
		++sshift;
		ssize <<= 1;
	}
	// segmentShift:移位属性 默认是 32 - 4 = 28
	this.segmentShift = 32 - sshift;
	// segmentMask:掩码属性 默认是 15(前28位都是0)即 0000...0000 1111
	this.segmentMask = ssize - 1;
	if (initialCapacity > MAXIMUM_CAPACITY)
		initialCapacity = MAXIMUM_CAPACITY;
	int c = initialCapacity / ssize;
	if (c * ssize < initialCapacity)
		++c;
	int cap = MIN_SEGMENT_TABLE_CAPACITY;
	while (cap < c)
		cap <<= 1;
	// 创建 segments and segments[0]
	Segment<K,V> s0 = new Segment<K,V>(loadFactor, (int)(cap * loadFactor),
										(HashEntry<K,V>[])new HashEntry[cap]);
	Segment<K,V>[] ss = (Segment<K,V>[])new Segment[ssize];
	UNSAFE.putOrderedObject(ss, SBASE, s0); // ordered write of segments[0]
	this.segments = ss;
}
ConcurrentHashMap没有实现懒惰初始化,空间占用不友好
其中this.segmentShift和this.segmentMask的作用是决定将key的hash结果匹配到哪个segment
例如,根据某一hash值求segment位置,先将高位向低位移动this.segmentShift位
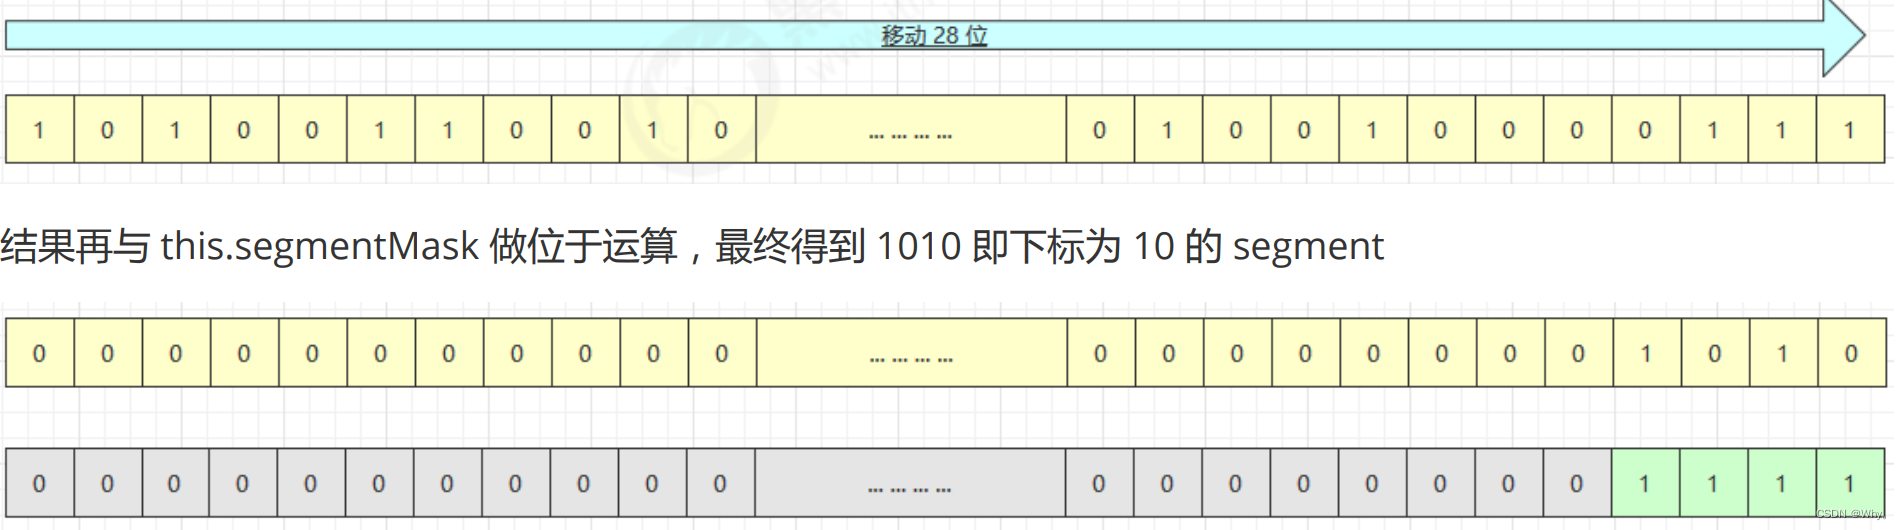
put 流程
public V put(K key, V value) {
	Segment<K,V> s;
	if (value == null)
		throw new NullPointerException();
	int hash = hash(key);
	// 计算出 segment 下标
	int j = (hash >>> segmentShift) & segmentMask;

	// 获得 segment 对象, 判断是否为 null, 是则创建该 segment
	if ((s = (Segment<K,V>)UNSAFE.getObject
		(segments, (j << SSHIFT) + SBASE)) == null) {
		// 这时不能确定是否真的为 null, 因为其它线程也发现该 segment 为 null,
		// 因此在 ensureSegment 里用 cas 方式保证该 segment 安全性
		s = ensureSegment(j);
	}
	// 进入 segment 的put 流程
	return s.put(key, hash, value, false);
}
segment 继承了可重入锁(ReentrantLock),它的 put 方法为
final V put(K key, int hash, V value, boolean onlyIfAbsent) {
	// 尝试加锁
	HashEntry<K,V> node = tryLock() ? null :
		// 如果不成功, 进入 scanAndLockForPut 流程
		// 如果是多核 cpu 最多 tryLock 64 次, 进入 lock 流程
		// 在尝试期间, 还可以顺便看该节点在链表中有没有, 如果没有顺便创建出来
		scanAndLockForPut(key, hash, value);

	// 执行到这里 segment 已经被成功加锁, 可以安全执行
	V oldValue;
	try {
		HashEntry<K,V>[] tab = table;
		int index = (tab.length - 1) & hash;
		HashEntry<K,V> first = entryAt(tab, index);
		for (HashEntry<K,V> e = first;;) {
			if (e != null) {
				// 更新
				K k;
				if ((k = e.key) == key || (e.hash == hash && key.equals(k))) {
					oldValue = e.value;
					if (!onlyIfAbsent) {
						e.value = value;
						++modCount;
					}
					break;
				}
				e = e.next;
			}
			else {
				// 新增
				// 1) 之前等待锁时, node 已经被创建, next 指向链表头
				if (node != null)
					node.setNext(first);
				else
					// 2) 创建新 node
					node = new HashEntry<K,V>(hash, key, value, first);
				int c = count + 1;
				// 3) 扩容
				if (c > threshold && tab.length < MAXIMUM_CAPACITY)
					rehash(node);
				else
					// 将 node 作为链表头
					setEntryAt(tab, index, node);
				++modCount;
				count = c;
				oldValue = null;
				break;
			}
		}
	} finally {
		unlock();
	}
	return oldValue;
}
rehash 流程
发生在 put 中,因为此时已经获得了锁,因此 rehash 时不需要考虑线程安全
private void rehash(HashEntry<K,V> node) {
	HashEntry<K,V>[] oldTable = table;
	int oldCapacity = oldTable.length;
	int newCapacity = oldCapacity << 1;
	threshold = (int)(newCapacity * loadFactor);
	HashEntry<K,V>[] newTable = (HashEntry<K,V>[]) new HashEntry[newCapacity];
	int sizeMask = newCapacity - 1;
	for (int i = 0; i < oldCapacity ; i++) {
		HashEntry<K,V> e = oldTable[i];
		if (e != null) {
			HashEntry<K,V> next = e.next;
			int idx = e.hash & sizeMask;
			if (next == null) // Single node on list
				newTable[idx] = e;
			else { // Reuse consecutive sequence at same slot
				HashEntry<K,V> lastRun = e;
				int lastIdx = idx;
				// 过一遍链表, 尽可能把 rehash 后 idx 不变的节点重用
				for (HashEntry<K,V> last = next; last != null; last = last.next) {
					int k = last.hash & sizeMask;
					if (k != lastIdx) {
						lastIdx = k;
						lastRun = last;
					}
				}
				newTable[lastIdx] = lastRun;
				// 剩余节点需要新建
				for (HashEntry<K,V> p = e; p != lastRun; p = p.next) {
					V v = p.value;
					int h = p.hash;
					int k = h & sizeMask;
					HashEntry<K,V> n = newTable[k];
					newTable[k] = new HashEntry<K,V>(h, p.key, v, n);
				}
			}
		}
	}
	// 扩容完成, 才加入新的节点
	int nodeIndex = node.hash & sizeMask; // add the new node
	node.setNext(newTable[nodeIndex]);
	newTable[nodeIndex] = node;

	// 替换为新的 HashEntry table
	table = newTable;
}
get 流程
get 时并未加锁,用了 UNSAFE 方法保证了可见性,扩容过程中,get 先发生就从旧表取内容,get 后发生就从新表取内容
public V get(Object key) {
	Segment<K,V> s; // manually integrate access methods to reduce overhead
	HashEntry<K,V>[] tab;
	int h = hash(key);
	// u 为 segment 对象在数组中的偏移量
	long u = (((h >>> segmentShift) & segmentMask) << SSHIFT) + SBASE;
	// s 即为 segment
	if ((s = (Segment<K,V>)UNSAFE.getObjectVolatile(segments, u)) != null && (tab = s.table) != null) {
			for (HashEntry<K,V> e = (HashEntry<K,V>) UNSAFE.getObjectVolatile
			(tab, ((long)(((tab.length - 1) & h)) << TSHIFT) + TBASE);
			e != null; e = e.next) {
			K k;
		if ((k = e.key) == key || (e.hash == h && key.equals(k)))
			return e.value;
		}
	}
	return null;
}
size 计算流程
- 计算元素个数前,先不加锁计算两次,如果前后两次结果如一样,认为个数正确返回
- 如果不一样,进行重试,重试次数超过 3,将所有 segment 锁住,重新计算个数返回
public int size() {
	// Try a few times to get accurate count. On failure due to
	// continuous async changes in table, resort to locking.
	final Segment<K,V>[] segments = this.segments;
	int size;
	boolean overflow; // true if size overflows 32 bits
	long sum; // sum of modCounts
	long last = 0L; // previous sum
	int retries = -1; // first iteration isn't retry
	try {
		for (;;) {
			if (retries++ == RETRIES_BEFORE_LOCK) {
				// 超过重试次数, 需要创建所有 segment 并加锁
				for (int j = 0; j < segments.length; ++j)
				ensureSegment(j).lock(); // force creation
			}
			sum = 0L;
			size = 0;
			overflow = false;
			for (int j = 0; j < segments.length; ++j) {
				Segment<K,V> seg = segmentAt(segments, j);
				if (seg != null) {
					sum += seg.modCount;
					int c = seg.count;
					if (c < 0 || (size += c) < 0)
					overflow = true;
				}
			}
			if (sum == last)
				break;
			last = sum;
		}
	} finally {
	if (retries > RETRIES_BEFORE_LOCK) {
		for (int j = 0; j < segments.length; ++j)
			segmentAt(segments, j).unlock();
		}
	}
	return overflow ? Integer.MAX_VALUE : size;
}


 233
233


 被折叠的 条评论
为什么被折叠?
被折叠的 条评论
为什么被折叠?
 到【灌水乐园】发言


