


目录
一、JDBC概述
1、数据的持久化
-
持久化(persistence):把数据保存到可掉电式存储设备中以供之后使用。大多数情况下,特别是企业级应用,数据持久化意味着将内存中的数据保存到硬盘上加以"固化”,而持久化的实现过程大多通过各种关系数据库来完成。
-
持久化的主要应用是将内存中的数据存储在关系型数据库中,当然也可以存储在磁盘文件、XML数据文件中。

2、Java 中的数据存储技术
- 在Java中,数据库存取技术可分为如下几类:
JDBC直接访问数据库
JDO技术
第三方O/R工具,如Hibernate, mybatis 等 - JDBC是java访问数据库的基石,JDO, Hibernate等只是更好
的封装了JDBC
3、JDBC基础

连接数据库:


4、JDBC体系结构
JDBC接口(API)包括两个层次:
面向应用的API:Java API,抽象接口,供应用程序开发人员使用(连接数据库,执行SQL语句,获得结果)。
面向数据库的API:Java Driver API,供开发商开发数据库驱动程序用。

5、JDBC API
JDBC API 是一系列的接口,它使得应用程序能够进行数据库联接,执行SQL语句,并且得到返回结果。

6、JDBC程序访问数据库步骤


二、获取数据库连接
1、Driver 接口
-
java.sql.Driver 接口是所有 JDBC 驱动程序需要实现的接口。这个接口是提
供给数据库厂商使用的,不同数据库厂商提供不同的实现 -
在程序中不需要直接去访问实现了 Driver 接口的类,而是由驱动程序管理
器类(java.sql.DriverManager)去调用这些Driver实现
Oracle的驱动:oracle.jdbc.driver.OracleDriver
mySql的驱动: com.mysql.jdbc.Driver
2、加载与注册 JDBC 驱动

3、建立连接(Connection)

4、几种常用数据库的JDBC URL

连接mysql代码实例:
import java.io.InputStream;
import java.sql.DriverManager;
import java.sql.SQLException;
import java.util.Properties;

import org.junit.Test;

import com.mysql.jdbc.Connection;
import com.mysql.jdbc.Driver;

public class testconnction01 {


    /**
     * @throws SQLException
     */
    @Test
    //方式一
	public void testConnection011() throws SQLException {
		Driver driver = new com.mysql.jdbc.Driver();
		String url = "jdbc:mysql://localhost:3306/test";
		Properties info = new Properties();
		info.setProperty("user", "root");
		info.setProperty("password", "root");
		Connection collection = (Connection) driver.connect(url, info);
		System.out.println(collection);
	}

    @Test
    //方式二,对方式一的迭代,使得程序具有更好的可移植性
   	public void testConnection02() throws Exception {
   		//获取Driver实现类对象;使用反射
   		Class clazz= Class.forName("com.mysql.jdbc.Driver");
   		Driver driver=(Driver) clazz.newInstance();
   		//提供要连接的数据库
   		String url = "jdbc:mysql://localhost:3306/test";
   		//提供连接需要的用户名和密码
   		Properties info = new Properties();
   		info.setProperty("user", "root");
   		info.setProperty("password", "root");
   		//获取连接
   		Connection collection = (Connection) driver.connect(url, info);
   		System.out.println(collection);
   	}

    @Test
    //方式三,使用DriverManager替换Driver
   	public void testConnection03() throws Exception {
    	Class clazz= Class.forName("com.mysql.jdbc.Driver");
   		Driver driver=(Driver) clazz.newInstance();

   		//提供另外三个连接的基本信息;
   		String url ="jdbc:mysql://localhost:3306/test";
   		String user ="root";
   		String password ="root";

    	//注册驱动
    	DriverManager.registerDriver(driver);

    	//获取连接
    	Connection connection= (Connection) DriverManager.getConnection(url,user,password);
   		System.out.println(connection);
   	}

    @Test
    //方式四,可以只是加载驱动,不用是示的注册驱动过了。
   	public void testConnection04() throws Exception {

   		//提供另外三个连接的基本信息;
   		String url ="jdbc:mysql://localhost:3306/test";
   		String user ="root";
   		String password ="root";

   		Class.forName("com.mysql.jdbc.Driver");

//   		Class clazz= Class.forName("com.mysql.jdbc.Driver");
//   		Driver driver=(Driver) clazz.newInstance();
//
//    	//注册驱动
//    	DriverManager.registerDriver(driver);
//
    	//获取连接
    	Connection connection= (Connection) DriverManager.getConnection(url,user,password);
   		System.out.println(connection);
   	}

    @Test
    //方式五,(final版):将数据库连接需要的4个基本信息声明在配置文件中,通过读取配置文件的方式,获取连接
    //实现了数据和代码的分离(解耦)
   	public void testConnection05() throws Exception {

   	//读取配置文件的4个基本信息
    InputStream is = testconnction01.class.getClassLoader().getResourceAsStream("jdbc.properties");

      Properties p =new Properties();
      p.load(is);

      String user = p.getProperty("user");
      String password = p.getProperty("password");
      String url = p.getProperty("url");
      String driverClass =p.getProperty("driverClass");

      Class.forName(driverClass);

        //获取连接
  	    Connection connection= (Connection) DriverManager.getConnection(url,user,password);
 		System.out.println(connection);
   	}
}
扩展:2022年5月6日
用C3p0连接数据库
package tool;

import java.sql.Connection;
import java.sql.PreparedStatement;
import java.sql.ResultSet;
import java.sql.SQLException;
import java.sql.Statement;

import javax.sql.DataSource;

import com.mchange.v2.c3p0.ComboPooledDataSource;

public class C3P0Util {
	public static void main(String[] args) {
		        Connection conn = null;
		        PreparedStatement ps = null;
		        conn = C3P0Util.getConnection();
		        try {
		            ps = conn.prepareStatement("INSERT INTO users (username,PASSWORD,email,birthday)VALUES('dyq','123','123456@qq.com','2022-05-06')");
		            ps.executeUpdate();
		            System.out.println("添加操作执行成功!");
		        } catch (SQLException e) {
		            // TODO Auto-generated catch block
		            e.printStackTrace();
		            System.out.println("添加操作执行失败!");
		        } finally {
		            C3P0Util.release(conn, ps, null);
		        }

	}
	//使用ComboPooledDataSource来生成DataSource的实例
    private static DataSource dataSource = new ComboPooledDataSource();

    //从连接池中获取连接
    public static Connection getConnection() {
        try {
            return dataSource.getConnection();
        } catch (SQLException e) {
            // TODO Auto-generated catch block
            throw new RuntimeException();
        }
    }

    //释放连接回连接池
    public static void release(Connection conn, Statement stmt, ResultSet rs) {
        if (rs != null) {
            try {
                rs.close();
            } catch (Exception e) {
                e.printStackTrace();
            }
            rs = null;
        }
        if (stmt != null) {
            try {
                stmt.close();
            } catch (Exception e) {
                e.printStackTrace();
            }
            stmt = null;
        }
        if (conn != null) {
            try {
                conn.close();
            } catch (Exception e) {
                e.printStackTrace();
            }
            conn = null;
        }
    }
}
编写c3p0-config.xml配置文档
<?xml version="1.0" encoding="UTF-8"?>
<c3p0-config>
<default-config>
<!--mysql数据库连接的各项参数-->
<property name="driverClass">com.mysql.cj.jdbc.Driver</property>
<property name="jdbcUrl">jdbc:mysql://localhost:3306/jdbctest?useUnicode=true&characterEncoding=utf8&serverTimezone=GMT&useSSL=false</property>
<property name="user">root</property>
<property name="password">root</property>
<!--配置数据库连接池的初始连接数、最小链接数、获取连接数、最大连接数、最大空闲时间-->
<property name="initialPoolSize">10</property>
<property name="minPoolSize">10</property>
<property name="acquireIncrement">5</property>
<property name="maxPoolSize">100</property>
<property name="maxIdleTime">30</property>
</default-config>
</c3p0-config>

5、使用Statement操作数据表的弊端
a、需要拼写SQL语句

b、Statement操作会导致SQL注入攻击

java.sql.SQLSyntaxErrorException: Unknown column ‘xxx‘ in ‘where clause‘问题解决及防止SQL注入:
https://blog.csdn.net/weixin_45041745/article/details/120054985
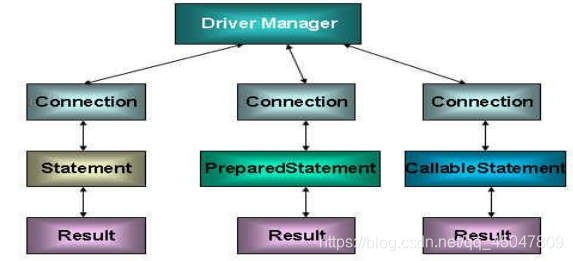
- 数据库连接被用于向数据库服务器发送命令和SQL语句,并接受数据库服务器返回的结果。其实一个数据库连接就是一个Socket连接。
在java.sql包中有3个接口分别定义了对数据库的调用的不同方式:
- Statement :用于执行静态SQL语句并返回它所生成结果的对象。
- PrepatedIatement : SQL语句被预编译并存储在此对象中,可以使用此对象多次高效地执行该语句。
- CallableStatement :用于执行SQL存储过程
-


 735
735


 被折叠的 条评论
为什么被折叠?
被折叠的 条评论
为什么被折叠?
 到【灌水乐园】发言


