


文章目录
Java后端(基础篇)
封装,继承,多态的基本了解与运用
封装:Person类的属性name和age被声明为private,外部无法直接访问,通过提供公共的getter和setter方法来访问和修改属性,
    /**
     * Person类的属性name和age被声明为private,外部无法直接访问,通过提供公共的getter和setter方法来访问和修改属性,
     * 这就是封装的体现。
     */
    public class Person {
        private String name;
        private int age;

        /** 其构造方法 */
        public Person(String name,int age){
            this.name=name;
            this.age=age;
        }

        public String getName() {
            return name;
        }

        public void setName(String name) {
            this.name = name;
        }

        public int getAge() {
            return age;
        }

        public void setAge(int age) {
            this.age = age;
        }
    }
继承:Student类继承了Person类,并新增了一个属性grade。由于Person类的属性name和age已经被封装,所以在Student类中可以直接使用父类的getter和setter方法来访问和修改这两个属性。
    /**
     * Student类继承了Person类,并新增了一个属性grade。由于Person类的属性name和age已经被封装,
     * 所以在Student类中可以直接使用父类的getter和setter方法来访问和修改这两个属性。
     * 这就是继承的体现
     */

    public class Student extends Person{
        private int grade;

        /**
         * 其构造方法
         *
         * @param name  名字
         * @param age   年龄
         */
        public Student(String name, int age,int grade) {
            super(name, age);
            this.grade=grade;
        }

        public int getGrade() {
            return grade;
        }

        public void setGrade(int grade) {
            this.grade = grade;
        }
    }
多态:定义一个父类:动物类,然后动物都拥有动作。所以定义一个通用方法
如:Animal是一个父类,Dog和Cat是Animal的两个子类。在Test类中,创建了三个Animal对象,其中一个是Animal类型,
另外两个是子类类型。调用它们的move方法时,会根据实际对象的类型来执行相应的方法,这就是多态的体现
    public class Animal{
        public void move(){
            System.out.println("Animal is moving.");
        }
    }
    /** 子类:狗  */
    public class Dog extends Animal{
        /** 重写父类方法move   */
        @Override
        public void move() {
            System.out.println("Dog is running");
        }
    }

    /** 子类:猫  */
    public class Cat extends Animal{
        @Override
        public void move() {
            System.out.println("Cat is jumping.");
        }
    }
    @Test
    public void testMoreStatus(){
        Animal animal=new Animal();
        Dog dog=new Dog();
        Cat cat=new Cat();

        animal.move();
        dog.move();
        cat.move();
        //运行结果如下
//        Animal is moving.
//        Dog is running
//        Cat is jumping.
    }
基本数据类型的划分以及其封装类
具体可以通过代码注释理解
package com.ouo.ouo_skill.study;

import org.junit.Test;

/**
 * @ClassName
 * @Description 基本数据类型的划分以及其封装类
 * @Author: OUO
 * @date 2023/3/28 11:05
 * @Version 1.0
 */
public class twoDay  {
    //整型:byte,short,int,long
    //浮点型:float,double
    //字符型:char
    //布尔型:boolean
    /**
     * 每种基本数据类型都有对应的封装类,用于将基本数据类型转换为对象类型。封装类的命名规则为基本数据类型的首字母大写。
     * 下面给出各种基本数据类型以及封装类的Demo
     */

    /** 整型 */
    @Test
    public void Z(){
        int i=10;
        Integer integer=new Integer(i);
        System.out.println("整型数据:"+i);
        System.out.println("整型数据的封装类:"+integer);
        //输出     整型数据:10
        //        整型数据的封装类:10
    }

    /** 浮点型  */
    @Test
    public void D(){
        double d=3.14;
        Double doub=new Double(d);
        System.out.println("浮点型数据:"+d);
        System.out.println("浮点型数据的封装类:"+doub);
        //输出
        //浮点型数据:3.14
        //浮点型数据的封装类:3.14
    }

    /**  字符型     */
    @Test
    public void C(){
        char c='A';
        Character character=new Character(c);
        System.out.println("字符型数据:"+c);
        System.out.println("字符型数据的封装类:"+character);
        //输出
        //字符型数据:A
        //字符型数据的封装类:A
    }

    /** 布尔型 */
    @Test
    public void b(){
        boolean b=false;
        Boolean bool=new Boolean(b);
        System.out.println("布尔型数据:" + b);
        System.out.println("布尔型数据的封装类:" + bool);
        //输出
        //布尔型数据:false
        //布尔型数据的封装类:false
    }
}
String类的日常使用
一些我平常常用的String类方法
package com.ouo.ouo_skill.study;

import org.junit.Test;

import java.util.ArrayList;
import java.util.List;
import java.util.stream.Collectors;

/**
 * @ClassName
 * @Description String类的日常使用
 * @Author: OUO
 * @date 2023/3/28 11:16
 * @Version 1.0
 */
public class threeDay{
    /**
     * 一个业务场景:你需要将字符串以','分割的形式传给前端,要拼凑出来一个类似:1,2,3这样的字符串
     *
     * 1. length():获取字符串的长度
     * 2. charAt(int index):获取字符串中指定位置的字符
     * 3. equals(Object anObject):将此字符串与指定对象进行比较
     * 4. isEmpty():判断字符串是否为空
     * 5. substring(int beginIndex):返回一个新字符串,它是此字符串的一个子字符串
     * 6. toLowerCase():将此字符串转换为小写
     * 7. toUpperCase():将此字符串转换为大写
     * 8. trim():返回字符串的副本,忽略前导空白和尾部空白
     * 9. indexOf(String str):返回指定子字符串在此字符串中第一次出现处的索引
     * 10. replace(char oldChar, char newChar):返回一个新的字符串,它是通过用 newChar 替换此字符串中出现的所有 oldChar 得到的
     */
    @Test
    public void StringDemo(){
        String str1="Hello";
        String str2="World";
        String str3="   Java    ";

        //一个业务场景:你需要将字符串以','分割的形式传给前端,要拼凑出来一个类似:1,2,3这样的字符串
        //基础版本
        List<String> all=new ArrayList<>();
        all.add(str1);
        all.add(str2);
        all.add(str3);
        String one="";
        for (String s : all) {
            one+=s.trim()+",";
        }
        one=one.substring(0,one.length()-1);
        System.out.println("普通版-业务场景结果:"+one);
        //输出:普通版-业务场景结果:Hello,World,Java
        //高阶版本--这里使用了map方法将每个字符串都进行trim操作,然后使用Collectors.joining方法将它们以逗号连接起来。最终得到的result就是拼凑出来的字符串
        String result=all.stream().map(String::trim).collect(Collectors.joining(","));
        System.out.println("高阶版-业务场景结果:"+result);
        //输出:高阶版-业务场景结果:Hello,World,Java


        //length()方法
        System.out.println("str1的长度为:"+str1.length());
        //输出:str1的长度为:5

        //charAt()方法,str2的第二个字符为
        System.out.println("str2的第二个字符为:"+str2.charAt(1));
        //输出:str2的第二个字符为:o

        //equals 将此字符串与指定对象进行比较
        if (str1.equals(str2)) {
            System.out.println("str1和str2相等");
        } else {
            System.out.println("str1和str2不相等");
        }
        //输出:str1和str2不相等


        //isEmpty():判断字符串是否为空
        if (str1.isEmpty()) {
            System.out.println("str1为空");
        } else {
            System.out.println("str1不为空");
        }
        //输出:str1不为空

        //substring(int beginIndex):返回一个新字符串,它是此字符串的一个子字符串
        System.out.println("str2的前三个字母为:" + str2.substring(0, 3));
        //输出:str2的前三个字母为:Wor

        //toLowerCase():将此字符串转换为小写
        System.out.println("将str1的字符串转为小写:"+str1.toLowerCase());
        //输出:将str1的字符串转为小写:hello

        //toUpperCase():将此字符串转换为大写
        System.out.println("将str2的字符串转为大写:"+str2.toUpperCase());
        //输出:将str2的字符串转为大写:WORLD

        //trim()方法
        System.out.println("将str3的空白区域抹除:"+str3.trim());
        //输出:将str3的空白区域抹除:Java

        //indexOf(String str):返回指定子字符串在此字符串中第一次出现处的索引
        System.out.println("str2中o第一次出现的位置:"+str2.indexOf("o"));
        //输出:str2中o第一次出现的位置:1

        // replace(char oldChar, char newChar):返回一个新的字符串,它是通过用 newChar 替换此字符串中出现的所有 oldChar 得到的
        System.out.println("将str3中的Java替换成Hello:"+str3.replace("Java","World"));
        //输出:将str3中的Java替换成Hello:   World
    }
}
数组以及集合的使用
数组的个人理解:数组是一个固定长度的数据结构,它可以存储相同类型的元素。在 Java 中,数组可以是基本类型(如 int、float 等)或对象类型(如 String、Integer 等)。数组的长度在创建时指定,一旦创建后,长度就无法改变。 要访问数组中的元素,需要使用索引,索引从 0 开始,依次递增。
 /** 以下是一个创建和访问数组的示例: */
    @Test
    public void testArray(){
        //创建一个包含5个整数的数组
        int[] nums=new int[5];
        //在数组中存储值
        nums[0]=1;
        nums[1]=2;
        nums[2]=3;
        nums[3]=4;
        nums[4]=5;
        //访问数组中的值
        System.out.println(nums[0]);    //输出1
        System.out.println(nums[3]);    //输出4
    }
**集合的个人理解:**集合是一个动态的数据结构,它可以存储不同类型的元素。在 Java 中,集合有很多种实现方式,如 ArrayList、LinkedList、HashSet 等。每种实现方式都有其特点和适用场景。集合的长度可以动态改变,可以添加或删除元素,可以进行查找和排序等操作。
    @Test
    public void testMap(){
        //创建一个ArrayList集合
        List<String> names=new ArrayList<>();
        //向集合中添加元素
        names.add("ouo");
        names.add("aua");
        names.add("bub");
        //访问集合中的元素
        System.out.println(names.get(0)); //输出ouo
        System.out.println(names.get(2)); //输出bub
        //删除集合中的元素
        names.remove(1);
        //遍历集合中的元素
        for (String name : names) {
            System.out.println(name);
        }
        //需要注意的是,数组和集合在使用时需要根据实际情况选择,
        //如果需要对元素进行频繁的添加、删除、查找和排序等操作,建议使用集合。
        //如果需要存储固定长度的同类型元素,可以使用数组。
    }
数组的常用方法
    @Test
    public void testArrayNor() {
        //创建数组的4种方式
        //1.直接初始化:在声明数组时,可以直接指定数组元素的初始值,例如
        int[] arr = {1, 2, 3, 4, 5};
        //2.动态初始化:先声明数组,再通过循环或其他方式为数组元素赋值,例如
        int[] arrs = new int[5]; for (int i = 0; i < 5; i++) { arrs[i] = i + 1; }
        //3.通过数组工具类Arrays创建:使用Arrays类提供的静态方法创建数组,例如
        int[] arrss= Arrays.copyOf(new int[]{1,2,3,4,5},5);
        //4.通过类的反射机制创建,通过Class类的newInstance()方法创建数组,例如
        //获取数组对应的Class对象,例如
        Class<?> clazz=String[].class;
        //其中,clazz.getComponentType()方法可以获取数组元素的类型,10表示数组长度。
        Object array = Array.newInstance(clazz.getComponentType(), 10);
        //对数组进行操作,例如
        // 其中,Array.set()方法可以设置数组中指定下标的值,需要注意的是,
        // 由于数组元素类型是Object,所以需要进行强制类型转换
        Array.set(array, 0, "Hello");
        String[] strArray = (String[]) array;


        //length方法
        System.out.println("数组长度为:"+arr.length);
        //数组长度为:5

        //clone方法
        int[] arr2=arr.clone();
        System.out.println("复制后的数组为:");
        for (int i : arr2) {
            System.out.println(i+" ");
            //1
            //2
            //3
            //4
            //5
        }
        System.out.println();


        //equals方法
        int[] arr3={1,3,5,7,9};
        boolean isEqual = Arrays.equals(arr, arr3);
        System.out.println("arr和arr3数组是否相等:"+isEqual);
        //arr和arr3数组是否相等:false

        //fill方法
        int[] arr4=new int[5];
        Arrays.fill(arr4,3);
        System.out.println("填充后的数组为:");
        for (int i : arr4) {
            System.out.println(i+" ");
            //3
            //3
            //3
            //3
            //3
        }
        System.out.println();

        //sort方法
        Arrays.sort(arr);
        System.out.println("排序后的数组为:");
        for (int i : arr) {
            System.out.println(i+" ");
            //1
            //2
            //3
            //4
            //5
        }
        System.out.println();

        //binarySearch方法
        int index = Arrays.binarySearch(arr, 5);
        System.out.println("元素5在数组中的位置为:" + index);
    }
集合的常用方法
    @Test
    public void testMapNor(){
        /**1. List:List是有序的,可以包含重复元素的集合。常用的List实现类有ArrayList和LinkedList。常用操作包括添加元素、获取元素、删除元素、遍历元素等。*/
        List<String> stringList=new ArrayList<>();
        //添加元素
        stringList.add("无量");
        stringList.add("天尊");
        stringList.add("骑士");
        //获取元素
        stringList.get(0);
        //删除元素
        stringList.remove(0);
        //遍历元素
        stringList.stream().forEach(System.out::println);

        //LinkedList方法与上面ArrasyList基本相同
        List<String> linkedList=new LinkedList<>();
        linkedList.add("法海");

        //两者的特点以及区别
        /**
         * ArrayList是基于动态数组实现的,即底层是一个Object类型的数组。当数组元素不足时,会自动扩容。
         * LinkedList是基于双向链表实现的,每个节点包含当前元素的值和指向前驱和后继节点的指针。
         *
         * 2. 插入和删除操作
         * ArrayList插入和删除元素时,需要移动数组中的元素,因为数组中的元素是连续存储的,因此这个操作的时间复杂度为O(n)。
         * LinkedList插入和删除元素时,只需要改变节点的指针,因此这个操作的时间复杂度为O(1)。
         *
         * 3. 随机访问
         * ArrayList支持快速随机访问,因为数组元素是连续存储的,可以通过下标直接访问,时间复杂度为O(1)。
         * LinkedList不支持快速随机访问,需要从头节点或尾节点开始遍历,时间复杂度为O(n)。
         *
         * 4. 内存使用
         * ArrayList的内存使用比LinkedList更高,因为ArrayList需要预留内存空间,当元素数量不足时,会浪费一部分内存。
         * LinkedList的内存使用比较灵活,只需要根据元素数量动态分配内存即可。
         *
         * 5. 迭代器性能
         * ArrayList的迭代器性能比LinkedList更好,因为ArrayList支持快速随机访问。
         * LinkedList的迭代器性能较差,因为需要从头节点开始遍历。
         */


        /**2. Set:Set是无序的,不允许重复元素的集合。常用的Set实现类有HashSet和TreeSet。常用操作包括添加元素、判断元素是否存在、删除元素、遍历元素等。*/

        Set<String> stringSet=new HashSet<>(10);
        stringSet.add("a");
        System.out.println("是否包含a元素:"+stringSet.contains("a"));
        System.out.println("删除a元素是否成功:"+stringSet.remove("a"));
        for (String s : stringSet) {
            System.out.println("目前元素:"+s);
        }
        Set<String> treeSet=new TreeSet<>();
        //方法同理一样
        /** 两者的区别  */
        /**
         * HashSet和TreeSet的区别:
         * 1. HashSet的存储元素是无序的,而TreeSet的存储元素是有序的。
         * 2. HashSet的底层实现是基于哈希表的,而TreeSet的底层实现是基于红黑树的。
         * 3. HashSet对于元素的访问、插入和删除的时间复杂度都是O(1),而TreeSet的时间复杂度都是O(log n)。
         * 4. HashSet允许存储空元素(null),而TreeSet不允许存储空元素(null)。
         * 5. HashSet适用于对元素的快速访问和去重,而TreeSet适用于对元素的排序和范围查找。
         * */


        /**3. Map:Map是一种键值对的集合,每个键对应一个值。常用的Map实现类有HashMap和TreeMap。常用操作包括添加键值对、获取键对应的值、删除键值对、遍历键值对等。*/
        Map<String,Object> map=new HashMap<>();
        map.put("1","1号");
        map.put("2","2号");
        map.put("3","3号");
        map.put("4","4号");
        String o = (String)map.get("1");
        System.out.println("取出来的值:"+o);
        map.remove("2");
        System.out.println("删除后的数组长度:"+map.size());
        //1. for-each循环遍历Map集合:
        //注意:map.entrySet()是将Map集合转换成Set集合,其中每个元素都是Map.Entry类型,
        // 即Map中的每一个键值对。使用entrySet()方法可以方便地遍历Map集合中的键值对。
        for (Map.Entry<String, Object> entry : map.entrySet()) {
            System.out.println("Key:"+entry.getKey()+",Value: "+entry.getValue());
        }
        //2.使用迭代器遍历Map集合
        Iterator<Map.Entry<String, Object>> iterator = map.entrySet().iterator();
        while (iterator.hasNext()){
            Map.Entry<String,Object> entry=iterator.next();
            System.out.println("Key: "+entry.getKey()+",Value: "+entry.getValue());
        }


        /**
         * HashMap是基于哈希表实现的,它使用键值对的方式存储数据,其中键是唯一的,值可以重复。HashMap的特点如下:
         *
         * - 查找和插入操作的时间复杂度为O(1),效率高。
         * - HashMap的键是无序的。
         * - HashMap允许存储null值和null键。
         *
         * TreeMap是基于红黑树实现的,它使用键值对的方式存储数据,其中键是唯一的,值可以重复。TreeMap的特点如下:
         *
         * - TreeMap中的键是有序的,通过比较键的大小来确定键的顺序。
         * - 查找和插入操作的时间复杂度为O(log n),效率相对较低。
         * - TreeMap不允许存储null键,但允许存储null值。
         *
         * 总的来说,HashMap适合用于需要快速查找和插入数据的场景,而TreeMap适合用于需要对数据进行排序的场景。
         * */


        //总结
        //Java集合的实现方式包括数组、链表、红黑树等。不同的实现方式具有不同的特点,
        //例如数组实现的ArrayList可以快速随机访问元素,但插入和删除元素的效率较低;
        //链表实现的LinkedList可以快速插入和删除元素,但访问元素的效率较低;
        //红黑树实现的TreeSet和TreeMap可以快速查找元素,但插入和删除元素的效率较低。
        //因此,在实际应用中需要根据具体的需求选择适合的集合实现方式。
    }
条件控制,循环结构的了解
文件相关,如字符字节流,缓存流的使用
package com.ouo.ouo_skill.study;

import org.junit.Test;

import java.io.*;
import java.time.LocalDate;
import java.time.LocalDateTime;
import java.util.ArrayList;
import java.util.Date;
import java.util.List;
import java.util.Random;

/**
 * @ClassName
 * @Description 文件相关,如字符字节流,缓存流的使用
 * @Author: OUO
 * @date 2023/3/30 9:44
 * @Version 1.0
 */
public class sixDay {
    //整体结构图:https://www.runoob.com/wp-content/uploads/2013/12/iostream2xx.png
    /** 文件流分为两种:字节流和字符流  */

    /**
     * 字节流
     * 字节流是Java中用于读写二进制数据的流,它是InputStream和OutputStream的抽象基类。
     * 其中,InputStream是字节输入流的抽象类,OutputStream是字节输出流的抽象类
     *
     * 常见的字节流的子类包括FileInputStream、FileOutputStream、
     * ByteArrayInputStream、ByteArrayOutputStream等
     */


    //FileInputStream用于从文件中读取数据
    @Test
    public void testFileInputStream(){
        //FileInputStream的示例
        try {
            //读取D盘ouo.txt文件
            FileInputStream fis=new FileInputStream("D:\\ouo.txt");
            int b;
            //不等于-1就代表还存在下一个字节
            while ((b= fis.read())!=-1){
                System.out.print((char)b);
            }
            //最后记得关闭流
            fis.close();
        } catch (FileNotFoundException e) {
            throw new RuntimeException(e);
        } catch (IOException e) {
            throw new RuntimeException(e);
        }
    }

    //FileOutputStream用于向文件中写入数据
    @Test
    public void testFileOutputStream(){
        //流在打开文件进行输出前,目标文件不存在,那么该流会创建该文件。
        try {
            //后面那个true是开启追加模式,如果不加则默认是全覆盖模式
            FileOutputStream fos=new FileOutputStream("D:\\ouo.txt",true);
            String str="Hello World!";
            //这种写入会将之前文件里面的内容全覆盖
            fos.write(str.getBytes());
            fos.close();
        } catch (FileNotFoundException e) {
            throw new RuntimeException(e);
        } catch (IOException e) {
            throw new RuntimeException(e);
        }
    }


    //ByteArrayInputStream用于从字节数组中读取数据
    @Test
    public void testByteArrayInputStream() throws IOException {
        byte[] bytes = "Hello World!".getBytes();
        ByteArrayInputStream bais = new ByteArrayInputStream(bytes);
        int b;
        while ((b=bais.read())!=-1){
            System.out.print((char)b);
        }
        bais.close();
    }

    //ByteArrayOutputStream用于向字节数组中写入数据
    @Test
    public void testByteArrayOutputStream(){
        ByteArrayOutputStream outputStream = new ByteArrayOutputStream();
        String str="ouo";
        try {
            outputStream.write(str.getBytes());
            byte[] bytes = outputStream.toByteArray();
            System.out.println(bytes.length);
            outputStream.close();
        } catch (IOException e) {
            throw new RuntimeException(e);
        }

    }


    /**
     * 字符流
     *  这里只是简单得应用
     *  1. FileReader:读取字符文件的字符流
     *  2. FileWriter:写入字符文件的字符流
     *  3. BufferedReader:缓冲字符输入流,提高读取效率
     *  4. BufferedWriter:缓冲字符输出流,提高写入效率
     *  5. CharArrayReader:将字符数组作为字符流进行读取
     *  6. CharArrayWriter:将字符流写入字符数组中
     */

    //1. FileReader:读取字符文件的字符流
    @Test
    public void testFileReader(){
        try {
            FileReader fileReader = new FileReader("D:\\ouo.txt");
            //此处涉及一个小知识点:定义int类型的时候,如果没显示定义其值,会默认为0,而String就不行,必须得显示定义其默认值
            int c;
            while((c=fileReader.read())!=-1){
                System.out.print((char)c);
            }
            fileReader.close();
        } catch (FileNotFoundException e) {
            throw new RuntimeException(e);
        } catch (IOException e) {
            throw new RuntimeException(e);
        }
    }

    //2.FileWriter:写入字符文件得字符流
    @Test
    public void testFileWriter(){
        try {
            FileWriter fileWriter = new FileWriter("D:\\ouo.txt",true);
            fileWriter.write("无情铁手");
            fileWriter.close();
        } catch (IOException e) {
            throw new RuntimeException(e);
        }
    }

    //3. BufferedReader:缓冲字符输入流,提高读取效率
    @Test
    public void testBufferedReader() throws IOException {
        FileReader fileReader = new FileReader("D:\\ouo.txt");
        BufferedReader bufferedReader = new BufferedReader(fileReader);
        String line;
        while ((line=bufferedReader.readLine())!=null){
            System.out.print(line);
        }
        bufferedReader.close();
    }

    //4. BufferedWriter:缓冲字符输出流,提高写入效率
    @Test
    public void testBufferedWriter() throws IOException{
        FileWriter fileWriter = new FileWriter("D:\\ouo.txt");
        BufferedWriter bufferedWriter = new BufferedWriter(fileWriter);
        bufferedWriter.write("ouo is");
        bufferedWriter.newLine();           //换一行
        bufferedWriter.write("a human");
        bufferedWriter.close();
    }

    //5.CharArrayReader:将字符数组作为字符流进行读取
    @Test
    public void testCharArrayReader() throws IOException {
        char[] charArray = {'H', 'e', 'l', 'l', 'o', ' ', 'W', 'o', 'r', 'l', 'd', '!'};
        CharArrayReader charArrayReader = new CharArrayReader(charArray);
        int c;
        while((c=charArrayReader.read())!=-1){
            System.out.print((char)c);
        }
        charArrayReader.close();
    }
    //6. CharArrayWriter:将字符流写入字符数组中
    @Test
    public void  testCharArrayWriter() throws IOException {
        CharArrayWriter writer = new CharArrayWriter();
        writer.write("Hello World!");
        char[] charArray = writer.toCharArray();
        for (char c : charArray) {
            System.out.print(c);
        }
        writer.close();
    }


    /**
     * 一个业务场景
     * 我需要将某个文件复制到一个新路径下,并且需要对原来得文件进行删除
     * 1. 创建一个File对象,表示要复制的源文件。
     * 2. 创建一个File对象,表示要复制到的目标文件。
     * 3. 创建一个FileInputStream对象,读取源文件的内容。
     * 4. 创建一个FileOutputStream对象,将读取到的内容写入到目标文件中。
     * 5. 关闭输入输出流。
     * 6. 删除源文件。
     */
    @Test
    public void oneYuWuPro(){
        //创建数据源地址和目标源地址
        String sourceFilePath="D:/ouo.txt";
        String targetDirFilePath="D:/news/";
        long currentTimeMillis = System.currentTimeMillis();

        try {
            //创建源文件和目标文件对象
            File sourceFile=new File(sourceFilePath);
            File targetDirFile=new File(targetDirFilePath);
            //解决路径不存在报错
            if (!sourceFile.exists()){
                System.out.println("源目标文件不存在,请检查后再试");
                return;
            }
            if (!targetDirFile.exists()){
                targetDirFile.mkdir();
            }
            File targetFile=new File(targetDirFilePath+currentTimeMillis+".txt");

            //创建输入输出流
            FileInputStream inputStream = new FileInputStream(sourceFile);
            FileOutputStream outputStream = new FileOutputStream(targetFile);
            //读取并写入文件内容
            byte[] bytes = new byte[1024];
            int length;
            while((length = inputStream.read(bytes))>0){
                System.out.println(length);
                outputStream.write(bytes,0,length);
            }

            //关闭输入输出流
            inputStream.close();
            outputStream.close();

            //删除源文件
            if (sourceFile.exists()){
                sourceFile.delete();
            }
            System.out.println("文件移动成功!");
        }catch (IOException e){
            e.printStackTrace();
        }
    }


}
文件相关,如字符字节流,缓存流的使用
package com.ouo.ouo_skill.study;

import org.junit.Test;

import java.io.*;
import java.time.LocalDate;
import java.time.LocalDateTime;
import java.util.ArrayList;
import java.util.Date;
import java.util.List;
import java.util.Random;

/**
 * @ClassName sixDay
 * @Description 文件相关,如字符字节流,缓存流的使用
 * @Author: OUO
 * @date 2023/3/30 9:44
 * @Version 1.0
 */
public class sixDay {
    //整体结构图:https://www.runoob.com/wp-content/uploads/2013/12/iostream2xx.png
    /** 文件流分为两种:字节流和字符流  */

    /**
     * 字节流
     * 字节流是Java中用于读写二进制数据的流,它是InputStream和OutputStream的抽象基类。
     * 其中,InputStream是字节输入流的抽象类,OutputStream是字节输出流的抽象类
     *
     * 常见的字节流的子类包括FileInputStream、FileOutputStream、
     * ByteArrayInputStream、ByteArrayOutputStream等
     */


    //FileInputStream用于从文件中读取数据
    @Test
    public void testFileInputStream(){
        //FileInputStream的示例
        try {
            //读取D盘ouo.txt文件
            FileInputStream fis=new FileInputStream("D:\\ouo.txt");
            int b;
            //不等于-1就代表还存在下一个字节
            while ((b= fis.read())!=-1){
                System.out.print((char)b);
            }
            //最后记得关闭流
            fis.close();
        } catch (FileNotFoundException e) {
            throw new RuntimeException(e);
        } catch (IOException e) {
            throw new RuntimeException(e);
        }
    }

    //FileOutputStream用于向文件中写入数据
    @Test
    public void testFileOutputStream(){
        //流在打开文件进行输出前,目标文件不存在,那么该流会创建该文件。
        try {
            //后面那个true是开启追加模式,如果不加则默认是全覆盖模式
            FileOutputStream fos=new FileOutputStream("D:\\ouo.txt",true);
            String str="Hello World!";
            //这种写入会将之前文件里面的内容全覆盖
            fos.write(str.getBytes());
            fos.close();
        } catch (FileNotFoundException e) {
            throw new RuntimeException(e);
        } catch (IOException e) {
            throw new RuntimeException(e);
        }
    }


    //ByteArrayInputStream用于从字节数组中读取数据
    @Test
    public void testByteArrayInputStream() throws IOException {
        byte[] bytes = "Hello World!".getBytes();
        ByteArrayInputStream bais = new ByteArrayInputStream(bytes);
        int b;
        while ((b=bais.read())!=-1){
            System.out.print((char)b);
        }
        bais.close();
    }

    //ByteArrayOutputStream用于向字节数组中写入数据
    @Test
    public void testByteArrayOutputStream(){
        ByteArrayOutputStream outputStream = new ByteArrayOutputStream();
        String str="ouo";
        try {
            outputStream.write(str.getBytes());
            byte[] bytes = outputStream.toByteArray();
            System.out.println(bytes.length);
            outputStream.close();
        } catch (IOException e) {
            throw new RuntimeException(e);
        }

    }


    /**
     * 字符流
     *  这里只是简单得应用
     *  1. FileReader:读取字符文件的字符流
     *  2. FileWriter:写入字符文件的字符流
     *  3. BufferedReader:缓冲字符输入流,提高读取效率
     *  4. BufferedWriter:缓冲字符输出流,提高写入效率
     *  5. CharArrayReader:将字符数组作为字符流进行读取
     *  6. CharArrayWriter:将字符流写入字符数组中
     */

    //1. FileReader:读取字符文件的字符流
    @Test
    public void testFileReader(){
        try {
            FileReader fileReader = new FileReader("D:\\ouo.txt");
            //此处涉及一个小知识点:定义int类型的时候,如果没显示定义其值,会默认为0,而String就不行,必须得显示定义其默认值
            int c;
            while((c=fileReader.read())!=-1){
                System.out.print((char)c);
            }
            fileReader.close();
        } catch (FileNotFoundException e) {
            throw new RuntimeException(e);
        } catch (IOException e) {
            throw new RuntimeException(e);
        }
    }

    //2.FileWriter:写入字符文件得字符流
    @Test
    public void testFileWriter(){
        try {
            FileWriter fileWriter = new FileWriter("D:\\ouo.txt",true);
            fileWriter.write("无情铁手");
            fileWriter.close();
        } catch (IOException e) {
            throw new RuntimeException(e);
        }
    }

    //3. BufferedReader:缓冲字符输入流,提高读取效率
    @Test
    public void testBufferedReader() throws IOException {
        FileReader fileReader = new FileReader("D:\\ouo.txt");
        BufferedReader bufferedReader = new BufferedReader(fileReader);
        String line;
        while ((line=bufferedReader.readLine())!=null){
            System.out.print(line);
        }
        bufferedReader.close();
    }

    //4. BufferedWriter:缓冲字符输出流,提高写入效率
    @Test
    public void testBufferedWriter() throws IOException{
        FileWriter fileWriter = new FileWriter("D:\\ouo.txt");
        BufferedWriter bufferedWriter = new BufferedWriter(fileWriter);
        bufferedWriter.write("ouo is");
        bufferedWriter.newLine();           //换一行
        bufferedWriter.write("a human");
        bufferedWriter.close();
    }

    //5.CharArrayReader:将字符数组作为字符流进行读取
    @Test
    public void testCharArrayReader() throws IOException {
        char[] charArray = {'H', 'e', 'l', 'l', 'o', ' ', 'W', 'o', 'r', 'l', 'd', '!'};
        CharArrayReader charArrayReader = new CharArrayReader(charArray);
        int c;
        while((c=charArrayReader.read())!=-1){
            System.out.print((char)c);
        }
        charArrayReader.close();
    }
    //6. CharArrayWriter:将字符流写入字符数组中
    @Test
    public void  testCharArrayWriter() throws IOException {
        CharArrayWriter writer = new CharArrayWriter();
        writer.write("Hello World!");
        char[] charArray = writer.toCharArray();
        for (char c : charArray) {
            System.out.print(c);
        }
        writer.close();
    }


    /**
     * 一个业务场景
     * 我需要将某个文件复制到一个新路径下,并且需要对原来得文件进行删除
     * 1. 创建一个File对象,表示要复制的源文件。
     * 2. 创建一个File对象,表示要复制到的目标文件。
     * 3. 创建一个FileInputStream对象,读取源文件的内容。
     * 4. 创建一个FileOutputStream对象,将读取到的内容写入到目标文件中。
     * 5. 关闭输入输出流。
     * 6. 删除源文件。
     */
    @Test
    public void oneYuWuPro(){
        //创建数据源地址和目标源地址
        String sourceFilePath="D:/ouo.txt";
        String targetDirFilePath="D:/news/";
        long currentTimeMillis = System.currentTimeMillis();

        try {
            //创建源文件和目标文件对象
            File sourceFile=new File(sourceFilePath);
            File targetDirFile=new File(targetDirFilePath);
            //解决路径不存在报错
            if (!sourceFile.exists()){
                System.out.println("源目标文件不存在,请检查后再试");
                return;
            }
            if (!targetDirFile.exists()){
                targetDirFile.mkdir();
            }
            File targetFile=new File(targetDirFilePath+currentTimeMillis+".txt");

            //创建输入输出流
            FileInputStream inputStream = new FileInputStream(sourceFile);
            FileOutputStream outputStream = new FileOutputStream(targetFile);
            //读取并写入文件内容
            byte[] bytes = new byte[1024];
            int length;
            while((length = inputStream.read(bytes))>0){
                System.out.println(length);
                outputStream.write(bytes,0,length);
            }

            //关闭输入输出流
            inputStream.close();
            outputStream.close();

            //删除源文件
            if (sourceFile.exists()){
                sourceFile.delete();
            }
            System.out.println("文件移动成功!");
        }catch (IOException e){
            e.printStackTrace();
        }
    }


}
时间相关:如判断区间,加减时
一些常用的场景
1.假设你需要统计过去12个月得某些数据,你需要根据当前时间往前推12个月
//1.假设你需要统计过去12个月得某些数据,你需要根据当前时间往前推12个月
        LocalDateTime now = LocalDateTime.now();
        System.out.println("当前时间:"+now);
        //当前时间:2023-04-23T11:34:30.457
        List<LocalDateTime> localDateTimeList=new ArrayList<>();
        for (int i = 1; i < 13; i++) {
            //往前推i个月
            LocalDateTime localDateTime = now.minusMonths(i);
            localDateTimeList.add(localDateTime);
            System.out.println(localDateTime.format(DateTimeFormatter.ofPattern("YYYY-MM-dd HH:mm:ss")));
            //2023-03-23 11:34:30
            //2023-02-23 11:34:30
            //2023-01-23 11:34:30
            //2022-12-23 11:34:30
            //2022-11-23 11:34:30
            //2022-10-23 11:34:30
            //2022-09-23 11:34:30
            //2022-08-23 11:34:30
            //2022-07-23 11:34:30
            //2022-06-23 11:34:30
            //2022-05-23 11:34:30
            //2022-04-23 11:34:30
            //此处为了展示所以时分秒。在实际业务中你可以截取月份即可
        }
2.假设你需要统计本月每天得某些数据,你需要根据当前时间统计本月多少天。
        //2.假设你需要统计本月每天得某些数据,你需要根据当前时间统计本月多少天。
        LocalDate localDate = LocalDate.now();
        int dayOfMonth = localDate.getDayOfMonth();
        System.out.println("本月有多少天:"+dayOfMonth);
        //本月有多少天:23
3.假设你需要统计本周得某些数据,你需要根据当前时间推算本周是那些天
        //3.假设你需要统计本周得某些数据,你需要根据当前时间推算本周是那些天
        //过去一周是那些天
        for (int i = 1; i < 8; i++) {
            LocalDateTime localDateTime = now.minusDays(i);
            String format = localDateTime.format(DateTimeFormatter.ofPattern("yyyy-MM-dd HH:mm:ss"));
            System.out.println("本周往前推有那些天:"+format);
            //本周往前推有那些天:2023-04-22 11:34:30
            //本周往前推有那些天:2023-04-21 11:34:30
            //本周往前推有那些天:2023-04-20 11:34:30
            //本周往前推有那些天:2023-04-19 11:34:30
            //本周往前推有那些天:2023-04-18 11:34:30
            //本周往前推有那些天:2023-04-17 11:34:30
            //本周往前推有那些天:2023-04-16 11:34:30
        }
4.假设你需要判断当前时间在某一个时间间隔之内还是之外。例如现在是否是工作时间
        //4.假设你需要判断当前时间在某一个时间间隔之内还是之外。例如现在是否是工作时间
        LocalTime localTime = now.toLocalTime();
        //工作时间是8-12点
        LocalTime time = LocalTime.of(14, 0, 0);
        LocalTime time2 = LocalTime.of(18, 0, 0);
        String format = localTime.format(DateTimeFormatter.ofPattern("HH:mm:ss"));
        System.out.println("当前时间时分秒:"+format);
        //当前时间时分秒:11:34:30
        if (localTime.isAfter(time)&&localTime.isBefore(time2)){
            //代表在8-12点之内
            System.out.println("目前是上班时间");
        }else{
            System.out.println("目前不是上班时间");
        }
        //目前不是上班时间
LocalDate:只包含日期,不包含时区,比如:2016-10-20
    /**
     * LocalDate测试方法
     * 用于表示 “本地日期” 无 “时间”,且不承载时区信息。可以对时间进行加减等操作并返回新副本,是不可变类且线程安全的。
     * 默认格式:yyyy-MM-dd。
     */
    @Test
    public void testLocalDate(){
        //首先实例化一个LocalDate对象。以当前时间为基准
        LocalDate now = LocalDate.now();
        //此处注意了不能加时分秒。否则报错
        String format = now.format(DateTimeFormatter.ofPattern("YYYY-MM-dd"));
        System.out.println("当前格式化后得时间:"+format);
        //当前格式化后得时间:2023-03-31

        //比较时间在指定时间之后还是之前
        LocalDate a = LocalDate.of(2023, 3, 30);
        boolean after = now.isAfter(a);
        System.out.println("当前时间在2023-3-30之后:"+after);
        //当前时间在2023-3-30之后:true

    }
LocalTime:只包含时间,不包含时区,比如:23:12:10
    /**
     * LocalTime是Java 8中的一个时间类,表示一个不带时区的本地时间,
     * 可以表示类似“14:30:00”这样的时间。常用的方法如下
     *
     * LocalTime的使用场景包括但不限于:
     * 1. 在需要表示时间但不需要时区的场景中使用,例如某个商场每天营业时间的开始和结束时间。
     *  2. 在需要对时间进行计算的场景中使用,例如某个课程的开始时间和结束时间之间的时长。
     */
    @Test
    public void testLocalTime(){
        //1. now():获取当前的本地时间。
        System.out.println(LocalTime.now());                            //14:05:48.881

        //2. of(int hour, int minute, int second):创建指定小时、分钟和秒的本地时间。
        System.out.println(LocalTime.of(3,5,6));    //03:05:06

        //最大时间区间   23:59:59.999999999
        LocalTime max = LocalTime.MAX;
        System.out.println(max);
    }
LocalDateTime:包含日期和时间,内部维护着一对LocalDate与LocalTime实例,同时也不包含时区,比如:2016-10-20 23:14:21
    /**
     * LocalDateTime含有完整得时间,包含时区。
     * 它也可以转换成上面两种形式。直接toLocalDate或者toLocalDate
     */
    @Test
    public void LocalDateTime(){
        //3. getHour():获取当前时间的小时数。
        System.out.println(LocalDateTime.now().getHour());              //14

        //4. getMinute():获取当前时间的分钟数。
        System.out.println(LocalDateTime.now().getMinute());            //5

        //5. getSecond():获取当前时间的秒数。
        System.out.println(LocalDateTime.now().getSecond());            //48

        //6. plusHours(long hoursToAdd):增加指定小时数后的本地时间。
        LocalDateTime plusLocalDateTime = LocalDateTime.now();
        System.out.println(plusLocalDateTime.plusHours(1));             //2023-03-31T15:05:48.881
        //7. plusMinutes(long minutesToAdd):增加指定分钟数后的本地时间。
        System.out.println(plusLocalDateTime.plusMinutes(10));          //2023-03-31T14:15:48.881
        //8. plusSeconds(long secondsToAdd):增加指定秒数后的本地时间。
        System.out.println(plusLocalDateTime.plusSeconds(10));          //2023-03-31T14:05:58.881

        //9. format(DateTimeFormatter formatter):使用指定格式化程序格式化当前时间。
        System.out.println(plusLocalDateTime.format(DateTimeFormatter.ofPattern("YYYY-MM-dd HH:mm:ss")));
        //结果:2023-03-31 14:05:48
    }
树形结构得产生与构造
1.创建一个List集合,所以准备一个实体类TreeDO
package com.ouo.ouo_skill.model;

import java.util.ArrayList;
import java.util.List;

/**
 * @ClassName TreeDO
 * @Description 树形结构实体类
 * @Author: OYZJ
 * @date 2023/3/31 15:36
 * @Version 1.0
 */
public class TreeDO {
    private String key;
    private String title;
    private String parentId;
    private List<TreeDO> children;


    //创建一个树形结构
    public List<TreeDO> children(){
        List<TreeDO> list=new ArrayList<>();
        TreeDO treeDO=new TreeDO("1","1号",null,null);
        TreeDO treeDOPro=new TreeDO("2","2号",null,null);
        TreeDO treeDOPros=new TreeDO("3","3号",null,null);

        TreeDO treeDO1 = new TreeDO("11", "1-1号", "1", null);
        TreeDO treeDO2 = new TreeDO("12", "1-2号", "1", null);
        TreeDO treeDO3 = new TreeDO("13", "1-3号", "1", null);

        TreeDO tree1 = new TreeDO("14", "2-1号", "2", null);
        TreeDO tree2 = new TreeDO("15", "2-2号", "2", null);
        TreeDO tree3 = new TreeDO("16", "2-3号", "2", null);


        TreeDO treeDO4 = new TreeDO("21", "1-1-1号", "11", null);
        TreeDO treeDO5 = new TreeDO("22", "1-1-2号", "11", null);
        TreeDO treeDO6 = new TreeDO("23", "1-1-3号", "11", null);

        TreeDO treeDO7 = new TreeDO("24", "1-2-1号", "12", null);
        TreeDO treeDO8 = new TreeDO("25", "1-2-2号", "12", null);
        TreeDO treeDO9 = new TreeDO("26", "1-2-3号", "12", null);

        list.add(treeDO);
        list.add(treeDOPro);
        list.add(treeDOPros);
        list.add(treeDO1);
        list.add(treeDO2);
        list.add(treeDO3);
        list.add(tree1);
        list.add(tree2);
        list.add(tree3);
        list.add(treeDO4);
        list.add(treeDO5);
        list.add(treeDO6);
        list.add(treeDO7);
        list.add(treeDO8);
        list.add(treeDO9);
        return list;
    }

    public TreeDO() {
    }

    public TreeDO(String key, String title, String parentId, List<TreeDO> children) {
        this.key = key;
        this.title = title;
        this.parentId = parentId;
        this.children = children;
    }

    public String getKey() {
        return key;
    }

    public void setKey(String key) {
        this.key = key;
    }

    public String getTitle() {
        return title;
    }

    public void setTitle(String title) {
        this.title = title;
    }

    public String getParentId() {
        return parentId;
    }

    public void setParentId(String parentId) {
        this.parentId = parentId;
    }

    public List<TreeDO> getChildren() {
        return children;
    }

    public void setChildren(List<TreeDO> children) {
        this.children = children;
    }

    @Override
    public String toString() {
        return "TreeDO{" +
                "key='" + key + '\'' +
                ", title='" + title + '\'' +
                ", parentId='" + parentId + '\'' +
                ", children=" + children +
                '}';
    }
}
具体实现代码
package com.ouo.ouo_skill.study;

import com.ouo.ouo_skill.model.TreeDO;
import org.apache.commons.lang3.StringUtils;
import org.junit.Test;

import java.util.ArrayList;
import java.util.List;

/**
 * @ClassName eighthDay
 * @Description 树形结构得产生与构造
 * @Author: OUO
 * @date 2023/3/31 15:35
 * @Version 1.0
 */
public class eighthDay {

    @Test
    public void testTree(){
        //树形集合--调用构建树形初始数据集合
        List<TreeDO> treeDOList = new TreeDO().children();
        List<TreeDO> treeDOS = buildTreePu(treeDOList);
        for (TreeDO treeDO : treeDOS) {
            System.out.println(treeDO.toString());
//TreeDO{key='1', title='1号', parentId='null', children=[TreeDO{key='11', title='1-1号', parentId='1', children=[TreeDO{key='21', title='1-1-1号', parentId='11', children=null}, TreeDO{key='22', title='1-1-2号', parentId='11', children=null}, TreeDO{key='23', title='1-1-3号', parentId='11', children=null}]}, TreeDO{key='12', title='1-2号', parentId='1', children=[TreeDO{key='24', title='1-2-1号', parentId='12', children=null}, TreeDO{key='25', title='1-2-2号', parentId='12', children=null}, TreeDO{key='26', title='1-2-3号', parentId='12', children=null}]}, TreeDO{key='13', title='1-3号', parentId='1', children=null}]}
//TreeDO{key='2', title='2号', parentId='null', children=[TreeDO{key='14', title='2-1号', parentId='2', children=null}, TreeDO{key='15', title='2-2号', parentId='2', children=null}, TreeDO{key='16', title='2-3号', parentId='2', children=null}]}
//TreeDO{key='3', title='3号', parentId='null', children=null}
        }

    }
    /**
     * 将List集合转换为树形结构集合。普通版
     * @param treeList
     * @return
     */
    public static List<TreeDO> buildTreePu(List<TreeDO> treeList) {
        // 用于存储树形结构的集合
        List<TreeDO> tree = new ArrayList<>();

        // 遍历整个树形结构list
        for (TreeDO node : treeList) {
            // 如果当前节点的parentId不在list中,则说明该节点为顶级节点
            if (StringUtils.isBlank(node.getParentId()) || !containsParentId(node.getParentId(), treeList)) {
                tree.add(findChildren(node, treeList));
            }
        }

        return tree;
    }

    /**
     * 判断list中是否存在指定的parentId
     */
    private static boolean containsParentId(String parentId, List<TreeDO> treeList) {
        for (TreeDO node : treeList) {
            if (StringUtils.equals(node.getKey(), parentId)) {
                return true;
            }
        }
        return false;
    }

    /**
     * 递归查找子节点
     */
    private static TreeDO findChildren(TreeDO parentNode, List<TreeDO> treeList) {
        for (TreeDO node : treeList) {
            if (StringUtils.equals(node.getParentId(), parentNode.getKey())) {
                if (parentNode.getChildren() == null) {
                    parentNode.setChildren(new ArrayList<>());
                }

                parentNode.getChildren().add(findChildren(node, treeList));
            }
        }

        return parentNode;
    }
}
AOP得了解运用
1.引入pom依赖
        <!-- 引入AOP相关       -->
        <dependency>
            <groupId>org.springframework.boot</groupId>
            <artifactId>spring-boot-starter-aop</artifactId>
        </dependency>
2.创建AOP注解
@Target(ElementType.METHOD)
@Retention(RetentionPolicy.RUNTIME)
public @interface Listen {

    String ouoListen() default "ouo";
}
3.测试监听AOP
/**
 * @ClassName ListenAop
 * @Description 测试监听AOP
 * @Author: OYZJ
 * @date 2023/4/3 12:28
 * @Version 1.0
 */
@Aspect
@Slf4j
@Component
public class ListenAop {

    /** 环绕通知 */
    @Around(value = "@annotation(listen)",argNames = "pjp,listen")
    public Object testAop(ProceedingJoinPoint pjp,Listen listen){
        //获取默认值
        log.info("iiii>>>"+listen.ouoListen());
        //获取方法参数
        Object[] args= pjp.getArgs();
        try {
            //获取方法返回值,到时候需要返回,否则方法不能正常返回
            Object proceed = pjp.proceed(args);
            if (proceed instanceof String){
                System.out.println(proceed);
            }
            return proceed;
        } catch (Throwable e) {
            throw new RuntimeException(e);
        }
    }
}
4.测试
在方法上加上AOP注解后即可
    @Listen(ouoListen = "123")
    public String ss(String a){
        return a;
    }
另外一种方式
1.定义注解
@Documented
@Target({ElementType.METHOD})
@Retention(RetentionPolicy.RUNTIME)
public @interface OuoLog {

    /**
     * 参数描述
     * @return
     */
    String params() default "";
}
2.AOP所要干的事
package com.ouo.ouo_skill.aop;

import lombok.extern.slf4j.Slf4j;
import org.aspectj.lang.JoinPoint;
import org.aspectj.lang.annotation.AfterReturning;
import org.aspectj.lang.annotation.Aspect;
import org.aspectj.lang.annotation.Pointcut;
import org.aspectj.lang.reflect.MethodSignature;
import org.slf4j.Logger;
import org.slf4j.LoggerFactory;
import org.springframework.stereotype.Component;

/**
 * @ClassName LogAspect
 * @Description 日志AOP得了解与使用
 * @Author: OYZJ
 * @date 2023/3/31 17:09
 * @Version 1.0
 */
@Aspect
@Component
@Slf4j
public class LogAspect {

    private Logger LOG = LoggerFactory.getLogger(LogAspect.class);


    /**
     * 定义切入点,
     */
    @Pointcut("@annotation(com.ouo.ouo_skill.aop.OuoLog)")
    public void Logs(){

    }

    /**
     * 后置通知
     */
    @AfterReturning(returning = "ret",pointcut = "Logs()")
    public void Logs(JoinPoint joinPoint,Object ret){
        //调用保存方法
        saveTest(joinPoint,ret);
    }

    /**
     * 保存日志信息--测试
     * @param joinPoint
     * @param ret
     */
    private void saveTest(JoinPoint joinPoint,Object ret){
        MethodSignature signature = (MethodSignature) joinPoint.getSignature();
        OuoLog annotation = signature.getMethod().getAnnotation(OuoLog.class);
        System.out.println("后置通知:"+ret);
        System.out.println("携带参数:"+annotation.params());
    }

}
3.测试,调用如下方法后会执行AOP里面的业务逻辑
    @OuoLog(params = "测试ooo")
    public int ouoAop(int s){
        return s;
    }
Strem流得基本使用
平常使用场景
1.在一个用户集合中,我需要根据年龄划分各组成员,
    @Test
    public void testOne(){
        List<UserStreamDO> list = new UserStreamDO().getList();
        Map<Integer, List<UserStreamDO>> listMap = list.stream().collect(Collectors.groupingBy(UserStreamDO::getAge));
        listMap.forEach((age,userList)->{
            System.out.println("当前分组年龄:"+age+",对应实体类"+userList.toString());
        });
    }
2.在用户集合中,根据年龄排序
    @Test
    public void testTwo(){
        List<UserStreamDO> list = new UserStreamDO().getList();
        //排序1-按升序排序
        List<UserStreamDO> collect = list.stream().sorted(Comparator.comparing(UserStreamDO::getAge)).collect(Collectors.toList());
        //排序2
        Collections.sort(list,Comparator.comparing(UserStreamDO::getAge).reversed());
        for (UserStreamDO userStreamDO : list) {
            System.out.println(userStreamDO.toString());
        }
    }
3.在用户集合中,统计出人数,以及总年龄,男女各多少人
    @Test
    public void testThree(){
        List<UserStreamDO> list = new UserStreamDO().getList();
        int i; /** 男数量  */
        int ii;/** 女数量  */
        i = list.stream().filter(userStreamDO -> userStreamDO.getSex().equals("男")).collect(Collectors.toList()).size();
        ii = list.stream().filter(userStreamDO -> userStreamDO.getSex().equals("女")).collect(Collectors.toList()).size();
        System.out.println("男数量:"+i+"----女数量:"+ii);

        Integer reduce = list.stream().map(UserStreamDO::getAge).reduce(0, (a, b) -> a + b);
        System.out.println("总年龄:"+reduce);

    }
4.将所有用户的姓名拼接成字符串,计算所有用户的年龄平均值
    @Test
    public void testFour(){
        List<UserStreamDO> list = new UserStreamDO().getList();
        //拼接字符串
        String collect = list.stream().map(UserStreamDO::getUsername).collect(Collectors.joining(","));
        System.out.println("》》》"+collect);
        //计算所有用户得年龄平均值
        double asDouble = list.stream().mapToInt(UserStreamDO::getAge).average().getAsDouble();
        System.out.println("平均值>:"+asDouble);
    }
反射机制得日常使用
1.创建一个实体类做测试
package com.ouo.ouo_skill.model;

import com.ouo.ouo_skill.aop.OuoLog;

/**
 * @ClassName ReflectDO
 * @Description OYZJ
 * @Author: OYZJ
 * @date 2023/4/6 9:40
 * @Version 1.0
 */
public class ReflectDO {
    private String reName;
    public int age;
    private String address;

    public ReflectDO(){

    }

    public ReflectDO(String reName, int age, String address) {
        this.reName = reName;
        this.age = age;
        this.address = address;
    }

    public String getReName() {
        return reName;
    }

    public void setReName(String reName) {
        this.reName = reName;
    }

    public int getAge() {
        return age;
    }

    public void setAge(int age) {
        this.age = age;
    }

    public String getAddress() {
        return address;
    }

    public void setAddress(String address) {
        this.address = address;
    }

    public String testReflect(String message){
        System.out.println("测试反射传入得内容:"+message);
        return message;
    }

    private String testOuo(String sss){
        System.out.println("测试私有方法:"+sss);
        return sss;
    }

    @Override
    public String toString() {
        return "ReflectDO{" +
                "reName='" + reName + '\'' +
                ", age=" + age +
                ", address='" + address + '\'' +
                '}';
    }
}
2.业务代码
package com.ouo.ouo_skill.study;

import com.ouo.ouo_skill.model.ReflectDO;
import org.junit.Test;

import java.lang.reflect.Constructor;
import java.lang.reflect.Field;
import java.lang.reflect.InvocationTargetException;
import java.lang.reflect.Method;

/**
 * @ClassName elevenDay
 * @Description 反射机制得日常使用
 * 1. 自定义注解和反射:在编写Java程序时,我们可以使用注解来标记某些类、方法或属性,然后使用反射机制来读取这些注解信息,以便在程序运行时进行相应的处理。
 *
 * 2. 动态代理:反射机制可以用于创建动态代理对象,这种代理对象可以在运行时动态地代理某个类的方法,从而实现对该类的方法进行增强或控制。
 *
 * 3. 序列化和反序列化:当我们需要将一个Java对象序列化为字节数组或者反序列化时,就需要使用反射机制来获取该对象的类信息,以便正确地进行序列化和反序列化操作。
 *
 * 4. 反射调用方法:在某些情况下,我们需要在运行时动态地调用某个类的方法,这时就可以使用反射机制来获取该类的方法信息,并在运行时调用它。
 *
 * 5. 动态加载类和资源:反射机制可以用于动态加载某个类或资源文件,这种方式可以让我们在运行时动态地加载一些未知的类或资源,从而提高程序的灵活性和可扩展性。
 * @Author: OUO
 * @date 2023/4/6 9:33
 * @Version 1.0
 */
public class elevenDay {
    //1. 在框架中使用反射机制,以便在运行时动态加载类和调用类中的方法。
    //2. 使用反射机制获取类的属性并进行操作。
    //3. 使用反射机制获取类的构造函数并创建对象。
    //4. 在测试中使用反射机制来验证私有方法的行为。
    @Test
    public void testReflect() throws ClassNotFoundException {
        try {
            //加载类并创建对象
            Class<?> clazz=Class.forName("com.ouo.ouo_skill.model.ReflectDO");
            Object obj = clazz.newInstance();
            //调用方法
            Method method=clazz.getMethod("testReflect",String.class);
            method.invoke(obj,"hello world");

            /**2.使用反射机制获取类的属性并进行操作。*/
            //获取类的所有属性
            Class<?> cla = ReflectDO.class;
            Field[] fields = cla.getDeclaredFields();
            for (Field field : fields) {
                System.out.println(field);
                //测试反射传入得内容:hello world
                //private java.lang.String com.ouo.ouo_skill.model.ReflectDO.reName11
			//public int com.ouo.ouo_skill.model.ReflectDO.age11
			//private java.lang.String com.ouo.ouo_skill.model.ReflectDO.address11
            }


            //设置属性的值
            Field field = cla.getDeclaredField("address");
            field.setAccessible(true);
            field.set(obj,"大海市农贸市场355号");

            //获取属性的值
            Object value = field.get(obj);
            System.out.println(value);
            //大海市农贸市场355号

            /**3.使用反射机制获取类的构造函数并创建对象。*/
            Class<ReflectDO> doClass = ReflectDO.class;
            Constructor<ReflectDO> constructor = doClass.getConstructor(String.class, int.class,String.class);

            //创建对象
            ReflectDO reflectDO = constructor.newInstance("ouo", 13,"我家在东北");
            System.out.println(reflectDO.toString());
            //ReflectDO{reName='ouo', age=13, address='我家在东北'}

            /**4.在测试中使用反射机制来验证私有方法的行为。*/
            Class<ReflectDO> aClass = ReflectDO.class;
            Method testOuo = aClass.getDeclaredMethod("testOuo", String.class);
            testOuo.setAccessible(true); //允许访问私有方法
            Object invoke = testOuo.invoke(obj, "测测测");
            System.out.println(invoke);
            //测试私有方法:测测测
		   //测测测

        } catch (InstantiationException e) {
            throw new RuntimeException(e);
        } catch (IllegalAccessException e) {
            throw new RuntimeException(e);
        } catch (NoSuchMethodException e) {
            throw new RuntimeException(e);
        } catch (InvocationTargetException e) {
            throw new RuntimeException(e);
        } catch (NoSuchFieldException e) {
            throw new RuntimeException(e);
        }
    }
}
日常工作实践篇
Word模板得生成,导入
1.首先引入pom依赖
        <!-- 引入poi-tl       -->
        <dependency>
            <groupId>com.deepoove</groupId>
            <artifactId>poi-tl</artifactId>
            <version>1.12.0<</version>
        </dependency>
        <dependency>
            <groupId>org.apache.poi</groupId>
            <artifactId>poi</artifactId>
            <version>5.2.2</version>
        </dependency>
        <dependency>
            <groupId>org.apache.poi</groupId>
            <artifactId>poi-ooxml</artifactId>
            <version>5.2.2</version>
        </dependency>
2.具体的业务实现代码。(需要实现准备一个Word模板)
package com.ouo.ouo_skill.woring;

import com.deepoove.poi.XWPFTemplate;
import com.deepoove.poi.config.Configure;
import com.deepoove.poi.data.Pictures;
import com.deepoove.poi.plugin.table.LoopRowTableRenderPolicy;
import com.deepoove.poi.util.PoitlIOUtils;
import com.ouo.ouo_skill.model.CaseFileList;
import com.ouo.ouo_skill.model.FlowCommentDO;
import com.ouo.ouo_skill.model.ReflectDO;
import com.ouo.ouo_skill.model.WordDTO;
import org.apache.poi.xwpf.extractor.XWPFWordExtractor;
import org.apache.poi.xwpf.usermodel.XWPFDocument;
import org.apache.tika.exception.TikaException;
import org.apache.tika.metadata.Metadata;
import org.apache.tika.parser.AutoDetectParser;
import org.apache.tika.parser.ParseContext;
import org.apache.tika.parser.Parser;
import org.apache.tika.sax.BodyContentHandler;
import org.junit.Test;
import org.springframework.web.bind.annotation.GetMapping;
import org.springframework.web.bind.annotation.RequestMapping;
import org.springframework.web.bind.annotation.RestController;
import org.xml.sax.SAXException;

import javax.servlet.http.HttpServletResponse;
import java.io.*;
import java.time.LocalDateTime;
import java.time.format.DateTimeFormatter;
import java.util.Date;
import java.util.HashMap;
import java.util.List;
import java.util.Map;

/**
 * @ClassName oneDay
 * @Description  Word模板得生成,导入
 * 使用的是poi-tl,官网地址:http://deepoove.com/poi-tl/#hack-loop-table
 * @Author: OYZJ
 * @date 2023/4/6 11:05
 * @Version 1.0
 */
@RestController
@RequestMapping("ouo")
public class oneDay {

    private static final String imgUrlDemo="http://deepoove.com/images/icecream.png";

    private static final String templateURL="D:\\file\\ouo\\testOUO.docx";

    private static final String wordDataUrl="D:\\ouoDev\\ouoAll\\ouo_skill\\src\\main\\resources\\template\\testWordData.docx";

    /**
     * word根据模板导出
     */
    @GetMapping("/test")
    public void testWord(HttpServletResponse response) throws IOException {
        //设置响应头
        response.setContentType("application/octet-stream");
        response.setHeader("Content-Disposition", "attachment;filename=test.docx");

        File file = new File(templateURL);
        if (!file.exists()){
            file.mkdirs();
        }

        //准备数据
        Map<String,Object> map=new HashMap<>();
        //数据一
        WordDTO aDo = new WordDTO().getDO();
        //数据二
        List<FlowCommentDO> list = new FlowCommentDO().getList();
        //数据三
        List<CaseFileList> caseFileLists = new CaseFileList().getList();
        //存入数据源
        map.put("case",aDo);
        map.put("flowComment",list);
        map.put("caseFileList",caseFileLists);
        map.put("username","OUO");
        map.put("nowDate", LocalDateTime.now().format(DateTimeFormatter.ofPattern("yyyy-MM-dd HH:mm:ss")));
        // 设置图片宽高
        map.put("lastedImg", Pictures.ofUrl(imgUrlDemo).size(100, 100).create());
        //绑定过程集合与附件列表
        LoopRowTableRenderPolicy policy = new LoopRowTableRenderPolicy();
        Configure config = Configure.builder().useSpringEL(true)
                .bind("flowComment", policy).bind("caseFileList", policy).build();

        //调用根据模板生成word,并且后续关闭文件流
        XWPFTemplate template = XWPFTemplate.compile(templateURL,config).render(map);
        OutputStream out = response.getOutputStream();
        BufferedOutputStream bos = new BufferedOutputStream(out);
        template.write(bos);
        bos.flush();
        out.flush();
        PoitlIOUtils.closeQuietlyMulti(template, bos, out);
    }


    /**
     * word导入读取其中数据
     */
    @Test
    public void testReadWord(){
        // 读取word文档
        XWPFDocument doc = null;
        try {
            doc = new XWPFDocument(new FileInputStream(wordDataUrl));
            XWPFWordExtractor extractor = new XWPFWordExtractor(doc);
            // 提取文本内容
            String text = extractor.getText();
            System.out.println("获取到的Word文本内容:"+text);
            // 关闭资源
            extractor.close();
            doc.close();
        } catch (IOException e) {
            throw new RuntimeException(e);
        }
    }
}
模板如下

Excel模板生成,导入
1.我们采用得是阿里开源得EasyExcel包
        <!--  引入EasyExcel方便Excel导入导出做准备      -->
        <dependency>
            <groupId>com.alibaba</groupId>
            <artifactId>easyexcel</artifactId>
            <version>3.2.1</version>
        </dependency>
 		<!-- 引入hutool工具类包       -->
        <dependency>
            <groupId>cn.hutool</groupId>
            <artifactId>hutool-all</artifactId>
            <version>5.8.15</version>
        </dependency>
2.具体操作代码
package com.ouo.ouo_skill.woring;

import cn.hutool.core.collection.CollUtil;
import cn.hutool.poi.excel.ExcelReader;
import cn.hutool.poi.excel.ExcelUtil;
import com.alibaba.excel.EasyExcel;
import com.ouo.ouo_skill.model.TestExcelDO;
import org.junit.Test;

import java.io.File;
import java.io.FileInputStream;
import java.io.InputStream;
import java.util.ArrayList;
import java.util.List;
import java.util.Map;

/**
 * @ClassName twoDay
 * @Description Excel模板生成,导入
 * 使用得是EasyExcel满足大部分Excel得导入导出场景。这里只做简单应用,具体还有更多细节
 * 请查询官网:https://easyexcel.opensource.alibaba.com/docs/current/
 * @Author: OYZJ
 * @date 2023/4/6 16:36
 * @Version 1.0
 */
public class twoDay {

    /** 根据模板导出Excel  */
    @Test
    public void testExcelWrite(){
        List<TestExcelDO> list=new ArrayList<>();
        for (int i = 0; i < 10; i++) {
            TestExcelDO testExcelDO=new TestExcelDO();
            testExcelDO.setName("测试"+i);
            testExcelDO.setSex(i%2==0?"男":"女");
            testExcelDO.setAge(18+i);
            testExcelDO.setPhone("1856545101"+i);
            testExcelDO.setAddress("长江东路十八栋七单元"+(i+1)+"楼");
            list.add(testExcelDO);
        }
        String fileName = "D:\\" + "simpleWrite" + System.currentTimeMillis() + ".xlsx";
        EasyExcel.write(fileName, TestExcelDO.class)
                .sheet("模板")
                .doWrite(()->{
                    return list;
                });
    }


    /** 读Excel--此处额外加入了监听器,防止OOM  */
    @Test
    public void testExcelRead(){
        //默认识别对象
        List<TestExcelDO> list = EasyExcel.read("D:\\simpleWrite1680775214258.xlsx").head(TestExcelDO.class).sheet().doReadSync();
        for (TestExcelDO testExcelDO : list) {
            System.out.println(testExcelDO.toString());
            //打印结果:
//            TestExcelDO{name='测试0', sex='男', age=18, phone='18565451010', address='长江东路十八栋七单元1楼', testIgnore='null'}
//            TestExcelDO{name='测试1', sex='女', age=19, phone='18565451011', address='长江东路十八栋七单元2楼', testIgnore='null'}
//            TestExcelDO{name='测试2', sex='男', age=20, phone='18565451012', address='长江东路十八栋七单元3楼', testIgnore='null'}
//            TestExcelDO{name='测试3', sex='女', age=21, phone='18565451013', address='长江东路十八栋七单元4楼', testIgnore='null'}
//            TestExcelDO{name='测试4', sex='男', age=22, phone='18565451014', address='长江东路十八栋七单元5楼', testIgnore='null'}
//            TestExcelDO{name='测试5', sex='女', age=23, phone='18565451015', address='长江东路十八栋七单元6楼', testIgnore='null'}
//            TestExcelDO{name='测试6', sex='男', age=24, phone='18565451016', address='长江东路十八栋七单元7楼', testIgnore='null'}
//            TestExcelDO{name='测试7', sex='女', age=25, phone='18565451017', address='长江东路十八栋七单元8楼', testIgnore='null'}
//            TestExcelDO{name='测试8', sex='男', age=26, phone='18565451018', address='长江东路十八栋七单元9楼', testIgnore='null'}
//            TestExcelDO{name='测试9', sex='女', age=27, phone='18565451019', address='长江东路十八栋七单元10楼', testIgnore='null'}
        }

        //不带对象
        List<Map<Integer, String>> listMap = EasyExcel.read("D:\\simpleWrite1680775214258.xlsx").sheet().doReadSync();
        for (Map<Integer, String> data : listMap) {
            // 返回每条数据的键值对 表示所在的列 和所在列的值
            System.out.println(data);
               //打印结果
//            {0=测试0, 1=男, 2=18, 3=18565451010, 4=长江东路十八栋七单元1楼}
//            {0=测试1, 1=女, 2=19, 3=18565451011, 4=长江东路十八栋七单元2楼}
//            {0=测试2, 1=男, 2=20, 3=18565451012, 4=长江东路十八栋七单元3楼}
//            {0=测试3, 1=女, 2=21, 3=18565451013, 4=长江东路十八栋七单元4楼}
//            {0=测试4, 1=男, 2=22, 3=18565451014, 4=长江东路十八栋七单元5楼}
//            {0=测试5, 1=女, 2=23, 3=18565451015, 4=长江东路十八栋七单元6楼}
//            {0=测试6, 1=男, 2=24, 3=18565451016, 4=长江东路十八栋七单元7楼}
//            {0=测试7, 1=女, 2=25, 3=18565451017, 4=长江东路十八栋七单元8楼}
//            {0=测试8, 1=男, 2=26, 3=18565451018, 4=长江东路十八栋七单元9楼}
//            {0=测试9, 1=女, 2=27, 3=18565451019, 4=长江东路十八栋七单元10楼}
        }
    }


    /** 读Excel。此处用Hutool工具包中封装好得Excel工具类  */
    @Test
 	public void testExcelHutool(){
        File file = new File("D:\\simpleWrite1694748972985.xlsx");
        ExcelReader reader = ExcelUtil.getReader(file);
        //此处reader有很多方法,这里取默认第一行做为标题,数据从第二行开始.读取所有行
        List<Map<String, Object>> readAll = reader.readAll();
        if (CollUtil.isEmpty(readAll)){
            System.out.println("没有数据");
        }
        for (Map<String, Object> map : readAll) {
            //此处注意点得就是Object转换成我们想要得类型,转换类型时要考虑值为空等情况
            Object o = map.get("键值-也就是Excel标题某一列值");
            String o2 = (String)map.get("姓名");
            System.out.println("名称:"+o2);
            //输出结果
            //名称:测试0
            //名称:测试1
            //名称:测试2
            //名称:测试3
            //名称:测试4
            //名称:测试5
            //名称:测试6
            //名称:测试7
            //名称:测试8
            //名称:测试9
            Object o3 = map.get("键值-也就是Excel标题某一列值");
        }
    }
}
3.导出Excel结果图片

Word转PDF生成
1.pom文件引入对应的转换包
   <!-- 引入jodc转换文档依赖,本次使用主要是word->pdf       -->
        <dependency>
            <groupId>org.jodconverter</groupId>
            <artifactId>jodconverter-local</artifactId>
            <version>${jodconverter.version}</version>
        </dependency>
        <dependency>
            <groupId>org.jodconverter</groupId>
            <artifactId>jodconverter-spring-boot-starter</artifactId>
            <version>${jodconverter.version}</version>
        </dependency>
2.具体操作代码
package com.ouo.ouo_skill.woring;

import cn.hutool.extra.spring.SpringUtil;
import lombok.extern.slf4j.Slf4j;
import org.jodconverter.core.DocumentConverter;
import org.jodconverter.core.document.DefaultDocumentFormatRegistry;
import org.jodconverter.core.document.DocumentFormat;
import org.jodconverter.core.office.OfficeException;
import org.jodconverter.core.office.OfficeUtils;
import org.jodconverter.local.JodConverter;
import org.jodconverter.local.office.LocalOfficeManager;
import org.junit.Test;
import org.springframework.beans.factory.annotation.Autowired;
import org.springframework.web.bind.annotation.GetMapping;
import org.springframework.web.bind.annotation.RequestMapping;
import org.springframework.web.bind.annotation.RestController;

import java.io.*;
import java.util.Iterator;

/**
 * @ClassName threeDay
 * @Description PDF生成
 * 目前方案是有个word模板,然后将生成得word转PDF
 * 比较好点得文章:https://blog.csdn.net/Gufang617/article/details/127162270
 * @Author: OUO
 * @date 2023/4/7 11:36
 * @Version 1.0
 */
@Slf4j
@RestController
@RequestMapping("pdf")
public class threeDay {

    private static DocumentConverter documentConverter;

    @GetMapping("/test")
    public void wordConverter() throws IOException {
       File inputFile= new File("D:\\ouoDev\\ouoAll\\ouo_skill\\src\\main\\resources\\template\\testWordData.docx");
        long currentTimeMillis = System.currentTimeMillis();
        File outputFile = new File("D:\\ouoDev\\ouoAll\\ouo_skill\\src\\main\\resources\\template\\" + currentTimeMillis + ".pdf");

        try {
            documentConverter = SpringUtil.getBean(DocumentConverter.class);
            documentConverter.convert(inputFile).as(DefaultDocumentFormatRegistry.DOCX).to(outputFile)
                    .as(DefaultDocumentFormatRegistry.PDF).execute();
//            DocumentFormat targetFormat=DefaultDocumentFormatRegistry.PDF;
//            converter.convert(inputFile).to(outputFile).as(targetFormat).execute();
        } catch (Exception e) {
            log.error("错误信息"+e);
        }

    }
}
3.yaml中配置
# 附件预览
jodconverter:
  local:
    enabled: true
    #   # 设置LibreOffice目录libreoffice
    officeHome: D:\\LibreOffice\\LibreOfficePortable\\App\\libreoffice
    #   # CentOS 下安装 LibreOffice:
    #   # 1、安装:yum -y install libreoffice
    #   # 2、配置:officeHome: /usr/lib64/libreoffice
    #   # Linux 中文字体乱码解决:
    #   # 1、上传 C:\Windows\Fonts 下的字体到 /usr/share/fonts/windows 目录
    #   # 2、执行命令: chmod 644 /usr/share/fonts/windows/* && fc-cache -fv
    #   # 监听端口,开启多个LibreOffice进程,每个端口对应一个进程
    #   portNumbers: 8100,8101,8102
    portNumbers: 2002,2003
    #   # LibreOffice进程重启前的最大进程数
    maxTasksPerProcess: 10
    #   # 任务在转换队列中的最大生存时间,默认30s
    taskQueueTimeout: 30
附件统一配置管理(上传下载)
代码如下:至于额外得依赖可以查看我引入得import内容自行查找
FilePropertis类
/**
 * @ClassName FileProperties
 * @Description 附件相关配置类
 * @Author: OYZJ
 * @date 2023/4/7 14:52
 * @Version 1.0
 */
@ConfigurationProperties(prefix = "file")
@Component
@Data
public class FileProperties implements Serializable {

    /**
     * 文件根路径
     */
    private String rootPath;

    /**
     * 上传路径
     */
    private String profile;


}
具体操作类
package com.ouo.ouo_skill.woring;

import cn.hutool.core.io.FileUtil;
import cn.hutool.core.io.IoUtil;
import cn.hutool.core.io.file.FileNameUtil;
import cn.hutool.core.util.IdUtil;
import com.ouo.ouo_skill.properties.FileProperties;
import org.apache.tomcat.util.http.fileupload.FileUpload;
import org.slf4j.Logger;
import org.slf4j.LoggerFactory;
import org.springframework.http.MediaType;
import org.springframework.web.bind.annotation.*;
import org.springframework.web.multipart.MultipartFile;

import javax.annotation.Resource;
import javax.servlet.ServletOutputStream;
import javax.servlet.http.HttpServletRequest;
import javax.servlet.http.HttpServletResponse;
import java.io.BufferedInputStream;
import java.io.File;
import java.io.IOException;
import java.io.UnsupportedEncodingException;
import java.net.URLEncoder;
import java.nio.charset.StandardCharsets;
import java.time.LocalDate;
import java.time.format.DateTimeFormatter;

/**
 * @ClassName FourPoint
 * @Description 附件统一配置管理
 *
 * @Author: OYZJ
 * @date 2023/4/7 14:36
 * @Version 1.0
 */
@RestController
@CrossOrigin
@RequestMapping("basefile")
public class FourPoint {

    private static final Logger log = LoggerFactory.getLogger(FourPoint.class);


    @Resource
    protected FileProperties fileProperties;

    private static final String FILE_DELIMETER = ",";


    /**
     * 一般文件上传也就是上传,删除,修改.预览 。
     */


    /**
     * 上传单个附件
     */
    @PostMapping("/upload")
    public void testUpload(@RequestParam("file")MultipartFile file) throws IOException {
        //上传文件到此路径
        String filePath = fileProperties.getProfile();
        //为了后面方便查找创建新得文件夹路径
        String path=filePath+ File.separator+ LocalDate.now().format(DateTimeFormatter.ofPattern("yyyyMMdd"))+File.separator;
        //获取附件名称
        String filename = file.getOriginalFilename();
        //获取附件大小
        long size = file.getSize();
        //获取文件得扩展名
        String suffix = "." + FileNameUtil.getSuffix(filename);
        //文件存储地址
        String fileStorage=path+IdUtil.simpleUUID()+ suffix;
        // 如果没有就创建文件夹
        FileUtil.mkdir(filePath + path);
        //指定路径生成文件
        file.transferTo(new File(fileStorage));
		//对应的参数可以保存到自己得附件表或者业务表中
         //此处省略存储数据库得过程
    }


    /**
     * 下载附件---此处采用本地附件,实际业务中可以传入附件名称或者附件地址来下载
     * @param
     * @param response
     */
    @GetMapping("/downloadFile")
    public void downloadFile(HttpServletResponse response) throws UnsupportedEncodingException {
        //一般通过附件ID查询附件详细内容,此处由于演示,我们直接采用本地附件下载得形式
        //@RequestParam Long fileId,
        //本地文件路径
        File file=new File("D:\\ouo.txt");
        //清空缓冲区,状态码和响应头
        // 清空缓冲区,状态码和响应头(headers)
        response.reset();
        // 设置ContentType,响应内容为二进制数据流,编码为utf-8,此处设定的编码是文件内容的编码
        response.setContentType("application/octet-stream;charset=utf-8");
        response.addHeader("Access-Control-Allow-Origin", "*");
        // 以(Content-Disposition: attachment; filename="filename.jpg")格式设定默认文件名,设定utf8编码,此处的编码是文件名的编码,
        // 使能正确显示中文文件名
        String fileName="ouo.txt";
        response.setHeader("Content-Disposition", "attachment;fileName=" + fileName
                + ";filename*=utf-8''" + URLEncoder.encode(fileName, "utf-8"));

        try {
            ServletOutputStream outputStream=response.getOutputStream();
            BufferedInputStream bufferedInputStream = FileUtil.getInputStream(file);
            //hutool工具包中的
            IoUtil.copy(bufferedInputStream,outputStream);
        }catch (IOException e){
            log.info("下载附件出现IO流异常:{}",e);
        }


    }


}
识别验证码(本地/第三方)
1.老样子引入pom文件依赖,此处本地ocr识别包我会上传到我得资源里面去
    <!-- 引入 识别验证码工具包      -->
        <!--java openCV-->
        <dependency>
            <groupId>org.bytedeco</groupId>
            <artifactId>javacv-platform</artifactId>
            <version>1.5.5</version>
        </dependency>
        <!--  引入图片验证码识别      -->
        <dependency>
            <groupId>com.microsoft.onnxruntime</groupId>
            <artifactId>onnxruntime</artifactId>
            <version>1.12.1</version>
        </dependency>
        <dependency>
            <groupId>top.gcszhn</groupId>
            <artifactId>d4ocr</artifactId>
            <version>1.0</version>
            <scope>system</scope>
            <!-- 上传到我得资源中:https://download.csdn.net/download/qq_45059975/88342922  -->
            <systemPath>${project.basedir}/src/main/resources/lib/d4ocr.jar
            </systemPath>
        </dependency>
        <dependency>
            <groupId>com.alibaba</groupId>
            <artifactId>fastjson</artifactId>
            <version>1.2.68</version>
        </dependency>
2.具体操作代码
package com.ouo.ouo_skill.woring;

import cn.hutool.core.codec.Base64Decoder;
import cn.hutool.core.util.RandomUtil;
import cn.hutool.core.util.StrUtil;
import cn.hutool.http.HttpResponse;
import cn.hutool.http.HttpUtil;
import com.alibaba.fastjson.JSON;
import com.alibaba.fastjson.JSONObject;
import lombok.extern.slf4j.Slf4j;
import org.junit.Test;
import top.gcszhn.d4ocr.OCREngine;

import javax.imageio.ImageIO;
import java.awt.image.BufferedImage;
import java.io.File;
import java.io.IOException;
import java.util.HashMap;

import static cn.hutool.core.text.CharSequenceUtil.cleanBlank;

/**
 * @ClassName FivePoint
 * @Description 识别验证码(本地/第三方)
 * @Author: OYZJ
 * @date 2023/4/10 12:00
 * @Version 1.0
 */
@Slf4j
public class FivePoint {
    private static final OCREngine OCR_ENGINE;
    //任意一张字母数字的base64编码的验证码图片,
    static String base64="iVBORI=";

    static  {
        OCR_ENGINE = OCREngine.instance();
    }

    /** 本地识别OCR验证码  */
    @Test
    public void testLocalCaptcha() throws IOException {
        /** 两个来源,一个base64转。一个本地文件 */
//        String base64 = jsonObject.getString("Data");
//        log.info("base64:{}",base64);
//        byte[] decode = Base64Decoder.decode(base64);
//        BufferedImage image = ImageIO.read(new ByteArrayInputStream(decode));
        //本地文件
        BufferedImage image = ImageIO.read(new File("D:\\Users\\Administrator\\Desktop\\nan-1.png"));
        String predict = OCR_ENGINE.recognize(image);
        String captch=(StrUtil.blankToDefault(predict,"").replace("\n", "").replaceAll(" ", ""));
        log.info("验证码:{},经过处理后得:{}",predict,captch);
    }


    /** 调用第三方接口,本处拿https://www.tulingtech.xyz/这个验证码识别平台做示例  */
    @Test
    public void testWebCaptcha(){
        //任意一张字母数字的base64编码的验证码图片
        String ba64="iV///RU5ErkJggg==";

        //开始识别
        String apiCaptch = "http://www.tulingtech.xyz/tuling/predict";
        HashMap<String, Object> paramMapUser = new HashMap<>(5);
        //此处账号密码替换成自己注册的
        paramMapUser.put("username", "xxxx");
        paramMapUser.put("password", "xxxx");
        //cleanBlank-清理空白字符
        paramMapUser.put("b64", cleanBlank(ba64));
        paramMapUser.put("ID", "15689512");
        paramMapUser.put("version", "3.1.1");
        HttpResponse executeApi = HttpUtil.createPost(apiCaptch).body(JSON.toJSONString(paramMapUser)).execute();
        System.out.println(executeApi);
        //响应结果:    {"code": 1, "message": "", "data": {"result": "x6yby3c"}}
    }

    /**
     * 将返回得乱七八糟接口数据得转换成JSON对象
     *
     * @param response
     * @return
     */
    private JSONObject checkIfSuccess(String response) {
        JSONObject jsonObject = JSON.parseObject(JSON.parse(response).toString());
        Boolean isSuccess = jsonObject.getBoolean("IsSuccess");
        if (!isSuccess) {
            log.info("未能连接设备服务器!");
        }
        return jsonObject;
    }
}
分库分表,如何统一配置,自动识别查那个表或者库
1.引入部分依赖
    <!-- 引入Mysql相关依赖,包含mysql驱动包。mybatis-plus       -->
        <dependency>
            <groupId>com.alibaba</groupId>
            <artifactId>druid-spring-boot-starter</artifactId>
            <version>1.2.15</version>
        </dependency>
        <dependency>
            <groupId>mysql</groupId>
            <artifactId>mysql-connector-java</artifactId>
            <version>8.0.27</version>
        </dependency>
        <dependency>
            <groupId>org.mybatis.spring.boot</groupId>
            <artifactId>mybatis-spring-boot-starter</artifactId>
            <version>2.2.2</version>
        </dependency>
        <!-- 引入mybatis-plus       -->
        <!--mybatis-plus-boot-starter是自己开发的, 并非官方-->
        <dependency>
            <groupId>com.baomidou</groupId>
            <artifactId>mybatis-plus-boot-starter</artifactId>
            <version>3.0.5</version>
        </dependency>
        <!--  引入多数据源      -->
        <dependency>
            <groupId>com.baomidou</groupId>
            <artifactId>dynamic-datasource-spring-boot-starter</artifactId>
            <version>3.6.0</version>
        </dependency>
      <!-- web支持 -->
        <dependency>
            <groupId>org.springframework.boot</groupId>
            <artifactId>spring-boot-starter-web</artifactId>
        </dependency>
        <!--  引入阿里fastJson工具包      -->
        <dependency>
            <groupId>com.alibaba</groupId>
            <artifactId>fastjson</artifactId>
            <version>1.2.68</version>
        </dependency>
2.yaml配置类
#    数据源相关配置
spring:
  redis:
    database: 1
    host: 127.0.0.1
    port: 6379
    jedis:
#连接池最大连接数(使用复数表示没有限制)默认8
      pool:
        max-active: 10
        max-idle: 10
        min-idle: 0
    timeout: 6000
  datasource:
    dynamic:
      primary: master #设置默认的数据源或者数据源组,默认值即为master
      # 严格匹配数据源,默认false,true未匹配到指定数据源时抛异常,false使用默认数据源
      strict: false
      # 数据库连接信息配置
      datasource:
        #主库
        master:
          url: jdbc:mysql://127.0.0.1:3306/xxx?useUnicode=true&characterEncoding=UTF-8&serverTimezone=UTC&serverTimezone=Asia/Shanghai
          username: root
          password: root
          driver-class-name: com.mysql.cj.jdbc.Driver
        #从库
        slave:
          url: jdbc:mysql://127.0.0.1:3306/xxx2?useUnicode=true&characterEncoding=UTF-8&serverTimezone=UTC&serverTimezone=Asia/Shanghai
          username: root
          password: root
          driver-class-name: com.mysql.cj.jdbc.Driver
        slave2:
          url: jdbc:mysql://127.0.0.1:3306/security_ouo?useUnicode=true&characterEncoding=UTF-8&serverTimezone=UTC&serverTimezone=Asia/Shanghai
          username: root
          password: root
          driver-class-name: com.mysql.cj.jdbc.Driver
      # druid相关配置
      druid:
        # 初始化时建立物理连接的个数
        initial-size: 5
        # 最大连接池数量
        max-active: 20
        # 最小连接池数量
        min-idle: 10
        # 获取连接时最大等待时间,单位毫秒
        max-wait: 60000
        # 配置间隔多久才进行一次检测,检测需要关闭的空闲连接,单位是毫秒
        time-between-eviction-runs-millis: 60000
        # 连接保持空闲而不被驱逐的最小时间
        min-evictable-idle-time-millis: 300000
        # 用来检测连接是否有效的sql,要求是一个查询语句
        validation-query: SELECT 1 FROM DUAL
        # 建议配置为true,不影响性能,并且保证安全性。申请连接的时候检测,如果空闲时间大于timeBetweenEvictionRunsMillis,执行validationQuery检测连接是否有效
        test-while-idle: true
        # 申请连接时执行validationQuery检测连接是否有效,做了这个配置会降低性能
        test-on-borrow: false
        # 归还连接时执行validationQuery检测连接是否有效,做了这个配置会降低性能
        test-on-return: false
        # 是否缓存preparedStatement,也就是PSCache。PSCache对支持游标的数据库性能提升巨大,比如说oracle。在mysql下建议关闭
        pool-prepared-statements: false
        # 要启用PSCache,必须配置大于0,当大于0时,poolPreparedStatements自动触发修改为true
        max-pool-prepared-statement-per-connection-size: 50
        # 配置监控统计拦截的filters,去掉后监控界面sql无法统计
        filter:
          stat:
            enabled: true
            # 慢sql记录
            log-slow-sql: true
            slow-sql-millis: 1000
            merge-sql: true
          wall:
            config:
            multi-statement-allow: true
        # 通过connectProperties属性来打开mergeSql功能;慢SQL记录
        connect-properties: druid.stat.mergeSql=true;druid.stat.slowSqlMillis=500
        # 合并多个DruidDataSource的监控数据
        use-global-data-source-stat: true
        web-stat-filter:
          enabled: true
        stat-view-servlet:
          enabled: true
          # 设置白名单,不填则允许所有访问
          allow:
          url-pattern: /druid/*
    driver-class-name: com.mysql.cj.jdbc.Driver
mybatis-plus:
  configuration:
    log-impl: org.apache.ibatis.logging.stdout.StdOutImpl
3.控制层代码
package com.ouo.ouo_skill.woring;

import com.ouo.ouo_skill.model.UserDO;
import com.ouo.ouo_skill.woring.mapper.UserMapper;
import org.junit.Test;
import org.springframework.web.bind.annotation.RequestMapping;
import org.springframework.web.bind.annotation.RestController;

import javax.annotation.Resource;
import java.util.Arrays;
import java.util.List;

/**
 * @ClassName SixPoint
 * @Description 分库分表,如何统一配置,自动识别查那个表或者库
 * 额外扩展mybatis-plus相关知识
 *
 * @Author: OYZJ
 * @date 2023/4/10 14:38
 * @Version 1.0
 */
@RestController
@RequestMapping("sqlTest")
public class SixPoint {

    @Resource
    private UserMapper userMapper;

    /** 查询全部用户  */
    @RequestMapping("/oneSql")
    public void testOne(){
        List<UserDO> userDOS = userMapper.selectList(null);
        userDOS.forEach(System.out::println);
    }

    /**
     * 新增
     */
    @RequestMapping("/insertSql")
    public void insertTest(){
        UserDO userDO=new UserDO();
        userDO.setName("OUOss");
        userDO.setAge(19);
        userDO.setEmail("2873883627@qq.com");
        userMapper.insert(userDO);
    }

    /**
     * 修改
     */
    @RequestMapping("/updateSql")
    public void updateTest(){
        UserDO userDO=new UserDO();
        //通过条件自动拼接动态Sql
        userDO.setId(7);
        userDO.setEmail("21121@qq.com");
        userDO.setName("OUO_update");
        userDO.setAge(19);
        int i = userMapper.updateById(userDO);
        System.out.println("数量:"+i);
    }


    /**
     * 测试乐观锁失败  多线程下
     */
    @RequestMapping("/optimisticLocker")
    public void optimisticLocker(){
        //线程1
        UserDO userDO = userMapper.selectById(1L);
        userDO.setName("多并发1");
        userDO.setEmail("5689@qq.com");

        //模拟另外一个线程执行了插队操作
        UserDO userDO1 = userMapper.selectById(1L);
        userDO1.setName("多并发2");
        userDO1.setEmail("56448@qq.com");
        userMapper.updateById(userDO1);

        //自旋锁来多次尝试提交
        //如果没有乐观锁就会覆盖插队线程的值!
        userMapper.updateById(userDO);
    }

    /**
     * 常用查询
     */
    @RequestMapping("/selectBatch")
    public void selectBatch(){
        UserDO userDO = userMapper.selectById(1L);
        System.out.println(userDO);

        //根据ID查询
        List<UserDO> users = userMapper.selectBatchIds(Arrays.asList(1L, 2L, 3L));
        users.forEach(System.out::println);
    }
}
4.Mapper层(从库可配置)
package com.ouo.ouo_skill.woring.mapper;

import com.baomidou.mybatisplus.core.mapper.BaseMapper;
import com.ouo.ouo_skill.model.UserDO;
import org.apache.ibatis.annotations.Mapper;
import org.springframework.stereotype.Repository;

/**
 * @ClassName Test2Mapper
 * @Description 主从库,多数据源Demo测试专用
 * @Author: OYZJ
 * @date 2023/4/12 12:01
 * @Version 1.0
 */
@Repository
@Mapper
//@DS("slave")--不加该注解查询的是主库
public interface UserMapper extends BaseMapper<UserDO> {
        //所有CRUD操作已经编写完成
}
package com.ouo.ouo_skill.woring.mapper;

import com.baomidou.dynamic.datasource.annotation.DS;
import com.baomidou.mybatisplus.core.mapper.BaseMapper;
import com.ouo.ouo_skill.model.SysUser;
import org.apache.ibatis.annotations.Mapper;
import org.springframework.stereotype.Repository;

import javax.annotation.Resource;

/**
 * @ClassName SysUserMapper
 * @Description 为了测试SpringSecurity
 * @Author: OYZJ
 * @date 2023/4/18 14:29
 * @Version 1.0
 */
@Repository
@Mapper
//加入该注解后会查从库
@DS("slave2")
public interface SysUserMapper extends BaseMapper<SysUser> {

}
阿里云得OSS存储,视频点播,短信业务,语音通话
1.引入各种pom文件依赖jar包,有的jar包得从阿里云官网示例中lib文件夹内获取
 <!-- 引入阿里云短信相关依赖       -->
        <dependency>
            <groupId>com.aliyun.alicom</groupId>
            <artifactId>alicom-mns-receive-sdk</artifactId>
            <version>1.1.3</version>
            <scope>system</scope>
            <systemPath>${project.basedir}/src/main/resources/lib/alicom-mns-receive-sdk-1.1.3.jar</systemPath>
        </dependency>
        <dependency>
            <groupId>com.aliyun.mns</groupId>
            <artifactId>aliyun-sdk-mns</artifactId>
            <version>1.1.9.1</version>
            <scope>system</scope>
            <systemPath>${project.basedir}/src/main/resources/lib/aliyun-sdk-mns-1.1.9.1.jar</systemPath>
        </dependency>
        <dependency>
            <groupId>com.aliyun</groupId>
            <artifactId>aliyun-java-sdk-core</artifactId>
            <version>4.5.14</version>
            <scope>system</scope>
            <systemPath>${project.basedir}/src/main/resources/lib/aliyun-java-sdk-core-4.5.14.jar</systemPath>
        </dependency>
        <dependency>
            <groupId>com.aliyun</groupId>
            <artifactId>aliyun-java-sdk-dybaseapi</artifactId>
            <version>1.0.1</version>
            <scope>system</scope>
            <systemPath>${project.basedir}/src/main/resources/lib/aliyun-java-sdk-dybaseapi-1.0.1.jar</systemPath>
        </dependency>
<!-- 引入阿里云视频点播       -->
        <dependency>
            <groupId>com.aliyun</groupId>
            <artifactId>aliyun-java-sdk-vod</artifactId>
            <version>2.16.10</version>
        </dependency>
        <dependency>
            <groupId>com.aliyun</groupId>
            <artifactId>aliyun-java-sdk-kms</artifactId>
            <version>2.10.1</version>
        </dependency>
        <!-- 引入阿里云短信       -->
        <dependency>
            <groupId>com.aliyun</groupId>
            <artifactId>dysmsapi20170525</artifactId>
            <version>2.0.23</version>
        </dependency>
2.具体业务代码
package com.ouo.ouo_skill.woring;

import cn.hutool.core.io.resource.ResourceUtil;
import cn.hutool.json.JSONUtil;
import com.aliyun.dysmsapi20170525.Client;
import com.aliyun.dysmsapi20170525.models.SendSmsRequest;
import com.aliyun.dysmsapi20170525.models.SendSmsResponse;
import com.aliyun.oss.ClientException;
import com.aliyun.oss.OSS;
import com.aliyun.oss.OSSClientBuilder;
import com.aliyun.oss.OSSException;
import com.aliyun.oss.model.OSSObject;
import com.aliyun.oss.model.PutObjectResult;
import com.aliyun.teaopenapi.models.Config;
import com.aliyuncs.DefaultAcsClient;
import com.aliyuncs.profile.DefaultProfile;
import com.aliyuncs.vod.model.v20170321.CreateUploadVideoRequest;
import lombok.extern.slf4j.Slf4j;
import org.junit.Test;
import org.springframework.web.bind.annotation.RequestBody;
import org.springframework.web.bind.annotation.RestController;
import org.springframework.web.multipart.MultipartFile;

import java.io.*;
import java.net.URL;

/**
 * @ClassName SevenPoint
 * @Description 阿里云得OSS存储,视频点播,短信业务,语音通话
 * @Author: OYZJ
 * @date 2023/4/10 14:50
 * @Version 1.0
 */
@Slf4j
@RestController
public class SevenPoint {

    /** 测试本地文件上传至阿里云OSS  */
    @Test
    public void testAliyunOss(){
        //获取本地文件输入流
        InputStream inputStream  = ResourceUtil.getStream("template/testOUO.docx");
        //Endpoint从https://oss.console.aliyun.com/bucket/oss-cn-beijing/ouo666s/overview访问端口中查找
        String endpoint="https://oss-cn-beijing.aliyuncs.com";
        // 阿里云账号AccessKey拥有所有API的访问权限,风险很高。强烈建议您创建并使用RAM用户进行API访问或日常运维,请登录RAM控制台创建RAM用户。
        String accessKeyId = "xxxxx";
        String accessKeySecret = "xxxxx";
        // 填写Bucket名称,例如examplebucket。
        String bucketName = "ouo666s";

        //创建OSSClient实例
        OSS ossClient = new OSSClientBuilder().build(endpoint, accessKeyId, accessKeySecret);
        try {
            PutObjectResult putObjectResult = ossClient.putObject(bucketName, "testOUO.docx", inputStream);
            System.out.println(JSONUtil.parse(putObjectResult));
            //eTag标记
            //{"eTag":"0BA012EF1AB2D8740D94376DDFF8435C","requestId":"6437BCF1ED63F03031129B96","clientCRC":6534124095948473878,"serverCRC":6534124095948473878}
        }catch (ClientException oe){
            System.out.println("Error Message:"+oe.getMessage());
        }finally {
            if (ossClient!=null){
                ossClient.shutdown();
            }
        }
    }

    /**
     * 测试从阿里云OSS已经存储得文件目录中下载文件
     */
    @Test
    public void testDownload(){
        //
        long start = System.currentTimeMillis();

        //Endpoint从https://oss.console.aliyun.com/bucket/oss-cn-beijing/ouo666s/overview访问端口中查找
        String endpoint="https://oss-cn-beijing.aliyuncs.com";
        // 阿里云账号AccessKey拥有所有API的访问权限,风险很高。强烈建议您创建并使用RAM用户进行API访问或日常运维,请登录RAM控制台创建RAM用户。
        String accessKeyId = "xxxx";
        String accessKeySecret = "xxxx";
        // 填写Bucket名称,例如examplebucket。
        String bucketName = "ouo666s";


        // 创建OSSClient实例。
        OSS ossClient = new OSSClientBuilder().build(endpoint, accessKeyId, accessKeySecret);
        //
        try {
            // 调用ossClient.getObject返回一个OSSObject实例,该实例包含文件内容及文件元信息。
            OSSObject ossObject = ossClient.getObject(bucketName, "testOUO.docx");
            // 调用ossObject.getObjectContent获取文件输入流,可读取此输入流获取其内容。
            InputStream content = ossObject.getObjectContent();
            if (content!=null){
                BufferedReader reader = new BufferedReader(new InputStreamReader(content));
                //指定别的文件
                FileWriter fileWriter = new FileWriter("D:\\testOOO.docx");
                BufferedWriter writer = new BufferedWriter(fileWriter);

                //缓冲思想
                char[] buf=new char[1024*8];

                int len=0;
                while ((len=reader.read(buf))!=-1){
                    writer.write(new String(buf,0,len));
                }

                // 数据读取完成后,获取的流必须关闭,否则会造成连接泄漏,导致请求无连接可用,程序无法正常工作。
                content.close();
                if (reader!=null){
                    reader.close();
                }
                if (writer!=null){
                    writer.close();
                }
            }
        }catch (OSSException oe){
            log.error(oe.getMessage());
        }catch (ClientException ce){
            log.error(ce.getMessage());
        } catch (IOException e) {
            log.error(e.getMessage());
        } finally {
            if (ossClient!=null){
                ossClient.shutdown();
            }
        }
        long end = System.currentTimeMillis();
        System.out.println("字符流读取和写入实现文件拷贝,总共耗时" + (end-start) + "ms");
    }


    /**
     * 测试阿里云视频点播上传
     * 由于没啥特别的,就是官网示例
     * https://help.aliyun.com/document_detail/476208.htm?spm=a2c4g.61063.0.0.44b35000kQyRev
     *
     */
    @Test
    public void testMV_Up(){
        String accessKeyId = "xxxx";
        String accessKeySecret = "xxxxx";
        //区域标识:https://help.aliyun.com/document_detail/98194.htm?spm=a2c4g.61062.0.0.ea995000SeSLvn#concept-1985625
        String regionId = "cn-beijing";  // 点播服务接入地域
        DefaultProfile profile = DefaultProfile.getProfile(regionId, accessKeyId, accessKeySecret);
        DefaultAcsClient client = new DefaultAcsClient(profile);

        CreateUploadVideoRequest createUploadVideoRequest = new CreateUploadVideoRequest();
        //

    }


    /**
     * 发送短信
     */
    @Test
    public void testSms() throws Exception {
        Config config = new Config()
                // 必填,您的 AccessKey ID
                .setAccessKeyId("xxxx")
                // 必填,您的 AccessKey Secret
                .setAccessKeySecret("xxxx");
        // 访问的域名
        config.endpoint = "dysmsapi.aliyuncs.com";
        Client client = new Client(config);

        //准备发送短信
        SendSmsRequest sendSmsRequest = new SendSmsRequest();
        //模板名称
        sendSmsRequest.setSignName("阿里云短信测试");
        //发送手机号
        sendSmsRequest.setPhoneNumbers("17674784193");
        //发送验证码
        sendSmsRequest.setTemplateParam("{\"code\":\"1234\"}");
        //短信模板Code
        sendSmsRequest.setTemplateCode("SMS_154950909");
        // 复制代码运行请自行打印 API 的返回值
        SendSmsResponse sendSmsResponse = client.sendSms(sendSmsRequest);
        System.out.println(JSONUtil.parseObj(sendSmsResponse));
        //{"headers":{"access-control-allow-origin":"*","date":"Fri, 14 Apr 2023 02:12:43 GMT","content-length":"110","x-acs-request-id":"0D7F9D46-EA98-556B-91F5-8F9E44B00ED0","connection":"keep-alive","content-type":"application/json;charset=utf-8","x-acs-trace-id":"f7c2cd8d06ba0df558be59ee8c693efb"},
        // "statusCode":200,"body":{"bizId":"869711081438362671^0","code":"OK","message":"OK","requestId":"0D7F9D46-EA98-556B-91F5-8F9E44B00ED0"}}

    }


    /**
     * 语音通话
     * 本人另外一篇博客已经详细描述了 https://blog.csdn.net/qq_45059975/article/details/124096224
     *
     */

}
微信公众号对接
1.引入部分依赖
<dependency>
    <groupId>org.springframework.boot</groupId>
    <artifactId>spring-boot-starter-web</artifactId>
</dependency>

<!-- 借鉴文章:https://blog.csdn.net/s524061267/article/details/96572592 -->
<dependency>
    <groupId>com.github.binarywang</groupId>
    <artifactId>weixin-java-mp</artifactId>
    <version>3.4.0</version>
</dependency>
2.创建Contrller类,用于接收微信服务器发送得消息
@RestController
@RequestMapping("/weixin")
public class WeixinController {

    @Autowired
    private WxMpService wxMpService;

    @GetMapping(produces = "text/plain;charset=utf-8")
    public String authGet(
            @RequestParam(name = "signature", required = false) String signature,
            @RequestParam(name = "timestamp", required = false) String timestamp,
            @RequestParam(name = "nonce", required = false) String nonce,
            @RequestParam(name = "echostr", required = false) String echostr) {
        if (!this.wxMpService.checkSignature(timestamp, nonce, signature)) {
            throw new IllegalArgumentException("非法请求,可能属于伪造的请求!");
        }
        return echostr;
    }

    @PostMapping(produces = "application/xml; charset=UTF-8")
    public String post(@RequestBody String requestBody,
                       @RequestParam("signature") String signature,
                       @RequestParam("timestamp") String timestamp,
                       @RequestParam("nonce") String nonce,
                       @RequestParam(name = "encrypt_type", required = false) String encType,
                       @RequestParam(name = "msg_signature", required = false) String msgSignature) {
        if (!wxMpService.checkSignature(timestamp, nonce, signature)) {
            throw new IllegalArgumentException("非法请求,可能属于伪造的请求!");
        }
        String out = null;
        if (encType == null) {
            // 明文传输的消息
            WxMpXmlMessage inMessage = WxMpXmlMessage.fromXml(requestBody);
            out = wxMpService.getDispatcher().process(inMessage);
        } else if ("aes".equals(encType)) {
            // aes加密的消息
            WxMpXmlMessage inMessage = WxMpXmlMessage.fromEncryptedXml(requestBody,
                    wxMpService.getWxMpConfigStorage(), timestamp, nonce, msgSignature);
            out = wxMpService.getDispatcher().process(inMessage);
        }
        return out;
    }
}
3.配置微信公众号消息
@Configuration
public class WeixinConfiguration {

    @Value("${wx.mp.appId}")
    private String appId;

    @Value("${wx.mp.secret}")
    private String secret;

    @Value("${wx.mp.token}")
    private String token;

    @Value("${wx.mp.aesKey}")
    private String aesKey;

    @Bean
    public WxMpConfigStorage wxMpConfigStorage() {
        WxMpDefaultConfigImpl config = new WxMpDefaultConfigImpl();
        config.setAppId(this.appId);
        config.setSecret(this.secret);
        config.setToken(this.token);
        config.setAesKey(this.aesKey);
        return config;
    }

    //通过 `WxMpService` 类来处理接收的微信公众号消息。 `WxMpService` 是weixin-java-mp库中提供的类,封装了微信公众号消息的处理,可用于处理文本、图片、语音等各种类型的消息。
    @Bean
    public WxMpService wxMpService(WxMpConfigStorage wxMpConfigStorage) {
        WxMpServiceImpl service = new WxMpServiceImpl();
        service.setWxMpConfigStorage(wxMpConfigStorage);
        return service;
    }
}
4.配置微信公众号信息
wx:
  mp:
    appId: xxxxx
    secret: xxxxx
    token: xxxx
    aesKey: xxxx
微信第三方扫码登录
1.配置yaml
wx-chat:
  appId: 123
  appSecret: 123
2.创建配置对象
package com.ouo.ouo_skill.woring.wxPoint;

import lombok.Data;
import org.springframework.boot.context.properties.ConfigurationProperties;
import org.springframework.stereotype.Component;

import java.io.Serializable;

/**
 * @ClassName WxConstant
 * @Description 微信相关配置
 * @Author: OYZJ
 * @date 2023/4/20 14:03
 * @Version 1.0
 */
@ConfigurationProperties(prefix = "wx-chat")
@Component
@Data
public class WxConstant implements Serializable {

    private String appId;

    private String appSecret;
}
3.第一步业务代码,详情可以查看我借鉴得博客
package com.ouo.ouo_skill.woring.wxPoint;

import org.springframework.web.bind.annotation.CrossOrigin;
import org.springframework.web.bind.annotation.RequestMapping;
import org.springframework.web.bind.annotation.RestController;

import javax.annotation.Resource;
import javax.servlet.http.HttpServletResponse;
import java.io.IOException;
import java.net.URLEncoder;

/**
 * @ClassName wxLogin
 * @Description Tea微信登录接口++第二步
 * https://ellis.blog.csdn.net/article/details/103070060?spm=1001.2101.3001.6650.2&utm_medium=distribute.pc_relevant.none-task-blog-2%7Edefault%7ECTRLIST%7ERate-2-103070060-blog-129147893.235%5Ev29%5Epc_relevant_default_base&depth_1-utm_source=distribute.pc_relevant.none-task-blog-2%7Edefault%7ECTRLIST%7ERate-2-103070060-blog-129147893.235%5Ev29%5Epc_relevant_default_base&utm_relevant_index=4
 * @Author: OUO
 * @date 2023/4/20 12:12
 * @Version 1.0
 */
//@IgnoreAuth
@CrossOrigin
@RestController
@RequestMapping("wx")
public class wxLogin {
    @Resource
    private WxConstant wxConstant;

    @RequestMapping("wx_login")
    public void wxLogin(HttpServletResponse response)throws IOException{
        //域名(使用内网穿透的随机域名)
        String sym=" http://mw8i72.natappfree.cc";
        //String appId="xxxxxxxx";
        //这里是回调的url
        String redirect_url= URLEncoder.encode(sym+"/front/auth/callBack","UTF-8");
        String url="https://open.weixin.qq.com/connect/oauth2/authorize?"+
                "appid=APPID"+
                "&redirect_uri=REDIRECT_URI"+
                "&response_type=code"+
                "&scope=SCOPE"+
                "&state=123#wechat_redirect";
        response.sendRedirect(url.replace("APPID",wxConstant.getAppId()).replace("REDIRECT_URI",redirect_url).replace("SCOPE","snsapi_userinfo"));


    }

}
4.扫码登录城管后回调处理
package com.ouo.ouo_skill.woring.wxPoint;

import cn.hutool.http.HttpUtil;
import cn.hutool.json.JSONObject;
import cn.hutool.json.JSONUtil;
import org.springframework.web.bind.annotation.CrossOrigin;
import org.springframework.web.bind.annotation.RequestMapping;
import org.springframework.web.bind.annotation.RestController;

import javax.annotation.Resource;
import javax.servlet.http.HttpServletRequest;
import javax.servlet.http.HttpServletResponse;
import java.io.IOException;

/**
 * @ClassName WxAuthorizeController
 * @Description 微信授权成功回调地址--第三步准备回调处理
 * @Author: OUO
 * @date 2023/4/20 13:55
 * @Version 1.0
 */
@RestController
@CrossOrigin
@RequestMapping("front/auth")
public class WxAuthorizeController {

    @Resource
    private WxConstant wxConstant;


    @RequestMapping("callBack")
    protected void deGet(HttpServletRequest request, HttpServletResponse response) throws IOException {
            //获取回调地址中的code
            String code=request.getParameter("code");
            //拼接url
            String url="https://api.weixin.qq.com/sns/oauth2/access_token?appid=" + wxConstant.getAppId() + "&secret="
                    +wxConstant.getAppSecret()+"&code="+code+"&grant_type=authorization_code";
            //发送Get类型的请求
            String s = HttpUtil.get(url, 5000);
            //获取JSONObject类型
            JSONObject jsonObject = JSONUtil.parseObj(s);
            //1.获取微信用户的openid
            String openid = jsonObject.getStr("openid");
            //2.获取access_token
            String access_token = jsonObject.getStr("access_token");
            String infoUrl="https://api.weixin.qq.com/sns/userinfo?access_token=" + access_token + "&openid=" + openid
                                + "&lang=zh_CN";
            //3.获取微信用户信息
            JSONObject userInfo = JSONUtil.parseObj(HttpUtil.get(infoUrl, 5000));
            //至此拿到了微信用户的所有信息,剩下的就是业务逻辑处理部分了
            //保存openid和access_token到session
            request.getSession().setAttribute("openid",openid);
            request.getSession().setAttribute("access_token",access_token);
            //去数据库查询此微信是否绑定过手机
            //~~此处业务逻辑省略N字

            if (true){
                //如果无用户信息,则跳转至注册页面
                response.sendRedirect("/register.html");
            }else{
                //否则直接跳转首页
                response.sendRedirect("/index.html");
            }
    }
}
微信扫码支付
本篇素材来源:https://blog.csdn.net/z3125877949/article/details/125552688
引入pom文件依赖
<dependencies>
    <!-- 微信支付SDK -->
    <!-- 微信支付的核心依赖 -->
<!-- https://search.maven.org/artifact/com.github.binarywang/weixin-java-pay -->
<!-- https://github.com/Wechat-Group/WxJava -->
    <dependency>
        <groupId>com.github.binarywang</groupId>
        <artifactId>weixin-java-pay</artifactId>
        <version>4.3.0</version>
    </dependency>

    <!-- ZXing生成二维码库 -->
    <dependency>
        <groupId>com.google.zxing</groupId>
        <artifactId>core</artifactId>
        <version>3.4.1</version>
    </dependency>
    <dependency>
        <groupId>com.google.zxing</groupId>
        <artifactId>javase</artifactId>
        <version>3.4.1</version>
    </dependency>
</dependencies>
1.在application.properties文件中配置微信支付相关信息
# 微信支付相关配置
wxpay.appId=[你的微信公众号AppId]
wxpay.mchId=[你的商户号]
wxpay.key=[你的API秘钥]
wxpay.notifyUrl=[异步通知回调URL]
2.编写用于生成支付二维码的Controller:
@RestController
@RequestMapping("/pay")
public class PayController {

    @Autowired
    private WxPayService wxPayService;

    /**
     * 生成微信扫码支付二维码
     * @param orderId 订单号
     * @param amount 支付金额,单位为分
     * @return
     */
    @GetMapping("/qrcode")
    public ResponseEntity<byte[]> generatePayQrcode(@RequestParam String orderId,
                                                    @RequestParam int amount) throws Exception {
        WxPayUnifiedOrderRequest request = new WxPayUnifiedOrderRequest();
        request.setOutTradeNo(orderId);
        request.setBody("订单支付");
        request.setTotalFee(amount);
        request.setSpbillCreateIp("127.0.0.1");
        request.setTradeType(WxPayConstants.TradeType.NATIVE);

        WxPayUnifiedOrderResult result = wxPayService.unifiedOrder(request);
        String codeUrl = result.getCodeURL();

        ByteArrayOutputStream out = new ByteArrayOutputStream();
        BitMatrix bitMatrix = new MultiFormatWriter().encode(codeUrl, BarcodeFormat.QR_CODE, 200, 200);
        MatrixToImageWriter.writeToStream(bitMatrix, "png", out);
        byte[] bytes = out.toByteArray();

        HttpHeaders headers = new HttpHeaders();
        headers.setContentType(MediaType.IMAGE_PNG);
        return new ResponseEntity<>(bytes, headers, HttpStatus.OK);
    }
}
3.处理支付成功或失败后的回调操作
//在微信支付成功或失败后,微信会向你配置的回调地址发送异步通知
@RestController
@RequestMapping("/wxpay")
public class WxPayController {

    @Autowired
    private WxPayService wxPayService;  // 注入微信支付Service

    /**
     * 微信支付结果通知回调接口
     *
     * @param request
     * @return
     */
    @PostMapping("/payNotify")
    public String payNotify(HttpServletRequest request) {
        try {
            // 读取通知数据
            String xmlData = IOUtils.toString(request.getInputStream(), request.getCharacterEncoding());


            // 处理支付结果通知
            //使用微信支付Service中的parseOrderNotifyResult()方法解析通知数据并获取支付结果
            WxPayOrderNotifyResult result = wxPayService.parseOrderNotifyResult(xmlData);
            if ("SUCCESS".equals(result.getReturnCode())) {
                if ("SUCCESS".equals(result.getResultCode())) {
                    // 支付成功,更新订单状态
                    String outTradeNo = result.getOutTradeNo();  // 商户订单号
                    // TODO: 根据商户订单号更新订单状态
                    //WxPayNotifyResponse是微信支付SDK中提供的响应类
                    return WxPayNotifyResponse.success("OK");
                } else {
                    // 支付失败,记录日志
                    String errCode = result.getErrCode();  // 错误代码
                    String errCodeDes = result.getErrCodeDes();  // 错误描述
                    // TODO: 记录日志

                    return WxPayNotifyResponse.fail(errCodeDes);
                }
            } else {
                // 通信失败,记录日志
                String returnMsg = result.getReturnMsg();  // 失败信息
                // TODO: 记录日志

                return WxPayNotifyResponse.fail(returnMsg);
            }
        } catch (WxPayException e) {
            // 处理异常,记录日志
            // TODO: 记录日志
            return WxPayNotifyResponse.fail(e.getMessage());
        } catch (IOException e) {
            // 处理异常,记录日志
            // TODO: 记录日志
            return WxPayNotifyResponse.fail(e.getMessage());
        }
    }
}
微信推送消息
1.有很多第三方推送消息平台,本次我们采用WxPusher:https://wxpusher.zjiecode.com/docs/#/
<dependency>
  <groupId>com.github.wxpusher</groupId>
  <artifactId>wxpusher-sdk-java</artifactId>
  <version>1.1.0</version>
</dependency>
2.然后,你需要在wxPushPlus官网上注册并获取你的推送token,以便发送消息。接着,你可以创建一个消息推送工具类,用于发送推送消息。
import com.github.wxpusher.client.WxPusher;
import com.github.wxpusher.client.bean.PushResult;

public class WxPushUtil {
    // 你的推送token
    private static final String TOKEN = "xxxxxxxxxxxxxxx";

    /**
     * 发送推送消息
     * @param topic 推送主题
     * @param content 推送内容
     * @return 是否发送成功
     */
    public static boolean push(String topic, String content) {
        PushResult result = WxPusher.send("wxpusher://app/" + TOKEN, topic, content);
        return result.isSuccess();
    }
}
3.最后,在你的Controller中调用该推送工具类,即可实现微信推送消息的功能
import org.springframework.web.bind.annotation.GetMapping;
import org.springframework.web.bind.annotation.RestController;

@RestController
public class TestController {
    @GetMapping("/push")
    public String pushMessage() {
        boolean success = WxPushUtil.push("测试消息", "这是一条测试消息");
        if (success) {
            return "消息推送成功";
        } else {
            return "消息推送失败";
        }
    }
}
支付宝扫码支付
推荐详细操作博客:https://blog.51cto.com/loveddz/6159886
此处代码仅供参考,提供个大致思路,并未实际测试过
1.部分依赖引入
<dependency>
    <groupId>com.alipay.sdk</groupId>
    <artifactId>alipay-sdk-java</artifactId>
    <version>3.8.10.ALL</version>
</dependency>
2.控制层处理
在控制层中实现支付宝扫码支付的相关处理,包括生成支付二维码、支付查询和回调处理等。
生成支付二维码:
@RequestMapping("/qrCode")
@ResponseBody
public String generateQrCode() throws AlipayApiException {
    AlipayClient alipayClient = new DefaultAlipayClient("https://openapi.alipay.com/gateway.do", appId, privateKey, "json", "UTF-8", alipayPublicKey, "RSA2");
    AlipayTradePrecreateRequest request = new AlipayTradePrecreateRequest();
    request.setNotifyUrl(notifyUrl);
    request.setBizContent("{\"out_trade_no\":\"" + outTradeNo + "\",\"total_amount\":\"" + totalAmount + "\",\"subject\":\"" + subject + "\",\"store_id\":\"" + storeId + "\",\"timeout_express\":\"" + timeoutExpress + "\"}");
    AlipayTradePrecreateResponse response = alipayClient.execute(request);
    if (response.isSuccess()) {
        return response.getQrCode();
    }
    return null;
}
支付查询:
@RequestMapping("/query")
@ResponseBody
public String queryPay() throws AlipayApiException {
    AlipayClient alipayClient = new DefaultAlipayClient("https://openapi.alipay.com/gateway.do", appId, privateKey, "json", "UTF-8", alipayPublicKey, "RSA2");
    AlipayTradeQueryRequest request = new AlipayTradeQueryRequest();
    request.setBizContent("{\"out_trade_no\":\"" + outTradeNo + "\"}");
    AlipayTradeQueryResponse response = alipayClient.execute(request);
    if (response.isSuccess()) {
        return response.getTradeStatus();
    }
    return null;
}
回调处理:
@RequestMapping("/notify")
@ResponseBody
public String notify(HttpServletRequest request) throws AlipayApiException {
    Map<String, String> params = new HashMap<>();
    Map<String, String[]> requestParams = request.getParameterMap();
    for (String key : requestParams.keySet()) {
        String[] values = requestParams.get(key);
        StringBuilder stringBuilder = new StringBuilder();
        for (int i = 0; i < values.length; i++) {
            stringBuilder.append(i == values.length - 1 ? values[i] : values[i] + ",");
        }
        params.put(key, stringBuilder.toString());
    }
    boolean signVerified = AlipaySignature.rsaCheckV1(params, alipayPublicKey, "UTF-8", "RSA2");
    if (signVerified) {
        String tradeStatus = params.get("trade_status");
        if (tradeStatus.equals("TRADE_SUCCESS")) {
            // 处理支付成功逻辑
            return "success";
        }
    }
    return "fail";
}
3.属性配置
需要在配置文件中配置以下属性:
其中,appId、privateKey、publicKey分别是支付宝开放平台申请应用时生成的应用ID、应用私钥和支付宝公钥,notifyUrl是支付宝异步通知的回调地址。
以上是Spring Boot和Java对接支付宝扫码支付的相关代码示例。需要注意的是,在实际开发中,还需要考虑支付安全、订单管理等问题,以保证支付系统的稳定性和安全性。
alipay.appId=
alipay.privateKey=
alipay.publicKey=
alipay.notifyUrl=
支付宝扫码登录
暂无,建议百度 haha~
QQ第三方登录
找了两个写的不错得博客,偷懒了
package com.ouo.ouo_skill.woring.qqPoint;

/**
 * @ClassName QQDemo
 * @Description 多种登录方式
 * https://www.cnblogs.com/liyhbk/category/2089783.html
 * https://blog.csdn.net/liyh722/article/details/129264463?spm=1001.2101.3001.6650.2&utm_medium=distribute.pc_relevant.none-task-blog-2%7Edefault%7EYuanLiJiHua%7EPosition-2-129264463-blog-110817906.235%5Ev30%5Epc_relevant_default_base&depth_1-utm_source=distribute.pc_relevant.none-task-blog-2%7Edefault%7EYuanLiJiHua%7EPosition-2-129264463-blog-110817906.235%5Ev30%5Epc_relevant_default_base&utm_relevant_index=4
 * @Author: OYZJ
 * @date 2023/4/20 16:29
 * @Version 1.0
 */
public class QQDemo {
}
Camunda大体流程工作流得了解以及运用
登记
/**
  * 登记,todo
  * <p>
  * 此处9秒超时
  *
  * @param ilesCaseInfoDTO dto iles业务信息
  */
@Transactional(rollbackFor = Exception.class, timeout = 9)
@Override
public void caseRegister(IlesCaseInfoDTO ilesCaseInfoDTO) {
//1.必须有流程定义图了
//此处省略一万字的业务代码--例如保存业务表中的那个数据逻辑代码
//	新建流程
ProcessInstance processInstance=runtimeService.createProcessInstanceByKey(processKey)
    .businessKey(主键ID).execute();
//获取到流程实例ID
String processInstanceId=processInstance.getProcessInstanceId();
//根据流程实例Id获取任务
Task task=taskService.createTaskQuery().processInstanceId(processInstanceId)
    .singleResult();
 //拿到流程实例ID与案件任务节点名称以及ID--准备存入更新到业务表中
ilesCaseInfoDTO.setProcessInstanceId(processInstanceId)
.setProcessDefinitionId(task.getProcessDefinitionId())      		 .setTaskDefinitionKey(task.getTaskDefinitionKey())
.setTaskDefinitionKey(task.getTaskDefinitionKey())
.setTaskId(task.getId()).setTaskName(task.getName());

//领取任务
taskService.claim(task.getId(),用户ID)
//增加经过记录
if (StringUtils.isNotEmpty(用户ID)) {
      identityService.setAuthenticatedUserId(用户ID);
}
taskService.createComment(task.getId(), processInstanceId,
                          CaseConst.CASE_REG + "登记了XX");
//看业务需求是否添加计时---此处我加上,但是涉及较多,能看懂点的参考即可
// todo 流程截止时间和警告时间计算
Task newTask=taskService.createTaskQuery().processInstanceId(processInstanceId)
    .singleResult();
handleNodeProperty(ilesCaseInfoDTO, newTask, ilesCaseInfoDTO);
//修改填充业务特殊信息
ilesCaseInfoMapper.updateByPrimaryKeySelective(ilesCaseInfoDTO);


    /**
     * 处理节点属性
     *
     * @param caseInfo    业务信息
     * @param task        任务
     * @param newCaseInfo 新业务信息,处理后的数据会存到此处
     */
private void handleNodeProperty(IlesCaseInfoDO caseInfo, Task task, IlesCaseInfoDO newCaseInfo) {
    	//获取节点时间---一般根据业务需求定义时间一套。每个系统都不同
        NodeTimeDTO nodeTimeDTO = nodeTimeSetService.getNodeTime(caseInfo, 		           task.getTaskDefinitionKey());
          if (nodeTimeDTO != null) {
              //修改任务的截至时间
             task.setDueDate(nodeTimeDTO.getDueDate());
              //修改任务的后续日期
             task.setFollowUpDate(nodeTimeDTO.getFollowUpDate());
              //保存(更新)任务
             taskService.saveTask(task);
             newCaseInfo.setTaskType(nodeTimeDTO.getNodeType()); newCaseInfo.setTaskTypeName(nodeTypeHandler.getTypeName(nodeTimeDTO.getNodeType()));
             nodeTypeHandler.handle(caseInfo, newCaseInfo);
        }
}
批转
其实批转前还得有一步。获取下一步批转的人或部门,下面再补上吧。这里直接上业务代码
    /**
     * 完成task任务
     *
     * @param flowDTO 工作流dto
     */
    @Transactional(rollbackFor = Exception.class)
    @Override
    public void completeTask(FlowDTO flowDTO) {
        //检查候选人是否有权限处理此工作流
        checkCandidate(flowDTO);
        //获取下一个候选人角色与候选人--前端封装好传入
        List<Role> candidateRole = flowDTO.getNextCandidateRole();
        List<User> candidateUser = flowDTO.getNextCandidateUser();

        //通过taskId拿到业务信息
        String taskId = flowDTO.getTaskId();
        IlesCaseInfoDO caseInfo = getIlesCaseInfo(taskId, flowDTO.getCaseId());
        String processInstanceId = caseInfo.getProcessInstanceId();
        User flowUser = flowDTO.getUser();
        //操作用户,设置权限以及领取任务
        identityService.setAuthenticatedUserId(flowUser.getUserId());
        taskService.claim(taskId, flowUser.getUserId());

        //设置批转意见
        String options = pubOption(flowDTO.getOpinion());
        String opinion = CaseConst.CASE_TURN + options;
        //添加办理经过信息
        flowUtil.addComment(opinion, taskId, processInstanceId);
        // 业务批准到下一步
        Map<String, Object> variables = Optional.ofNullable(flowDTO.getVariables()).orElse(new HashMap<>());
        //获取下一个节点信息
        NextNodeDTO nextNode = flowDTO.getNextNode();

        //若未传入下一步候选人与候选岗位未空且处于未结案得状态时抛出异常
        if (!Boolean.TRUE.equals(nextNode.getIfEnd()) && CollUtil.isEmpty(candidateRole) && CollUtil.isEmpty(candidateUser)) {
            throw new CustomException(ExceptionCodeEnum.STATUS_FLOW_ERROR, "请指定候选人或候选岗位");
        }

        //流程变量-下一步
        String nodeId = nextNode.getNodeId();
        variables.put("nextNode", nodeId);
        Task task = flowUtil.goNextNode(taskId, processInstanceId, variables, nextNode);

        //处理候选人和候选组,task为null说明已经结束
        if (task != null) {
            if (CollUtil.isNotEmpty(candidateRole)) {
                for (Role role : candidateRole) {
                    taskService.addCandidateGroup(task.getId(), role.getRoleId());
                }
            }

            if (CollUtil.isNotEmpty(candidateUser)) {
                for (User user : candidateUser) {
                    taskService.addCandidateUser(task.getId(), user.getUserId());
                }
            }
        }

        // 业务数据处理
        IlesCaseInfoDO newCaseInfo = new IlesCaseInfoDO();
        newCaseInfo.setCaseId(caseInfo.getCaseId()).setPreDisposerId(flowUser.getUserId())
                .setPreDisposerName(flowUser.getUsername())
                .setUpdated(new Date());
        if (task != null) {
            newCaseInfo.setTaskId(task.getId()).setTaskName(task.getName())
                    .setTaskDefinitionKey(task.getTaskDefinitionKey());
            // todo 流程截止时间和警告时间计算、文档数据处理
            handleNodeProperty(caseInfo, task, newCaseInfo);
        } else {
            String nodeName = nextNode.getNodeName();
            newCaseInfo.setTaskId("").setTaskDefinitionKey(StrUtil.isNotEmpty(nodeId) ? nodeId : "end")
                    .setTaskName(StrUtil.isNotEmpty(nodeName) ? nodeName : "结束").setIfFinish(true)
                    .setCaseFinishDate(new Date());
        }

        ilesCaseInfoMapper.updateByPrimaryKeySelective(newCaseInfo);


        // 处理经办,必须最后处理
        if (Boolean.TRUE.equals(nextNode.getIfEnd())) {
            flowUtil.saveCaseUserAsync(caseInfo, processInstanceId);
        }
    }

    /**
     * 检查候选人
     *
     * @param flowDTO 流dto
     */
    private void checkCandidate(FlowDTO flowDTO) {
        List<IdentityLink> identityLinksForTask;
        try {
            //获取与这个task相关链路
            //检索与给定任务关联的IdentityLinks。这样的IdentityLink告知如何使用某个标识(例如。组或用户)与某个任务相关联(例如。作为候选人、受让人等)
            identityLinksForTask = taskService.getIdentityLinksForTask(flowDTO.getTaskId());
        } catch (NullValueException e) {
            throw new CustomException(ExceptionCodeEnum.STATUS_FLOW_ERROR, "该节点可能已经批转,请刷新页面");
        }
        if (CollUtil.isEmpty(identityLinksForTask)) {
            // 没有候选信息的不校验了,防止流程流转不了
            return;
        }
        User user = flowDTO.getUser();
        List<Role> roles = Optional.ofNullable(user.getRoles()).orElse(new ArrayList<>());
        Set<String> collect = roles.stream().map(Role::getRoleId).collect(Collectors.toSet());

        for (IdentityLink identityLink : identityLinksForTask) {
            if (StrUtil.isNotEmpty(identityLink.getUserId())) {
                if (identityLink.getUserId().equals(user.getUserId())) {
                    // 存在候选用户,则通过
                    return;
                }
            } else if (StrUtil.isNotEmpty(identityLink.getGroupId())) {
                // 候选组
                String groupId = identityLink.getGroupId();
                if (collect.contains(groupId)) {
                    //存在候选角色则通过
                    return;
                }
            }
        }
        throw new CustomException(ExceptionCodeEnum.STATUS_FLOW_ERROR, "操作用户不在本节点的候选人中");
    }
获取下一个节点候选人(组)以及相关信息
    /**
     * 得到下一个节点
     *
     * @param taskId 任务id
     * @param caseId 用例id
     * @return {@link List}<{@link NextNodeVO}>
     */
    @Override
    public List<NextNodeVO> getNextNodes(String taskId, @NotNull Long caseId) {
        // 需要判断此taskId是否有效
        getIlesCaseInfo(taskId, caseId);
        Task task = taskService.createTaskQuery().taskId(taskId).singleResult();
        if (task == null) {
            throw new CustomException(ExceptionCodeEnum.STATUS_FLOW_ERROR, "该案件没有活动的节点");
        }
        String processDefinitionId = task.getProcessDefinitionId();

        ProcessDefinitionEntity def = (ProcessDefinitionEntity) ((RepositoryServiceImpl) repositoryService)
                .getDeployedProcessDefinition(processDefinitionId);
        List<ActivityImpl> activities = def.getActivities();

        List<NextNodeVO> nodes = new ArrayList<>();

        for (ActivityImpl activityImpl : activities) {
            String id = activityImpl.getId();
            if (id.equals(task.getTaskDefinitionKey())) {
                //获取连线
                List<PvmTransition> outTransitions = activityImpl.getOutgoingTransitions();
                for (PvmTransition tr : outTransitions) {
                    ActivityImpl activity = (ActivityImpl) tr.getDestination();
                    String type = activity.getProperty("type").toString();
                    NextNodeVO nextNode = new NextNodeVO();
                    //后续用户节点和按钮(连线为按钮)
                    nextNode.setLineId(tr.getId()).setLineName(Utils.getStringValue(tr.getProperty("name"), "批转"));

                    nextNode.setNodeId(activity.getId());
                    Object name = activity.getProperty("name");
                    if (type.contains("EndEvent")) {
                        // 说明下一个节点是结束节点
                        if (name != null) {
                            nextNode.setNodeName(name.toString());
                        } else {
                            nextNode.setNodeName("结束");
                        }
                        nextNode.setIfEnd(true);
                    } else {
                        nextNode.setNodeName(Utils.getStringValue(name, ""));
                    }
                    nodes.add(nextNode);
                }
                break;
            }
        }

        return nodes;
    }
引入spring-security安全验证框架
借鉴:https://gitee.com/myha/springsecurity
注:教程主要是开发思路的讲解,其中涉及到的代码仅供参考,为了方便,很多地方忽略了一些细节
1.引入依赖
<dependencies>
    <dependency>
        <groupId>org.springframework.boot</groupId>
        <artifactId>spring-boot-starter-web</artifactId>
    </dependency>

    <!--security依赖-->
    <dependency>
        <groupId>org.springframework.boot</groupId>
        <artifactId>spring-boot-starter-security</artifactId>
    </dependency>

    <!--测试相关-->
    <dependency>
        <groupId>org.springframework.boot</groupId>
        <artifactId>spring-boot-starter-test</artifactId>
        <scope>test</scope>
    </dependency>
    <!--hutool基础工具类-->
<dependency>
    <groupId>cn.hutool</groupId>
    <artifactId>hutool-all</artifactId>
    <version>5.7.20</version>
</dependency>

<dependency>
    <groupId>redis.clients</groupId>
    <artifactId>jedis</artifactId>
    <version>3.7.0</version>
</dependency>

<dependency>
    <groupId>org.projectlombok</groupId>
    <artifactId>lombok</artifactId>
    <optional>true</optional>
</dependency>

<dependency>
    <groupId>com.alibaba</groupId>
    <artifactId>fastjson</artifactId>
    <version>1.2.33</version>
</dependency>

<dependency>
    <groupId>org.apache.commons</groupId>
    <artifactId>commons-lang3</artifactId>
    <version>3.10</version>
</dependency>
<dependency>
    <groupId>org.apache.commons</groupId>
    <artifactId>commons-collections4</artifactId>
    <version>4.0</version>
</dependency>
</dependencies>
2.redis配置
#-------------------------------------------------------------------------------
# Redis客户端配置样例
# 每一个分组代表一个Redis实例
# 无分组的Pool配置为所有分组的共用配置,如果分组自己定义Pool配置,则覆盖共用配置
# 池配置来自于:https://www.cnblogs.com/jklk/p/7095067.html
#-------------------------------------------------------------------------------

#----- 默认(公有)配置
# 地址,默认localhost
host = localhost
# 端口,默认6379
port = 6379
# 超时,默认2000
timeout = 2000
# 连接超时,默认timeout
connectionTimeout = 2000
# 读取超时,默认timeout
soTimeout = 2000
# 密码,默认无
password = 12345
# 数据库序号,默认0
database = 0
# 客户端名,默认"Hutool"
clientName = Hutool
# SSL连接,默认false
ssl = false;
3.登录校验流程
我们前后端分离的实现过程就按照这个流程
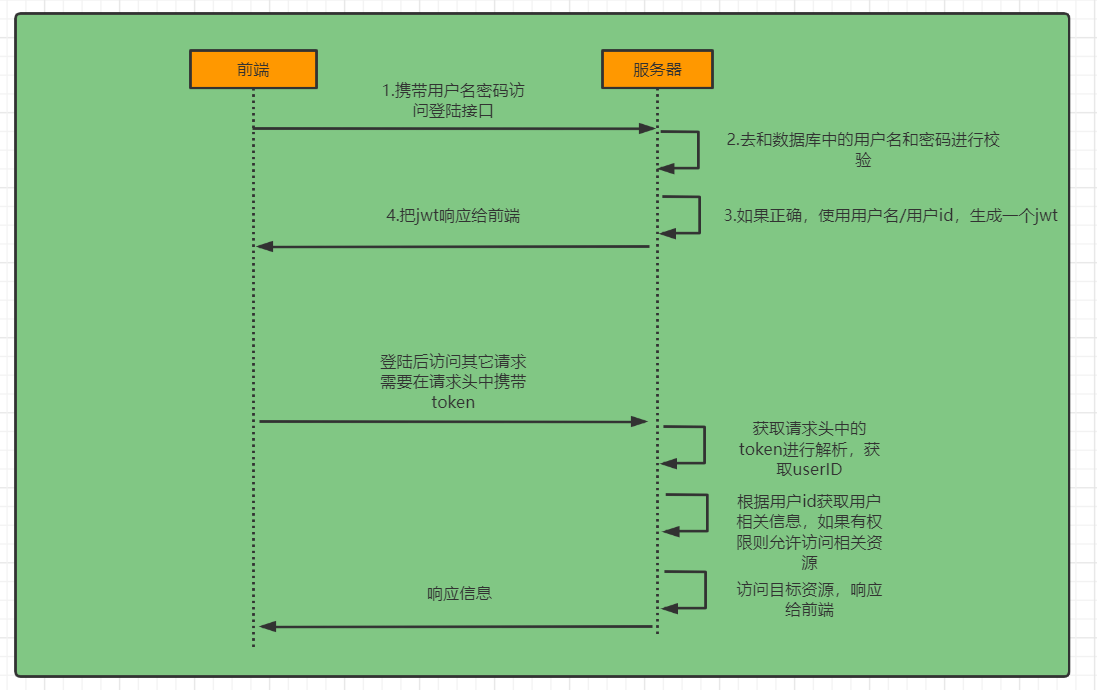
4.1第一步:创建自定义登录过滤器
package com.ouo.ouo_skill.woring.filter;

import cn.hutool.db.nosql.redis.RedisDS;
import com.ouo.ouo_skill.contant.RedisKey;
import org.springframework.lang.Nullable;
import org.springframework.security.authentication.AuthenticationManager;
import org.springframework.security.authentication.AuthenticationServiceException;
import org.springframework.security.authentication.UsernamePasswordAuthenticationToken;
import org.springframework.security.core.Authentication;
import org.springframework.security.core.AuthenticationException;
import org.springframework.security.web.authentication.AbstractAuthenticationProcessingFilter;
import org.springframework.security.web.util.matcher.AntPathRequestMatcher;
import org.springframework.stereotype.Component;
import org.springframework.util.Assert;
import redis.clients.jedis.Jedis;

import javax.servlet.http.HttpServletRequest;
import javax.servlet.http.HttpServletResponse;

public class AdminUsernamePasswordAuthenticationFilter extends AbstractAuthenticationProcessingFilter {
    public static final String SPRING_SECURITY_FORM_USERNAME_KEY = "username";

    public static final String SPRING_SECURITY_FORM_PASSWORD_KEY = "password";

    //(1)新增验证码
    public static final String SPRING_SECURITY_FORM_CODE_KEY  = "code";

    //(2)改成我们登录地址
    private static final AntPathRequestMatcher DEFAULT_ANT_PATH_REQUEST_MATCHER = new AntPathRequestMatcher("/admin/login", "POST");

    private String usernameParameter = SPRING_SECURITY_FORM_USERNAME_KEY;

    private String passwordParameter = SPRING_SECURITY_FORM_PASSWORD_KEY;

    private String codeParameter = SPRING_SECURITY_FORM_CODE_KEY;

    private boolean postOnly = true;

    public AdminUsernamePasswordAuthenticationFilter() {
        super(DEFAULT_ANT_PATH_REQUEST_MATCHER);
    }

    public AdminUsernamePasswordAuthenticationFilter(AuthenticationManager authenticationManager) {
        super(DEFAULT_ANT_PATH_REQUEST_MATCHER, authenticationManager);
    }

    @Override
    public Authentication attemptAuthentication(HttpServletRequest request, HttpServletResponse response)
            throws AuthenticationException {
        if (this.postOnly && !request.getMethod().equals("POST")) {
            throw new AuthenticationServiceException("Authentication method not supported: " + request.getMethod());
        }
        //(3)验证码判断---此处我们采用账密登录,暂无验证码
//        String code = obtainCode(request);
//        Jedis jedis = RedisDS.create().getJedis();
//        if (!jedis.exists(RedisKey.ADMIN_VERIFY_CODE+code)){
//            System.out.print("Verification Code is error");
//            throw new AuthenticationServiceException("Verification Code is error");
//        }else{
//            //验证通过后 删除缓存
//            jedis.del(RedisKey.ADMIN_VERIFY_CODE+code);
//        }

        String username = obtainUsername(request);
        username = (username != null) ? username.trim() : "";
        String password = obtainPassword(request);
        password = (password != null) ? password : "";
        //(4)自定义自己的UsernamePasswordAuthenticationToken
        UsernamePasswordAuthenticationToken authRequest = UsernamePasswordAuthenticationToken.unauthenticated(username,
                password);
        setDetails(request, authRequest);

        return this.getAuthenticationManager().authenticate(authRequest);
    }

    @Nullable
    protected String obtainPassword(HttpServletRequest request) {
        return request.getParameter(this.passwordParameter);
    }

    @Nullable
    protected String obtainUsername(HttpServletRequest request) {
        return request.getParameter(this.usernameParameter);
    }

    @Nullable
    protected String obtainCode(HttpServletRequest request) {
        return request.getParameter(this.codeParameter);
    }

    protected void setDetails(HttpServletRequest request, UsernamePasswordAuthenticationToken authRequest) {
        authRequest.setDetails(this.authenticationDetailsSource.buildDetails(request));
    }

    public void setCodeParameter(String codeParameter) {
        Assert.hasText(codeParameter, "code parameter must not be empty or null");
        this.codeParameter = codeParameter;
    }

    public void setUsernameParameter(String usernameParameter) {
        Assert.hasText(usernameParameter, "Username parameter must not be empty or null");
        this.usernameParameter = usernameParameter;
    }

    public void setPasswordParameter(String passwordParameter) {
        Assert.hasText(passwordParameter, "Password parameter must not be empty or null");
        this.passwordParameter = passwordParameter;
    }

    public void setPostOnly(boolean postOnly) {
        this.postOnly = postOnly;
    }

    public final String getUsernameParameter() {
        return this.usernameParameter;
    }

    public final String getPasswordParameter() {
        return this.passwordParameter;
    }

    public final String getCodeParameter() {
        return this.codeParameter;
    }
}
4.2 添加到Springsecurity过滤链
上面我们已经定义了一个AdminUsernamePasswordAuthenticationFilter过滤器,必须把它添加到容器中,它才能生效
新建一个名为SpringSecurityAdminConfig的配置文件,用来管理后台用户名密码登录,其内容如下
package com.ouo.ouo_skill.woring.config;

import com.ouo.ouo_skill.woring.filter.AdminAuthenticationSuccessHandler;
import com.ouo.ouo_skill.woring.filter.AdminAuthenticationTokenFilter;
import com.ouo.ouo_skill.woring.filter.AdminUsernamePasswordAuthenticationFilter;
import org.springframework.security.authentication.AuthenticationManager;
import org.springframework.security.config.annotation.SecurityConfigurerAdapter;
import org.springframework.security.config.annotation.web.builders.HttpSecurity;
import org.springframework.security.web.DefaultSecurityFilterChain;
import org.springframework.security.web.authentication.UsernamePasswordAuthenticationFilter;
import org.springframework.stereotype.Component;

import javax.annotation.Resource;
/**
 * @ClassName SpringSecurityAdminConfig
 * @Description 第二步:配置文件
 * 添加到springsecurity过滤链
 * 上面我们已经定义了一个AdminUsernamePasswordAuthenticationFilter过滤器,
 * 必须把它添加到容器中,它才能生效
 *
 * @Author: OYZJ
 * @date 2023/4/18 12:31
 * @Version 1.0
 */
@Component
public class SpringSecurityAdminConfig extends SecurityConfigurerAdapter<DefaultSecurityFilterChain, HttpSecurity> {
    @Override
    public void configure(HttpSecurity http) throws Exception {
        AdminUsernamePasswordAuthenticationFilter adminUsernamePasswordAuthenticationFilter = new AdminUsernamePasswordAuthenticationFilter();
        adminUsernamePasswordAuthenticationFilter.setAuthenticationManager(http.getSharedObject(AuthenticationManager.class));

        //注入过滤器,addFilterAt替换UsernamePasswordAuthenticationFilter
        http.addFilterAt(adminUsernamePasswordAuthenticationFilter, UsernamePasswordAuthenticationFilter.class);
    }
}
注意我们是用adminUsernamePasswordAuthenticationFilter替换了原来的UsernamePasswordAuthenticationFilter
然后在SecurityConfig中加载SpringSecurityAdminConfig即可
package com.ouo.ouo_skill.woring.config;

import com.ouo.ouo_skill.woring.filter.AuthenticationEntryPointIHandler;
import com.ouo.ouo_skill.woring.service.impl.UserDetailServiceImpl;
import org.springframework.beans.factory.annotation.Autowired;
import org.springframework.context.annotation.Bean;
import org.springframework.data.redis.core.RedisTemplate;
import org.springframework.security.authentication.AuthenticationManager;
import org.springframework.security.config.annotation.authentication.builders.AuthenticationManagerBuilder;
import org.springframework.security.config.annotation.method.configuration.EnableGlobalMethodSecurity;
import org.springframework.security.config.annotation.web.builders.HttpSecurity;
import org.springframework.security.config.annotation.web.configuration.EnableWebSecurity;
import org.springframework.security.config.annotation.web.configurers.AbstractHttpConfigurer;
import org.springframework.security.crypto.bcrypt.BCryptPasswordEncoder;
import org.springframework.security.crypto.password.PasswordEncoder;
import org.springframework.security.web.AuthenticationEntryPoint;
import org.springframework.security.web.SecurityFilterChain;

import javax.annotation.Resource;

/**
 * @ClassName SecurityConfig
 * @Description https://gitee.com/myha/springsecurity
 * 新建一个SecurityConfig配置类,第三步
 * @Author: OUO
 * @date 2023/4/17 10:35
 * @Version 1.0
 */
@EnableWebSecurity
@EnableGlobalMethodSecurity(prePostEnabled = true)
public class SecurityConfig {
    @Resource
    SpringSecurityAdminConfig springSecurityAdminConfig;

    @Resource
    UserDetailServiceImpl userDetailService;

    @Resource
    AuthenticationEntryPointIHandler authenticationEntryPointIHandler;


    @Bean
    public SecurityFilterChain securityFilterChain(HttpSecurity http) throws Exception {
        http.   //禁用它。因为前后端分离不需要
                csrf(AbstractHttpConfigurer::disable)
                //禁用session
                .sessionManagement(AbstractHttpConfigurer::disable)
                .authorizeRequests(auhtor->auhtor
                //这里配置的接口不需要验证
                .antMatchers("/admin/code","/admin/login","**").permitAll()
                //其它接口都需要经过验证
                .anyRequest().authenticated()
        ).cors();

        //后台登录配置
        http.apply(springSecurityAdminConfig);
        //注入新得AuthticationManager
        /**
         * 其密码是预先经过BCryptPasswordEncoder加密的,因此在做密码校验的时候也要使用它,而不是使用springSecurity默认的。
         */
        http.authenticationManager(authenticationManager(http));
        //认证异常处理器
        http.exceptionHandling(ex->ex.authenticationEntryPoint(authenticationEntryPointIHandler));
        return http.build();
    }


    /**
     * 密码加密规则
     */
    @Bean
    public PasswordEncoder passwordEncoder(){
        return new BCryptPasswordEncoder(12);
    }


    /**
     * 构造一个AuthenticationManager,使用自定义得userDetailsService和passwordEncoder
     * @param http
     * @return
     */
    @Bean
    AuthenticationManager authenticationManager(HttpSecurity http) throws Exception {
        AuthenticationManager authenticationManager = http.getSharedObject(AuthenticationManagerBuilder.class)
                .userDetailsService(userDetailService)
                .passwordEncoder(passwordEncoder())
                .and()
                .build();
        return authenticationManager;
    }

/*    public static void main(String[] args) {
        String pass = "123456";
        BCryptPasswordEncoder bcryptPasswordEncoder = new BCryptPasswordEncoder();
        String hashPass = bcryptPasswordEncoder.encode(pass);
        System.out.println(hashPass);

        boolean f = bcryptPasswordEncoder.matches("123456","$2a$12$pgFnH5Ot.XIvbaTM7X9nNe8AGwBV.3eggszusKShXXG2HJ1fFdNMO");
        System.out.println(f);
    }*/
}
4.3数据库查询用户信息
虽然我们自定义了登录过滤器,但并没有改变用户信息来源于内存,而不是数据库。在阅读源码的时候我们已经说过,我们要重写UserDetailsService接口里面的loadUserByUsername方法。
新建BaseUserDetailsService类,继承UserDetailsService,内容如下:
package com.ouo.ouo_skill.woring.service.impl;

import com.aliyun.oss.ServiceException;
import com.baomidou.mybatisplus.core.conditions.query.LambdaQueryWrapper;
import com.ouo.ouo_skill.model.SysMenu;
import com.ouo.ouo_skill.model.SysUser;
import com.ouo.ouo_skill.model.dto.SysUserDTO;
import com.ouo.ouo_skill.woring.mapper.SysUserMapper;
import com.ouo.ouo_skill.woring.service.BaseUserDetailsService;
import org.springframework.security.core.userdetails.UserDetails;
import org.springframework.security.core.userdetails.UsernameNotFoundException;
import org.springframework.stereotype.Service;
import org.springframework.util.CollectionUtils;

import javax.annotation.Resource;
import java.util.List;

/**
 * @ClassName UserDetailServiceImpl
 * @Description OUO
 * @Author: OUO
 * @date 2023/4/18 14:21
 * @Version 1.0
 */
@Service
public class UserDetailServiceImpl implements BaseUserDetailsService {
    @Resource
    SysUserMapper sysUserMapper;

    //暂时此处不需要
    @Override
    public UserDetails loadUserByPhone(String phone) throws UsernameNotFoundException {
        return null;
    }

    @Override
    public SysUserDTO loadUserByUsername(String username) {
        //通过用户名查询用户信息
        LambdaQueryWrapper<SysUser> wrapper=new LambdaQueryWrapper<>();
        wrapper.eq(SysUser::getUserName,username);
        List<SysUser> sysUsers = sysUserMapper.selectList(wrapper);
        if (CollectionUtils.isEmpty(sysUsers)){
            throw new ServiceException("该用户不存在");
        }

        //获取权限信息
//        List<SysMenu> userHasMenu = sysUserMapper.getUserHasMenu(sysUsers.get(0).getId());
        return new SysUserDTO(sysUsers.get(0),null);
    }
}
对应的接口
package com.ouo.ouo_skill.woring.service;

import org.springframework.security.core.userdetails.UserDetails;
import org.springframework.security.core.userdetails.UserDetailsService;
import org.springframework.security.core.userdetails.UsernameNotFoundException;

/**
 * @ClassName BaseUserDetailsService
 * @Description OUO
 * @Author: OUO
 * @date 2023/4/18 14:09
 * @Version 1.0
 */
public interface BaseUserDetailsService extends UserDetailsService {

    /**
     * 手机号登录
     * @param phone
     * @return
     * @throws UsernameNotFoundException
     */
    UserDetails loadUserByPhone(String phone)throws UsernameNotFoundException;
}
这些接口的返回值类型都是UserDetails,这里的SysUserDTO是继承UserDetails,主要是保存用户信息及权限信息,可以参考一下其内置的User类,然后做出一下的修改
package com.ouo.ouo_skill.model.dto;

import com.alibaba.fastjson.annotation.JSONField;
import com.ouo.ouo_skill.model.SysMenu;
import com.ouo.ouo_skill.model.SysUser;
import lombok.Data;
import lombok.NoArgsConstructor;
import org.springframework.security.core.GrantedAuthority;
import org.springframework.security.core.authority.SimpleGrantedAuthority;
import org.springframework.security.core.userdetails.UserDetails;
import org.springframework.util.CollectionUtils;
import org.springframework.util.StringUtils;

import java.util.ArrayList;
import java.util.Collection;
import java.util.List;


@Data
@NoArgsConstructor

//(1)必须继承UserDetails
public class SysUserDTO implements UserDetails {
    //(2)把用户信息封装成实体类,比较容易管理和操作,比如说新增一些字段,只需在实体类里面加上即可
    private SysUser sysUser;

    private List<SysMenu> sysMenu;

    //不进行序列化
    //(3)权限信息,这里需要注意的是要禁止序列化,不然存储到缓存中会有问题
    @JSONField(serialize = false)
    private List<GrantedAuthority> authorities = new ArrayList<>();

    public SysUserDTO(SysUser sysUser, List<SysMenu> menus){
        this.sysUser = sysUser;
//        this.sysMenu = menus;
    }

    @Override
    public Collection<? extends GrantedAuthority> getAuthorities() {
        if (!CollectionUtils.isEmpty(authorities)) {
            return authorities;
        }

//        for (SysMenu menu : sysMenu) {
//            String perms = menu.getPerms();
//            if (StringUtils.hasLength(perms)) {
//                SimpleGrantedAuthority simpleGrantedAuthority = new SimpleGrantedAuthority(menu.getPerms());
//                authorities.add(simpleGrantedAuthority);
//            }
//        }
        return authorities;
    }

    @Override
    public String getPassword() {
        return this.sysUser.getPassword();
    }

    @Override
    public String getUsername() {
        return this.sysUser.getUserName();
    }

    @Override
    public boolean isAccountNonExpired() {
        //账号是否过期,因为用户表里面没有这个字段,因此默认账号不过期,下面几个方法同理
        return true;
    }

    @Override
    public boolean isAccountNonLocked() {
        return true;
    }

    @Override
    public boolean isCredentialsNonExpired() {
        return true;
    }

    @Override
    public boolean isEnabled() {
        return true;
    }
}
到这里就已经写好了从数据库中查询用户信息的代码,接下来就是怎样使springsecurity使用我们写的loadUserByUsername这个,而不是其默认的。
springsecurity为此提供了使用配置的方式:
   //就是在上方SpringSecurityConfig配置文件中加入以下内容
    /**
     *密码加密规则
     */
    @Bean
    public PasswordEncoder passwordEncoder() {
        return new BCryptPasswordEncoder(12);
    }

    /**
     *构造一个AuthenticationManager,使用自定义的userDetailsService和passwordEncoder
     */
    @Bean
    AuthenticationManager authenticationManager(HttpSecurity http) throws Exception {
        AuthenticationManager authenticationManager = http.getSharedObject(AuthenticationManagerBuilder.class)
                .userDetailsService(userDetailService)
                .passwordEncoder(passwordEncoder())
                .and()
                .build();
        return authenticationManager;
    }
到此为止就可以启用登录测试了
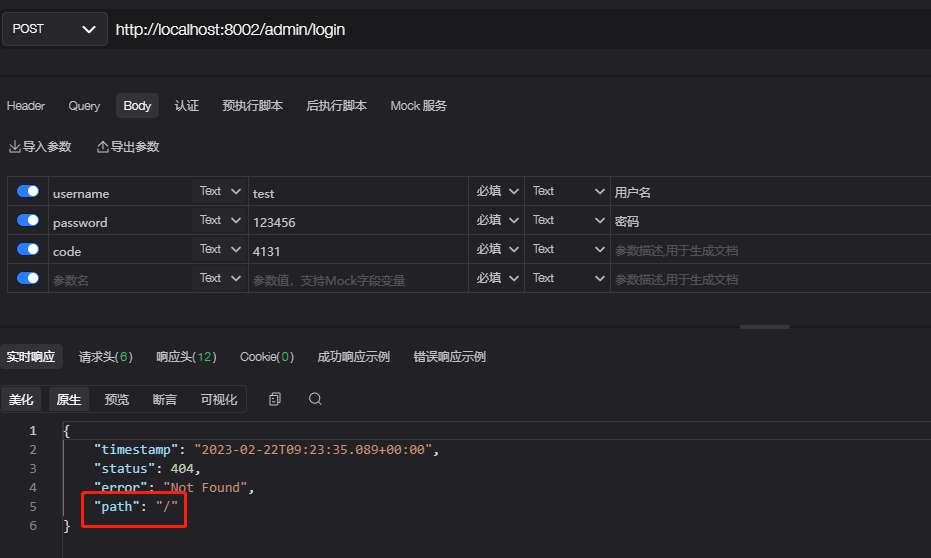
not found “/” 说明已经登录成功了,还记得开头那会,登录成功后会跳转到首页(/),但很显然这并不满足前后的分离项目,因此还需要进行改造。
4.4登录成功/失败处理器
前后端分离的项目是通过header携带token进行验证的,因此登录成功后需要返回一窜token,我们在阅读AbstractAuthenticationProcessingFilter源码时已经讲过其默认是跳转到固定页面,因此需要我们需要自定义一个successHandler和failureHandler
新建AdminAuthenticationSuccessHandler,让它继承AuthenticationSuccessHandler
package com.ouo.ouo_skill.woring.filter;

import cn.hutool.db.nosql.redis.RedisDS;
import cn.hutool.jwt.JWTUtil;
import com.alibaba.fastjson.JSON;
import com.ouo.ouo_skill.contant.RedisKey;
import com.ouo.ouo_skill.contant.TokenHeader;
import com.ouo.ouo_skill.model.dto.SysUserDTO;
import com.ouo.ouo_skill.util.ResultUtil;
import org.springframework.security.core.Authentication;
import org.springframework.security.web.authentication.AuthenticationSuccessHandler;
import org.springframework.stereotype.Component;
import redis.clients.jedis.Jedis;
import redis.clients.jedis.params.SetParams;

import javax.servlet.FilterChain;
import javax.servlet.ServletException;
import javax.servlet.http.HttpServletRequest;
import javax.servlet.http.HttpServletResponse;
import java.io.IOException;
import java.util.HashMap;

/**
 * @ClassName AdminAuthenticationSuccessHandler
 * @Description 前后端分离的项目是通过header携带token进行验证的,因此登录成功后需要返回一窜token
 * ,我们在阅读AbstractAuthenticationProcessingFilter源码时已经讲过其默认是跳转到固定页面,
 * 因此需要我们需要自定义一个successHandler和failureHandler
 * 新建AdminAuthenticationSuccessHandler,让它实现AuthenticationSuccessHandler
 * @Author: OUO
 * @date 2023/4/18 17:35
 * @Version 1.0
 */
@Component
public class AdminAuthenticationSuccessHandler implements  AuthenticationSuccessHandler {

    @Override
    public void onAuthenticationSuccess(HttpServletRequest request, HttpServletResponse response, Authentication authentication) throws IOException, ServletException {
        //拿到登录用户信息
        SysUserDTO userDetails=(SysUserDTO) authentication.getPrincipal();

        //生成JWT(token)
        HashMap<String, Object> map = new HashMap<>();
        map.put("uid",userDetails.getSysUser().getId());
        //半月过期
        map.put("expire_time",System.currentTimeMillis()+1000 * 60 * 60 * 24 * 15);
        String jwtToken = JWTUtil.createToken(map, "1234".getBytes());

        //将用户信息保存到redis
        Jedis jedis = RedisDS.create().getJedis();
        String key  = RedisKey.ADMIN_USER_INFO + userDetails.getSysUser().getId().toString();
        SetParams setParams=new SetParams();
        setParams.ex(1000L);
        jedis.set(key, JSON.toJSONString(userDetails),setParams);

        //当前token也保存到redis//单点登录
        jedis.set(RedisKey.ADMIN_USER_TOKEN+userDetails.getSysUser().getId().toString(),jwtToken);

        HashMap<Object, Object> resultMap = new HashMap<>();
        resultMap.put("token", TokenHeader.ADMIN_TOKEN_PREFIX+jwtToken);
        //输出结果
        response.setCharacterEncoding("utf-8");
        response.setContentType("application/json");
        response.getWriter().write(JSON.toJSONString(ResultUtil.ok(resultMap)));
    }
}
失败过滤器
package com.ouo.ouo_skill.woring.filter;

import com.alibaba.fastjson.JSON;
import com.ouo.ouo_skill.util.ResultUtil;
import org.springframework.security.authentication.BadCredentialsException;
import org.springframework.security.core.AuthenticationException;
import org.springframework.security.web.authentication.AuthenticationFailureHandler;
import org.springframework.stereotype.Component;

import javax.servlet.ServletException;
import javax.servlet.http.HttpServletRequest;
import javax.servlet.http.HttpServletResponse;
import java.io.IOException;

/**
 * @ClassName AdminAuthenticationFailureHandler
 * @Description 后台登录失败处理器
 * @Author: OUO
 * @date 2023/4/18 18:00
 * @Version 1.0
 */
@Component
public class AdminAuthenticationFailureHandler implements AuthenticationFailureHandler {
    @Override
    public void onAuthenticationFailure(HttpServletRequest request, HttpServletResponse httpServletResponse, AuthenticationException exception) throws IOException, ServletException {
        //修改编码格式
        httpServletResponse.setCharacterEncoding("utf-8");
        httpServletResponse.setContentType("application/json");

        if (exception instanceof BadCredentialsException){
            httpServletResponse.getWriter().write(JSON.toJSONString(ResultUtil.fail(1000,"用户名或密码错误")));
        }else {
            httpServletResponse.getWriter().write(JSON.toJSONString(ResultUtil.fail(1000,exception.getMessage())));
        }
    }
}
登录成功正常截图
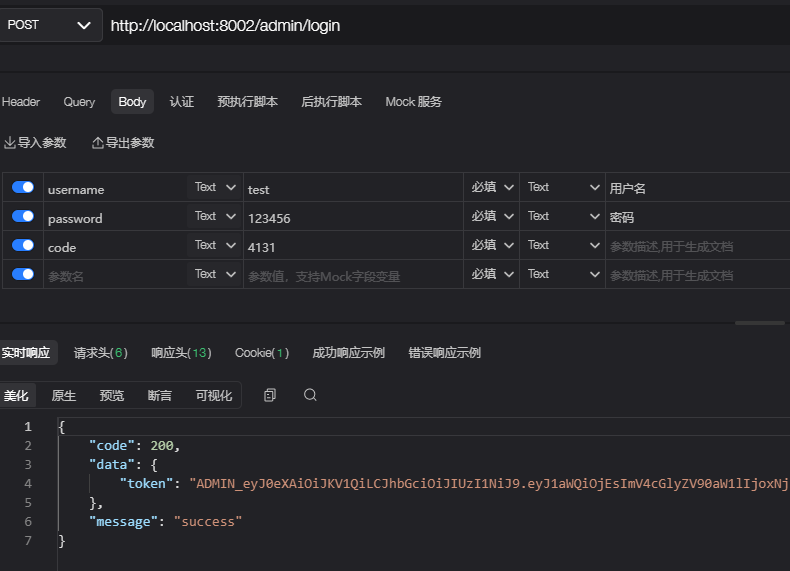
4.5:认证过滤器
当我们登录成功后,是通过token去访问我们接口的,因此需要自定义一个过滤器,这个过滤器会去获取请求头中的token,对token进行解析取出其中的用户ID,然后根据用户ID去获取缓存中的用户信息,存入到SecurityContextHolder中
package com.ouo.ouo_skill.woring.filter;

import cn.hutool.db.nosql.redis.RedisDS;
import cn.hutool.jwt.JWT;
import cn.hutool.jwt.JWTUtil;
import com.alibaba.fastjson.JSONObject;
import com.ouo.ouo_skill.contant.RedisKey;
import com.ouo.ouo_skill.contant.TokenHeader;
import com.ouo.ouo_skill.model.dto.SysUserDTO;
import lombok.extern.slf4j.Slf4j;
import org.springframework.security.authentication.UsernamePasswordAuthenticationToken;
import org.springframework.security.core.context.SecurityContextHolder;
import org.springframework.stereotype.Component;
import org.springframework.util.StringUtils;
import org.springframework.web.filter.OncePerRequestFilter;
import redis.clients.jedis.Jedis;

import javax.servlet.FilterChain;
import javax.servlet.ServletException;
import javax.servlet.http.HttpServletRequest;
import javax.servlet.http.HttpServletResponse;
import java.io.IOException;
import java.util.Objects;

/**
 * @ClassName AdminAuthenticationTokenFilter
 * @Description 当我们登录成功后,是通过token去访问我们接口的,因此需要自定义一个过滤器,
 * 这个过滤器会去获取请求头中的token,对token进行解析取出其中的用户ID,
 * 然后根据用户ID去获取缓存中的用户信息,存入到SecurityContextHolder中
 * @Author: OUO
 * @date 2023/4/19 10:46
 * @Version 1.0
 */
@Component
@Slf4j
public class AdminAuthenticationTokenFilter extends OncePerRequestFilter {
    @Override
    protected void doFilterInternal(HttpServletRequest request, HttpServletResponse response, FilterChain chain) throws ServletException, IOException {
        //获取token
        String token=request.getHeader("token");
        if (!StringUtils.hasLength(token)||!token.startsWith(TokenHeader.ADMIN_TOKEN_PREFIX)){
            //如果不存在和前缀不是TokenHeader.ADMIN_TOKEN_PREFIX,就放行到下一个过滤器
            chain.doFilter(request, response);
            SecurityContextHolder.clearContext();
            return;
        }

        //获取真实得token(去掉前缀)
        String authToken = token.substring(TokenHeader.ADMIN_TOKEN_PREFIX.length());

        //解析token
        JWT jwt;
        String code=null;
        try {
            jwt= JWTUtil.parseToken(authToken);
        }catch (Exception e){
            chain.doFilter(request,response);
            return;
        }
        if (!Objects.isNull(jwt.getPayload("uid"))){
            code=jwt.getPayload("uid").toString();
        }
        if (!StringUtils.hasLength(code)){
            chain.doFilter(request,response);
            return;
        }

        Jedis jedis = RedisDS.create().getJedis();
        //单点登录
        if (!authToken.equals(jedis.get(RedisKey.ADMIN_USER_TOKEN+code))){
            chain.doFilter(request,response);
            return;
        }

        //从缓存中获取用户信息
        String key=RedisKey.ADMIN_USER_INFO+code;
        if (!jedis.exists(key)){
            chain.doFilter(request,response);
            return;
        }


        Object userObj=jedis.get(key);
        if (Objects.isNull(userObj)){
            chain.doFilter(request,response);
            return;
        }

        //保存相关的验证信息
        SysUserDTO userDTO = JSONObject.parseObject(userObj.toString(), SysUserDTO.class);
        UsernamePasswordAuthenticationToken authenticationToken =
                new UsernamePasswordAuthenticationToken(userDTO, null, userDTO.getAuthorities());

        SecurityContextHolder.getContext().setAuthentication(authenticationToken);
        chain.doFilter(request, response);


    }
}
4.6认证异常抛出
如果未登录,或者登录后,随便携带一个token,它是如何抛出异常的?
springsecurity中的HttpSecurity对象提供了了exceptionHandling方法,只需要在配置文件中绑定相关的处理接口即可
具体代码如下
package com.ouo.ouo_skill.woring.filter;

import cn.hutool.json.JSONUtil;
import com.ouo.ouo_skill.util.ResultUtil;
import org.springframework.http.HttpStatus;
import org.springframework.security.core.AuthenticationException;
import org.springframework.security.web.AuthenticationEntryPoint;
import org.springframework.stereotype.Component;

import javax.servlet.ServletException;
import javax.servlet.http.HttpServletRequest;
import javax.servlet.http.HttpServletResponse;
import java.io.IOException;

/**
 * @ClassName AuthenticationEntryPointIHandler
 * @Description OUO
 * @Author: OUO
 * @date 2023/4/19 11:11
 * @Version 1.0
 */
@Component
public class AuthenticationEntryPointIHandler implements AuthenticationEntryPoint {
    @Override
    public void commence(HttpServletRequest request, HttpServletResponse response, AuthenticationException authException) throws IOException, ServletException {
        response.setCharacterEncoding("UTF-8");
        response.setContentType("application/json");
        response.getWriter().println(JSONUtil.toJsonStr(ResultUtil.fail(HttpStatus.UNAUTHORIZED.value(), "认证失败,请重新登录")));
        response.getWriter().flush();
    }
}
对应SpringConfig配置文件内容(用注释标记出来了):
@Bean
public SecurityFilterChain securityFilterChain(HttpSecurity http) throws Exception {
    http
        .csrf(AbstractHttpConfigurer::disable)
        .sessionManagement(AbstractHttpConfigurer::disable)
        .authorizeHttpRequests(auhtor-> auhtor
                               .antMatchers("/admin/code", "/admin/login").permitAll()
                               .anyRequest().authenticated())
        .cors();
    http.apply(springSecurityAdminConfig);
    http.authenticationManager(authenticationManager(http));

    //----认证异常处理器----
    http.exceptionHandling(ex->ex.authenticationEntryPoint(authenticationEntryPointIHandler));

    return http.build();
}
对异常处理如下
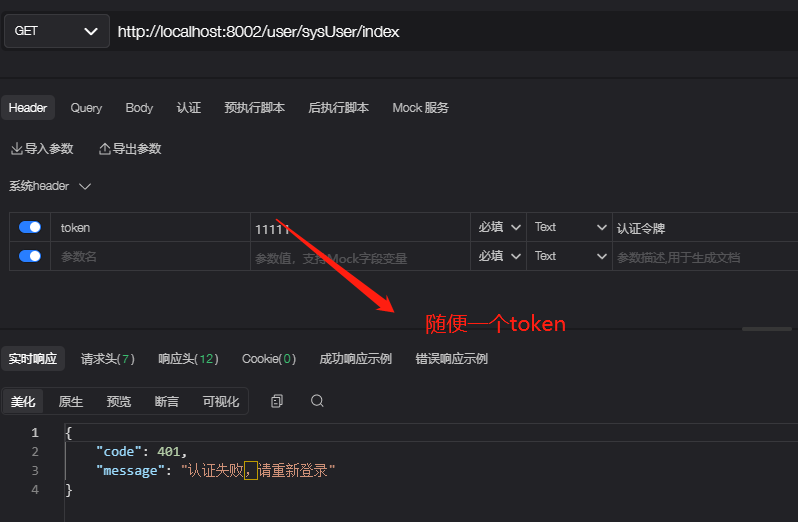
4.7退出登录
springsecurity中的HttpSecurity对象提供了logout方法,但本教程使用自定义的方式,写一个退出登录的接口
package com.ouo.ouo_skill.woring;

import cn.hutool.db.nosql.redis.RedisDS;
import com.ouo.ouo_skill.contant.RedisKey;
import org.springframework.security.core.context.SecurityContextHolder;
import org.springframework.web.bind.annotation.GetMapping;
import org.springframework.web.bind.annotation.RequestMapping;
import org.springframework.web.bind.annotation.RestController;
import redis.clients.jedis.Jedis;

import javax.annotation.Resource;

/**
 * @ClassName springSecurityPoint
 * @Description 引入spring-security安全验证框架
 * @Author: OUO
 * @date 2023/4/14 15:39
 * @Version 1.0
 */
@RestController
@RequestMapping("/")
public class springSecurityPoint {

    @Resource
    private HttpRequestComponent httpRequestComponent;

    /**
     * 退出操作
     * 主要是删除缓存及清空SecurityContextHolder里面的用户信息,httpRequestComponent是获取登录用户信息的组件
     */
    @GetMapping("/admin/logout")
    public void adminLogout(){
        //是获取登录用户信息的组件
        String key = RedisKey.ADMIN_USER_INFO + httpRequestComponent.getAdminUserId().toString();
        //删除缓存即可
        Jedis jedis = RedisDS.create().getJedis();
        jedis.del(key);
        SecurityContextHolder.clearContext();
    }

}
这段代码还是比较简单的,主要是删除缓存及清空SecurityContextHolder里面的用户信息,httpRequestComponent是获取登录用户信息的组件,代码如下:
package com.ouo.ouo_skill.woring;

import com.aliyun.oss.ServiceException;
import com.ouo.ouo_skill.model.dto.SysUserDTO;
import org.springframework.security.core.Authentication;
import org.springframework.security.core.context.SecurityContextHolder;
import org.springframework.stereotype.Component;
import org.springframework.util.StringUtils;
import org.springframework.web.context.request.RequestContextHolder;
import org.springframework.web.context.request.ServletRequestAttributes;

import javax.servlet.http.HttpServletRequest;
import java.util.Objects;

/**
 * @ClassName HttpRequestComponent
 * @Description 主要是删除缓存及清空SecurityContextHolder里面的用户信息,
 * httpRequestComponent是获取登录用户信息的组件
 * @Author: OUO
 * @date 2023/4/19 11:19
 * @Version 1.0
 */
@Component
public class HttpRequestComponent {

    /**
     * 获取token
     *
     */
    public String getToken(){
        HttpServletRequest request=((ServletRequestAttributes) Objects.requireNonNull(RequestContextHolder.getRequestAttributes())).getRequest();
        String token=request.getHeader("token");
        if (!StringUtils.hasLength(token)){
            throw new ServiceException("授权令牌为空");
        }
        return token;
    }

    /**
     * 获取用户信息
     */
    public SysUserDTO getAdminUserInfo(){
        Authentication authentication = SecurityContextHolder.getContext().getAuthentication();
        SysUserDTO userDetialsDTO = (SysUserDTO) authentication.getPrincipal();
        if (Objects.isNull(userDetialsDTO)){
            throw new ServiceException("登录失效,请重新登录");
        }

        return userDetialsDTO;
    }

    /**
     * 获取用户ID
     */
    public Long getAdminUserId(){
        if (Objects.isNull(this.getAdminUserInfo().getSysUser())){
            throw new ServiceException("登录失效,请重新登录");
        }
        return this.getAdminUserInfo().getSysUser().getId();
    }
}
Redis相关
借鉴:https://blog.csdn.net/m0_62866192/article/details/121438008
引入配置以及依赖
依赖:
        <!-- 引入redis       -->
        <dependency>
            <groupId>org.springframework.boot</groupId>
            <artifactId>spring-boot-starter-data-redis</artifactId>
        </dependency>
配置序列化
package com.ouo.ouo_skill.woring.config;


import com.fasterxml.jackson.annotation.JsonAutoDetect;
import com.fasterxml.jackson.annotation.JsonTypeInfo;
import com.fasterxml.jackson.annotation.PropertyAccessor;
import com.fasterxml.jackson.databind.ObjectMapper;
import com.fasterxml.jackson.databind.jsontype.impl.LaissezFaireSubTypeValidator;
import org.springframework.context.annotation.Bean;
import org.springframework.context.annotation.Configuration;
import org.springframework.data.redis.connection.RedisConnectionFactory;
import org.springframework.data.redis.core.RedisTemplate;
import org.springframework.data.redis.serializer.Jackson2JsonRedisSerializer;
import org.springframework.data.redis.serializer.StringRedisSerializer;


/**
 * @ClassName RedisConfig
 * @Description 编写redistemplate的bean配置
 * @Author: OUO
 * @date 2023/4/17 10:54
 * @Version 1.0
 */

@Configuration
public class RedisConfig {

    @Bean
    @SuppressWarnings("all")
    public RedisTemplate<String,Object> redisTemplate(RedisConnectionFactory factory){
        RedisTemplate<String, Object> template = new RedisTemplate<>();
        template.setConnectionFactory(factory);
        Jackson2JsonRedisSerializer jackson2JsonRedisSerializer = new Jackson2JsonRedisSerializer(Object.class);
        ObjectMapper om = new ObjectMapper();
        // 指定序列化输入的类型,类必须是非final修饰的,final修饰的类,比如String,Integer等会跑出异常
        om.activateDefaultTyping(LaissezFaireSubTypeValidator.instance, ObjectMapper.DefaultTyping.NON_FINAL, JsonTypeInfo.As.WRAPPER_ARRAY);
        om.setVisibility(PropertyAccessor.ALL, JsonAutoDetect.Visibility.ANY);
        om.enableDefaultTyping(ObjectMapper.DefaultTyping.NON_FINAL);
        jackson2JsonRedisSerializer.setObjectMapper(om);
        StringRedisSerializer stringRedisSerializer = new StringRedisSerializer();
        template.setKeySerializer(stringRedisSerializer);
        template.setHashKeySerializer(stringRedisSerializer);
        template.setValueSerializer(jackson2JsonRedisSerializer);
        template.setHashValueSerializer(jackson2JsonRedisSerializer);
        template.afterPropertiesSet();
        return template;

    }
}
操作String
具体操作代码
    /**
     * String类型
     */
    public void redisTestString(){
        //String类型
        Boolean hasKey = redisTemplate.hasKey("ouo" + 1);
        log.info("是否存在{}",hasKey);
        //存储一个实体对象
        UserStreamDO userStreamDO=new UserStreamDO("OUO",18,"男");
        redisTemplate.opsForValue().set("ouo"+1,userStreamDO);
        UserStreamDO demo = (UserStreamDO) redisTemplate.opsForValue().get("ouo" + 1);
        log.info("如果redis存在key,取出来对象{}",demo);
        //删除redis中对应得key值
        Boolean delete = redisTemplate.delete("ouo" + 1);
        log.info("删除结果:{}",delete);
        //批量删除redis中对应得key值,其中keys是数组keys:Collection<K> keys
        //redisTemplate.delete(Collection<String> keys);
        //根据新的key的名称修改redis中老的key的名称
        Boolean ifAbsent = redisTemplate.renameIfAbsent("ouo1", "ouoRename");
        log.info("修改旧key值{}",ifAbsent);
        //获取key值的类型
        DataType ouoRename = redisTemplate.type("ouoRename");
        log.info("该key值类型{}",ouoRename);
        //获取当前key的剩下的过期时间
        Long expire = redisTemplate.getExpire("ouoRename");
        log.info("当前key值剩余时间:{}",expire);
        //直接将key进行持久化
        Boolean persist = redisTemplate.persist("ouoRename");
        log.info("将key进行持久化结果{}",persist);
        //将当前数据库的key移动到指定redis中数据库当中
        Boolean move = redisTemplate.move("ouoRename", 0);
        log.info("将当前数据库的key移动另外一个库中结果:{}",move);
        //设置key跟value的值
        Boolean aBoolean = redisTemplate.opsForValue().setIfAbsent("ouoRename", "666", 5 * 60, TimeUnit.SECONDS);
        log.info("设值结果:{}",aBoolean);
        //截取key的字符串
        String s = redisTemplate.opsForValue().get("ouoRename", 1, 2);
        log.info("截取key的字符串结果:{}",s);
        //对传入得key值设置过期时间
        Boolean expires = redisTemplate.expire("ouo" + 1, 5 * 60, TimeUnit.SECONDS);
        log.info("设置过期时间结果:{}",expires);
        //模糊查询key值,返回的是一个没有重复的Set类型
        Set<String> ou = redisTemplate.keys("ou*");
        log.info("模糊查询key值{}",ou);
        //获取原来的key的值后在后面新增上新的字符串
        Integer append = redisTemplate.opsForValue().append("ouo1", "666");
        log.info("新增结果:{}",append);
        //增量方式增加Double值
        Long increment = redisTemplate.opsForValue().increment("ouo2", 10);
        log.info("增量方式增加double值:{}",increment);
        //增加map集合到redis
        HashMap<String,String> maps=new HashMap<>(3);
        maps.put("1","1");
        maps.put("2","2");
        maps.put("3","3");
        redisTemplate.opsForValue().multiSet(maps);
        //获取指定key的字符串的长度
        Long size = redisTemplate.opsForValue().size("ouo2");
        log.info("指定key字符串长度值:{}",size);
        //根据偏移量offset的值,覆盖重写value的值
        redisTemplate.opsForValue().set("ouo2","123456",1);
    }
操作Hash
 /**
     * Hash类型
     */
    public void redisTestHash(){
        //当hashKey不存在的时候,进行设置map的值
        HashMap<String,String> map=new HashMap<>(3);
        map.put("1","1");
        map.put("2","2");
        map.put("3","3");
        Boolean ifAbsentMap = redisTemplate.opsForHash().putIfAbsent("ouoMap", "map", map);
        log.info("设置map值结果:{}",ifAbsentMap);

        //获取mao中指定的key值,如果存在则返回值,没有就返回null
        HashMap<String,String> o = (HashMap<String,String>)redisTemplate.opsForHash().get("ouoMap", "map");
        log.info("取出Hash类型结果:{}",o);

        //获取变量中的map的键值对
        Map<Object, Object> ouoMap = redisTemplate.opsForHash().entries("ouoMap");
        log.info("获取变量中的mao的键值对:{}",ouoMap);

        //以map集合的形式添加键值对
        HashMap<String,String> maps=new HashMap<>(3);
        maps.put("11","1");
        maps.put("22","2");
        maps.put("33","3");
        redisTemplate.opsForHash().putAll("ouoMapTwo",maps);
        //查看hash表中指定字段是否存在
        Boolean aBoolean = redisTemplate.opsForHash().hasKey("ouoMap", "map");
        log.info("查看hash表中指定字段是否存在结果:{}",aBoolean);
    }
操作List
/**
 * List类型
 */
public void redisTestList(){
    //根据索引获取list中的值
    //redisTemplate.opsForList().index(key, index)
    //获取list中开始索引到结束索引的所有值
    //redisTemplate.opsForList().range(key, start, end)
    //把值添加在list的最前面
    //redisTemplate.opsForList().leftPush(key, value)
    //直接把一个新的list添加到老的list上面去
    //redisTemplate.opsForList().leftPushAll(key, value)
    //List存在的时候就加入新的值
    //redisTemplate.opsForList().leftPushIfPresent(key, value)
    //在pivot值的索引的前面加上一个值
    //redisTemplate.opsForList().leftPush(key, pivot, value)
    //按照先进先出的顺序来添加
    //redisTemplate.opsForList().rightPush(key,value)redisTemplate.opsForList().rightPushAll(key, value)
    //在pivot元素的后面添加值
    //redisTemplate.opsForList().rightPush(key, pivot, value)
    //设置指定索引的值
    //redisTemplate.opsForList().set(key, index, value)
    //移除并获取列表中第一个元素
    //redisTemplate.opsForList().leftPop(key)redisTemplate.opsForList().leftPop(key, timeout, unit)
    //移除并获取列表最后一个元素
    //redisTemplate.opsForList().rightPop(key)redisTemplate.opsForList().rightPop(key, timeout, unit)
    //从一个队列的右边弹出一个元素并将这个元素放入另一个指定队列的最左边
    //redisTemplate.opsForList().rightPopAndLeftPush(sourceKey, destinationKey)redisTemplate.opsForList().rightPopAndLeftPush(sourceKey, destinationKey, timeout, unit)
    //删除集合中值等于value的元素
    //redisTemplate.opsForList().remove(key, index, value)
    //剪裁List列表
    //redisTemplate.opsForList().trim(key, start, end)
    //获取list的大小
    //redisTemplate.opsForList().size(key)


}
操作Set
    /**
     * Set类型
     */
    public void redisTestSet(){
        //添加元素
        //redisTemplate.opsForSet().add(key, values)
        //移除元素
        //redisTemplate.opsForSet().remove(key, values)
        //删除一个随机元素,并返回来
        //redisTemplate.opsForSet().pop(key)
        //获取集合的大小
        //redisTemplate.opsForSet().size(key)
        //判断集合中是否存在value值
        //redisTemplate.opsForSet().isMember(key, value)
        //获取两个集合的交集并返回一个集合
        //redisTemplate.opsForSet().intersect(key, otherKey)
        //获取key集合与otherKey集合的两个交集,并存储到destKey


    }


 763
763


 被折叠的 条评论
为什么被折叠?
被折叠的 条评论
为什么被折叠?
 到【灌水乐园】发言


