vue项目点击跳转一个新标签页并渲染该页面

需求:vue-template-admin的项目开发后,需要添加隐私条款之类的在页面底部,点击后浏览器跳转一个新标签页并渲染页面。

方法一

将一个简单的h5页面写好后部署到服务器去,然后获得链接,使用

window.open('链接')

这样就可以直接跳转。但这个方法太过繁琐,而且一般也没必要特意为了一个简单的文字展示页面部署环境。

方法二

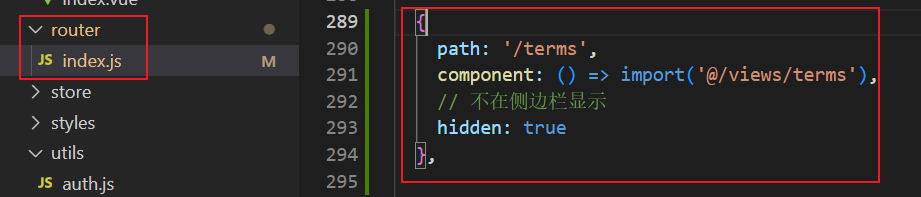
首先创建好terms.vue文件,再在router中注册一个路由

然后在你需要跳转的点击事件中写

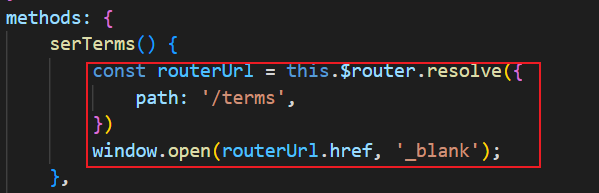
const routerUrl = this.$router.resolve({
                path: '/terms',
})
window.open(routerUrl.href, '_blank')

这样就可以了,新标签页接的是原来系统的url,所以不需要另外部署,也很方便。

所需要的数据都可以在创建的terms.vue中通过接口获取,然后渲染就行。

  • 3
    点赞
  • 8
    收藏
    觉得还不错? 一键收藏
  • 2
    评论
好的,下面我来讲一下如何在 Vue3 + TypeScript 项目中实现动态增减标签跳转到相应页面的操作。 首先,在 Vue3 中实现动态标签与上面的回答类似,需要创建一个 `tabs` 数组来存储标签信息,并使用动态组件来加载对应的页面组件。 不过,在 TypeScript 中,我们需要对 `tabs` 数组进行类型定义。我们可以定义一个 `Tab` 接口来描述标签的结构: ```typescript interface Tab { title: string; path: string; component: any; // 动态组件类型为 any } ``` 其中,`title` 表示标签的标题,`path` 表示标签跳转的路由路径,`component` 表示对应的页面组件,由于是动态加载的组件,因此类型为 `any`。 接着,在 Vue 组件中,我们需要使用 `ref` 来创建 `tabs` 和 `currentTab` 变量,并对其进行类型定义: ```typescript import { defineComponent, ref } from 'vue'; export default defineComponent({ name: 'Tabs', setup() { const tabs = ref<Tab[]>([]); const currentTab = ref<Tab>(); // ... }, }); ``` 在此示例中,我们使用了泛型 `Tab[]` 来对 `tabs` 数组进行类型定义,并使用 `Tab` 对象对 `currentTab` 进行类型定义。 接下来,我们需要实现标签增加、删除和跳转的逻辑。这里我们可以定义以下方法: ```typescript const addTab = (tab: Tab) => { const index = tabs.value.findIndex((item) => item.path === tab.path); if (index === -1) { tabs.value.push(tab); currentTab.value = tab; } else { currentTab.value = tabs.value[index]; } }; const removeTab = (tab: Tab) => { const index = tabs.value.findIndex((item) => item.path === tab.path); if (index !== -1) { tabs.value.splice(index, 1); if (currentTab.value === tab) { currentTab.value = tabs.value[index] || tabs.value[index - 1]; } } }; const switchTab = (tab: Tab) => { currentTab.value = tab; }; ``` 其中,`addTab` 方法用于增加一个标签,如果 `tabs` 数组中不存在对应的标签,则一个标签,并将 `currentTab` 设置为增的标签;否则直接将 `currentTab` 设置为已存在的标签。 `removeTab` 方法用于删除一个标签,如果 `tabs` 数组中存在对应的标签,则从 `tabs` 数组中移除该标签,并将 `currentTab` 设置为上一个或下一个标签(如果当前标签是第一个或最后一个标签,则将 `currentTab` 设置为上一个或下一个标签,否则将 `currentTab` 设置为第一个标签)。 `switchTab` 方法用于切换到指定的标签,将 `currentTab` 设置为指定的标签。 最后,在模板中,我们可以使用 `v-for` 循环渲染 `tabs` 数组,并使用 `router-link` 实现标签跳转: ```html <template> <div class="tabs"> <ul> <li v-for="tab in tabs" :key="tab.path" :class="{ active: currentTab === tab }"> <router-link :to="tab.path" exact @click.native="switchTab(tab)">{{ tab.title }}</router-link> <span class="close" @click="removeTab(tab)">x</span> </li> </ul> <router-view /> </div> </template> ``` 在此模板中,我们使用 `v-for` 循环渲染 `tabs` 数组,并使用 `router-link` 实现标签跳转。在点击 `router-link` 时,我们调用 `switchTab` 方法切换到对应的标签,并设置 `router-link` 的 `exact` 属性,使得在当前标签时,`router-link` 也能被激活。 完整的代码如下: ```typescript <template> <div class="tabs"> <ul> <li v-for="tab in tabs" :key="tab.path" :class="{ active: currentTab === tab }"> <router-link :to="tab.path" exact @click.native="switchTab(tab)">{{ tab.title }}</router-link> <span class="close" @click="removeTab(tab)">x</span> </li> </ul> <router-view /> </div> </template> <script lang="ts"> import { defineComponent, ref } from 'vue'; import { RouteRecordRaw, useRoute, useRouter } from 'vue-router'; interface Tab { title: string; path: string; component: any; } export default defineComponent({ name: 'Tabs', setup() { const tabs = ref<Tab[]>([]); const currentTab = ref<Tab>(); const route = useRoute(); const router = useRouter(); const addTab = (tab: Tab) => { const index = tabs.value.findIndex((item) => item.path === tab.path); if (index === -1) { tabs.value.push(tab); currentTab.value = tab; } else { currentTab.value = tabs.value[index]; } }; const removeTab = (tab: Tab) => { const index = tabs.value.findIndex((item) => item.path === tab.path); if (index !== -1) { tabs.value.splice(index, 1); if (currentTab.value === tab) { currentTab.value = tabs.value[index] || tabs.value[index - 1]; } } }; const switchTab = (tab: Tab) => { currentTab.value = tab; router.push(tab.path); }; const findTabByPath = (path: string) => { return tabs.value.find((tab) => tab.path === path); }; const createRouteTabs = (routes: RouteRecordRaw[]) => { routes.forEach((route) => { if (route.meta?.showInTabs) { addTab({ title: route.meta.title || route.name || '', path: route.path, component: route.component || {}, }); } if (route.children) { createRouteTabs(route.children); } }); }; createRouteTabs(router.getRoutes()); const created = () => { const tab = findTabByPath(route.path); if (tab) { currentTab.value = tab; } else { const { meta, name, path, component } = route; addTab({ title: meta.title || name || '', path, component: component || {}, }); } }; return { tabs, currentTab, addTab, removeTab, switchTab, created, }; }, }); </script> ``` 在此示例中,我们还使用了 `useRoute` 和 `useRouter` 钩子来获取当前路由信息和路由实例,从而实现了在页面时恢复标签状态的功能。同时,我们也通过 `meta` 字段来标记哪些路由需要在标签中显示。

“相关推荐”对你有帮助么?

  • 非常没帮助
  • 没帮助
  • 一般
  • 有帮助
  • 非常有帮助
提交
评论 2
添加红包

请填写红包祝福语或标题

红包个数最小为10个

红包金额最低5元

当前余额3.43前往充值 >
需支付:10.00
成就一亿技术人!
领取后你会自动成为博主和红包主的粉丝 规则
hope_wisdom
发出的红包
实付
使用余额支付
点击重新获取
扫码支付
钱包余额 0

抵扣说明:

1.余额是钱包充值的虚拟货币,按照1:1的比例进行支付金额的抵扣。
2.余额无法直接购买下载,可以购买VIP、付费专栏及课程。

余额充值