


目录
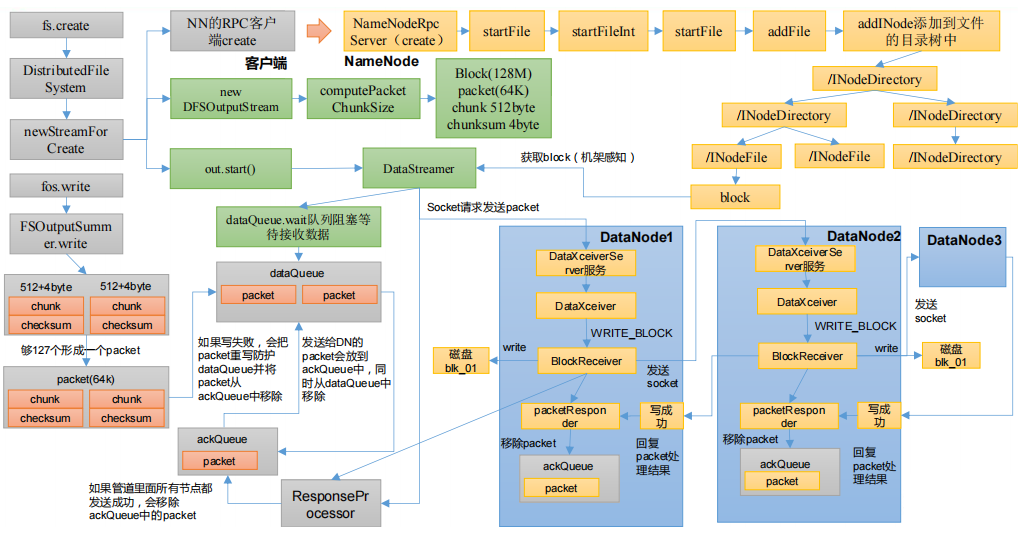
HDFS写数据流程
- 1)客户端这边先创建一个的RPC客户端,发送给NameNode进行请求,NameNode对这个请求进行判断,判断文件的路径是否存在,是否有权限添加
- 2)客户端创建一个
DataStreamer,DataStreamer里创建了一个队列dataQueue,并将dataQueue进行等待;同时DataStreamer从NameNode通过机架感知获取block块可以写到哪些DataNode上 - 3)紧接着客户端会向DataNode请求建立数据传输通道
- 4)然后才真正开始写数据,先写
chunk和checksum,将其封装成packet,packet要往dataQueue里面写数据;会先查看dataQueue里面是否已经满了,如果满了的话需要等待dataQueue没满的时候再往里写;如果没满,就可以往dataQueue写packet - 5)
packet向dataQueue里面已经写完之后会通知dataQueue队列已经向队列里写完数据,接下来要把数据传到DataNode - 6)由
DataStreamer准备将dataQueue的数据往DataNode里发送,通过Socket的形式发送packet- 发送packet时首先将
dataQueue里对应的packet发送给DataNode一份 - 然后将
dataQueue里对应的packet移除掉,再将其放到ackQueue队列的尾部
- 发送packet时首先将
- 7)由
DataNode对应的服务来接收对应的数据,接收完数据之后,先把数据持久化到磁盘,同时将数据发送到下一个节点- 下一个节点同样将数据持久化到磁盘,再往下一个节点发送,如此往复;
- 发送数据之后由后往前逐渐进行应答,直到应答到
ResponseProcessor,ResponseProcessor收齐三个应答(假设有三个DataNode)之后,会告诉ackQueue当前应答已经全部收齐,ackQueue可以将对应的packet数据删除;如果没有收齐三个应答,就会告诉ackQueue队列保存,再将对应的packet移到dataQueue尝试从新发送数据
create
进入到FileSystem类下面的create方法
public FSDataOutputStream create(Path f) throws IOException {
    return create(f, true);
}
顺着create方法一直查看下去,找到如下代码,当前的create方法是抽象方法
public abstract FSDataOutputStream create(...) throws IOException;
回退到上一步,ctrl + alt + B,查看实现类,以分布式文件系统为例,选择DistributedFileSystem
public FSDataOutputStream create(...) throws IOException {
    return this.create(...);
  }
继续跟进create方法
public FSDataOutputStream create(...) throws IOException {

    return new FileSystemLinkResolver<FSDataOutputStream>() {
      @Override
      public FSDataOutputStream doCall(final Path p) throws IOException {
        final DFSOutputStream dfsos = dfs.create(...);
        return dfs.createWrappedOutputStream(dfsos, statistics);
      }
  }
跟进dfs.create()
public DFSOutputStream create(...)
      throws IOException {
    return create(src, permission, flag, true,
        replication, blockSize, progress, buffersize, checksumOpt, null);
  }
public DFSOutputStream create(...)
      throws IOException {
    return create(src, permission, flag, createParent, replication, blockSize,
        progress, buffersize, checksumOpt, favoredNodes, null);
  }
public DFSOutputStream create(...) throws IOException {
    final DFSOutputStream result = DFSOutputStream.newStreamForCreate(...);
  }
走到这里,看到dfsClient.namenode.create(...),代表客户端开始向namenode发送RPC请求,选中ctrl + alt + b,可以看到NameNodeRpcServer,是namenode的一个服务,现在相当于客户端跟服务端进行通信。接下来namenode就要检查目录树是否可以创建文件
static DFSOutputStream newStreamForCreate(...)
      throws IOException {
    stat = dfsClient.namenode.create(...);
}
选中NameNodeRpcServer,进入到create方法
public HdfsFileStatus create(...) throws IOException {
	status = namesystem.startFile(...);
}
跟进namesystem.startFile(...)方法
HdfsFileStatus startFile(...) throws IOException {
    status = startFileInt(...);
}
private HdfsFileStatus startFileInt(...) throws IOException {
    stat = FSDirWriteFileOp.startFile(...);
}
会检查所要上传的目录是否存在,如果存在,并且传入的参数是可以覆盖的,则不抛出异常;否则会抛出异常;
static HdfsFileStatus startFile(...)
      throws IOException {
    if (overwrite) {
        }
      } else {
        // If lease soft limit time is expired, recover the lease
        throw new FileAlreadyExistsException(src + " for client " +
            clientMachine + " already exists");
      }
    iip = addFile(...);
}
紧接着会执行addFile()方法,跟进addFile()方法
private static INodesInPath addFile(...) throws IOException {
    // 创建一个文件
    INodeFile newNode = newINodeFile(...);
    // 执行addINode,添加目录树
    newiip = fsd.addINode(existing, newNode, permissions.getPermission());
}
addINode方法添加目录树,会根据以前的目录结构,选择一个节点往上面添加;至此,整个创建过程就结束
INodesInPath addINode(INodesInPath existing, INode child,
                        FsPermission modes)
      throws QuotaExceededException, UnresolvedLinkException {
    cacheName(child);
    writeLock();
    try {
      return addLastINode(existing, child, modes, true);
    } finally {
      writeUnlock();
    }
  }
下面要进行的是准备工作,DataNode会准备一个上传队列,并将其状态设置为wait,阻塞等待,等待数据的上传。
回退到最开始,从create方法再逐步地跟进
FSDataOutputStream fos = fs.create(new Path("/input"));
public FSDataOutputStream create(Path f) throws IOException {
    return create(f, true);
  }
public FSDataOutputStream create(Path f, boolean overwrite)throws IOException {
    return create(...);
}
public FSDataOutputStream create(Path f,
                                 boolean overwrite,
                                 int bufferSize,
                                 short replication,
                                 long blockSize) throws IOException {
    return create(f, overwrite, bufferSize, replication, blockSize, null);
}
public FSDataOutputStream create(...) throws IOException {
    return this.create(...);
}
看到抽象方法之后,就往上回退一步,ctrl + alt +b,选择分布式文件系统distributedFileStsrem
public abstract FSDataOutputStream create(Path f,
    FsPermission permission,
    boolean overwrite,
    int bufferSize,
    short replication,
    long blockSize,
    Progressable progress) throws IOException;
进入到distributedFileStsrem下的create方法
public FSDataOutputStream create(...) throws IOException {
    return this.create(...);
}
public FSDataOutputStream create(...) throws IOException {

    final DFSOutputStream dfsos = dfs.create(getPathName(p), permission,
                                             cflags, replication, blockSize, progress, bufferSize,
                                             checksumOpt);
}
public DFSOutputStream create(...) throws IOException {
    return create(src, permission, flag, true,
                  replication, blockSize, progress, buffersize, checksumOpt, null);
}
public DFSOutputStream create(...)
    throws IOException {
    return create(src, permission, flag, createParent, replication, blockSize,
                  progress, buffersize, checksumOpt, favoredNodes, null);
}
public DFSOutputStream create(...) throws IOException {
    final DFSOutputStream result = DFSOutputStream.newStreamForCreate(...);
}
datanode已经得到namenode同意请求之后,接下来就要创建一个输出流来写数据DFSOutputStream
static DFSOutputStream newStreamForCreate(...) throws IOException {
    // 刚刚create创建过程执行的方法
    stat = dfsClient.namenode.create(...);
    // 创建完成之后,new了一个DFSOutputStream对象,并调用了start方法
    out = new DFSOutputStream(dfsClient, src, stat,
                              flag, progress, checksum, favoredNodes, true);
    out.start();
    return out;
}
跟进到DFSOutputStream方法,创建了一个DataStreamer输出流
protected DFSOutputStream(...);
    computePacketChunkSize(dfsClient.getConf().getWritePacketSize(),bytesPerChecksum);

    if (createStreamer) {
      streamer = new DataStreamer(stat, null, dfsClient, src, progress,
          checksum, cachingStrategy, byteArrayManager, favoredNodes,
          addBlockFlags);
    }
  }
回退到上一步,进入到start()方法
protected synchronized void start() {
    getStreamer().start();
}
继续跟进start(),发现是一个getStreamer().start()返回的是一个线程thread,返回到上一层
进入getStreamer(),找到getStreamer类,搜索run()方法
看到dataQueue.wait(timeout),相当于datanode准备了一个上传队列,wait表示当前状态是阻塞,进行等待
public void run() {
    dataQueue.wait(timeout);
}
write
datanode上传的准备工作做完之后,接下来就要执行上传的工作
FSDataOutputStream fos = fs.create(new Path("/input"));
fos.write("hello world".getBytes());
选择write()方法点进去
public void write(byte b[]) throws IOException {
    write(b, 0, b.length);
}
public void write(byte b[], int off, int len) throws IOException {
    for (int i = 0 ; i < len ; i++) {
        write(b[off + i]);
    }
}
public void write(int b) throws IOException {
    out.write(b);
}
发现是一个抽象方法
public abstract void write(int b) throws IOException;
1)将数据以packet的形式传到dataQueue
就回退到上一步,ctrl + alt + b,选择FSOutputSummer,write方法里,通过flushBuffer()方法往出写数据
public synchronized void write(int b) throws IOException {
    buf[count++] = (byte)b;
    if(count == buf.length) {
        flushBuffer();
    }
}
protected synchronized void flushBuffer() throws IOException {
    flushBuffer(false, true);
}
 protected synchronized int flushBuffer(boolean keep, boolean flushPartial) throws IOException {
     writeChecksumChunks(buf, 0, lenToFlush);
 }
进入到writeChecksumChunks()方法,里面的writeChunk()方法将chunk以及checksum组成一个单位往外写数据
private void writeChecksumChunks(byte b[], int off, int len) throws IOException {
    sum.calculateChunkedSums(b, off, len, checksum, 0);
    TraceScope scope = createWriteTraceScope();
    try {
        for (int i = 0; i < len; i += sum.getBytesPerChecksum()) {
            int chunkLen = Math.min(sum.getBytesPerChecksum(), len - i);
            int ckOffset = i / sum.getBytesPerChecksum() * getChecksumSize();
            writeChunk(b, off + i, chunkLen, checksum, ckOffset,
                       getChecksumSize());
        }
    } finally {
        if (scope != null) {
            scope.close();
        }
    }
}
继续往里走,进入到writeChunk()方法,发现是一个抽象方法
protected abstract void writeChunk(byte[] b, int bOffset, int bLen,
      byte[] checksum, int checksumOffset, int checksumLen) throws IOException;
往上回退一步,ctrl+alt+b,选择DFSOutputStream,currentPacket.writeChecksum(checksum, ckoff, cklen)、currentPacket.writeData(b, offset, len)、currentPacket.incNumChunks()相当于往packet里面写数据,以packet为单位进行数据传输,enqueueCurrentPacketFull()方法判断当前packtet是否已经满了(packet的大小是64k,里面装的是chunk和checksum)
protected synchronized void writeChunk(byte[] b, int offset, int len,
      byte[] checksum, int ckoff, int cklen) throws IOException {
    writeChunkPrepare(len, ckoff, cklen);

    currentPacket.writeChecksum(checksum, ckoff, cklen);
    currentPacket.writeData(b, offset, len);
    currentPacket.incNumChunks();
    getStreamer().incBytesCurBlock(len);

    // If packet is full, enqueue it for transmission
    if (currentPacket.getNumChunks() == currentPacket.getMaxChunks() ||
        getStreamer().getBytesCurBlock() == blockSize) {
      enqueueCurrentPacketFull();
    }
  }
进入到enqueueCurrentPacketFull()方法
synchronized void enqueueCurrentPacketFull() throws IOException {
    enqueueCurrentPacket();
}
void enqueueCurrentPacket() throws IOException {
    getStreamer().waitAndQueuePacket(currentPacket);
    currentPacket = null;
}
void waitAndQueuePacket(DFSPacket packet) throws IOException {
    synchronized (dataQueue) {
        // 如果这个队列已经满了,那么就等待有足够的空间之后再往里面存
        dataQueue.wait();
        // 如果队列没有满,执行queuePacket(packet)方法
        queuePacket(packet);
    }
  }
进入到queuePacket(packet)方法,dataQueue.addLast(packet)将当前的packet添加到队列的最后,添加完成之后还执行了dataQueue.notifyAll()进行通知,告诉队列已经向里面发送数据了,要求队列对数据进行处理
void queuePacket(DFSPacket packet) {
    synchronized (dataQueue) {
        dataQueue.addLast(packet);
        dataQueue.notifyAll();
    }
}
2)将dataQueue数据写入到DataNode
接下来要讲dataQueue里的数据写入到DataNode,首先需要通过机架感知获取到block
需要回到DataStreamer类,查找其run()方法,发送数据时,会先执行dataQueue.getFirst()获取到dataQueue队列里的第一个数据向外发送,发送数据之前执行setPipeline(nextBlockOutputStream())方法,先建立传输管道
public void run() {
    // dataQueue里面有数据之后,会执行getFirst()方法,从队列里取出第一个数据,准备往外发送
    one = dataQueue.getFirst(); // regular data packet
    // 发送数据之前,先执行setPipeline方法,先建立管道
    setPipeline(nextBlockOutputStream());
}
先进入到nextBlockOutputStream(),
protected LocatedBlock nextBlockOutputStream() throws IOException {
      lb = locateFollowingBlock(excluded.length > 0 ? excluded : null, oldBlock);
    // Connect to first DataNode in the list.
      success = createBlockOutputStream(nodes, nextStorageTypes, nextStorageIDs, 0L, false);
}
private LocatedBlock locateFollowingBlock(DatanodeInfo[] excluded,
      ExtendedBlock oldBlock) throws IOException {
    return DFSOutputStream.addBlock(excluded, dfsClient, src, oldBlock,
        stat.getFileId(), favoredNodes, addBlockFlags);
  }
在这里通过namenode来addBlock
static LocatedBlock addBlock(...) throws IOException {
    return dfsClient.namenode.addBlock(src, dfsClient.clientName, prevBlock,
                                       excludedNodes, fileId, favoredNodes, allocFlags);
}
3)namenode机架感知
选择addBlock,ctrl + alt + b,选择NameNodeRpcServer
public LocatedBlock addBlock(...) throws IOException {
    LocatedBlock locatedBlock = namesystem.getAdditionalBlock(src, fileId,
        clientName, previous, excludedNodes, favoredNodes, addBlockFlags);
  }
进入到getAdditionalBlock(),chooseTargetForNewBlock()选择目标的新块
LocatedBlock getAdditionalBlock(...) throws IOException {
    DatanodeStorageInfo[] targets = FSDirWriteFileOp.chooseTargetForNewBlock(
        blockManager, src, excludedNodes, favoredNodes, flags, r);
}
chooseTargetForNewBlock()
static DatanodeStorageInfo[] chooseTargetForNewBlock(...) throws IOException {
    // choose targets for the new block to be allocated.
    return bm.chooseTarget4NewBlock(src, r.numTargets, clientNode,
                                    excludedNodesSet, r.blockSize,
                                    favoredNodesList, r.storagePolicyID,
                                    r.blockType, r.ecPolicy, flags);
  }
chooseTarget4NewBlock()
public DatanodeStorageInfo[] chooseTarget4NewBlock(...) throws IOException {
    final DatanodeStorageInfo[] targets = blockplacement.chooseTarget(src,
        numOfReplicas, client, excludedNodes, blocksize,
        favoredDatanodeDescriptors, storagePolicy, flags);
}
chooseTarget()
DatanodeStorageInfo[] chooseTarget(...) {
    return chooseTarget(src, numOfReplicas, writer,
        new ArrayList<DatanodeStorageInfo>(numOfReplicas), false,
        excludedNodes, blocksize, storagePolicy, flags);
  }
发现是抽象方法,往上回退一步,选中chooseTarget()方法,ctrl + alt + b
public DatanodeStorageInfo[] chooseTarget(...) {
    return chooseTarget(numOfReplicas, writer, chosenNodes, returnChosenNodes,
                        excludedNodes, blocksize, storagePolicy, flags, null);
}
private DatanodeStorageInfo[] chooseTarget(...) {
    localNode = chooseTarget(...);
}
private Node chooseTarget(...) {
     writer = chooseTargetInOrder(numOfReplicas, writer, excludedNodes, blocksize,
          maxNodesPerRack, results, avoidStaleNodes, newBlock, storageTypes);
}
机架副本的相关选择
- 第一个副本选择当前的本地节点localstorage
- 第二块选择跟当前机架不同的机架节点,远程机架
- 选择第三块时,首先判断前两块在不在一个机架,如果在同一个机架,想办法将第三块机架不在这个机架上
- 如果是新块,就选择
chooseLocalRack
protected Node chooseTargetInOrder(...) throws NotEnoughReplicasException {
    final int numOfResults = results.size();
    if (numOfResults == 0) {
      DatanodeStorageInfo storageInfo = chooseLocalStorage(writer,
          excludedNodes, blocksize, maxNodesPerRack, results, avoidStaleNodes,
          storageTypes, true);

      if (--numOfReplicas == 0) {
        return writer;
      }
    }

    if (numOfResults <= 1) {
      chooseRemoteRack(1, dn0, excludedNodes, blocksize, maxNodesPerRack,
          results, avoidStaleNodes, storageTypes);
    }
    if (numOfResults <= 2) {
      if (clusterMap.isOnSameRack(dn0, dn1)) {
        chooseRemoteRack(1, dn0, excludedNodes, blocksize, maxNodesPerRack,
            results, avoidStaleNodes, storageTypes);
      } else if (newBlock){
        chooseLocalRack(dn1, excludedNodes, blocksize, maxNodesPerRack,
            results, avoidStaleNodes, storageTypes);
      } else {
        chooseLocalRack(writer, excludedNodes, blocksize, maxNodesPerRack,
            results, avoidStaleNodes, storageTypes);
      }
    }
    chooseRandom(numOfReplicas, NodeBase.ROOT, excludedNodes, blocksize,
        maxNodesPerRack, results, avoidStaleNodes, storageTypes);
    return writer;
  }
走到这里,就把节点的位置选择好了
回退到DataStreamer类下面的nextBlockOutputStream()方法,节点位置选完之后,就开始创建BlockOutputStream
protected LocatedBlock nextBlockOutputStream() throws IOException {
    lb = locateFollowingBlock(excluded.length > 0 ? excluded : null, oldBlock);
    // Connect to first DataNode in the list.
      success = createBlockOutputStream(nodes, nextStorageTypes, nextStorageIDs,0L, false);
}
4)通过Socket形式开始写数据
进入到createBlockOutputStream(nodes, nextStorageTypes, nextStorageIDs,0L, false)
boolean createBlockOutputStream(...) {
    new Sender(out).writeBlock(blockCopy, nodeStorageTypes[0], accessToken,
            dfsClient.clientName, nodes, nodeStorageTypes, null, bcs,
            nodes.length, block.getNumBytes(), bytesSent, newGS,
            checksum4WriteBlock, cachingStrategy.get(), isLazyPersistFile,
            (targetPinnings != null && targetPinnings[0]), targetPinnings,
            nodeStorageIDs[0], nodeStorageIDs);
}
send()通过socket形式发送数据到datanode
public void writeBlock(...) throws IOException {
    send(out, Op.WRITE_BLOCK, proto.build());
  }
去datanode中通过DataXceiverServer类来接收发送过来的数据
搜索DataXceiverServer方法,找到其run()方法
public void run() {
    Peer peer = null;
    while (datanode.shouldRun && !datanode.shutdownForUpgrade) {
        try {
            // 接收信息
            peer = peerServer.accept();
            // 在当前线程里又开启了一个线程
            new Daemon(datanode.threadGroup,
                       DataXceiver.create(peer, datanode, this))
                .start();
        }
    }
}
跟进datanode.threadGroup,DataXceiver.create(peer, datanode, this),找到其run()方法
public void run() {
    op = readOp();
	processOp(op);
}
因为刚刚传输数据时,send(out, Op.WRITE_BLOCK, proto.build());,send过来的Op类型是WRITE_BLOCK
进入到processOp(op),选择WRITE_BLOCK的情况
private void opWriteBlock(DataInputStream in) throws IOException {
    writeBlock(...);
}
weiterBlock()是接口里定义的方法,ctrl + alt + b查找其实现类
进入到DataXceiver类的的weiterBlock()
public void writeBlock(...) throws IOException {
    setCurrentBlockReceiver(getBlockReceiver(block, storageType, in,
            peer.getRemoteAddressString(),
            peer.getLocalAddressString(),
            stage, latestGenerationStamp, minBytesRcvd, maxBytesRcvd,
            clientname, srcDataNode, datanode, requestedChecksum,
            cachingStrategy, allowLazyPersist, pinning, storageId));
}
getBlockReceiver()方法要向磁盘里写数据,跟进此方法
BlockReceiver getBlockReceiver(...) throws IOException {
    return new BlockReceiver(block, storageType, in,
        inAddr, myAddr, stage, newGs, minBytesRcvd, maxBytesRcvd,
        clientname, srcDataNode, dn, requestedChecksum,
        cachingStrategy, allowLazyPersist, pinning, storageId);
  }
BlockReceiver(...) throws IOException {
    switch (stage) {
        case PIPELINE_SETUP_CREATE:  // 管道建立阶段
            replicaHandler = datanode.data.createRbw(storageType, storageId,
                                                     block, allowLazyPersist); // 向磁盘写文件
    }
}
将数据写入磁盘之后,还要将数据向下一个DataNode发送,
回退到DataXceiver类的writeBlock方法,方法里会判断如果连接的节点有多个,需要将数据继续往下发送Sender
public void writeBlock(...) throws IOException {
    setCurrentBlockReceiver(...)); // 向磁盘写入数据

    if (targets.length > 0) { // 如果连接的节点有多个,需要将数据继续往下发送Sender
        new Sender(mirrorOut).writeBlock(originalBlock, targetStorageTypes[0],
                blockToken, clientname, targets, targetStorageTypes,
                srcDataNode, stage, pipelineSize, minBytesRcvd, maxBytesRcvd,
                latestGenerationStamp, requestedChecksum, cachingStrategy,
                allowLazyPersist, targetPinnings[0], targetPinnings,
                targetStorageId, targetStorageIds);
    }
}
假设现在有三个DataNode,那么就要从DataNode1再发往DataNode2,DataNode2再发往DataNode3,每个DataNode收到数据之后都会先写入磁盘,然后再传到下一个DataNode,最后会由后往前逐个应答
5)DataStreamer应答
找到DataStreamer类的run()方法
public void run() {
    setPipeline(nextBlockOutputStream()); // 管道建立完成
    initDataStreaming(); // 进行应答
}
进入到initDataStreaming()方法
private void initDataStreaming() {
    response = new ResponseProcessor(nodes); // 接收对方发送的情况
    response.start();
  }
response执行了start()方法,搜索run()方法,有两个run()方法,查看第二个run()
public void run() {
    // 前面部分代码是对信息进行收集
    // 到下面这个位置,如果收集的信息正确的话,会将ackQueue.removeFirst()
    lastAckedSeqno = seqno;
    pipelineRecoveryCount = 0;
    ackQueue.removeFirst();
    packetSendTime.remove(seqno);
    dataQueue.notifyAll();
}
如果数据packet发送成功,会将ackQueue.removeFirst(),如果没有发送成功,会将packet移动到dataQueue的首位置,并将packet从ackQueue中移出
继续回退到DataStreamer类的run()方法,在进行应答之后,datanode往出写数据时,先执行dataQueue.removeFirst()
先将数据从dataQueue里移出,再将数据加入到ackQueue末尾
public void run() {
    setPipeline(nextBlockOutputStream()); // 管道建立完成
    initDataStreaming(); // 进行应答

    dataQueue.removeFirst();
    ackQueue.addLast(one);
    packetSendTime.put(one.getSeqno(), Time.monotonicNow());
    dataQueue.notifyAll();
    // 真正的写数据是通过writeTo方法
    one.writeTo(blockStream);
}


 1161
1161


 被折叠的 条评论
为什么被折叠?
被折叠的 条评论
为什么被折叠?
 到【灌水乐园】发言


