1.什么是Ribbon
Spring Cloud Ribbon是一个基于HTTP和TCP的客户端负载均衡工具,它基于Netflix Ribbon实现。通过Spring Cloud的封装,可以让我们轻松地将面向服务的REST模版请求自动转换成客户端负载均衡的服务调用。Spring Cloud Ribbon虽然只是一个工具类框架,它不像服务注册中心、配置中心、API网关那样需要独立部署,但是它几乎存在于每一个Spring Cloud构建的微服务和基础设施中。因为微服务间的调用,API网关的请求转发等内容,实际上都是通过Ribbon来实现的,包括后续我们将要介绍的Feign,它也是基于Ribbon实现的工具。所以,对Spring Cloud Ribbon的理解和使用,对于我们使用Spring Cloud来构建微服务非常重要。
简单的说就是将用户的请求平摊分配到多个服务上,从而达到系统的HA(高可用)
2.Ribbon本地负载均衡客户端VSNginx服务端负载均衡区别
Nginx是服务器负载均衡,客户端所有的请求都会交给Nginx,然后由Nginx实现转发请求。即负载均衡是由客户端实现的
Ribbon本地负载均衡,在调用微服务接口的时候,会在注册中心上获取注册信息服务列表之后缓存到JVM本地,从而在本地实现RPC远程服务调用技术。
3.Ribbon的主要功能
-
简化远程调用(RestTemplate)
-
实现负载均衡
负载均衡分为两种- 服务端负载均衡:
负载均衡算法在服务端
由负载均衡器维护服务地址列表

- 客户端负载均衡:
负载均衡算法在客户端
客户端维护服务地址列表

- 服务端负载均衡:
4.Ribbon架构说明
总结:Ribbon其实就是一个软负载均衡的客户端组件,它可以和其他所需请求的客户端结合使用,和eureka结合只是其中的一个实例。
5.二说Template
getForObject返回对象为响应体中数据转化成的对象,基本上可以理解为Json

getForEntity返回对象为ResponseEntity对象,包含了响应中的一些重要信息,比如响应头、响应状态码、响应体等

6.实现负载均衡的其他模式
在之前的案例中每当我们去实现consumer模块中的查询方法,每次的端口都是按顺序出现的即8001之后是8002(默认轮询模式)
Ⅰ. 引入相关依赖
不用引入,为什么?
因为spring-cloud-netflix-eureka-netflix-client自带了ribbon引用
Ⅱ.Ribbon自带的负载均衡模式

- RoundRobinRule:轮询
- RandomRule:随机
- RetryRule:先按照RoundRobinRule的策略获取服务,如果获取服务失败则在指定时间内会重试,获取可用的服务
- WeightedResponseTimeRule:对RoundRobinRule的扩展,响应速度越快的实例选择权重越大,越容易被选择
- BestAvailableRule:会过滤掉由于多次访问故障而处于断路器跳闸状态的服务,然后选择一个并发量最小的服务
- AvailabilityFilteringRule:先过滤掉故障实例,再选择并发较小的实例
- ZoneAvoidanceRule:符合判断Server所在区域的性能和server的可用性选择服务器
Ⅲ.替换负载均衡的默认模式
注意:不能放在@ComponentScan所扫描的当前包下以及子包下(不要跟主启动类放在一个包下),否则我们自定义的这个配置类就会被所有的Ribbon客户端所共享,达不到特殊化定制的目的
-
新建com.myrule包

-
在myrule包下新建MySelfRule
package com.myrule; import com.netflix.loadbalancer.IRule; import com.netflix.loadbalancer.RandomRule; import org.springframework.context.annotation.Bean; import org.springframework.context.annotation.Configuration; /** * @author: ASULE * @create: 2022/1/24 12:35 * @version: 1.0 **/ @Configuration public class MySelfRule { @Bean public IRule myRule(){ return new RandomRule();//定义为随机 } } -
在主启动类添加注解
package com.asule; import com.myrule.MySelfRule; import org.springframework.boot.SpringApplication; import org.springframework.boot.autoconfigure.SpringBootApplication; import org.springframework.cloud.netflix.eureka.EnableEurekaClient; import org.springframework.cloud.netflix.ribbon.RibbonClient; /** * @author: ASULE * @create: 2022/1/22 18:13 * @version: 1.0 **/ @SpringBootApplication @EnableEurekaClient /* 配置Ribbon的负载均衡策略 * name: 设置服务的提供方的应用名称,可以是提供者集群的名称 * configuration:设置负载均衡的Bean */ @RibbonClient(name = "CLOUD-PAYMENT-SERVICE",configuration = MySelfRule.class) public class Order80Application { public static void main(String[] args) { SpringApplication.run(Order80Application.class,args); } } -
通过postman测试可以得出已经变成负载均衡已经不是轮询模式了,变成了我们所定义的随机模式。
7.Ribbon默认负载均衡轮询算法解析
Ⅰ.注释掉@RibbonClient注解
恢复默认的轮询模式
Ⅱ.负载均衡算法原理
rest接口第几次请求%服务器集群总数量=实际调用服务器位置下标,每次服务启动后rest接口计数从1开始。

List<ServiceInstance> instances = discoveryClient.getInstances("CLOUD-PAYMENT-SERVICE");
如:
List[0] instances = 127.0.0.1:cloud-payment-service:8002
List[1] instances = 127.0.0.1:cloud-payment-service:8001
8001+8002组合为集群,他们共计2台机器,集群总数为2,按照轮询算法原理
当请求总数为1时:1%2=1 对应下标位置为1,则获取服务地址为 127.0.0.1:cloud-payment-service:8001
当请求总数为2时,2%2=0 对应下标位置为0,则获取服务地址为 127.0.0.1:cloud-payment-service:8002
以此类推
如果此时重启,则计数重新开始
Ⅲ.轮询源码(需要看JUC和CAS)
进入RoundRobinRule类查看choose源码
    public Server choose(ILoadBalancer lb, Object key) {
        if (lb == null) {
            log.warn("no load balancer");
            return null;
        }

        Server server = null;
        int count = 0;
        while (server == null && count++ < 10) {
            List<Server> reachableServers = lb.getReachableServers();
            List<Server> allServers = lb.getAllServers();
            int upCount = reachableServers.size();
            int serverCount = allServers.size();

            if ((upCount == 0) || (serverCount == 0)) {
                log.warn("No up servers available from load balancer: " + lb);
                return null;
            }

            int nextServerIndex = incrementAndGetModulo(serverCount);
            server = allServers.get(nextServerIndex);

            if (server == null) {
                /* Transient. */
                Thread.yield();
                continue;
            }

            if (server.isAlive() && (server.isReadyToServe())) {
                return (server);
            }

            // Next.
            server = null;
        }

        if (count >= 10) {
            log.warn("No available alive servers after 10 tries from load balancer: "
                    + lb);
        }
        return server;
    }

    /**
     * Inspired by the implementation of {@link AtomicInteger#incrementAndGet()}.
     *
     * @param modulo The modulo to bound the value of the counter.
     * @return The next value.
     */
    private int incrementAndGetModulo(int modulo) {
        for (;;) {
            int current = nextServerCyclicCounter.get();
            int next = (current + 1) % modulo;
            if (nextServerCyclicCounter.compareAndSet(current, next))
                return next;
        }
    }
    /**
     * Atomically sets the value to the given updated value
     * if the current value {@code ==} the expected value.
     *
     * @param expect the expected value
     * @param update the new value
     * @return {@code true} if successful. False return indicates that
     * the actual value was not equal to the expected value.
     */
    public final boolean compareAndSet(int expect, int update) {
        return unsafe.compareAndSwapInt(this, valueOffset, expect, update);
    }
Ⅳ.手写负载算法(需要看JUC和CAS)
注:看不懂先去把JUC(CAS+自旋锁的复习)看了
阳哥面试题
-
在payment8001和8002的controller中添加如下方法
@GetMapping("/lb") public String getPaymentLB(){ return port; } -
ApplicationContextBean去掉注解@LoadBalanced关闭默认的负载均衡轮询模式
-
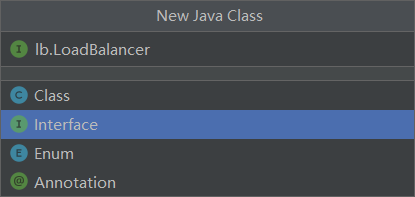
在com.asule下建立LoadBalancer接口(模拟的是源码中的ILoadBalncer)

-
创建MyLB实现LoadBalancer接口
package com.asule.lb; import org.springframework.cloud.client.ServiceInstance; import org.springframework.stereotype.Component; import java.util.List; import java.util.concurrent.atomic.AtomicInteger; /** * @author: ASULE * @create: 2022/1/24 13:59 * @version: 1.0 **/ @Component public class MyLB implements LoadBalancer{ //原子类 private AtomicInteger atomicInteger = new AtomicInteger(0); public final int getAndIncrement(){ int current; int next; do { current = this.atomicInteger.get(); //判断是否越界 next = current >= 2147483647 ? 0 : current+1; }while(!this.atomicInteger.compareAndSet(current,next)); System.out.println("**********next:"+next); return next; } @Override public ServiceInstance instances(List<ServiceInstance> serviceInstances) { int index = getAndIncrement() % serviceInstances.size(); return serviceInstances.get(index); } } -
在order80消费者的控制层中添加如下代码
@Autowired
    private LoadBalancer loadBalancer;

    @Autowired
    private DiscoveryClient discoveryClient;

    @GetMapping("/payment/lb")
    public String getPaymentLB() {
        List<ServiceInstance> instances = discoveryClient.getInstances("CLOUD-PAYMENT-SERVICE");
        if (instances == null || instances.size() <=0){
            return null;
        }
        ServiceInstance serviceInstance = loadBalancer.instances(instances);
        URI uri = serviceInstance.getUri();
        log.info("****uri:"+uri);
        return restTemplate.getForObject(uri+"/payment/lb",String.class);
    }


 338
338


 被折叠的 条评论
为什么被折叠?


