


查看中断控制相关的设备树节点
*********************gpiof控制器*************************
    pinctrl: pin-controller@50002000 {
        #address-cells = <1>;
        #size-cells = <1>;
        compatible = "st,stm32mp157-pinctrl";

        interrupt-parent = <&exti>;
                gpiof: gpio@50007000 {

            interrupt-controller;//中断标识
            #interrupt-cells = <2>;
    //引用gpiof节点用于中断时,成员需要有两个值
            status = "disabled";//gpiof为启用
            };
       &pinctrl {
               gpiof: gpio@50007000 {
        status = "okay";
        ngpios = <16>;
        gpio-ranges = <&pinctrl 0 80 16>;
    };

        };
        ************************exti**************************************
        soc {

        #address-cells = <1>;
        #size-cells = <1>;
        interrupt-parent = <&intc>;
        exti: interrupt-controller@5000d000 {
            compatible = "st,stm32mp1-exti", "syscon";
            interrupt-controller;
            #interrupt-cells = <2>;
            reg = <0x5000d000 0x400>;
                           };
                           };
  ****************************GIC****************************************

    intc: interrupt-controller@a0021000 {
        compatible = "arm,cortex-a7-gic";
        #interrupt-cells = <3>;
        interrupt-controller;
        reg = <0xa0021000 0x1000>,
              <0xa0022000 0x2000>;
    };
编写设备树将按键和中断控制器对接起来
/内核顶层目录/Documentation/devicetree/bindings/interrupt-controller
vi interrupts.txt

 Example:
    interrupt-parent = <&intc1>;//引用中断父节点
    interrupts = <5 0>, <6 0>;//填写的时中断index,第二个成员填0表示默认属性

two cells
  ------------
  The #interrupt-cells property is set to 2 and the first cell defines the
  index of the interrupt within the controller, while the second cell is used
  to specify any of the following flags:
    - bits[3:0] trigger type and level flags
        1 = low-to-high edge triggered
        2 = high-to-low edge triggered
        4 = active high level-sensitive
        8 = active low level-sensitive

  vi stm32mp157a-fsmp1a.dts

    myirq{
    compatible="hqyj,irq";
    interrupt-parent = <&gpiof>;
    interrupts = <9 0>,<7 0>,<8 0>;//节点中引入的中断管脚  pf9 pf8 pf7
    };
按键中断实例
#include <linux/init.h>
#include <linux/module.h>
#include<linux/of.h>
#include<linux/of_gpio.h>
#include<linux/gpio.h>
#include<linux/timer.h>
#include<linux/of_irq.h>
#include<linux/interrupt.h>
/*
 myirq{
    compatible="hqyj,irq";
    interrupt-parent = <&gpiof>;
    interrupts = <9 0>,<7 0>,<8 0>;
};
 };*/
unsigned int irqno[3];
 struct device_node *node;
char *irqname[3]={"key1_int","key2_int","key3_int"};
//中断 处理函数
irqreturn_t irq_handler(int irqno,void *dev)
 {
     //根据request_irq函数的第5个参数来确定是哪一个按键产生的中断
    switch((int)dev)
    {
      case 0:
        printk("key1_int\n");
        break;
      case 1:
        printk("key2_int\n");
        break;
      case 2:
        printk("key3_int\n");
        break;
    }
    return IRQ_HANDLED;
}


static int __init mycdev_init(void)
{
 int i,ret;
    //通过名字获取设备树节点信息
    node=of_find_node_by_name(NULL,"myirq");
    if(node==NULL)
    {
        printk("通过路径解析设备树节点信息失败\n");
        return -ENODATA;
    }
      printk("通过路径解析设备树节点信息成功\n");
      //获取软中断号
      //3个按键对应的是3个软中断号,循环注册
  for(i=0;i<ARRAY_SIZE(irqno);i++)
  {
    irqno[i]=irq_of_parse_and_map(node,i);
    if(irqno[i]==0)
    {
      printk("获取软中断号失败 %d\n",i);
      return -EINVAL;
    }
    //注册中断
    ret=request_irq(irqno[i],irq_handler, IRQF_TRIGGER_FALLING,irqname[i],(void *)i);
    if(ret)
    {
      printk("中断注册失败\n");
      return ret;
    }
  }

     return 0;
}
static void __exit mycdev_exit(void)
{
  int i;
  //注销中断
  for(i=0;i<ARRAY_SIZE(irqno);i++)
  {
    free_irq(irqno[i],(void *)i);
  }
}
module_init(mycdev_init);
module_exit(mycdev_exit);
MODULE_LICENSE("GPL");
中断底半部
1.什么是中断底半部
在linux内核的中断处理程序里,不允许做延时、耗时甚至休眠的操作,但是有的时候又希望中断到来的时候尽可能多做一些事情,所以两个需求产生了矛盾。linux内核为了解决这个矛盾,引入了中断底半部机制。
中断顶半部:处理紧急的不耗时的任务
中断底半部:处理不紧急的、耗时的操作
中断底半部的实现机制:软中断、tasklet、工作队列
2.软中断
软中断这个底半部实现机制存在个数限制(32),一般留给内核的开发工作者使用
3.tasklet
tasklet是基于软中断来实现,特点和软中断一样,但是没有个数限制(对象通过链表维系)。
tasklet必须基于中断工作,是中断的一部分。
tasklet的底半部处理函数能够做相对耗时的操作,但是不能进行延时或者休眠操作。
tasklet工作于中断上下文。

中断顶半部处理函数执行结束时,将标志位置位,中断标志位清除后底半部机制会判断中断标志位是否置位,如果置位了,就回调底半部处理函数。
对于tasklet来说最多可以同时处理五个底半部事件,此时如果想要再处理多的底半部事件,就需要创建内核线程来进行处理
3.1tasklet相关API
tasklet对象结构体:
struct tasklet_struct
{
    struct tasklet_struct *next;//tasklet对象链表下一个节点指针
    unsigned long state;//是否执行底半部的状态标志位
    atomic_t count;//底半部触发的次数
    bool use_callback;//false使用func回调函数  true使用callback回调函数
    union {
        void (*func)(unsigned long data);
        void (*callback)(struct tasklet_struct *t);
    };
    unsigned long data;//向底半部传的参数
};

1.分配一个tasklet对象
struct tasklet_struct tasklet;

2.对象初始化
void tasklet_setup(struct tasklet_struct *t,
           void (*callback)(struct tasklet_struct *))
void tasklet_init(struct tasklet_struct *t,
          void (*func)(unsigned long), unsigned long data)

3.启用中断底半部
void tasklet_schedule(struct tasklet_struct *t)
3.2tasklet实例
#include <linux/init.h>
#include <linux/module.h>
#include<linux/of.h>
#include<linux/of_gpio.h>
#include<linux/gpio.h>
#include<linux/timer.h>
#include<linux/of_irq.h>
#include<linux/interrupt.h>
/*
 myirq{
    compatible="hqyj,irq";
    interrupt-parent = <&gpiof>;
    interrupts = <9 0>,<7 0>,<8 0>;
};
 };*/
unsigned int irqno;
 struct device_node *node;
 //1.分配一个tasklet对象
struct tasklet_struct tasklet;


//中断底半部函数
void task_callback(struct tasklet_struct *t)
{
    //进行耗时操作
    int i=50;
    while(--i)
    {
      printk("i=%d\n",i);
    }
}
//中断顶半部处理函数
irqreturn_t irq_handler(int irqno,void *dev)
 {
   //开启中断底半部
   tasklet_schedule(&tasklet);
    return IRQ_HANDLED;
}


static int __init mycdev_init(void)
{
      int ret;
      //tasklet对象的初始化
      tasklet_setup(&tasklet,task_callback);
    //通过名字获取设备树节点信息
    node=of_find_node_by_name(NULL,"myirq");
    if(node==NULL)
    {
        printk("通过路径解析设备树节点信息失败\n");
        return -ENODATA;
    }
      printk("通过路径解析设备树节点信息成功\n");
      //获取软中断号


    irqno=irq_of_parse_and_map(node,0);
    if(irqno==0)
    {
      printk("获取软中断号失败 %d\n",0);
      return -EINVAL;
    }
    //注册中断
    ret=request_irq(irqno,irq_handler, IRQF_TRIGGER_FALLING,"key1_int",(void *)0);
    if(ret)
    {
      printk("中断注册失败\n");
      return ret;
    }


     return 0;
}
static void __exit mycdev_exit(void)
{


    free_irq(irqno,(void *)0);


}
module_init(mycdev_init);
module_exit(mycdev_exit);
MODULE_LICENSE("GPL");
4.工作队列
工作队列时linux内核启动的时候就默认开启的一个events线程,这个线程默认处于休眠状态。
如果你要是有任务要去执行,只需要将任务提交到工作队列中,唤醒这个线程即可。
工作队列不仅可以用于中断,也可以用于进程上下文。
在底半部处理函数中可以进行延时、耗时甚至休眠的操作。
4.1工作队列相关API
工作队列结构体
struct work_struct {
    atomic_long_t data;//用于进行数据传递的
    struct list_head entry;//工作队列的结构入口
    work_func_t func;//工作队列底半部处理函数指针
    };
1.分配一个工作队列对象
struct work_struct work;
2.初始化对象
typedef void (*work_func_t)(struct work_struct *work);//函数指针
//定义底半部函数
void work_func(struct work_struct *work)
{

}
INIT_WORK(&work,work_func);

3.开启底半部处理函数
 bool schedule_work(struct work_struct *work)
4.2工作队列实例
#include <linux/init.h>
#include <linux/module.h>
#include<linux/of.h>
#include<linux/of_gpio.h>
#include<linux/gpio.h>
#include<linux/timer.h>
#include<linux/of_irq.h>
#include<linux/interrupt.h>
/*
 myirq{
    compatible="hqyj,irq";
    interrupt-parent = <&gpiof>;
    interrupts = <9 0>,<7 0>,<8 0>;
};
 };*/
unsigned int irqno;
 struct device_node *node;
 //1.分配一个工作队列对象
struct work_struct work;


//中断底半部函数
void work_func(struct work_struct *work)
{
    int i=50;
    while(--i)
    {
      printk("i=%d\n",i);
    }
}
//中断顶半部处理函数
irqreturn_t irq_handler(int irqno,void *dev)
 {
   //开启中断底半部
    schedule_work(&work);
    return IRQ_HANDLED;
}


static int __init mycdev_init(void)
{
      int ret;
      //工作队列对象的初始化
     INIT_WORK(&work,work_func);
    //通过名字获取设备树节点信息
    node=of_find_node_by_name(NULL,"myirq");
    if(node==NULL)
    {
        printk("通过路径解析设备树节点信息失败\n");
        return -ENODATA;
    }
      printk("通过路径解析设备树节点信息成功\n");
      //获取软中断号


    irqno=irq_of_parse_and_map(node,0);
    if(irqno==0)
    {
      printk("获取软中断号失败 %d\n",0);
      return -EINVAL;
    }
    //注册中断
    ret=request_irq(irqno,irq_handler, IRQF_TRIGGER_FALLING,"key1_int",(void *)0);
    if(ret)
    {
      printk("中断注册失败\n");
      return ret;
    }


     return 0;
}
static void __exit mycdev_exit(void)
{
    free_irq(irqno,(void *)0);
}
module_init(mycdev_init);
module_exit(mycdev_exit);
MODULE_LICENSE("GPL");
5、platfrom总线驱动
5.1什么是总线驱动
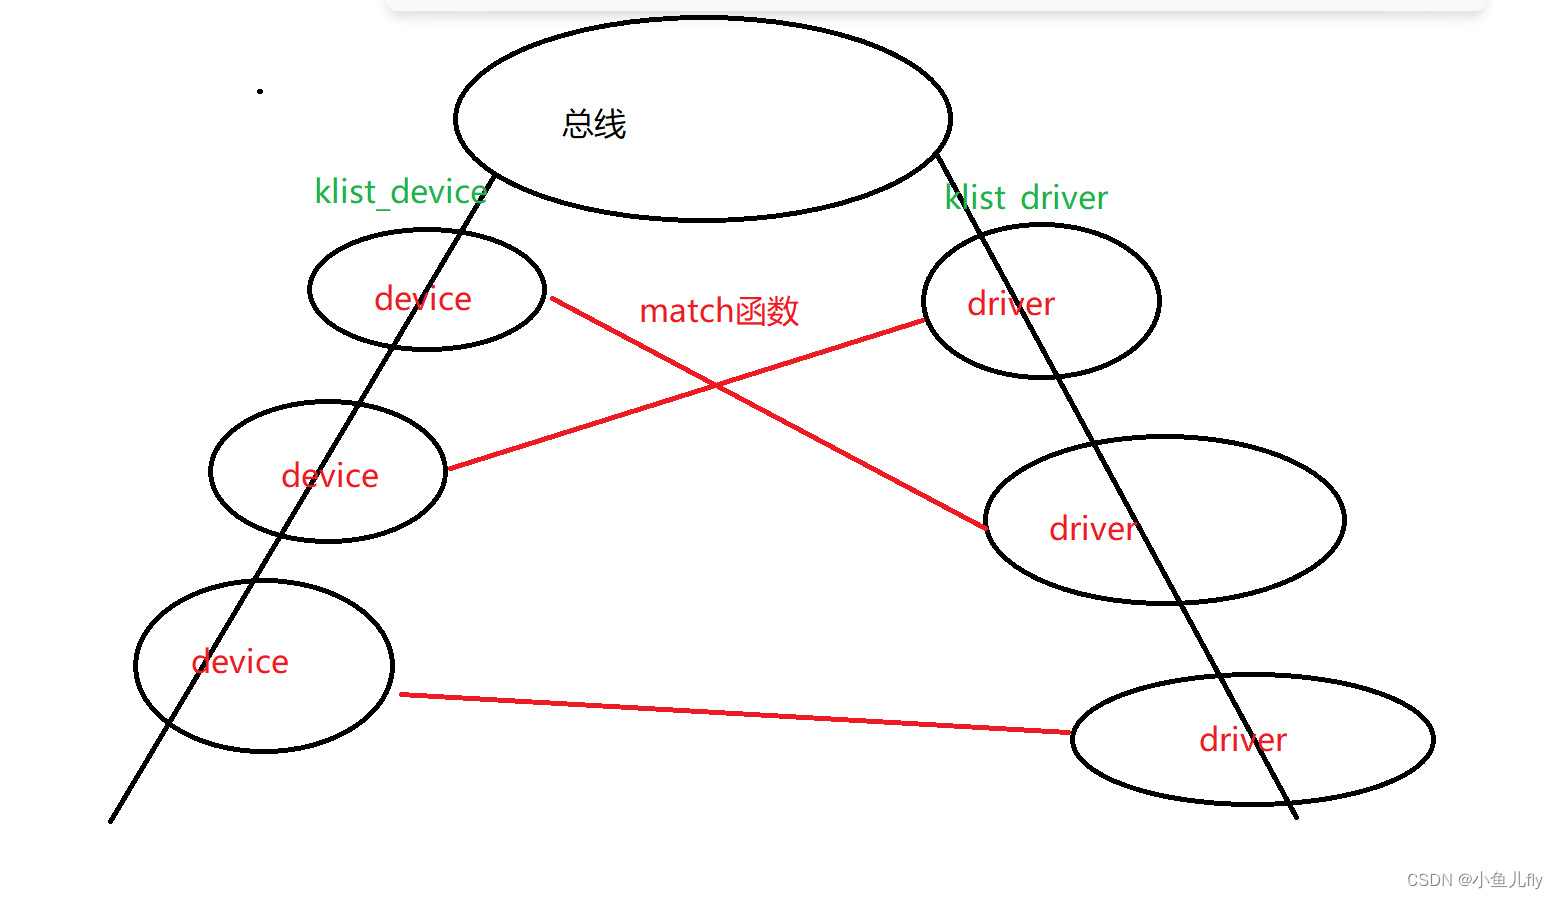
linux内核中所有的总线驱动都要遵循总线驱动模型

内核在设计总线驱动模型的时候将一个驱动分为三部分:device、driver、bus。
device是用来描述硬件信息的。
bus是总线用来连接device和driver;driver是用来描述驱动的对象。
在内核中所有的device都是存在内核的klist_device链表中。
内核中所有的driver都是以klist_driver链表中管理。
内核中的device和driver通过bus完成关联,当driver和device通过match函数匹配成功之后,执行驱动里的probe函数,在probe函数中完成硬件的驱动工作
5.2platfrom总线驱动原理
platform总线驱动遵循总线驱动模型,platform是linux内核抽象出来的软件代码,并没有真实的硬件总线协议与之对应。
platform总线驱动的思想是将设备和驱动进行分离。
platform_device和platform_driver通过总线进行匹配成功后执行驱动中的probe函数,在probe函数中获取硬件的设备信息从而操作硬件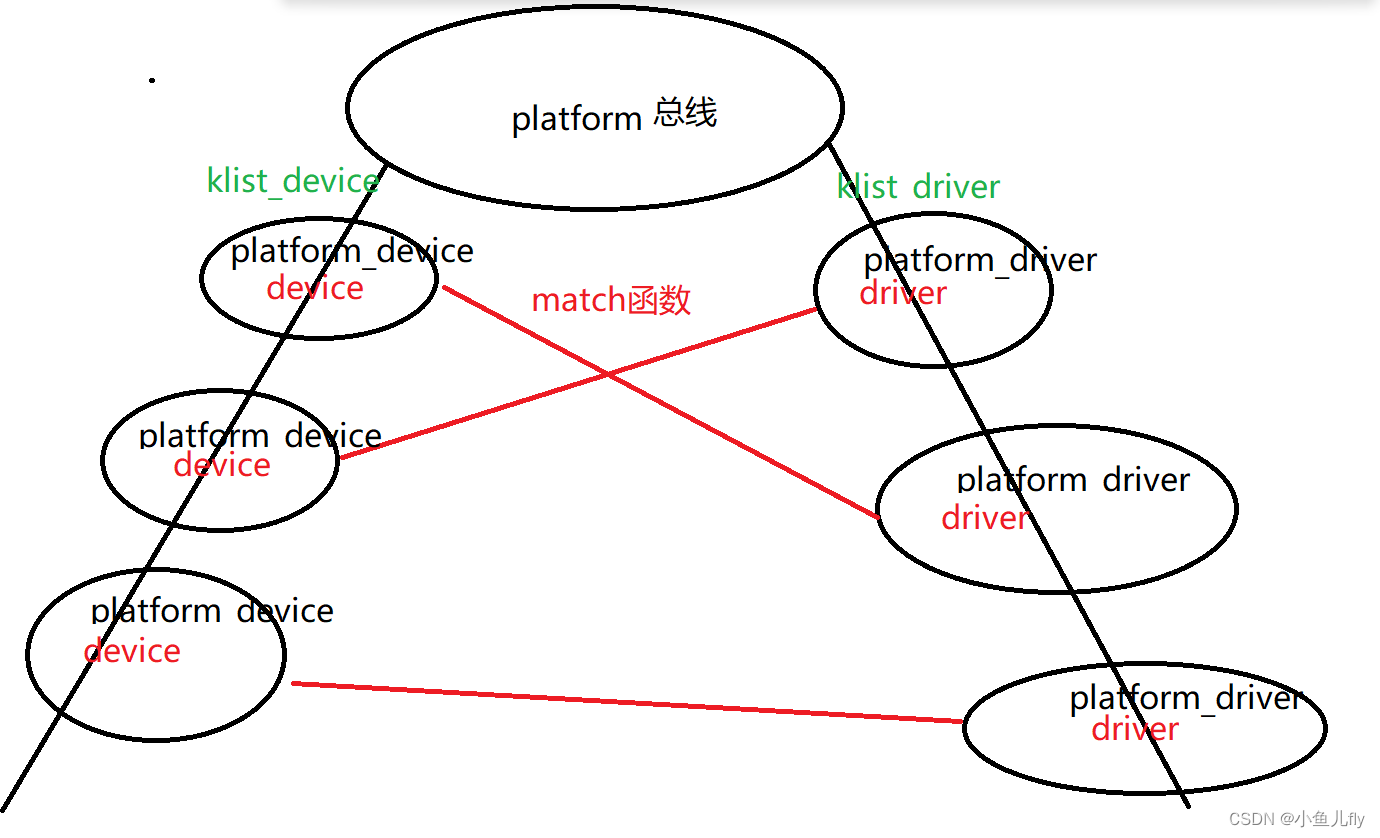
5.3platfrom总线驱动相关API
设备端
#include<linux/platform_device.h>
1.device对象结构体
struct platform_device {
    const char  *name;//用来进行匹配的名字
    int     id;//总线编号  PLATFORM_DEVID_AUTO(自动分配总线号)
    struct device   dev;//父类
    u32     num_resources;//设备信息的个数
    struct resource *resource;//存放设备信息的空间的首地址
};
struct device {
    void    (*release)(struct device *dev);//用于释放device申请的资源,卸载驱动时执行
    };

    //资源结构体
    struct resource {
    resource_size_t start;//资源的起始数值 0X50006000       0XC0008000        71(中断号)
    resource_size_t end;//资源的结束数值   0X50006000+4     0XC0008000+49     71
    const char *name;//资源的名字
    unsigned long flags;//资源的类型    IORESOURCE_IO|IORESOURCE_MEM|IORESOURCE_IRQ
};


2.对象的初始化
//填充设备信息
struct resource res[]={
    [0]={
        .start=0x12345678,
        .end=0x12345678+49,
        .flags=IORESOURCE_MEM,
    },
    [1]={
        .start= 71,
        .end=71,
        .flags=IORESOURCE_IRQ,
    },
};
//定义一个release函数用于卸载驱动时回收device资源
void    pdev_release(struct device *dev)
{

}
//给对象分配空间并且完成对象的初始化
struct platform_device pdev={
    .name="hahahha",
    .id=PLATFORM_DEVID_AUTO,
    .dev={
        .release=pdev_release,
    },
    .num_resources=ARRAY_SIZE(res),
    .resource=res,
};

3.对象的注册
int platform_device_register(struct platform_device *pdev)
4.对象的注销
void platform_device_unregister(struct platform_device *pdev)
驱动端
1.driver对象结构体
struct platform_driver {
    int (*probe)(struct platform_device *);//匹配成功后执行
    int (*remove)(struct platform_device *);//设备和驱动分离时执行remove
    struct device_driver driver;//父类,用于设置和device端的匹配方式
    const struct platform_device_id *id_table;//设备和device端的匹配方式位idtable
};
//父类结构体
struct device_driver {
    const char      *name;//设置和device端匹配方式位名字匹配
     const struct of_device_id   *of_match_table;//设备树匹配
     };
2.对象的初始化
//probe函数
int pdrv_probe(struct platform_device *pdev)
{
    return 0;
}
//remove函数
 int pdrv_remove(struct platform_device *pdev)
 {
     return 0;
 }
struct platform_driver pdrv={
    .probe=pdrv_probe,
    .remove=pdrv_remove,
    .driver={
        .name="hahahha",
    },
};
3.对象的注册
#define platform_driver_register(drv) \
    __platform_driver_register(drv, THIS_MODULE)
4.对象的注销
void platform_driver_unregister(struct platform_driver *drv)
5.4 platfrom总线驱动编程实例
pdev.c
#include <linux/init.h>
#include <linux/module.h>
#include<linux/platform_device.h>

//填充设备信息
struct resource res[]={
    [0]={
        .start=0x12345678,
        .end=0x12345678+49,
        .flags=IORESOURCE_MEM,
    },
    [1]={
        .start= 71,
        .end=71,
        .flags=IORESOURCE_IRQ,
    },
};
//定义一个release函数用于卸载驱动时回收device资源
void    pdev_release(struct device *dev)
{
    printk("%s:%s:%d\n",__FILE__,__func__,__LINE__);
}

//给对象分配空间并且完成对象的初始化
struct platform_device pdev={
    .name="hahahha",
    .id=PLATFORM_DEVID_AUTO,
    .dev={
        .release=pdev_release,
    },
    .num_resources=ARRAY_SIZE(res),
    .resource=res,
};

static int __init mycdev_init(void)
{
    //对象的注册
    platform_device_register(&pdev);
    return 0;
}
static void __exit mycdev_exit(void)
{
    //对象的注销
     platform_device_unregister(&pdev);

}
module_init(mycdev_init);
module_exit(mycdev_exit);
MODULE_LICENSE("GPL");
pdrv.c
#include <linux/init.h>
#include <linux/module.h>
#include<linux/platform_device.h>
//probe函数
int pdrv_probe(struct platform_device *pdev)
{
    printk("%s:%s:%d\n",__FILE__,__func__,__LINE__);
    return 0;
}
//remove函数
 int pdrv_remove(struct platform_device *pdev)
 {
    printk("%s:%s:%d\n",__FILE__,__func__,__LINE__);
     return 0;
 }

 //定义对象并且初始化
 struct platform_driver pdrv={
    .probe=pdrv_probe,
    .remove=pdrv_remove,
    .driver={
        .name="hahahha",
    },
};

static int __init mycdev_init(void)
{
    //对象的注册
    platform_driver_register(&pdrv);
    return 0;
}
static void __exit mycdev_exit(void)
{
    platform_driver_unregister(&pdrv);

}
module_init(mycdev_init);
module_exit(mycdev_exit);
MODULE_LICENSE("GPL");
5.5 一键注册宏
#define module_platform_driver(__platform_driver) \
    module_driver(__platform_driver, platform_driver_register, \
            platform_driver_unregister)

#define module_driver(__driver, __register, __unregister, ...) \
    static int __init __driver##_init(void) \
    { \
        return __register(&(__driver) , ##__VA_ARGS__); \
    } \
    module_init(__driver##_init); \
    static void __exit __driver##_exit(void) \
    { \
        __unregister(&(__driver) , ##__VA_ARGS__); \
    } \
    module_exit(__driver##_exit);
5.6 在platfrom驱动中获取设备信息相关API
1.struct resource *platform_get_resource(struct platform_device *dev,
                       unsigned int type, unsigned int num)
功能:在驱动中获取设备信息
参数:
dev:platform_device对象指针
type:资源类型
num:同类型资源的序号,从0开始
返回值:成功返回资源结构体首地址,失败返回NULL

2.int platform_get_irq(struct platform_device *dev, unsigned int num)
功能:获取中断类型的资源
参数:
    dev:platform_device对象指针
    num:同类型资源的序号,从0开始
返回值:成功返回中断号,失败返回错误码


 1384
1384


 被折叠的 条评论
为什么被折叠?
被折叠的 条评论
为什么被折叠?
 到【灌水乐园】发言


