


文章目录
前言
这是shiro的初期学习笔记,如有错误,欢迎各位大佬指出错误!以下教程来源
在web中使用shiro
在数据库中能够加密支持了,那么现在就得真正的在web上支持了;
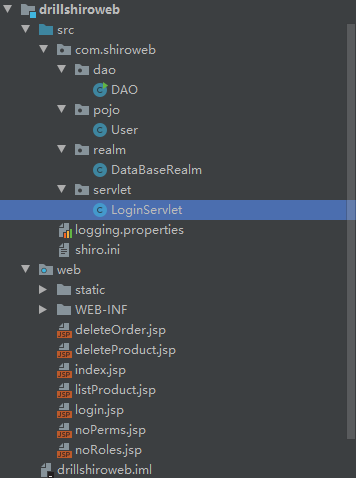
重新创建一个项目,web项目就行;项目结构如下:
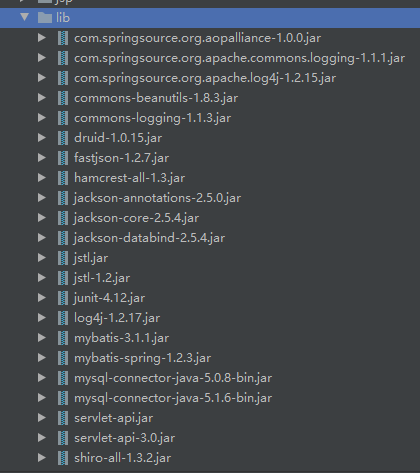
首先是添加依赖,如下:
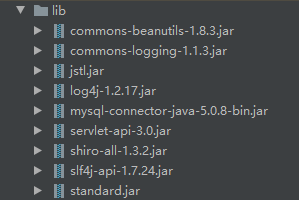
注意
a.必须要有slf4j的依赖
b.加了log4j的依赖,是为了让控制台更好的显示错误
数据库中需要创建User表,这个User表在shiro学习基础(一)之ee例子已经创建好了,不赘述;
然后创建实体类,User如下:
package com.shiroweb.pojo;

public class User {
    private int id;
    private String name;
    private String password;

    public int getId() {
        return id;
    }

    public void setId(int id) {
        this.id = id;
    }

    public String getName() {
        return name;
    }

    public void setName(String name) {
        this.name = name;
    }

    public String getPassword() {
        return password;
    }

    public void setPassword(String password) {
        this.password = password;
    }
}
有的变化
DAO类将原来加密有的获取用户信息和注册用户方法删除,其它保持不变;
DataRealm类将加密用的方法,改为不用加密的,当然要保持加密也可以。看个人喜欢,初学的话最好减少难度,如下:
package com.shiroweb.realm;
import org.apache.shiro.authc.*;
import org.apache.shiro.authz.AuthorizationInfo;
import org.apache.shiro.authz.SimpleAuthorizationInfo;
import org.apache.shiro.realm.AuthorizingRealm;
import org.apache.shiro.subject.PrincipalCollection;
import com.shiroweb.dao.DAO;


import java.util.Set;

/**
 * 这个类继承了AuthorizingRealm
 * 类似于继承HttpServlet
 * 里面的方法是我们自己提供,但是调用是shiro去调用
 */
public class DataBaseRealm extends AuthorizingRealm {
    /*
     * 授权,即权限验证
     * */
    @Override
    protected AuthorizationInfo doGetAuthorizationInfo(
            PrincipalCollection principalCollection) {
        /*
         * PrincipalCollection是一个身份集合
         * */
//        获取通过doGetAuthenticationInfo认证的用户名
        String userName = (String) principalCollection.getPrimaryPrincipal();
//        根据认证的用户名,在DAO类中获取角色和权限
        Set<String> permissions = new DAO().listPermissions(userName);
        Set<String> roles = new DAO().listRoles(userName);
//        将获取到的角色和权限,放到能够授权的类中,即授权对象
        SimpleAuthorizationInfo sai=new SimpleAuthorizationInfo();
        sai.setStringPermissions(permissions);
        sai.setRoles(roles);
        return sai;
    }


    /*
     * 获取
     * 身份认证功能,也就是登录
     * */
    @Override
    protected AuthenticationInfo doGetAuthenticationInfo(
            AuthenticationToken authenticationToken) throws AuthenticationException {
//        获取登录的账号密码
        UsernamePasswordToken t= (UsernamePasswordToken) authenticationToken;
        String userName = t.getPrincipal().toString();
        String password= new String( t.getPassword());

        //获取数据库中的密码
        String passwordInDB = new DAO().getPassword(userName);

        //如果为空就是账号不存在,如果不相同就是密码错误,但是都抛出AuthenticationException,而不是抛出具体错误原因,免得给破解者提供帮助信息
        if(null==passwordInDB || !passwordInDB.equals(password)){
            throw new AuthenticationException();
        }
        //认证信息里存放账号密码, getName() 是当前Realm的继承方法,通常返回当前类名 :databaseRealm
        SimpleAuthenticationInfo sai = new SimpleAuthenticationInfo(userName,password,getName());
        return sai;
    }
}
创建一个处理登录的LoginServlet,如下:
package com.shiroweb.servlet;

import org.apache.shiro.SecurityUtils;
import org.apache.shiro.authc.AuthenticationException;
import org.apache.shiro.authc.UsernamePasswordToken;
import org.apache.shiro.session.Session;
import org.apache.shiro.subject.Subject;

import javax.servlet.ServletException;
import javax.servlet.annotation.WebServlet;
import javax.servlet.http.HttpServlet;
import javax.servlet.http.HttpServletRequest;
import javax.servlet.http.HttpServletResponse;
import java.io.IOException;

@WebServlet(name = "LoginServlet",urlPatterns = "/login")
public class LoginServlet extends HttpServlet {
    protected void doPost(HttpServletRequest request,
                          HttpServletResponse response) throws ServletException, IOException {
        String name = request.getParameter("name");
        String password = request.getParameter("password");
//        获取到当前用户对象
        Subject subject = SecurityUtils.getSubject();
//        获取到UsernamePasswordToken类
        /*
        * 这个类可以存储前端登录的用户名,密码,主机地址,以及是否记住我
        * 记住我:就是后续能够继续登录
        * */
        UsernamePasswordToken token=new UsernamePasswordToken(name,password);
        try{//如果验证成功
            subject.login(token);
//        这个shiro的session对象,是实现了HttpSession对象的,所以就可当做session一样使用
            Session session = subject.getSession();
//        将当前的用户存储进session域中
            session.setAttribute("subject",subject);

//            重定向到根目录
            response.sendRedirect("/index.jsp");
        }catch(AuthenticationException e){//如果验证失败
            request.setAttribute("error","验证失败");
            request.getRequestDispatcher("login.jsp").forward(request,response);
        }

    }

    protected void doGet(HttpServletRequest request,
                         HttpServletResponse response) throws ServletException, IOException {
        this.doPost(request,response);
    }
}
这里使用了shiro中的UsernamePasswordToken和Session;
前者UsernamePasswordToken是保存了用户的登录信息等等,在这篇博客Shiro学习笔记(二)UsernamePasswordToken源码简单解析有详细的介绍这个类;
后者Session,是相当于web中的HttpSession,详情在
在web.xml文件中配置,如下:
 <listener>
        <listener-class>org.apache.shiro.web.env.EnvironmentLoaderListener</listener-class>
    </listener>
<!--    定义全局化参数-->
    <context-param>
        <param-name>shiroEnvironment</param-name>
        <param-value>org.apache.shiro.web.env.IniWebEnvironment</param-value>
    </context-param>
    <!-- 默认先从/WEB-INF/shiro.ini,如果没有找classpath:shiro.ini -->
    <context-param>
        <param-name>shiroConfigLocations</param-name>
        <param-value>classpath:shiro.ini</param-value>
    </context-param>

<!--    配置拦截器,
    1.拦截所有请求
    2.加载配置文件
    3.并且获取安全管理者实例,将安全挂历者实例放入全局对象中
-->
    <filter>
        <filter-name>shiroFilter</filter-name>
        <filter-class>org.apache.shiro.web.servlet.ShiroFilter</filter-class>
    </filter>
    <filter-mapping>
        <filter-name>shiroFilter</filter-name>
        <url-pattern>/*</url-pattern>
    </filter-mapping>
其中IniWebEnvironment就相当于在ee例子中的加载shiro配置文件获取subject的代码,就相当于这个:
//加载配置文件,并获取工厂
        Factory<SecurityManager> factory = new IniSecurityManagerFactory("classpath:shiro.ini");
        //获取安全管理者实例
        SecurityManager sm = factory.getInstance();
        //将安全管理者放入全局对象
        SecurityUtils.setSecurityManager(sm);
根据一个博主的解读官方文档,Shiro官方文档超详细解读(三)之shiro web支持
这个配置的作用如下:
1)EnvironmentLoaderListener初始化Shiro
WebEnvironment实例(其中包含Shiro需要操作的所有内容,包括SecurityManager),并使其在ServletContext中可访问。您可以通过调用WebUtils.getRequiredWebEnvironment(servletContext)在任何时候获得这个WebEnvironment实例。
(2)ShiroFilter将使用这个WebEnvironment为任何过滤的请求执行所有必要的安全操作。
(3)最后,过滤器映射定义filter-mapping
definition确保所有请求都由ShiroFilter进行过滤,这是大多数web应用程序推荐的,以确保可以保护任何请求。
log4j的文件配置如下:
handlers =  java.util.logging.ConsoleHandler
java.util.logging.ConsoleHandler.level = FINE
java.util.logging.ConsoleHandler.formatter = java.util.logging.SimpleFormatter
在web下创建一个css样式文件,如下:
span.desc{
    margin-left:20px;
    color:gray;
}
div.workingroom{
    margin:200px auto;
    width:400px;
}
div.workingroom a{
    display:inline-block;
    margin-top:20px;
}
div.loginDiv{
    text-align: left;
}
div.errorInfo{
    color:red;
    font-size:0.65em;
}
然后创建index.jsp,如下:
<%@ page contentType="text/html;charset=UTF-8" language="java" %>
<%@taglib prefix="c" uri="http://java.sun.com/jsp/jstl/core" %>
<html>
<head>
<title>$Title$</title>
<link rel="stylesheet" type="text/css" href="static/css/style.css"/>
</head>
<body>
<div class="workingroom">
<div class="loginDiv">
<%-- subject.principal判断用户是否登录--%>
<c:if test="${empty subject.principal}">
<a href="login.jsp">登录</a><br/>
</c:if>
<c:if test="${!empty subject.principal}">
<span class="desc">你好,${subject.principal}</span>
<a href="doLogout">退出</a>
</c:if>
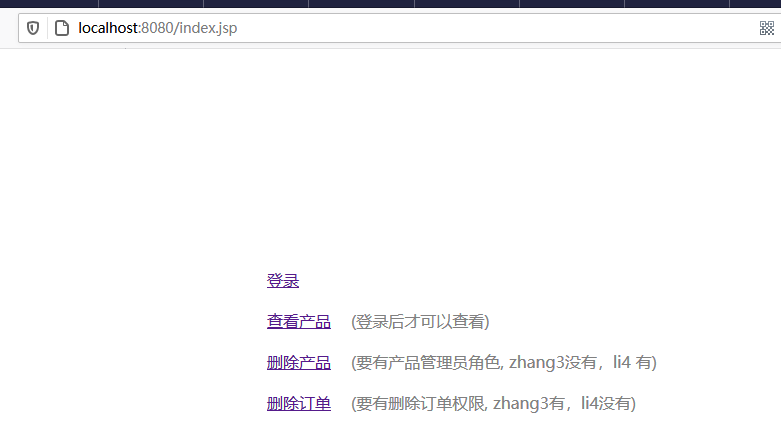
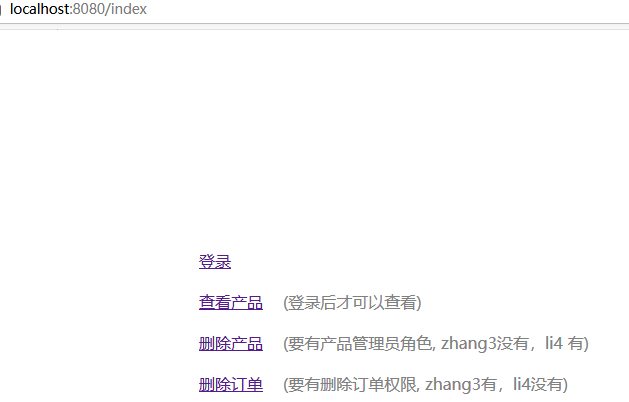
<a href="listProduct.jsp">查看产品</a><span class="desc">(登录后才可以查看) </span><br>
<a href="deleteProduct.jsp">删除产品</a><span class="desc">(要有产品管理员角色, zhang3没有,li4 有) </span><br>
<a href="deleteOrder.jsp">删除订单</a><span class="desc">(要有删除订单权限, zhang3有,li4没有) </span><br>
</div>
</div>
</body>
</html>
以及login.jsp,如下:
<%@ page contentType="text/html;charset=UTF-8" language="java" %>
<%@taglib prefix="c" uri="http://java.sun.com/jsp/jstl/core" %>
<html>
<head>
    <title>Title</title>
    <link rel="stylesheet" type="text/css" href="static/css/style.css">
</head>
<body>
<div class="workingroom">
    <div class="errorInfo">${error}</div>
    <form action="login" method="post">
        账号:<input type="text" name="name"><br/>
        密码:<input type="password" name="password"><br/>
        <input type="submit" value="登录"><br/><br/>
    </form>

    <div>
        <span class="desc">账号:zhang3 密码:12345 角色:admin</span><br>
        <span class="desc">账号:li4 密码:abcde 角色:productManager</span><br>
    </div>
</div>
</body>
</html>
然后还有其它的查看产品删除产品页面,其实都是一样,并没有真正的实现,页面内容就是一些文字提示以及返回上一页面的代码,如下listProduct.jsp页面,如下:
<%@ page contentType="text/html;charset=UTF-8" language="java" %>
<%@taglib prefix="c" uri="http://java.sun.com/jsp/jstl/core" %>
<html>
<head>
    <title>Title</title>
    <link rel="stylesheet" type="text/css" href="static/css/style.css">
</head>
<body>
<div class="workingroom">
    <b>这个是listProduct.jsp页面,即查询产品页面,
        能够看到这个页面,说明是已经登录的,对应的配置为/listProduct.jsp=authc</b><br/>
    <a href="#" onclick="javascript:history.back()">返回</a>
</div>
</body>
</html>
最终重要的配置,shiro.ini的配置,如下:
[main]
#使用数据库进行验证和授权
databaseRealm=com.shiroweb.realm.DataBaseRealm
securityManager.realms=$databaseRealm

#当访问需要验证的页面,但是又没有验证的情况下,跳转到login.jsp
authc.loginUrl=/login.jsp
#当访问需要角色的页面,但是又不拥有这个角色的情况下,跳转到noroles.jsp
roles.unauthorizedUrl=/noRoles.jsp
#当访问需要权限的页面,但是又不拥有这个权限的情况下,跳转到noperms.jsp
perms.unauthorizedUrl=/noPerms.jsp


#users,roles和perms都通过前面知识点的数据库配置了
[users]

#[urls]用来指定那些资源需要什么对应的授权才能使用
[urls]
#doLogout地址进行退出行为
/doLogout=logout

#login.jsp,noroles.jsp,noperms.jsp 可以匿名访问
/login.jsp=anon
/noRoles.jsp=anon
/noPerms.jsp=anon


#查询所有产品,需要登录之后才可以查看
/listProduct.jsp=authc

#删除商品不仅需要登录,而且要拥有productManager角色才能删除
/deleteProduct.jsp=authc,roles[productManager]

#删除订单,不仅需要登录,而且要拥有deleteOrder权限才能
/deleteOrder.jsp=authc,perms["deleteOrder"]
有一点很重要,就是这个shiro.ini文件在web项目中,是放到src这个文件夹下;不要放错,不然会报错!同理logging.properties文件也是一样的在src文件下;
然后将项目部署到tomcat,之后启动tomcat,如下:
在ssm中使用shiro
注解配置权限
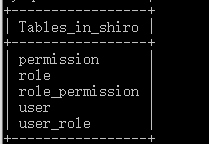
使用的数据库还是使用的原有的数据库,也就是上面的例子中的数据库,分为角色,权限,用户,其关系也是一样的,
实现的效果如下:
跟在web中使用的效果是一样的,只是这个是用ssm实现 ;
创建一个新的项目,导依赖包如下:
创建jsp页面,其页面跟在web中使用shiro一模一样的。。。。
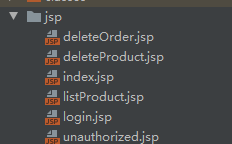
只是多了个unauthorized.jsp页面替代上面的没有权限和没有角色的跳转,其内容如下:
<%@ page language="java" contentType="text/html; charset=UTF-8"
         pageEncoding="UTF-8" import="java.util.*"%>
<!DOCTYPE html>

<meta http-equiv="Content-Type" content="text/html; charset=UTF-8">
<link rel="stylesheet" type="text/css" href="../../static/css/style.css" />

<div class="workingroom">

    权限不足,具体原因:${ex.message}
    <br>
    <a href="#" onClick="javascript:history.back()">返回</a>
</div>
然后创建实体类以及mapper类和Controller类,因为没有真正的实现增删改查,所以Controller类的内容很少,一个用于页面跳转的PageController,在该类中使用shiro的注解来配置其每个页面访问对应对的权限,如下:
package com.shirossm.controller;

import org.apache.shiro.authz.annotation.RequiresPermissions;
import org.apache.shiro.authz.annotation.RequiresRoles;
import org.springframework.stereotype.Controller;
import org.springframework.web.bind.annotation.RequestMapping;
import org.springframework.web.bind.annotation.RequestMethod;

/**
 * 这个类是专门用来显示页面的控制类
 */
@Controller
@RequestMapping("")
public class PageController {
    @RequestMapping("/index")
    public String index(){
        return "index";
    }

//     指明了 访问 deleteOrder 需要权限"deleteOrder"
    @RequiresPermissions("deleteOrder")
    @RequestMapping("/deleteOrder")
    public String deleteOrder(){
        return "deleteOrder";
    }

//    指明了删除deleteProduct,需要角色productManager
    @RequiresRoles("productManager")
    @RequestMapping("/deleteProduct")
    public String deleteProduct(){
        return "deleteProduct";
    }

    @RequestMapping("/listProduct")
    public String listProduct(){
        return "listProduct";
    }

//    这里这个login是get请求方式,设定为必须为get,因为只是用来显示login页面
    @RequestMapping(value = "/login" ,method = RequestMethod.GET)
    public String login(){
        return "login";
    }

    @RequestMapping("/unauthorized")
    public String noPerms(){
        return "unauthorized";
    }
}
另一个是跟在web中等同于servlet一样的LoginController,内容如下:
package com.shirossm.controller;

import org.apache.shiro.SecurityUtils;
import org.apache.shiro.authc.AuthenticationException;
import org.apache.shiro.authc.UsernamePasswordToken;
import org.apache.shiro.session.Session;
import org.apache.shiro.subject.Subject;
import org.springframework.stereotype.Controller;
import org.springframework.ui.Model;
import org.springframework.web.bind.annotation.RequestMapping;
import org.springframework.web.bind.annotation.RequestMethod;

@Controller
@RequestMapping("")
public class LoginController {
    @RequestMapping(value = "/login",method = RequestMethod.POST)
    public String login(Model model,String name, String password){
        Subject subject = SecurityUtils.getSubject();
        UsernamePasswordToken token=new UsernamePasswordToken(name,password);
        try{
            subject.login(token);
            Session session = subject.getSession();
            session.setAttribute("session",session);
            return "redirect:index";
        }catch (AuthenticationException e){
            model.addAttribute("error","验证失败");
            return "login";
        }
    }
}
作用是一样的,登录成功就跳转到index.jsp ,失败就跳转到登录login页面;
至于pojo和mapper以及xml文件,跟前面的功能是一样的,三个都是通过名字查询用户信息,权限信息,角色信息,这里就不一一列举出来了,因为内容较多这里只关注和shiro有关的内容;
整合在ssm中,同样需要安全数据源类,验证密码,其DatabaseRealm如下:
package com.shirossm.realm;

import com.shirossm.service.PermissionService;
import com.shirossm.service.RoleService;
import com.shirossm.service.UserService;
import org.apache.shiro.authc.*;
import org.apache.shiro.authz.AuthorizationInfo;
import org.apache.shiro.authz.SimpleAuthorizationInfo;
import org.apache.shiro.realm.AuthorizingRealm;
import org.apache.shiro.subject.PrincipalCollection;
import org.springframework.beans.factory.annotation.Autowired;

import java.util.Set;

/**
 * 这个DatabaseRealm是在applicationContext-shiro配置文件
 * 注入到bean容器的
 * <bean id="databaseRealm" class="com.shirossm.realm.DatabaseRealm"></bean>
 *
 */
public class DatabaseRealm extends AuthorizingRealm {
    @Autowired
    private UserService userService;
    @Autowired
    private RoleService roleService;
    @Autowired
    private PermissionService permissionService;

    /*
    * 权限验证
    * */
    @Override
    protected AuthorizationInfo doGetAuthorizationInfo(
            PrincipalCollection principalCollection) {
//        获取身份集合
        String userName = (String) principalCollection.getPrimaryPrincipal();
//        在数据库中获取角色和权限
        Set<String> permissions = permissionService.listPermissions(userName);
        Set<String> roles = roleService.listRoles(userName);

//        授权对象
        SimpleAuthorizationInfo s = new SimpleAuthorizationInfo();
        //把通过service获取到的角色和权限放进去
        s.setStringPermissions(permissions);
        s.setRoles(roles);
        return s;
    }

    /*
    * 身份验证
    * */
    @Override
    protected AuthenticationInfo doGetAuthenticationInfo(
            AuthenticationToken authenticationToken) throws AuthenticationException {
//        获取登录信息存储的类
        UsernamePasswordToken token= (UsernamePasswordToken) authenticationToken;
        String username = token.getUsername();
        String password = new String(token.getPassword());
//        获取数据库中的密码
        String passwordFromDB = userService.getPassword(username);
        //如果为空就是账号不存在,如果不相同就是密码错误,但是都抛出AuthenticationException,而不是抛出具体错误原因,免得给破解者提供帮助信息
        if(null==passwordFromDB || !passwordFromDB.equals(password)){
            throw new AuthenticationException();
        }

        //认证信息里存放账号密码, getName() 是当前Realm的继承方法,通常返回当前类名 :databaseRealm
        SimpleAuthenticationInfo a = new SimpleAuthenticationInfo(username,password,getName());
        return a;
    }
}
ps:没有使用加密。
异常类DefaultExceptionHandler,是采用注解实现的,其中实例化过程是配置在springMVC中,如下:
package com.shirossm.exception;

import org.apache.shiro.authz.UnauthenticatedException;
import org.apache.shiro.authz.UnauthorizedException;
import org.springframework.http.HttpStatus;
import org.springframework.web.bind.annotation.ControllerAdvice;
import org.springframework.web.bind.annotation.ExceptionHandler;
import org.springframework.web.bind.annotation.ResponseStatus;
import org.springframework.web.servlet.ModelAndView;

@ControllerAdvice
public class DefaultExceptionHandler {
    @ExceptionHandler({UnauthenticatedException.class})
    @ResponseStatus(HttpStatus.UNAUTHORIZED)//这个是设定抛出异常状态的原因
    public ModelAndView processUnauthenticatedException(UnauthorizedException e){
        ModelAndView mv = new ModelAndView();
        mv.addObject("ex", e);
        mv.setViewName("unauthorized");
        return mv;
    }
}
接下来就是说ssm项目中的配置了,且因为使用了shiro,配置增多;
首先配置了web.xml如下:
<?xml version="1.0" encoding="UTF-8"?>
<web-app xmlns="http://xmlns.jcp.org/xml/ns/javaee"
         xmlns:xsi="http://www.w3.org/2001/XMLSchema-instance"
         xsi:schemaLocation="http://xmlns.jcp.org/xml/ns/javaee http://xmlns.jcp.org/xml/ns/javaee/web-app_3_1.xsd"
         version="3.1">
<!--    spring的配置文件-->
    <context-param>
        <param-name>contextConfigLocation</param-name>
        <param-value>
            classpath:applicationContext.xml,
            classpath:applicationContext-shiro.xml
        </param-value>
    </context-param>
    <listener>
        <listener-class>org.springframework.web.context.ContextLoaderListener</listener-class>
    </listener>

<!--    前端控制器-->
    <servlet>
        <servlet-name>mvc-dispatcher</servlet-name>
        <servlet-class>org.springframework.web.servlet.DispatcherServlet</servlet-class>
        <!-- spring mvc的配置文件 -->
        <init-param>
            <param-name>contextConfigLocation</param-name>
            <param-value>classpath:springMVC.xml</param-value>
        </init-param>
        <load-on-startup>1</load-on-startup>
    </servlet>
    <servlet-mapping>
        <servlet-name>mvc-dispatcher</servlet-name>
        <url-pattern>/</url-pattern>
    </servlet-mapping>

<!--    shiro的配置-->
    <filter>
<!--        DelegatingFilterProxy就是一个对于servlet filter的代理,
        用这个类的好处主要是通过Spring容器来管理servlet filter的生命周期,
        还有就是如果filter中需要一些Spring容器的实例,可以通过spring直接注入,
        另外读取一些配置文件这些便利的操作都可以通过Spring来配置实现。-->
        <filter-name>shiroFilter</filter-name>
        <filter-class>org.springframework.web.filter.DelegatingFilterProxy</filter-class>
        <init-param>
            <param-name>targetFilterLifecycle</param-name>
            <param-value>true</param-value>
        </init-param>
    </filter>
    <filter-mapping>
        <filter-name>shiroFilter</filter-name>
        <url-pattern>/*</url-pattern>
    </filter-mapping>
</web-app>
注意点DelegatingFilterProxy
其中配置了一个shiroFilter的拦截器,这个拦截器的全名是:
org.springframework.web.filter.DelegatingFilterProxy
这个拦截器不是shiro依赖包中的拦截器,而是属于springframework中的,这类的作用在这里就是相当于web中的拦截器,详情参考博文
Spring:代理Filter:DelegatingFilterProxy原理和作用
然后配置了spring的主配置文件,applicationContext.xml文件。
ps:
注意这里不是maven项目,这些配置文件都是在src目录下创建的
<?xml version="1.0" encoding="UTF-8"?>
<beans xmlns="http://www.springframework.org/schema/beans"
       xmlns:xsi="http://www.w3.org/2001/XMLSchema-instance"
       xmlns:aop="http://www.springframework.org/schema/aop"
       xmlns:tx="http://www.springframework.org/schema/tx"
       xmlns:jdbc="http://www.springframework.org/schema/jdbc"
       xmlns:context="http://www.springframework.org/schema/context"
       xmlns:mvc="http://www.springframework.org/schema/mvc"
       xsi:schemaLocation="
     http://www.springframework.org/schema/context http://www.springframework.org/schema/context/spring-context-3.0.xsd
     http://www.springframework.org/schema/beans http://www.springframework.org/schema/beans/spring-beans-3.0.xsd
     http://www.springframework.org/schema/jdbc http://www.springframework.org/schema/jdbc/spring-jdbc-3.0.xsd
     http://www.springframework.org/schema/tx http://www.springframework.org/schema/tx/spring-tx-3.0.xsd
     http://www.springframework.org/schema/aop http://www.springframework.org/schema/aop/spring-aop-3.0.xsd
     http://www.springframework.org/schema/mvc http://www.springframework.org/schema/mvc/spring-mvc.xsd">

    <context:annotation-config/>
    <context:component-scan base-package="com.shirossm.service"/>
    <bean id="dataSource" class="org.springframework.jdbc.datasource.DriverManagerDataSource">
        <property name="driverClassName">
            <value>com.mysql.jdbc.Driver</value>
        </property>
        <property name="url">
            <value>jdbc:mysql://localhost:3306/shiro?characterEncoding=UTF-8</value>

        </property>
        <property name="username">
            <value>root</value>
        </property>
        <property name="password">
            <value>admin</value>
        </property>
    </bean>

<!--    对mybatis的SqlSession的配置-->
    <bean id="sqlSession" class="org.mybatis.spring.SqlSessionFactoryBean">
        <property name="typeAliasesPackage" value="com.shirossm.pojo"/>
        <property name="dataSource" ref="dataSource"/>
        <property name="mapperLocations" value="classpath:com/shirossm/mapper/*.xml"/>
    </bean>
<!--    对mapper的注解扫描-->
    <bean class="org.mybatis.spring.mapper.MapperScannerConfigurer">
        <property name="basePackage" value="com.shirossm.mapper"/>
    </bean>
</beans>
还有代替shiro.ini配置文件的applicationContext-shiro.xml配置文件,如下;
<?xml version="1.0" encoding="UTF-8"?>
<beans xmlns="http://www.springframework.org/schema/beans"
       xmlns:xsi="http://www.w3.org/2001/XMLSchema-instance"
       xmlns:aop="http://www.springframework.org/schema/aop"
       xmlns:tx="http://www.springframework.org/schema/tx"
       xmlns:jdbc="http://www.springframework.org/schema/jdbc"
       xmlns:context="http://www.springframework.org/schema/context"
       xmlns:mvc="http://www.springframework.org/schema/mvc"
       xmlns:util="http://www.springframework.org/schema/util"
       xsi:schemaLocation="http://www.springframework.org/schema/context http://www.springframework.org/schema/context/spring-context-3.0.xsd
     http://www.springframework.org/schema/beans http://www.springframework.org/schema/beans/spring-beans-3.0.xsd
     http://www.springframework.org/schema/jdbc http://www.springframework.org/schema/jdbc/spring-jdbc-3.0.xsd
     http://www.springframework.org/schema/tx http://www.springframework.org/schema/tx/spring-tx-3.0.xsd
     http://www.springframework.org/schema/aop http://www.springframework.org/schema/aop/spring-aop-3.0.xsd
     http://www.springframework.org/schema/mvc http://www.springframework.org/schema/mvc/spring-mvc.xsd
     http://www.springframework.org/schema/util http://www.springframework.org/schema/util/spring-util.xsd">

<!--    等同于原有的web项目中是shiro这个配置文件-->

    <!-- 配置shiro的过滤器工厂类,id- shiroFilter要和我们在web.xml中配置的过滤器一致 -->
    <bean id="shiroFilter" class="org.apache.shiro.spring.web.ShiroFilterFactoryBean">
<!--        调用我们配置的权限管理器-->
        <property name="securityManager" ref="securityManager" />
<!--        配置我们的登录请求地址-->
        <property name="loginUrl" value="/login"/>
<!-- 如果您请求的资源不在您的权限范围,则跳转到/403请求地址 -->
        <property name="unauthorizedUrl" value="/unauthorized" />
<!--        退出-->
        <property name="filters">
            <util:map>
                <entry key="logout" value-ref="logoutFilter"/>
            </util:map>
        </property>
<!--        权限配置-->
        <property name="filterChainDefinitions">
            <value>
                /login=anon
                /index=anon
                /static/**=anon
                /doLogout=logout
                <!--所有的请求(除去配置的静态资源请求或请求地址为anon的请求)
                都要通过登录验证,如果未登录则跳到/login -->
                /** = authc
            </value>
        </property>
    </bean>

<!--    退出过滤器-->
    <bean id="logoutFilter" class="org.apache.shiro.web.filter.authc.LogoutFilter">
        <property name="redirectUrl" value="/index"/>
    </bean>

<!--    session的id生成器-->
    <bean id="sessionIdGenerator" class="org.apache.shiro.session.mgt.eis.JavaUuidSessionIdGenerator"/>
<!--    session的Cookie模板-->
    <bean id="sessionIdCookie" class="org.apache.shiro.web.servlet.SimpleCookie">
        <constructor-arg value="sid"/>
        <property name="httpOnly" value="true"/>
        <property name="maxAge" value="-1"/>
    </bean>
    <!-- 会话DAO -->
    <bean id="sessionDAO"
          class="org.apache.shiro.session.mgt.eis.EnterpriseCacheSessionDAO">
        <property name="sessionIdGenerator" ref="sessionIdGenerator" />
    </bean>
    <!-- 会话验证调度器,每30分钟执行一次验证 ,设定会话超时及保存 -->
    <bean name="sessionValidationScheduler"
          class="org.apache.shiro.session.mgt.ExecutorServiceSessionValidationScheduler">
        <property name="interval" value="1800000" />
        <property name="sessionManager" ref="sessionManager" />
    </bean>
    <!-- 会话管理器 -->
    <bean id="sessionManager"
          class="org.apache.shiro.web.session.mgt.DefaultWebSessionManager">
        <!-- 全局会话超时时间(单位毫秒),默认30分钟 -->
        <property name="globalSessionTimeout" value="1800000" />
        <property name="deleteInvalidSessions" value="true" />
        <property name="sessionValidationSchedulerEnabled" value="true" />
        <property name="sessionValidationScheduler" ref="sessionValidationScheduler" />
        <property name="sessionDAO" ref="sessionDAO" />
        <property name="sessionIdCookieEnabled" value="true" />
        <property name="sessionIdCookie" ref="sessionIdCookie" />
    </bean>
<!--    安全管理器-->
    <bean id="securityManager" class="org.apache.shiro.web.mgt.DefaultWebSecurityManager">
        <property name="realm" ref="databaseRealm" />
        <property name="sessionManager" ref="sessionManager" />
    </bean>
    <!-- 相当于调用SecurityUtils.setSecurityManager(securityManager) -->
    <bean
            class="org.springframework.beans.factory.config.MethodInvokingFactoryBean">
        <property name="staticMethod"
                  value="org.apache.shiro.SecurityUtils.setSecurityManager" />
        <property name="arguments" ref="securityManager" />
    </bean>
    <bean id="databaseRealm" class="com.shirossm.realm.DatabaseRealm"></bean>

    <!-- 保证实现了Shiro内部lifecycle函数的bean执行 -->
    <bean id="lifecycleBeanPostProcessor"
          class="org.apache.shiro.spring.LifecycleBeanPostProcessor" />
</beans>
注意点lifecycleBeanPostProcessor
这个配置文件前面的内容我们都知道,但是这个lifecycleBeanPostProcessor类,不太明白,这个类的作用在shiro笔记之LifecycleBeanPostProcessor的作用中得出的结论是:
从此,可知道LifecycleBeanPostProcessor将Initializable和Destroyable的实现类统一在其内部自动分别调用了Initializable.init()和Destroyable.destroy()方法,从而达到管理shiro bean生命周期的目的。
然后就是配置ssm中的mvc的配置文件,如下:
<?xml version="1.0" encoding="UTF-8"?>
<beans xmlns="http://www.springframework.org/schema/beans"
       xmlns:xsi="http://www.w3.org/2001/XMLSchema-instance"
       xmlns:aop="http://www.springframework.org/schema/aop"
       xmlns:tx="http://www.springframework.org/schema/tx"
       xmlns:jdbc="http://www.springframework.org/schema/jdbc"
       xmlns:context="http://www.springframework.org/schema/context"
       xmlns:mvc="http://www.springframework.org/schema/mvc"
       xsi:schemaLocation="
     http://www.springframework.org/schema/context http://www.springframework.org/schema/context/spring-context-3.0.xsd
     http://www.springframework.org/schema/beans http://www.springframework.org/schema/beans/spring-beans-3.0.xsd
     http://www.springframework.org/schema/jdbc http://www.springframework.org/schema/jdbc/spring-jdbc-3.0.xsd
     http://www.springframework.org/schema/tx http://www.springframework.org/schema/tx/spring-tx-3.0.xsd
     http://www.springframework.org/schema/aop http://www.springframework.org/schema/aop/spring-aop-3.0.xsd
     http://www.springframework.org/schema/mvc http://www.springframework.org/schema/mvc/spring-mvc.xsd">

    <context:annotation-config/>
    <context:component-scan base-package="com.shirossm.controller">
        <context:include-filter type="annotation"
                                expression="org.springframework.stereotype.Controller"/>
    </context:component-scan>

    <mvc:annotation-driven/>
    <mvc:default-servlet-handler/>

    <bean class="org.springframework.web.servlet.view.InternalResourceViewResolver">
        <property name="viewClass" value="org.springframework.web.servlet.view.JstlView"/>
        <property name="prefix" value="/WEB-INF/jsp/"/>
        <property name="suffix" value=".jsp" />
    </bean>

<!--    启动shiro注解
加aop配置,以使shiro认证注解(@RequiresPermissions、@RequiresRoles、
@RequiresUser、@RequiresGuest)
-->
    <bean class="org.springframework.aop.framework.autoproxy.DefaultAdvisorAutoProxyCreator"
          depends-on="lifecycleBeanPostProcessor">
        <property name="proxyTargetClass" value="true"/>
    </bean>

    <bean class="org.apache.shiro.spring.security.interceptor.AuthorizationAttributeSourceAdvisor">
        <property name="securityManager" ref="securityManager"/>
    </bean>

    <!-- 控制器异常处理 -->
    <bean id="exceptionHandlerExceptionResolver" class="org.springframework.web.servlet.mvc.method.annotation.ExceptionHandlerExceptionResolver">
    </bean>
    <bean class="com.shirossm.exception.DefaultExceptionHandler"/>
</beans>
注意点DefaultAdvisorAutoProxyCreator
这个类是一个事务配置的类,前面提到的注意点,lifecycleBeanPostProcessor类,正是使用这个类来配置其事务的增强,详情参考:
spring事务配置方法(DefaultAdvisorAutoProxyCreator)
使用DefaultAdvisorAutoProxyCreator实现spring的自动代理
这个类的作用如下:
这个代理生成器自动搜索Spring容器中的Advisor,并为容器中所有的bean创建代理。
注意点AuthorizationAttributeSourceAdvisor
在博文aop:config在shiro权限注解中发挥的作用
中有详细的解释其实现,以及做了如下结论,这个类作用:
AuthorizationAttributeSourceAdvisor匹配所有类,匹配所有加了认证注解的方法
为了解决出现错误,而没有明显的日志错误显示在控制台的问题,参考了博文日志报错在src上新建了一个logging.properties的配置文件其内容如下:
handlers =  java.util.logging.ConsoleHandler
java.util.logging.ConsoleHandler.level = FINE
java.util.logging.ConsoleHandler.formatter = java.util.logging.SimpleFormatter
然后重启,运行项目,访问出来的效果跟在web中使用shiro是一样的;
使用url配置权限表实现权限
在上面的ssm项目中使用shiro,是在PageController,使用注解来实现配置访问某一个页面需要的权限和角色的;
使用了两个注解:
一个是角色注解:
@RequiresRoles(“productManager”)
一个是权限注解:@RequiresPermissions(“deleteProduct”)
如下所示:
//     指明了 访问 deleteOrder 需要权限"deleteOrder"
//    @RequiresPermissions("deleteOrder")
    @RequestMapping("/deleteOrder")
    public String deleteOrder(){
        return "deleteOrder";
    }

//    指明了删除deleteProduct,需要角色productManager或者权限deleteProduct
//    @RequiresRoles("productManager")
//    @RequiresPermissions("deleteProduct")
    @RequestMapping("/deleteProduct")
    public String deleteProduct(){
        return "deleteProduct";
    }
更多关于这个注解的博客文章,在shiro注解权限控制-5个权限注解中解释;
这样其实不太方便实现访问页面的权限控制,还是得基于url的权限访问控制就更加灵活;
下面实现配置权限表来实现配置权限;
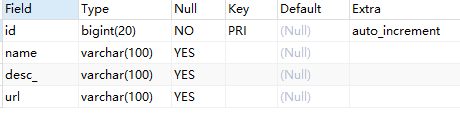
首先得修改表结构,在权限表Permission中添加一个url字段,还可以适度添加该权限的描述,如下表结构:
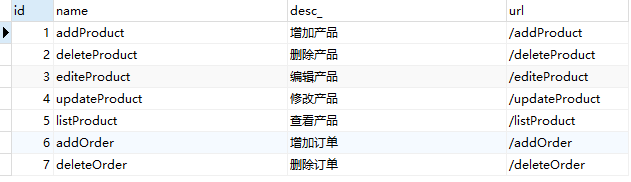
表数据:
在之前的项目基础上添加好对编码问题的过滤器配置,在web.xml中配置如下:
<filter>
        <filter-name>CharacterEncodingFilter</filter-name>
        <filter-class>org.springframework.web.filter.CharacterEncodingFilter</filter-class>
        <init-param>
            <param-name>encoding</param-name>
            <param-value>utf-8</param-value>
        </init-param>
    </filter>
注意点:配置到最前面!!!
之后将PageController中配置的权限注释掉,如下所示:
package com.shirossm.controller;

import org.apache.shiro.authz.annotation.RequiresPermissions;
import org.apache.shiro.authz.annotation.RequiresRoles;
import org.springframework.stereotype.Controller;
import org.springframework.web.bind.annotation.RequestMapping;
import org.springframework.web.bind.annotation.RequestMethod;

/**
 * 这个类是专门用来显示页面的控制类
 */
@Controller
@RequestMapping("")
public class PageController {
    @RequestMapping("/index")
    public String index(){
        return "index";
    }

//     指明了 访问 deleteOrder 需要权限"deleteOrder"
//    @RequiresPermissions("deleteOrder")
    @RequestMapping("/deleteOrder")
    public String deleteOrder(){
        return "deleteOrder";
    }

//    指明了删除deleteProduct,需要角色productManager或者权限deleteProduct
//    @RequiresRoles("productManager")
//    @RequiresPermissions("deleteProduct")
    @RequestMapping("/deleteProduct")
    public String deleteProduct(){
        return "deleteProduct";
    }
}
然后在PermissionService中新加三个方法,如下:
//    通过角色id查询该角色拥有的权限
 	public List<Permission> list(Role role);
//    是否需要拦截
    public boolean needInterceptor(String requestURI);

//    获取某个用户所拥有的权限地址集合
    public Set<String> listPermissionURLs(String userName);
在PermissionServiceImpl实现类中,实现这三个方法如下:
//    通过角色id查询该角色拥有的权限
    @Override
    public List<Permission> list(Role role) {
        List<Permission> result = new ArrayList<>();
        RolePermissionExample example = new RolePermissionExample();
        example.createCriteria().andRidEqualTo(role.getId());
        List<RolePermission> rps = rolePermissionMapper.selectByExample(example);
        for (RolePermission rolePermission : rps) {
            result.add(permissionMapper.selectByPrimaryKey(rolePermission.getPid()));
        }
        return result;
    }
 //    判断该访问的url在权限表中是否存在
    @Override
    public boolean needInterceptor(String requestURI) {
        /*
        * 判断的依据是如果访问的某个url
        * 在权限系统里存在,就要进行拦截。
        * 如果不存在,就放行了。
        * */
//        获取到所有的权限
        List<Permission> result = list();
//        遍历这些权限
        for (Permission p : result) {
            if(p.getUrl().equals(requestURI)){
                return true;
            }
        }
        return false;
    }

//    通过用户名来获取某个用户所拥有的权限地址集合
    @Override
    public Set<String> listPermissionURLs(String userName) {
        Set<String> result = new HashSet<>();
        List<Role> roles = roleService.listRoles(userName);

        List<RolePermission> rolePermissions = new ArrayList<>();

        for (Role role : roles) {
            RolePermissionExample example = new RolePermissionExample();
            example.createCriteria().andRidEqualTo(role.getId());
            List<RolePermission> rps = rolePermissionMapper.selectByExample(example);
            rolePermissions.addAll(rps);
        }

        for (RolePermission rolePermission : rolePermissions) {
            Permission p = permissionMapper.selectByPrimaryKey(rolePermission.getPid());
            result.add(p.getUrl());
        }

        return result;
    }
最后需要实现一个拦截器的方法,以此做到拦截所有的请求,这个拦截器是属于shiro中的,拦截器名为PathMatchingFilter,全名是:
import org.apache.shiro.web.filter.PathMatchingFilter;
这个类是用作请求路径匹配功能,在博文Shiro学习(8)拦截器机制中有介绍该拦截器,如下:
5、PathMatchingFilter
PathMatchingFilter提供了基于Ant风格的请求路径匹配功能及拦截器参数解析的功能,如“roles[admin,user]”自动根据“,”分割解析到一个路径参数配置并绑定到相应的路径:
Java代码 收藏代码boolean pathsMatch(String path, ServletRequest request) boolean onPreHandle(ServletRequest request, ServletResponse response, Object mappedValue) throws ExceptionpathsMatch:该方法用于path与请求路径进行匹配的方法;如果匹配返回true;
onPreHandle:在preHandle中,当pathsMatch匹配一个路径后,会调用opPreHandler方法并将路径绑定参数配置传给mappedValue;然后可以在这个方法中进行一些验证(如角色授权),如果验证失败可以返回false中断流程;默认返回true;也就是说子类可以只实现onPreHandle即可,无须实现preHandle。如果没有path与请求路径匹配,默认是通过的(即preHandle返回true)。
并且在博文shiro Filter–拦截器中也有阐述,只需要实现onPreHandle方法即可做到拦截。
创建一个filter包并且写一个拦截器的类UrlPathMatchingFilter,继承PathMatchingFilter,并且重写onPreHandle方法,
代码如下:
package com.shirossm.filter;

import com.shirossm.service.PermissionService;
import org.apache.shiro.SecurityUtils;
import org.apache.shiro.authz.UnauthorizedException;
import org.apache.shiro.subject.Subject;
import org.apache.shiro.web.filter.PathMatchingFilter;
import org.apache.shiro.web.util.WebUtils;
import org.springframework.beans.factory.annotation.Autowired;

import javax.servlet.ServletRequest;
import javax.servlet.ServletResponse;
import java.util.Set;

public class UrlPathMatchingFilter extends PathMatchingFilter {
    @Autowired
    PermissionService permissionService;

    @Override
    protected boolean onPreHandle(ServletRequest request,
                                  ServletResponse response,
                                  Object mappedValue) throws Exception {
//        获取访问的地址
        String requestURL=getPathWithinApplication(request);
//        System.out.println("这个东西是啥?: "+requestURL);

        Subject subject = SecurityUtils.getSubject();

//       如果没有登录就跳转到登录页面
        if(!subject.isAuthenticated()){
            WebUtils.issueRedirect(request, response, "/login");
            return false;
        }
        boolean needInterceptor = permissionService.needInterceptor(requestURL);
//        如果访问的路径在权限表中不存在,那么就放行
        if(!needInterceptor){
            return true;
        }else{
            boolean hasPermission=false;
//            获取用户名
            String userName = subject.getPrincipal().toString();
//            通过用户名获取该用户拥有的权限url集合
            Set<String> permissionUrls = permissionService.listPermissionURLs(userName);
            for (String userPermissionUrl : permissionUrls) {
//                如果该用户权限url集合中包含了访问的路径url
                if(userPermissionUrl.equals(requestURL)){
                    hasPermission=true;
                    break;
                }
            }
            if (hasPermission){
                return true;
            } else {
                UnauthorizedException ex = new UnauthorizedException("当前用户没有访问路径 " + requestURL + " 的权限");

                subject.getSession().setAttribute("ex", ex);

                WebUtils.issueRedirect(request, response, "/unauthorized");
                return false;
            }
        }

    }
}
最后需要在applicationContext-shiro.xml中配置该拦截器类,并且声明在shiro中使用,改变如下:
第一点:
< !-- 权限url过滤器–>
< bean id=“urlPathMatchingFilter” class=“com.shirossm.filter.UrlPathMatchingFilter”/>
第二点:
< !-- 声明在shiro中使用权限过滤器–>
< entry key=“url” value-ref=“urlPathMatchingFilter”/>
第三点:
< !-- 设置权限url过滤器的拦截规则–>
/**=url
<!--    退出过滤器-->
<bean id="logoutFilter" class="org.apache.shiro.web.filter.authc.LogoutFilter">
    <property name="redirectUrl" value="/index"/>
</bean>

<!--    权限url过滤器-->
<bean id="urlPathMatchingFilter" class="com.shirossm.filter.UrlPathMatchingFilter"/>

<!-- 配置shiro的过滤器工厂类,id- shiroFilter要和我们在web.xml中配置的过滤器一致 -->
<bean id="shiroFilter" class="org.apache.shiro.spring.web.ShiroFilterFactoryBean">
    <!--        调用我们配置的权限管理器-->
    <property name="securityManager" ref="securityManager" />
    <!--        配置我们的登录请求地址-->
    <property name="loginUrl" value="/login"/>
    <!-- 如果您请求的资源不在您的权限范围,则跳转到/403请求地址 -->
    <property name="unauthorizedUrl" value="/unauthorized" />
    <!--        退出-->
    <property name="filters">
        <util:map>
<!--            声明在shiro中使用退出过滤器-->
            <entry key="logout" value-ref="logoutFilter"/>
<!--            声明在shiro中使用权限过滤器-->
            <entry key="url" value-ref="urlPathMatchingFilter"/>
        </util:map>
    </property>
    <!--        权限配置-->
    <property name="filterChainDefinitions">
        <value>
            /login=anon
            /index=anon
            /static/**=anon
            <!-- 只对业务功能进行权限管理,权限配置本身不需要没有做权限要求,
            这样做是为了不让初学者混淆
             额,就是让这个权限页面可以匿名访问-->
            /config/**=anon
            /doLogout=logout
            <!--所有的请求(除去配置的静态资源请求或请求地址为anon的请求)
            都要通过登录验证,如果未登录则跳到/login -->
            /** = authc
<!--            设置权限url过滤器的拦截规则-->
            /**=url
        </value>
    </property>
</bean>
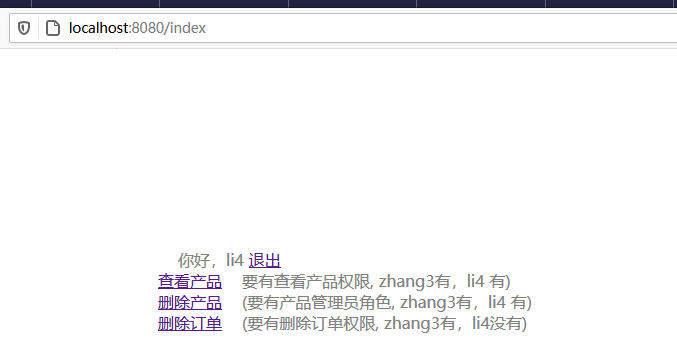
最终重启,访问login,使用li4账户登陆成功页面如下:
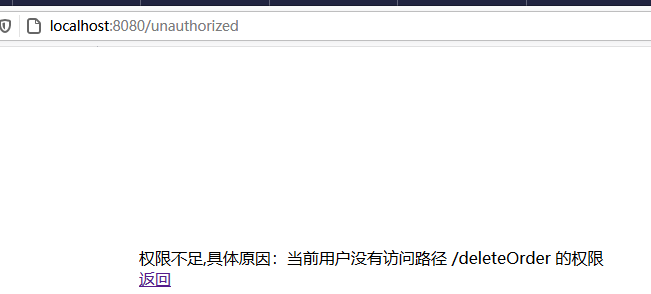
当我们点击删除订单的时候,是没有权限的,如下:


 1万+
1万+


 被折叠的 条评论
为什么被折叠?
被折叠的 条评论
为什么被折叠?
 到【灌水乐园】发言


