


一、MyBatis 基础
1、什么是MyBatis
mybatis是一个持久层框架,用java编写的。它封装了jdbc操作的很多细节,使开发者只需要关注sql语句本身,而无需关注注册驱动,创建连接等繁杂过程。它使用了ORM思想实现了结果集的封装。
ORM: Object Relational Mappging 对象关系映射。简单的说:就是把数据库表和实体类及实体类的属性对应起来。让我们可以操作实体类就实现操作数据库表。
2、MyBatis的下载使用
确保安装好MySQL,并且MySQL能够正常连接。
MyBatis 下载Jar包
maven方式添加依赖:
<dependency>
    <groupId>org.mybatis</groupId>
    <artifactId>mybatis</artifactId>
    <version>3.4.6</version>
</dependency>
maven 单元测试依赖:
<dependency>
    <groupId>junit</groupId>
    <artifactId>junit</artifactId>
    <version>4.12</version>
    <scope>test</scope>
</dependency>
添加 MySQL 依赖(MyBatis的底层是靠JDBC进行实现):
<dependency>
	<groupId>mysql</groupId>
	<artifactId>mysql-connector-java</artifactId>
	<version>5.1.6</version>
	<scope>runtime</scope>
</dependency>
日志管理依赖:
<dependency>
	<groupId>log4j</groupId>
	<artifactId>log4j</artifactId>
	<version>1.2.12</version>
</dependency>
3、MyBatis入门程序
3.1 基于xml的demo
项目目录:

3.1.1、在utils目录下创建MyBatis工具类
public class MyBatisUtils {

    private static SqlSessionFactory sqlSessionFactory ;
    static {

        try {
            // 1、读取配置文件
            InputStream input = Resources.getResourceAsStream("SqlMapConfig.xml");
            // 2、常见SQLSession工厂
            sqlSessionFactory = new SqlSessionFactoryBuilder().build(input);
        } catch (IOException e) {
            e.printStackTrace();
        }
    }
    public static SqlSession getSqlSession(){
        return sqlSessionFactory.openSession();
    }
}
3.1.2、在pojo目录下创建实体类,该类必须和数据库表保持一致。
public class User implements Serializable {
    private Integer id;
    private String username;
    private Date birthday;
    private String sex;
    private String address;

}
属性的get、set和tostring方法自行创建。
3.1.3、创建mapper隐射类,相当于dao层接口。
public interface IUserMapper {
    /*
     * @Author wmh
     * @Description //TODO  查询所有的用户
     **/
    List<User> findAll();
}
3.1.4、创建主配置文件SqlMapConfig.xml
<?xml version="1.0" encoding="UTF-8"?>
<!DOCTYPE configuration
        PUBLIC "-//mybatis.org//DTD Config 3.0//EN"
        "http://mybatis.org/dtd/mybatis-3-config.dtd">

<configuration>

    <!-- 配置 mybatis 的环境 -->
    <environments default="mysql">
        <!-- 配置 mysql 的环境 -->
        <environment id="mysql">
            <!-- 配置事务的类型 -->
            <transactionManager type="JDBC"></transactionManager>
            <!-- 配置连接数据库的信息:用的是数据源(连接池) -->
            <dataSource type="POOLED">
                <property name="driver" value="com.mysql.jdbc.Driver"/>
                <property name="url" value="jdbc:mysql://192.168.92.130:3306/mybatis"/>
                <property name="username" value="mybatis"/>
                <property name="password" value="123456"/>
            </dataSource>
        </environment>
    </environments>


    <!-- 告知 mybatis 映射配置的位置 -->
    <mappers>
        <!--  必须指定隐射文件位置 -->
        <mapper resource="mapper/IUserDao.xml"/>
    </mappers>

</configuration>
3.1.5、配置映射文件 IUserMapper.xml
<?xml version="1.0" encoding="UTF-8"?>
<!DOCTYPE mapper
        PUBLIC "-//mybatis.org//DTD Mapper 3.0//EN"
        "http://mybatis.org/dtd/mybatis-3-mapper.dtd">

 <!-- namespace 指定隐射接口路径 -->
<mapper namespace="mapper.IUserMapper">
	 <!-- id 指定接口中方法名字 -->
    <select id="findAll" resultType="pojo.User">
        select * from user ;
    </select>
</mapper>
3.1.6、创建测试类IUserMapperTest进行测试
public class IUserMapperTest {

    @Test
    public void testFindAll(){
        SqlSession session = MyBatisUtils.getSqlSession();
        // 拿到IUserMapper的代理对象
        IUserMapper mapper = session.getMapper(IUserMapper.class);
        List<User> userall = mapper.findAll();
        for (User user : userall) {
            System.out.println(user);
        }
        session.close();
    }

}
整个流程走下来,主要就是配置文件。
3.2 基于注解的demo
3.2.1、在持久层接口中添加注解
public interface IUserMapper {
    /*
     * @Author wmh
     * @Description //TODO  查询所有的用户
     **/
    @Select("select * from user;")
    List<User> findAll();
}
3.2.2、修改 SqlMapConfig.xml
<!-- 告知 mybatis 映射配置的位置 -->
<mappers>
     <mapper class="mapper.IUserMapper"/>
 </mappers>
3.2.3、 注意事项:
在使用基于注解的 Mybatis 配置时,请移除 xml 的映射配置(IUserDao.xml)。
补充。
基于注解的方式只能实现简单的SQL查询,在复杂的场景下,我们还是使用xml配置方式比较多,比如在多表查询的情况下。
二、MyBatis 核心原理
1、分析(重点)
1.1、流程分析
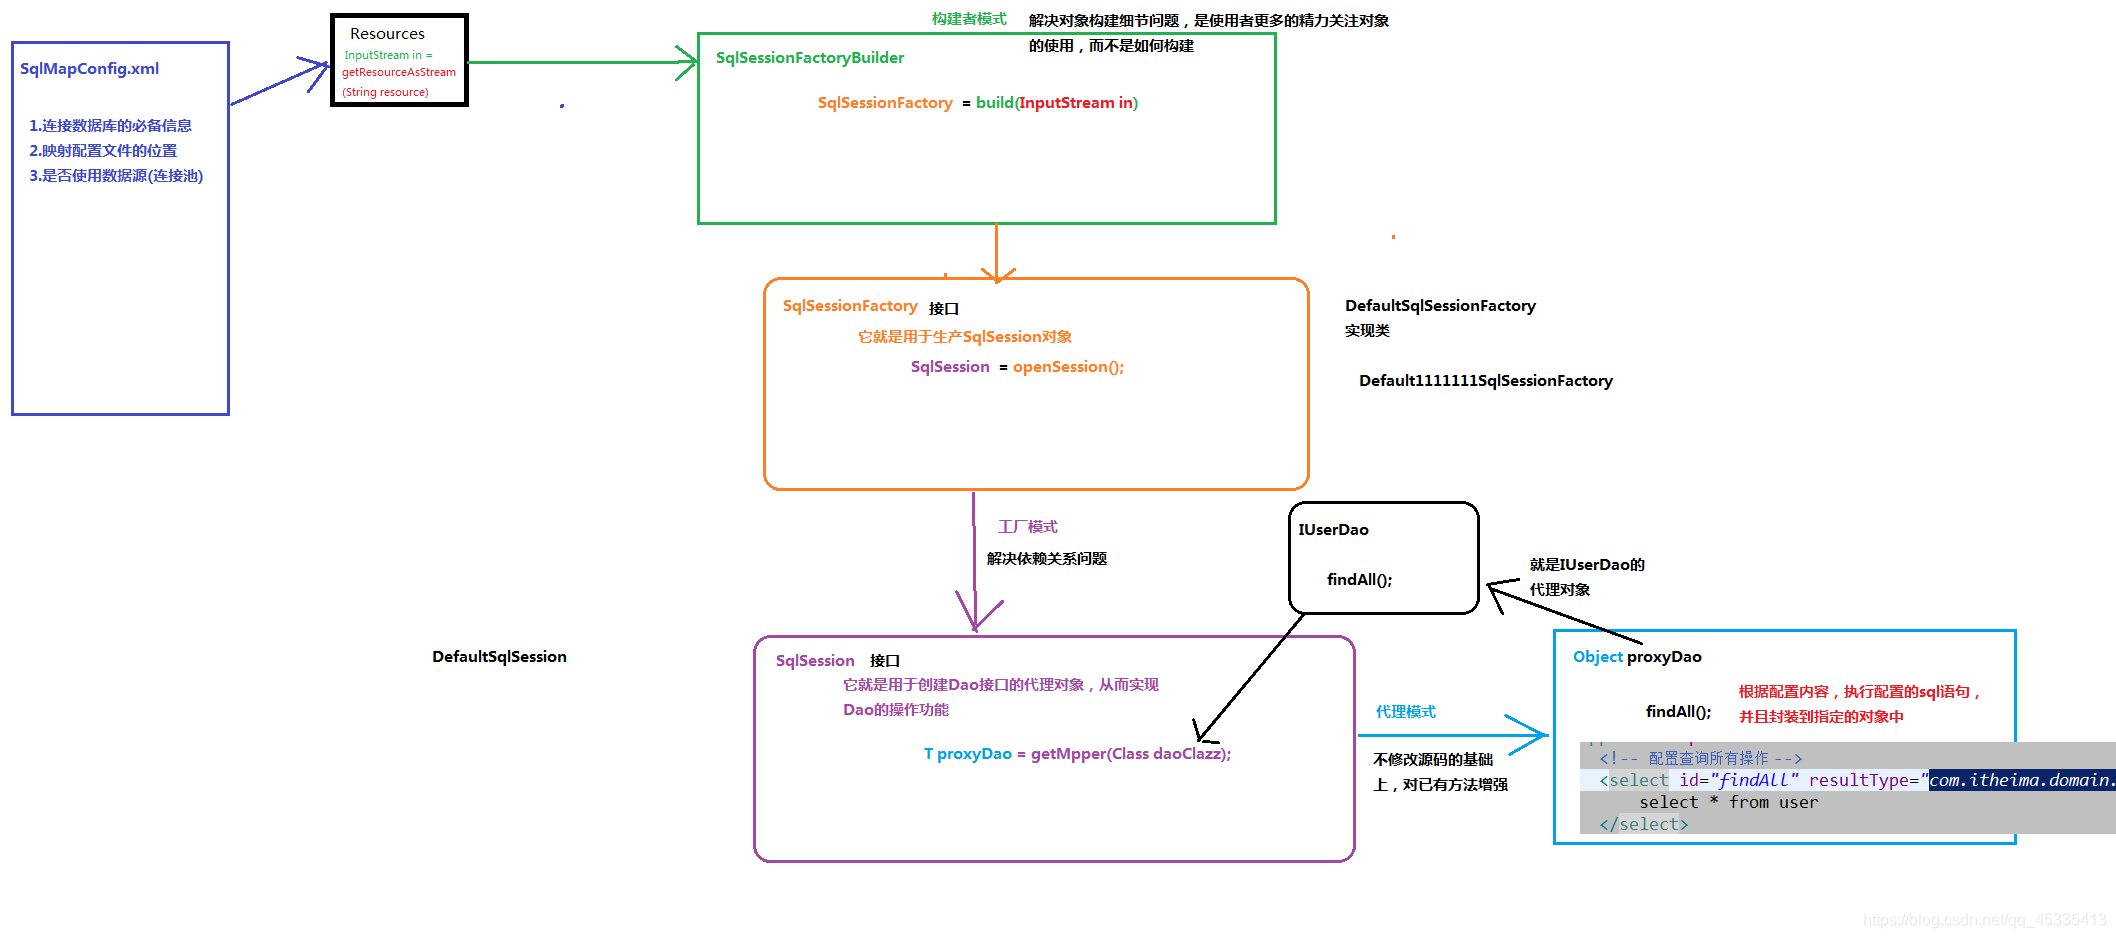
==注意:我们拿到SQLSession代理对象,调用方法,就能实现与数据库进行交互,并将数据库查询得到的数据封装到Java对象里。首先代理对象的功能就是,在不改变源码的情况的下,对方法进行增强,那么这个增强的过程是不是把从配置文件拿到SQL语句,jdbc配置信息等,然后与数据库进行交互,并将得到的数据进行封装,然后返回值。 ==
1.2、调用findAll 分析

代理对象调用findall方法,就会触动jdbc连接数据库,执行SQL语句。如上图过程。从这个过程,我们可以看出,需要两个信息:连接信息、映射信息 。
连接信息:可以从配置文件进行读取,然后dom4j进行处理后,得到想要的信息。
映射信息:根据映射配置文件,可以生成一个Map集合,Map的key就是接口包路径加上方法名,value就是SQL语句。
1.3、自定义开发一个MyBatis的流程

2、MyBatis的核心对象
2.1、SqlSessionFactoryBuilder
SqlSessionFactoryBuilder 可以从 XML 配置文件或一个预先配置的 Configuration 实例来构建出 SqlSessionFactory 实例。MyBatis 包含一个名叫 Resources 的工具类,它包含一些实用方法,使得从类路径或其它位置加载资源文件更加容易。就是读取配置文件。
生命周期
这个类可以被实例化、使用和丢弃,一旦创建了 SqlSessionFactory,就不再需要它了。
代码示例
String resource = "org/mybatis/example/mybatis-config.xml";
InputStream inputStream = Resources.getResourceAsStream(resource);
SqlSessionFactory sqlSessionFactory = new SqlSessionFactoryBuilder().build(inputStream);
2.2、SqlSessionFactory
SqlSessionFactory 是通过SqlSessionFactoryBuilder 进行构建的。有了SqlSessionFactory,顾名思义,我们可以从中获得 SqlSession 的实例。就是生成SQLSession示例。
生命周期
SqlSessionFactory 一旦被创建就应该在应用的运行期间一直存在。使用 SqlSessionFactory 的最佳实践是在应用运行期间不要重复创建多次。 有很多方法可以做到,最简单的就是使用单例模式或者静态单例模式。
代码示例
SqlSession sqlsession = sqlSessionFactory.openSession();
2.3、SqlSession
SqlSession 提供了在数据库执行 SQL 命令所需的所有方法。你可以通过 SqlSession 实例来直接执行已映射的 SQL 语句。
生命周期
每个线程都应该有它自己的 SqlSession 实例。绝对不能将 SqlSession 实例的引用放在一个类的静态域,甚至一个类的实例变量也不行。SQLSession就相当于是数据库与服务器之间一个连接,我们都知道,数据库可以定义连接池,我们可以认为SQLSession就是连接池中的一个连接。用过之后就还回去,当然这需要我们在配置文件中进行配置。
代码示例
// 拿到IUserMapper的代理对象
IUserMapper mapper = sqlsession .getMapper(IUserMapper.class);
// 调用方法
List<User> userall = mapper.findAll();
3、MyBatis核心(主)配置文件 SqlMapConfig.xml
3.1、environment
MyBatis 可以配置成适应多种环境,这种机制有助于将 SQL 映射应用于多种数据库之中,例如,开发、测试和生产环境需要有不同的配置;不过要记住:尽管可以配置多个环境,但每个 SqlSessionFactory 实例只能选择一种环境。 所以,如果你想连接两个数据库,就需要创建两个 SqlSessionFactory 实例,每个数据库对应一个。
代码示例
<environments default="development">

  <environment id="development">

    <transactionManager type="JDBC"></transactionManager>

    <dataSource type="POOLED">
      <property name="driver" value="${driver}"/>
      <property name="url" value="${url}"/>
      <property name="username" value="${username}"/>
      <property name="password" value="${password}"/>
    </dataSource>

  </environment>

</environments>
注意一些关键点:
必须有一个environment 的ID与environments 默认的ID相同,environments 默认ID就是使用的环境,可以做个环境的切换。
事务类型(transactionManager)
- JDBC – 这个配置直接使用了 JDBC 的提交和回滚设施
- MANAGED – 这个配置几乎没做什么。它从不提交或回滚一个连接,而是让容器来管理事务的整个生命周期
数据源类型(dataSource)
- POOLED– 这种数据源的实现利用“池”的概念将 JDBC 连接对象组织起来,避免了创建新的连接实例时所必需的初始化和认证时间。 这种处理方式很流行,能使并发 Web 应用快速响应请求。具体连接池配置参考官方文档
- UNPOOLED– 这个数据源的实现会每次请求时打开和关闭连接。
3.2、mappers(映射器)
<mapper resource=" " />
使用相对于类路径的资源
如:<mapper resource="com/itheima/dao/IUserDao.xml" />
<mapper class=" " />
使用 mapper 接口类路径
如:<mapper class="com.itheima.dao.UserDao"/>
注意:此种方法要求 mapper 接口名称和 mapper 映射文件名称相同,且放在同一个目录中。
<package name=""/>
注册指定包下的所有 mapper 接口
如:<package name="cn.itcast.mybatis.mapper"/>
注意:此种方法要求 mapper 接口名称和 mapper 映射文件名称相同,且放在同一个目录中。
3.3、properties (属性)
就是提前设置一些属性参数。在使用 properties 标签配置时,我们可以采用两种方式指定属性配置。
第一种
<properties>
	<property name="jdbc.driver" value="com.mysql.jdbc.Driver"/>
	<property name="jdbc.url" value="jdbc:mysql://localhost:3306/eesy"/>
	<property name="jdbc.username" value="root"/>
	<property name="jdbc.password" value="1234"/>
</properties>
第二种
- 在 classpath 下定义 db.properties 文件
jdbc.driver=com.mysql.jdbc.Driver
jdbc.url=jdbc:mysql://localhost:3306/eesy
jdbc.username=root
jdbc.password=1234
- properties 标签配置
<properties url=“file:///D:/db.properties"></properties>
或者
<properties resource="db.properties"></properties>
注意:db.properties在class类路径下
此时我们的 dataSource 标签就变成了引用上面的配置
<dataSource type="POOLED">
	<property name="driver" value="${jdbc.driver}"/>
	<property name="url" value="${jdbc.url}"/>
	<property name="username" value="${jdbc.username}"/>
	<property name="password" value="${jdbc.password}"/>
</dataSource>
3.4、setting(全局配置参数)
这是 MyBatis 中极为重要的调整设置,它们会改变 MyBatis 的运行时行为。
具体的看官方文档:
官方文档连接
3.5、typeAliases(类型别名)
在前面我们讲的 Mybatis 支持的默认别名,我们也可以采用自定义别名方式来开发。
自定义别名
在 SqlMapConfig.xml 中配置:
<typeAliases>
	<!-- 单个别名定义 -->
	<typeAlias alias="user" type="com.itheima.domain.User"/>
	<!-- 批量别名定义,扫描整个包下的类,别名为类名(首字母大写或小写都可以) -->
	<package name="com.itheima.domain"/>
	<package name="其它包"/>
</typeAliases>
4、映射文件
参数解释
id ---- 对应mapper层接口中方法名
resultType ----- 执行SQL语句后,返回的数据类型,自动封装。
parameterType ---- 方法传入的数据类型,如果传入的是对象,直接用对象的属性值 #{属性值},其中#{}就相当于jdbc中?号。
resultMap ---- 会在关系隐射这一章节进行重点讲解。意思就是加入实例对象的属性名与数据库列名不一致时,我们可以做一个对象属性与数据库表列名做一个关系的映射。
注意: 当我们传入接口方法参数只有一个时,不需要使用@Param这个注解,但是当我们传入两个方法的时候,就要为每个参数指定传入的名字。如下:
List<User> findById(@Param("id") int id , @Param("id2") int id2);
4.1、增insert
<!-- 保存用户-->
<insert id="saveUser" parameterType="pojo.User">
	insert into user(username,birthday,sex,address)  values(#{username},#{birthday},#{sex},#{address})
</insert>
4.2、删delete
<!-- 删除用户 -->
<delete id="deleteUser" parameterType="java.lang.Integer">
	delete from user where id = #{uid}
</delete>
4.3、改update
<!-- 更新用户 -->
<update id="updateUser" parameterType="pojo.User">
	update user set username=#{username},birthday=#{birthday},sex=#{sex},address=#{address} where id=#{id}
</update>
4.4、查select
<select id="findByName" resultType="pojo.User" parameterType="String">
	 select * from user where username like #{username}
</select>
这里引用模糊查找,调用方法传入的字符串必须是带模糊字符的字符串。
三、动态SQL
当编写动态SQL时,必须指定接口传入参数名称,不然会报错。
使用(@Param(“id”)指定传入参数名称。因为标签使用方法传入的参数时,需要调用get与set方法,普通参数(int ,string)没有get与set方法,所以需要注解生成。当我们传入对象的时候,对象里我们已经生成get与set方法,因此不需要使用注解。
List<User> findById(@Param("id") int id);
1、动态SQL概述与if元素
使用 JDBC 或其它类似的框架,你应该能理解根据不同条件拼接 SQL 语句有多痛苦。利用动态 SQL,可以彻底摆脱这种痛苦。
if标签
<select id="findByUser" resultType="user" parameterType="user">
	select * from user where 1=1
	<if test="username!=null and username != '' ">
		and username like #{username}
	</if>
	<if test="address != null">
		and address like #{address}
	</if>
</select>
注意:标签的 test 属性中写的是对象的属性名。另外要注意 where 1=1 ,也可以换成其他条件。
2、元素(choose-where-set)
choose
有时候,我们不想使用所有的条件,而只是想从多个条件中选择一个使用。针对这种情况,MyBatis 提供了 choose 元素,它有点像 Java 中的 switch 语句。当所有when标签不满足时,触发otherwise标签。
<select id="findActiveBlogLike"
     resultType="Blog">
  SELECT * FROM BLOG WHERE state = ‘ACTIVE’
  <choose>

    <when test="title != null">
      AND title like #{title}
    </when>

    <when test="author != null and author.name != null">
      AND author_name like #{author.name}
    </when>

    <otherwise>
      AND featured = 1
    </otherwise>

  </choose>
</select>
where
回归到if标签,我们写SQL语句select * from user where 1=1,为什么加上where 1=1,如果不加,if标签都为false,那么SQL语句变为select * from user where,显然是错误的,所以加上where 1=1。而where标签就能解决这个问题。
where 元素只会在子元素返回任何内容的情况下才插入 “WHERE” 子句。而且,若子句的开头为 “AND” 或 “OR”,where 元素也会将它们去除。
<select id="findActiveBlogLike"
     resultType="Blog">
  SELECT * FROM BLOG
  <where>
    <if test="state != null">
         state = #{state}
    </if>
    <if test="title != null">
        AND title like #{title}
    </if>
    <if test="author != null and author.name != null">
        AND author_name like #{author.name}
    </if>
  </where>
</select>
set
用于动态更新语句的类似解决方案叫做 set。set标签与where标签类似。只不过解决update。
<update id="updateAuthorIfNecessary">
  update Author
    <set>
      <if test="username != null">username=#{username},</if>
      <if test="password != null">password=#{password},</if>
      <if test="email != null">email=#{email},</if>
      <if test="bio != null">bio=#{bio}</if>
    </set>
  where id=#{id}
</update>
3、foreach 元素
需求
传入多个 id 查询用户信息,用下边两个 sql 实现:
SELECT * FROM USERS WHERE username LIKE '%张%' AND (id =10 OR id =89 OR id=16)
SELECT * FROM USERS WHERE username LIKE '%张%' AND id IN (10,89,16)
思考
我们在进行范围查询时,可以将一个集合中的值,作为参数动态添加进来。
这样我们将如何进行参数的传递?
<!-- 查询所有用户在 id 的集合之中 -->
<select id="findInIds" resultType="pojo.User" parameterType="list">
   select * from user
   <where>
       <if test="list != null and list.size() > 0" >
           <foreach collection="list" open="id in (" item="uid" separator="," close=")">
               #{uid}
           </foreach>
       </if>
   </where>
</select>
collection:代表要遍历的集合元素,注意编写时不要写#{}
open:代表语句的开始部分
close:代表结束部分
item:代表遍历集合的每个元素,生成的变量名
sperator:代表分隔符
你可以将任何可迭代对象(如 List、Set 等)、Map 对象或者数组对象作为集合参数传递给 foreach。当使用可迭代对象或者数组时,index 是当前迭代的序号,item 的值是本次迭代获取到的元素。
注意 :collection属性,该属性是必须指定的,但是在不同情况下,该属性的值是不一样的。
- 如果传入的是单参数且参数类型是一个List的时候,collection属性值为list .
- 如果传入的是单参数且参数类型是一个array数组的时候,collection的属性值为array .
注意 :if标签中test中 假如传入的是List类型,标签也必须是list
四、MyBatis 关系隐射
关联关系概述
场景一:我们创建的实体类的属性与数据库表的列名不匹配。
场景二:多表查询,返回的结果进行映射。
在这里我们只讨论场景二
多对一
有student表和teacher表,多个学生对应一个老师。
pojo实体类
public class Student {
    private int sid;
    private String sname;
    private Teacher teacher;
}
get与set 、tostring方法自己生成
映射文件配置如下
<resultMap id="findStudentWithTeacherMap" type="pojo.Student" >

    <id column="sid" property="sid"></id>
    <result column="sname" property="sname"></result>

    <association property="teacher" javaType="pojo.Teacher">
        <result column="tname" property="tname" ></result>
    </association>

</resultMap>

<select id="findStudentWithTeacher" resultMap="findStudentWithTeacherMap" >
    select sid , sname ,tname
    from student s ,teacher t
    where s.tid = t.tid
</select>
注意:
1、resultMap=“findStudentWithTeacherMap” 与 resultMap id="findStudentWithTeacherMap"保持一致。
2、association 标签映射的是一个对象,其中javaType是对象类型。JavaType要与collection中的ofType区分开。
其他调用方法测试代码一样。
一对多、多对多。
一对多和多对多的道理都一样。下面举例一对多
有student表和teacher表,一个teacher对应多个student。
pojo实体类
public class Teacher {
    private int tid;
    private String tname;
    private List<Student> students;
}
get与set 、tostring方法自己生成
映射文件配置如下
<resultMap id="findTeacherWithStudentMap" type="pojo.Teacher">
    <id column="tid" property="tid" ></id>
    <result column="tname" property="tname" ></result>

    <collection property="students" ofType="pojo.Student">
        <result column="sname" property="sname"></result>
    </collection>

</resultMap>

<select id="findTeacherWithStudent" resultMap="findTeacherWithStudentMap" >
    select t.tid ,tname ,sname
    from student s , teacher t
    where t.tid = s.tid
</select>
注意:collection 标签中ofType 与 association标签不同。该标签封装的是一个集合。
五、MyBatis整合druid
MyBatis与druid的关系:
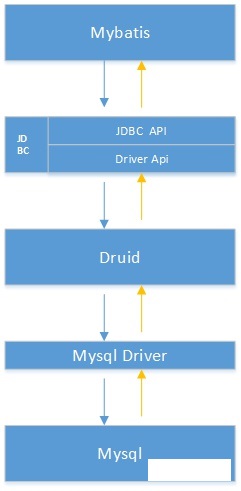
首先,Druid与数据库建立连接,然后MyBatis去Druid拿连接。通俗说Druid就是数据库连接池。
1、添加依赖
<dependency>
    <groupId>com.alibaba</groupId>
    <artifactId>druid</artifactId>
    <version>1.1.12</version>
</dependency>
2、配置Druid数据源
package confDataSource;
public class DruidDataSourceFactory implements DataSourceFactory {

    private Properties properties;

    public void setProperties(Properties properties) {
        this.properties = properties;

    }

    public DataSource getDataSource() {
        DruidDataSource dds = new DruidDataSource();
        dds.setUrl(this.properties.getProperty("url"));
        dds.setUsername(this.properties.getProperty("username"));
        dds.setPassword(this.properties.getProperty("password"));
        dds.setInitialSize(5);
        dds.setMaxActive(20);
        dds.setMaxWait(6000);
        try {
            dds.init();
        } catch (SQLException e) {
            e.printStackTrace();
        }
        return dds;
    }
}
可以设置连接池等。
3、修改主配置文件的数据源

数据源修改后,MyBatis操作都不变。
六、springboot、MyBatis、Druid整合(重点)与理解
1、添加依赖
<parent>
    <groupId>org.springframework.boot</groupId>
    <artifactId>spring-boot-starter-parent</artifactId>
    <version>2.1.12.RELEASE</version>
</parent>

<dependencies>
    <!--springboot启动器-->
    <dependency>
        <groupId>org.springframework.boot</groupId>
        <artifactId>spring-boot-starter-web</artifactId>
        <version>2.3.1.RELEASE</version>
    </dependency>
    <!--MyBatis-->
    <dependency>
        <groupId>org.mybatis.spring.boot</groupId>
        <artifactId>mybatis-spring-boot-starter</artifactId>
        <version>1.3.2</version>
    </dependency>

    <!-- 数据库连接池 -->
    <dependency>
        <groupId>com.alibaba</groupId>
        <artifactId>druid-spring-boot-starter</artifactId>
        <version>1.1.10</version>
    </dependency>
    <!--MySQL驱动-->
    <dependency>
        <groupId>mysql</groupId>
        <artifactId>mysql-connector-java</artifactId>
        <version>5.1.6</version>
        <scope>runtime</scope>
    </dependency>
    <!--日志管理器-->
    <dependency>
        <groupId>log4j</groupId>
        <artifactId>log4j</artifactId>
        <version>1.2.12</version>
    </dependency>
    <!--springboot 单元测试-->
    <dependency>
        <groupId>org.springframework.boot</groupId>
        <artifactId>spring-boot-starter-test</artifactId>
        <scope>test</scope>
    </dependency>

</dependencies>

<!--xml文件出现在Java目录下,springboot就会扫描不到文件,因此需要配置-->
<build>
    <resources>
        <resource>
            <directory>src/main/java</directory>
            <includes>
                <include>**/*.xml</include>
            </includes>
        </resource>
        <resource>
            <directory>src/main/resources</directory>
        </resource>
    </resources>
</build>
注意:MyBatis与Druid添加的依赖是springboot驱动器。
2、配置application.yml文件
spring:
  datasource:
    # 配置数据源
    type: com.alibaba.druid.pool.DruidDataSource
    url: jdbc:mysql://192.168.92.130:3306/mybatis
    username: root
    password: 123456
    driver-class-name: com.mysql.jdbc.Driver
    druid:
      #2.连接池配置
      #初始化连接池的连接数量 大小,最小,最大
      initial-size: 5
      min-idle: 5
      max-active: 20
      #配置获取连接等待超时的时间
      max-wait: 60000
      #配置间隔多久才进行一次检测,检测需要关闭的空闲连接,单位是毫秒
      time-between-eviction-runs-millis: 60000
      # 配置一个连接在池中最小生存的时间,单位是毫秒
      min-evictable-idle-time-millis: 30000
      validation-query: SELECT 1 FROM DUAL
      test-while-idle: true
      test-on-borrow: true
      test-on-return: false
      # 是否缓存preparedStatement,也就是PSCache  官方建议MySQL下建议关闭   个人建议如果想用SQL防火墙 建议打开
      pool-prepared-statements: true
      max-pool-prepared-statement-per-connection-size: 20
      # 配置监控统计拦截的filters,去掉后监控界面sql无法统计,'wall'用于防火墙
      filter:
        stat:
          merge-sql: true
          slow-sql-millis: 5000
      #3.基础监控配置
      web-stat-filter:
        enabled: true
        url-pattern: /*
        #设置不统计哪些URL
        exclusions: "*.js,*.gif,*.jpg,*.png,*.css,*.ico,/druid/*"
        session-stat-enable: true
        session-stat-max-count: 100
      stat-view-servlet:
        enabled: true
        url-pattern: /druid/*
        reset-enable: true
        #设置监控页面的登录名和密码
        login-username: admin
        login-password: admin
        allow: 127.0.0.1
        #deny: 192.168.1.100
(1)、Druid与数据库进行连接,MyBatis从Druid进行拿连接,这个关系一定注意,因此,我们只需在数据源中进行配置数据库连接。
(2)、我们可以进一步配置Druid中连接池数量等一些参数,在这里我们也进行配置了Druid监控平台。启动springboot,输入http://localhost:8080/druid/index.html 连接,出现下面界面,表明Druid配置完成。

用户名和密码在配置信息中设置的。
3、pojo层
创建实体类,在这里不过多解释,必须强调,创建的实体类的属性必须和数据库列名一一对应。
4、mapper层
mapper就是一个一个接口。代码具体:
方式一
@Mapper
public interface IStudentMapper {

    // 查询所有的学生
    public List<Student> findallStudent();

    // 查询每个学生 属于哪个老师
    public List<Student> findStudentWithTeacher();


    // 查询每个老师对应的学生
    public List<Teacher> findTeacherWithStudent();
}
注意:通过上面的讲解我们可以知道,MyBatis主要有两类配置文件:主配置文件、映射配置文件。主配置文件在springboot中我们不需要配置,springboot已经配置好了,但是我们是不是要告诉springboot我们的映射配置文件在什么地方。因此**@Mapper**注解就是告诉springboot这是一个映射接口,我们要把映射文件和接口放在一起,因此也就找到了隐射文件所在位置。
方式二
public interface IStudentMapper {


    // 查询所有的学生
    public List<Student> findallStudent();

    // 查询每个学生 属于哪个老师
    public List<Student> findStudentWithTeacher();


    // 查询每个老师对应的学生
    public List<Teacher> findTeacherWithStudent();
}
上面这个接口不要@Mapper注解。
我们启动类上去主动扫描映射文件。
@SpringBootApplication
@MapperScan("com.demo.mapper")
public class App {
    public static void main(String[] args) {
        SpringApplication.run(App.class,args);
    }
}
用@MapperScan(“com.demo.mapper”)注解完成。
5、service层
service层就是对mapper层进一步封装,这一层去掉也是可以的。
@Service
public class StudentService {

    @Autowired
    IStudentMapper iStudentMapper;

    public List<Student> findallStudent(){
        return iStudentMapper.findallStudent();
    }


}
@Autowired
IStudentMapper iStudentMapper;
== 其中,这两行代码非常重要,@Autowired是自动注入,首先我们还要理解注入的是什么?我们知道,要用MyBatis,是不是要拿到MyBatis的代理对象,然后调用代理对象中方法进行实现业务。那么iStudentMapper自动注入的就是mapper层IStudentMapper 接口的代理对象。 ==
6、controller层
@RestController
public class FindStudent {
    @Autowired
    StudentService studentService;
    @GetMapping("findall")
    public List<Student> findAllStudent(){

        return studentService.findallStudent();
    }
}
注入service层对象,进行调用。
总结
通过上面的学习,我们可以看出,springboot把很多细节都给我们屏蔽了,做到开箱即用。比如,我们不用再去配置MyBatis的主配置文件,我们不用再去关注MyBatis的SQLSessionFactory,SQLSession等对象来获取代理对象。我们只需要关注映射文件,去关注如何编写SQL语句。


 1万+
1万+


 被折叠的 条评论
为什么被折叠?
被折叠的 条评论
为什么被折叠?
 到【灌水乐园】发言


